Quickstart Guide - Kubernetes#
This Quickstart Guide provides a comprehensive step-by-step walkthrough to help you quickly set up and start using the Smart City Blueprint on Kubernetes, based on the VSS 3.0 framework.
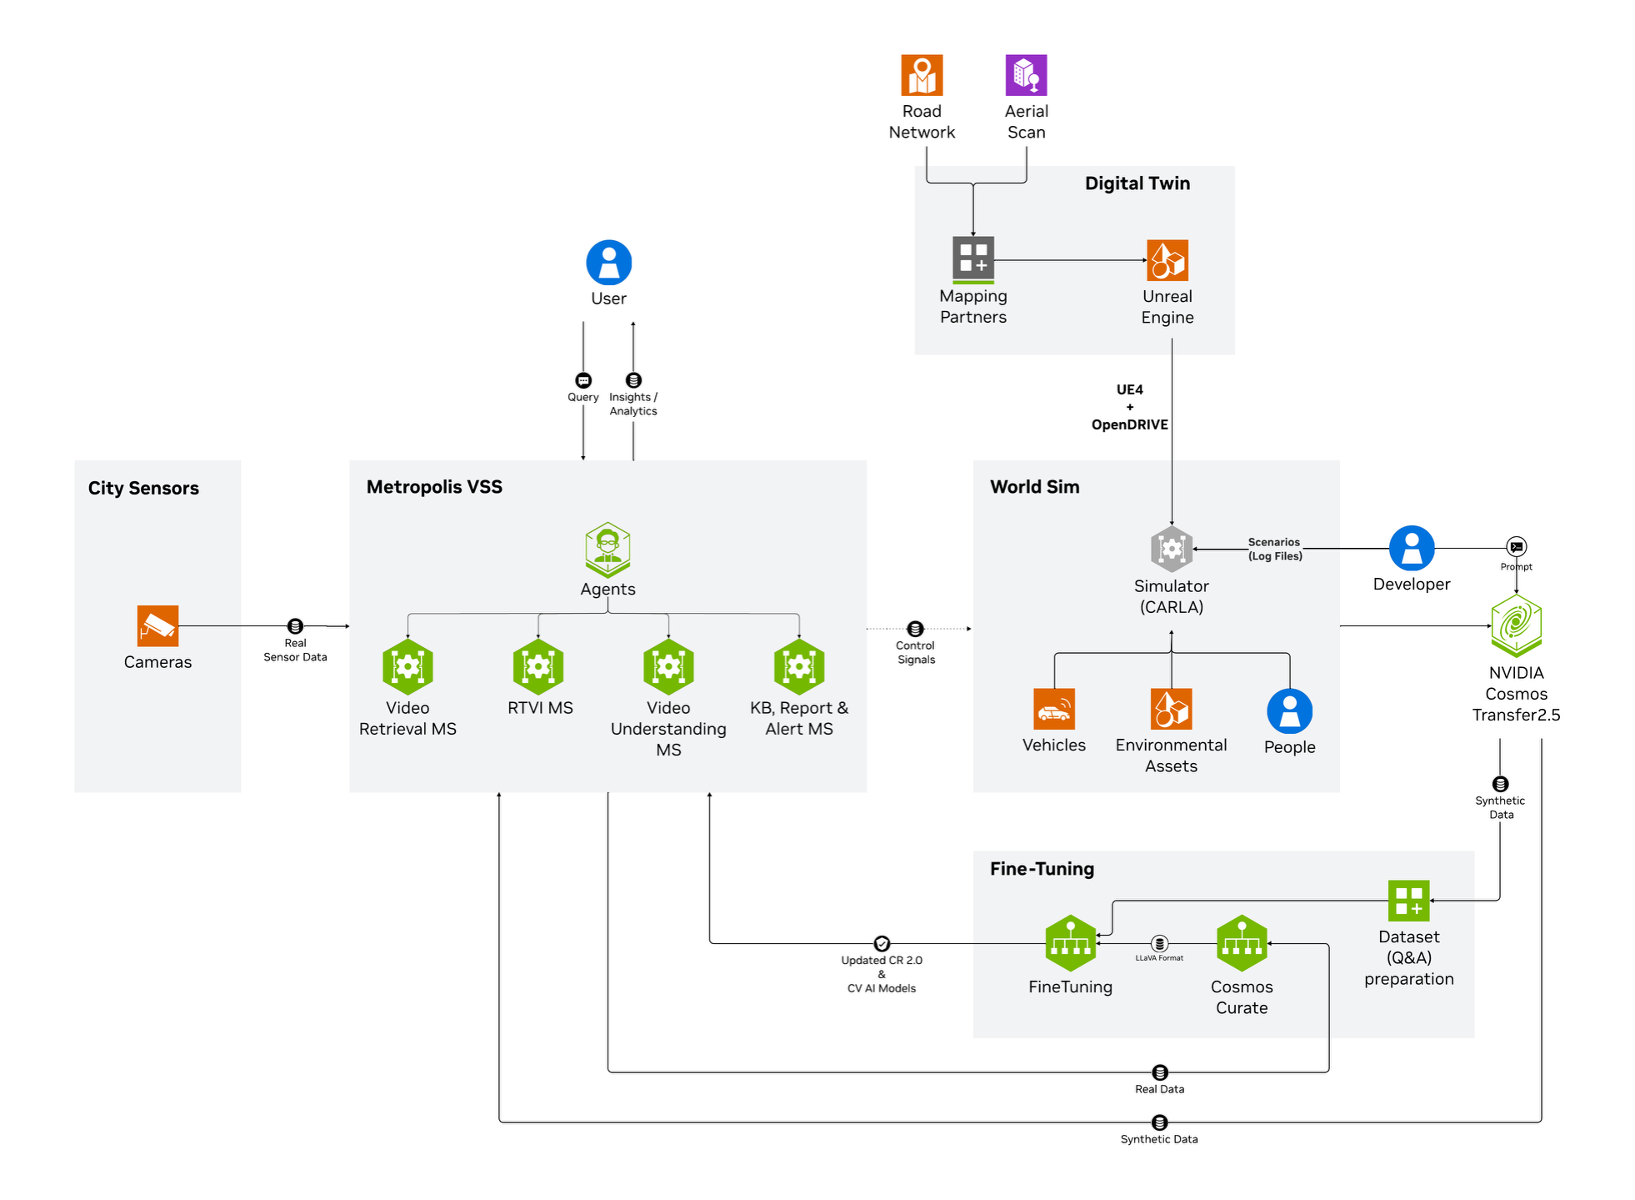
Components Overview#
The high-level diagram illustrates the components of the Smart City Blueprint. The system features a layered architecture based on VSS 3.0 that comprises:
Foundational Microservices - Based on vision language models (VLMs) and computer vision (CV) models
Real-time Video Processing Pipelines - For processing live camera feeds
AI Agents - For intelligent analysis and interaction
Prerequisites#
Before you begin, ensure all prerequisites are met:
Review the Prerequisites page for complete requirements
Ensure you have installed all Common Prerequisites and Kubernetes-Specific Prerequisites
Verify you have a Kubernetes cluster with GPU-enabled nodes
Confirm sufficient GPU resources are available (see Hardware Profiles below)
Deployment Overview#
The Smart City Blueprint on Kubernetes includes all available features in a single unified deployment:
CV-based perception using RTDETR model
VLM-based verification for enhanced alert accuracy
Agents and Agent UI for natural language interaction with the system
Integration options:
API
Kibana dashboard
Kafka event streams
Web UI with map view
Hardware Profiles#
This section provides an overview of the hardware profiles supporting the various deployment options described in the previous section. Each profile is designed to meet specific use case performance and resource requirements, ensuring optimal operation of the blueprint.
GPU Type |
Number of Streams (RTDETR) |
Number of GPUs |
|---|---|---|
Local VLM+LLM (dedicated GPU each) (default) |
||
H100 |
30 |
3 |
L40S |
30 |
3 |
RTX PRO 6000 Blackwell |
30 |
3 |
Note
Above numbers are based on the default configurations using streams at 1080p 10fps with RTDETR model
Install Smart City Blueprint on Kubernetes#
The following section will guide you through the steps to install the Smart City Blueprint on Kubernetes.
Setup NGC Access#
# Setup NGC access
export NGC_CLI_API_KEY={your NGC_CLI_API_KEY}
export NGC_CLI_ORG='nvidia'
Download Kubernetes Deployment Files#
# Create directory and download deployables
mkdir -p ~/vss-smartcities-k8s
cd ~/vss-smartcities-k8s

ngc \
  registry \
  resource \
  download-version \
  nvidia/vss-smartcities/vss-smartcities-k8s:3.0.0

tar \
  -zxvf \
  vss-smartcities-k8s_v3.0.0/deploy-smartcities-k8s.tar.gz

rm -rf vss-smartcities-k8s_v3.0.0

export LOCAL_K8S_APP_DIR="$(realpath ~/vss-smartcities-k8s)"
Configure the Kubernetes Cluster (One-Time Setup)#
Enable Kube-Proxy in IPVS Mode#
# Get kube-proxy configmap
kubectl \
  --namespace kube-system \
  get \
  configmap \
  kube-proxy -o yaml > kube-proxy.yaml
Update the config.conf section in kube-proxy.yaml using a text editor:
mode: "ipvs"
ipFamily: "IPv4"
ipvs:
  scheduler: "rr"
Apply the configuration changes and restart kube-proxy:
# Apply the config changes
kubectl \
  apply \
  -f kube-proxy.yaml

# Restart kube-proxy
kubectl \
  --namespace kube-system \
  delete \
  pod \
  -l k8s-app=kube-proxy
Label Kubernetes Nodes#
Label the nodes to control where specific components are deployed using node selectors:
# Label node for NIM deployment
kubectl \
  label \
  node \
  <name-of-node-for-nim> \
  nim=allowed

# Label node for Elasticsearch
kubectl \
  label \
  node \
  <name-of-node-for-elastic> \
  elastic=allowed

# Label node for Kafka
kubectl \
  label \
  node \
  <name-of-node-for-kafka> \
  kafka=allowed

# Label node for Redis
kubectl \
  label \
  node \
  <name-of-node-for-redis> \
  redis=allowed

# Label node for VST
kubectl \
  label \
  node \
  <name-of-node-for-vst> \
  vst=allowed

# Label node for NVStreamer
kubectl \
  label \
  node \
  <name-of-node-for-nvstreamer> \
  nvstreamer=allowed
Configure Environment Variables#
# Set path for local k8s configs directory
export LOCAL_K8S_APP_DIR="$(realpath ~/vss-smartcities-k8s)"

# Configure number of streams
# Increment by 1 for every 30 streams
export PERCEPTION_REPLICAS='1'

# Set to 2 for more than 150 streams
export PERCEPTION_NODE_COUNT='1'

# Set external IP for UI communication with nodes
export NODE_EXTERNAL_IP='<one of your node IPs>'

# Get GPU product type
# Run: kubectl get node <node-name> -o jsonpath='{.metadata.labels.nvidia\.com/gpu\.product}'
# Example: NVIDIA-H100-NVL, NVIDIA-L40S
export GPU_PRODUCT='<your node GPU type>'

# Set GPU name (should be one of: H100, L40S, RTX6000PROBW)
export GPU_NAME='<your node GPU name>'

# Set NGC credentials
export NGC_CLI_API_KEY={your NGC_CLI_API_KEY}

# Set Google Maps API credentials
export GOOGLE_MAPS_API_KEY={your GOOGLE_MAPS_API_KEY}
Create Kubernetes Secrets#
# Create NGC Docker registry secret
kubectl \
  --namespace default \
  create \
  secret \
  docker-registry \
  ngc-docker-reg-secret \
  --docker-server='nvcr.io' \
  --docker-username='$oauthtoken' \
  --docker-password="${NGC_CLI_API_KEY}"

# Create NGC API key secret
kubectl \
  --namespace default \
  create \
  secret \
  generic \
  ngc-api-key-secret \
  --from-literal=NGC_API_KEY="${NGC_CLI_API_KEY}" \
  --from-literal=NGC_CLI_API_KEY="${NGC_CLI_API_KEY}"

# Create Google Maps API secret
kubectl \
  --namespace default \
  create \
  secret \
  generic \
  google-maps-api-secret \
  --from-literal=GOOGLE_MAPS_API_KEY="${GOOGLE_MAPS_API_KEY}"
Install Storage Classes#
# Add Helm repository
helm repo add \
  containeroo \
  https://charts.containeroo.ch

helm repo update
Before installing the storage classes, update the storagePath for various storage classes in the following files:
local-path-provisioner/default-values.ymllocal-path-provisioner/kafka-values.ymllocal-path-provisioner/elastic-values.ymllocal-path-provisioner/streamstore-values.yml
Important
Disk Requirements for Persistent Volumes:
Ensure the following minimum disk space is available at the configured storagePath for each storage provisioner:
Storage Provisioner |
Up to 150 Streams |
Up to 390 Streams |
|---|---|---|
Kafka |
500 GB |
1000 GB |
Elastic |
1000 GB |
2000 GB |
Streamstore |
1000 GB |
3000 GB |
Note
Each storage provisioner must use a separate mount/device. Do not configure all storage provisioners on a single shared device, as this can lead to performance degradation and I/O contention.
Kafka and Elastic storage must use SSDs for optimal performance and reliability.
For Elastic storage, ensure the underlying disk supports high IOPS (minimum 16000 IOPS) and throughput (minimum 1000 MB/s) for optimal performance.
# Install default storage provisioner
helm upgrade \
  --namespace default \
  --install \
  local-path-provisioner-default \
  containeroo/local-path-provisioner \
  --version '0.0.32' \
  --values "${LOCAL_K8S_APP_DIR}/local-path-provisioner/default-values.yml"

# Install Kafka storage provisioner
helm upgrade \
  --namespace default \
  --install \
  local-path-provisioner-kafka \
  containeroo/local-path-provisioner \
  --version '0.0.32' \
  --values "${LOCAL_K8S_APP_DIR}/local-path-provisioner/kafka-values.yml"

# Install Elastic storage provisioner
helm upgrade \
  --namespace default \
  --install \
  local-path-provisioner-elastic \
  containeroo/local-path-provisioner \
  --version '0.0.32' \
  --values "${LOCAL_K8S_APP_DIR}/local-path-provisioner/elastic-values.yml"

# Install Streamstore storage provisioner
helm upgrade \
  --namespace default \
  --install \
  local-path-provisioner-streamstore \
  containeroo/local-path-provisioner \
  --version '0.0.32' \
  --values "${LOCAL_K8S_APP_DIR}/local-path-provisioner/streamstore-values.yml"
Install Ingress Controller#
# Add Helm repository
helm repo add \
  ingress-nginx \
  https://kubernetes.github.io/ingress-nginx

helm repo update

# Install ingress-nginx
helm upgrade \
  --namespace default \
  --install \
  ingress-nginx \
  ingress-nginx/ingress-nginx \
  --version '4.12.2' \
  --values "${LOCAL_K8S_APP_DIR}/ingress-nginx/override-values.yaml"
Install Monitoring Stack#
# Add Helm repository
helm repo add \
  prometheus-community \
  https://prometheus-community.github.io/helm-charts

helm repo update

# Install kube-prometheus-stack
helm upgrade \
  --namespace default \
  --install \
  kube-prometheus-stack \
  prometheus-community/kube-prometheus-stack \
  --version '72.6.3' \
  --values "${LOCAL_K8S_APP_DIR}/kube-prometheus-stack/override-values.yaml"
Configure Dashboards and Exporters#
# Deploy exporters
kubectl \
  --namespace default \
  apply \
  -f "${LOCAL_K8S_APP_DIR}/other-manifests/elasticsearch-exporter.yml"

kubectl \
  --namespace default \
  apply \
  -f "${LOCAL_K8S_APP_DIR}/other-manifests/logstash-exporter.yml"

kubectl \
  --namespace default \
  apply \
  -f "${LOCAL_K8S_APP_DIR}/other-manifests/kafka-exporter.yml"

# Deploy Grafana dashboards
kubectl \
  --namespace default \
  apply \
  --server-side \
  -f "${LOCAL_K8S_APP_DIR}/other-manifests/grafana-dashboards.yml"
Install Redis#
# Add Helm repository
helm repo add \
  bitnami \
  https://charts.bitnami.com/bitnami

helm repo update

# Install Redis
helm upgrade \
  --namespace default \
  --install \
  redis \
  bitnami/redis \
  --version '21.1.8' \
  --values "${LOCAL_K8S_APP_DIR}/redis/override-values.yaml"
Install Phoenix#
# Install Phoenix for telemetry
helm upgrade \
  --namespace default \
  --install \
  phoenix \
  oci://registry-1.docker.io/arizephoenix/phoenix-helm \
  --version '4.0.23' \
  --values "${LOCAL_K8S_APP_DIR}/phoenix/override-values.yaml"
Install NIMs (NVIDIA Inference Microservices)#
Install NIM Operator#
# Add Helm repository
helm repo add \
  nvidia \
  https://helm.ngc.nvidia.com/nvidia

helm repo update

# Install NIM operator
helm upgrade \
  --namespace nim-operator \
  --create-namespace \
  --install \
  nim-operator \
  nvidia/k8s-nim-operator \
  --version '3.0.1'
Install LLM NIM (Nemotron)#
# Add NIM Helm repository
helm repo add \
  nim \
  https://helm.ngc.nvidia.com/nim \
  --username '$oauthtoken' \
  --password "${NGC_CLI_API_KEY}"

helm repo update

# Install Nemotron NIM
helm upgrade \
  --namespace default \
  --install \
  nemotron-nim \
  nim/nim-llm \
  --version '1.15.0' \
  --values "${LOCAL_K8S_APP_DIR}/nemotron-nim/override-values.yaml" \
  --values "${LOCAL_K8S_APP_DIR}/nemotron-nim/override-env-for-${GPU_NAME}-values.yaml"
Install VLM NIM (Cosmos)#
# Create NIM cache for Cosmos
kubectl \
  --namespace default \
  apply \
  -f "${LOCAL_K8S_APP_DIR}/other-manifests/cosmos-nim-cache.yml"

# Wait for NIM cache to be ready (up to 30 minutes)
kubectl \
  --namespace default \
  wait \
  nimcache \
  cosmos-reason2-8b \
  --for=jsonpath='{.status.state}'=Ready \
  --timeout=30m

# Deploy Cosmos NIM
kubectl \
  --namespace default \
  apply \
  -f "${LOCAL_K8S_APP_DIR}/other-manifests/cosmos-nim-env-${GPU_NAME}.yml"

# Create Cosmos NIM service
kubectl \
  --namespace default \
  apply \
  -f "${LOCAL_K8S_APP_DIR}/other-manifests/cosmos-nim-service.yml"
Note
The NIM cache creation can take up to 30 minutes as it downloads and caches the model
If the wait command times out, check the status with:
kubectl get nimcache cosmos-reason2-8b -o yamlRe-run the wait command if the status is not
Ready
Deploy the Blueprint#
Install Application Charts#
# Install Smart City application
helm upgrade \
  --namespace default \
  --install \
  smc-app \
  "${LOCAL_K8S_APP_DIR}/smc-app" \
  --values "${LOCAL_K8S_APP_DIR}/smc-app/override-values-for-${PERCEPTION_NODE_COUNT}-nodes.yaml" \
  --set 'perception.nodeSelector.nvidia\.com/gpu\.product'="${GPU_PRODUCT}" \
  --set perception.workloadSpecs.workload.wl_units="${PERCEPTION_REPLICAS}"

# Install ECK operator
helm upgrade \
  --namespace default \
  --install \
  eck-operator \
  "${LOCAL_K8S_APP_DIR}/eck-app/eck-operator"

# Install Elastic/Kibana stack
helm upgrade \
  --namespace default \
  --install \
  smc-elk \
  "${LOCAL_K8S_APP_DIR}/eck-app/eck-stack" \
  --values "${LOCAL_K8S_APP_DIR}/eck-app/eck-stack/override-values-for-${PERCEPTION_NODE_COUNT}-nodes.yaml"

# Install perception application
helm upgrade \
  --namespace default \
  --install \
  smc-perception \
  "${LOCAL_K8S_APP_DIR}/perception-app" \
  --values "${LOCAL_K8S_APP_DIR}/perception-app/override-values-for-${PERCEPTION_NODE_COUNT}-nodes.yaml"

# Install NVStreamer
helm upgrade \
  --namespace default \
  --install \
  smc-nvstreamer \
  "${LOCAL_K8S_APP_DIR}/nvstreamer-app" \
  --values "${LOCAL_K8S_APP_DIR}/nvstreamer-app/override-values.yaml"

# Install VST
helm upgrade \
  --namespace default \
  --install \
  smc-vst \
  "${LOCAL_K8S_APP_DIR}/vst-app" \
  --values "${LOCAL_K8S_APP_DIR}/vst-app/override-values.yaml"

# Install VST-MCP
helm upgrade \
  --namespace default \
  --install \
  smc-vst-mcp \
  "${LOCAL_K8S_APP_DIR}/vst-mcp-smc" \
  --values "${LOCAL_K8S_APP_DIR}/vst-mcp-smc/override-values.yaml"

# Install VLM as verifier
helm upgrade \
  --namespace default \
  --install \
  smc-vlm-as-verifier-app \
  "${LOCAL_K8S_APP_DIR}/vlm-as-verifier-app" \
  --values "${LOCAL_K8S_APP_DIR}/vlm-as-verifier-app/override-values.yaml"

# Install agents application
helm upgrade \
  --namespace default \
  --install \
  smc-agents-app \
  "${LOCAL_K8S_APP_DIR}/agents-app" \
  --values "${LOCAL_K8S_APP_DIR}/agents-app/override-values.yaml" \
  --set global.externalHost="${NODE_EXTERNAL_IP}"
Note
Initialization of some components might take a while, especially the first time as large containers must be pulled.
Verify Deployment#
Verify if pods are in running state:
kubectl get pods
kubectl get deployments
kubectl get statefulsets
Check to make sure streams were properly added to VST. Navigate to the VST UI (see endpoint below) and check the Dashboard to confirm your streams are in a healthy state.
Check Perception FPS to make sure the perception pipeline is running properly:
kubectl logs -f statefulsets/perception-appLook for FPS lines in the logs. Ensure it is running at the desired FPS (10fps with the sample streams). If this is lower than expected, make sure your GPU is not oversaturated.
Check Kibana for traffic statistics and alerts. Go to the endpoint listed below and navigate to the dashboard.
Check the VSS UI (see endpoint below) and test a few prompts after the system is up for a few minutes and a few alerts are present.
Note
By default, Kubernetes deployments do not support automatically loading calibration and road network files in the Map UI. You must upload the calibration and road network through the Map UI page at http://<HOST-IP>:30080/ui/smartcities/.
You can download the calibration and road network files from NGC:
Endpoints#
Once deployed, the following endpoints are available:
Service |
Endpoint |
|---|---|
VSS-UI |
|
Video-Analytics-UI (Map View) |
|
Grafana-UI |
|
Kibana-UI |
|
NvStreamer-UI |
|
VST-UI |
|
Phoenix-UI (Telemetry) |
|
Service |
Endpoint |
|---|---|
Alert-Verification-API |
|
Note
Replace <HOST-IP> with the external IP of one of your Kubernetes nodes or the value you set in NODE_EXTERNAL_IP.
Add Streams (Optional)#
Note
To scale beyond the default stream count, refer to the Kubernetes Stream Upload section.
Run the provided /helper-scripts/nvstreamer_upload.py script to help upload streams to NVStreamer:
python3 /helper-scripts/nvstreamer_upload.py http://localhost:30889/nvstreamer/ 100 /path/to/videos-1/
Modify the command to change 100 to be the number of streams in the given folder, and /path/to/videos-1/ to the current directory you are trying to upload.
Run the provided /helper-scripts/add-nvstreamer-to-vst.py script to help add sensors from NVStreamer to VST:
python3 /helper-scripts/add-nvstreamer-to-vst.py --nvstreamer_endpoint=http://localhost:30889/nvstreamer --vst_endpoint=http://localhost:30888/vst/ --max_streams_to_add=<NUMBER_OF_STREAMS>
To delete sensors from VST, run the following command:
python3 /helper-scripts/add-nvstreamer-to-vst.py --vst_endpoint=http://localhost:30888/vst/ --delete_all=1
Teardown the Deployment#
To stop and remove the Smart City Blueprint deployment from Kubernetes:
Uninstall Application Charts#
# Uninstall application components
helm uninstall smc-agents-app
helm uninstall smc-vlm-as-verifier-app
helm uninstall smc-vst-mcp
helm uninstall smc-vst
helm uninstall smc-nvstreamer
helm uninstall smc-perception
helm uninstall smc-elk
helm uninstall smc-app

# Remove NIM components
kubectl delete -f "${LOCAL_K8S_APP_DIR}/other-manifests/cosmos-nim-service.yml"
kubectl delete -f "${LOCAL_K8S_APP_DIR}/other-manifests/cosmos-nim-env-${GPU_NAME}.yml"
kubectl delete -f "${LOCAL_K8S_APP_DIR}/other-manifests/cosmos-nim-cache.yml"
helm uninstall nemotron-nim
Uninstall Infrastructure Components#
# Uninstall infrastructure
helm uninstall redis
helm uninstall phoenix
helm uninstall kube-prometheus-stack
helm uninstall ingress-nginx

# Remove dashboards and exporters
kubectl delete -f "${LOCAL_K8S_APP_DIR}/other-manifests/grafana-dashboards.yml"
kubectl delete -f "${LOCAL_K8S_APP_DIR}/other-manifests/kafka-exporter.yml"
kubectl delete -f "${LOCAL_K8S_APP_DIR}/other-manifests/logstash-exporter.yml"
kubectl delete -f "${LOCAL_K8S_APP_DIR}/other-manifests/elasticsearch-exporter.yml"
Cleanup Storage and Secrets#
# Delete all PVCs
kubectl delete pvc --all

# Uninstall storage provisioners
helm uninstall local-path-provisioner-streamstore
helm uninstall local-path-provisioner-elastic
helm uninstall local-path-provisioner-kafka
helm uninstall local-path-provisioner-default

# Delete secrets
kubectl delete secret google-maps-api-secret
kubectl delete secret ngc-api-key-secret
kubectl delete secret ngc-docker-reg-secret
Warning
Deleting PVCs will permanently remove all data. Ensure you have backups if needed before running this command.
Known Issues and Limitations#
The current perception chart does not support toggling to use GDINO model. Only RTDETR model is supported in Kubernetes deployments
Custom VLM weights are not currently supported in Kubernetes deployments
Using alternate VLMs and/or LLMs is not currently supported in Kubernetes deployments
The NIM cache creation can take up to 30 minutes for the first deployment