Install with the Command Line
SDK Manager supports running a command-line installation on a pure headless environment without any graphical context, (Docker, PuTTY, Ubuntu Server, and so on). There is no longer a requirement for any graphical context to install via the command-line.
To run NVIDIA SDK Manager from a terminal in Linux, do the following:
Download and run SDK Manager on your host machine.
Launch SDK Manager from the terminal, using the parameters below to run an installation from the command-line.
General Arguments
Parameter |
Description |
|---|---|
-h, --help
|
Displays this usage guide. |
--ver
|
Outputs the version of the installed SDK Manager client. |
--query interactive | non-interactive
|
Optional. Prints all options available for the user.
Default is Example: --query interactive --logintype devzone
--query non-interactive --product Jetson
--query --non-interactive --product DOCA --version 2.0.2
--query --non-interactive --product Switch --action uninstall
|
--show-all-versions
|
Prints all available product versions for the user. If it is not set, SDK Manager will only list the primary product versions. |
--export-logs [folder_path]
|
Export the log files to |
--exit-on-finish
|
Automatically exit from SDK Manager when the install/uninstall session is finished without user input. Intended for scripts/automation usage. |
--user user_email
|
Set the user email to log in. Valid only for NVONLINE users with partners.nvidia.com accounts. |
--password string
|
Set the user login password. Valid only for NVONLINE users with partners.nvidia.com accounts. |
--login-type devzone | nvonline | offline
|
Set the login server (
|
--stay-logged-in true | false
|
Keep the user account logged in for the next running session.
Default is |
--logout
|
Log out the user account from SDK Manager. |
--download-folder folder_path
|
This option allows you to set the folder path for the downloaded files. Example: --download-folder /my-mounted-drive/Shared/nvidia/sdk-manager
If |
--archived-versions
|
Use this option to display only archived SDK versions which are not shown on the standard run. |
--cli
|
Enable SDK Manager runs in CLI mode. If you want to run it in unattended mode, you will need to provide more parameters that are defined as optional.
You can also use the |
--action install | uninstall |
downloadonly
|
This allows SDK Manager to run install, uninstall, or download action in the session. This option should be used together with other options from the “Additional Arguments” table below. |
--settings
|
Configure SDK Manager settings in the terminal. This supports configuring the parameters from the SDK Manager settings UI, such as proxy settings, concurrent downloads, and privacy settings. |
--sudo-password string
|
Set the sudo password to skip the authentication prompt. Note that the password is in clear text and visible in the terminal window. |
--collect-usage-data enable | disable
|
Enable or disable the collection of the usage data, and send it to the SDK Manager server. |
--check-for-updates
|
Check for the updates of SDK Manager client. Default is Run |
--list-connected all | Jetson | DOCA |
Holoscan
|
List information for connected devices. Default is |
--extra-configs
|
Use extra configuration to overwrite the software and hardware data for installation/uninstallation. This can be used to support the installation of a third-party carrier board, customized packages, and so on. |
Additional Arguments for Install/Uninstall
Parameter |
Description |
|---|---|
--product DRIVE | Jetson | Holoscan | DOCA | Switch | ARC
|
Set the product to be installed in command-line mode. |
--version string
|
Set the product version.
The value of DRIVE example: --version 6.0.6
Jetson example: --version 4.3
Holoscan example: --version IGPU_1.2
DOCA example: --version 2.0.2
Ethernet Switch example: --version 4.6.02
ARC example: --version A1.1
|
--target-os string
|
Set the target hardware operating system. Example: --target-os Linux
|
--host
|
When this parameter is set, the host components will be selected. |
--target target_id
|
Use this parameter to select the specific target hardware. DRIVE example: --target DRIVE_AGX_ORIN_DEVKITS
Jetson example: --target JETSON_AGX_ORIN_32GB
Holoscan example: --target IGX_ORIN_DEVKIT_ES
DOCA example: --target BLUEFIELD3_DPU_BMC_100GBE
Ethernet Switch example: --target SWITCH_5XXX_TARGETS
ARC example: --target GNB_TARGETS
|
--flash all | a | b | ab | skip
|
Optionally set whether to flash the target. If the option is not set, SDK Manager will skip the flashing. |
--usb-port usb_port_id
|
Select the usb port if multiple boards are connected. The Jetson example: |
--serial-port serial_port_name
|
Select the serial port name if multiple serial devices are connected. ARC example: |
--additional-sdk additional_sdk_title
|
Specify additional SDKs to install. Multiple entries are allowed. Available |
--select section_title | group_title
|
Select the specified section or group to the installation list. Multiple entries are allowed. Available |
--deselect section_title | group_title
|
Deselect the specified section or group from the installation list. Multiple entries are allowed. Available |
--licenses accept | reject
|
Set this option to accept the terms and conditions of the NVIDIA software licenses. If the option is not set, SDK Manager will prompt you with the license pages to review and confirm. |
--target-image-folder folder_path
|
This option allows you to set the host location of the target hardware image for flashing. If this folder is not set, SDK Manager will use the default folder: |
--export-response-file folder_path
|
Create the response file per user’s selections and export the response file to |
--auto
|
This auto-completes all of the prompts with the default values. This can only be used in |
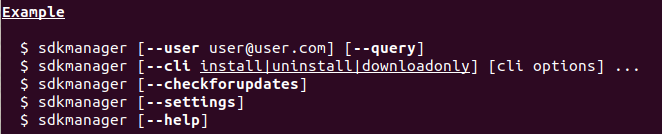
Run the Interactive Command Line
You can now simply run SDK Manager with the --cli option for the complete installation and uninstallation flow of a specific SDK. This option provides instructions for how to make the required actions or selections through interactive queries, and then execute the full command line based on your selection results.
$ sdkmanager --cli
First, you are asked to select the login type from the available options to complete the login.
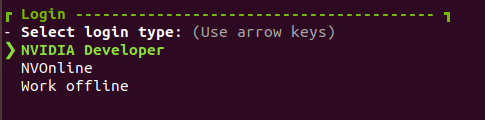
Please refer to Login to NVIDIA server to complete your login before proceeding.
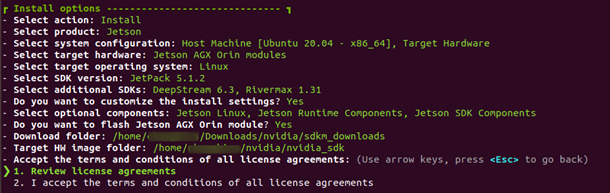
After signing in to the NVIDIA server, you are asked for a list of interactive queries to confirm the install options that are required to install a specific product SDK.
Note
Before your final confirmation of all the selections, you can press the
<ESC>key all the way up in this part to re-select for a specific query.When the installation options are confirmed, SDK Manager will print the full command line to run. You can click
<Enter>to start the installation, or click the spacebar to stop the timer, to either install the SDK or exit SDK Manager.
Refer to Review Licenses and Select Components to complete the remaining steps of the installation session.
Query Available Command Line
Note
This section explains how to use the --query command to create the command line that is executed by SDK Manager. Please refer to Run the Interactive Command Line for the complete installation flow.
Run SDK Manager with the below options to print all options available for the user. For users from developer.nvidia.com:
$ sdkmanager --query non-interactive --login-type devzone
Note
Refer to Login to NVIDIA Server to complete your NVIDIA Developer login before proceeding.
For users from partners.nvidia.com:
$ sdkmanager --query --user john.doe@example.com --login-type nvonlineThis outputs the full list of command options for all available SDKs for your user account.
You can also run an interactive query to print the available options from a set of inquiry steps. For users from developer.nvidia.com:
$ sdkmanager --query interactive --login-type devzone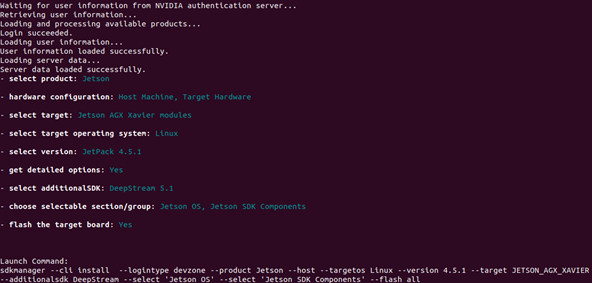
For users from partners.nvidia.com:
$ sdkmanager --query interactive --user john.doe@example.com --login-type nvonline
Refer to the syntax parameters in General Arguments and Additional Arguments for Install/Uninstall, then run SDK Manager with your own customized command.
Login to NVIDIA Server
- You can login to NVIDIA servers with any of the below options:
Run the command with
--login-type [server]Select the appropriate login server for your account type and installation.
NVIDIA Developer - developer.nvidia.com
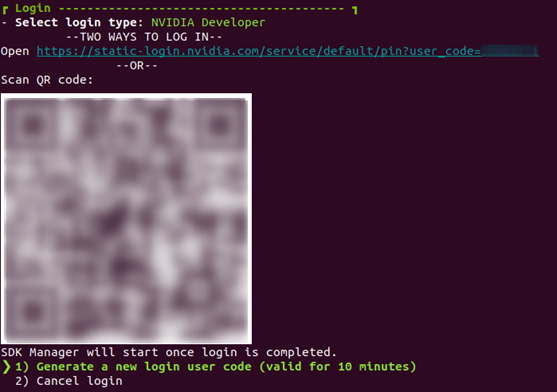
There are two ways to login to the NVIDIA Developer server.
Browser login option:
Open the generated URL from a browser. The browser could run on the same or a different host as the SDK Manager application.
In the browser, click Submit to confirm device login.
Enter your email address and click Continue.
On the SDK Manager login page, enter the credentials for your NVIDIA Developer account, and click LOGIN.
Once completed, SDK Manager will start.
QR code login option:
When the QR code image appears, scan the code via a camera application on a different device.
Enter the credentials for your NVIDIA Developer account on that device.
Once completed, SDK Manager will start.
NVONLINE - partners.nvidia.com
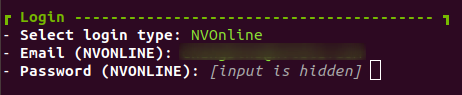
Enter the credentials for your NVONLINE account and click LOGIN.
Offline - To install SDKs that were previously downloaded and available from a local folder or mounted drive. For more information, refer to Offline Install.
Note
SDK Manager will keep you signed in with the current user account so that you don’t need to login for a second time. To sign out from the current account, use the --logout option.
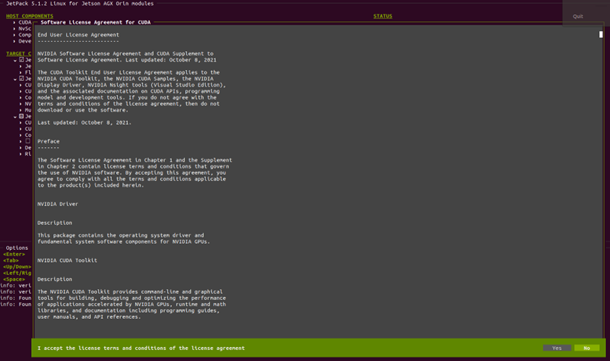
Review Licenses and Select Components
To review the license, you can use the arrow keys or mouse to scroll up and down the content.
To confirm your answer, use Tab to switch between the Yes or No options, then press Enter. You can also use a mouse click to confirm the option.
You must view and accept all licenses one by one to continue to the next step. If you want to bypass the license review, run with the command option:
--license accept
In the component selection screen, SDK Manager allows you to select sections or groups you want to install.
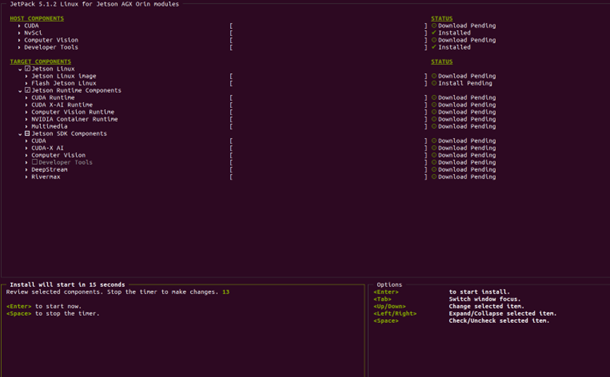
You can use the list of keys below to make the selection:
Key
Description
Enter
Start the installation
Tab
Switch window focus
Up/Down
Change selected item
Left/Right
Expand/collapse selected items
Space
Check/uncheck selected items
Installation
Before the installation begins, SDK Manager prompts you to enter your sudo password.
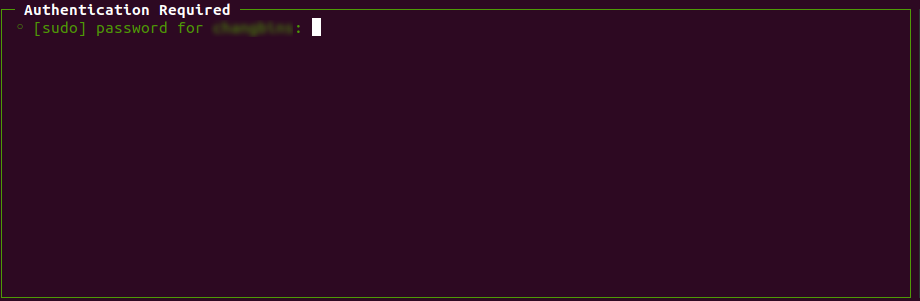
The display shows the progress of the download and installation of the software.
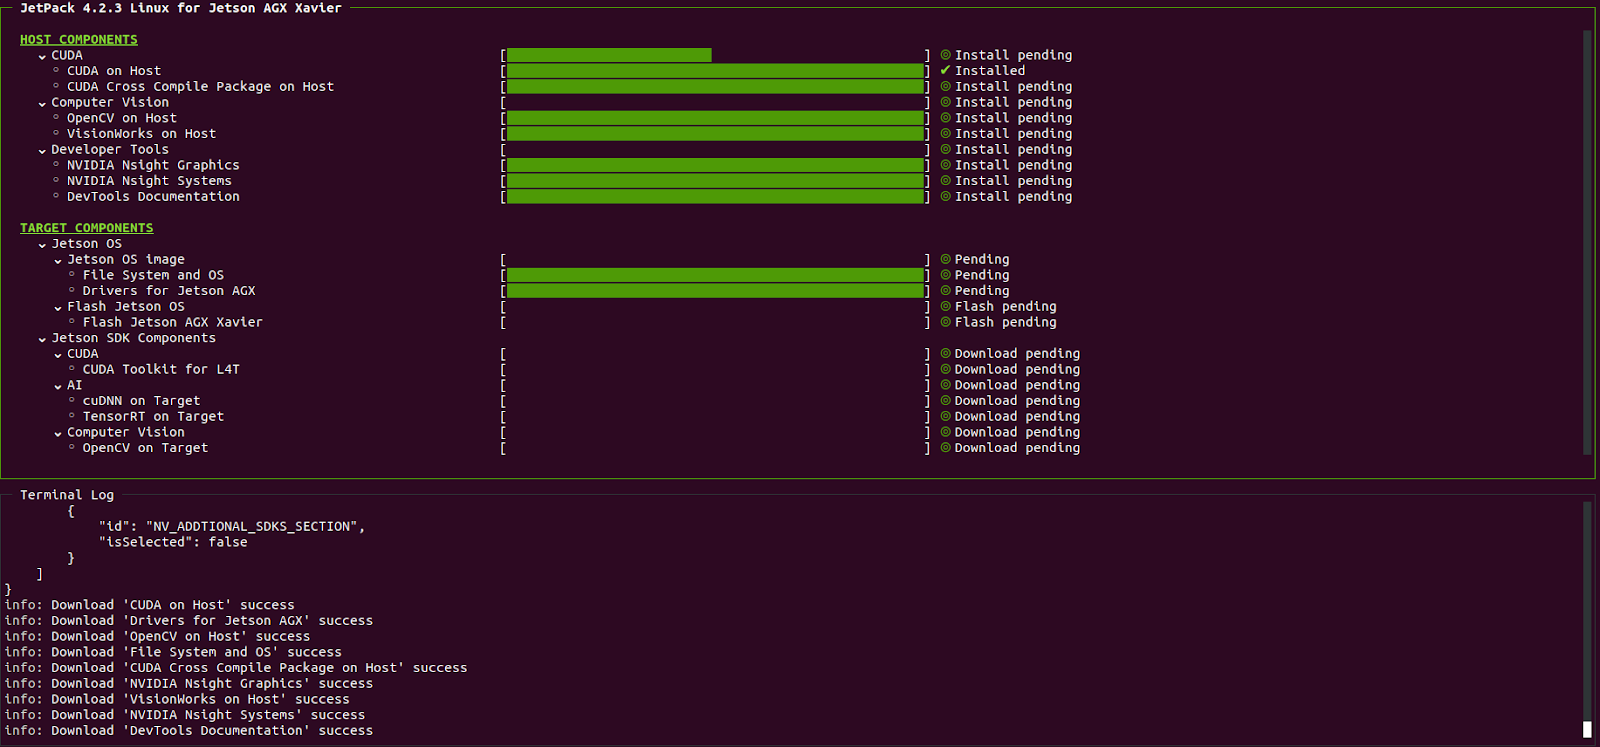
You can toggle between the installation and terminal panels. The terminal panel displays detailed information about the download and installation, with any errors highlighted.
Response File
You can use a response file to run SDK Manager in automated and unattended sessions. This will automatically set the command-line options and parameters for your command-line installation.
The samples can be found in the following location:
Jetson users (download here)
/opt/nvidia/sdkmanager/sdkm_responsefile_sample_jetson.ini
Ethernet Switch users (download here)
/opt/nvidia/sdkmanager/sdkm_responsefile_sample_ethernet_switch.ini
Holoscan users (download here)
/opt/nvidia/sdkmanager/sdkm_responsefile_sample_holoscan.ini
ARC users (download here)
/opt/nvidia/sdkmanager/sdkm_responsefile_sample_aerial.ini
DRIVE users (download here)
/opt/nvidia/sdkmanager/sdkm_responsefile_sample_drive.ini
DOCA users (download here)
/opt/nvidia/sdkmanager/sdkm_responsefile_sample_doca.ini
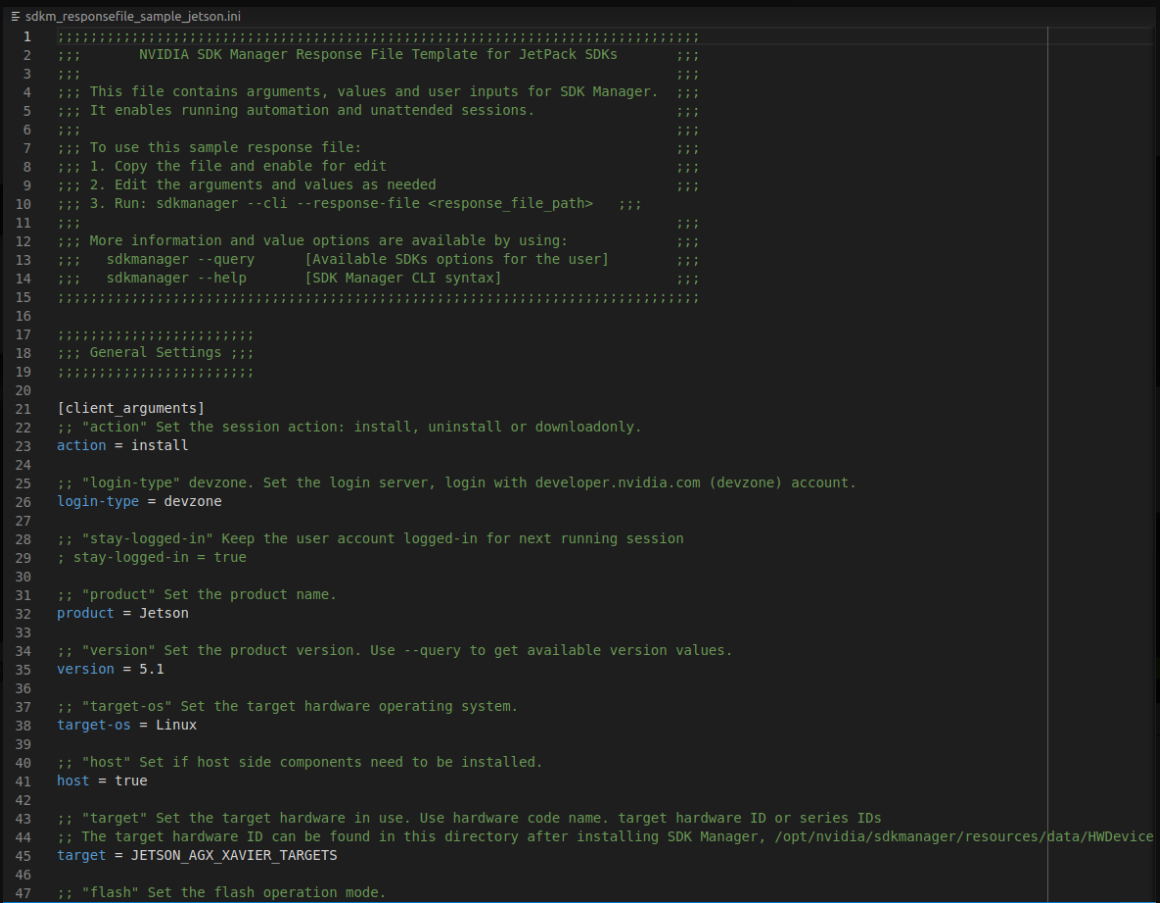
To run SDK Manager with a response file, do the following:
Copy the sample file to your selected location, and enable it for editing.
Edit the arguments and values as needed.
Run SDK Manager with the
--responsefileoption. For example:$ sdkmanager --cli install --responsefile <response_file_path>
Example
For example, a Jetson 5.1.2 (including DeepStream and Rivermax as additional SDKs) example would be:
sdkmanager --cli --action install --login-type devzone --product Jetson --target-os Linux --version 5.1.2 --host --target JETSON_AGX_ORIN_TARGETS --additional-sdk 'DeepStream 6.3' --additional-sdk 'Rivermax 1.31' --select 'Jetson Linux' --select 'Jetson Runtime Components' --select 'Jetson SDK Components' --deselect 'Developer Tools' --flash
For a DOCA 2.2.0 example, use the following:
sdkmanager --cli --action install --login-type devzone --product DOCA --target-os Linux --version 2.2.0 --host --target BLUEFIELD3_DPU_TARGETS --additional-sdk 'Rivermax 1.31' --select 'BlueField OS' --select 'DOCA Software Package' --deselect 'Development Container on Host' --deselect 'Development Container on Target' --flash
For an Ethernet Switch 4.6.02 example, use the following:
sdkmanager --cli --action install --login-type devzone --product 'Ethernet Switch' --target-os Linux --version 4.6.02 --show-all-versions --host --target SWITCH_5XXX_TARGETS --flash
For a HoloPack 2.0DP example, use the following:
sdkmanager --cli --action install --login-type devzone --product Holoscan --target-os Linux --version DP_2.0 --host --target IGX_ORIN_DEVKIT_IGPU_TARGETS --select 'Jetson Linux' --select 'Jetson SDK Components' --deselect 'Developer Tools' --flash
For an ARC 1.1 example, use the following:
sdkmanager --cli --action install --login-type devzone --product ARC --target-os Linux --version A1.1 --host --target GNB_TARGETS
To install DRIVE OS 6.0.6 Linux via the command-line, use the following:
sdkmanager --cli --action install --login-type devzone --product DRIVE --target-os Linux --version 6.0.6 --host --target DRIVE_AGX_ORIN_DEVKITS --select 'DRIVE OS Linux (custom GDM Desktop)' --flash