Setting up ACE Configurator#
The goal of this section is to show how to deploy the ACE Configurator through its UCS microservice. At the end of this section you will have a working ACE Configurator that can be used to configure the rendering of an avatar.
This guide assumes that you’ve been through the Development Setup guide and that the following prerequisites are met:
You have a Kubernetes cluster available
The cluster must be running on a machine with a GPU, and the NVIDIA GPU operator must be enabled. If you are using
microk8s, you can enable it with the following command:microk8s enable gpu
The cluster must have a storage class named
mdx-local-path. If you do not have one yet, we recommend local-path-provisioner, which is commonly used for development purposes. You can enable it with the following command:curl https://raw.githubusercontent.com/rancher/local-path-provisioner/v0.0.31/deploy/local-path-storage.yaml | sed 's/^ name: local-path$/ name: mdx-local-path/g' | kubectl apply -f -
If the above command fails, it’s possible you already have an
mdx-local-pathinstalled. You can confirm this with the commandkubectl get storageclass.
You have installed Kubectl v1.30.0 or above
You have installed Helm v3.17.0 or above
You have VS Code For Desktop (Windows or Linux) version 1.98 or above
In addition, your system must meet the hardware requirements for the Omniverse Renderer Microservice.
Initial UCS Application#
First, we will create a simple UCS application that renders an avatar. To do so, create an empty ace-configurator-demo directory for the application. In this guide, all commands will be run from this directory:
mkdir ace-configurator-demo
cd ace-configurator-demo
Then, create the structure of the application’s directory:
mkdir -p examples/dummy-app
In the examples/dummy-app directory, create an application.yaml file and copy the following content. It defines a simple application running a single Omniverse Renderer microservice which will render the avatar:
specVersion: 2.5.0
version: 1.0.0
name: ace-configurator-dummy-app
description: A dummy deployment to showcase how to setup ACE Configurator
dependencies:
  - ucf.svc.ia-omniverse-renderer-microservice:1.1.0
secrets:
  k8sSecret/ngc-api-key-secret/NGC_CLI_API_KEY:
    k8sSecret:
      secretName: ngc-api-key-secret
      key: NGC_CLI_API_KEY
components:
  - name: avatar-renderer
    type: ucf.svc.ia-omniverse-renderer-microservice
    parameters:
      imagePullSecrets:
        - name: ngc-docker-reg-secret
  - name: fake-rtp-negotiation
    type: ucf.svc.external-endpoint
    parameters:
      service: 0.0.0.0
      port: 32667
connections:
  avatar-renderer/rtpNegot: fake-rtp-negotiation/endpoint
Then, create a parameters.yaml file and copy the following content. It defines the parameters of the Omniverse Renderer microservice, such as the avatar’s scene to download and render. It also specifies where the output should be streamed. The avatar-renderer.livestream.host parameter must be updated with the ip of your machine (On Ubuntu, run hostname -I to find your IPv4 address):
avatar-renderer:
  window:
    width: 1280
    height: 720
  ucfVisibleGpus: [0]
  replicas: 1
  resourceDownload:
    remoteResourcePath: nvidia/ace/default-avatar-scene:1.1.5
    secretName: ngc-api-key-secret
    image: nvcr.io/nvidia/ace/ngc-resource-downloader:1.2.0
  livestream:
    audioSampleRate: 16000
    rtpNegotiationHostMockingEnabled: true
    host: "<YOUR_IP_ADDRESS>" # Update this value with the ip of your machine
    videoPort: 9020
    audioPort: 9021
Now, we can build the UCS application with the following commands:
rm -rf _build/dummy-app*
ucf_app_builder_cli app build examples/dummy-app/application.yaml examples/dummy-app/parameters.yaml -o _build/dummy-app
When successful, the output of the commands above should end with the line MsBuilder - INFO - App built.
Then, let’s create a new ace-configurator namespace in your Kubernetes cluster, and deploy the UCS application there. Make sure to update the first line with your NGC CLI API key if you haven’t done so yet:
NGC_CLI_API_KEY=<ENTER_YOUR_NGC_API_KEY>
name=ace-configurator
namespace=$name

kubectl create namespace $namespace
kubectl create secret docker-registry ngc-docker-reg-secret --docker-server=nvcr.io --docker-username='$oauthtoken' --docker-password=$NGC_CLI_API_KEY -n $namespace
kubectl create secret generic ngc-api-key-secret --from-literal=NGC_CLI_API_KEY=$NGC_CLI_API_KEY -n $namespace

helm upgrade --install --cleanup-on-fail --namespace $namespace $name _build/dummy-app -f _build/dummy-app/values.yaml
When successful, the last command should output a message ending with:
...
NAMESPACE: ace-configurator
STATUS: deployed
REVISION: 1
TEST SUITE: None
Once deployed, wait for the pods to be in Running state, and for the READY column to show 1/1. This can take 5-10 minutes the first time you run this command:
kubectl get pods -n $namespace --watch

NAME                                              READY   STATUS    RESTARTS   AGE
ia-omniverse-renderer-microservice-deployment-0   0/1     Running   0          5m25s
ia-omniverse-renderer-microservice-deployment-0   1/1     Running   0          5m28s
Once the service is ready, we need to instruct it to start streaming. For this, forward the API’s port so that we can access the service’s HTTP API:
kubectl port-forward statefulsets/ia-omniverse-renderer-microservice-deployment 8021:8021 -n $namespace
While the command above is running, open another terminal and run the following command to start a new test stream:
curl http://127.0.0.1:8021/streams/test -X POST
When successful, the above command should output "OK". You may then close the terminal and return to the terminal where the port-forwarding is running. You may exit the port-forwarding command with CTRL+C.
Finally, we’ll use gstreamer to view the video output of the renderer microservice. Run the following commands in a new terminal:
# Install gstreamer if needed
sudo apt-get install gstreamer1.0-plugins-bad gstreamer1.0-libav

gst-launch-1.0 -v udpsrc port=9020 caps="application/x-rtp" ! rtpjitterbuffer drop-on-latency=true latency=20 ! rtph264depay ! h264parse ! avdec_h264 ! videoconvert ! fpsdisplaysink text-overlay=0 video-sink=autovideosink
This command should open a window displaying the avatar slowly moving, like below.
Note
If the window does not appear, make sure you have updated the host parameter in the parameters.yaml file to your IP address. If you haven’t, set it and re-run the steps above.
Adding the ACE Configurator#
In this section, we will update the application to include the ACE Configurator microservice. This will allow us to modify the configuration from VS Code.
To do so, we need to add the ace Configurator microservice as a dependencies entry and define a new components entry in the application.yaml file:
specVersion: 2.5.0
version: 1.0.0
name: ace-configurator-dummy-app
description: A dummy deployment to showcase how to setup ACE Configurator
dependencies:
  - ucf.svc.ia-omniverse-renderer-microservice:1.1.0
  - ucf.svc.ace-configurator:1.0.0
secrets:
  k8sSecret/ngc-api-key-secret/NGC_CLI_API_KEY:
    k8sSecret:
      secretName: ngc-api-key-secret
      key: NGC_CLI_API_KEY
components:
  - name: ace-configurator
    type: ucf.svc.ace-configurator
    parameters:
      imagePullSecrets:
        - name: ngc-docker-reg-secret
  - name: avatar-renderer
    type: ucf.svc.ia-omniverse-renderer-microservice
    parameters:
      imagePullSecrets:
        - name: ngc-docker-reg-secret
  - name: fake-rtp-negotiation
    type: ucf.svc.external-endpoint
    parameters:
      service: 0.0.0.0
      port: 32667
connections:
  avatar-renderer/rtpNegot: fake-rtp-negotiation/endpoint
We also need to add a parameter for the ACE Configurator microservice in parameters.yaml. This parameter tells the ACE Configurator about the Omniverse Renderer microservice, what types of configurations it supports, and how to reload the service after these configurations have been updated:
ace-configurator:
  service:
    type: ClusterIP
  configurator:
    config: |
      ---
      services:
        ia-omniverse-renderer-microservice-deployment:
          ia-omniverse-renderer-microservice-params:
            refresh_policy:
              type: Restart
            config_type: Cm
          ia-omniverse-renderer-microservice-configs:
            refresh_policy:
              type: Restart
            config_type: Cm
          asset-volume:
            container_name: ms
            refresh_policy:
              type: Http
              url: http://ia-omniverse-renderer-microservice:8021/reload_scene
            config_type: Pv
avatar-renderer:
  window:
    width: 1280
    height: 720
  ucfVisibleGpus: [0]
  replicas: 1
  resourceDownload:
    remoteResourcePath: nvidia/ace/default-avatar-scene:1.1.5
    secretName: ngc-api-key-secret
    image: nvcr.io/nvidia/ace/ngc-resource-downloader:1.2.0
  livestream:
    audioSampleRate: 16000
    rtpNegotiationHostMockingEnabled: true
    host: "<YOUR_IP_ADDRESS>" # Update this value with the ip of your machine
    videoPort: 9020
    audioPort: 9021
Note
The ace-configurator.configurator.config above demonstrates how to configure the ACE Configurator to manage a simple service. In this case, a statefulset called ia-omniverse-renderer-microservice. This stateful set has three configurations:
ia-omniverse-renderer-microservice-paramswhich is aConfigMapia-omniverse-renderer-microservice-configswhich is aConfigMapasset-volumewhich is aPersistentVolume
Any modification to any of the ConfigMap will trigger a restart of the service, while a modification of the assets under asset-volume will trigger a HTTP POST request to http://ia-omniverse-renderer-microservice:8021/reload_scene.
The ACE Configurator microservice supports more UCS parameters. See the full list at UCS Parameters.
Then, rebuild the UCS app and deploy the application by following the exact same steps as in the section as above.
Once you can see the avatar moving again, forward the port for the ACE Configurator HTTP API. This will allow the VS Code Extension to communicate with the ACE Configurator microservice:
kubectl port-forward deployments/ace-configurator-deployment 8000:8000 -n $namespace
Ensure this command keeps running during the next steps, while we use the VS Code extension.
Using the ACE Configurator#
Everything is ready to start using the ACE Configurator. To be able to interact with it you have to install the vscode extension associtaed with the ACE Configurator. To do so please install it from the VS Code Marketplace.
The extension will ask to provide the url of the ACE Configurator API, for this demo the url will be http://127.0.0.1:8000.
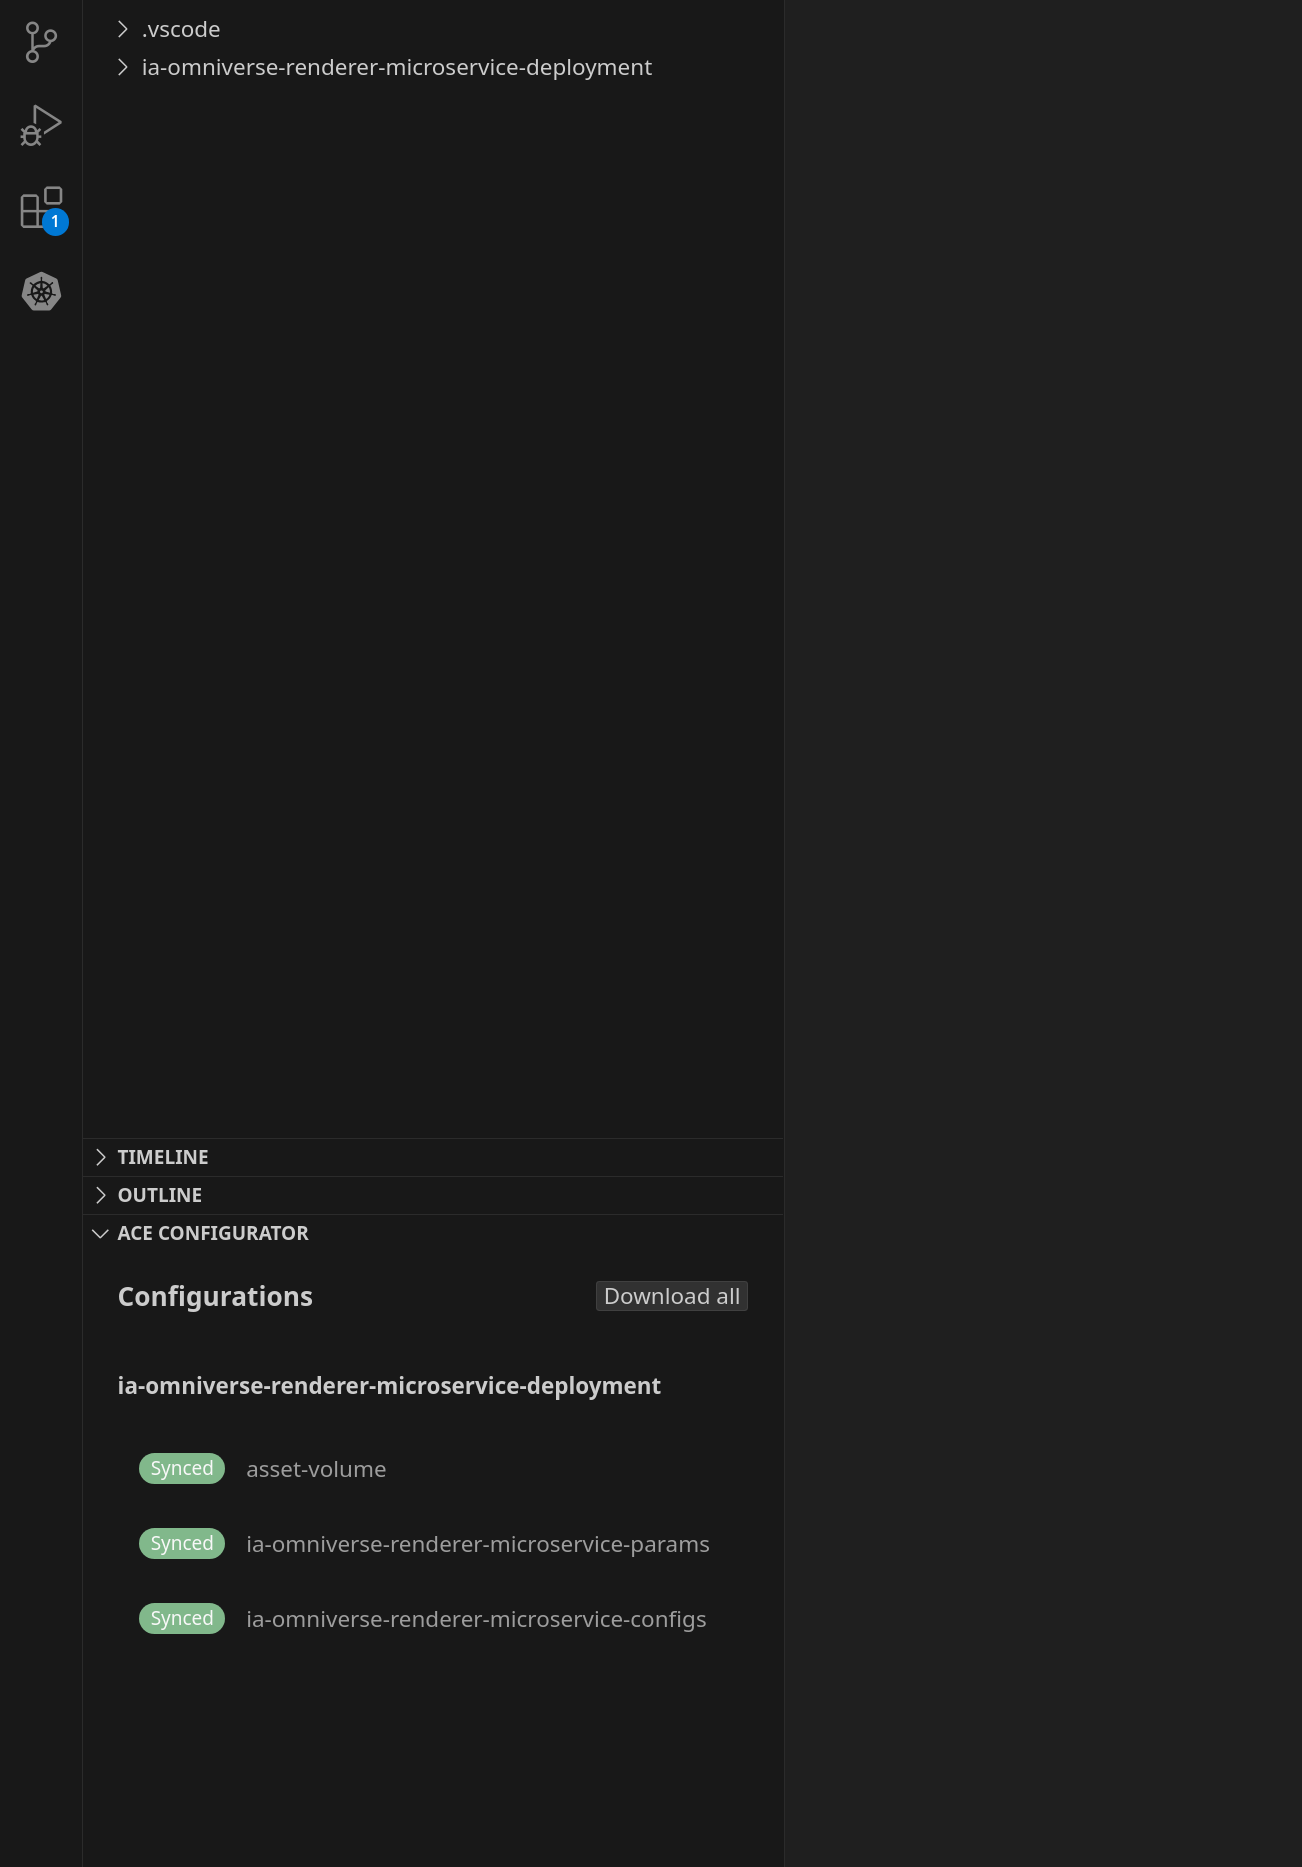
Once everything is setup your VS Code should like this:
Let’s try to change the resolution of the video. To do that modify both files IAORMS_WINDOWS_HEIGHT and IAORMS_WINDOWS_WIDTH. Then save the changes and click upload button.
Wait for VS Code to say that everything went fine, recreate the stream and relaunch the gstreamer pipeline.
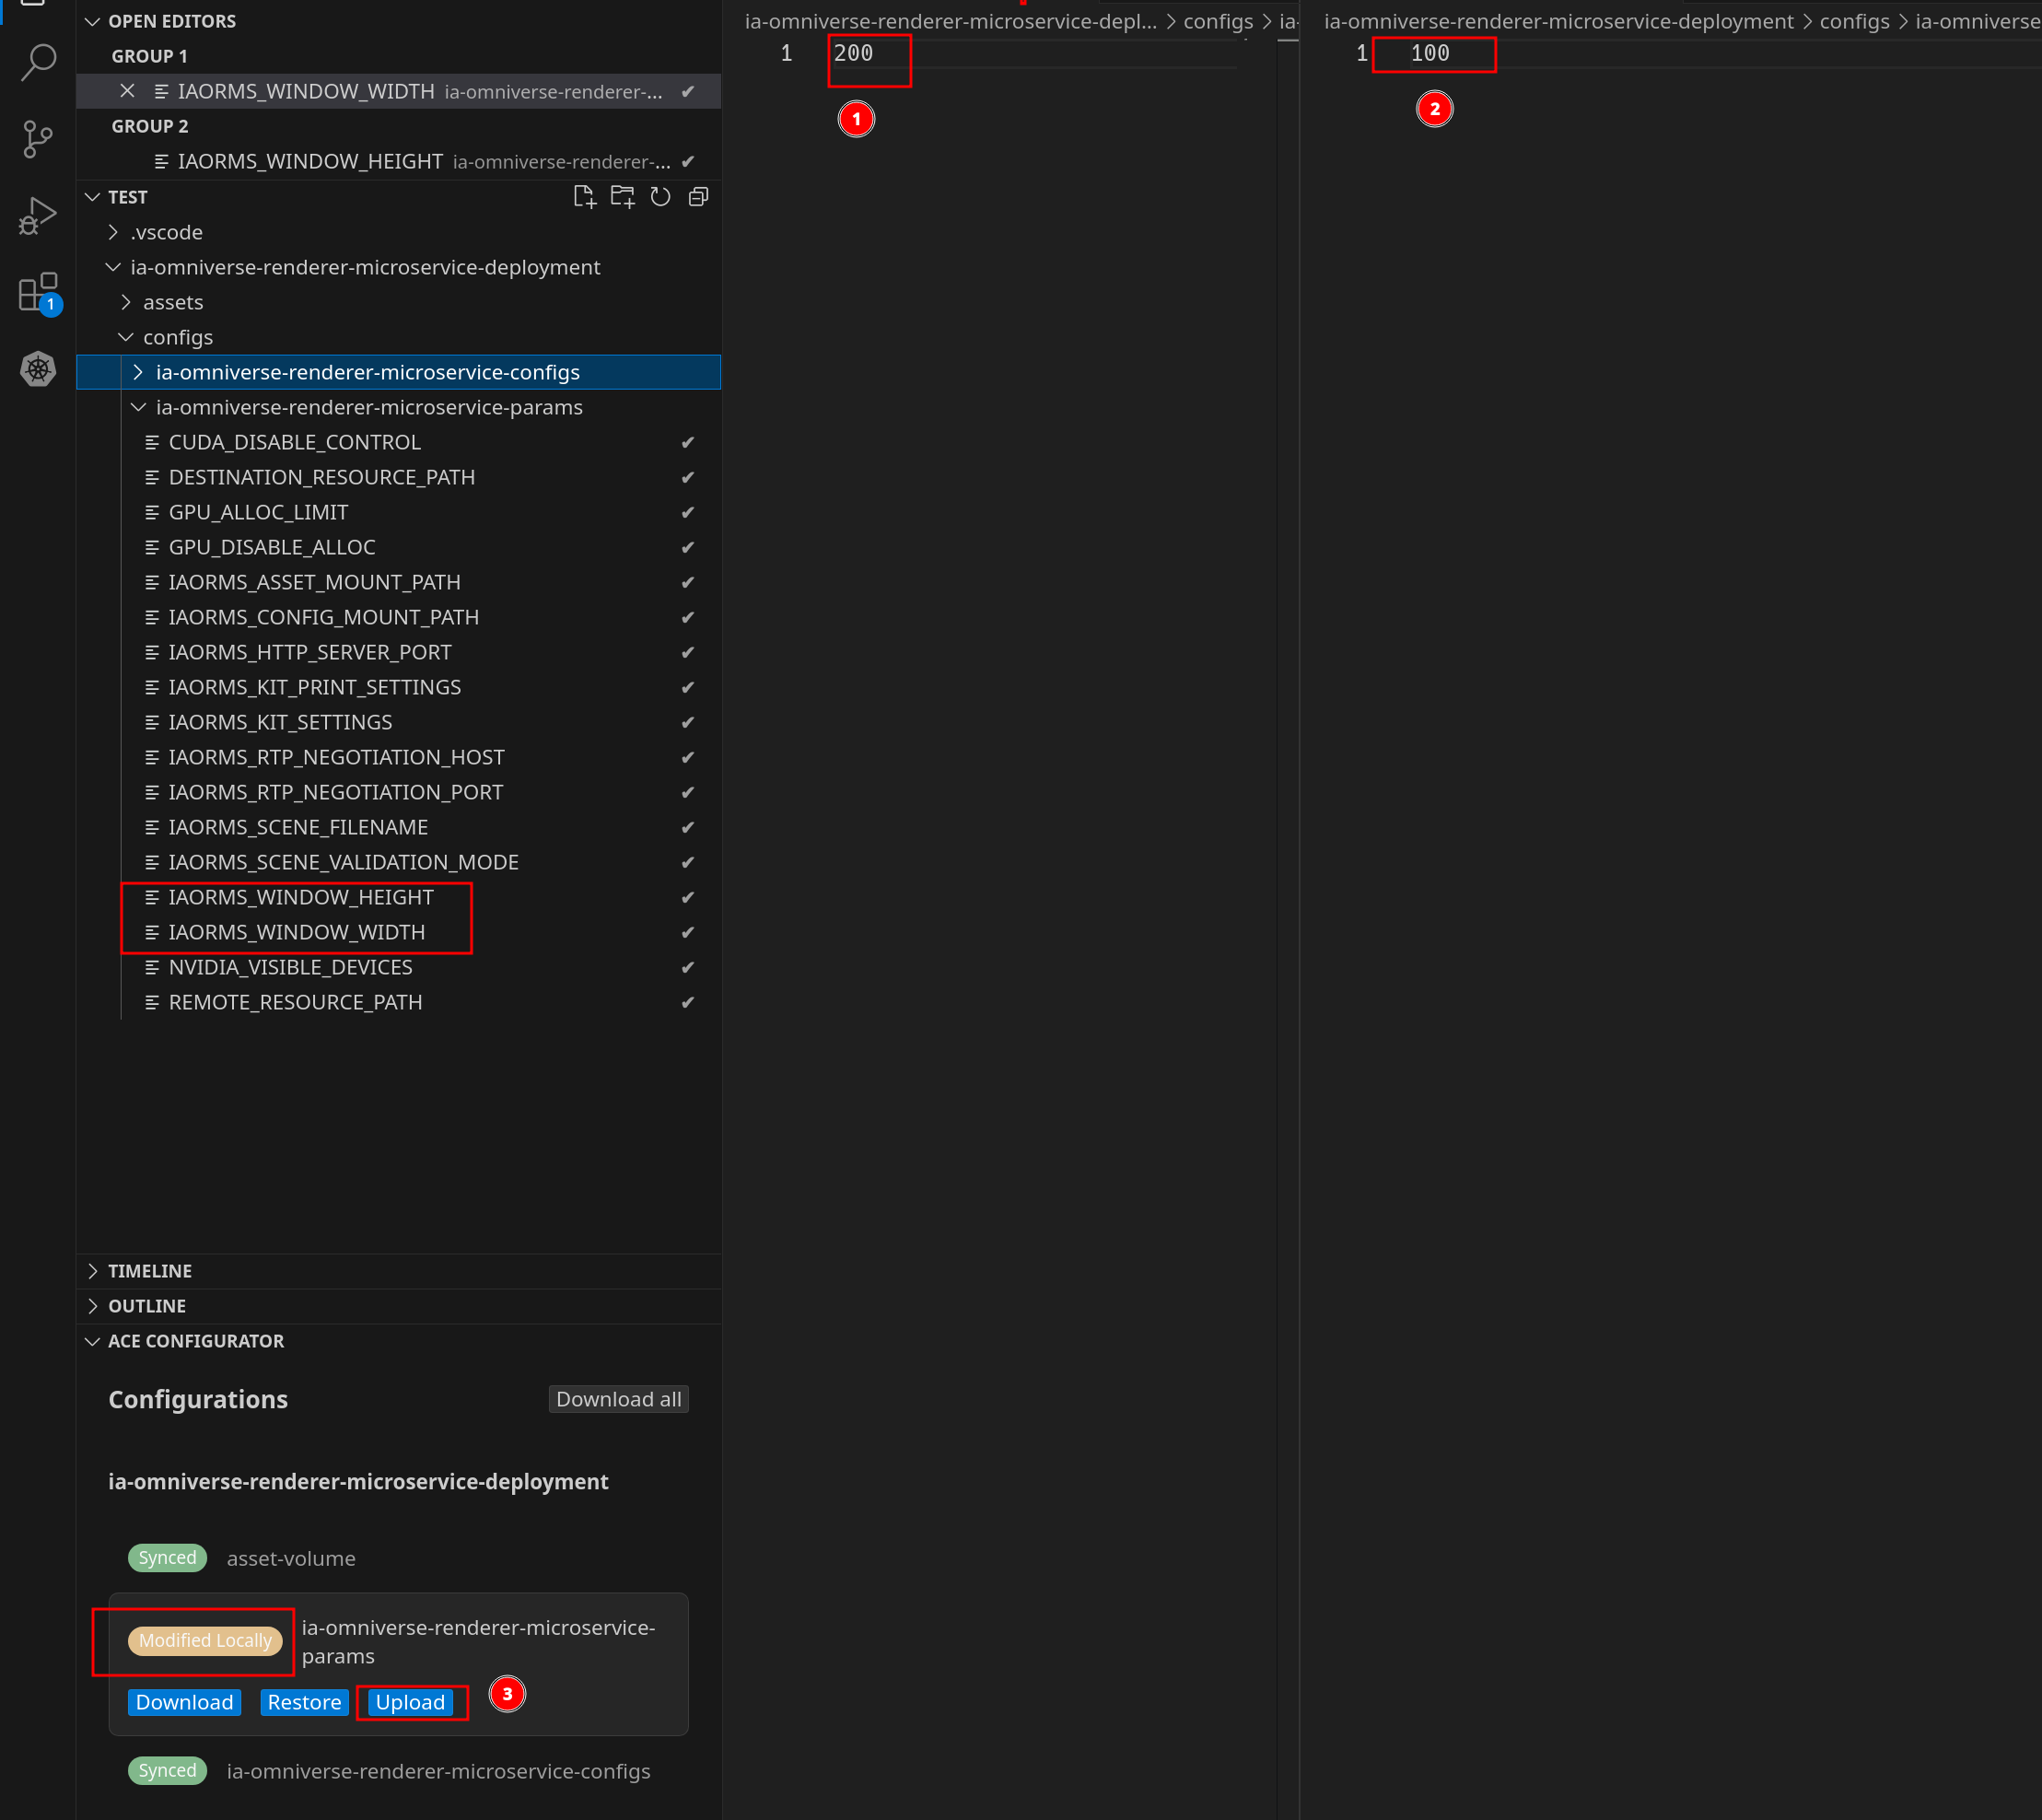
Wait for vscode to say that eveything went fine, recreate the stream and relaunch the gstreamer pipeline:
kubectl port-forward deployments/ace-configurator-deployment 8000:8000 -n $namespace

# While the above command is running, in another window, run:
curl http://127.0.0.1:8021/streams/test -X POST
gst-launch-1.0 -v udpsrc port=9020 caps="application/x-rtp" ! rtpjitterbuffer drop-on-latency=true latency=20 ! rtph264depay ! h264parse ! avdec_h264 ! videoconvert ! fpsdisplaysink text-overlay=0 video-sink=autovideosink
After this, you should see the avatar moving in a window with a different resolution.
We can also modify the avatar by editing the scene. To do that modify the file Configurator_Scene.usda one line 123 as shown below. You may change the variant to avatar1.
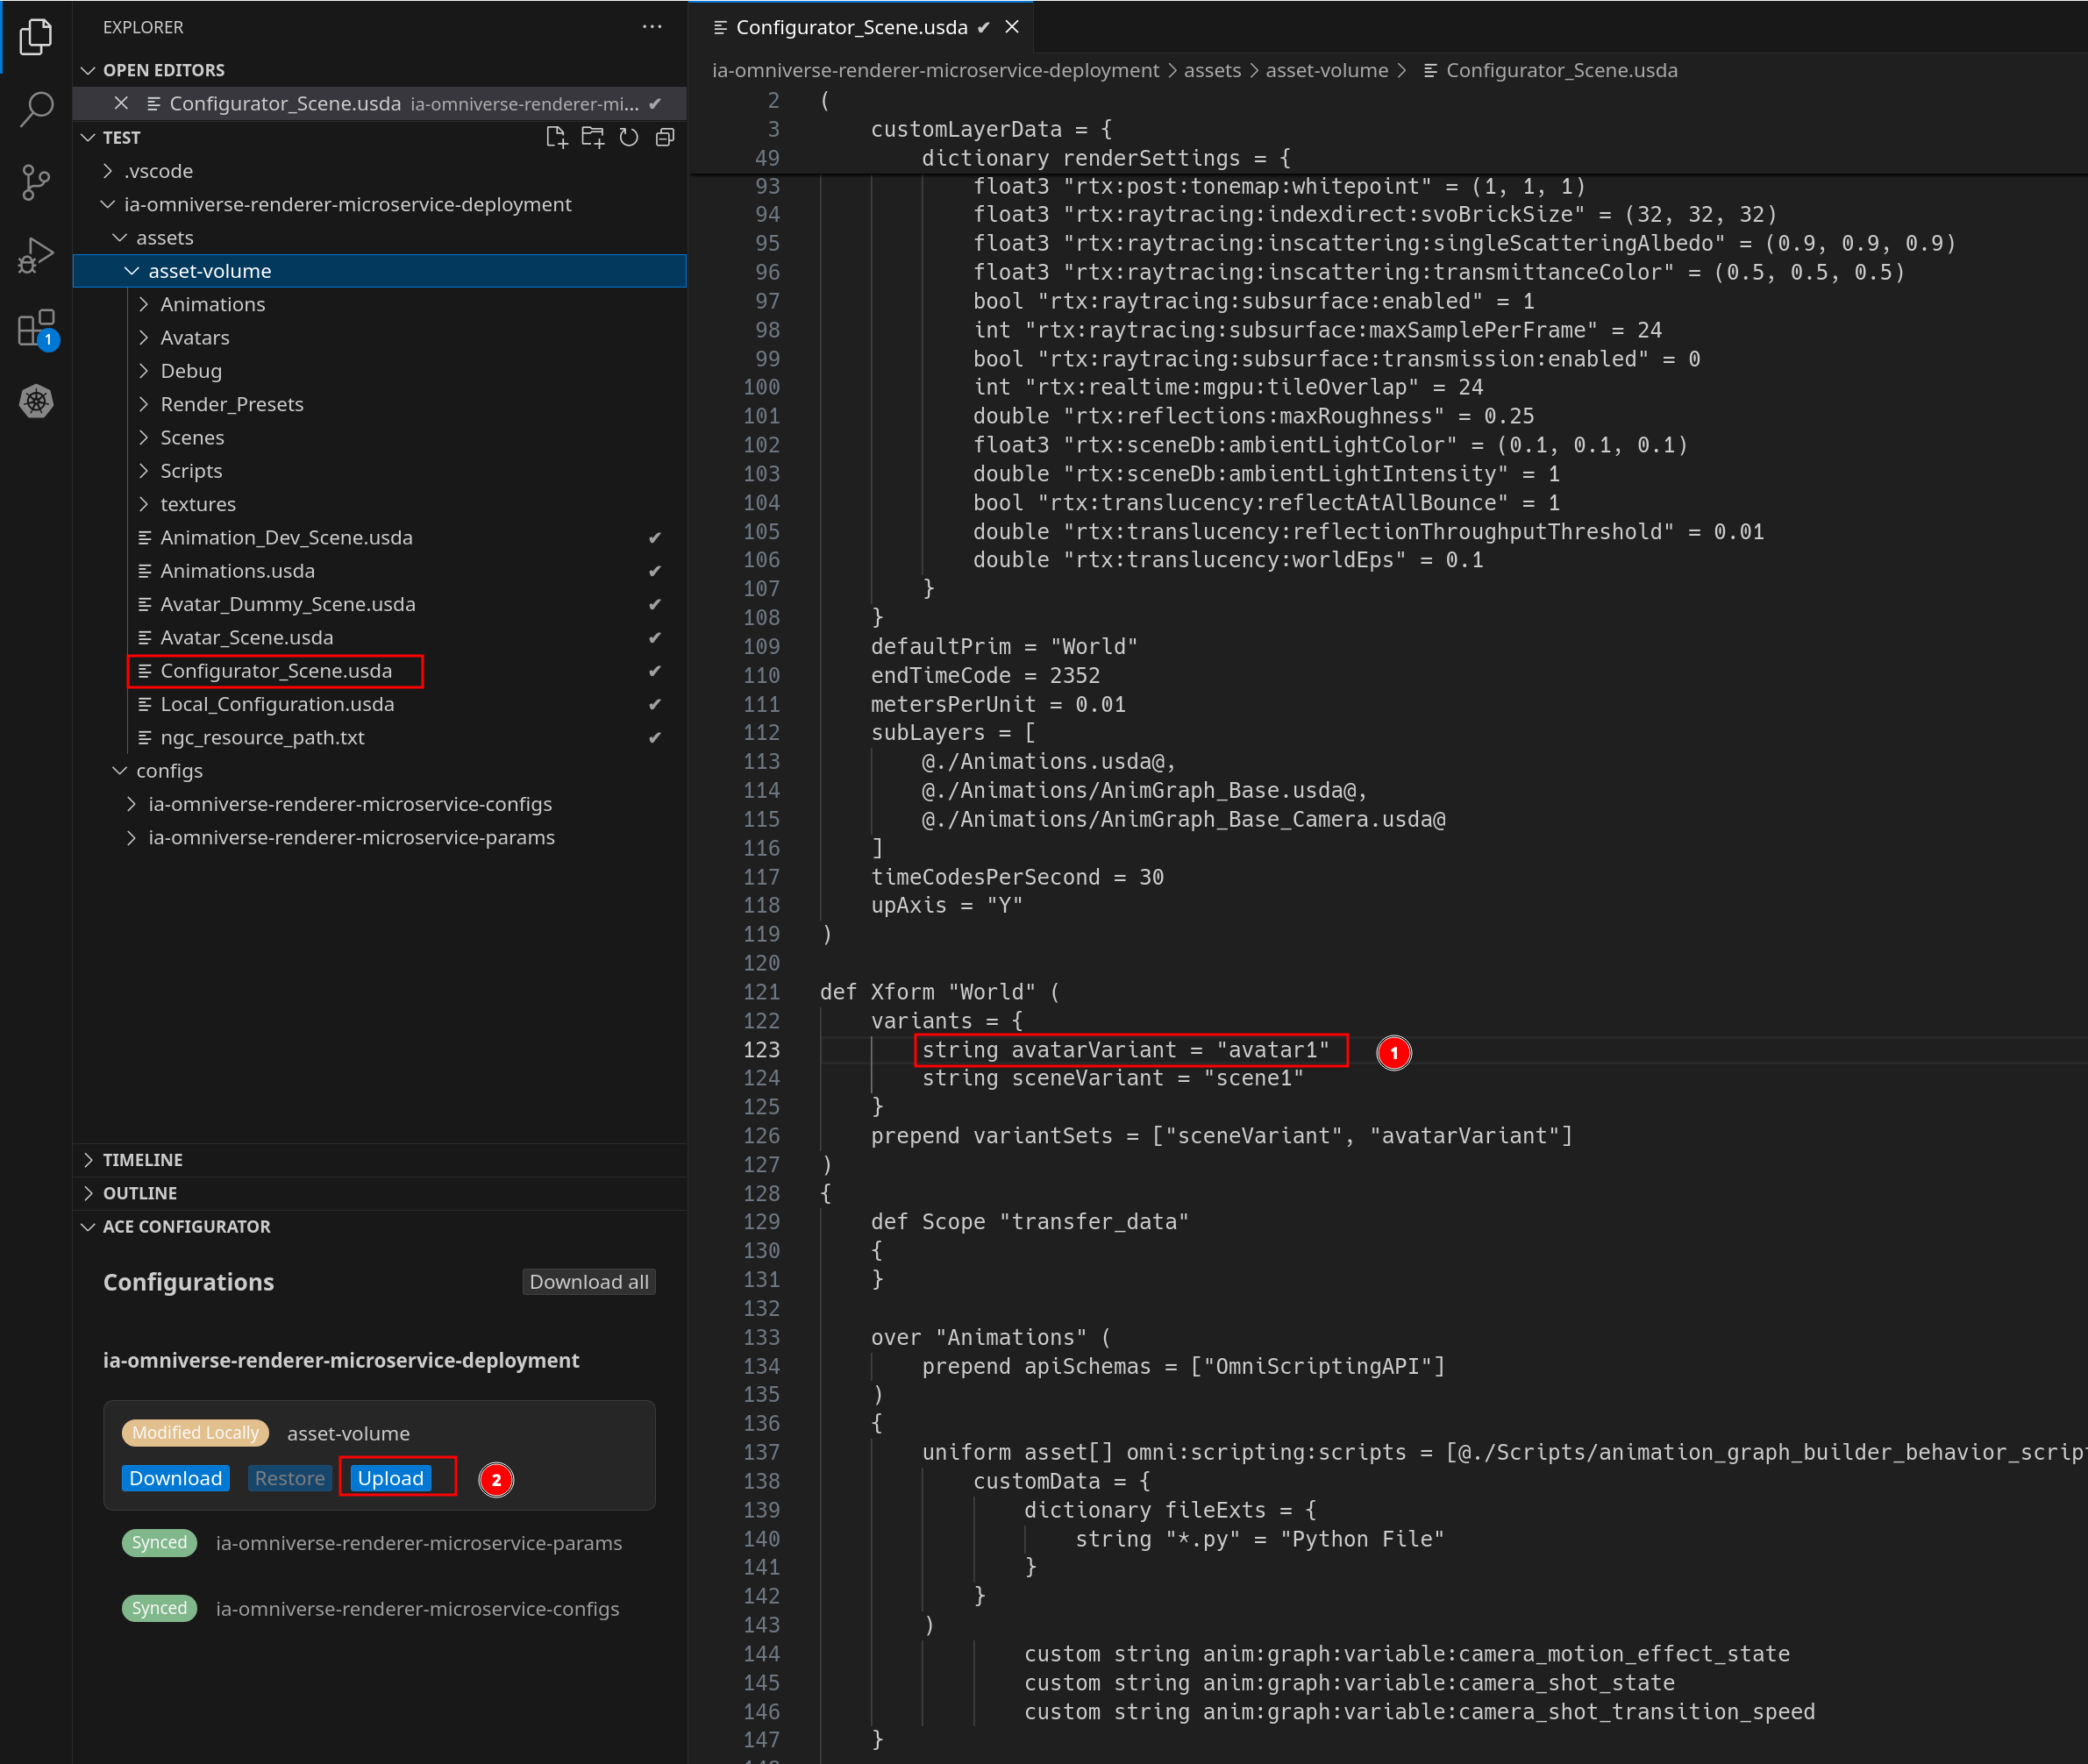
Recreate the stream and launch gstreamer command you should see a different avatar like below:
At this point, you have learned how to set up a simple UCS application, add the ACE Configurator to it, and use its VS Code extension to modify the application’s configuration in real time.
To clean up the resources created by this demo, you may delete the namespace:
kubectl delete namespace $namespace
The next section is a deep dive into the VS Code extension and its features.