Kubernetes & Unreal Animation Pipeline Workflow#
In this setup you will run the microservices in a Kubernetes cluster, render an avatar using Unreal Renderer, and view it in a browser.
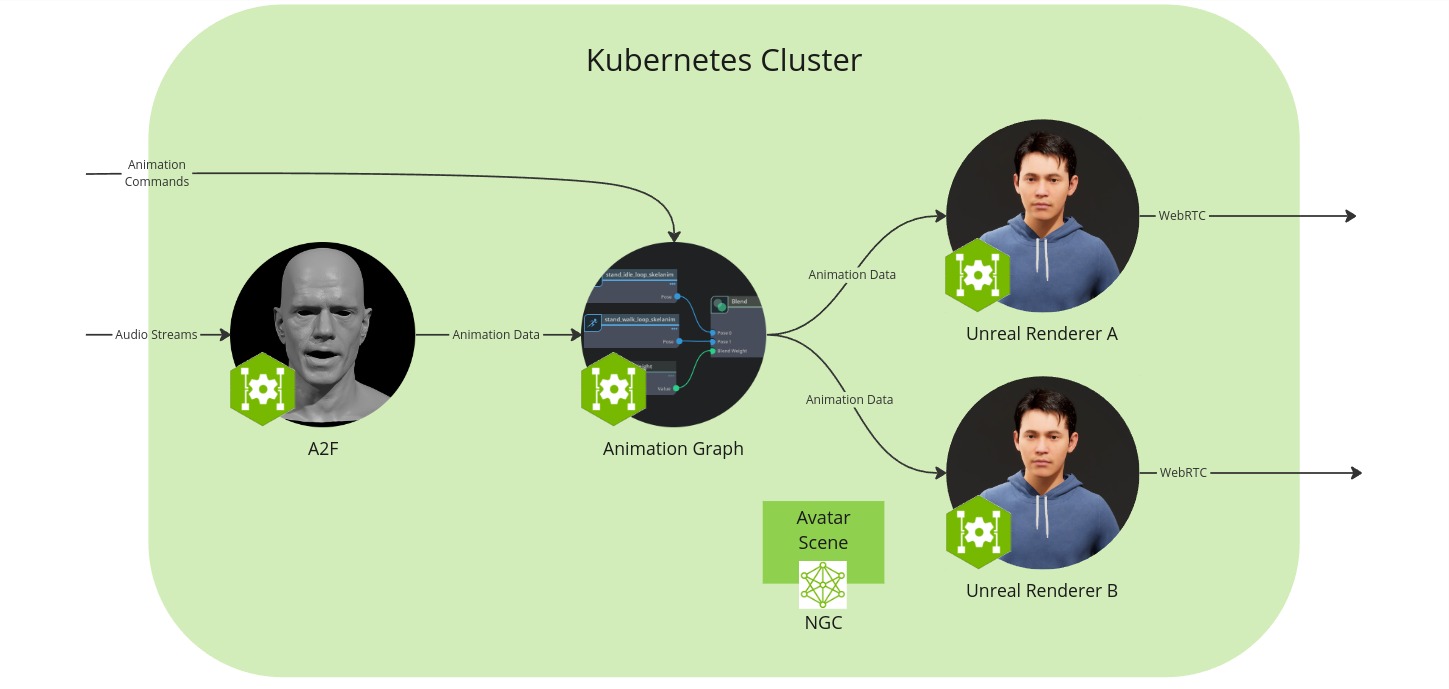
The workflow configuration consists of the following components:
Audio2Face-3D microservice: converts speech audio into facial animation, including lip syncing.
Animation Graph microservice: manages and blends animation states.
Unreal Renderer microservice: renderer that visualizes the animation data using Unreal Engine (UE).
Unreal Engine Pixel Streaming client: allows to view the animation from a browser.
Coturn TURN server: enables WebRTC communication between the browser and the Unreal Renderer microservice.
Avatar scene: Collection of 3D scene and avatar model data that is saved in a local folder
Prerequisites#
Before you start make sure to have installed and checked all prerequisites in the Development Setup, in particular following the prerequisites of UCS Tools.
Additionally, this section assumes that the following prerequisites are met:
You have a Kubernetes cluster available
You have installed Kubectl
You have installed Helm
You have access to NVAIE, which is required to download the relevant microservices
Note
Note that driver issues have been reported with
minikubeandmicrok8sversions1.29and1.30. If you encounter the errorCuda failure: CUDA driver version is insufficient for CUDA runtime version, consider switching tomicrok8s 1.24, which has been verified to work.
You also need to link a Github account to EPIC games. To do so:
Create a Github account if you do not have one already
Create an Epic Games account if you do not have one already
Authenticate with the GitHub Container Registry and note your access token
Finally, this workflow relies on the Unreal Renderer Microservice which is currently only available as Early Access. If you do not have access to this resource yet, reach out to your NVIDIA Account Manager.
Hardware Requirements#
Each component has its own hardware requirements. The requirements of the workflow are the sum of its components.
Audio2Face-3D microservice
Animation Graph microservice
Unreal Renderer microservice
The actual hardware requirements depend on the specific use case and the complexity of the avatar scene. Also the numbers vary on the actuall hardware used. The following table gives some guidance.
Component |
Minimum CPU |
Recommended CPU |
Minimum RAM |
Recommended RAM |
Recommended GPU |
Minimum GPU RAM |
Recommended GPU RAM |
Recommended Storage |
|---|---|---|---|---|---|---|---|---|
Audio2Face-3D |
4 cores |
8 cores |
4 GB |
8 GB |
Any NVIDIA GPU with compute capability |
10 GB |
12 GB |
10 GB |
Animation Graph |
< 1 core |
1 core |
1 GB |
4 GB |
< 1 NVIDIA RTX-compatible GPU |
1 GB |
1 GB |
5 GB |
Unreal Renderer |
1 cores |
2 cores |
8 GB |
32 GB |
1 NVIDIA GPU with compute and encoding capability |
6 GB |
8 GB |
10 GB |
Signalling Server |
1 cores |
2 cores |
1 GB |
2 GB |
0 |
0 GB |
0 GB |
0 GB |
TURN Server |
1 cores |
2 cores |
1 GB |
2 GB |
0 |
0 GB |
0 GB |
0 GB |
Total |
8 cores |
15 cores |
15 GB |
48 GB |
1-2 NVIDIA RTX-compatible GPU |
17 GB |
21 GB |
25 GB |
Create Avatar Scene#
To create a customized MetaHuman avatar follow the Avatar Customization guide to create and build a UE project.
In the subsection How to package and upload the project you will also find information on how to upload it to NGC and how to update the UCS application to point to your new resource.
Download UCS App Files#
Download the following files and place them in an empty ucs_apps directory:
In the animation_pipeline_with_unreal_renderer_params.yaml file, update the unreal-renderer.signallingServer.peerConnectionOptions.iceServers.urls field with your own IP address (hostname -I will show you your IP address).
Configure the Resource Downloader#
The Unreal Renderer microservice uses a Unreal project and optionally packed MetaHuman and scene files. By default, the UCS app configures the microservices to download the avatar scene from NGC. However, there are also alternative methods to download resources, and you can also create your own resource downloader init container as described in the Resource Downloader section.
Build UCS App#
rm -rf _build/animation_pipeline*
ucf_app_builder_cli app build ucs_apps/animation_pipeline_with_unreal_renderer.yaml ucs_apps/animation_pipeline_with_unreal_renderer_params.yaml -o _build/animation_pipeline
Start TURN Server#
A TURN server is required to allow the Unreal Renderer microservice to stream data to the browser through WebRTC. The TURN server must run outside of kubernetes because it needs to be accessible from both the microservice and the browser.
To start a TURN server, download the TURN server docker-compose file (note: this is not the same docker compose file as in the Docker & Unreal workflow) to your working directory. Then, open a new terminal and run the following:
PUBLIC_IP=<CHANGE_WITH_YOUR_IP_ADDRESS> docker compose --file turn-server-docker-compose.yaml up turnserver --force-recreate
Starting the TURN server should take no more than a few seconds. The TURN server is ready when the output prints TCP listener opened on : <SOME_IP>:<SOME_PORT> or Http listening on *: 30080.
Note
If you are using a firewall, you may need to open ports:
sudo ufw allow 31720:31820/udp
sudo ufw allow 30080/tcp
sudo ufw allow 30080/udp
sudo ufw allow 8888/tcp
sudo ufw allow 8888/udp
sudo ufw allow 3478/tcp
sudo ufw allow 3478/udp
If you get a Permission Denied error while running these images, check the “Permission Denied For EpicGames Docker Images” chapter of the troubleshooting section.
Deploy UCS App#
name=animation-pipeline
namespace=$name

kubectl create namespace $namespace
kubectl create secret docker-registry ngc-docker-reg-secret --docker-server=nvcr.io --docker-username='$oauthtoken' --docker-password=$NGC_CLI_API_KEY -n $namespace
kubectl create secret generic ngc-api-key-secret --from-literal=NGC_CLI_API_KEY=$NGC_CLI_API_KEY -n $namespace
Set the Github credentials from the prerequisites section:
GITHUB_USERNAME=<CHANGE_WITH_YOUR_GITHUB_USERNAME>
GITHUB_ACCESS_TOKEN=<CHANGE_WITH_YOUR_GITHUB_ACCESS_TOKEN> # see Prerequisites section

kubectl create secret docker-registry ghcr-docker-reg-secret --docker-server=ghcr.io --docker-username=$GITHUB_USERNAME --docker-password=$GITHUB_ACCESS_TOKEN -n $namespace
And start the deployment.
helm upgrade --install --cleanup-on-fail --namespace $namespace $name _build/animation_pipeline/ -f _build/animation_pipeline/values.yaml -f ucs_apps/animation_pipeline_with_unreal_renderer_values.yaml
Check the pod states:
watch kubectl get pods -n $namespace
Starting all the pods will take up to 30 min. You need to wait until they are all indicated as ready. If the pods fail to start up, check the troubleshooting section.
Prepare Communication to Pods#
We’re not installing curl or wget anymore in the images. Therefore you can’t use kubectl exec ... anymore to call the API endpoints.
To talk with the API, you now need to use kubectl port-forward.
As the kubectl port-forward command doesn’t exit until it is shut down, you either need to run it in separate shells or run them in the background.
In this example, we are running them in separate shells.
kubectl port-forward -n $namespace ia-animation-graph-microservice-deployment-0 8020:8020
kubectl port-forward -n $namespace ia-unreal-renderer-microservice-deployment-0 8021:8021
Prepare Streaming#
Create a stream:
stream_id=$(uuidgen)
curl -X POST -s http://localhost:8020/streams/$stream_id
curl -s -X POST http://localhost:8021/streams/$stream_id -d ""
If successful, the output of this command should contain “OK” and “Stream ID successfully created!”.
Then, verify in the logs that Output animation data | Stream ID: <stream_id> is present:
kubectl logs -n $namespace -c ms ia-animation-graph-microservice-deployment-0
At this point, you should be able to view the avatar in your browser at http://<CHANGE_WITH_YOUR_IP>:30080.
Test Audio2Face-3D#
In separate tabs, activate port-forwarding:
kubectl port-forward -n $namespace a2f-with-emotion-a2f-deployment-XXX 50010:50010
kubectl port-forward -n $namespace ia-animation-graph-microservice-deployment-0 8020:8020
Note that the Audio2Face-3D pod has a random suffix, which must be adapted in the above command.
Let’s now take a sample audio file to feed into Audio2Face-3D to drive the facial speaking animation.
Normally, you would send audio to Audio2Face-3D through its gRPC API. For convenience, a python script allows you to do this through the command line. Follow the steps to setup the script.
The script comes with a sample audio file that is compatible with Audio2Face-3D. Run the following command to send the sample audio file to Audio2Face-3D:
Follow this Audio2Face-3D link to get more information.
Note
The audio formats in the Audio2Face-3D microservice, Animation Graph microservice, and Omniverse Renderer microservice need to be configured in the same way.
python3 validate.py -u 127.0.0.1:50010 -i $stream_id Mark_joy.wav
Clean up: Remove Streams#
You can clean up the stream using the following commands:
curl -X DELETE -s http://localhost:8020/streams/$stream_id
curl -X DELETE -s http://localhost:8021/streams/$stream_id
Afterwards, you can shutdown the kubectl port-forward commands from Prepare Communication to Pods.