Workflow 2: Kubernetes Cluster
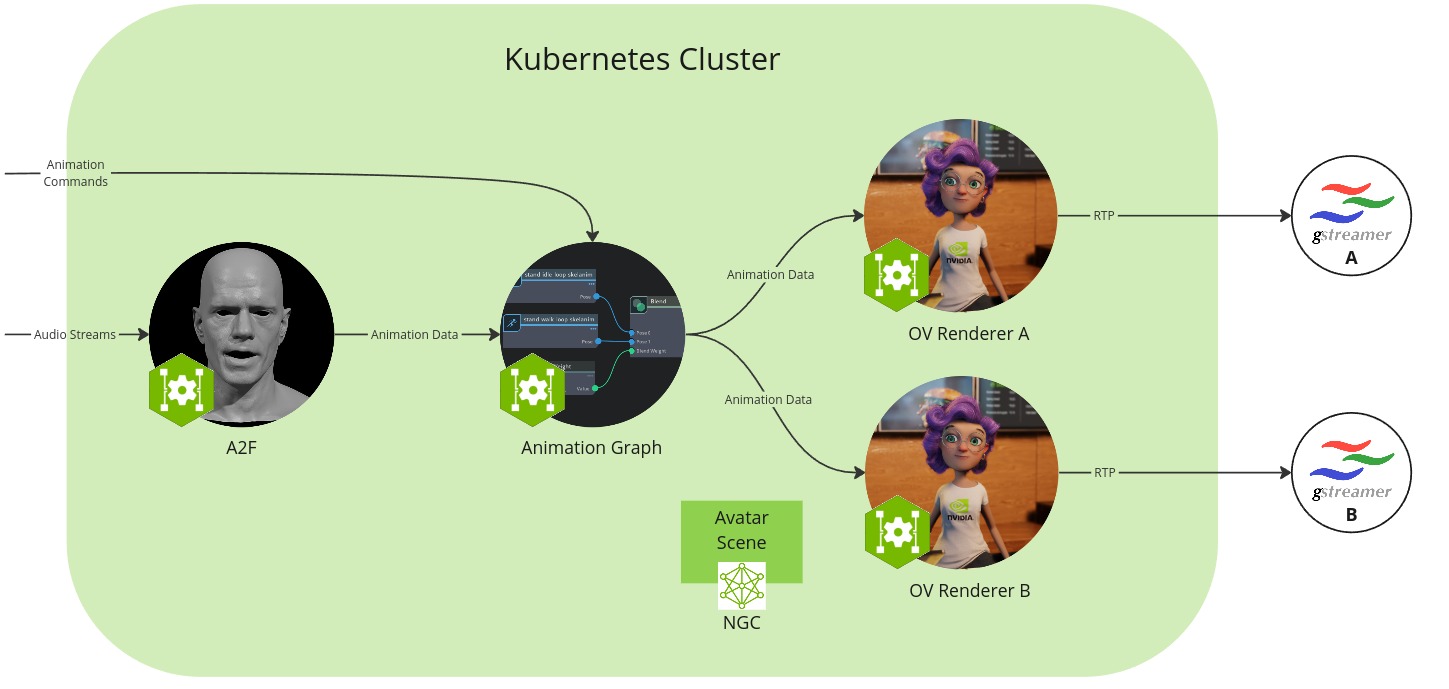
In this setup you will run the microservices in a Kubernetes cluster that supports two independent avatar animation stream instances.
The workflow configuration consists of the following components:
Audio2Face (A2F) microservice: converts speech audio into facial animation including lip syncing
Animation Graph microservice: manages and blendes animation states
Omniverse Renderer microservice: renderer that visualizes the animation data based on the loaded avatar scene
Gstreamer client: captures and shows image and audio streaming data as user front end
Avatar scene: Collection of 3D scene and avatar model data that is shared between the animation graph and Omniverse renderer microservices and pulled from NGC resource
Prerequisites
Before you start make sure to have installed and checked all prerequisites in the Development Setup.
Additionally, this section assumes that the following prerequisites are met:
You have a Kubernetes cluster available
You have installed Kubectl
You have installed Helm
You have access to NVAIE, which is required to download the Animation Graph and Omniverse Renderer microservices
You have access access to the public NGC catalog, which is required to download the Avatar Configurator
Note
If you are running Kubernetes using microk8s, note that driver issues have been reported with
microk8sversions1.29and1.30. If you encounter the errorCuda failure: CUDA driver version is insufficient for CUDA runtime version, consider downgrading to version1.24, which has been verified to work.
Hardware Requirements
This guide assumes you have access to enough GPU resources. A single renderer will consume up to 8 GB of GPU memory (avatar scene dependent). To run two renderers as shown in the pipeline we recommend to use two GPUs. Alternately, you can configure the setup to run only one renderer on a single GPU (see Adapt UCS App for Single Renderer & GPU).
Each component has its own hardware requirements. The requirements of the workflow is the sum of its components.
Audio2Face (A2F) microservice
Animation Graph microservice
Omniverse Renderer microservice
Download UCS App Files
Download the following files and place them in an empty ucs_apps directory:
Update the animation_pipeline_params.yaml file’s avatar-renderer-a.livestream.host property to use your own IP address (hostname -I will show you your IP address). Do the same for avatar-renderer-b.
Note
The above configuration assumes you have access to two GPUs, and it deploys one renderer per GPU.
Adapt UCS App for Single Renderer & GPU
To reduce the required GPU resources you can adapt the UCS app configuration to run one renderer on a single GPU by commenting all sections and lines that contain avatar-renderer-b:
ucs_apps/animation_pipeline.yaml: (lines: 49-53, 69-70)
ucs_apps/animation_pipeline_values.yaml: (lines: 38-56)
ucs_apps/animation_pipeline_params.yaml: (lines: 62-73)
Configure the Resource Downloader
Both the Animation Graph microservice and the Omniverse Renderer microservice use a USD scene configuration. By default the UCS app configures the microservices to download the avatar scene from NGC. However, there are also alternative methods to download resources and you can also create your own resource downloader init container as described in the Resource Downloader section.
Build UCS App
rm -rf _build/animation_pipeline*
ucf_app_builder_cli app build ucs_apps/animation_pipeline.yaml ucs_apps/animation_pipeline_params.yaml -o _build/animation_pipeline
Deploy UCS App
name=animation-pipeline
namespace=$name

kubectl create namespace $namespace
kubectl create secret docker-registry ngc-docker-reg-secret --docker-server=nvcr.io --docker-username='$oauthtoken' --docker-password=$NGC_CLI_API_KEY -n $namespace
kubectl create secret generic ngc-api-key-secret --from-literal=NGC_CLI_API_KEY=$NGC_CLI_API_KEY -n $namespace

helm upgrade --install --cleanup-on-fail --namespace $namespace $name _build/animation_pipeline/ -f _build/animation_pipeline/values.yaml -f ucs_apps/animation_pipeline_values.yaml
Check the pod states:
watch kubectl get pods -n $namespace
Starting all the pods will take up to 30 min. You need to wait until they are all indicated as ready.
Prepare Streaming
We will create two independent avatar stream instances.
Add two different stream ids for Animation Graph microservice:
stream_id_1=$(uuidgen)
kubectl exec -n $namespace -c ms ia-animation-graph-microservice-deployment-0 -- curl -X POST -s http://localhost:8020/streams/$stream_id_1

 # If using two renderers:
stream_id_2=$(uuidgen)
kubectl exec -n $namespace -c ms ia-animation-graph-microservice-deployment-0 -- curl -X POST -s http://localhost:8020/streams/$stream_id_2
Verify logs that “Sending Animation Data to output for stream_id <stream_id_#>” is present:
kubectl logs -n $namespace -c ms ia-animation-graph-microservice-deployment-0
Add stream ids to Omniverse Renderer microservices:
kubectl exec -n $namespace -c ms avatar-renderer-a-deployment-0 -- curl -X POST -s http://localhost:8021/streams/$stream_id_1

# If using two renderers:
kubectl exec -n $namespace -c ms avatar-renderer-b-deployment-0 -- curl -X POST -s http://localhost:8021/streams/$stream_id_2
Verify that logs “Rendering animation data” are present in both renderer microservices:
kubectl logs -n $namespace -c ms avatar-renderer-a-deployment-0

# If using two renderers:
kubectl logs -n $namespace -c ms avatar-renderer-b-deployment-0
Setup & Start Gstreamer
We will use Gstreamer to catch the image and audio output streams to visualize the two avatar scenes.
Install Gstreamer plugin:
sudo apt-get install gstreamer1.0-plugins-bad gstreamer1.0-libav
Use the ports specified in ucs_apps/animation_pipeline_params.yaml. Default ports are 9020/9030 for video and 9021/9031 for audio.
Run each of the following commands in its own terminal:
# Avatar stream 1
gst-launch-1.0 -v udpsrc port=9020 caps="application/x-rtp" ! rtpjitterbuffer drop-on-latency=true latency=20 ! rtph264depay ! h264parse ! avdec_h264 ! videoconvert ! fpsdisplaysink text-overlay=0 video-sink=autovideosink
gst-launch-1.0 -v udpsrc port=9021 caps="application/x-rtp,clock-rate=16000" ! rtpjitterbuffer ! rtpL16depay ! audioconvert ! autoaudiosink sync=false

# Avatar stream 2 (if using two renderers)
gst-launch-1.0 -v udpsrc port=9030 caps="application/x-rtp" ! rtpjitterbuffer drop-on-latency=true latency=20 ! rtph264depay ! h264parse ! avdec_h264 ! videoconvert ! fpsdisplaysink text-overlay=0 video-sink=autovideosink
gst-launch-1.0 -v udpsrc port=9031 caps="application/x-rtp,clock-rate=16000" ! rtpjitterbuffer ! rtpL16depay ! audioconvert ! autoaudiosink sync=false
Alternatively, you can also record the audio and video streams together to a file:
# Avatar stream 1
gst-launch-1.0 -e -v udpsrc port=9021 caps="application/x-rtp,clock-rate=16000" ! rtpjitterbuffer ! rtpL16depay ! audioconvert ! matroskamux name=mux ! filesink location="stream_id_1.mkv" udpsrc port=9020 caps="application/x-rtp" ! rtpjitterbuffer drop-on-latency=true latency=20 ! rtph264depay ! h264parse ! mux.

# Avatar stream 2 (if using two renderers)
gst-launch-1.0 -e -v udpsrc port=9031 caps="application/x-rtp,clock-rate=16000" ! rtpjitterbuffer ! rtpL16depay ! audioconvert ! matroskamux name=mux ! filesink location="stream_id_2.mkv" udpsrc port=9030 caps="application/x-rtp" ! rtpjitterbuffer drop-on-latency=true latency=20 ! rtph264depay ! h264parse ! mux.
Test Animation Graph Interface
Back in your main terminal, let’s set a new posture for avatar 1:
kubectl exec -n $namespace -c ms ia-animation-graph-microservice-deployment-0 -- curl -X PUT -s http://localhost:8020/streams/$stream_id_1/animation_graphs/avatar/variables/posture_state/Talking
or change the avatar’s position:
kubectl exec -n $namespace -c ms ia-animation-graph-microservice-deployment-0 -- curl -X PUT -s http://localhost:8020/streams/$stream_id_1/animation_graphs/avatar/variables/position_state/Left
or start a gesture:
kubectl exec -n $namespace -c ms ia-animation-graph-microservice-deployment-0 -- curl -X PUT -s http://localhost:8020/streams/$stream_id_1/animation_graphs/avatar/variables/gesture_state/Pulling_Mime
or trigger a facial gesture:
kubectl exec -n $namespace -c ms ia-animation-graph-microservice-deployment-0 -- curl -X PUT -s http://localhost:8020/streams/$stream_id_1/animation_graphs/avatar/variables/facial_gesture_state/Smile
Alternatively, you can explore the OpenAPI interface of the Animation Graph microservice (http://localhost:8020/docs) or Omniverse Renderer microservice (http://localhost:8021/docs) after you enabled the port-forwarding:
kubectl port-forward -n $namespace ia-animation-graph-microservice-deployment-0 8020:8020
kubectl port-forward -n $namespace avatar-renderer-a-deployment-0 8021:8021
You can find all valid variable values here: Default Animation Graph.
Test Audio2Face
Activate port-forwarding:
kubectl port-forward -n $namespace a2f-with-emotion-a2f-deployment-XXX 50010:50010
kubectl port-forward -n $namespace ia-animation-graph-microservice-deployment-0 8020:8020
Note that the A2F pod has a random suffix, which must be adapted in the above command.
Let’s now take a sample audio file to feed into Audio2Face to drive the facial speaking animation.
Normally, you would send audio to Audio2Face through its gRPC API. For convenience, a python script allows you to do this through the command line. Follow the steps to setup the script.
The script comes with a sample audio file that is compatible with Audio2Face. Run the following command to send the sample audio file to Audio2Face:
python3 validate.py -u 127.0.0.1:50010 -i $stream_id_1 english_voice_male_p1_neutral_16k.wav
Note
Audio2Face requires audio to be in 16KHz, mono-channel format.
Extract Crash Dumps
List the directory, where the crash dumps are saved:
kubectl exec -n $namespace -c ms avatar-renderer-a-deployment-0 -- ls -alh /home/ace/asset
Copy the crash dumps (<uuid>.zip) to the local filesystem:
kubectl cp -n $namespace avatar-renderer-a-deployment-0:/home/ace/asset/526ab2d4-72be-4f3d-d83ad384-893d4b00.dmp.zip -c ms 526ab2d4-72be-4f3d-d83ad384-893d4b00.dmp.zip
Copy to a different machine if needed:
scp.exe -r <username>@<hostname>:<folder_path>/*.zip .\Downloads\
Change Avatar Scene
To modify or switch out the default avatar scene you can use the Avatar Configurator.
Download and unpack it and start it by running ./run_avatar_configurator.sh.
Once it successfully started (first time it takes longer to compile shaders) you can create your custom new scene and save it.
Now, you need to upload the new scene to NGC (see Uploading a Version to the NGC Resource) and adapt related links in the UCS application configuration and redeploy it.
Clean up: Remove Streams
You can clean up the streams using the following commands:
kubectl exec -n $namespace -c ms avatar-renderer-a-deployment-0 -- curl -X DELETE -s http://localhost:8021/streams/$stream_id_1
kubectl exec -n $namespace -c ms ia-animation-graph-microservice-deployment-0 -- curl -X DELETE -s http://localhost:8020/streams/$stream_id_1

# If using two renderers:
kubectl exec -n $namespace -c ms avatar-renderer-b-deployment-0 -- curl -X DELETE -s http://localhost:8021/streams/$stream_id_2
kubectl exec -n $namespace -c ms ia-animation-graph-microservice-deployment-0 -- curl -X DELETE -s http://localhost:8020/streams/$stream_id_2