Base Command Platform
1. Introduction to NVIDIA Base Command Platform
NVIDIA Base Command Platform is a comprehensive platform for businesses, their data scientists, and IT teams, offered in a ready-to-use cloud-hosted solution that manages the end-to-end lifecycle of AI development, AI workflows, and resource management.
NVIDIA Base Command Platform provides
A set of cloud-hosted tools that lets data scientists access the AI infrastructure without interfering with each other.
A comprehensive cloud-based UI, and a complete command line API to efficiently execute AI workloads with right-sized resources ranging from a single GPU to a multi-node cluster with dataset management, providing quick delivery of production-ready models and applications.
A built-in telemetry feature to validate deep learning techniques, workload settings, and resource allocations as part of a constant improvement process.
Reporting and showback capabilities for business leaders who want to measure AI projects against business goals, as well as team managers who need to set project priorities and plan for a successful future by correctly forecasting compute capacity needs.
1.1. NVIDIA Base Command Platform Terms and Concepts
The following are a description of common NVIDIA Base Command Platform terms used in this document.
Term |
Definition |
|---|---|
Accelerated Computing Environment (ACE) |
An ACE is a cluster or an availability zone. Each ACE has separate storage, compute, and networking. |
NGC Catalog |
NGC Catalog is a curated set of GPU-optimized software maintained by NVIDIA and accessible to the general public. It consists of containers, pre-trained models, Helm charts for Kubernetes deployments, and industry-specific AI toolkits with software development kits (SDKs). |
Container Images |
All applications running in NGC are containerized as Docker containers and execute in our Runtime environment. Containers are stored in the NGC Container Registry nvcr.io, accessible from both the CLI and the Web UI. |
Container Port |
Opening a port when creating a job will create a URL that can be used to reach the container on that port using web protocols. The security of web applications (e.g. Jupyterlab) that are accessed this way is the user’s responsibility. See note below. |
Dataset |
Datasets are the data inputs to a job, mounted as read-only to the location specified in the job. They can contain data or code. Datasets are covered in detail in the Datasets section. |
Data Results |
Result is a read-write mount specified by the job and captured by the system. All data written to the result is available once the job completes, along with contents of stdout and stderr. |
Instance |
The instance determines the number of CPU cores, RAM size, and the type and number of GPUs available to the job. Instance types from one to eight GPUs are available depending on the ACE. |
Job |
A Job is the fundamental unit of computation - a container running an NVIDIA Base Command Platform instance in an ACE. Job is defined by the set of attributes specified at submission. |
Job Definition |
The attributes that define a job. |
Job Command |
Each Job can specify a command to run inside the container. The command can be as simple or as complex as needed, as long as quotes are properly escaped. |
Jobs - Multinode |
A job that is run on multiple nodes. |
Models |
NGC offers a collection of State of the Art pre-trained deep learning models that can be easily used out of the box, re-trained or fine-tuned. |
Org |
The enterprise organization with its own registry space. Users are assigned (or belong) to an org. |
Team |
A sub-unit within an organization with its own registry space. Only members of the same team have access to that team’s registry space. |
Users |
Anyone with a Base Command Platform account. Users are assigned to an org. |
Private Registry |
The NGC private registry provides you with a secure space to store and share custom containers, models, resources, and Helm charts within your enterprise. |
Quota |
Every user is assigned a default GPU and storage quota. GPU quota defines the maximum number of concurrent GPUs in use by a user account. Each user is allocated a default initial storage quota. Your storage assets (datasets, results, and workspaces) count towards your storage quota. |
Resources |
NGC offers step-by-step instructions and scripts for creating deep learning models that you can share within teams or the org. |
Telemetry |
Base Command Platform provides time-series metric data collected from various system components such as GPU, Tensor Cores, CPU, Memory, and I/O. |
Workspaces |
Workspaces are shareable read-write persistent storage mountable in jobs for concurrent use. Mounting workspaces in read-write mode (which is the default) in a job works well for use as a checkpoint folder. Workspaces can also be mounted to a job in read-only mode, making them ideal for configuration/code/input use cases in the comfort of knowing that the job will not corrupt/modify any of this data. |
1.1.1. Security Note
The security of web applications (e.g. JupyterLab) hosted by user jobs and containers is the customer’s responsibility. The Base Command Platform provides a unique URL to access this web application, and ANY user with that URL will have access to that application. Here are a few recommendations to protect your web applications:
Implement appropriate authentication mechanisms to protect your application.
By default, we use a subdomain under nvbcp.com, which is a shared domain, and if you use cookie-based authentication, you are advised to set the cookie against your FQDN, not just the subdomain.
If internal users access the application, you may limit access only from your corporate network, behind the firewall and VPN.
Consider the URL confidential, and only share it with authorized users (unless you have appropriate authentication controls implemented as in (1) above.
2. Onboarding and Signing Up
This chapter walks you through the process of setting up your NVIDIA Base Command Account. In this chapter you will learn about signing up, signing in, installing and configuring CLI, and selecting and switching your team context.
2.1. Inviting Users
This section is for org or team administrators (with User Admin role) and describes the process for inviting (adding) users to NVIDIA Base Command Platform.
As the organization administrator, you must create user accounts to allow others to use the NVIDIA Base Command Platform within the organization.
Log on to the NGC web UI and and select the NGC Org associated with NVIDIA Base Command Platform.
Click Organization > Users from the left navigation menu.
This capability is available only to User Admins.
Click Invite New User on the top right corner of the page.

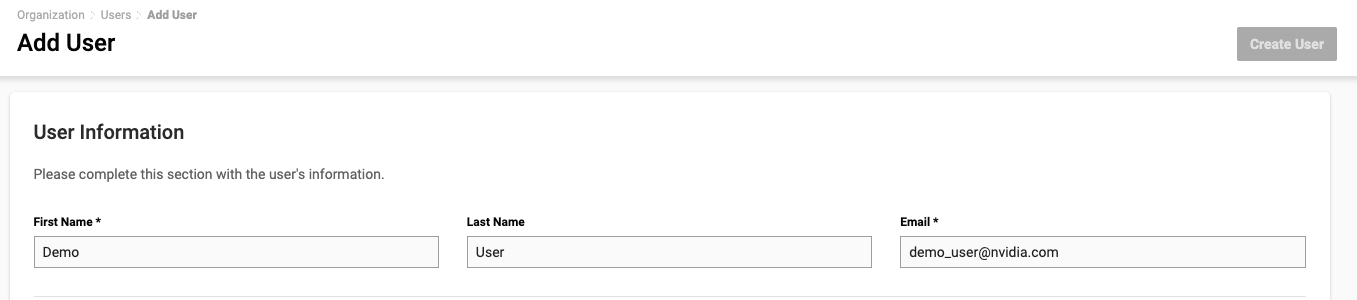
On the new page, fill out the User Information section. Enter your screen name for First Name, and the email address to receive an invitation email.
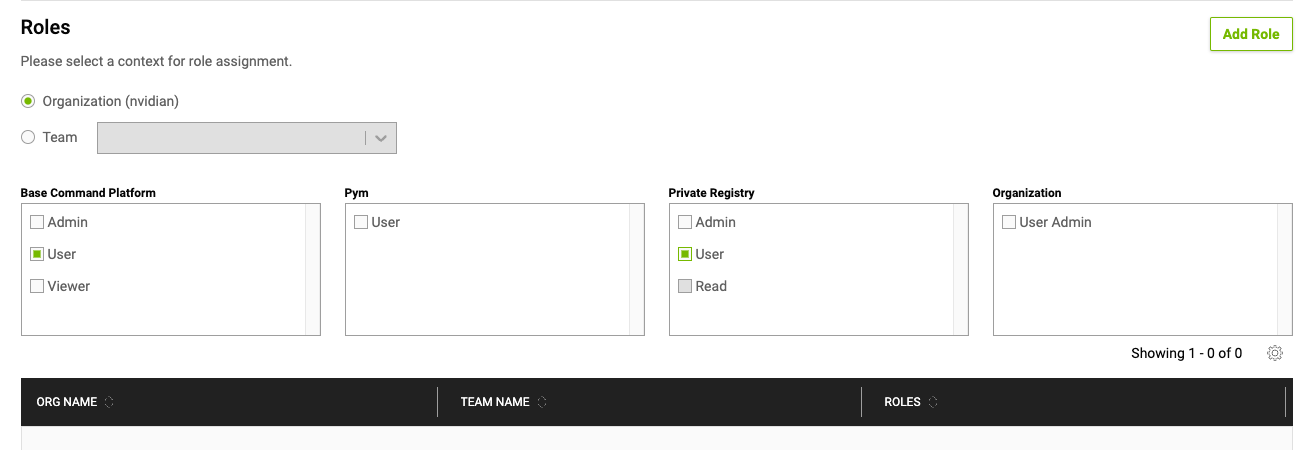
In the Roles section, select the appropriate context (either the organization or a specific team) and the available roles shown in the boxes below. Click Add Role to the right to save your changes. You can add or remove multiple roles before creating the user.
The following are brief descriptions of the user roles:
NVIDIA Base Command Platform Roles Role
Description
Base Command Admin
Admin persona with the capabilities to manage all artifacts available in Base Command Platform. The capabilities of the Admin role include resource allocation and access management.
Base Command Viewer
Admin persona with the read-only access to jobs, workspaces, datasets, and results within the user’s org or team.
Registry Admin
Registry Admin persona for managing NGC Private Registry artifacts and with the capability for Registry User Management. The capabilities of the Registry Admin role include the capabilities of all Registry roles.
Registry Read
Registry User persona with capabilities to only consume the Private Registry artifacts.
Registry User
Registry User persona with the capabilities to publish and consume the Private Registry artifacts.
User Admin
User Admin persona with the capabilities to only manage users.
Refer to the section Assigning Roles for additional information.
After adding roles, double-check all the fields and then click Create User on the top right. An invitation email will automatically be sent to the user.
Users that still need to accept their invitation emails are displayed in the Pending Invitations list on the Users page.

2.2. Joining an NGC Org or Team
Before using NVIDIA Base Command Platform, you must have an NVIDIA Base Command Platform account created by your organization administrator. You need an email address to set up an account. Activating an account depends on whether your email domain is mapped to your organization’s single sign-on (SSO). Choose one of the following processes depending on your situation for activating your NVIDIA Base Command Platform account.
2.2.1. Joining an NGC Org or Team Using Single Sign-on
This section describes activating an account where the domain of your email address is mapped to an organization’s single sign-on.
After NVIDIA or your organization administrator adds you to a new org or team within the organization, you will receive a welcome email that invites you to continue the activation and login process.
Click the link in the email to open your organization’s single sign-on page.
Sign in using your single sign-on credentials.
The Set Your Organization screen appears.
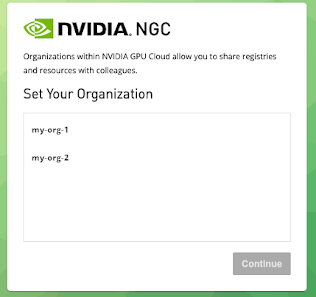
This screen appears any time you log in.
Select the organization and team under which you want to log in and then click Continue.
You can always change to a different organization or team you are a member of after logging in.
The NGC web UI opens to the Base Command dashboard.

2.2.2. Joining an Org or Team with a New NVIDIA Account
This section describes activating a new account where the domain of your email address is not mapped to an organization’s single sign-on.
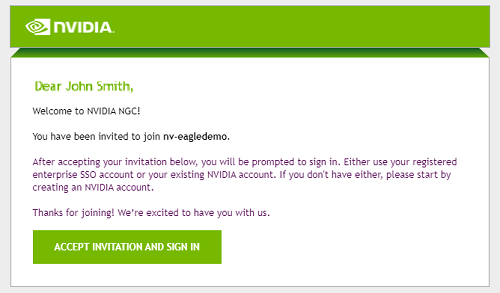
After NVIDIA or your organization administrator sets up your NVIDIA Base Command account, you will receive a welcome email that invites you to continue the activation and login process.
Click the Sign In link to open the sign in dialog in your browser.
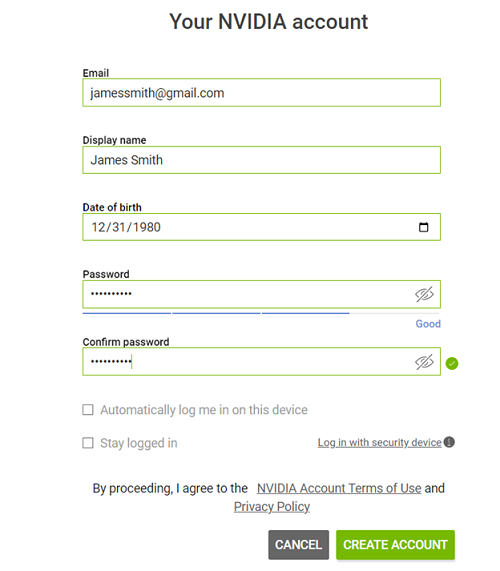
Fill out your information, create a password, agree to the Terms and Conditions, and click Create Account.
You will need to verify your email.
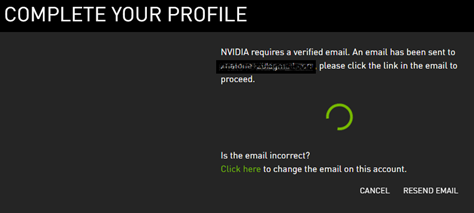
The verification email is sent.
Open the email and then click Verify Email Address.
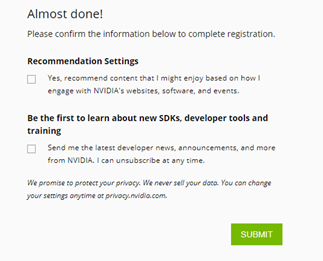
Select your options for using recommended settings and receiving developer news and announcements, and then click Submit.
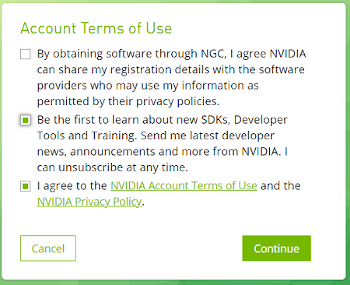
Agree to the NVIDIA Account Terms of Use, select desired options, and then click Continue.
Click Accept at the NVIDIA GPU Cloud Terms of Use screen.
The Set Your Organization screen appears.
This screen appears any time you log in.
Select the organization and team under which you want to log in and click Continue.
You can always change to a different organization or team you are a member of after logging in.
The NGC web UI opens to the Base Command dashboard.
2.2.3. Joining an Org or Team with an Existing NVIDIA Account
This section describes activating an account where the domain of your email address is not mapped to an organization’s single sign-on (SSO).
After NVIDIA or your organization administrator adds you to a new org or team within the organization, you will receive a welcome email that invites you to continue the activation and login process.
Click the Sign In link to open the sign in dialog in your browser.
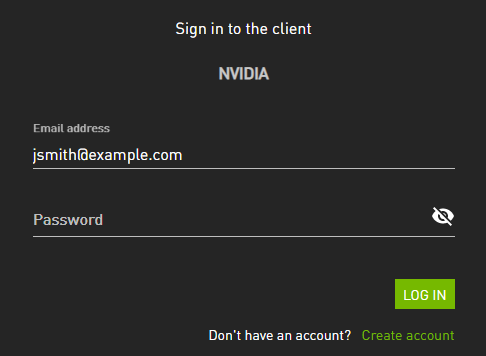
Enter your password and then click Log In.
The Set Your Organization screen appears.
This screen appears any time you log in.
Select the organization and team under which you want to log in and click Continue.
You can always change to a different organization or team you are a member of after logging in.
The NGC web UI opens to the Base Command dashboard.
3. Signing in to Your Account
During the initial account setup, you are signed into your NVIDIA Base Command Platform account on the NGC web site. This section describes the sign in process that occurs at a later time. It also describes the web UI sections of NVIDIA Base Command Platform at a high level, including the UI areas for accessing available artifacts and actions available to various user roles.
Open https://ngc.nvidia.com and click Continue by one of the sign-on choices, depending on your account.
NVIDIA Account: Select this option if single sign-on (SSO) is not available.
Single Sign-on (SSO): Select this option to use your organization’s SSO. You may need to verify with your organization or Base Command Platform administrator whether SSO is enabled.

Continue to sign in using your organization’s single sign-on.
Set the organization you wish to sign in under, then click Continue.
You can always change to a different org or team that you are a member of after logging in.
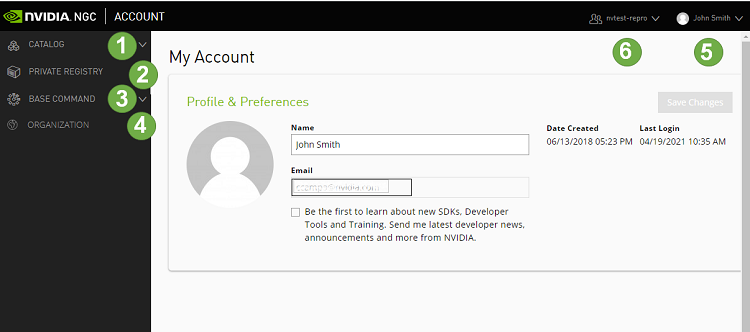
The following image and table describe the main features in the left navigation menu of the web site, including the controls for changing the org or team.
ID |
Description |
|---|---|
1 |
CATALOG:. Click this menu to access a curated set of GPU-optimized software. It consists of containers, pre-trained models, Helm charts for Kubernetes deployments, and industry-specific AI toolkits with software development kits (SDKs) that are periodically released by NVIDIA and are read-only for a Base Command Platform user. |
2 |
PRIVATE REGISTRY: Click this menu to access the secure space to store and share custom containers, models, resources, and Helm charts within your enterprise. |
3 |
BASE COMMAND:.Click this menu to access controls for creating and running Base Command Platform jobs. |
4 |
ORGANIZATION: (User Admins only) Click this menu to manage users and teams. |
5 |
User Info: Select this drop down list to view user information, select the org to operate under, and download the NGC CLI and API key, described later in this document. |
6 |
Team Selection: Select this drop down list to select which team to operate under. |
4. Introduction to the NGC CLI
This chapter introduces the NGC Base Command Platform CLI, installable on your workstation for interfacing with Base Command Platform. In this section you will learn about generic features of CLI applicable to all commands as well as CLI modules that map to the Web UI areas that you have learned about in a previous chapter.
The NGC Base Command Platform CLI is a command-line interface for managing content within the NGC Registry and for interfacing with the NVIDIA Base Command Platform. The CLI operates within a shell and lets you use scripts to automate commands.
With NGC Base Command Platform CLI, you can connect with:
NGC Catalog
NGC Private Registry
User Management (available to org or team User Admins only)
NVIDIA Base Command Platform workloads and entities
4.1. About NGC CLI for NVIDIA Base Command Platform
The NGC CLI is available to you if you are logged in with your own NGC account or with an NVIDIA Base Command Platform account, and with it you can:
View a list of GPU-accelerated Docker containers available to you as well as detailed information about each container image.
See a list of deep-learning models and resources as well as detailed information about them.
Download container images, models, and resources.
Upload and optionally share container images, models, and resources.
Create and manage users and teams (available to administrators).
Launch and manage jobs from the NGC registry.
Download, upload and optionally share datasets for jobs.
Create and manage workspaces for use in jobs.
4.2. Generating Your NGC API Key
This section describes how to obtain an API key needed to configure the CLI application so you can use the CLI to access locked container images from the NGC Catalog, access content from the NGC Private Registry, manage storage entities, and launch jobs.
The NGC API key is also used for docker login to manage container images in the NGC Private Registry with the docker client.
Sign in to the NGC web UI.
From a browser, go to NGC sign in page and then enter your email.
Click Continue by the Sign in with Enterprise sign in option.
Enter the credentials for you organization.
In the top right corner, click your user account icon and then select an org that belongs to the NVIDIA Base Command Platform account.
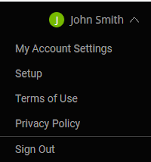
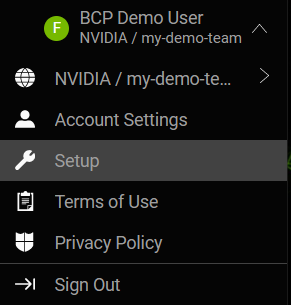
Click your user account icon again and select Setup.
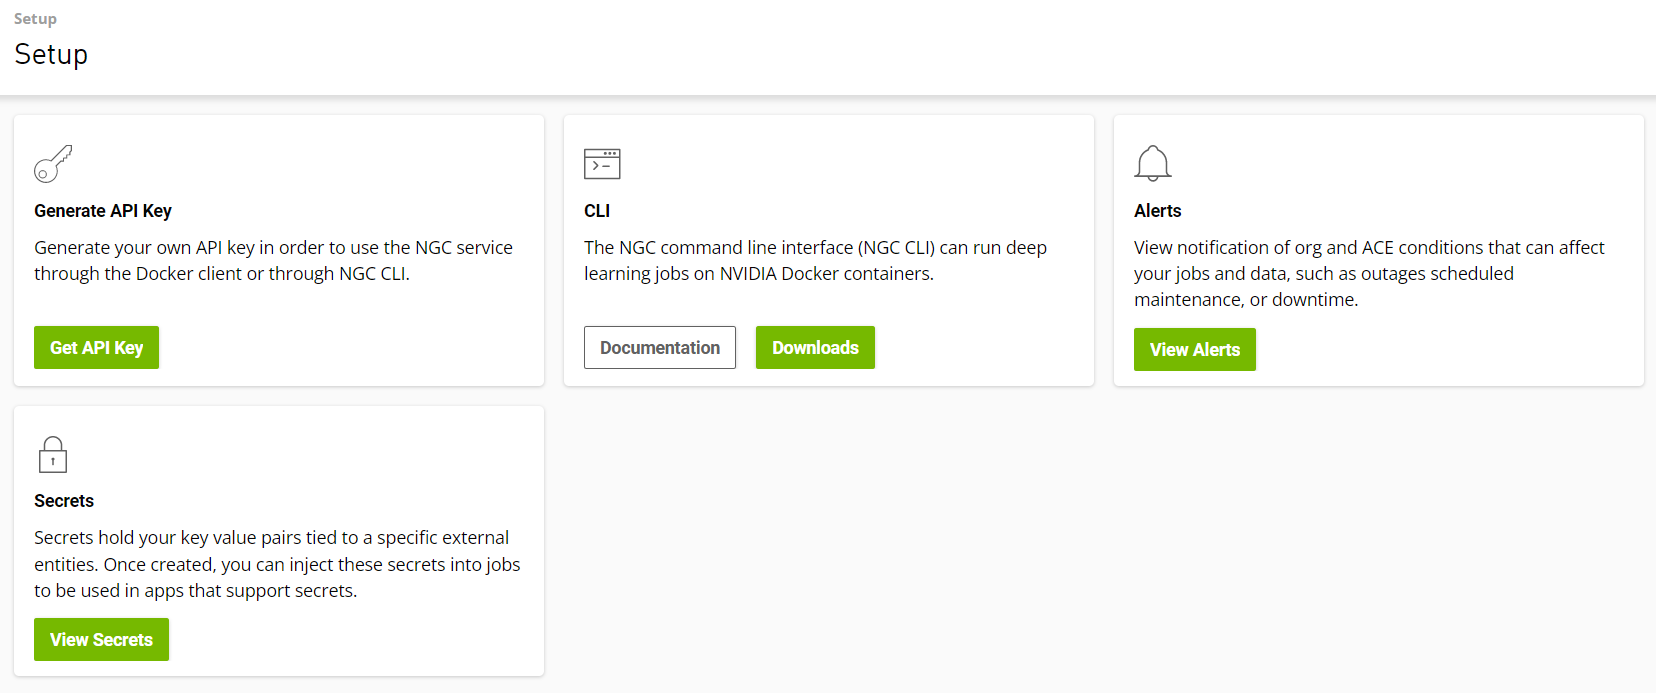
Click Get API key to open the Setup > API Key page.
Click Get API Key to generate your API key. A warning message appears to let you know that your old API key will become invalid if you create a new key.
Click Confirm to generate the key.
Your API key appears.
You only need to generate an API key once. NGC does not save your key, so store it in a secure place. (You can copy your API key to the clipboard by clicking the copy icon to the right of the API key. )
Should you lose your API key, you can generate a new one from the NGC website. When you generate a new API Key, the old one is invalidated.
4.3. Installing NGC CLI
To install NGC CLI, perform the following:
Log in to your NVIDIA Base Command Platform account on the NGC website (https://ngc.nvidia.com).
In the top right corner, click your user account icon and select an org that belongs to the Base Command Platform account.
From the user account menu, select Setup, then click Downloads under CLI from the Setup page.
From the CLI Install page, click the Windows, Linux, or macOS tab, according to the platform from which you will be running NGC CLI.
Follow the Install instructions that appear on the OS section that you selected.
Verify the installation by entering
ngc --version. The output should beNGC CLI x.y.zwherex.y.zindicates the version.
4.4. Getting Help Using NGC CLI
This section describes how to get help using NGC CLI.
Note
The ngc batch commands have been replaced with ngc base-command or simply ngc bc. The new commands provide the same functionality as their predecessors. Note that the old ngc batch commands are now deprecated and will be phased out in a future release.
4.4.1. Getting Help from the Command Line
To run an NGC CLI command, enter ngc followed by the appropriate options.
To see a description of available options and command descriptions, use the option -h after any command or option.
Example 1: To view a list of all the available options for the ngc command, enter
$ ngc -h
Example 2: To view a description of all ngc base-command commands and options, enter
$ ngc base-command -h
Example 3: To view a description of the dataset commands, enter
$ ngc dataset -h
4.4.2. Viewing NGC CLI Documentation Online
The NGC Base Command Platform CLI documentation provides a reference for all the NGC Base Command Platform CLI commands and arguments. You can also access the CLI documentation from the NGC web UI by selecting Setup from the user drop down list and then clicking Documentation from the CLI pane.
4.5. Configuring the CLI for your Use
To make full use of NGC Base Command Platform CLI, you must configure it with your API key using the ngc config set command.
While there are options you can use for each command to specify org and team, as well as the output type and debug mode, you can also use the ngc config set command to establish these settings up front.
If you have a pre-existing set up, you can check the current configuration using:
$ ngc config current
To configure the CLI for your use, issue the following:
$ ngc config set
Enter API key. Choices: [<VALID_APIKEY>, 'no-apikey']:
Enter CLI output format type [ascii]. Choices: [ascii, csv, json]:
Enter org [nv-eagledemo]. Choices: ['nv-eagledemo']:
Enter team [nvtest-repro]. Choices: ['nvtest-repro, 'no-team']:
Enter ace [nv-eagledemo-ace]. Choices: ['nv-eagledemo-ace', 'no-ace']:
Successfully saved NGC configuration to C:\Users\jsmith\.ngc\config
If you are a member of several orgs or teams, be sure to select the ones associated with NVIDIA Base Command Platform.
4.5.1. Configuring the Output Format
You can configure the output format when issuing a command by using the --format_type <fmt> argument. This is useful if you want to use a different format than the default ascii, or different from what you set when running ngc config set.
The following are examples of each output format.
Ascii
$ ngc base-command list --format_type ascii
+---------+----------+--------------+------+------------------+----------+----------------+
| Id      | Replicas | Name         | Team | Status             | Duration | Status Details |
+---------+----------+--------------+------+------------------+----------+----------------+
| 1893896 | 1        | helloworld   | ngc  | FINISHED_SUCCESS | 0:00:00  |                   |
CSV
$ ngc base-command list --format_type csv
Id,Replicas,Name,Team,Status,Duration,Status Details
1893896,1,helloworld ml-model.exempt-qsg,ngc,FINISHED_SUCCESS,0:00:00,
JSON
$ ngc base-command list --format_type json
[{
     "aceId": 257,
     "aceName": "nv-us-west-2",
     "aceProvider": "NGN",
    "aceResourceInstance": "dgx1v.16g.1.norm",
     "createdDate": "2021-04-08T01:20:05.000Z",
     "id": 1893896,
     "jobDefinition": {
…
     },
     "jobStatus": {
…
     ],
     "submittedByUser": "John Smith",
    "submittedByUserId": 28166,
     "teamName": "ngc"
}]
4.6. Running the Diagnostics
Diagnostic information is available which provides details to assist in isolating issues. You can provide this information when reporting issues with the CLI to NVIDIA support.
The following diagnostic information is available for the NGC Base Command Platform CLI user:
Current time
Operating system
Disk usage
Current directory size
Memory usage
NGC CLI installation
NGC CLI environment variables (whether set and or not set)
NGC CLI configuration values
API gateway connectivity
API connectivity to the container registry and model registry
Data storage connectivity
Docker runtime information
External IP
User information (ID, name, and email)
User org roles
User team roles
Syntax
$ ngc diag [all,client,install,server,user]
where
all
Produces the maximum amount of diagnostic output.
client
Produces diagnostic output only for the client machine.
install
Produces diagnostic output only for the local installation.
server
Produces diagnostic output only for the remote server.
user
Produces diagnostic output only for the user configuration.
4.7. Specifying List Columns
Some commands provide lists, such as a list of registry images or a list of batch jobs.
Examples:
ngc base-command list
ngc dataset list
ngc registry image list
ngc registry model list
ngc registry resource list
ngc workspace list
The default information includes several columns of information which can appear cluttered, especially if you are not interested in all the information.
For example, the ngc base-command list command provides the following columns:
+----+----------+------+------+--------+----------+----------------+
| Id | Replicas | Name | Team | Status | Duration | Status Details |
+----+----------+------+------+--------+----------+----------------+
You can restrict the output to display only the columns that you specify using the --column argument.
For example, to display only the Name, Team, and Status, enter
$ ngc base-command list --column name --column team --column status
+----+------+------+--------+
| Id | Name | Team | Status |
+----+------+------+--------+
Note
The Id column will always appear and does not need to be specified.
Consult the help for the --column argument to determine the exact values to use for each column.
4.8. Other Useful Command Options
4.8.1. Automatic Interactive Command Process
Use the -y argument to insert a yes (y) response to all interactive questions.
Example:
$ ngc workspace share --team <team> -y <workspace>
4.8.2. Testing a Command
Some commands support the --dry-run argument. This argument produces output that describes what to expect with the command.
Example:
$ ngc result remove 1893896 --dry-run
Would remove result for job ID: 1893896 from org: <org>
Use the -h argument to see if a specific command supports the --dry-run argument.
5. Using NGC APIs
This section provides an example of how to use NGC Base Command Platform APIs. For a detailed list of the APIs, refer to the NGC API Documentation.
5.1. Example of Getting Basic Job Information
This example shows how to get basic job information. It shows the API method for performing the steps that correspond to the NGC Base Command Platform CLI command
ngc base-command get-json {job-id}
5.1.1. Using Get Request
The following is the flow using the API Get requests.
Get valid authorization.
Send a GET request to
https://authn.nvidia.com/tokento get a valid token.Get the job information.
Send a GET request to
https://api.ngc.nvidia.com/v2/org/{org-name}/jobs/{job-id}with the token returned from the first request.Another ask step.
5.1.2. Code Example of Getting a Token
The following is a code example of getting valid authorization (token).
Note
API_KEY is the key obtained from the NGC web UI and should be present in your NGC config file if you have used the CLI.
#!/usr/bin/python3
import os, base64, json, requests

def ngc_get_token(org='nv-eagledemo', team=None):
   '''Use the api key set environment variable to generate auth token'''

   scope = f'group/ngc:{org}'
   if team: #shortens the token if included
       scope += f'/{team}'

   querystring = {"service": "ngc", "scope": scope}
   auth = '$oauthtoken:{0}'.format(os.environ.get('API_KEY'))

  headers = {
       'Authorization': 'Basic {}'.format(base64.b64encode(auth.encode('utf-8')).decode('utf-8')),
       'Content-Type': 'application/json',
       'Cache-Control': 'no-cache',
   }

   url = 'https://authn.nvidia.com/token'

   response = requests.request("GET", url, headers=headers, params=querystring)

   if response.status_code != 200:
       raise Exception("HTTP Error %d: from '%s'" % (response.status_code, url))
   return json.loads(response.text.encode('utf8'))["token"]
Example output of the auth response:
{
  "token": "eyJraW...",
  "expires_in": 600
}
5.1.3. Code Example of Getting Job Information
The token is the output of the function in the Getting a Token section.
def ngc_get_jobinfo(token=None, jobid=None, org=None):

   url = f'https://api.ngc.nvidia.com/v2/org/{org}/jobs/{jobid}'

   headers = {
     'Content-Type': 'application/json',
     'Authorization': f'Bearer {token}'
   }

   response = requests.request("GET", url, headers=headers)

   if response.status_code != 200:
       raise Exception("HTTP Error %d: from '%s'" % (response.status_code, url))

   return response.json()
Output of the job info
{
  "job": {
    "aceId": 357,
    "aceName": "nv-eagledemo-ace",
    "aceProvider": "NGN",
    "aceResourceInstance": "dgxa100.40g.1.norm",
    "createdDate": "2021-06-04T16:14:31.000Z",
    "datasets": [],
    "gpuActiveTime": 1,
    "gpuUtilization": 0,
    "id": 2039271,
    "jobDefinition": {
      "aceId": 357,
      "clusterId": "eagle-demo.nvk8s.com",
      "command": "set -x; jupyter lab --NotebookApp.token='' --notebook-dir=/ --NotebookApp.allow_origin='*' & date; nvidia-smi; echo $NVIDIA_BUILD_ID; sleep 1d",
      "datasetMounts": [],
      "dockerImage": "nvidia/pytorch:21.02-py3",
      "jobDataLocations": [
        {
          "accessRights": "RW",
          "mountPoint": "/result",
          "protocol": "NFSV3",
          "type": "RESULTSET"
        },
        {
          "accessRights": "RW",
          "mountPoint": "/result",
          "protocol": "NFSV3",
          "type": "LOGSPACE"
        }
      ],
      "jobType": "BATCH",
      "name": "NVbc-jupyterlab",
      "portMappings": [
        {
          "containerPort": 8888,
          "hostName": "https://kpog9271.eagle-demo.proxy.ace.ngc.nvidia.com",
          "hostPort": 0
        }
      ],
      "replicaCount": 1,
      "resources": {
        "cpuCores": 30,
        "gpus": 1,
        "name": "dgxa100.40g.1.norm",
        "systemMemory": 124928
      },
      "resultContainerMountPoint": "/result",
      "runPolicy": {
        "minTimesliceSeconds": 3600,
        "preemptClass": "RESUMABLE",
        "totalRuntimeSeconds": 72000
      },
      "useImageEntryPoint": false,
      "workspaceMounts": []
    },
    "jobStatus": {
      "containerName": "6a977c9461f228b875b800acd6ced1b9a14905a46fca62c5bdbc393409bebe2d",
      "createdDate": "2021-06-04T20:05:19.000Z",
      "jobDataLocations": [
        {
          "accessRights": "RW",
          "mountPoint": "/result",
          "protocol": "NFSV3",
          "type": "RESULTSET"
        },
        {
          "accessRights": "RW",
          "mountPoint": "/result",
          "protocol": "NFSV3",
          "type": "LOGSPACE"
        }
      ],
      "portMappings": [
        {
          "containerPort": 8888,
          "hostName": "https://kpog9271.eagle-demo.proxy.ace.ngc.nvidia.com",
          "hostPort": 0
        }
      ],
      "resubmitId": 0,
      "selectedNodes": [
        {
          "ipAddress": "ww.x.yy.zz",
          "name": "node-02",
          "serialNumber": "ww.x.yy.zz"
        }
      ],
      "startedAt": "2021-06-04T16:14:42.000Z",
      "status": "RUNNING",
      "statusDetails": "",
      "statusType": "OK",
      "totalRuntimeSeconds": 14211
    },
    "lastStatusUpdatedDate": "2021-06-04T20:05:19.000Z",
    "orgName": "nv-eagledemo",
    "resultset": {
      "aceName": "nv-eagledemo-ace",
      "aceStorageServiceUrl": "https://nv-eagledemo.dss.ace.ngc.nvidia.com",
      "createdDate": "2021-06-04T16:14:31.000Z",
      "creatorUserId": "99838",
      "creatorUserName": "K Kris",
      "id": "2039271",
      "orgName": "nv-eagledemo",
      "owned": true,
      "shared": false,
      "sizeInBytes": 2662,
      "status": "COMPLETED",
      "updatedDate": "2021-06-04T20:05:19.000Z"
    },
    "submittedByUser": "K Kris",
    "submittedByUserId": 99838,
    "teamName": "nvbc-tutorials",
    "workspaces": []
  },
  "jobRequestJson": {
    "dockerImageName": "nvidia/pytorch:21.02-py3",
    "aceName": "nv-eagledemo-ace",
    "name": "NVbc-jupyterlab",
    "command": "set -x; jupyter lab --NotebookApp.token\\u003d\\u0027\\u0027 --notebook-dir\\u003d/ --NotebookApp.allow_origin\\u003d\\u0027*\\u0027 \\u0026 date; nvidia-smi; echo $NVIDIA_BUILD_ID; sleep 1d",
    "replicaCount": 1,
    "publishedContainerPorts": [
      8888
    ],
    "runPolicy": {
      "minTimesliceSeconds": 3600,
      "totalRuntimeSeconds": 72000,
      "preemptClass": "RESUMABLE"
    },
    "workspaceMounts": [],
    "aceId": 357,
    "datasetMounts": [],
    "resultContainerMountPoint": "/result",
    "aceInstance": "dgxa100.40g.1.norm"
  },
  "jobStatusHistory": [
    {
      "containerName": "6a977c9461f228b875b800acd6ced1b9a14905a46fca62c5bdbc393409bebe2d",
      "createdDate": "2021-06-04T20:05:19.000Z",
      "jobDataLocations": [],
      "portMappings": [
        {
          "containerPort": 8888,
          "hostName": "https://kpog9271.eagle-demo.proxy.ace.ngc.nvidia.com",
          "hostPort": 0
        }
      ],
      "resubmitId": 0,
      "selectedNodes": [
        {
          "ipAddress": "10.0.66.70",
          "name": "node-02",
          "serialNumber": "10.0.66.70"
        }
      ],
      "startedAt": "2021-06-04T16:14:42.000Z",
      "status": "RUNNING",
      "statusDetails": "",
      "statusType": "OK",
      "totalRuntimeSeconds": 14212
    },
    {
      "createdDate": "2021-06-04T16:14:39.000Z",
      "jobDataLocations": [],
      "portMappings": [
        {
          "containerPort": 8888,
          "hostName": "",
          "hostPort": 0
        }
      ],
      "resubmitId": 0,
      "selectedNodes": [
        {
          "ipAddress": "10.0.66.70",
          "name": "node-02",
          "serialNumber": "10.0.66.70"
        }
      ],
      "status": "STARTING",
      "statusDetails": "",
      "statusType": "OK"
    },
    {
      "createdDate": "2021-06-04T16:14:36.000Z",
      "jobDataLocations": [],
      "portMappings": [
        {
          "containerPort": 8888,
          "hostName": "",
          "hostPort": 0
        }
      ],
      "resubmitId": 0,
      "selectedNodes": [],
      "status": "QUEUED",
      "statusDetails": "Resources Unavailable",
      "statusType": "OK"
    },
    {
      "jobDataLocations": [],
      "selectedNodes": [],
      "status": "CREATED"
    }
  ],
  "requestStatus": {
    "requestId": "f7fbc3ff-36cf-4676-84a0-3d332b4091b1",
    "statusCode": "SUCCESS"
  }
}
5.1.4. Code Example of Getting Telemetry Data
The token is the output from the Get Token section.
#!/usr/bin/python3
# INFO: Before running this you must run 'export API_KEY=<ngc api key>' in your terminal
import os, json, base64, requests
def get_token(org='nv-eagledemo', team=None):
   '''Use the api key set environment variable to generate auth token'''
   scope = f'group/ngc:{org}'
   if team: #shortens the token if included
       scope += f'/{team}'
   querystring = {"service": "ngc", "scope": scope}
   auth = '$oauthtoken:{0}'.format(os.environ.get('API_KEY'))
   auth = base64.b64encode(auth.encode('utf-8')).decode('utf-8')
   headers = {
       'Authorization': f'Basic {auth}',
       'Content-Type': 'application/json',
       'Cache-Control': 'no-cache',
   }
   url = 'https://authn.nvidia.com/token'
   response = requests.request("GET", url, headers=headers, params=querystring)
   if response.status_code != 200:
       raise Exception("HTTP Error %d: from '%s'" % (response.status_code, url))
   return json.loads(response.text.encode('utf8'))["token"]
def get_job(job_id, org, team, token):
   '''Get general information for a specific job'''
   url = f'https://api.ngc.nvidia.com/v2/org/{org}/jobs/{job_id}'
   headers = {
       'Content-Type': 'application/json',
       'Authorization': f'Bearer {token}'
   }
   response = requests.request("GET", url, headers=headers)
   if response.status_code != 200:
       raise Exception("HTTP Error %d: from '%s'" % (response.status_code, url))
   return response.json()
def get_telemetry(job_id, start, end, org, team, token):
   '''Get telemetry information for a specific job'''
   url = f'https://api.ngc.nvidia.com/v2/org/{org}/jobs/{job_id}/telemetry'
   # INFO: See the docs for full list of telemetry
   vals = {
       'measurements': [
       {
           "type":"APPLICATION_TELEMETRY",
           "aggregation":"MEAN",
           "toDate": end,
           "fromDate": start,
           "period":60
       },{
           "toDate": end,
           "period": 60,
           "aggregation": "MEAN",
           "fromDate": start,
           "type": "GPU_UTILIZATION"
       }]
   }
   params = {'q': json.dumps(vals)}
   headers = {
       'Content-Type': 'application/json',
       'Authorization': f'Bearer {token}'
   }
   response = requests.request("GET", url, params=params, headers=headers)
   if response.status_code != 200:
       raise Exception("HTTP Error %d: from '%s'" % (response.status_code, url))
   return response.json()
# Get org/team information from account setup
org = 'nv-eagledemo'
team='nvbc-tutorials'
# Get job ID from GUI, CLI, or other API calls
job_id = 'TODO'
# Generate a token
token = get_token(org, team)
print(token)
# Get general job info for the job of interest
job_info = get_job(job_id, org, team, token)
print(json.dumps(job_info, indent=4, sort_keys=True))
# Get all job telemetry for the job of interest
telemetry = get_telemetry(job_id,
                         job_info['job']['createdDate'],
                         job_info['job']['jobStatus']['endedAt'],
                         org, team, token)
print(json.dumps(telemetry, indent=4, sort_keys=True))
5.2. List of API Endpoints
By using the --debug flag in the CLI you can see what endpoints and arguments are used for a given command.
The listed endpoints are all for GET requests but other methods (POST, PATCH, etc…) are supported for different functions. More information can be found here: https://docs.ngc.nvidia.com/api/
Section |
Endpoints |
Description |
|---|---|---|
User Management |
/v2/users/me |
Get information pertaining to your user such as roles in all teams, datasets, and workspaces that you can access |
User Management |
/v2/org/{org-name}/teams/{team-name} |
Get description and id of {team-name} |
User Management |
/v2/org/{org-name}/teams |
Get a list of your teams in {org-name} |
User Management |
/v2/orgs |
Get a list of orgs that you can access |
Jobs |
/v2/org/{org-name}/jobs/{id} |
Get detailed information about the job, including all create job options, and status history |
Jobs |
/v2/org/{org-name}/jobs |
Get a list of jobs |
Jobs |
/v2/org/{org-name}/jobs/* |
There are many more job commands in the above link that allow you to control jobs |
Datasets |
/v2/org/{org-name}/datasets |
Get a list of accessible datasets in {org-name} |
Datasets |
/v2/org/{org-name}/datasets/{id} |
Get information about a dataset including a list of its files |
Datasets |
/v2/org/{org-name}/datasets/{id}/file/** |
Download a file from the dataset |
Telemetry |
/v2/org/{org-name}/jobs/{id}/telemetry |
Get telemetry information about the job. |
Telemetry |
/v2/org/{org-name}/measurements/jobs/{id}/[cpu|gpu|memory]/[allocation|utilization] |
Individual endpoints for specific type of telemetry information |
Workspaces |
/v2/org/{org-name}/workspaces |
Get a list of accessible workspaces |
Workspaces |
/v2/org/{org-name}/workspaces/{id-or-name} |
Get basic information about the workspace |
Workspaces |
/v2/org/{org-name}/workspaces/{id-or-name}/file/** |
Download a file from the workspace |
Job Templates |
/v2/org/{org-name}/jobs/templates/{id} |
Get info about a job template |
6. NGC Catalog
This chapter describes the NGC Catalog features of Base Command Platform. NGC Catalog, a collection of software published regularly by NVIDIA and Partners, is accessible through Base Command Platform Web UI and CLI. In this chapter you will learn how to identify and use the published artifacts with Base Command Platform either as is or as a basis for building and publishing your own container images and models.
NGC provides a catalog of NVIDIA and partner published artifacts optimized for NVIDIA GPUs.
These are a curated set of GPU-optimized software. It consists of containers, pre-trained models, Helm charts for Kubernetes deployments, and industry-specific AI toolkits with software development kits (SDKs).
Artifacts from NGC Catalog are periodically updated and can be used as a basis for building custom containers for Base Command Platform jobs.
6.1. Accessing NGC Catalog
After logging into the NGC website, click CATALOG from the left-side menu then click one of the options from the top ribbon menu.

Collections: Presents collections of deep learning and AI applications.
Containers: Presents the list of NGC container images.
Helm Charts: Presents a list of Helm charts.
Models: Presents the list of pre-trained deep learning models that can be easily re-trained or fine-tuned.
Resources: Provides a list of step-by-step instructions and scripts for creating deep learning models.
You can also use the filter bar to build a search filter and sorting preference.
6.2. Viewing Detailed Application Information
Each card displays the container name and a brief description.
Click the Pull Tag or Fetch Helm Chart link(depending on the artifact) to copy the pull or fetch command to your clipboard. Artifacts with a Download link will be downloaded to your local disk when the link is clicked.
Click the artifact name to open to the detailed page.
The top portion of the detailed page shows basic publishing information for the artifact.
The bottom portion of the detailed page shows additional details about the artifact.
6.3. Using the CLI
To see a list of container images using the CLI, issue the following command.
$ ngc registry image list
+------+--------------+---------------+------------+--------------+------------+
| Name | Repository   | Latest Tag    | Image Size | Updated Date | Permission |
+------+--------------+---------------+------------+--------------+------------+
| CUDA | nvidia/cuda  | 11.2.1-devel- | 2.18 GB    | Feb 17, 2021 | unlocked   |
|      |              | ubuntu20.04   |            |              |            |
...
Other Examples
To see a list of container images for PyTorch, issue the following.
$ ngc registry image list nvidia/pytorch*
+---------+----------------+------------+------------+--------------+------------+
| Name    | Repository     | Latest Tag | Image Size | Updated Date | Permission |
+---------+----------------+------------+------------+--------------+------------+
| PyTorch | nvidia/pytorch | 21.03-py3  | 5.89 GB    | Mar 26, 2021 | unlocked   |
+---------+----------------+------------+------------+--------------+------------+
To see a list of container images under the partners registry space, issue the following.
$ ngc registry image list partners/*
+-------------------+---------------------+--------------+------------+------------+----------+
| Name              | Repository          | Latest Tag   | Image Size |Updated Date|Permission|
+-------------------+---------------------+--------------+------------+------------+----------+
| OmniSci (MapD)    | partners/mapd       | None         | None       |Sep 24, 2020| unlocked |
| H2O Driverless AI | partners/h2oai-     | latest       | 2 GB       |Sep 24, 2020| unlocked |
|                   | driverless          |              |            |            |          |
| PaddlePaddle      | partners/paddlepadd | 0.11-alpha   | 1.28 GB    |Sep 24, 2020| unlocked |
|                   | le                  |              |            |            |          |
| Chainer           | partners/chainer    | 4.0.0b1      | 963.75 MB  |Sep 24, 2020| unlocked |
| Kinetica          | partners/kinetica   | latest       | 5.35 GB    |Sep 24, 2020| unlocked |
| MATLAB            | partners/matlab     | r2020b       | 9.15 GB    |Jan 08, 2021| unlocked |
...
7. NGC Private Registry
This chapter describes the Private Registry, a dedicated registry space allocated and accessible just for your organization, which is available to you as a Base Command Platform user. In this chapter, you will learn how to identify your team or org space, how to share container images and models with your team or org, and how to download and use those in your workloads on Base Command.
NGC Private Registry has the same set of artifacts and features available in NGC Catalog. Private Registry provides the space for you to upload, publish, and share your custom artifacts with your team and org with the ability to control access based on the team and org membership. Private Registry enables your org to have your own Catalog accessible only to your org users.
7.1. Accessing the NGC Private Registry
Set your org and team from the User and Select a Team drop-down menus, then click Private Registry from the left-side menu.

Click the menu item to view a list of the corresponding artifacts available to your org or team.
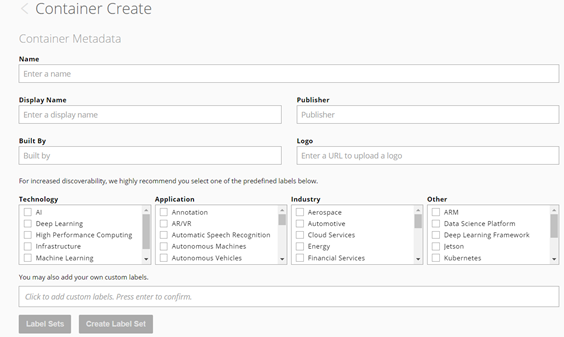
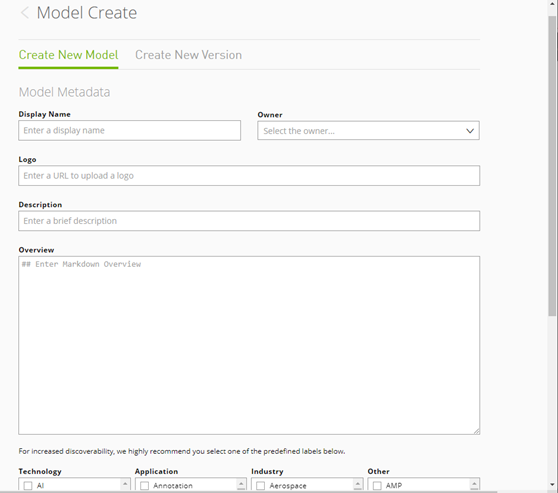
Click Create to open the screen where you can create the corresponding artifact and save it to your org or team.
Example of Container Create page
Example of Model Create page
7.2. Building and Sharing Private Registry Container Images
This section describes how to use a Dockerfile to customize a container from the NGC Private Registry and then push it to a shared registry space in the private registry.
Note
These instructions describe how to select a container image from your org and team registry space, but you can use a similar process for modifying container images from the NGC Catalog.
Select a container image to modify.
Log into the NGC website, selecting the org and team under which you want to obtain a container image.
Click PRIVATE REGISTRY > Containers from the left-side menu, then click either ORGANIZATION CONTAINERS or TEAM CONTAINERS, depending on who you plan to share your container image with.
Locate the container to pull, then click Pull tag to copy the pull command to the clipboard.
Pull the container image using the command copied to the clipboard.
You can use any method to edit or create containers to push to the NGC Private Registry as long as the image name follows the naming conventions. For example, running the container and changing it from the inside.
Run the container with the Docker run command:
$ docker run -it -name=pytorch nvcr.io/<org>/<team>/<container-name>:<tag> bashMake any changes to the container (install packages or create/download files).
Commit the changes into a new image.
$ docker commit pytorch nvcr.io/<org>/<team>/<container-name>:<new-tag>
Alternatively, you can use a
Dockerfileto make changes.On your workstation with Docker installed, create a subdirectory called
mydocker. This is an arbitrary directory name.Inside this directory, create a file called
Dockerfile(capitalization is important). This is the default name that Docker looks for when creating a container. TheDockerfileshould look similar to the following:$ mkdir mydocker $ cd mydocker $ vi Dockerfile $ more Dockerfile # This is the base container for the new container. FROM nvcr.io/<org>/<team>/<container-name>:<tag> # Update the apt-get database RUN apt-get update # Install the package octave with apt-get RUN apt-get install -y octave $
Build the docker container image.
$ docker build -t nvcr.io/<org>/<team>/<container-name>:<new-tag> .
Note
This command uses the default file
Dockerfilefor creating the container. The command starts withdocker build. The-toption creates a tag for this new container. Notice that the tag specifies the org and team registry spaces in thenvcr.iorepository where the container will be stored.
Verify that Docker successfully created the image.
$ docker images
Push the image into the repository, creating a container.
docker push nvcr.io/<org>/<team>/<container-image>:<new-tag>At this point, you should log into the NGC container registry at https://ngc.nvidia.com and look under your team space to see if the container is there.
If the container supports multi-node:
Open the container details page, click the menu icon from the upper right corner, then click Edit Details.
Click the Multi-node Container check box.
Click the menu icon and then click Save.
If you don’t see the container in your team space, make sure that the tag on the image matches the location in the repository. If, for some reason, the push fails, try it again in case there was a communication issue between your system and the container registry (nvcr.io).
8. NGC Secrets
NGC Secrets is a secure vault/repository for storing sensitive information that allows you to easily identify or authenticate with external systems. It provides a reliable and straightforward way to create, manage, and add hidden environment variables to your jobs. Some primary use cases include storing API keys, tokens, usernames and passwords, and encryption keys.
Additional Information
Can be up to 64 characters long and include alphanumeric characters and the following symbols:
^._-+:#&One user can have up to 100 secrets
Secret names
Names starting with “_” are reserved for special use cases
Names starting with “__” are reserved for use by system admins
Names cannot be changed once created, they will need to be recreated
Secret keys, values, and descriptions are each limited to 256 characters
Individual keys and values cannot be edited but can be individually removed and re-added
8.1. Setting up Secrets in the Web UI
To manage secrets in the Base Command Platform web application, click your user account icon on the top right of the page and select Setup.
Then click on View Secrets to go to the secrets page.
In the initial Secrets page, click on Add Secret to bring up the Secret Details pane.
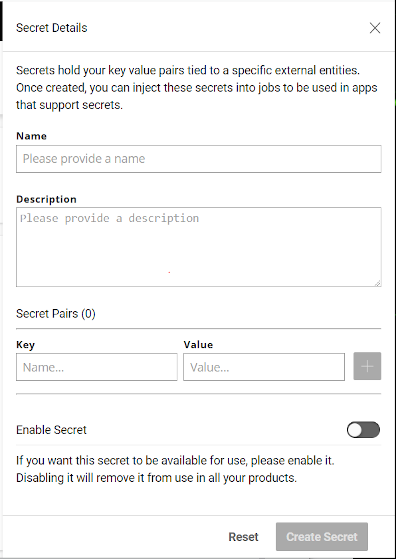
When creating a secret, the Name will be the identifier for a collection of key-value pairs and the Key will be the name of the environment variable created in the job.
Using Secrets in a Job
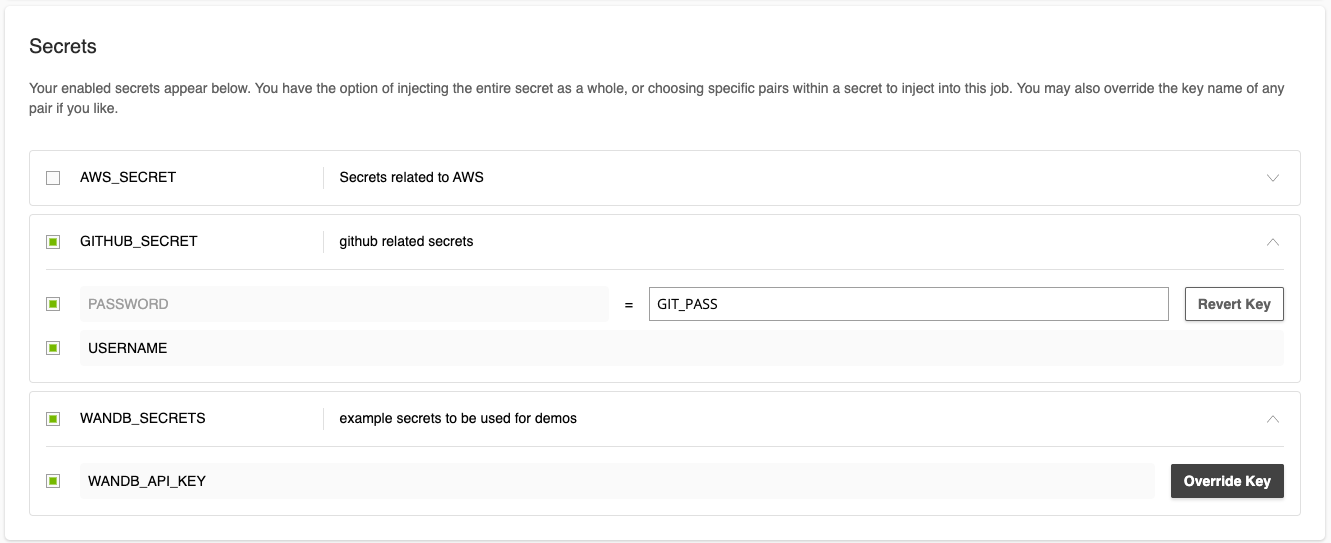
When creating a job in the web UI, you can add secrets in the Secrets section. In it, you can select the entire secret with all their key-value pairs or a subset. Additionally, mousing over the rightmost portion of the row will reveal the option to override the key. Secrets will be made available as environment variables.
8.2. Setting up Secrets in the CLI
You can use the NGC CLI to perform all the same actions as in the Base Command Platform web application. CRUD operations are supported with the ngc user secret [create|info|update|delete|list] commands.
To see a description of available options and command descriptions, use the option -h after any command or option.
Example 1: Creating a secret.
$ ngc user secret create WANDB_SECRET --desc "Wandb secret" \
    --pair "WANDB_API_KEY:ABC123"
Example 2: Creating a secret with multiple pairs.
$ ngc user secret create AWS_SECRET --desc "AWS secret" --pair "USERNAME:XYZ123" --pair "PASSWORD:ABC456" --pair "API_KEY:KEY_123"
You can add secrets to jobs with the --secret flag. You can access them from inside the job as an environment variable accessed by their key names.
Example 1: Adding a secret by name will add all its keys to the job.
$ ngc base-command run … --secret WANDB_SECRET
Example 2: To add only a specific key within a secret, specify the key name as below.
$ ngc base-command run … --secret "GITHUB_SECRET:USERNAME"
Example 3: It is also possible to override keys for individual secrets.
$ ngc base-command run … --secret "WANDB_SECRET" \
        --secret "GITHUB_SECRET:USERNAME:GITHUB_USERNAME" \
        --secret "GITHUB_SECRET:PASSWORD:GITHUB_PASSWORD" \
        --secret "AWS_SECRET:USERNAME:AWS_USERNAME" \
        --secret "AWS_SECRET:PASSWORD:AWS_PASSWORD"
9. Org, Team, and User Management
This chapter applies to organization and team administrators, and explains the tasks that an organization or team administrator can perform from the NGC website or CLI. In this chapter, you will learn about the different user roles along with their associate scopes and permissions available in Base Command Platform, and the features to manage users and teams.
9.1. Org and Team Overview
Every enterprise is assigned to an “org”, the name of which is determined by the enterprise at the time the account is set up. NVIDIA Base Command Platform provides each org with its own private registry space for running jobs, including storage and workspaces.
One or more teams can be created within the org to provide private access for groups within the enterprise. Individual users can be members of any number of teams within the org.
As the NVIDIA Base Command Platform administrator for your organization, you can invite other users to join your organization’s NVIDIA Base Command Platform account. Users can then be assigned as members of teams within your organization. Teams are useful for keeping custom work private within the organization.
The following table illustrates the interrelationship between orgs, teams, and users:
ORG |
|||
Registry Space |
<org>/ |
||
Org Admin |
Can add users to the org/, or to any org/team. Can create teams. |
||
Org User |
Can access resources and launch jobs within the org, but not within teams. |
||
Org Viewer |
Can read resources and jobs within the org. |
||
TEAM 1 |
TEAM 2 |
TEAM 3 |
|
Registry Space |
<org>/<team1> |
<org>/<team2> |
<org>/<team3> |
Team Admin |
Can add users to org/team1 |
Can add users to org/team2 |
Can add users to org/team3 |
Team User |
Can access and share resources and launch jobs within org/team1 |
Can access and share resources and launch jobs within org/team2 |
Can access and share resources and launch jobs within org/team3 |
Team Viewer |
Can read resources and jobs within org/team1 |
Can read resources and jobs within org/team2 |
Can read resources and jobs within org/team3 |
The general workflow for building teams of users is as follows:
The organization admin invites users to the organization’s NVIDIA Base Command account.
The organization admin creates teams within the organization.
The organization admin adds users to appropriate teams, and typically assigns at least one user to be the team admin.
The organization or team admin can then add other users to the team.
9.2. NVIDIA Base Command Platform User Roles
Prior to adding users and teams, familiarize yourself with the following descriptions of each role.
9.2.1. Base Command Admin
The Base Command Admin (BASE_COMMAND_ADMIN) is the role assigned to the Base Command Platform org administrator for the enterprise.
The following is a summary of the capabilities of the org administrator:
Access to all read-write and appropriate share commands involving the following features:
Jobs, workspaces, datasets, and results within the org.
Team administrators have the same capabilities as the org administrator with the following limits:
Capabilities are limited to the specific team.
9.2.2. Base Command User Role
The Base Command User role (BASE_COMMAND_USER) can make use of all NVIDIA Base Command Platform tasks. This includes all read, write, and appropriate sharing capabilities for jobs, workspaces, datasets, and results within the user’s org or team.
9.2.3. Base Command Viewer Role
The Base Command Viewer user (BASE_COMMAND_VIEWER) has the same scope as the Base Command User but with read-only access to all jobs, workspaces, datasets, and results within the scope of the role (org or team).
9.2.4. Registry Admin Role
The Registry Admin (REGISTRY_USER_ADMIN) is the role assigned to the initial org administrator for the enterprise.
The following is a summary of the capabilities of the registry admin org administrator
Access to all read-write and appropriate share commands involving the following features:
Containers, models, and resources within the org
Team administrators have the same capabilities as the org administrator with the following limits:
Capabilities are limited to the specific team.
Team administrators cannot create other teams or delete teams
9.2.5. Registry Read Role
The Registry Read (REGISTRY_READ) role has read-only access to containers, models, and resources within the user’s org or team.
9.2.6. Registry User Role
The Registry User (REGISTRY_USER_USER) can make full use of all Private Registry features. This includes all read, write, and appropriate sharing capabilities for containers, models, and resources within the user’s org or team.
9.2.7. User Admin Role
The User Admin (USER_ADMIN) user manages users within the org or team. The User Admin for an org can create teams within that org.
9.2.8. User Read Role
The User Read (USER_READ) user can view details within the org or team.
9.3. Assigning Roles
Each role is targeted for specific capabilities. When assigning roles, keep in mind all the capabilities you want the user or admin to achieve. Most users and admins will need to be assigned multiple roles. Use the following tables for guidance:
9.3.1. Assigning Admin Roles
Refer to the following table for a summary of the capabilities of each admin role. You may need to assign multiple roles depending on the capabilities you want the admin to have.
Role |
Users or Teams |
Jobs, Workspaces, datasets, results |
Container, models, resources |
|---|---|---|---|
Base Command Admin |
N/A |
Read/Write |
N/A |
Base Command Viewer |
N/A |
Read Only |
N/A |
Registry Admin |
N/A |
N/A |
Read/Write |
User Admin |
Read/Write |
N/A |
N/A |
Example: To add an admin for user management, registry management, and job management, issue the following:
$ ngc org add-user <email> <name> --role USER_ADMIN --role REGISTRY_USER_ADMIN --role BASE_COMMAND_ADMIN
9.3.2. Assigning User Roles
Refer to the following table for a summary of the capabilities of each user role. You may need to assign multiple roles depending on the capabilities you want the user to have.
Role |
Users |
Jobs, Workspaces, datasets, results |
Container, models, resources |
|---|---|---|---|
Base Command User |
N/A |
Read/Write |
N/A |
Registry Read |
N/A |
N/A |
Read Only |
Registry User |
N/A |
N/A |
Read/Write |
Example: To add a user who can run jobs using custom containers, issue the following:
$ ngc org add-user <email> <name> --role BASE_COMMAND_USER --role REGISTRY_USER
9.4. Org and Team Administrator Tasks
For org or team admins the most likely commands needed are adding users. The following is the typical process for adding users using the CLI.
Add a user to an org:
$ ngc org add-user <email> <name> --role <user-role>
Create a team:
$ ngc org add-team <name> <description>
Add a User to a team (and to the org if they are not already a member):
$ ngc team add-user --team <team> <email> <name> --role <user-role>
Other commands to list users, add additional admins, can be looked up with
ngc org --help
or
ngc team --help
or in the CLI documentation.
9.4.1. Managing Teams
You can create and remove teams using the web interface.
9.4.1.1. Creating Teams Using the Web UI
Creating teams is useful for allowing users to share images within a team while keeping them invisible to other teams in the same organization. Only organization administrators can create teams.
To create a team, do the following:
Log on to the NGC website.
Select Organization > Teams from the left navigation menu.
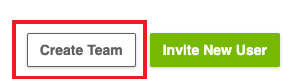
Click the Create Team menu on the top right of the page.
In the Create Team dialog, enter a team name and description, then click Create Team.

9.4.1.2. Removing Teams Using the Web UI
Deleting a team will revoke access to resources shared within the team. Any resources not associated with the team will remain unaffected. Only organization administrators can delete teams.
To remove a team, do the following:
Log on to the NGC website.
Select Organization > Teams from the left navigation menu.
From the list, select the team you wish to delete to go to its page.
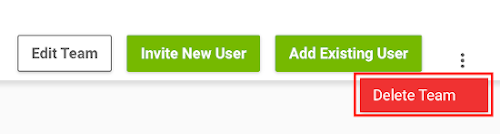
Click the vertical ellipsis in the top right corner and select Delete Team.
Confirm your choice.
9.4.2. Managing Users
You can create and remove users using the web interface.
9.4.2.1. Creating Users Using the Web UI
As the organization administrator, you must create user accounts to allow others to use the NVIDIA Base Command Platform within the organization.
Log on to the NGC website.
Click Organization > Users from the left navigation menu.
Click Invite New User on the top right corner of the page.
On the new page, fill out the User Information section. Enter your screen name for First Name, and the email address to receive an invitation email.
In the Roles section, select the appropriate context (either the organization or a specific team) and the available roles shown in the boxes below. Click Add Role to the right to save your changes. You can add or remove multiple roles before creating the user.
After adding roles, double-check all the fields and then click Create User on the top right. An invitation email will automatically be sent to the user.
9.4.2.2. Removing Users Using the Web UI
An organization administrator might need to remove a user if that user leaves the company.
Deleting a user will disable any shared resources and revoke access to the user’s shared workspaces and datasets for all team members.
To remove a user, do the following:
Log on to the NGC website.
Click Organization > Users from the left navigation menu.
From the list, select the user you wish to delete to go to its page.
Click Remove User on the top right corner of the page.
Confirm your choice.
10. NVIDIA Base Command Platform Data Concepts
This chapter describes the storage data entities available in NVIDIA Base Command Platform. In this chapter, you will learn datasets, workspaces, results, and storage space local to a computing instance along with their use cases. You will learn about actions that you can perform on these data storage entities from within a computing instance and from your workstations, both from the Web UI and from the CLI.
10.1. Data Types
NVIDIA Base Command Platform has the following data types on network storage within the ACE:
Dataset: Shareable read-only artifact, mountable to a job. Data persists after job completion, and is identical for each replica.
Workspace: Shareable read-write artifact, mountable to a job. Data persists after job completion, and is identical for each replica.
Result: Private to a job, read-write artifact, automatically generated for each replica in a job. Data persists after job completion, and is unique for each replica.
Tip
If shared storage that is the same across all replicas is necessary for a multi-replica job’s custom result data, use a Workspace for this purpose.
Local scratch space: Private to a replica, read-write local scratch space. Data does not persist after job completion, and is unique for each replica.
Secrets: Encrypted tokens and passwords for 3rd-party authentication. Data persists after job completion, and is identical for each replica.
Important
In addition to local scratch space, all other storage paths within a container will not persist new data or augmented data once a job is completed.
For example, if a user writes data to /mnt/ in a job, and /mnt was not used as a path for a Workspace or a Result, the written data will not be present in future job runs, even if the job is an exact clone of the previous job.
10.2. Managing Datasets
Datasets are intended for read-only data suitable for production workloads with repeatability, provenance, and scalability. They can be shared with your team or entire organization.
10.2.1. Determining Datasets by Org or Team
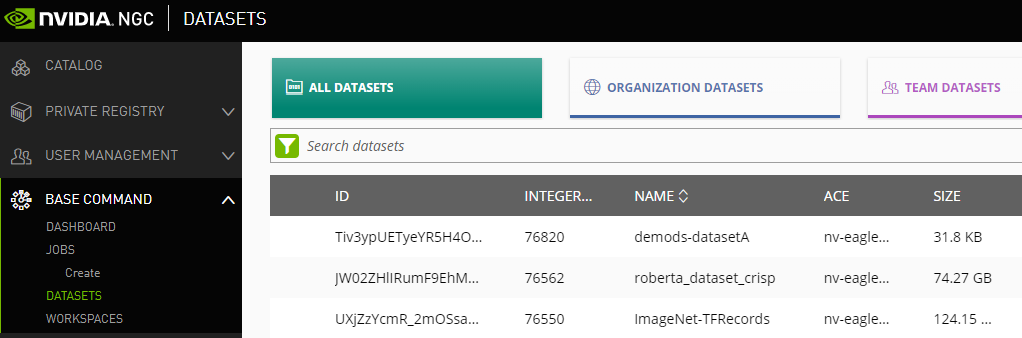
To view a list of datasets using the NGC website, click Datasets from the left-side menu, then select one of the tabs from the ribbon menu, depending on whether you want to view all datasets available to you, only datasets available to your org, or only datasets available to your team.
10.2.2. Mounting Datasets in a Job
Datasets are a critical part of a deep learning training job. They are intended as performant shareable read-only data suitable for production workload with repeatability and scalability. Multiple datasets can be mounted to the same job. Multiple jobs and users can mount a dataset concurrently.
To mount one or more datasets, specify the datasets and mount points from the NGC Job Creation page when you create a new job.
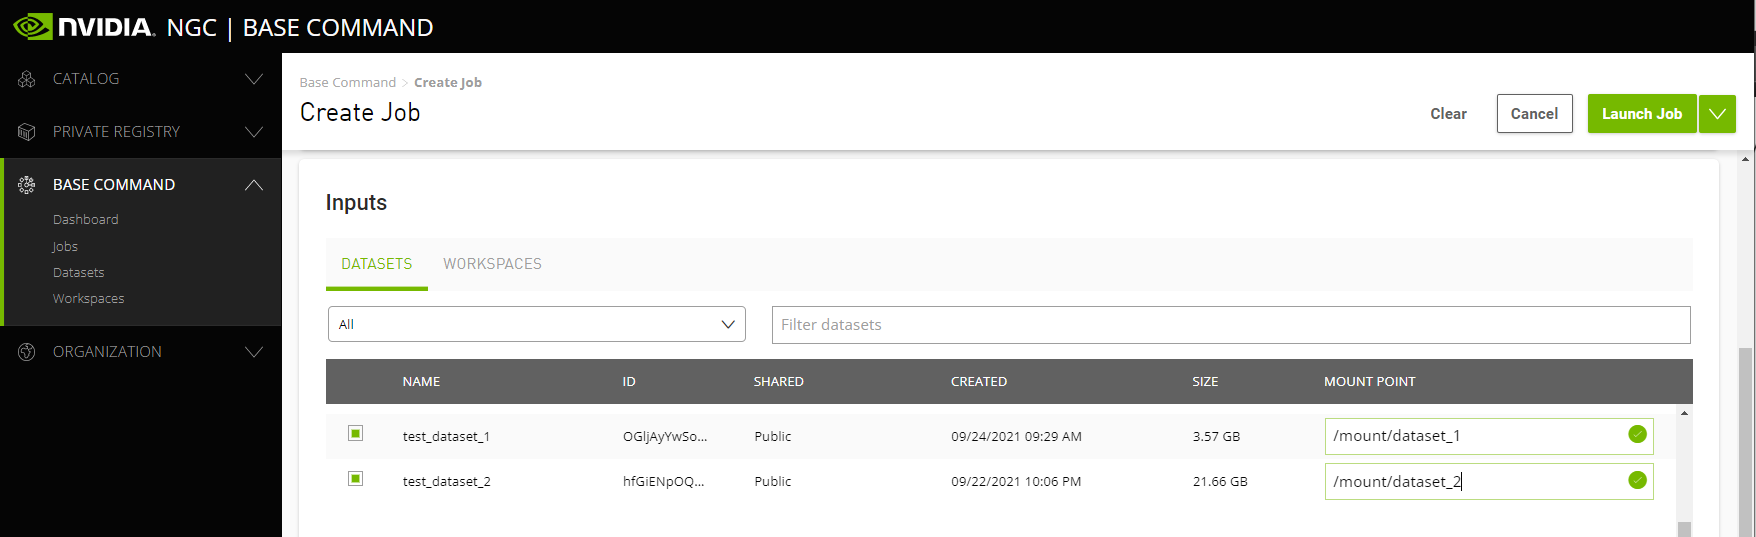
From the Data Input section, select the Datasets tab and then search for a dataset to mount using the available search criteria.
Select one or more datasets from the list.
Specify a unique mount point for each dataset selected.
10.2.3. Downloading a Dataset Using the Web UI
To download a dataset using the NGC website, select a dataset from the list to open the details page for the selected dataset.
Click the File Browser tab, then select one of the files to download.
The file will download to your Download folder.
10.2.4. Managing Datasets Using the NGC CLI
10.2.4.1. Uploading and Sharing a Dataset
Creating, uploading, and optionally sharing a dataset is done in one step:
$ ngc dataset upload --source <dir> --desc "my data" <dataset_name> [--share <team_name>]
Example:
$ ngc dataset upload --source mydata/ --desc "mnist is great" mnist --share my_team1
To share with multiple teams, use multiple --share arguments.
Example:
$ ngc dataset upload --source mydata/ --desc "mnist is great" mnist --share my_team1 --share my_team2
Tip
While the --share argument is optional, using the --share argument when uploading the dataset is a convenient way to make sure your datasets are shared so you don’t have to remember to share them later.
Important
Never reuse the name of a dataset because your organization will lose the ability to repeat and validate experiments.
10.2.4.3. Listing Datasets
Listing existing datasets available:
$ ngc dataset list
This lists all the datasets available to the configured org and team.
Example output:
$ ngc dataset list

+-------------+------------+-------------+-------------+------------+--------+-----------+-----------+------------+-------+---------+
| Id          | Integer Id | Name        | Description | ACE        | Shared | Size      | Status    | Created    | Owned | Pre-pop |
|             |            |             |             |            |        |           |           | Date       |       |         |
+-------------+------------+-------------+-------------+------------+--------+-----------+-----------+------------+-------+---------+
| Qo-D942jRZ6 | 91107      | BraTS21     |             | nv-        | Yes    | 14.69 GB  | COMPLETED | 2021-11-11 | No    | No      |
| qMTM2MMOrvQ |            |             |             | eagledemo- |        |           |           | 00:19:22   |       |         |
|             |            |             |             | ace        |        |           |           | UTC        |       |         |
Use -h option for list command to show all context based options including --owned which is useful to list only those dataset owned by the user.
Listing Datasets Owned by you
$ ngc dataset list --owned
Listing Datasets Within a Team
$ ngc dataset list --team <teamname>
10.2.4.4. Downloading a Dataset
To download a dataset, determine the dataset ID from the NGC website, then issue the following command to download the dataset to the current folder.
$ ngc dataset download <datasetid>
To download to a specific existing folder, specify the path in the command.
$ ngc dataset download <datasetid> --dest <destpath>
10.2.4.5. Deleting a Dataset
To delete a dataset from NGC on an ACE:
$ ngc dataset remove <datasetid>
10.2.5. Importing and Exporting Datasets
Datasets can be imported and exported from S3 (Object Storage) including pre-authenticated URLs (only on OCI, today) with the NGC CLI. To do so, you must set up Secrets with specific keys.
10.2.5.1. Prerequisites
NGC CLI version >= 3.2x.0
Have a secret with the name “ngc” and the key: “ngc_api_key”
$ ngc user secret create ngc --pair ngc_api_key:<your NGC API key>
For S3 instances:
Note: The following examples are for AWS, but any S3-compatible instance will work.
A secret with the keys: “aws_access_key_id”, “aws_secret_access_key”
$ ngc user secret create my_aws_secret \
--pair aws_access_key_id:<AWS_ACCESS_KEY_ID> \
--pair aws_secret_access_key:<AWS_SECRET_ACCESS_KEY>
For Pre-Authenticated URLs (on OCI, today) :
A secret with the key name: “oci_preauth_url”
$ ngc user secret create my_oci_secret \
--pair oci_preauth_url:<Authenticated URL from OCI>
10.2.5.2. Importing a Dataset
You can import a dataset with the following command.
$ ngc dataset import start --protocol s3 --secret my_aws_secret --instance <instance type> --endpoint https://s3.amazonaws.com --bucket <s3 bucket name> --region <region of bucket>

----------------------------------------------------------------
Dataset Import Job Details
  Id: 1386055
  Source: s3:https://s3.amazonaws.com/<s3 bucket name>/
  Destination: resultset 1386055
  Status: QUEUED
  Start time: 2023-04-19 04:29:36 UTC
  Finish time:
  Directories found: 1
  Directories traversed: 0
  Files found: 0
  Files copied: 0
  Files skipped: 0
  Total bytes copied: 0
----------------------------------------------------------------
This will start a job with the same ID that will download the contents of the bucket into the results folder of that job.
When working with an OCI instance, the source/destination URLs do not need to be specified since the secret already contains that information. So the command will look like this:
$ ngc dataset import start --protocol url --secret my_oci_secret --instance <instance type> <dataset id>
To check on the status of a submitted job, run the following:
$ ngc dataset import info <job_id>
The job status will go from QUEUED > RUNNING > FINISHED_SUCCESS. Or it will stop at FAILED if it encounters any unrecoverable errors.
To quickly check on all import jobs use:
$ ngc dataset import list
Once the job’s status is FINISHED_SUCCESS, convert the results of that job into a new dataset with the next command:
$ ngc dataset import finish <job_id> --name <dataset_name> --desc <dataset_description>
Alternatively, copy the name, description, and sharing permissions of another dataset on the same ACE:
$ ngc dataset import finish <job_id> --from-dataset <dataset_id>
10.2.5.3. Exporting a Dataset
You can export a dataset with the following command.
$ ngc dataset export run --protocol s3 --secret my_aws_secret --instance <instance type> --endpoint https://s3.amazonaws.com/ --bucket <s3 bucket name> --region <region of bucket> <dataset_id>

----------------------------------------------------------------
Dataset Export Job Details
  Id: 1386056
  Source: dataset 515151
  Destination: s3:https://s3.amazonaws.com/<s3 bucket name>/
  Status: QUEUED
  Start time: 2023-04-20 04:23:31 UTC
  Finish time:
  Directories found: 1
  Directories traversed: 0
  Files found: 0
  Files copied: 0
  Files skipped: 0
  Total bytes copied: 0
----------------------------------------------------------------
This will start a job that copies the contents of a dataset to the target object storage.
When working with an OCI instance, the source/destination URLs do not need to be specified since the secret already contains that information. So the command will look like this:
$ ngc dataset export run --protocol url --secret my_oci_secret --instance <instance type> <dataset id>
Just like with importing datasets, export jobs can be monitored with the following command:
$ ngc dataset import list
And for detailed information about a single import job:
$ ngc dataset import info <job_id>
10.2.5.4. Building a Dataset from External Sources
Many deep learning training jobs use publicly available datasets from the internet, licensed for specific use cases. If you need to use such datasets, and they are not compatible with the above dataset import commands, NVIDIA recommends cloning the dataset into BCP storage to avoid repeatedly downloading files from external sources on every run.
To build a dataset using only BCP resources:
Run an interactive job on a CPU or 1-GPU instance.
Execute the commands to download and pre-process your files and put them in the Result mount.
Finish the job and use Converting /result to a Dataset Using the CLI to convert the processed files from Result into a new dataset.
10.2.6. Converting a Checkpoint to a Dataset
For some workflows, such as for use with Transfer Learning Toolkit (TLT), you may need to save a checkpoint for a duration longer than that of the current project. These can then be shared with your team.
NVIDIA Base Command Platform lets you save checkpoints from a training job as a dataset for long term storage and for sharing with a team. Depending on the job configuration, checkpoints are obtained from the job /results mount or the job workspace mount.
10.2.6.1. Converting /result to a Dataset Using the NGC Web UI
Caution
This operation will remove the original files in the /result directory to create the dataset and cannot be undone.
You can convert /result to a dataset from the NGC web UI.
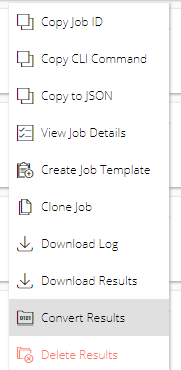
From either the Base Command > Dashboard or Base Command > Jobs page, click the menu icon for the job containing the /result files to convert, then select Convert Results.
Enter a name and (optionally) a description in the Convert Results to Dataset dialog.
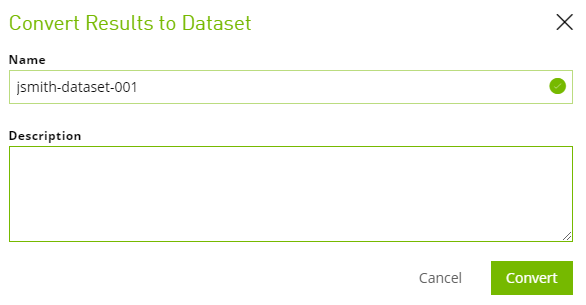
Click Convert when done.The dataset is created, which you can view from the Base Command > Datasets page.
10.2.6.2. Converting /result to a Dataset Using the CLI
Caution
This operation will remove the original files in the /result directory to create the dataset and cannot be undone.
You can convert /result to a dataset using the NGC Base Command Platform CLI as follows:
$ ngc dataset convert <new-dataset-name> --from-result <job-id>
10.2.6.3. Saving a Checkpoint from the Workspace
To save a checkpoint from your workspace, download the workspace and then upload as a dataset as follows:
Download the workspace to your local disk.
$ ngc workspace download <workspace-id> --dest <download-path>
You can also specify paths within the workspace to only download the necessary files.
$ ngc workspace download --dir path/within/workspace <workspace-id> --dest <download-path>
Use the
-hoption to view options for specifying folders and files within the workspace for downloading. The downloaded contents will be placed in a folder labeled <workspace-id>.Upload the file(s) to a dataset.
$ ngc dataset upload <dataset-name> --source <path-to-files>
The files are uploaded to the set ACE.
10.3. Managing Workspaces
Workspaces are shareable read-write persistent storage mountable in a job for concurrent use. They are intended as a tool for read-write volumes providing scratch space between jobs or users. They have an ID and can be named. They count towards your overall storage quota.
The primary use case for a workspace is to share persistent data between jobs; for example, to use for checkpoints or for retraining.
Workspaces also provide an easy way for users in a team to work together in a shared storage space. Workspaces are a good place to store code, can easily be synced with git, or even updated while a job is running, especially an interactive job. This means you can experiment rapidly in interactive mode without uploading new containers or datasets for each code change.
10.3.1. Workspace Limitations
No repeatability or other production workflow guarantees, auditing, provenance, etc.
Read/write race conditions, with undefined write ordering.
File locking behavior is undefined.
Bandwidth and IOPS performance are limited like any shared file system.
10.3.2. Examples of Workspace Use Cases
Multiple jobs can write to a workspace and be monitored with TensorBoard.
Users can use a Workspace as a network home directory.
Teams can use a Workspace as a shared storage area.
Code can be put in a Workspace instead of the container while it’s still being iterated on and used by multiple jobs during experimentation (see dangers above)
10.3.3. Mounting Workspaces from the Web UI
Workspaces provide an easy solution for any use cases.
To mount one or more workspaces, specify the workspaces and mount points from the NGC Job Creation page when you create a new job.
From the Data Input section, select the Workspaces tab and then search for a workspace to mount using the available search criteria.
Select one or more workspaces from the list.
Specify a unique mount point for each workspace selected.
10.3.4. Creating a Workspace
10.3.4.1. Creating a Workspace Using the Web UI
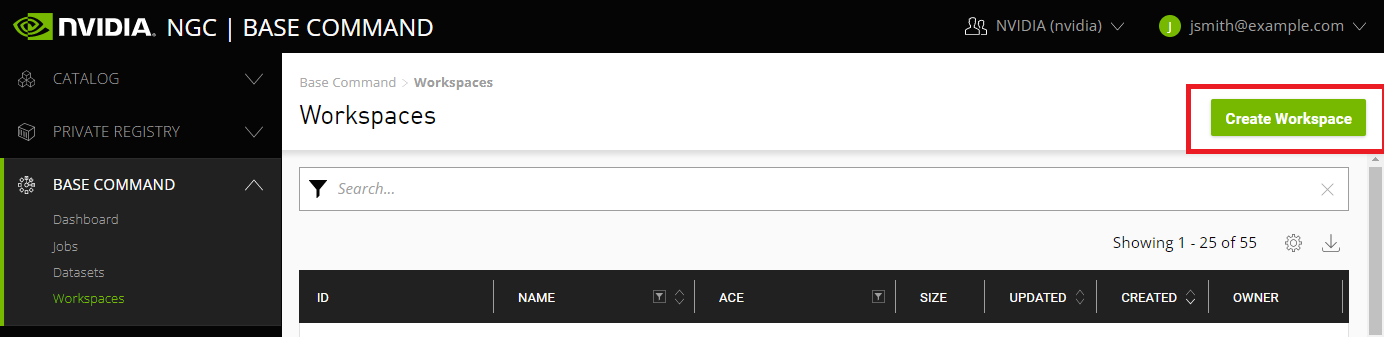
Select Base Command > Workspaces from the left navigation menu, then click the Create Workspace menu on the top right corner of the page.
In the Create a Workspace dialog, enter a workspace name and select an ACE to associate with the workspace.
Click Create.
The workspace is added to the workspace list.
10.3.4.2. Creating a Workspace Using the Base Command Platform CLI
Creating a workspace involves a single command which outputs the resulting Workspace ID:
$ ngc workspace create --name <workspace-name>
Workspaces can be named for easy reference. It can be named only one time, i.e. a workspace can’t be renamed. You can name the workspace when it is created, or name it afterwards.
10.3.4.3. Using Unique Workspace Names
Since a workspace can be specified by name and id, it is imperative that those are unique across both names and ids. Workspace id is generated by the system whereas the name is specified by the user. Workspace id is always 22 chars long. In order to ensure that a user specified name does not match a future workspace id, workspace names with exactly 22 chars are not allowed.
Workspace names must follow these constraints:
The name cannot be 22 chars long.
The name must start with an alphanumeric.
The name can contain alphanumeric, -, or _ characters.
The name must be unique within the org.
These restrictions are also captured in regex ^(?![-_])(?![a-zA-Z0-9_-]{22}$)[a-zA-Z0-9_-]*$.
10.3.4.4. Naming the Workspace When it is Created
$ ngc workspace create --name ws-demo
Successfully created workspace with id: XB1Cym98QWmsX79wf0n3Lw
  Workspace Information
    ID: XB1Cym98QWmsX79wf0n3Lw
    Name: ws-demo
    Created By: John Smith
    Size: 0 B
    ACE: nv-us-west-2
    Org: nvidian
    Description:
    Shared with: None
10.3.4.5. Naming the Workspace after it is Created
Example of creating a workspace without naming it.
$ ngc workspace create

Successfully created workspace with id: s67Bcb_GQU6g75XOglOn8g
If you created a workspace without naming it, you can name it later by specifying the id and using the set -n <name> option.
$ ngc workspace set -n ws-demo s67Bcb_GQU6g75XOglOn8g -y
Workspace name for workspace with id s67Bcb_GQU6g75XOglOn8g has been set.
$ ngc workspace info ws-demo
----------------------------------------------------
  Workspace Information
    ID: s67Bcb_GQU6g75XOglOn8g
    Name: ws-demo
    ACE: nv-us-west-2
    Org: nvidian
    Description:
    Shared with: None
---------------------------------------------------
10.3.5. Listing Workspaces
You can list the workspaces you have access to, and get the details of a specific workspace:
$ ngc workspace list

+-----------------+------------+--------------+--------------+----------------+---
| Id              | Name       | Description  | ACE          | Creator        |
|                 |            |              |              | Username       |
+-----------------+------------+--------------+--------------+----------------+---
| s67Bcb_GQU6g75X | ws-demo    |              | nv-us-west-2 | Sabu Nadarajan |
| OglOn8g         |            |              |              |                |
|-----------------+------------+--------------+--------------+----------------+---


$ ngc workspace info ws-demo
----------------------------------------------------
  Workspace Information
    ID: s67Bcb_GQU6g75XOglOn8g
    Name: ws-demo
    ACE: nv-us-west-2
    Org: nvidian
    Description:
    Shared with: None
----------------------------------------------------
10.3.6. Using Workspace in a Job
Caution
Most of NVIDIA DL images already have a directory /workspace that contains NVIDIA examples. When a mount point for your workspace is specified in the job definition, take precaution that it does not conflict with the existing directory in the container. Use a directory name that is unique and does not exist in the container. In the examples below, the name of the workspace is used as the mounting point.
Access to workspace is made available in a job by specifying a mount point in the command line to run a job.
$ ngc base-command run -i nvidia/tensorflow:18.10-py3 -in dgx1v.16g.1.norm --ace
                    nv-us-west-2 -n HowTo-workspace --result /result --commandline 'sleep
                    5h'
----------------------------------------------------
 Job Information
 Id: 223282
 Name: HowTo-workspace
...
 Datasets, Workspaces and Results
 Dataset ID: 8181
 Dataset Mount Point: /dataset
 Workspace ID: s67Bcb_GQU6g75XOglOn8g
 Workspace Mount Point: /ws-demo
 Workspace Mount Mode: RW
 Result Mount Point: /result
...
----------------------------------------------------
A workspace is mounted in Read-Write (RW) mode by default. Mounting in Read-Only (RO) mode is also supported. In RO mode, it functions similarly to a dataset.
$ ngc base-command run -i nvidia/tensorflow:18.10-py3 -in dgx1v.16g.1.norm --ace
                    nv-us-west-2 -n HowTo-workspace --result /result --commandline 'sleep 5h'
                    --datasetid 8181:/dataset --workspace ws-demo:/ws-demo:RO
----------------------------------------------------
 Job Information
 Id: 223283
 Name: HowTo-workspace
...
 Datasets, Workspaces and Results
 Dataset ID: 8181
 Dataset Mount Point: /dataset
 Workspace ID: s67Bcb_GQU6g75XOglOn8g
 Workspace Mount Point: /ws-demo
 Workspace Mount Mode: RO
 Result Mount Point: /result

...
----------------------------------------------------
Specifying a workspace in a job using a JSON file is shown below. The example below is derived from the first job definition shown in this section.
{
 "aceId": 357,
 "aceInstance": "dgxa100.40g.1.norm",
 "aceName": "nv-eagledemo-ace",
 "command": "sleep 5h",
 "datasetMounts": [
 {
 "containerMountPoint": "/dataset",
 "id": 8181
 }
 ],
 "dockerImageName": "nvidia/tensorflow:18.10-py3",
 "name": "HowTo-workspace",
 "resultContainerMountPoint": "/result",
 "runPolicy": {
 "preemptClass": "RUNONCE"
 },
 "workspaceMounts": [
 {
 {
 "containerMountPoint": "/ws-demo",
 "id": "ws-demo",
 "mountMode": "RW"
 }
 ]
}
10.3.7. Accessing Workspaces Using SFTP
Secure File Transfer Protocol (SFTP) is a commonly used network protocol for secure data access and transfer to and from network-accessible storage. Base Command Platform Workspaces interoperate with SFTP-compliant tools to provide a standard and secure access method to storage in a BCP environment.
NGC CLI can be used to query a workspace and expose the port, hostname, and token to be used with SFTP clients. Running ngc base-command workspace info with the --show-sftp flag will return all information necessary to communicate with the workspace via SFTP, along with a sample command for using the sftp CLI tool.
$ ngc base-command workspace info X7xHfMZISZOfUbKKtGnMng --show-sftp
-------------------------------------------------------------------------------
 Workspace Information
   ID: X7xHfMZISZOfUbKKtGnMng
   Name: sftp-test
   Created By: user@company.com
   Size: 0 B
   ACE: example-ace
   Org: nvidia
   Description: My workspace for using SFTP to move data
   Shared with:
-------------------------------------------------------------------------------
 SFTP Information
   Hostname: example-ace.dss.stg-ace.ngc.nvidia.com
   Port: 443
   Token: ABCDEFGHIJBObk5sWVhBemNXZzBOM05tY2pkMFptSTNiRzFsWVhVME9qQmpOamMzTWpFNExUaGlZVEV0TkRkbU1pMDVZakUzTFdZME9USTVORGN4TVRnMk5BLCwsWDd4SGZNWklTWk9mVWJLS3RHbk1uZywsLG52aWRpYQ==
   Example: sftp -P<Port> <Token>@<Hostname>:/
-------------------------------------------------------------------------------
10.3.7.1. Connecting to a Workspace Using the SFTP Tool
The sftp tool available for Linux, WSL, and MacOS shells can be used with the example provided in the NGC CLI output above. Using sftp with the previous example’s output follows.
sftp -P443 ABCDEFGHIJBObk5sWVhBemNXZzBOM05tY2pkMFptSTNiRzFsWVhVME9qQmpOamMzTWpFNExUaGlZVEV0TkRkbU1pMDVZakUzTFdZME9USTVORGN4TVRnMk5BLCwsWDd4SGZNWklTWk9mVWJLS3RHbk1uZywsLG52aWRpYQ==@example-ace.dss.stg-ace.ngc.nvidia.com:/
Connected to example-ace.dss.stg-ace.ngc.nvidia.com.
Changing to: /
sftp>
The commands supported by sftp can be viewed by entering ? at the prompt:
sftp> ?
Available commands:
bye                                  Quit sftp
cd path                         Change remote directory to 'path'
chgrp grp path                  Change group of file 'path' to 'grp'
chmod mode path                 Change permissions of file 'path' to 'mode'
chown own path                  Change owner of file 'path' to 'own'
df [-hi] [path]                 Display statistics for current directory or
                                filesystem containing 'path'
exit                            Quit sftp
get [-afPpRr] remote [local]    Download file
reget [-fPpRr] remote [local]   Resume download file
reput [-fPpRr] [local] remote   Resume upload file
help                            Display this help text
lcd path                        Change local directory to 'path'
lls [ls-options [path]]         Display local directory listing
lmkdir path                     Create local directory
ln [-s] oldpath newpath         Link remote file (-s for symlink)
lpwd                            Print local working directory
ls [-1afhlnrSt] [path]          Display remote directory listing
lumask umask                    Set local umask to 'umask'
mkdir path                      Create remote directory
progress                        Toggle display of progress meter
put [-afPpRr] local [remote]    Upload file
pwd                             Display remote working directory
quit                            Quit sftp
rename oldpath newpath          Rename remote file
rm path                         Delete remote file
rmdir path                      Remove remote directory
symlink oldpath newpath         Symlink remote file
version                         Show SFTP version
!command                        Execute 'command' in local shell
!                               Escape to local shell
?                               Synonym for help
The following is an example of using the put command.
sftp> put large-file
Uploading large-file to /large-file
large-file                                     16% 2885MB  21.9MB/s   11:07 ETA
When finished using sftp, end the active session with either the bye, quit, or exit command:
sftp> bye
10.3.7.2. Connecting to a Workspace Using WinSCP
WinSCP is a common SFTP application used for SFTP file transfers in the Windows operating system. Once WinSCP has been downloaded and installed to a user’s workstation, the same data used with the sftp CLI tool can be populated into the WinSCP user interface. Switch the file protocol to SFTP, and populate the host name and port number. Do not populate the user name or password. Click Login to proceed.
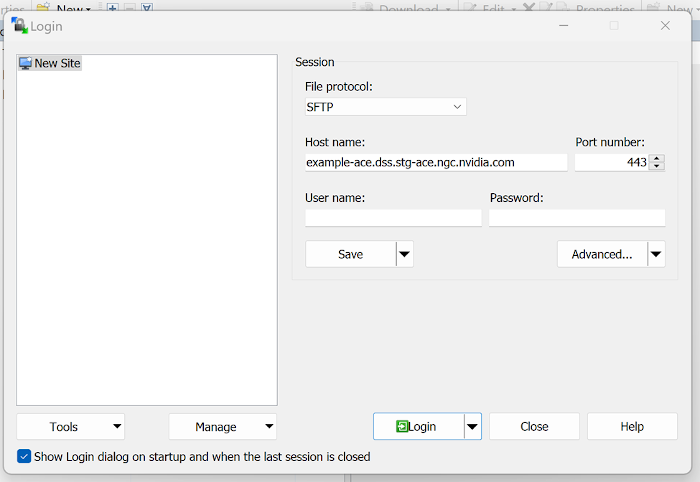
The user interface will prompt for a user name value - paste the token from the workspace’s NGC CLI output and click OK.
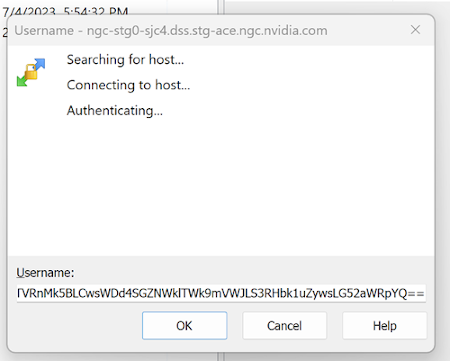
The local file system and workspace contents will now be visible side by side. Users can now drag and drop files between the two file systems as necessary.
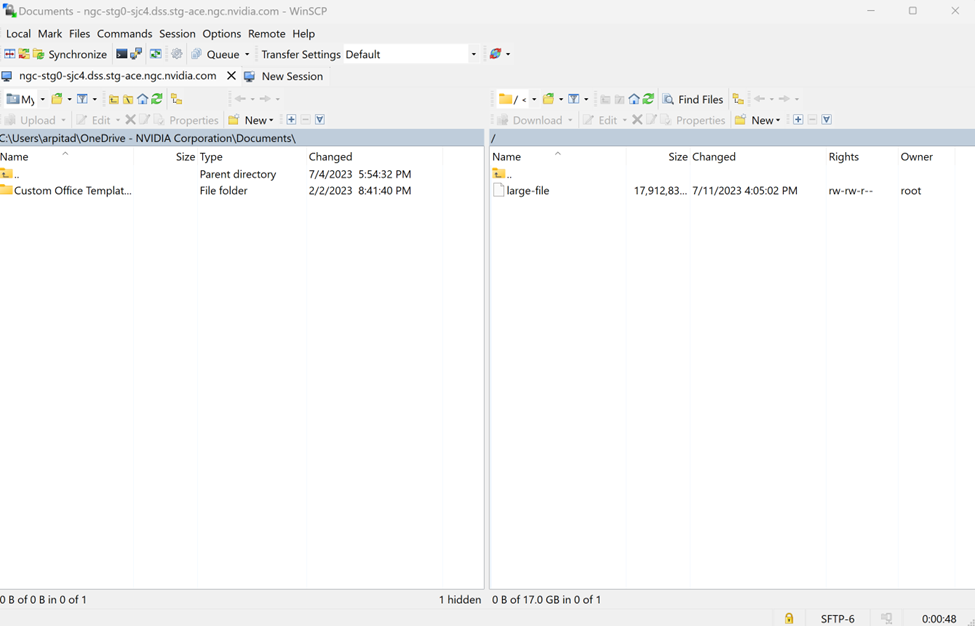
10.3.8. Bulk File Transfers for Workspaces
10.3.8.1. Uploading and Downloading Workspaces
Mounting a workspace to access or transfer a few files works great. If you need to do a bulk transfer of many files like populating an empty workspace at beginning or downloading an entire workspace for archiving, workspace upload and download commands work better.
Uploading a directory to workspace is similar to uploading files to a dataset.
$ ngc workspace upload --source ngc140
                  s67Bcb_GQU6g75XOglOn8g
Total number of files is 6459.
Uploaded 170.5 MB, 6459/6459 files in 9s, Avg Upload speed: 18.82 MB/s, Curr
                    Upload Speed: 25.9 KB/s
----------------------------------------------------
Workspace: s67Bcb_GQU6g75XOglOn8g Upload: Completed.
Imported local path (workspace): /home/ngccli/ngc140
Files transferred: 6459
Total Bytes transferred: 178777265 B
Started at: 2018-11-17 18:26:33.399256
Completed at: 2018-11-17 18:26:43.148319/
Duration taken: 9.749063 seconds
----------------------------------------------------
Downloading workspace to a local directory is similar to downloading results from a job.
$ ngc workspace download --dest temp s67Bcb_GQU6g75XOglOn8g
Downloaded 56.68 MB in 41s, Download speed: 1.38 MB/s
----------------------------------------------------
Transfer id: s67Bcb_GQU6g75XOglOn8g Download status: Completed.
Downloaded local path: /home/ngccli/temp/s67Bcb_GQU6g75XOglOn8g
Total files downloaded: 6459
Total downloaded size: 56.68 MB
Started at: 2018-11-17 18:31:03.530342
Completed at: 2018-11-17 18:31:45.592230
Duration taken: 42s seconds
----------------------------------------------------
10.3.8.2. Exporting Workspaces
Workspaces can also be exported directly to S3 and OCI instances. Refer to Importing and Exporting Datasets for details about the prerequisites for exporting datasets.
The following command will export all the files in a given workspace to an s3 bucket in AWS:
$ ngc workspace export run --protocol s3 --secret my_aws_secret \
--instance <instance type> --endpoint https://s3.amazonaws.com \
--bucket <s3 bucket name> --region <region of bucket> <workspace_id>
To export a workspace to an OCI storage instance, use the following arguments:
$ ngc workspace export run --protocol url --secret my_oci_secret --instance <instance type> <workspace_id>
Similar to exporting datasets, you can check on the status of the export job with the following:
$ ngc workspace export info <job_id>
Or check on all past and current workspace export jobs with the following:
$ ngc workspace export list
10.3.9. Workspace Sharing and Revoking Sharing
Workspaces can be shared with a team or with the entire org.
Important
Each workspace is private to the user who creates it until you decide to share with your team. Once you share with your team, all team members have the same rights in that workspace, so have a sharing protocol before you share. For instance one way of using a workspace is to have a common area which only the owner updates, and multiple user directories, one per user where each user can write their own data.
Sharing a workspace with a team:
$ ngc workspace info ws-demo
----------------------------------------------------
 Workspace Information
 ID: s67Bcb_GQU6g75XOglOn8g
 Name: ws-demo
 ACE: nv-us-west-2
 Org: nvidian
 Description:
 Shared with: None
----------------------------------------------------
$ ngc workspace share --team nves -y ws-demo
Workspace successfully shared
$ ngc workspace info ws-demo
----------------------------------------------------
 Workspace Information
 ID: s67Bcb_GQU6g75XOglOn8g
 Name: ws-demo
 ACE: nv-us-west-2
 Org: nvidian
 Description:
 Shared with: nvidian/nves
----------------------------------------------------
Revoking a shared workspace:
$ ngc workspace revoke-share --team nves -y ws-demo
Workspace share successfully revoked
$ ngc workspace info ws-demo
----------------------------------------------------
 Workspace Information
 ID: s67Bcb_GQU6g75XOglOn8g
 Name: ws-demo
 ACE: nv-us-west-2
 Org: nvidian
 Description:
 Shared with: None
----------------------------------------------------
10.3.10. Removing Workspaces
10.3.10.1. Using the Web UI
You can remove an unshared workspace using the Web UI:
Select Base Command > Workspaces from the left navigation menu and click on a workspace from the list.
Click the vertical ellipsis menu on the top right corner of the page and select Delete Workspace.
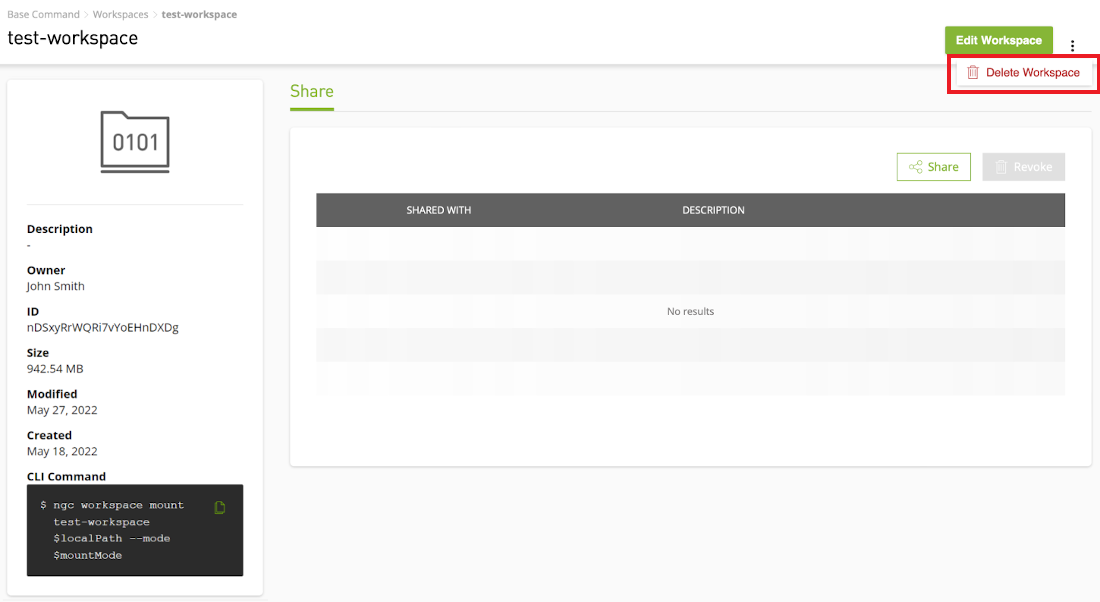
Shared workspaces are not removable using the Web UI. The following example shows the Delete Workspace command is disabled for a workspace shared with the nv-test team.
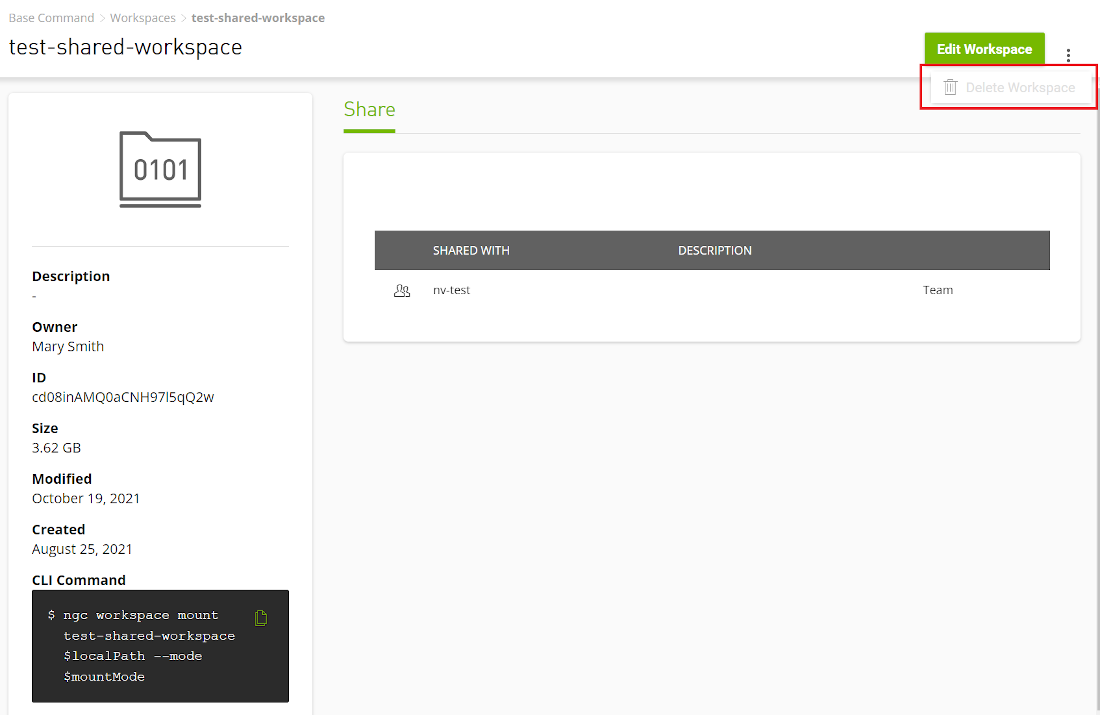
10.3.10.2. Using the CLI
Removing an unshared workspace involves a single command:
$ ngc workspace remove ws-demo

Are you sure you would like to remove the workspace with ID or name: 'ws-demo' from org: '<org_name>'? [y/n]y
Successfully removed workspace with ID or name: 'ws-demo' from org: '<org_name>'.
Shared workspaces are not removable using the CLI. You will see the following message if you attempt to remove a shared workspace:
$ ngc workspace remove test-shared-workspace

Are you sure you would like to remove the workspace with ID or name: 'test-shared-workspace' from org: '<org_name>'? [y/n]y
Removing of workspace with ID or name: 'test-shared-workspace' failed: Client Error: 422
Response: Workspace '<workspace_id>' can't be deleted while it is shared.
It is shared with: <org_name/team_name> - Request Id: None. Url: <workspace_url>.
10.4. Managing Results
A job result consists of a joblog.log file and all other files written to the result mount. In the case of multi-node jobs, each node is allocated a unique result mount and joblog.log file. Consequently, result mounts are not suitable for synchronization across nodes.
10.4.1. joblog.log
For jobs run with array-type “MPI,” the output of STDOUT and STDERR is consolidated into the joblog.log file within the result directory. In the case of a multi-node job, the default behavior is to stream the output of STDOUT and STDERR from all nodes to the joblog.log file on the first node (replica 0). As a result, the remaining log files on the other nodes will be empty.
For jobs run with array-type “PYTORCH,” the output of STDOUT and STDERR will be written to separate per-node, per-rank files in the job’s result directory. For example, STDOUT and STDERR for node 0 rank 0 will be written to /result/node_0_local_rank_0_stdout, /result/node_0_local_rank_0_stderr, respectively. The joblog.log for each worker node will then contain aggregated logs of the following format, containing the log content from the per-node, per-rank files:
{"date":"DATE_TIMESTAMP","file":"FILE_NAME","log":"LOG_FROM_FILE"}
These job logs can be viewed in the NGC Web UI. See Monitoring Console Logs (joblog.log) for instructions on how to do so.
10.4.2. Downloading a Result
To download the result of a Job, use the following command:
$ ngc result download <job-id>
For multi-node jobs, this command will retrieve the results for the first node/replica. To obtain the results for other nodes, you need to specify the replica ID as follows:
$ ngc result download <job-id>:<replica-id>
The content is downloaded to a folder named <job-id >. In the case of multi-node jobs, if a replica ID is specified, the folder will be named <job-id >_<replica-id >.
10.4.3. Removing a Result
Results will continue to occupy the system quota until you remove them. To remove the results, use the following command:
$ ngc result remove <job-id>
10.4.4. Converting Results into Datasets
If you wish to convert the results into a dataset, follow these steps:
Select Jobs from the left-hand navigation.
Locate the job from which you want to convert the results and click on the menu icon.
Select Convert Results to Dataset.
In the Convert Results to Dataset dialog box, provide a name and description for your dataset.
Click Convert to initiate the conversion process.
Once the conversion is complete, your dataset will appear on the Dataset page.
Remember to share your dataset with others in your team or org by following the instructions in Sharing a Dataset with your Team.
10.5. Local Scratch Space (/raid)
All Base Command Platform nodes come with several SSD drives configured as a RAID-0 array cache storage. This scratch space is mounted in every full-node job at /raid.
A typical use of this /raid scratch space can be to store temporary results/checkpoints that are not required to be available after a job is finished or killed. Using this local storage for intermediate results/logs will avoid heavy network storage access (such as results and workspaces) and should improve job performance. The data on this scratch space is cleared (and not automatically saved/backed-up to any other persistent storage) after a job is finished. Consider /raid to be a temporary scratch space available during the lifetime of the job.
Since the /raid volume is local to a node, the data in it is not backed-up and transferred when a job is preempted and resumed. It is the responsibility of the job/user to periodically backup the required checkpoint data to the available network storage (results or workspaces) to enable resuming a job (which is almost certainly on a different node) after a preemption.
Example Use Case: Copying a mounted dataset to /raid to remove network latency.
… -commandline "cp -r /mount/data/ /raid ; bash train.sh /raid/" …
This works well for jobs with many epochs using datasets that are reasonable in size to replicate to local storage. Note that contents of /raid volume are not carried over to the new node when a job is preempted and resumed and that the required info must be saved in an available network storage space for resuming the job using the data.
11. Jobs and GPU Instances
This chapter describes Base Command Platform features for submitting jobs to the GPU instances, and for managing and interacting with the jobs. In this chapter, you will learn how to identify GPU instances and their attributes available to you, how to define jobs to associated storage entities, and how to manage the jobs using either the Web UI or the CLI.
11.1. Quick Start Jobs
The Quick Start feature of Base Command Platform provides a simplified option for launching interactive jobs.
Using Quick Start, administrators can create templates with pre-selected ACES/compute instances, containers, workspaces, datasets, and more.
Users can easily launch these templates through the Web UI or the CLI, removing the requirement to configure individual jobs, and providing them quick and easy access to launch pre-configured jobs with an interactive JupyterLab session.
There are two Quick Start templates created by default:
JupyterLab - This simple template creates a single-node job that launches JupyterLab from within a specified container. By default, either PyTorch or TensorFlow base containers can be used.
Dask & RAPIDS - This template launches a more complex multi-node MPI job using a RAPIDS container and initiates a cluster of Dask workers on these nodes. JupyterLab is launched as the interaction point for this cluster.
See the sections below for how to launch jobs using these templates.
Important
Security Note: Launching a Quick Start Job will create a URL to access JupyterLab that ANYONE CAN USE. For more details and security recommendations, refer to the note in NVIDIA Base Command Platform Terms and Concepts.
11.1.1. JupyterLab Quick Start Jobs (Single-node)
The following shows how to launch a JupyterLab job using the Quick Start feature as a Base Command Platform User.
11.1.1.1. Using the NGC Web UI
From the Base Command Platform Dashboard, click Launch on the JupyterLab card under the Quick Start header.
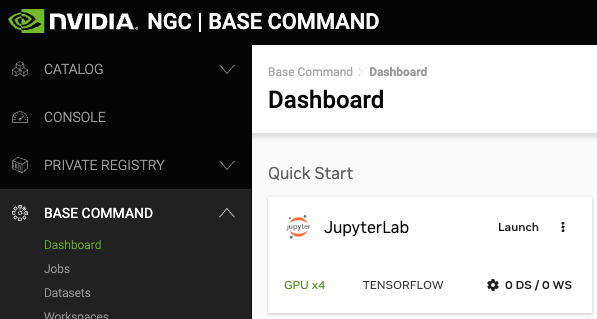
Details of the type of job to be launched are shown across the bottom of the card. From left to right, you can see:
The number of GPUs available for the job upon launch
The container used by the environment
The number of datasets mounted to the container and whether a workspace has been selected for use in the job.
Note
If you don’t select a Workspace, a custom workspace will automatically be created when you launch the job.
After launching the job, you will be taken to the job page, where you can see the job details, including the number of GPUs allocated and the available memory for your job. When the JupyterLab instance is ready, the status will read ‘RUNNING’, and the Launch JupyterLab button in the top right will turn green.
Click Launch JupyterLab in the top right corner of the page. A JupyterLab environment running inside the container listed on the card will be launched in a new tab.
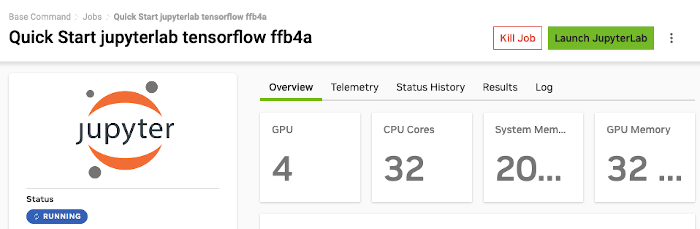
Note
The default run time for jobs launched through Quick Start is 60 minutes.
There are many ways to modify the Quick Start job before launch. You can specify a different workspace, add or remove datasets, change the container the job will use, and select a different ACE.
11.1.1.2. Using the NGC CLI
The NGC CLI supports creating and managing Quick Start Jobs via the following command:
$ ngc base-command quickstart cluster
You can launch a JupyterLab job using the Quick Start CLI with the following command syntax:
$ ngc base-command quickstart cluster create --name <cluster name> --ace <ace name> --cluster-lifetime 3600s \
--cluster-type jupyterlab --container-image <container image> --data-output-mount-point /results \
--scheduler-instance-type <instance type> --job-order 50 --job-priority NORMAL --min-time-slice 0s \
--nworkers 1 --org <org> --label quick_start_jupyterlab --workspace-mount <workspace>
Example: To launch a JupyterLab job:
$ ngc base-command quickstart cluster create --name "Quick Start jupyterlab tensorflow ffb4a" \
--ace ceph-sjc-4-ngc-wfs0 --cluster-lifetime 3600s --cluster-type jupyterlab \
--container-image "nvidia/tensorflow:23.08-tf2-py3" --data-output-mount-point /results \
--scheduler-instance-type dgx1v.32g.4.norm --job-order 50 --job-priority NORMAL \
--min-time-slice 0s --nworkers 1 --org nvidia --label quick_start_jupyterlab \
--workspace-mount ZNqskFA0SC2uMGUa4q-5Vg:/bcp/workspaces/49529_quick-start-jupyterlab-workspace_ceph-sjc-4-ngc-wfs0:RW
To see a complete list of options for the cluster create command, issue the following:
$ ngc base-command quickstart cluster create -h
For more information on the Quick Start ‘cluster’ command, refer to the NGC CLI documentation.
11.1.2. Dask and RAPIDS Quick Start Jobs (Multi-node)
All clusters have a Dask & RAPIDS Quick Start launch enabled by default. (However, this may have been disabled by your account admin.) The RAPIDS libraries provide a range of open-source GPU-accelerated Data Science libraries. For more information, refer to RAPIDS Documentation and Resources. Dask allows you to scale out workloads across multiple GPUs. For more information, refer to the documentation on Dask. When used together, Dask and RAPIDS allow you to scale your workloads both up and out.
11.1.2.1. Using the NGC Web UI
From the Base Command Platform Dashboard, click Launch on the Dask & RAPIDS card under the Quick Start header.
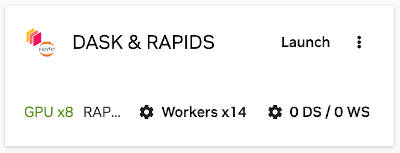
The job will be launched with the number of GPUs (per node), Dask workers, and container images shown on the card. Upon launch, the job will create a workspace that will be used in the job.
After launching the job, you will be taken to the job page, where you can see the job details, including the number of GPUs allocated and the amount of memory available for your job. When the JupyterLab instance is ready, the status will read ‘RUNNING’, and the Launch JupyterLab button in the top right will turn green.
Note
This may take up to 10 minutes to be ready.
Click Launch JupyterLab in the top right corner of the page. A JupyterLab environment running inside the Dask & RAPIDS container will be launched in a new tab.
11.1.2.2. Using the NGC CLI
The NGC CLI supports creating and managing Quick Start Jobs via the following command:
$ ngc base-command quickstart cluster
You can launch a Dask and RAPIDS JupyterLab job using the Quick Start CLI with the following command syntax:
$ ngc base-command quickstart cluster create --name <cluster name> --ace <ace name> \
--cluster-lifetime 3600s --cluster-type dask --container-image <container image> \
--data-output-mount-point /results --scheduler-instance-type <instance type> --job-order 50 \
--job-priority NORMAL --min-time-slice 0s --nworkers 1 --org <org> --label quick_start_dask \
--workspace-mount <workspace>
Example: To launch a Dask and RAPIDS JupyterLab job:
$ ngc base-command quickstart cluster create --name "Quick Start dask rapidsai-core b3f45" \
--ace ceph-sjc-4-ngc-wfs0 --cluster-lifetime 3600s --cluster-type dask \
--container-image "nvidia/rapidsai-core:cuda11.8-runtime-ubuntu22.04-py3.10" \
--data-output-mount-point /results --scheduler-instance-type dgx1v.32g.8.norm \
--worker-instance-type dgx1v.32g.8.norm --job-order 50 --job-priority NORMAL \
--min-time-slice 0s --nworkers 2 --org nvidia --preempt-class RUNONCE --label quick_start_dask \
--workspace-mount XaoQAFeTQKui6nB0Fr_J7A:/bcp/workspaces/49529_quick-start-dask-workspace_ceph-sjc-4-ngc-wfs0:RW
To see a complete list of options for the cluster create command, issue the following:
$ ngc base-command quickstart cluster create -h
For more information on the Quick Start ‘cluster’ command, refer to the NGC CLI documentation.
11.1.3. Customizing your Workspace and Datasets for a Quick Start Job
If necessary, additional datasets and workspaces than what were configured in the template can be mounted to your Quick Start Job so you can access your own data and specify your individual workspace to launch your job in.
Note
This customization is temporary and will not be saved if you navigate away from the dashboard. For permanent changes, work with your Base Command administrator to create a template for the Quick Start Job.
From the Base Command Platform Dashboard, click the dataset and workspace indicator, (in this example, 0 DS / 0 WS) on the JupyterLab Quick Start card you wish to use. The Data Input page will open.
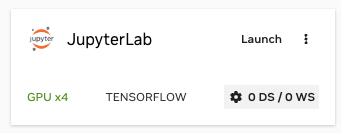
From the Data Input page, select any Datasets and/or a Workspace you wish to use with your Quick Start job. You can also specify a Mount Point for your Datasets.
Once you have made your selection, click Save Changes at the bottom of the page.

The DS / WS count on the Quick Start card will now be updated to show the number of Datasets and Workspaces selected. For example, the card below shows that we selected two datasets and one workspace.
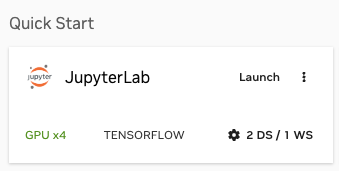
Click Launch. The job will use the workspace selected (or create a default if no Workspace was chosen) and mount any chosen datasets to the corresponding Mount Point.
Once the job has been created, you will be taken to the job page, where you can see details, including the number of GPUs allocated and the available memory for your job. When the JupyterLab instance is ready, the status will read ‘RUNNING’, and the Launch JupyterLab button in the top right will turn green.
Click Launch JupyterLab in the top right of the job page once it turns from grey to green. A JupyterLab environment running inside the container listed on the card will be launched in a new tab.
11.1.3.1. Customizing Number of Workers for Dask and RAPIDS Quick Start Job
The default Dask & RAPIDS Quick Start job is launched with a cluster of 14 workers.
These workers are Dask workers, each consuming a GPU of a node (replica). By default, two GPUs are used for Jupyterlab and Dask Scheduler (one each), and the Dask workers use 14 (one each), for a total of 16 GPUs. As a result, this default job will span two nodes (assuming eight GPUs per node/replica). Every additional node will support up to eight workers. For example, 15-22 workers will use three nodes, and 23-30 workers will use four.
To change the number of Dask workers for the job:
From the Base Command Platform Dashboard, click Workers along the bottom of the Dask & RAPIDS Quick Start card.
Use the + and - buttons to select the number of Dask workers you wish to use. Once selected, click Save Changes.
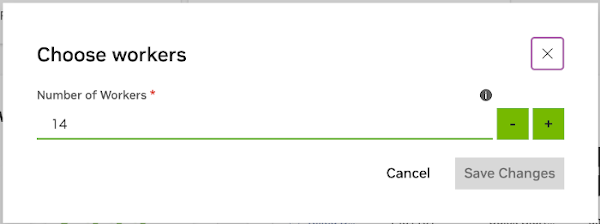
The Quick Start card will display the updated number of workers. Click Launch to launch the job.
11.1.4. Launching a Quick Start Job from a Template
Templates can be made available to users by the Organization Administrator. These allow users to quickly launch Quick Start environments with different defaults for ACE, container, datasets, and workspace mounts.
From the Base Command Platform Dashboard, click the vertical ellipses in the top right corner of the Quick Start Job you’d like to run, and select Launch from Templates.
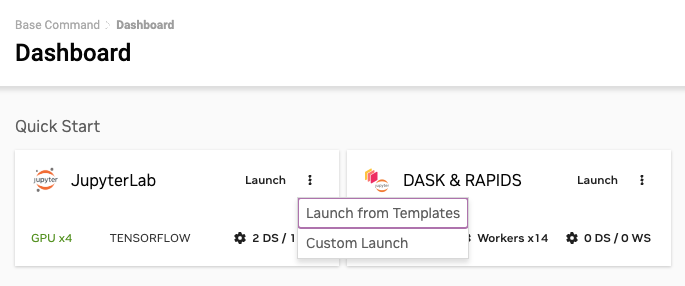
In the window, you will see a list of templates available to you, including details about the Container, Data Inputs, and Computing Resources used for each template. Select the template you wish to use, then click Launch with Template to launch a JupyterLab Quick Start from that template.
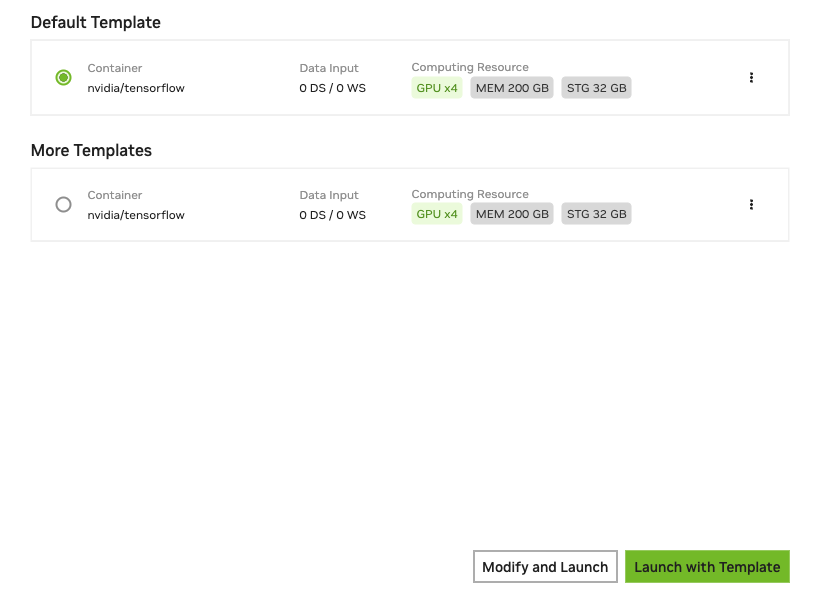
You will be taken to the job page once it has been created. When ready, you can click Launch JupyterLab in the top right corner.
Note
Only platform administrators can create new templates and make them available to Base Command Platform Users. For details on how to create a new template, see the instructions below.
11.1.5. Launching a Custom Quick Start Job
Custom Quick Start Jobs allow you to launch a job using either template, while specifying an ACE and a launch Container, and any additional ports you wish to expose.
From the Base Command Platform dashboard, for the Quick Start template you wish to start from, click the vertical ellipses in the top right corner of the template and select Custom Launch.
You will be guided through a multi-step Custom Launch menu. To move to the next stage, click the green ‘Next’ button in the bottom right corner.
First, select an ACE. Once you choose an ACE, the associated instances will be displayed. Select the instance you wish to use.
Next, if using the Dask & RAPIDS (multi-node) template, you will be prompted to select the number of workers. This step will not be present in the JupyterLab (single-node) template.
Next, you can select a container and protocol. Use the drop-down menu to choose a container. You must also select a container tag.
Note
Only containers listed as ‘Quick Start Validated’ have been tested to work with the Quick Start custom launch. You may select a different container; however, it may result in the failure of your job. We validate the penultimate release of the containers. To use the latest containers, we recommend you launch a custom job.
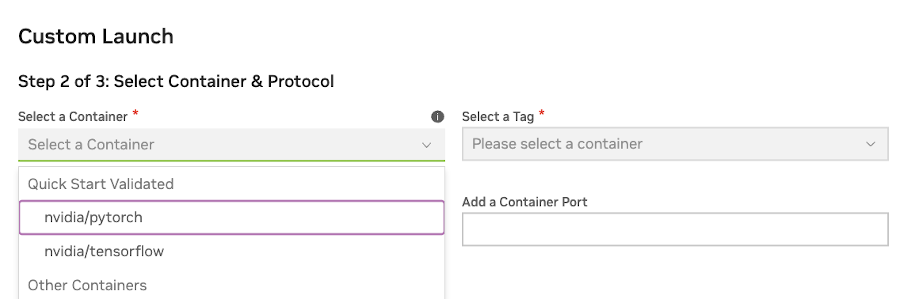
You can also select a protocol and container port to expose from within the running job. When using the Quick Start Validated containers, you should not expose port 8888 for JupyterLab as this is automatically exposed.
Next, select any datasets you wish to mount within your container and a workspace you want to use.
Click Launch JupyterLab to launch the job.
Important
Security Note: When opening a port to the container, it will create a URL that ANYONE CAN USE. For more details and security recommendations, refer to the note in NVIDIA Base Command Platform Terms and Concepts. To launch a secure job, follow the instructions for Running a Simple Job.
11.1.6. Creating New Quick Start Templates
This section is for administrators (with an org-level BASE_COMMAND_ADMIN role) and describes the process for creating and activating templates for NVIDIA Base Command Platform users.
11.1.6.1. Using the NGC Web UI
From the Base Command Platform Dashboard, click the vertical ellipses in the top right corner of any existing Quick Start card. Click Launch From Templates.
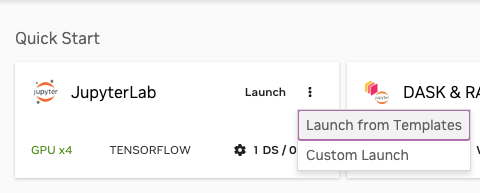
Click + Create New Template in the top left of the menu.
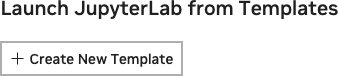
You will be guided through a multi-step Create New Template menu. To move to the next stage, click the green ‘Next’ button in the bottom right corner.
First, select an ACE. Once you choose an ACE, the associated instances will be displayed. Select the instance you wish to use.
Next, if using the Dask & RAPIDS (multi-node) template, you will be prompted to select the number of workers. This step will not be present in the JupyterLab (single-node) template.
Next, select a container and (optionally) a protocol. Use the drop-down menu to select a container. You must also select a container tag.
Note
Only containers listed as ‘Quick Start Validated’ have been tested to work with the Quick Start custom launch. You may select a different container; however, it may result in the failure of your job. We validate the penultimate release of the containers. To use the latest containers, we recommend you launch a custom job.
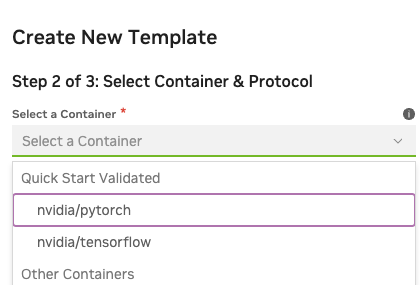
Next, select any datasets you wish to mount within the container and a workspace you may wish to use (if applicable).
Click Create JupyterLab template.
This template will now be available to users and can be found in the list of templates under the Launch From Templates menu, accessed from the vertical ellipses in the top right corner of the Quick Start card.
11.1.6.2. Using the NGC CLI
The NGC CLI supports creating and managing Quick Start Templates via the following command:
$ ngc base-command quickstart project
You can create a JupyterLab template using the Quick Start CLI with the following command syntax:
$ ngc base-command quickstart project create-template \
         --name <template name> \
         --description <template description> \
         --display-image-url <template image URL> \
         --ace <ace name> \
         --cluster-lifetime 3600s \
         --cluster-type jupyterlab \
         --container-image <container image> \
         --data-output-mount-point /results \
         --scheduler-instance-type <instance type> \
         --job-order 50 \
         --job-priority NORMAL \
         --min-time-slice 1s \
         --nworkers 2 \
         --org <org name> \
         --label <job labels> \
         --workspace-mount <workspace mountpoint>
Example: To create a TensorFlow JupyterLab template:
$ ngc base-command quickstart project create-template \
            --name "demo tensorflow template" \
            --description "demo" \
            --display-image-url "https://demo/demo-image.png" \
            --ace ceph-sjc-4-ngc-wfs0 \
            --cluster-lifetime 3600s \
            --cluster-type jupyterlab \
            --container-image "nvidia/tensorflow:23.08-tf2-py3" \
            --data-output-mount-point /results \
            --scheduler-instance-typedgx1v.32g.4.norm \
            --job-order 50 \
            --job-priority NORMAL \
            --min-time-slice 1s \
            --nworkers 2 \
            --org nvidia \
            --label "tf template" \
            --workspace-mount ZNqskFA0SC2uMGUa4q-5Vg:/bcp/workspaces/49529_quick-start-jupyterlab-workspace_ceph-sjc-4-ngc-wfs0:RW
Example: To create a PyTorch Jupyter template:
$ ngc base-command quickstart project create-template \
            --name "demo pytorch template" \
            --description "demo" \
            --display-image-url "https://demo/demo-image.png" \
            --ace ceph-sjc-4-ngc-wfs0 \
            --cluster-lifetime 3600s \
            --cluster-type jupyterlab \
            --container-image "nvidia/pytorch:23.08-py3" \
            --data-output-mount-point /results \
            --scheduler-instance-typedgx1v.32g.4.norm \
            --job-order 50 \
            --job-priority NORMAL \
            --min-time-slice 1s \
            --nworkers 2 \
            --org nvidia \
            --label "tf template" \
            --workspace-mount ZNqskFA0SC2uMGUa4q-5Vg:/bcp/workspaces/49529_quick-start-jupyterlab-workspace_ceph-sjc-4-ngc-wfs0:RW
To see a complete list of options for the template command, issue the following:
$ ngc base-command quickstart project -h
For more information on the Quick Start ‘project’ command, refer to the NGC CLI documentation.
11.1.7. Changing Default Quick Start Templates
This section is for administrators (with an org-level BASE_COMMAND_ADMIN role) and describes the process for changing the default template for each Quick Start Job card that’s shown on the Base Command Platform Dashboard.
From the Base Command Platform Dashboard, click the vertical ellipses in the top right corner of any existing Quick Start card. Click Launch From Templates.
Click on the vertical ellipses on the right-hand side of the template you wish to set as default.
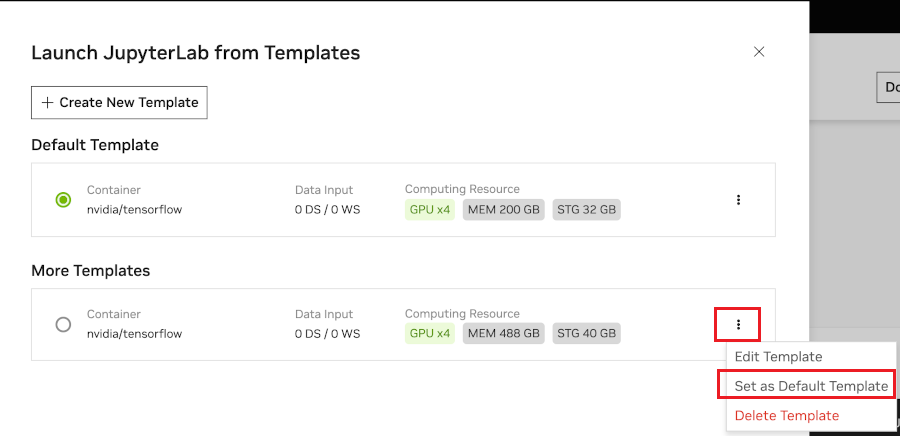
Click Set as Default Template. The default will be updated for all users upon refreshing the dashboard.
11.1.8. Updating Existing Quick Start Templates
This section is for administrators (with an org-level BASE_COMMAND_ADMIN role) and describes the process for updating templates for users of the NVIDIA Base Command Platform.
It is possible to update existing Quick Start templates, available for users to select as additional launch options as described in Launching a Quick Start Job from a Template.
From the Base Command Platform Dashboard, click the vertical ellipses in the top right corner of any existing Quick Start card. Click Launch From Templates.
Click on the vertical ellipses on the right-hand side of the template you wish to edit.
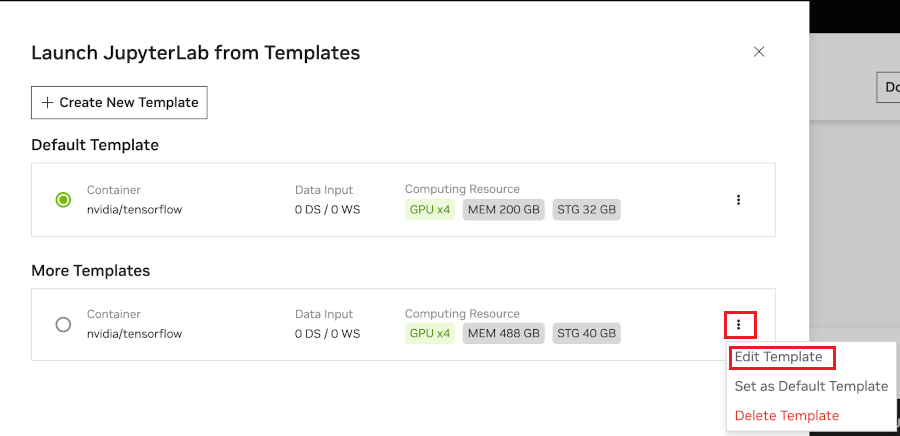
Click Edit Template. Follow the steps, similar to Creating New Quick Start Templates Using the NGC Web UI, to update the existing template.
11.2. Running a Simple Job
The section describes how to run a simple “Hello world” job.
Login to the NGC portal and click BASE COMMAND > Jobs from the left navigation menu.
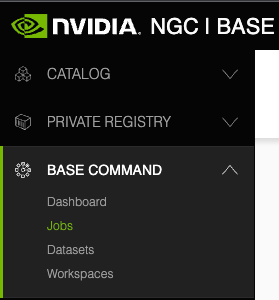
In the upper right select Create Job.
Select your Accelerated Computing Environment and Instance type from the ACE dropdown menu.
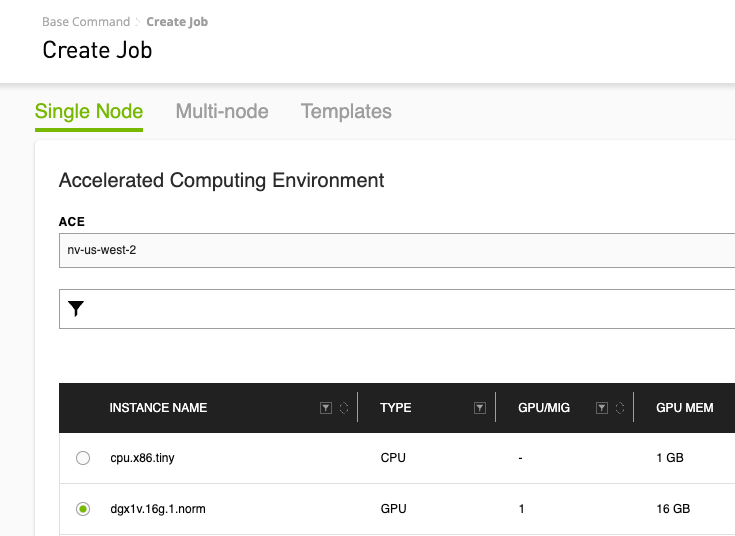
Under Data Output, choose a mount point to access results.
The mount point can be any path that isn’t already in the container. The result mount point is typically /result or /results.

Under the Container Selection area:
Select a container image and tag from the dropdown menus, such as
nvidia/tensorflow:22.12-tf1-py3Enter a bash command under Run Command; for example,
echo 'Hello from NVIDIA'.
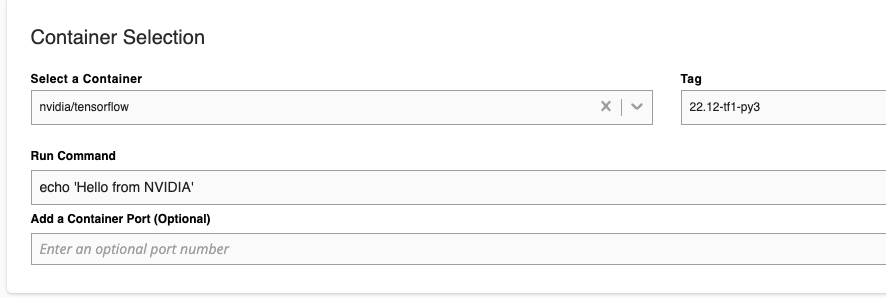
At the bottom of the screen, enter a name for your job.
You may optionally add a custom label for your job.
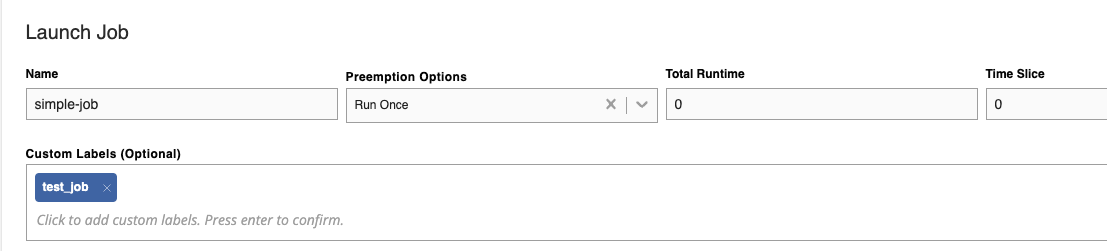
Click Launch Job in the top right corner of the page.
Alternatively, click the copy icon in the command box and then paste the command into the command line if you have NGC CLI installed.
After launching the job, you will be taken to the jobs page and see your new job at the top of the list in either a Queued or Starting state.

This job will run the command (the output can be viewed in the Log tab). The Status History tab reports the following progress with the timestamps: Created -> Queued -> Starting -> Running -> Finish.
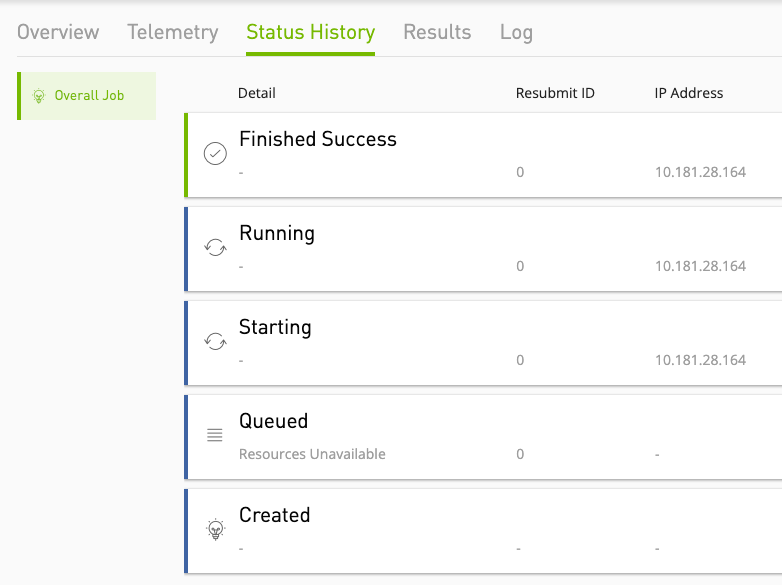
11.3. Running JupyterLab in a Job
This section describes how to run a simple ‘Hello world’ job incorporating JupyterLab.
NGC containers include JupyterLab within the container image. Using JupyterLab is a convenient way to run notebooks, get shell access (multiple sessions), run tensorboard, and have a file browser and text editor with syntax coloring all in one browser window. Running it in the background in your job is non-intrusive without any additional performance impact or effort and provides you an easy option to peek into your job at any time.
Important
Security Note: When opening a port to the container it will create an URL that ANYONE CAN USE. For more details and security recommendations, refer to the note in NVIDIA Base Command Platform Terms and Concepts.
11.3.1. Example of Running JupyterLab in a Job
The following is an example of a job that takes advantage of JupyterLab.
$ ngc base-command run --name "jupyterlab" --instance <INSTANCE_NAME> \
--commandline "jupyter lab --ip=0.0.0.0 --allow-root --no-browser --NotebookApp.token='' \
--notebook-dir=/ --NotebookApp.allow_origin='*'" \
--result /result --image "nvidia/pytorch:23.01-py3" --port 8888
These are some key aspects to using JupyterLab in your job.
Specify --port 8888 in the job definition.
The Jupyter lab port (8888 by default) must be exposed by the job.
The JupyterLab command must begin with the ‘jupyter lab’.
Total runtime should be set to a reasonable number to access the container before it finishes the job and closes
11.3.2. Connecting to JupyterLab
While the job is in a running state, you can connect to JupyterLab through the mapped URL as follows.
From the website, click the URL presented in the Mapped Port section of the job details page.
From the CLI, run $ ngc base-command info <job-id > and then copy the URL in the Port Mappings line and paste into a browser.
Example of JupyterLab:
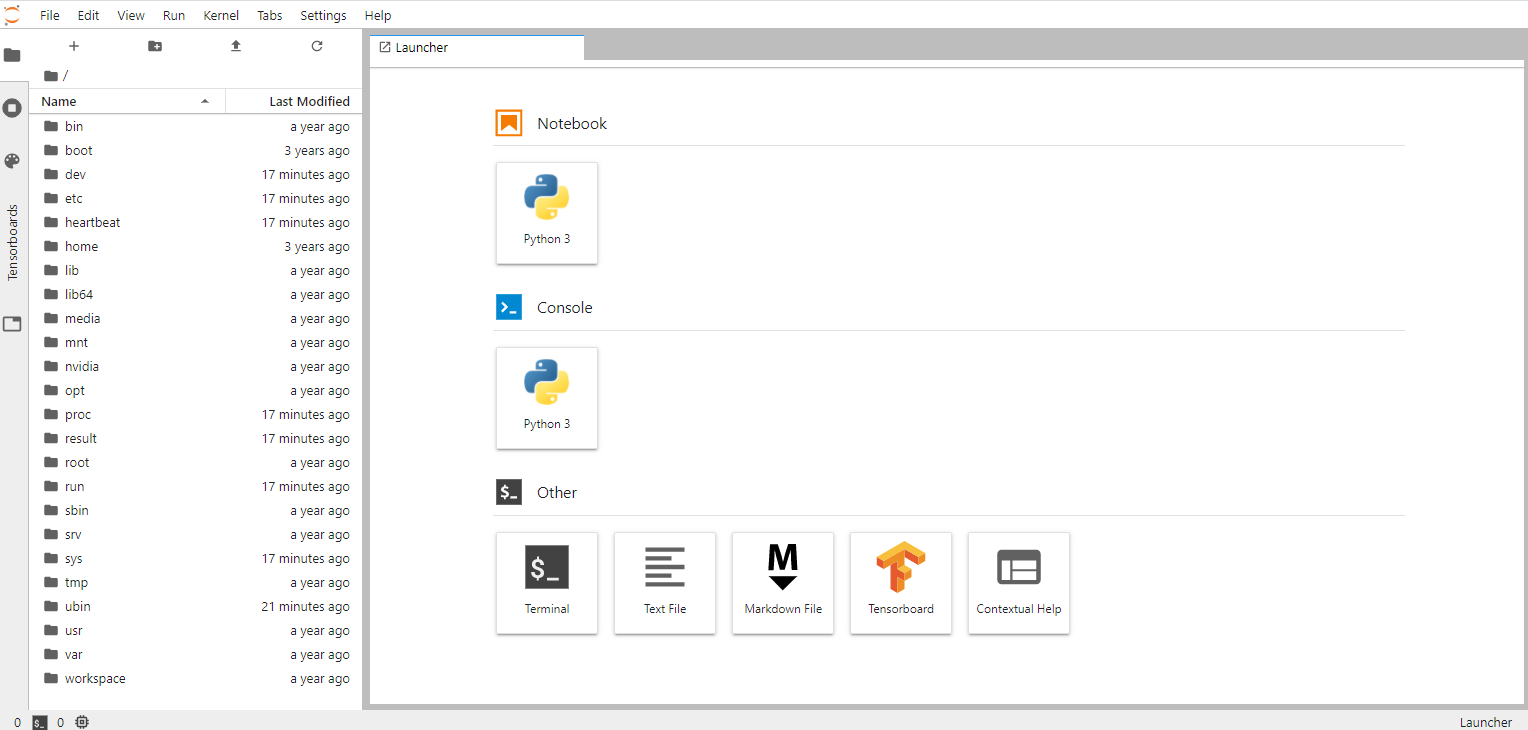
11.4. Cloning an Existing Job
You can clone jobs, which is useful when you want to start with an existing job and make small changes for a new job.
Click Jobs from the left navigation menu, then click the ellipsis menu for the job you want to copy and select Clone Job from the menu.
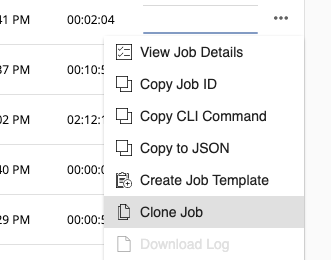
The create a job page opens with the fields populated with the information from the cloned job.
Edit fields as needed to create a new job, enter a unique name in the Name field, then click Launch.
The job should appear in the job dashboard.
To clone jobs via the CLI, use the --clone flag and add other flags to override any parameters being copied from the original job.
$ ngc base-command run --clone <job-id> --instance dgx1v.32g.8.norm
11.5. Launching a Job from a Template File
Click Base Command >Jobs > Create from the left-side menu and then click Create From Templates from the ribbon menu.
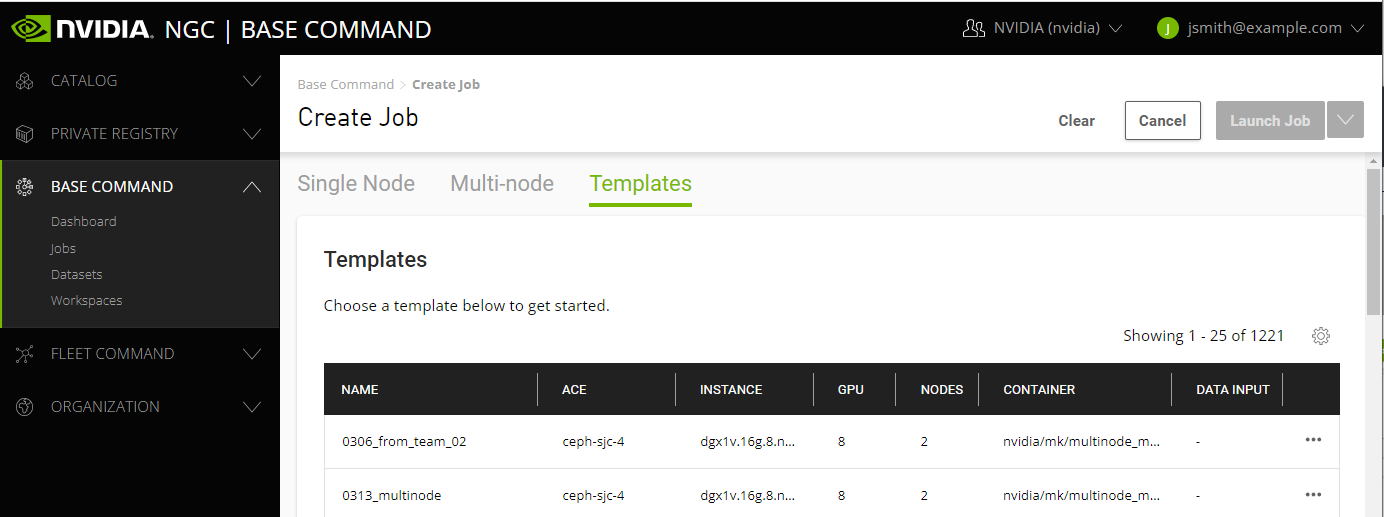
Click the menu icon for the template to use, then select Apply Template.
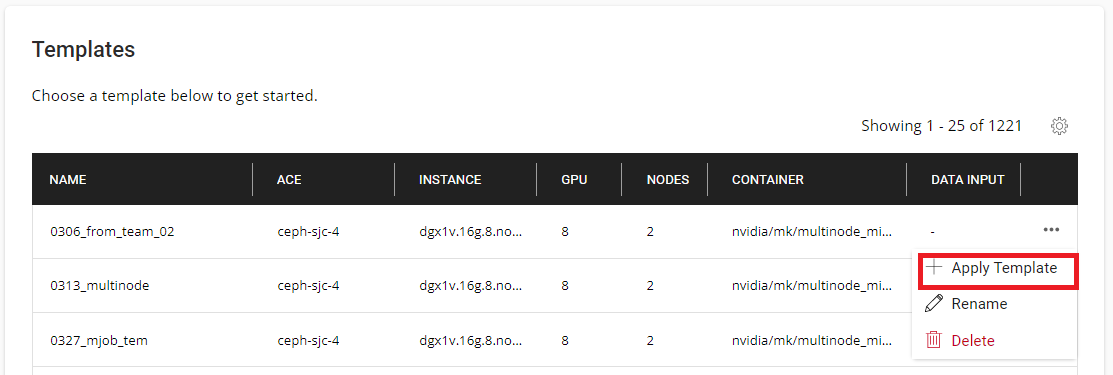
The create a job page opens with the fields populated with the information from the job template.
Edit fields as needed to create a new job or leave the fields as is, then click Launch.
11.6. Launching a Job Using a JSON File
When running jobs repeatedly from the CLI, sometimes it is easier to use a template file than the command line flags. This is currently supported in JSON. The following sections describe how to generate a JSON file from a job template and how to use it in the CLI.
11.6.1. Generating the JSON Using the Web UI
Perform the following to generate a JSON file using the NGC web UI.
Click Dashboard from the left-side menu, click the table view icon next to the search bar, then click the menu icon for the job you want to copy and select Copy to JSON.
The JSON is copied to your clipboard.
Open a blank text file, paste the contents into the file and then save the file using the extension .json.
Example:
test-json.jsonTo run a job from the file, issue the following:
$ ngc base-command run -f <file.json>
11.6.2. Generating the JSON Using the CLI
Alternatively, you can get the JSON using the CLI if you know the job ID as follows:
$ ngc base-command get-json <job-id> > <path-to-json-file>
The JSON is copied to the specified path and file.
Example:
$ ngc base-command get-json 1234567 > ./json/test-json.json
To run a job from the file, issue the following:
$ ngc base-command run -f <file.json>
Example:
$ ngc base-command run -f ./json/test-json.json
11.6.3. Overriding Fields in a JSON File
The following is an example JSON:
{
  "dockerImageName": "nvidia/tensorflow:19.11-tf1-py3",
  "aceName": "nv-us-west-2",
  "name": "test.exempt-demo",
  "command": "jupyter lab --ip=0.0.0.0 --allow-root --no-browser --NotebookApp.token='' --notebook-dir=/ --NotebookApp.allow_origin='*' & date; sleep 1h",
  "description": "sample command description",
  "replicaCount": 1,
  "publishedContainerPorts": [
    8888,
    6006
  ],
  "runPolicy": {
    "totalRuntimeSeconds": 3600,
    "premptClass": "RUNONCE"
  },
  "workspaceMounts": [
    {
      "containerMountPoint": "/mnt/democode",
      "id": "KUlaYYvXT56IhuKpNqmorQ",
      "mountMode": "RO"
    }
  ],
  "aceId": 257,
  "networkType": "ETHERNET",
  "datasetMounts": [
    {
      "containerMountPoint": "/data/imagenet",
      "id": 59937
    }
  ],
  "resultContainerMountPoint": "/result",
  "aceInstance": "dgx1v.32g.8.norm.beta"
}
You can specify other arguments in the command, but if they are specified in the JSON file, then the argument values will override the values in the JSON file.
See table below for mapping the field in template to option name in command line.
CLI option |
JSON Key |
|---|---|
|
command |
|
description |
|
none |
|
none |
|
dockerImageName |
|
aceInstance |
|
name |
|
port (pass in a list of ports [8888,6006]) |
|
workspaceMounts (pass in a list of objects) |
|
ace |
|
none |
|
none |
|
datasetMounts (pass in a list of objects) |
|
none |
|
none |
|
none |
|
none |
|
none |
|
networkType |
|
none |
|
runPolicy[preemptClass] |
|
replicaCount |
|
resultContainerMountPoint |
|
none |
|
none |
|
none |
|
none |
|
runPolicy[totalRuntimeSeconds] |
|
none |
|
none |
|
none |
Example:
Assuming the file pytorch.json is the example JSON file mentioned earlier, the following command will use instance dgx1v.16g.2.norm instead of instance dgx1v.16g.1.norm specified in the JSON.
$ ngc base-command run -f pytorch.json --instance dgx1v.16g.2.norm
Here are some more examples of overriding JSON arguments:
$ ngc base-command run -f pytorch.json --instance dgx1v.16g.4.norm --name "Jupyter Lab repro ml-model.exempt-repro"

$ ngc base-command run -f pytorch.json --image nvcr.io/nvidia/pytorch:20.03-py3
11.7. Exec into a Running Job using CLI
To exec into a running container, issue the following:
$ ngc base-command exec <job_id>
To exec a command in a running container, issue the following:
$ ngc base-command exec --commandline "command" <job_id>
Example using bash
$ ngc base-command exec --commandline "bash -c 'date; echo test'" <job_id>
11.8. Attaching to the Console of a Running Job
When a job is in running state, you can attach to the console of the job both from Web UI and using CLI. The console logs display outputs from both STDOUT and STDERR. These logs are also saved to the joblog.log file in the results mount location.
$ ngc base-command attach <job_id>
11.9. Managing Jobs
This section describes various job management tasks.
11.9.1. Checking Job Name, ID, Status, and Results
11.9.1.1. Using the NGC Web UI
Log into the NGC website, then click Base Command > Jobs from the left navigation menu.
The Jobs page lists all the jobs that you have run and shows the status, job name and ID.
The Status column reports the following progress along with timestamps: Created -> Queued -> Starting -> Running -> Finish.
When a job is in the Queued state, the Status History tab in the Web UI shows the reason for the queued state. The job info command on CLI also displays this detail.
When finished, click on your job entry from the JOBS page. The Results and Log tab both show the output produced by your job.
11.9.1.2. Using the CLI
After launching a job using the CLI, the output confirms a successful launch and shows the job details.
Example:
--------------------------------------------------
 Job Information
 Id: 1854152
 Name: ngc-batch-simple-job-raid-dataset-mnt
 Number of Replicas: 1
 Job Type: BATCH
 Submitted By: John Smith
 Job Container Information
 Docker Image URL: nvidia/pytorch:21.02-py3
 ...
 Job Status
 Created at: 2021-03-19 18:13:12 UTC
 Status: CREATED
 Preempt Class: RUNONCE
----------------------------------------
The Job Status of CREATED indicates a job that was just launched.
You can monitor the status of the job by issuing:
$ ngc base-command info <job-id>
This returns the same job information that is displayed after launching the job, with updated status information.
To view the stdout/stderr of a running job, issue the following:
$ ngc base-command attach <job-id>
All the NGC Base Command Platform CLI commands have additional options; issue ngc --help for details.
11.9.2. Monitoring Console Logs (joblog.log)
Job output (both STDOUT and STDERR) is captured in the joblog.log file.
For more information about result logging behavior, see Managing Results.
11.9.2.1. Using the NGC Web UI
To view the logs for your job, select the job from the Jobs page, then select the Log tab. From here, you can view the joblog.log for each node:
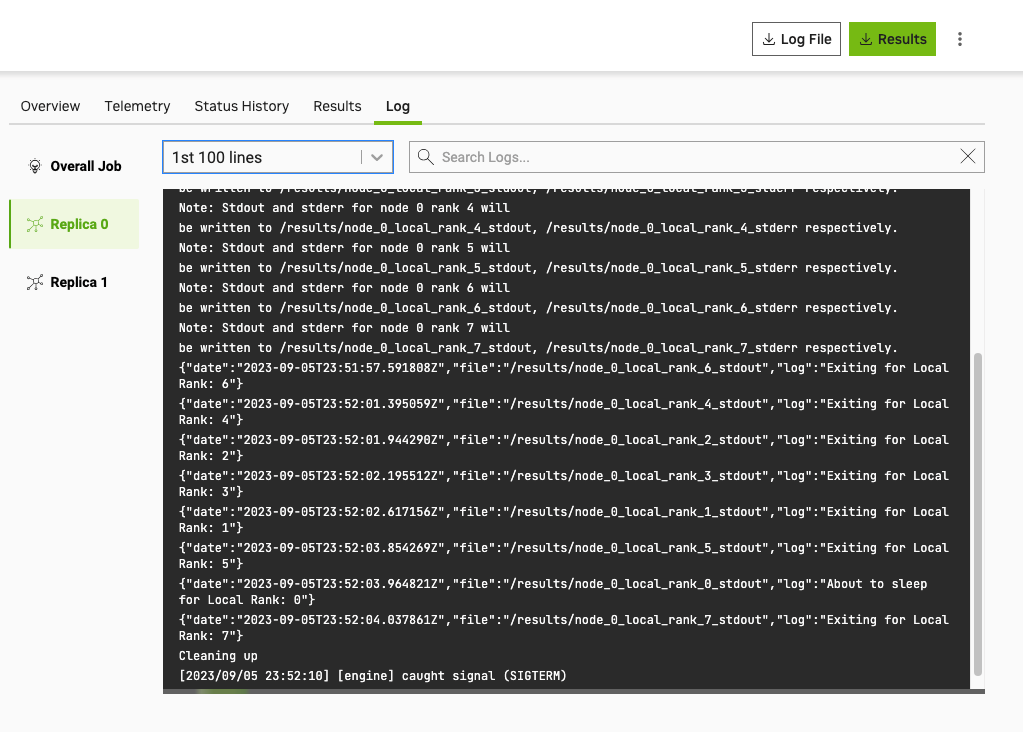
Note
If a multi-node job was run with array-type “MPI”, only the log from the first node (replica 0) will contain content. The default behavior is to stream the output of STDOUT and STDERR from all nodes to the joblog.log file on the first node (replica 0). As a result, the remaining log files on the other nodes will be empty.
11.9.2.2. Using the CLI
Issue the following command:
$ ngc result download <job-id>
The joblog.log files and STDOUT/STDERR from all nodes are included with the results, which are downloaded to the current directory on your local disk in a folder labeled job-id.
To view the STDOUT/STDERR of a running job, issue the following:
$ ngc base-command attach <job-id>
11.9.3. Downloading Results (interim and after completion)
11.9.3.1. Using the NGC Web UI
To download job results, do the following:
Select the job from the Jobs page, then select the Results tab.
From the Results page, select the file to download.
The file is downloaded to your Download folder.
11.9.3.2. Using the CLI
Issue the following:
$ ngc result download <job_id>
The results are downloaded to the current directory on your local disk in a folder labelled <job_id>.
11.9.4. Terminating Jobs
11.9.4.1. Using the NGC Web UI
To terminate a job from the NGC website, waiting until the job appears in the Jobs page, then click the menu icon for the job and select Kill Job.
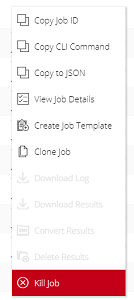
11.9.4.2. Using the CLI
Note the job ID after launching the job, then issue the following:
$ ngc base-command kill <job-id>
Example:
$ ngc base-command kill 1854178
Submitted job kill request for Job ID: '1854178'
You can also kill several jobs with one command by listing multiple job IDs as a combination of comma-separated IDs and ranges; for example ‘1-5’, ‘333’, ‘1, 2’, ‘1,10-15’.
11.9.5. Deleting Results
Results remain in the system consuming quota until removed:
$ ngc result remove <job_id>
11.10. Labeling Jobs
This section describes how to create custom labels when submitting a job and ways to use these labels thereafter.
Labels can be used to group or categorize similar jobs, or to search and filter on them.
Labels have the following requirements and restrictions:
Labels can be made with alphanumeric characters and “_” (underscore) and can be up to 256 characters long.
Labels that start with an “_” (underscore) are reserved for special purposes. Special purpose features are planned for a future release.
There is a maximum of 20 labels per job.
11.10.1. Creating Labels
Category Name |
Description |
Expected Values |
|---|---|---|
Normal |
Can be generated by any user with access to the job. |
Alphanumeric characters and “_” (underscores) up to 256 characters long and cannot start with “_”. |
Admin Labels |
Can only be generated, added, and removed by admins. |
Label that begins with a double underscore “__”. |
System Labels |
Labels that define a system behavior. Chosen from a pre-generated list and added or removed by anyone with access to the job. |
Label that begins with a single underscore “_”. |
System Label |
_locked_labels |
Label that, if present, disallows adding or removing any other labels by anyone. |
11.10.1.1. Using the NGC Web UI
In the Launch Job section of the Create Job page, enter a label in the Custom Labels field. Press Enter to apply the changes.
You can also specify more than one label to categorize one job into multiple groups, provided you add the labels one at a time (that is, press Enter after entering each label).
Example:
Create a custom label “nv_test_job_label_1001”
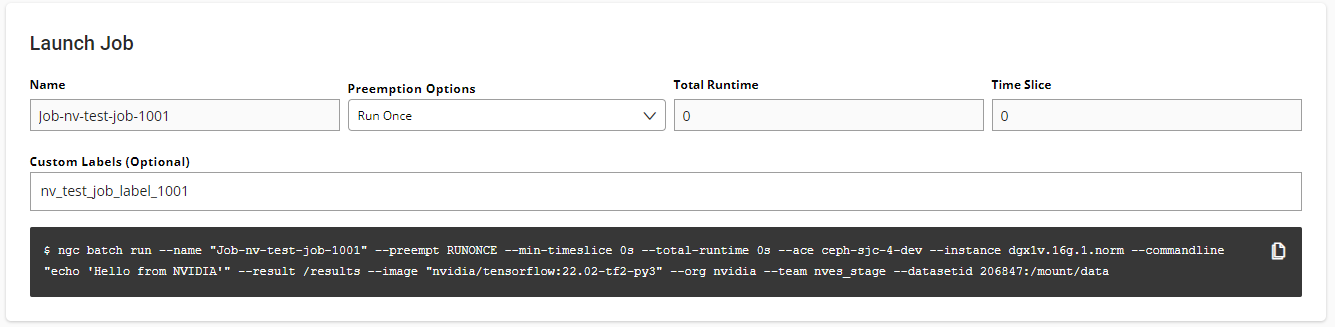
11.10.1.2. Using the CLI
You can assign job labels dynamically when submitting jobs using the CLI.
Issue the following for a single label:
$ ngc base-command run .. --label <label_1>
For multiple labels, issue the following:
$ ngc base-command run .. --label <label_1> --label <label_2>
System admins may create labels beginning with the __ (double underscore).
$ ngc base-command run .. --label <__some_label>
11.10.2. Modifying Labels
Labels for a job can be changed at any time during the lifetime of a job, as long as they are not locked.
11.10.2.1. Using the NGC Web UI
To modify a job label, do the following:
In the Custom Labels field, click on the “X” on the label to delete.
Add a new label and press Enter.
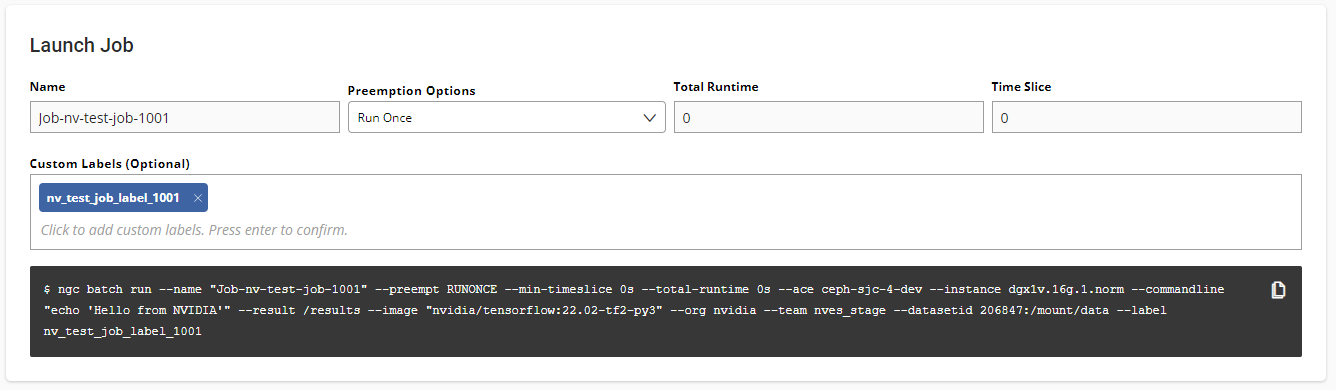
11.10.2.2. Using the CLI
The following examples show ways to modify labels in a job.
Clear (remove) all labels from a job
$ ngc base-command update .. --clear-label <job-id>
Add a label to a job
$ ngc base-command update .. --label "__bad" <job-id>Lock all labels currently assigned to a job
$ ngc base-command update .. --lock-label <job-id>
Unlock all labels currently assigned to a job
$ ngc base-command update .. --unlock-label <job-id>
Remove a specific label from a job
$ ngc base-command update .. --remove-label "test*" --remove-label "try" <job-id>
Admin system labels (starting with __ double underscores) can only be removed by users with admin privileges.
11.10.3. Searching/Sorting Labels
You can search on labels using the wildcard characters * and ? and filter using include/exclude patterns. Reserved labels are searchable by all users. Searching with multiple labels will return jobs with any of the listed labels. Search patterns are also case-insensitive.
11.10.3.1. Using the NGC Web UI
Enter a search term in the search field and press Enter.
Example:
Search on jobs with a label that starts with “nv_test_job_label*”
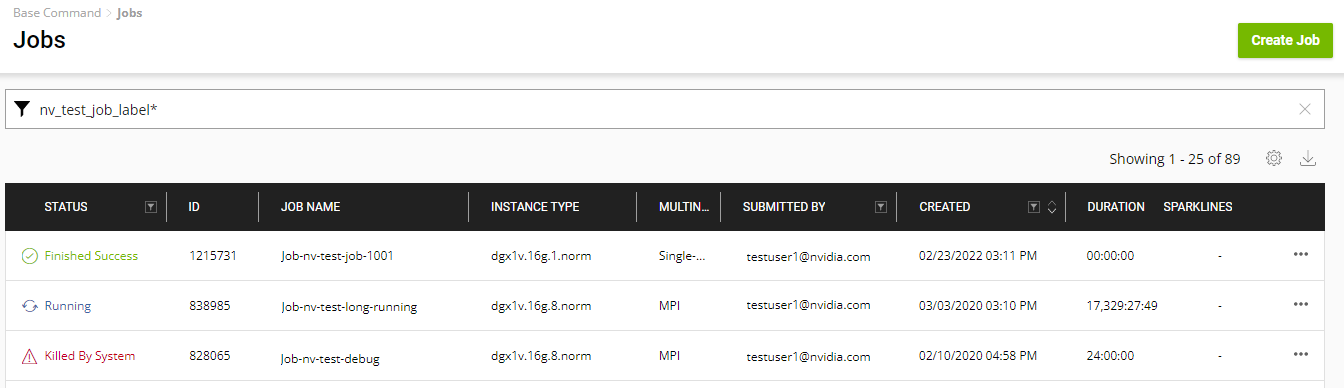
The results of the search are as follows:
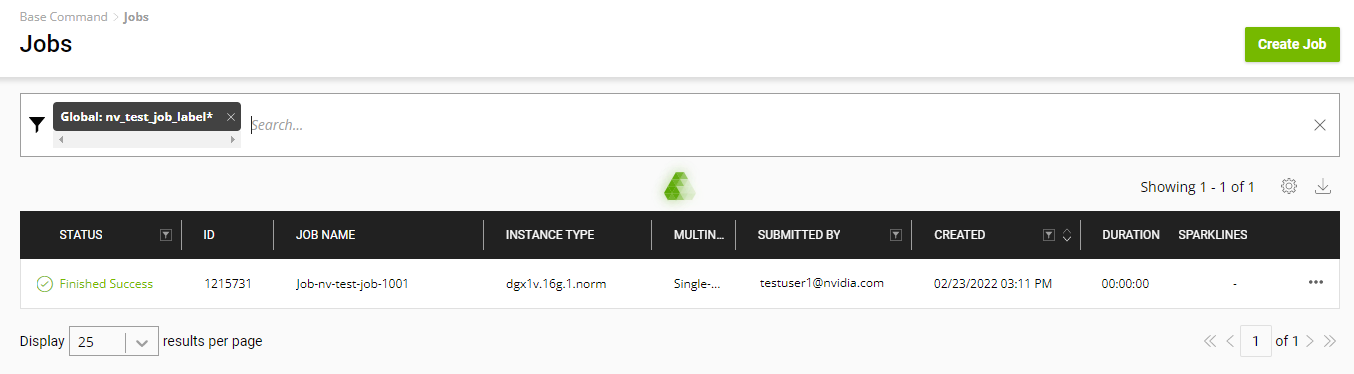
11.10.3.2. Using the CLI
You can exclude certain labels from a search.
Here is an example to list all jobs with “Pytorch” label but not with “bad” label:
$ ngc base-command list --label "Pytorch" --exclude-label "bad"
Here are some additional examples using the exclude options:
$ ngc base-command list --label "__tutorial" --exclude-label "qsg"
$ ngc base-command list --label "delete" --exclude-label "publish"
Here is an example of listing all labels except for label “aaa”:
$ ngc base-command list --label * --exclude-label "aaa"Here is an example to list multiple labels with a comma separator, which will list jobs with the labels “Pytorch” and/or “active” (case-insensitive):
$ ngc base-command list --label "Pytorch","active"
11.10.4. Viewing Labels
You can view job labels using the following methods.
11.10.4.1. Using the CLI
Example:
To view a list of all the labels defined or used within an org, issue the following:
$ ngc base-command list --column labels
Example:
To view a label for a particular job:
$ ngc base-command info <jobid>
The list of labels are returned in the following order:
system defined labels (starts with an underscore “_”)
labels added by an administrator (starts with a double underscore “__”)
other labels (sorted alphabetically)
11.10.5. Cloning/Templating Jobs
When jobs are cloned or created from a template, the custom labels are retained while the system or reserved labels are removed by default.
Refer to Cloning an Existing Job in the user guide for more information.
11.10.5.1. Using the NGC Web UI
In the Base Command > Jobs page, click the “…” menu and select Clone Job.
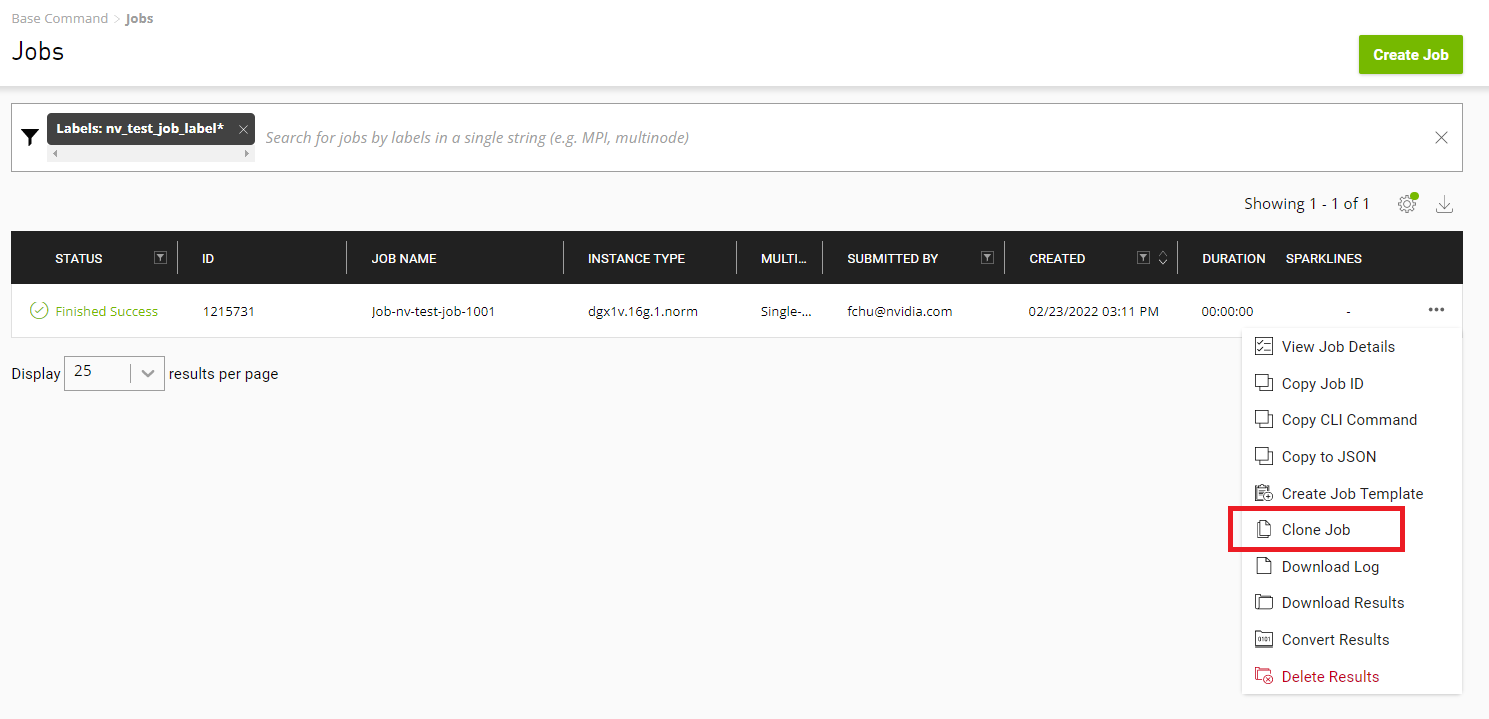
Note that custom labels are retained in the newly cloned job.
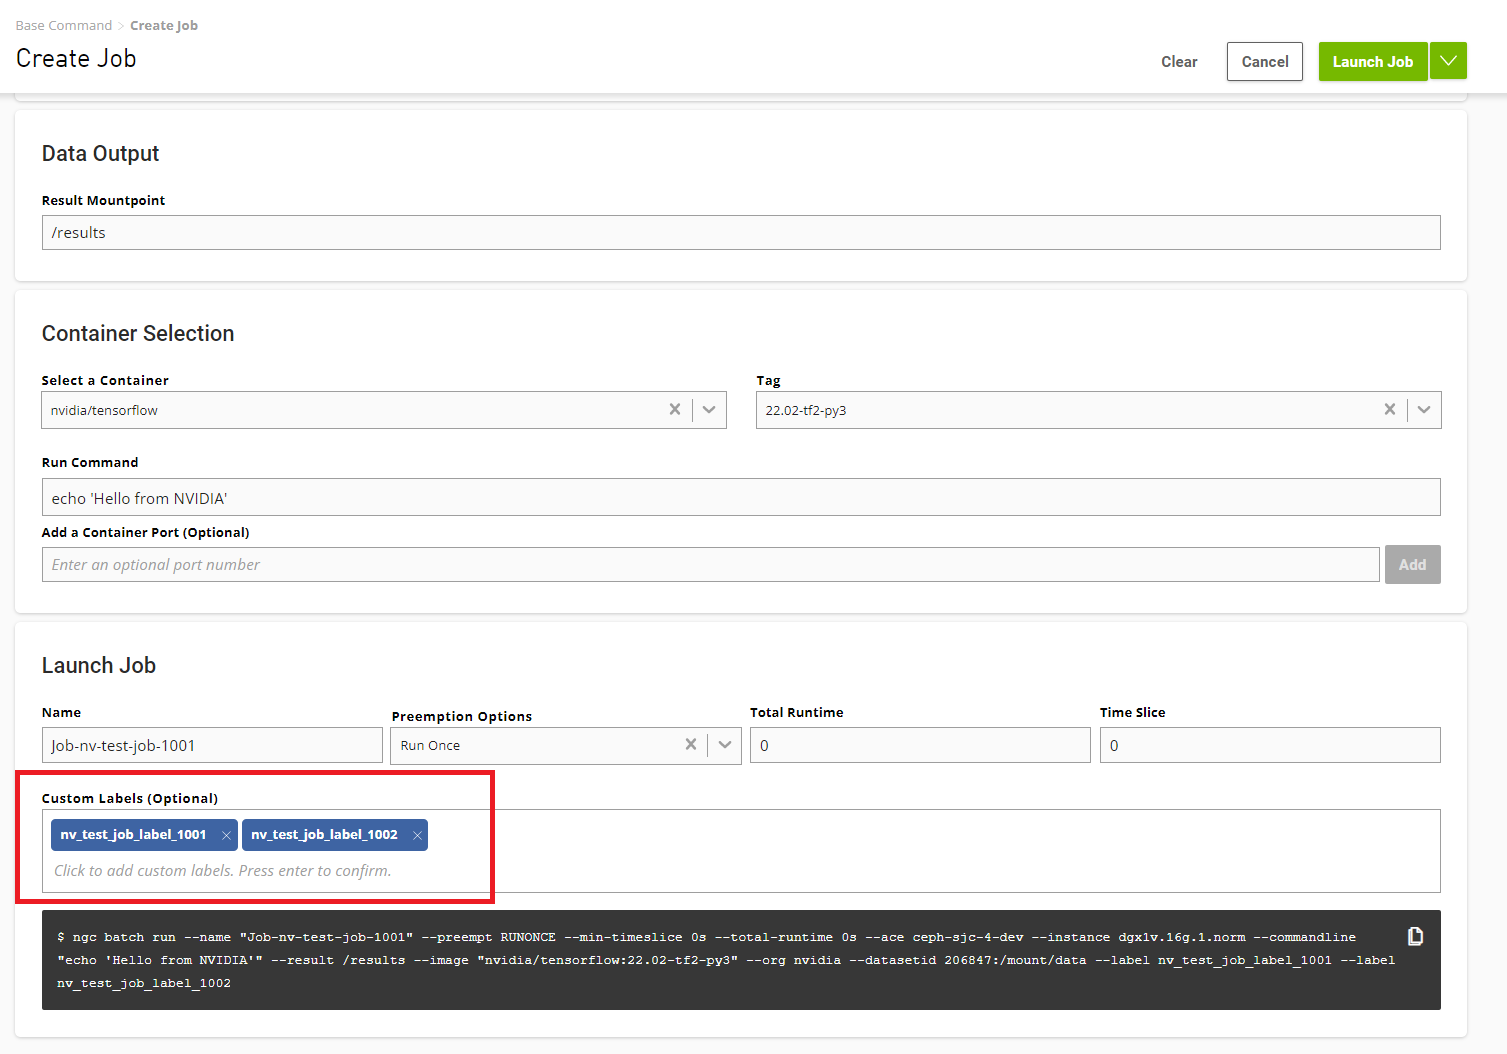
11.10.5.2. Using the CLI
Here is an example using the cloning options:
$ ngc base-command run .. -f jobdef.json --label "copy","rerun"
11.11. Scheduling Jobs
By default, jobs will run in the order they are submitted if resources and quota are available. Sometimes, there is a need to submit a high-priority job ahead of others. Two flags, order, and priority, can be set to allow for greater control over when jobs are run.
Priority can be HIGH, NORMAL, or LOW.
Order can be an integer between 1 and 99, with lower numbers executing first.
By default, the priority is NORMAL and the order is 50.
Flags |
Values |
Default |
Description |
|---|---|---|---|
Order |
[1-99] |
50 |
Affects the execution order of only your jobs. |
Priority |
[HIGH, NORMAL, LOW] |
NORMAL |
Affects the execution order of all jobs on the cluster. |
11.11.1. Job Order
Jobs can be assigned an order number ranging from 1 to 99 (default 50), with lower numbers executing first. The order number only changes the order of your jobs with the same priority and does not affect the execution of another user’s jobs. Order will not affect preemption behavior.
11.11.2. Job Priority
Priority can be HIGH, NORMAL (default), or LOW. Each priority is effectively its own queue on the cluster. All jobs in the higher priority queue will be run before jobs in the lower priority queues and will even preempt lower priority jobs if they are submitted as RESUMABLE. Since this can lead to NORMAL priority jobs being starved in an oversubscribed cluster, the ability for you to change your job priority must be enabled by your team or org admin.
In this example queue for a single user, jobs will be executed from top to bottom.
Priority |
Order |
|---|---|
HIGH |
1 |
HIGH |
50 |
NORMAL |
10 |
NORMAL |
50 |
NORMAL |
50 |
NORMAL |
99 |
LOW |
50 |
The following shows how to set the order and priority when submitting a job. Appending -h or --help to a command will provide more information about its flags.
$ ngc base-command run --name test-order ... --order 75 --priority HIGH
--------------------------------------------------------
 Job Information
   Id: 1247749
   Name: test-order
   ...
   Order: 75
   Priority: HIGH
You can also see the order and priority values when listing jobs.
$ ngc base-command list --column order --column priority
+---------+-------+----------+
| Id      | Order | Priority |
+---------+-------+----------+
| 1247990 | 75    | HIGH     |
| 1247749 | 75    | HIGH     |
| 1247714 | 12    | HIGH     |
| 1247709 | 50    | NORMAL   |
| 1247638 | 99    | HIGH     |
| 1247598 | 35    | NORMAL   |
+---------+-------+----------+

# Filtering only the high priority jobs
$ ngc base-command list --priority HIGH --column order --column priority
+---------+-------+----------+
| Id      | Order | Priority |
+---------+-------+----------+
| 1247990 | 75    | HIGH     |
| 1247749 | 75    | HIGH     |
| 1247714 | 12    | HIGH     |
| 1247638 | 99    | HIGH     |
+---------+-------+----------+
Note: Due to limitations of the current release, these are the steps to change the order or priority of a job.
Clone the job.
Before submitting, set the order and priority of the cloned job.
Delete the old job.
11.11.3. Configuring Job Preemption
Support for job preemption is an essential requirement for clusters to enable priority-based task scheduling and execution and improve resource utilization, fitness, fairness, and starvation handling. This is especially true in smaller clusters, which tend to operate under high load conditions, and where scheduling becomes a critical component impacting both revenue and user experience.
Job preemption in NGC clusters combines user-driven preempt and resume support, scheduler-driven system preemption, and operations-driven automatic node-drain support. Job preemption targets a specific class of jobs called resumable jobs ( --preempt RESUMABLE ). Resumable jobs in NGC have the advantage of being allowed longer total runtimes on the cluster than “run once” jobs.
11.11.3.1. Enabling Preemption in a Job
To enable the preemption feature, users need to launch the job with the following flags:
--preempt
--min-timeslice XX
11.11.3.2. Using the --preempt flag
The --preempt flag takes the following arguments.
--preempt <RUNONCE | RESUMABLE | RESTARTABLE>
Where
RUNONCE: is the default condition and specifies that the job not be restarted. This condition may be required to avoid adverse actions taken by the failed job.
RESUMABLE: allows the job to resume where it left off after preemption, using the same command that started the job. Typically applies week-long simulations with periodic checkpoints, nearly all HPC apps and DL Frameworks, and stateless jobs.
RESTARTABLE: (Currently not supported) specifies that the job must be restarted from the initial state if preempted. Typically applies to short jobs where resuming is more work than restarting, software with no resume ability, or jobs without workspaces.
11.11.3.3. Using the --min-timeslice flag
Users must provide an additional option of specifying a minimum timeslice, the minimum amount of time that a resumable job is guaranteed to run once it gets to a running state. This option allows the user to specify a time window during which the job can make enough progress before preempting and before a checkpoint is made of its state so that the job can resume if it gets preempted. Specifying a smaller timeslice may help the user get their job scheduled faster during high-load conditions.
11.11.3.4. Managing Checkpoints
Users are responsible for managing their checkpoints in workspaces.
They can accomplish this by adding these controllable attributes in the Job Script.
Training script saves checkpoints in regular intervals.
On resuming training, the script should read the existing checkpoint and resume training from the latest saved checkpoint.
11.11.3.5. Preempting a Job
To preempt a job, use the ngc base-command preempt command.
Syntax
$ ngc base-command preempt <job_id>
11.11.3.6. Resuming a Preempted Job
To preempt a job, use the ngc base-command resume command.
Syntax
$ ngc base-command resume <job_id>
Example Workflow
Launch a job with preempt set to “RESUMABLE.”
$ ngc base-command run --name "preemption-test" --preempt RESUMABLE
--min-timeslice 300s --commandline python train.py --total-runtime 72000s
--ace nv-eagledemo-ace --instance dgxa100.40g.1.norm --result /results
--image "nvidia/pytorch:21.02-py3"
--------------------------------------------------
   Job Information
      Id: 1997475
      Name: preemption-test
      Number of Replicas: 1
      Job Type: BATCH
      Submitted By: John Smith
      ...
This workload uses the Pytorch container and runs a dummy training script
train.py.Once the job is running, you can preempt it.
$ ngc base-command preempt 1997475Submitted job preempt request for Job ID: ‘1997475’
To resume the preempted job, issue the
ngc base-command resumecommand.$ ngc base-command resume 1997475 Submitted job resume request for Job ID: '1997475'
The Status History for the job on the NGC Base Command Platform web application shows its progression.
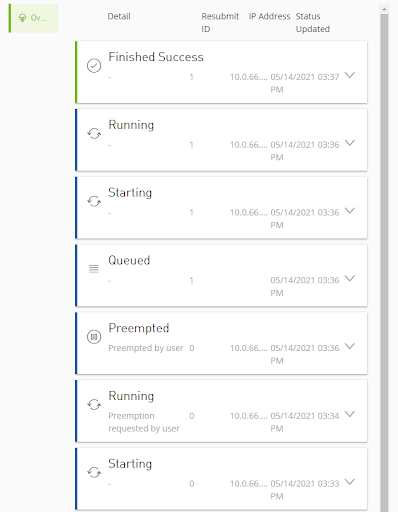
12. Telemetry
This chapter describes the system telemetry feature of Base Command Platform. In this chapter, you will learn about the different metrics collected from a workload and plotted in UI enabling you to monitor the efficiency of a workload in near real time (approximately 30 seconds). The telemetry can be accessed using both the web UI and CLI.
NVIDIA Base Command Platform provides system telemetry information for jobs and also allows jobs to send telemetry to Base Command Platform to be recorded. This information (graphed in the Base Command Platform dashboard and also available from the CLI in a future release) is useful for providing visibility into how jobs are running. This lets users
Optimize jobs.
Debug jobs.
Analyze job efficiency.
Job telemetry is automatically generated by Base Command Platform and provides GPU, Tensor Core, CPU, GPU Memory, and IO usage information for the job.
The following table provides a description of all the metrics that are measured and tracked in the Base Command Platform telemetry feature:
Note
The single numbers given for attributes that are measured for each GPU will be the mean by default.
Metric |
Definition |
|---|---|
Job Runtime |
How long the job has been in the RUNNING state (HH:MM:SS) |
Time GPUs Active |
The percentage of time over the entire job that the graphics engine on the GPUs have been active (GPU Active % > 0%). |
GPU Utilization |
One of the primary metrics to observe. It is defined as the percentage of time one or more GPU kernels are running over the last second, which is analogous to a GPU being utilized by a job. |
GPU Active % |
Percent of GPU cores that are active. The graphics engine is active if a graphics/compute context is bound and the graphics pipe or compute pipe is busy. Effectively the GPU utilization for each GPU. |
Tensor Cores Active % |
The percentage of cycles the tensor (HMMA) pipe is active (off the peak sustained elapsed cycles). |
GPU Memory Active |
This metric represents the percentage of time that the GPU’s memory controller is utilized to either read or write from memory. |
GPU Power |
Shows the power used by each GPU in Watts, as well as the percentage of its total possible power draw. |
GPU Memory Used (GB) |
This metric shows how much of the GPU’s video memory has been used. |
PCIe Read/Write BW |
This metric specifies the number of bytes of active PCIe read/transmit data including both header and payload. Note that this is from the perspective of the GPU, so copying data from host to device (HtoD) or device to host (DtoH) would be reflected in these metrics. |
CPU Usage |
This metric gives the % CPU usage over time. |
System Memory |
Total amount of system memory being used by the job in GB. |
Raid File System |
Amount of data in the /raid folder. By default the max is 2 TB. More info at Local Scratch Space. |
[Dataset | Workspace | Results] IOPS Read |
Number of read operations per second accessing the mounted [Dataset | Workspace | Results] folders. |
[Dataset | Workspace | Results] IOPS Write |
Number of write operations per second accessing the mounted [Dataset | Workspace | Results] folders. |
[Dataset | Workspace | Results] BW Read |
Shows the total amount of data (in GB) read from the mounted [Dataset | Workspace | Results] folders. |
[Dataset | Workspace | Results] BW Write |
Shows the total amount of data written to the mounted [Dataset | Workspace | Results] folders. |
Network BW [TX | RX] |
Shows the total amount of data transmitted from the job (TX) and received by the job (RX). |
NV Link BW [TX | RX] |
Shows NVLink bandwidth being used in GB/s. NVLink direct is a GPU-GPU interconnect for GPUs on the same node. This is a per replica metric for Multi Node Jobs and a per node metric for partial node workloads. |
12.1. Viewing Telemetry Information from the NGC Web UI
Click Jobs, select one of your jobs, then click the Telemetry tab.
The following are example screenshots of the Telemetry tab.
Note
The screenshot is presented for example purpose only - the exact look may change depending on the NGC release.
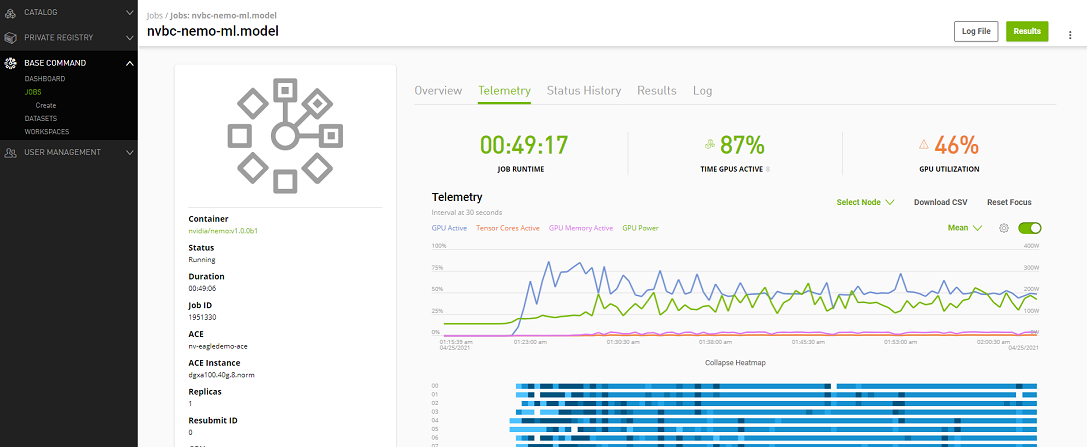
The floating window gives a breakdown of the telemetry metrics at each time slice for more informative walkthrough of the metrics.
The single numbers given for attributes that are measured for each GPU is mean/average by default but we can also visualize minimum or maximum statistics using the drop down menu.
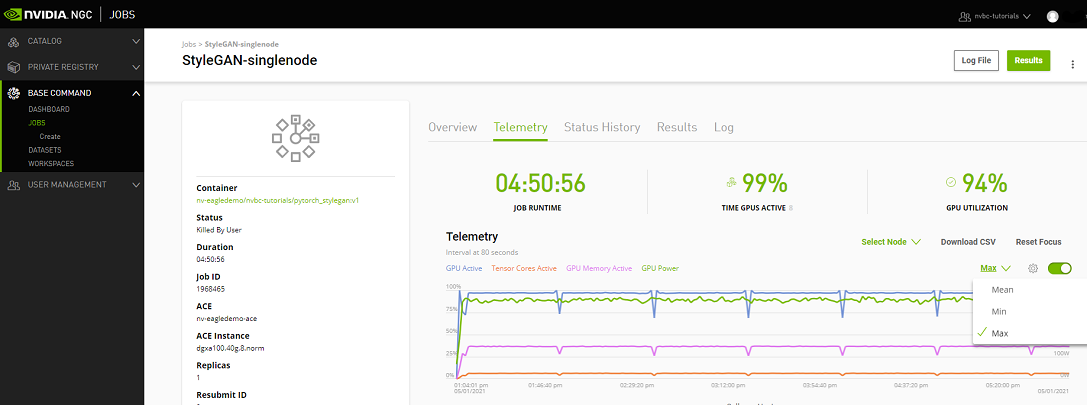
Viewing the telemetry in Min Statistics:
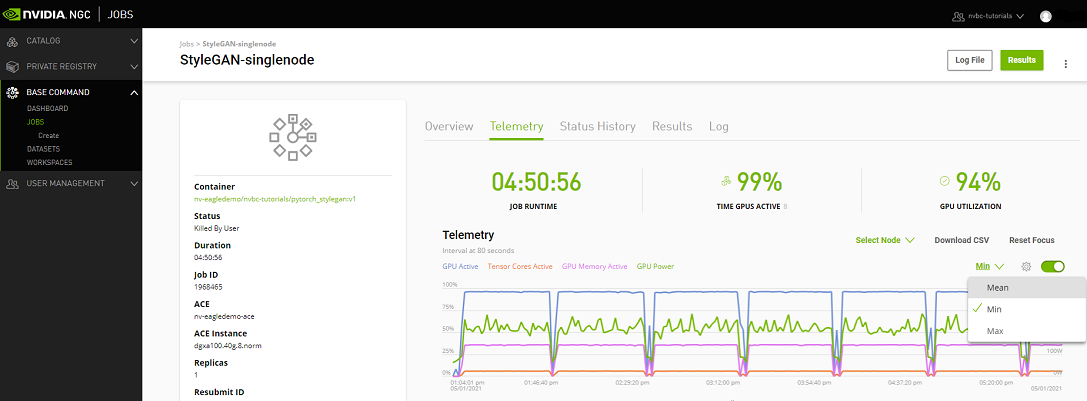
Viewing the telemetry in Max Statistics:
We can see the per-GPU metrics in the floating window as shown below.
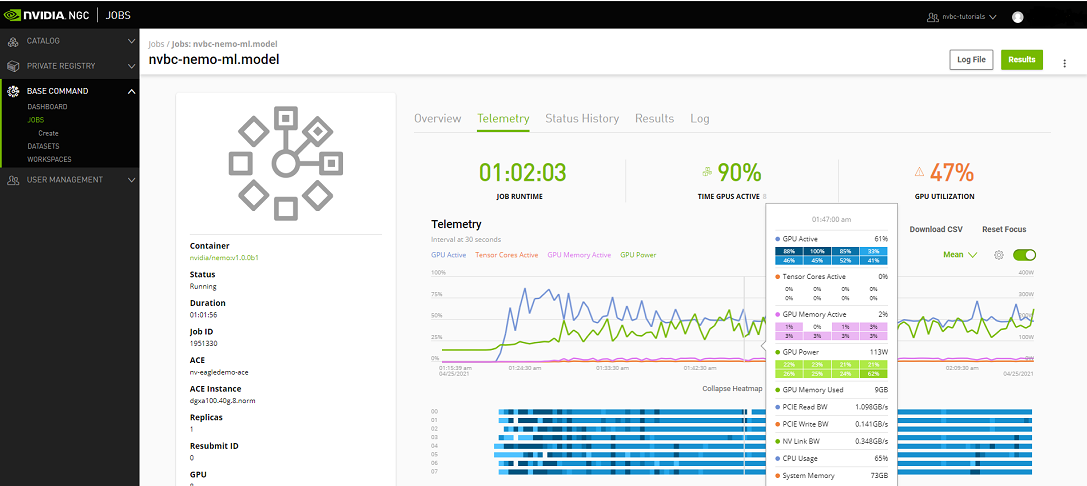
The telemetry shows the Overall GPU Utilization and GPU Active Percentage along with the Job Runtime on top. Following that we have more detailed information in each section of the telemetry.
GPU Active, Tensor Cores Active, GPU Memory Active and GPU Power:
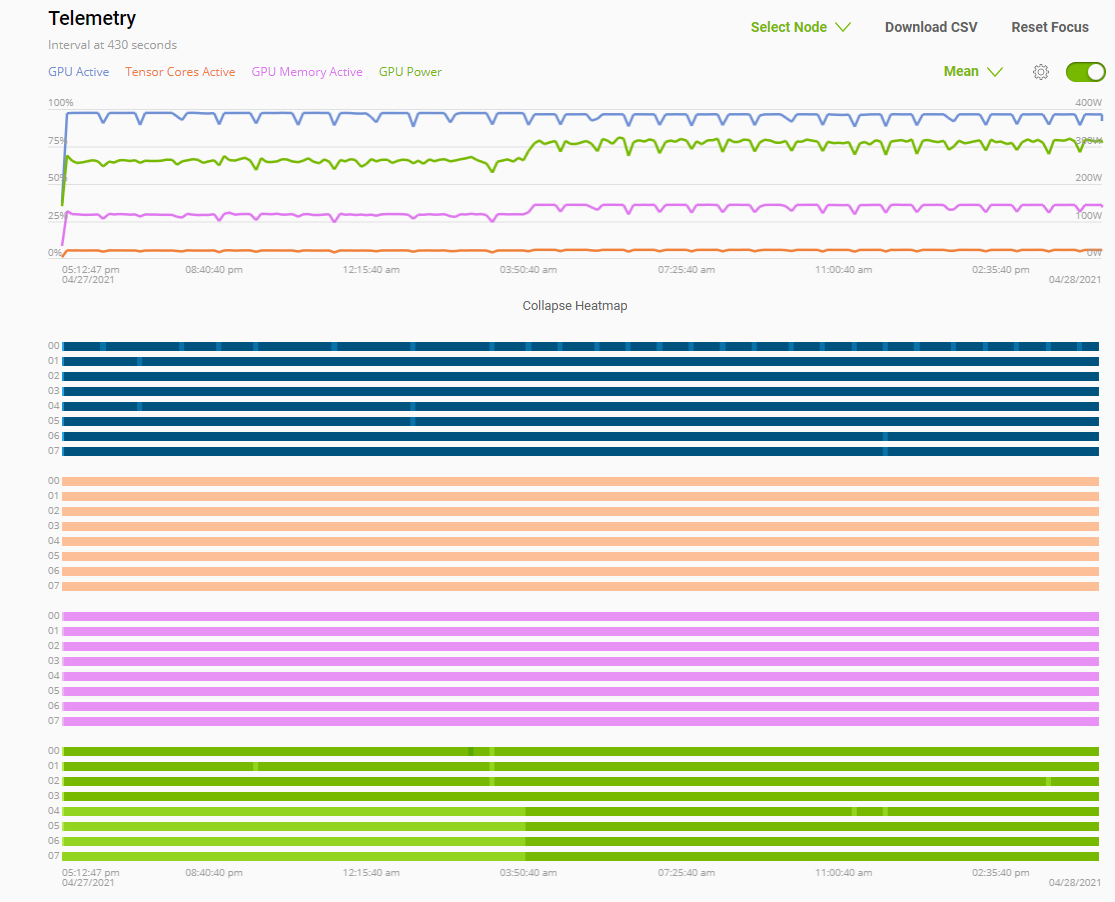
GPU memory Used:
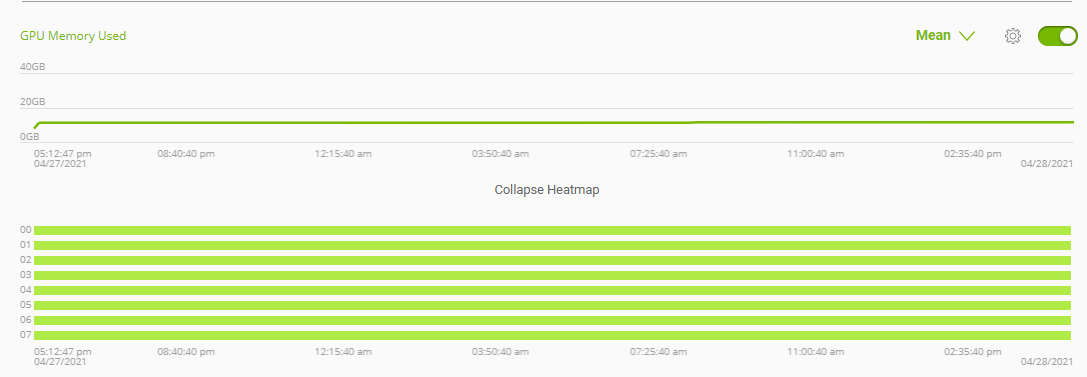
PCIe Read and Write BW:
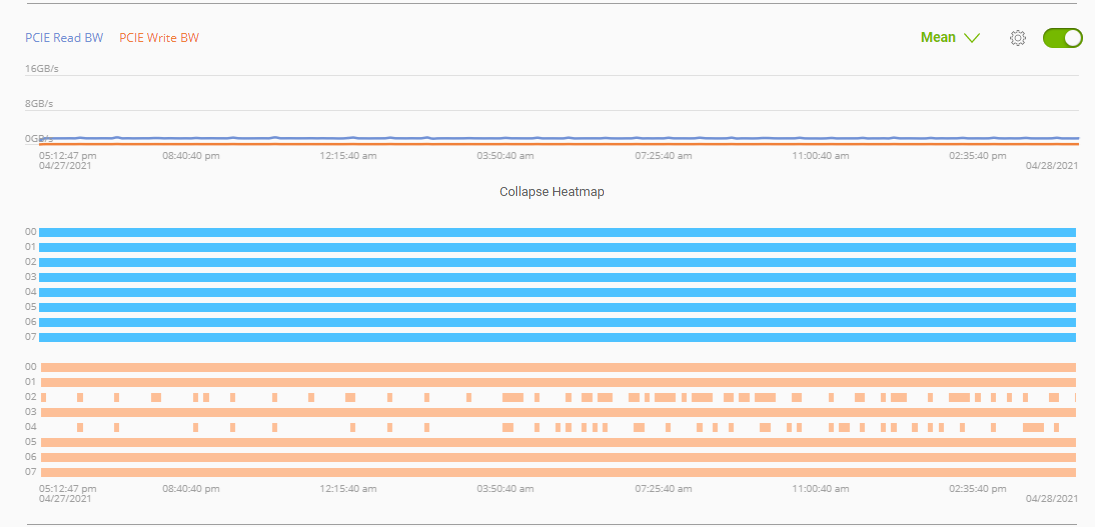
NVLink BW:
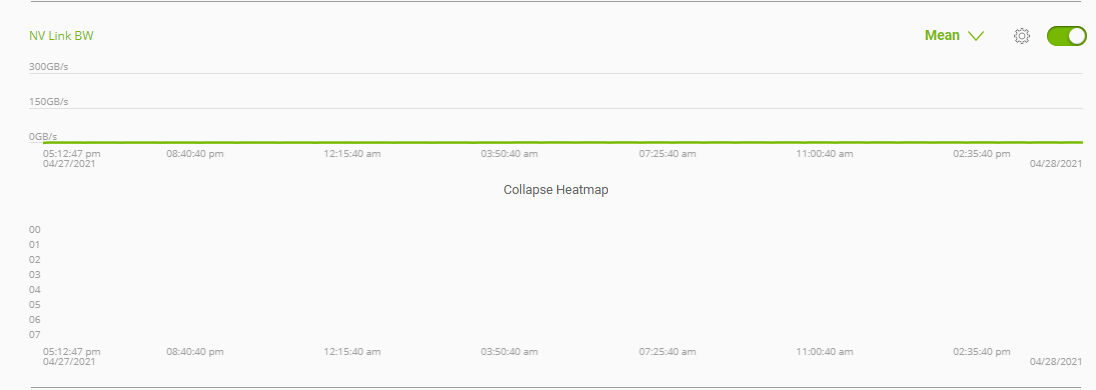
CPU Usage and System Memory:

12.2. Telemetry for Multinode Jobs
By default, the telemetry shows averaged out for all the Nodes. Switching between replicas is easy by selecting which Node you want to see the metric for clicking Select Node.
The metrics then can be seen for each replica as shown below:
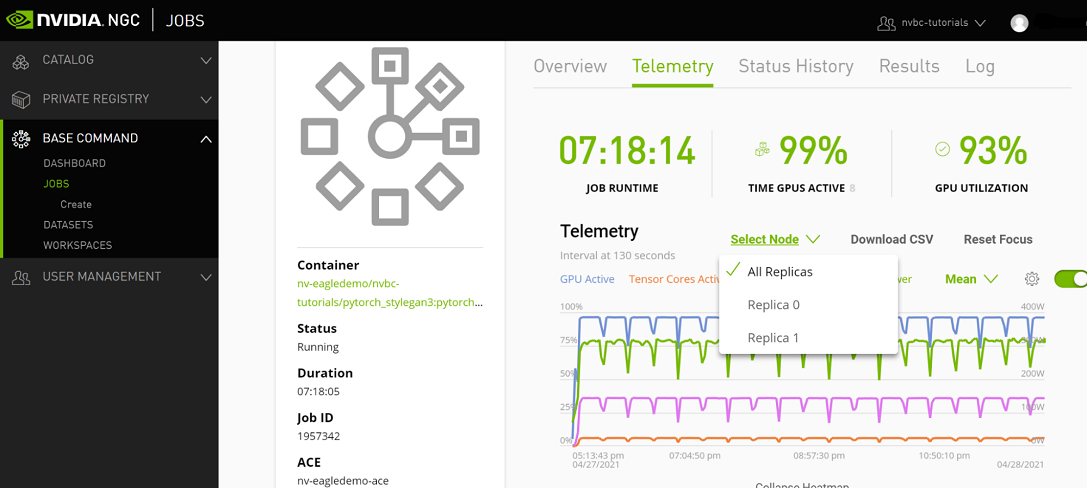
Replica 0:
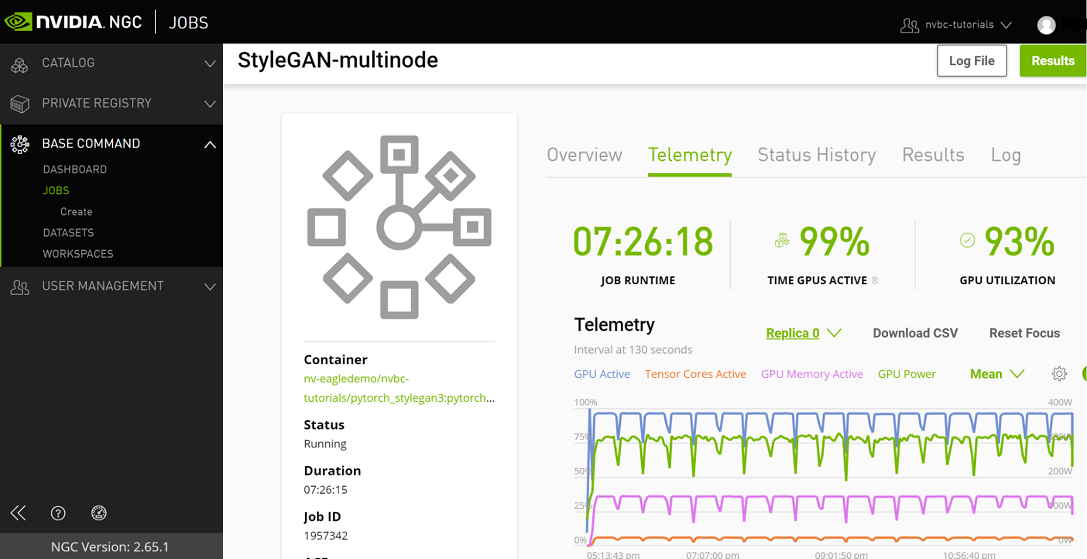
Replica 1:
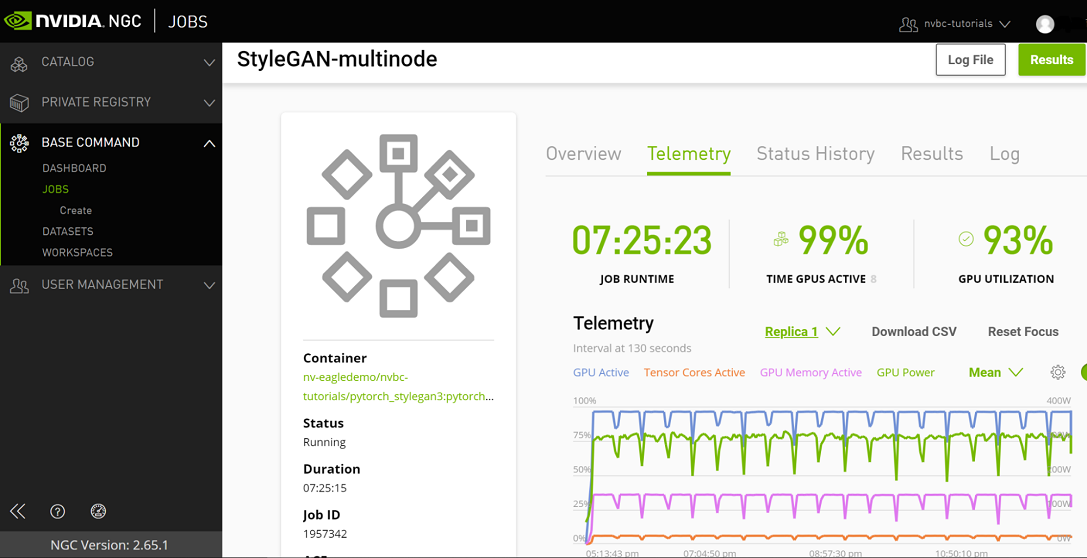
13. Advanced Base Command Platform Concepts
This chapter describes the more advanced features of Base Command Platform. In this chapter, you will learn about in-depth use cases of a special feature or in-depth attributes of an otherwise common feature.
13.1. Multi-node Jobs
NVIDIA Base Command Platform supports MPI-based distributed multi-node jobs in a cluster. This lets you run the same job on multiple nodes simultaneously, subject to the following requirements.
All GPUs in a node must be used.
Container images must include components such as OpenMPI 3.0+ and Horovod as needed.
13.1.1. Defining Multi-node Jobs
For a multi-node job, NVIDIA Base Command Platform schedules (reserves) all nodes as specified by the --replicas option. The specified command line in the job definition is executed only on the parent node (launcher), which is identified by replica id 0. It is the responsibility of the user to execute commands on child nodes (replica id >0), by utilizing mpirun command as shown in examples in this section.
NVIDIA Base Command Platform provides the required info, mostly exporting relevant ENV variables, to enable invocation of commands on all replicas and enable multi-node training using distributed PyTorch or Horovod.
Multi-node job command line must address the following two levels of inter-node interactions for a successful multi-node training job.
Invoke the command on replicas, typically all, using mpirun.
Include node details as args to distributed training scripts (such as parent node address or host file).
For this need, NVIDIA Base Command Platform sets the following variables in the job container runtime shell.
ENV Var |
Definition |
|---|---|
NGC_ARRAY_INDEX |
Set to the index of the replica. Set to 0 for the Parent node. |
NGC_ARRAY_SIZE |
Set to the number of replicas in the job definition. |
NGC_MASTER_ADDR |
Address (DNS service) to reach the Parent node or Launcher. Set on all replicas. For replica 0, it points to localhost. For use with distributed training (such as PyTorch). |
NGC_REPLICA_ID |
Same as NGC_ARRAY_INDEX. |
OMPI_MCA_orte_default_hostfile |
This is only valid on the Parent node, or replica 0. Set to the host file location for use with distributed training (like Horovod). |
13.1.2. Understanding the –replicas argument
The following table shows the corresponding node count and replica ids for the --replicas argument.
–replicas |
Number of nodes |
Replica IDs |
|---|---|---|
|
Not applicable |
Not applicable |
|
Not applicable |
Not applicable |
|
2 (1x parent, 1x child) |
0, 1 |
|
3 (1x parent, 2x child) |
0, 1, 2 |
|
4 (1x parent, 3x child) |
0, 1, 2, 3 |
|
N (1x parent, (N-1)x child |
0, 1, 2, …(N-1) |
13.1.3. Starting a Multi-node Job from the NGC Web UI
Multi-node jobs can also be started and monitored with the NGC Web UI.
Note
In order for a container to be selected for a multi-node job, it must first be tagged as a Multi-node Container in the Web UI.
Private registry users can tag the container from the container page: Click the menu icon, select Edit, then check the Multi-node Container checkbox and save the change. Public containers that are multi-node capable must also be tagged accordingly by the publisher.
Login to the NGC Dashboard and select Jobs from the left-side menu.
In the upper right select Create a job.
Click the Create a Multi-node Job tab.

Under the Accelerated Computing Environment section, select your ACE and Instance type.

Under the Multi-node section, select the replica count to use.
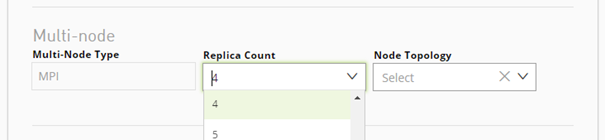
Under the Data Input section, select the Datasets and Workspaces as needed.
Under the Data Output section, enter the result mount point.
Under the Container Selection section, select the container and tag to run, any commands to run inside the container, and an optional container port.
Under the Launch Job section, provide a name for the job and enter the total run time.
Click Launch.
13.1.4. Viewing Multi-node Job Results from the NGC Web UI
Click Jobs from the left-side menu.
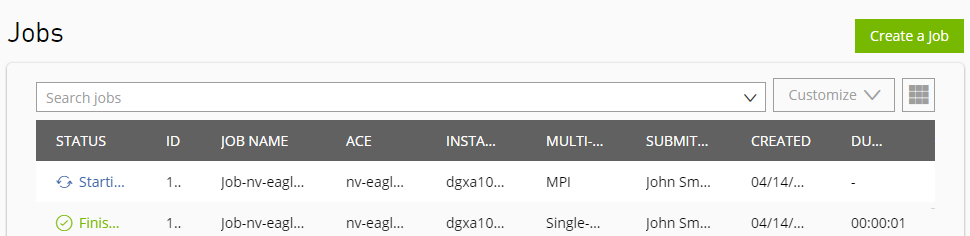
Select the Job that you want to view.
Select one of the tabs - Overview, Telemetry, Status History, Results, or Log. The following example shows Status History. You can view the history for the overall job or for each individual replica.
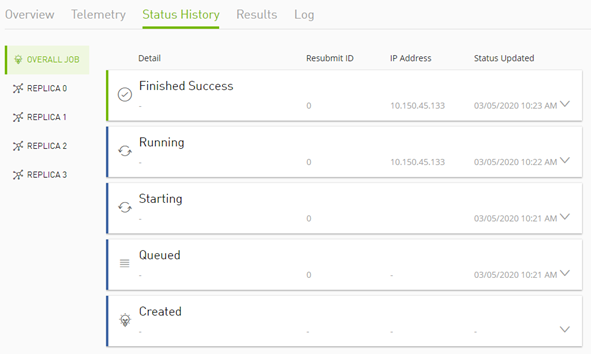
13.1.5. Launching Multi-node Jobs Using the NGC CLI
Along with other arguments required for running jobs, the following are the required arguments for running multi-node jobs.
Syntax:
$ ngc base-command run \
...
--replicas <num>
--total-runtime <t>
--preempt RUNONCE
...
Where:
--replicas: specifies the number of nodes (including the primary node) upon which to run the multi-node parallel job.
--total-runtime: specifies the total time the job can run before it is gracefully shut down. Format: [nD] [nH] [nM] [nS].
Note
To find the maximum run time for a particular ACE, use the following command:
$ ngc ace info <ace name> --org <org id> --format_type json
The field “maxRuntimeSeconds” in the output contains the maximum run time.
--preempt RUNONCE: specifies the RUNONCE job class for preemption and scheduling.
Example 1: To run a Jupyterlab instance on node 0
$ ngc base-command run \
--name "multinode-jupyterlab" \
--total-runtime 3000s \
--instance dgxa100.80g.8.norm \
--array-type "MPI" \
--replicas "2" \
--image "nvidia/tensorflow:21.03-tf1-py3" \
--result /result \
--port 8888 \
--commandline "set -x && date && nvidia-smi && \
jupyter lab --ip=0.0.0.0 --allow-root --no-browser --NotebookApp.token='' --notebook-dir=/ --NotebookApp.allow_origin=*"
mpirun and bcprun commands can then be run from within Jupyterlab after launching.
Example 2: Using mpirun
$ ngc base-command run \
--name "multinode-simple-test" \
--total-runtime 3000s \
--instance dgxa100.80g.8.norm \
--array-type "MPI" \
--replicas "2" \
--image "nvidia/tensorflow:21.03-tf1-py3" \
--result /result \
--port 8888 \
--commandline "mpirun --allow-run-as-root -x IBV_DRIVERS=/usr/lib/libibverbs/libmlx5 -np \${NGC_ARRAY_SIZE} -npernode 1 bash -c 'hostname'"
Note that mpirun is used to execute the commands on all the replicas, specified via NGC_ARRAY_SIZE. The actual command (highlighted in a different color in the example) to run on each replica is included as a bash command input (with special chars escaped as needed).
Example 3: Using mpirun with PyTorch
Note the use of NGC_ARRAY_SIZE, NGC_ARRAY_INDEX, and NGC_MASTER_ADDR.
$ ngc base-command run \
--name "multinode-pytorch" \
--total-runtime 3000s \
--instance dgxa100.80g.8.norm \
--array-type "MPI" \
--replicas "2" \
--image "nvidia/pytorch:22.11-py3" \
--result /result \
--port 8888 \
--commandline "python3 -m torch.distributed.launch \
--nproc_per_node=8 \
--nnodes=\${NGC_ARRAY_SIZE} \
--node_rank=\${NGC_ARRAY_INDEX} \
--master_addr=\${NGC_MASTER_ADDR} train.py"
13.1.5.1. Targeting Commands to a Specific Replica
CLI can be used to execute a command in a running job container by using the following command.
$ ngc base-command exec <job_id>
For a multi-node workload, there are multiple replicas running containers. The replicas are numbered with zero-based indexing. The above command, specifying just the job id, targets the exec command to the first replica, which is indexed at 0 (zero). You may need to run a command on a different replica in a multi-node workload, which can be achieved by the following option.
$ ngc base-command exec <job_id>:<replica-id>
When omitted, the first replica (id 0) is targeted for the command.
13.1.5.2. Viewing Multi-node Job Status and Information
The status of the overall job can be checked with the following command:
$ ngc base-command info <job_id>
To check the status of one of the replicas, issue:
$ ngc base-command info <job_id>:<replica_id>

where <replica_id > is from 0 (zero) to (number of replicas)-1.
The following example shows the status of each replica of a two-replica job:
$ ngc base-command info 1070707:0
--------------------------------------------------
 Replica Information
 Replica: 1070707:0
 Created At: 2020-03-04 22:39:00 UTC
 Submitted By: John Smith
 Team: swngc-mnpilot
 Replica Status
 Status: CREATED
--------------------------------------------------
$ ngc base-command info 1070707:1
--------------------------------------------------
 Replica Information
 Replica: 1070707:1
 Created At: 2020-03-04 22:39:00 UTC
 Submitted By: John Smith
 Team: swngc-mnpilot
 Replica Status
 Status: CREATED
--------------------------------------------------
To get information about the results of each replica, use:
$ ngc result info <job_id>:<replica_id>
13.1.6. Launching Multi-node Jobs with bcprun
When launching multi-node jobs, NGC installs bcprun, a multi-node application launcher utility on Base Command Platform clusters. The primary benefits of bcprun are the following:
Removes dependency on
mpirunin the container image.Provides
srunequivalence to allow users to easily migrate jobs between Slurm and Base Command Platform clusters.Provides a unified launch mechanism by abstracting a framework-specific environment needed by distributed DL applications.
Allows users to submit commands as part of a batch script.
Syntax:
$ bcprun --cmd '<command-line>'
Where:
<command-line>is the command to run
Example:
$ bcprun --cmd 'python train.py'
Optional Arguments
|
Number of nodes to run on. (type: integer) Range: min value: 1, max value: R, where R is the max number of replicas requested by the NGC job. Default value: R Example: |
|
Number of tasks per node to run. (type: integer) Range: min value: 1, max value: (none) Default value: environment variable Example: |
|
Environment variables to set with format ‘key=value’. (type: string) Each variable assignment requires a separate Default value: (none) Example: |
|
Base directory from which to run <cmd >. (type: string) May include environment variables defined with Default value: environment variable PWD (current working directory) Example: --workdir '$WORK_HOME/scripts' --env
'WORK_HOME=/mnt/workspace'
|
|
Run <cmd > using an external launcher program. (type: string) Supported launchers: mpirun, horovodrun
Note: This option assumes the launcher exists and is in PATH. Launcher-specific arguments (not part of bcprun options) can be provided as a suffix. Example: Default value: (none) |
|
Run with asynchronous failure support enabled, i.e. a child process of bcprun can exit on failure without halting the program. The program will continue while at least one child is running. The default semantics of bcprun is to halt the program when any child process launched by bcprun exits with error. |
|
Print debug info and enable verbose mode. This option also sets the following environment variables for additional debug logs: NCCL_DEBUG=INFO TORCH_DISTRIBUTED_DEBUG=INFO |
|
Note: For jobs with array-type “PYTORCH”. Override the default location for saving job logs. This location will contain the The Example: |
|
When this flag is used, bcprun will print the logs to terminal stdout/stderr instead of redirecting to joblog.log and per-rank per-node files. |
|
Note: For jobs with array-type “PYTORCH”. When this flag is used, bcprun will print the logs using fluent-bit’s json wrapper with timestamp and filename apart from the logs. Without this flag, it would write raw output. This flag is only applicable when process stdout/stderr are being redirected to logs. |
|
Print version info. |
|
Print this help message. |
13.1.6.1. Basic Usage
The following multi-node job submission command runs the hostname command on two nodes using bcprun.
ngc base-command run --name "getting-started" \
--image "nvidia/pytorch:20.06-py3" --commandline "bcprun --cmd hostname" \
--preempt RUNONCE --result /result --ace nv-us-west-2 --org nvidian \
--team swngc-mnpilot --instance dgx1v.32g.8.norm --total-runtime 1m \
--replicas 2 --array-type MPI
The job will print the hostnames of each replica and will be similar to the following output.
1174493-worker-0
1174493-worker-1
bcprunis only available inside a running container in Base Command Platform clusters. Hence, thebcpruncommand and its arguments can be specified (either directly or within a script) only as part of the--commandlineargument of the ngc jobMulti-node ngc jobs have to specify the
--array-typeargument to define the kind of environment required inside the container. The following array-types are supported:MPI: This is the legacy array-type for ngc jobs to launch multi-node applications from a single launcher node (aka mpirun launch model)
PYTORCH: This will setup the environment to launch distributed PyTorch applications with a simple command. Example:.
bcprun --npernode 8 --cmd 'python train.py'
bcprunrequires the user application command (and its arguments) to be specified as a string argument of flag--cmd(or -c in short form)
13.1.6.2. Using --nnodes / -n
This option specifies how many nodes to launch the command on to. While the maximum number of nodes allocated to a ngc job is specified by --replicas, the user can launch the application on a subset of nodes using --nnodes (or -n in the short form). In the absence of this option, the default behavior of bcprun is to launch the command on all the replica nodes.
ngc base-command run --name "getting-started" --image "nvidia/pytorch:20.06-py3" \
--commandline "bcprun --nnodes 3 --cmd hostname"--preempt RUNONCE --result /result \
--ace nv-us-west-2 --org nvidian --team swngc-mnpilot --instance dgx1v.32g.8.norm \
--total-runtime 1m --replicas 4 --array-type MPI
For example, although four replicas are allocated, bcprun will run hostname on only 3 nodes and produce the following output.
1174495-worker-0
1174495-worker-1
1174495-worker-2
13.1.6.3. Using --npernode / -p
Multiple instances of an application task can be run on each node by specifying the --npernode (or -p in the short form) option as follows:
ngc base-command run --name "getting-started" --image "nvidia/pytorch:20.06-py3" \
--commandline "bcprun --npernode 2 --cmd hostname"--preempt RUNONCE --result /result \
--ace nv-us-west-2 --org nvidian --team swngc-mnpilot --instance dgx1v.32g.8.norm \
--total-runtime 1m --replicas 2 --array-type MPI
In this case, two instances of hostname are run on each node, which produces the following output:
1174497-worker-0
1174497-worker-0
1174497-worker-1
1174497-worker-1
13.1.6.4. Using --workdir / -w
The user can specify the path of the executable using the --workdir option (or -w in the short form). This example shows the use of bcprun for a PyTorch DDP model training job on 2-nodes, and 8 GPUs per node; and it illustrates usage of the --workdir option
ngc base-command run --name "pytorch-job" --image "nvidia/pytorch:21.10-py3" \
--commandline "bcprun --npernode 8 --cmd 'python train.py' --workdir /workspace/test" \
--workspace MLumas39SZmqY8z2NAqoHw:/workspace/test:RW --result /result --preempt RUNONCE \
--ace netapp-sjc-4-ngc-dev6 --instance dgxa100.40g.8.norm --replicas 2 --array-type "PYTORCH" \
--total-runtime 30m
13.1.6.5. Using --env / -e
The user can set environment variables that can be passed to rank processes and used by the launched command using the --env option (or -e in the short form). The following example shows the user is able to set the debug level of NCCL output to INFO.
ngc base-command run --name "pytorch-job" --image "nvidia/pytorch:21.10-py3" \
--commandline "bcprun --npernode 8 --cmd 'python train.py' --workdir /workspace/test \
--env NCCL_DEBUG=INFO" --workspace MLumas39SZmqY8z2NAqoHw:/workspace/test:RW \
--result /result --preempt RUNONCE --ace netapp-sjc-4-ngc-dev6 --instance dgxa100.40g.8.norm \
--replicas 2 --array-type "PYTORCH" --total-runtime 30m
13.1.6.6. Using bcprun in a Script
bcprun commands can be chained together into a batch script and invoked by the job commandline as follows.
ngc base-command run --name "pytorch-job" --image "nvidia/pytorch:21.10-py3" \
--commandline "bcprun.sub" --workspace MLumas39SZmqY8z2NAqoHw:/workspace/test:RW \
--result /result --preempt RUNONCE --ace netapp-sjc-4-ngc-dev6 --instance dgxa100.40g.8.norm \
--replicas 2 --array-type "PYTORCH" --total-runtime 30m
where bcprun.sub is an executable script containing many bcprun commands as follows:
#!/bin/bash
bcprun --npernode 8 --cmd "python train.py --phase=1"
bcprun --npernode 8 --cmd "python train.py --phase=2"
13.1.6.7. PyTorch Example
bcprun greatly simplifies the launching of distributed PyTorch applications on BCP clusters by automatically abstracting the environment required by torch.distributed. A multi-node PyTorch Distributed Data Parallel (DDP) training job using a python training script (train.py) could be launched by mpirun as follows:
mpirun -np 2 -npernode 1 python -m torch.distributed.launch --nproc_per_node=8 \
--nnodes=${NGC_ARRAY_SIZE} --node_rank=${NGC_ARRAY_INDEX} --master_addr=${NGC_MASTER_ADDR} train.py
In contrast, the command using bcprun would look something like this:
bcprun -p 8 -c 'python train.py'
With bcprun, we have two advantages:
The container has no dependence on MPI or mpirun
Distributed PyTorch-specific parameters are now abstracted to a unified launch mechanism
Combined with the --array-type PYTORCH ngc job parameter, the complete job specification is shown below:
ngc base-command run --name "pytorch-test" --image "nvidia/pytorch:21.10-py3" \
--commandline "bcprun -d -p 8 -c 'python train.py' -w /workspace/test" \
--workspace MLumas39SZmqY8z2NAqoHw:/workspace/test:RW --result /result --preempt RUNONCE \
--ace netapp-sjc-4-ngc-dev6 --instance dgxa100.40g.8.norm --replicas 2 --array-type "PYTORCH" \
--total-runtime 30m
Environment Variables
The NGC job parameter --array-type PYTORCH is used by bcprun to set the environment variables required for the PyTorch training rank processes and conforms to the requirements of torch.distributed. A PyTorch distributed application can depend on the following environment variables to be set by bcprun when launching the training script:
LOCAL_RANK |
RANK |
GROUP_RANK |
LOCAL_WORLD_SIZE |
WORLD_SIZE |
ROLE_WORLD_SIZE |
MASTER_ADDR |
MASTER_PORT |
NGC_RESULT_DIR |
Optionally, if the -d, --debug argument is enabled in the bcprun command, the following environment variables will be set:
NCCL_DEBUG=INFO |
TORCH_DISTRIBUTED_DEBUG=INFO |
PyTorch local rank: ‘--local-rank’ flag vs ‘LOCAL_RANK’ env var
bcprun always sets the environment variable LOCAL_RANK regardless of PyTorch version.
bcprun also passes --local-rank flag argument by default as of this release.
The --local-rank flag has been deprecated starting from PyTorch Version >= 1.9. Training scripts are expected to use the environment variable LOCAL_RANK instead.
bcprun will pass the flag argument --local-rank only for PyTorch version < 1.10. For all PyTorch versions >= 1.10, the --local_rank flag argument will NOT be passed to the training script by default. If you depend on parsing --local-rank in your training script for PyTorch versions >= 1.10, you can override the default behavior by setting environment variable NGC_PYTORCH_USE_ENV=0. Conversely, setting environment variable NGC_PYTORCH_USE_ENV=1 for PyTorch version < 1.10 will suppress passing --local-rank flag argument.
13.1.6.8. BERT Example
The following example illustrates the use of bcprun to run a training job for the PyTorch BERT model.
ngc base-command run --name "bert_example" --image "nvidia/dlx_bert:21.05-py3" \
--commandline "cd /workspace/bert && BATCHSIZE=\$(expr 8192 / \$NGC_ARRAY_SIZE) LR=6e-3 GRADIENT_STEPS=\$(expr 128 / \$NGC_ARRAY_SIZE) PHASE=1 NGC_NTASKS_PER_NODE=8 ./bcprun.sub && BATCHSIZE=\$(expr 4096 / \$NGC_ARRAY_SIZE) LR=4e-3 GRADIENT_STEPS=\$(expr 256 / \$NGC_ARRAY_SIZE) PHASE=2 NGC_NTASKS_PER_NODE=8 ./bcprun.sub" \
--workspace MLumas39SZmqY8z2NAqoHw:/workspace/bert:RW --datasetid 208137:/workspace/data \
--result /result --preempt RUNONCE --ace netapp-sjc-4-ngc-dev6 --instance dgxa100.40g.8.norm \
--replicas 2 --array-type "PYTORCH" --total-runtime 2D
13.1.6.9. SSD Example
ngc base-command run --name "SSD_example" --image "nvidia/dlx_ssd:latest" \
--commandline "cd /workspace/ssd; ./ssd_bcprun.sub" --workspace SSD_dev6:/workspace/ssd:RW \
--result /result --preempt RUNONCE --ace netapp-sjc-4-ngc-dev6 --instance dgxa100.40g.8.norm \
--replicas 2 --array-type "PYTORCH" --total-runtime 10h
13.1.6.10. PyTorch Lightning Example
An example of a PyTorch Lightning training job is shown below. Note that array-type PYTORCH is used for PTL jobs.
ngc base-command run --name "ptl-test" --image "nvidia/nemo_megatron:pyt21.10" \
--commandline "bcprun -p 8 -d -c 'python test_mnist_ddp.py'" \
--workspace MLumas39SZmqY8z2NAqoHw:/workspace/bert:RW --result /result --preempt RUNONCE \
--ace netapp-sjc-4-ngc-dev6 --instance dgxa100.40g.8.norm --replicas 2 --array-type "PYTORCH" \
--total-runtime 30m
Note: bcprun sets environment variables (“RANK”, “GROUP_RANK”, “LOCAL_RANK”, “LOCAL_WORLD_SIZE”) which allows PyTorch Lightning to infer the torchelastic environment.
13.1.6.11. MPI Example
For applications which require MPI and mpirun, bcprun allows such applications by defining the --launcher="mpirun" option. An example of a MPI multinode job using bcprun is as follows.
ngc base-command run --name "bcprun-launcher-mpirun" --image "nvidia/mn-nccl-test:sharp" \
--commandline "bcprun -l mpirun -p 8 -c 'all_reduce_perf -b 1G -e 1G -g 1 -c 0 -n 200'" \
--result /result --preempt RUNONCE --ace netapp-sjc-4-ngc-dev6 --instance dgxa100.40g.8.norm \
--replicas 2 --array-type "MPI" --total-runtime 30m
The array-type here is set to “MPI”. bcprun invokes the multi-node job using the defined mpirun launcher. The equivalent mpirun command invoked by bcprun is as follows.
mpirun --allow-run-as-root -np 16 -npernode 8 all_reduce_perf -b 1G -e 1G -g 1 -c 0 -n 200
13.2. Job ENTRYPOINT
NGC Base Command Platform CLI now provides the option of incorporating Docker ENTRYPOINT when running jobs.
Some NVIDIA deep learning framework containers rely on ENTRYPOINT to be called for full functionality. The following functions in these containers rely on ENTRYPOINT:
Version banner to be printed to logs
Warnings/errors if any platform prerequisites are missing
MPI set up for multi-node
The following is an example of the version header information that is returned after running a TensorFlow container with the incorporated ENTRYPOINT using the docker run command.
$ docker run --runtime=nvidia --rm -it nvcr.io/nvidia/tensorflow:21.03-tf1 nvidia-smi

================
== TensorFlow ==
================
NVIDIA Release 21.03-tf1 (build 20726338)
TensorFlow Version 1.15.5
Container image Copyright (c) 2021, NVIDIA CORPORATION.  All rights reserved.
Copyright 2017-2021 The TensorFlow Authors.  All rights reserved.
NVIDIA Deep Learning Profiler (dlprof) Copyright (c) 2021, NVIDIA CORPORATION. All rights reserved.
Various files include modifications (c) NVIDIA CORPORATION.  All rights reserved.
This container image and its contents are governed by the NVIDIA Deep Learning Container License.
By pulling and using the container, you accept the terms and conditions of this license:
https://developer.nvidia.com/ngc/nvidia-deep-learning-container-license
NOTE: Legacy NVIDIA Driver detected. Compatibility mode ENABLED.
Without using ENTRYPOINT in the CLI, there would be no banner information in the output.
This is shown in the following example of using NGC Base Command CLI to run nvidia-smi within the TensorFlow container without using ENTRYPOINT.
$ ngc base-command run \
--name "TensorFlow Demo" \
--preempt RUNONCE \
--min-timeslice 0s \
--total-runtime 0s \
--ace nv-eagledemo-ace \
--instance dgxa100.40g.1.norm \
--result /result \
--image "nvidia/tensorflow:21.03-tf1-py3" \
--commandline "nvidia-smi"
Initial lines of the output Log File (no TensorFlow header information is generated):
Thu Apr 15 17:32:02 2021
+-------------------------------------------------------------------+
| NVIDIA-SMI 450.80.02 Driver Version: 450.80.02 CUDA Version: 11.2 |
|---------------------+----------------------+----------------------+
...
13.2.1. Example Using Container ENTRYPOINT
To use the container ENTRYPOINT, use the --use-image-entrypoint argument.
Example:
$ ngc base-command run \
--name "TensorFlow Entrypoint Demo" \
--preempt RUNONCE \
--ace nv-eagledemo-ace \
--instance dgxa100.40g.1.norm \
--result /result \
--image "nvidia/tensorflow:21.03-tf1-py3" \
--use-image-entrypoint \
--commandline "nvidia-smi"
Output log file with TensorFlow header information, including initial lines of the nvidia-smi output.
================
== TensorFlow ==
================
NVIDIA Release 21.03-tf1 (build 20726338)
TensorFlow Version 1.15.5
Container image Copyright (c) 2021, NVIDIA CORPORATION. All rights reserved.
Copyright 2017-2021 The TensorFlow Authors. All rights reserved.
NVIDIA Deep Learning Profiler (dlprof) Copyright (c) 2021, NVIDIA CORPORATION. All rights reserved.
Various files include modifications (c) NVIDIA CORPORATION. All rights reserved.
This container image and its contents are governed by the NVIDIA Deep Learning Container License.
By pulling and using the container, you accept the terms and conditions of this license:
https://developer.nvidia.com/ngc/nvidia-deep-learning-container-license
NOTE: Legacy NVIDIA Driver detected. Compatibility mode ENABLED.

Thu Apr 15 17:42:37 2021
+-----------------------------------------------------------------------------+
| NVIDIA-SMI 450.80.02 Driver Version: 450.80.02 CUDA Version: 11.2           |
|-------------------------------+----------------------+----------------------+
...
13.2.2. Example Using CLI ENTRYPOINT
You can also use the --entrypoint argument to specify an ENTRYPOINT to use that will override the container ENTRYPOINT.
The following is an example of specifying an ENTRYPOINT in the NGC base-command command to run nvidia-smi. This is instead of using the --commandline argument.
$ ngc base-command run \
--name "TensorFlow CLI Entrypoint Demo" \
--preempt RUNONCE \
--ace nv-eagledemo-ace \
--instance dgxa100.40g.1.norm \
--result /result \
--image "nvidia/tensorflow:21.03-tf1-py3" \
--entrypoint "nvidia-smi"
Initial lines of the output file.
Thu Apr 15 17:52:53 2021
+-----------------------------------------------------------------------------+
| NVIDIA-SMI 450.80.02 Driver Version: 450.80.02 CUDA Version: 11.0           |
|-------------------------------+----------------------+----------------------+
.. .
14. Tutorials
This chapter describes the tutorials that showcase various features of Base Command Platform (BCP). In this chapter, you will learn about ready-to-run tutorials available within the product for learning a workflow or for use as a basis for your custom workflow. This section also covers tutorials with sample commands or templates which can serve as a starting point for new users or new complex workflows.
Note
The ready-to-run tutorials are delivered as templates in nvbc-tutorials team context along with the required container images and data entities. Your org admin must add you to that team explicitly for you to be able to access these templates and run workloads based on those.
14.1. Launching a Job from Existing Templates
Click BASE COMMAND > Jobs the left navigation menu and then click Create Job.
Click the Templates tab.
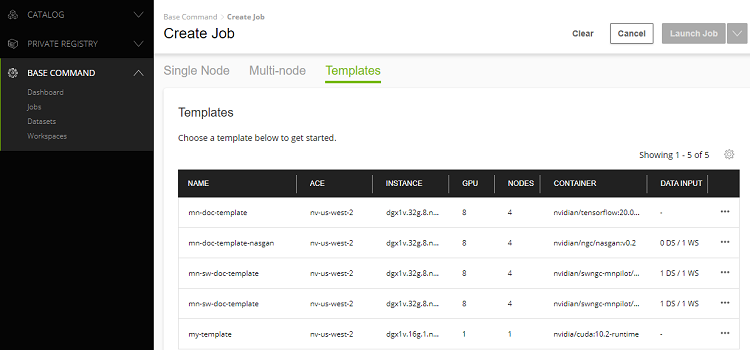
Click the menu icon for the template to use, then select Apply Template.
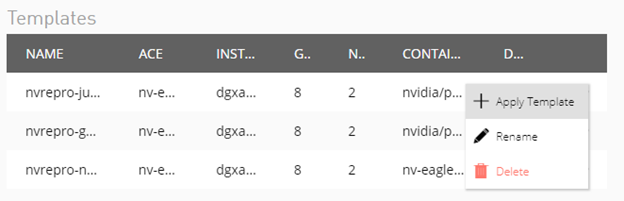
The create a job page opens with the fields populated with the information from the job template.
Verify the pre-filled fields, enter a unique name, then click Launch.

14.2. Launching an Interactive Job with JupyterLab
From the existing templates, you can run the nvbc-jupyterlab template to pre-fill the job creation fields and launch an Interactive Job with jupyterLab. The following is an example of the CLI script for the same job script template.
$ ngc base-command run \
--name "NVbc-jupyterlab" \
--preempt RUNONCE \
--ace nv-eagledemo-ace \
--instance dgxa100.40g.1.norm \
--commandline “set -x; jupyter lab --NotebookApp.token='' --notebook-dir=/
                    --NotebookApp.allow_origin='*' & date; nvidia-smi; echo $NVIDIA_BUILD_ID; sleep
                    1d”
--result /result \
--image "nvidia/pytorch:21.02-py3" \
--org nv-eagledemo \
--team nvbc-tutorials \
--port 8888
14.3. Launching a Multi Node Interactive Job with JupyterLab
From the existing templates, you can run the nvbc-jupyterlab-mn template to pre-fill the job creation fields and launch an multinode Interactive Job with 2 nodes. The following is an example of the CLI script for the same job script template.
$ ngc base-command run \
--name "nvbc-jupyterlab-mn" \
--preempt RUNONCE \
--min-timeslice 0s
--total-runtime 36000s
--ace nv-eagledemo-ace \
--instance dgxa100.40g.8.norm \
--commandline “mpirun --allow-run-as-root -np 2 -npernode 1 bash -c ' set -x;
                    jupyter lab --NotebookApp.token='' --notebook-dir=/
                    --NotebookApp.allow_origin='*' & date; nvidia-smi; echo ; sleep
                  1d'”
--result /result \
--array-type "MPI"
--replicas "2"
--image "nvidia/pytorch:21.02-py3" \
--org nv-eagledemo \
--team nvbc-tutorials \
--port 8888
14.4. Getting Started with Tensorboard
Tensorboard is already installed by default on standard NGC containers. Perform the following to get started using TensorBoard
Start a TensorFlow job.
The following is an example using the NGC CLI.
$ ngc base-command run \
--name "NVbc-tensorboard" \
--preempt RUNONCE \
--ace nv-eagledemo-ace \
--instance dgxa100.40g.1.norm \
--commandline "set -x; jupyter lab --allow-root --NotebookApp.token='' --NotebookApp.allow_origin=* --notebook-dir=/ & date; tensorboard --logdir /workspace/logs/fit ; sleep 1d" \
--result /result \
--image "nvidia/tensorflow:21.08-tf1-py3" \
--org nv-eagledemo \
--team nvbc-tutorials \
--port 8888 \
--port 6006
Once the container is running, the info page URL is mapped to ports 8888 and 6006.
Login to the container via JupyterLab and open a terminal.
Download the TensorBoard tutorial notebook.
wget https://storage.googleapis.com/tensorflow_docs/tensorboard/docs/get_started.ipynb
Open the downloaded notebook.
Run the commands in the notebook until you get to command 6.
tensorboard --logdir logs/fit
Open the URL mapped to port 6006 on the container to open Tensorboard.
The TensorBoard UI should appear similar to the following example.
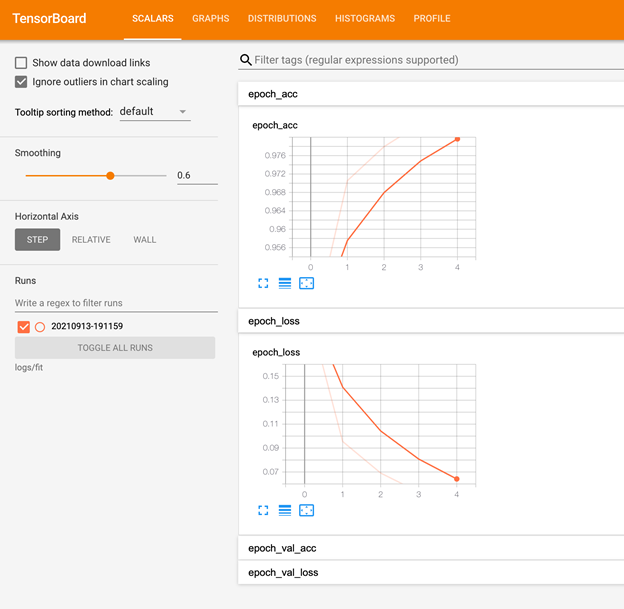
Refer to https://www.tensorflow.org/tensorboard/get_started for more information on how to use Tensorboard.
14.5. NCCL Tests
NCCL tests check both the performance and the correctness of NCCL operations and you can test out the performance between GPUs using the nvbc-MN-NCCL-Tests template. The following is an example of the CLI script for the same NCCL Test template. The Average Bus Bandwidth for a successful NCCL test is expected to be > 175GB.
$ ngc base-command run \
--name "nvbc-MN-NCCL-Tests" \
--preempt RUNONCE \
--total-runtime 86400s \
--ace nv-eagledemo-ace \
--instance dgxa100.40g.1.norm \
--commandline “bash -c 'for i in {1..20}; do echo \"******************** Run
                    ********************\"; mpirun -np ${NGC_ARRAY_SIZE} -npernode 1
                    /nccl-tests/build/all_reduce_perf -b 128M -e 2G -f 2 -t 8 -g 1;
                  done'”
--result /result \
--array-type “MPI” \
--replicas “2” \
--image "nv-eagledemo/mn-nccl-test:ibeagle" \
--org nv-eagledemo \
--team nvbc-tutorials
14.6. StyleGAN SingleNode Workload
From the existing templates, you can run the nvbc-stylegan-singlenode template to pre-fill the job creation fields and launch. The following is an example of the CLI script for StyleGAN single node workload with 8GPUs.
$ ngc base-command run \
--name "StyleGAN-singlenode" \
--preempt RUNONCE \
--min-timeslice 0s \
--ace nv-eagledemo-ace \
--instance dgxa100.40g.8.norm \
--commandline “python -u -m torch.distributed.launch --nproc_per_node=8
                    /mnt/workspace/train.py --snap=25 --data=/dataset --batch-size=32
                    --lr=0.002”
--result /output \
--image "nv-eagledemo/nvbc-tutorials/pytorch_stylegan:v1" \
--org nv-eagledemo \
--team nvbc-tutorials \
--datasetid 76731:/dataset
Here’s an example of the telemetry once the job is launched.
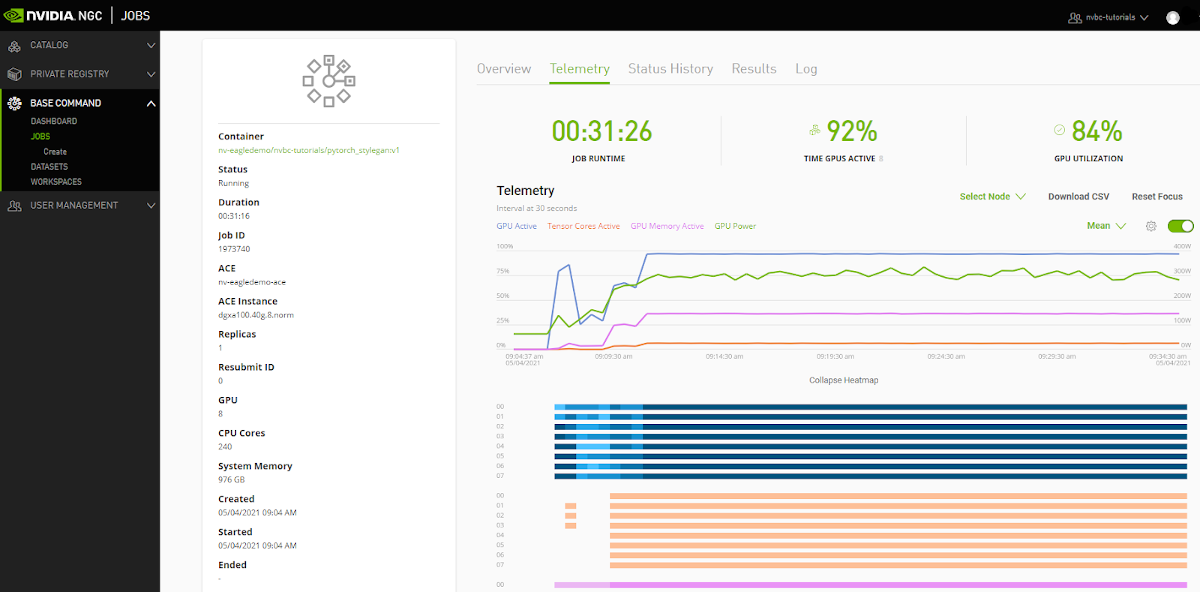
14.7. StyleGAN MultiNode Workload
From the existing templates, you can run the nvbc-stylegan-multinode template to pre-fill the job creation fields and launch. The following is an example of the CLI script for the multinode StyleGAN workload with 2 Nodes.
$ ngc base-command run \
--name "StyleGAN-multinode" \
--preempt RUNONCE \
--min-timeslice 0s \
--total-runtime 230400s \
--ace nv-eagledemo-ace \
--instance dgxa100.40g.8.norm \
--commandline “mpirun --allow-run-as-root -np 2 -npernode 1 bash -c 'python
                    -u -m torch.distributed.launch --nproc_per_node=8
                    --master_addr=${NGC_MASTER_ADDR} --nnodes=${NGC_ARRAY_SIZE}
                    --node_rank=${NGC_ARRAY_INDEX} /mnt/workspace/train.py --snap=25 --data=/dataset
                    --batch-size=64 --lr=0.002'”
--result /output \
--array-type “MPI” \
--replicas “2” \
--image "nv-eagledemo/nvbc-tutorials/pytorch_stylegan3:pytorch.stylegan.v1"
                    \
--org nv-eagledemo \
--team nvbc-tutorials \
--datasetid 76731:/dataset
Here’s an example of the telemetry once the job is launched.
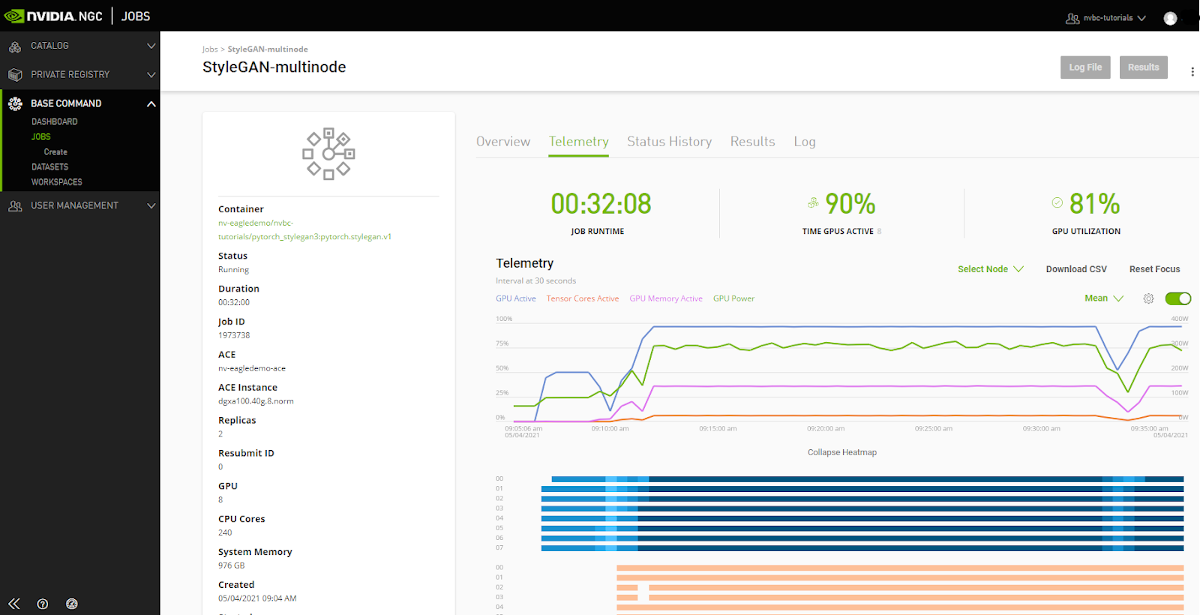
14.8. Building a Dataset from S3 Cloud Storage
This section details an example of building a dataset with CLI and code from a cloud storage bucket.
Perform the following before starting.
Identify credentials and location of the cloud storage bucket.
Know the directory structure within the bucket.
Create a workspace in Base Command Platform (typically dedicated as home workspace).
Refer to Creating a Workspace Using the Base Command Platform CLI for instructions.
Have a current job running to exec into or from which to run the following example.
14.8.1. Running a Job
Start a Jupyter notebook job.
Replace ACE, org, workspace, and team values arguments. The job will run for one hour.
ngc base-command run --name "demo-s3-cli" --preempt RUNONCE --ace {ace-name} \
--instance {instance-type} --commandline "jupyter lab --ip=0.0.0.0 --allow-root \
--no-browser --NotebookApp.token='' \
--notebook-dir=/ --NotebookApp.allow_origin='*' & date; sleep 1h" --result /results \
--workspace {workspace-name}:/{workspace-name}:RW --image "nvidia/pytorch:21.07-py3" \
--org {org-name} --team {team-name} --port 8888
Once the job has started, access the JupyterLab terminal.
ngc base-command info {id}
--------------------------------------------------
Job Information
  Id: 2233490
  ...
Job Container Information
  Docker Image URL: nvidia/pytorch:21.07-py3
  Port Mappings
    Container port: 8888 mapped to https://tnmy3490.eagle-demo.proxy.ace.ngc.nvidia.com
    ...
Job Status
  ...
  Status: RUNNING
  Status Type: OK
--------------------------------------------------
Alternatively, exec into the job through NGC CLI.
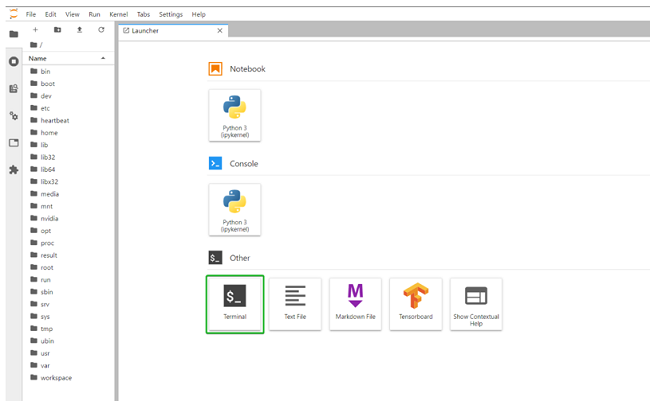
14.8.2. Creating a Dataset using AWS CLI
Obtain, unzip, and install the AWS CLI zip file.
 curl "https://awscli.amazonaws.com/awscli-exe-linux-x86_64.zip" -o "awscliv2.zip"
unzip awscliv2.zip
./aws/install -i /usr/local/aws-cli -b /usr/local/bin
Ensure there is access to the AWS CLI.
aws --version
Run through the AWS Configuration by inputting the Access Key ID and Secret Access Key.
These can be found underneath AWS’s IAM user panel. Refer to additional AWS CLI documentation.
aws configure
AWS Access Key ID [None]: <ACCESS_KEY>
AWS Secret Access Key [None]: <SECRET_ACCESS_KEY>
Default region name [None]: us-west-2
Default output format [None]: json
Sync a bucket to the results folder to be saved as a dataset.
aws s3 sync 's3://<source-bucket>' '../results'
Results should now be ready to be saved as a dataset. Refer to Managing Datasets for more information.
14.8.3. Creating a Dataset using AWS Boto3
Boto3 is the AWS SDK for accessing S3 buckets. This section will cover downloading a specific file from an S3 bucket and then saving it to a results folder. View more documentation regarding Boto3 here.
Install Boto3 through pip and prepare imports in the first cell of the Jupyter notebook.
!pip installboto3

import boto3
import io
import os
Initialize Boto3 with an AWS Access Key and Secret Access Key.
Make sure IAM user settings has proper access and permissions to the needed S3 buckets.
 # Let's use Amazon S3 by initializing our Access Key and Secret Access Key
s3 = boto3.resource('s3', aws_access_key_id=<ACCESS_KEY>,
aws_secret_access_key=<SECRET_ACCESS_KEY>)

bucket = s3.Bucket(<BUCKET_NAME>)
14.8.4. Downloading a File
Downloading a file is a function built within Boto3. It will need the Bucket Name, Object Name (referred to as a key), and the File Output Name. Refer to Amazon S3 Examples - Downloading files for additional information.
s3.download_file(<BUCKET_NAME>, <OBJECT_NAME>, <FILE_NAME>)
14.8.5. Downloading a Folder
The following includes a function for downloading a single-directory depth from an S3 bucket to BCP storage, either to /results mount of the job or to a Base Command Platform workspace mounted in the job.
def download_s3_folder(s3_folder, local_dir='../results/s3_bucket'):
    for obj in bucket.objects.filter(Prefix=s3_folder):
        target = obj.key if local_dir is None \
            else os.path.join(local_dir, os.path.relpath(obj.key, s3_folder))
        if not os.path.exists(os.path.dirname(target)):
            os.makedirs(os.path.dirname(target))
        if obj.key[-1] == '/':
            continue
        print(obj.key)
        bucket.download_file(obj.key, target)
To save a dataset or checkpoint from the /results mount, download the contents and then upload as a dataset as described in Converting a Checkpoint to a Dataset.
14.9. Using Data Loader for Cloud Storage
This document details an example of using a data loader from a cloud storage bucket. It is recommended that the CLI option is attempted before proceeding with the data loader as it will not save the folder hierarchy.
Perform the following before starting.
Identify credentials and location of the cloud storage bucket.
Know the directory structure within the bucket.
Create a workspace in Base Command Platform (typically dedicated as home workspace).
Refer to Creating a Workspace Using the Base Command Platform CLI for instructions.
14.9.1. Running and Opening JupyterLab
Mount the workspace in the job.
Replace ACE, org, workspace, and team arguments.
ngc base-command run --name "demo-s3-dataloader" --preempt RUNONCE --ace {ace-name} \
--instance {instance-type} --commandline "jupyter lab --ip=0.0.0.0 \
--allow-root --no-browser --NotebookApp.token='' --notebook-dir=/ \
--NotebookApp.allow_origin='*' & date; sleep 6h" --result /results \
--workspace {workspace-name}:/mount/{workspace-name}:RW --image "nvidia/pytorch:21.07-py3" \
--org {org-name} --team {team-name} --port 8888
Open the link for the JupyterLab to access the UI.
Do this by fetching the job’s information with the batch info command. Below is an example response with the mapped port. You can ctrl+left click the link in bold to access it in your browser.
ngc base-command info {id}
--------------------------------------------------
  Job Information
    Id: 2233490
    ...
  Job Container Information
    Docker Image URL: nvidia/pytorch:21.07-py3
    Port Mappings
       Container port: 8888 mapped to https://tnmy3490.eagle-demo.proxy.ace.ngc.nvidia.com
       ...
  Job Status
    ...
    Status: RUNNING
    Status Type: OK
--------------------------------------------------
You should now be prompted with options to create a file.
Navigate into your workspace on the sidebar, and then click on Python 3 to create your file.
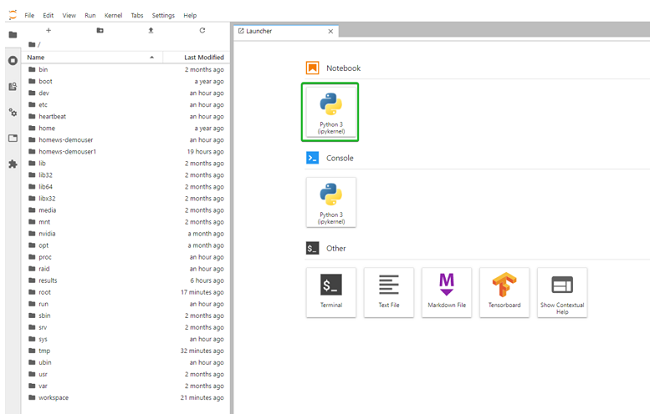
14.9.2. Utilizing the Cloud Data Loader for Training
Use the code for creating a Jupyter Notebook, with these changes:
Do not issue
import wandb.Add the following imports:
# Imports
!pip install boto3
import boto3
from botocore import UNSIGNED
from bot ocore.config import Config
Change the first line of #3.2.
From this:
(x_train, y_train), (x_test, y_test) = keras.datasets.mnist.load_data()
To this:
s3 = boto3.client('s3', config=Config(signature_version=UNSIGNED))
bucket_name='mnist-testbucket'
key='mnist_2.npz'

s3_response_object = s3.get_object(Bucket=bucket_name, Key=key)
object_content = s3_response_object['Body'].read()
load_bytes = BytesIO(object_content)

with np.load(load_bytes, allow_pickle=True) as f:
   x_train, y_train = f['x_train'], f['y_train']
   x_test, y_test = f['x_test'], f['y_test']
Execute Step #3 through Step #6.
14.10. Launching an Interactive Job with Visual Studio Code
This tutorial section contains three options for installing and accessing Visual Studio Code for use with Base Command Platform:
Installing Visual Studio Code’s code-server in a container
Installing and running Visual Studio Code’s code-server at job runtime
Installing Visual Studio Code CLI in a job and starting a remote tunnel
14.10.1. Installing Visual Studio Code in a Container
This option details installing Visual Studio Code in a container, pushing the container to a private registry, then launching a job in Base Command Platform using the container so that VS Code is accessible using a web browser.
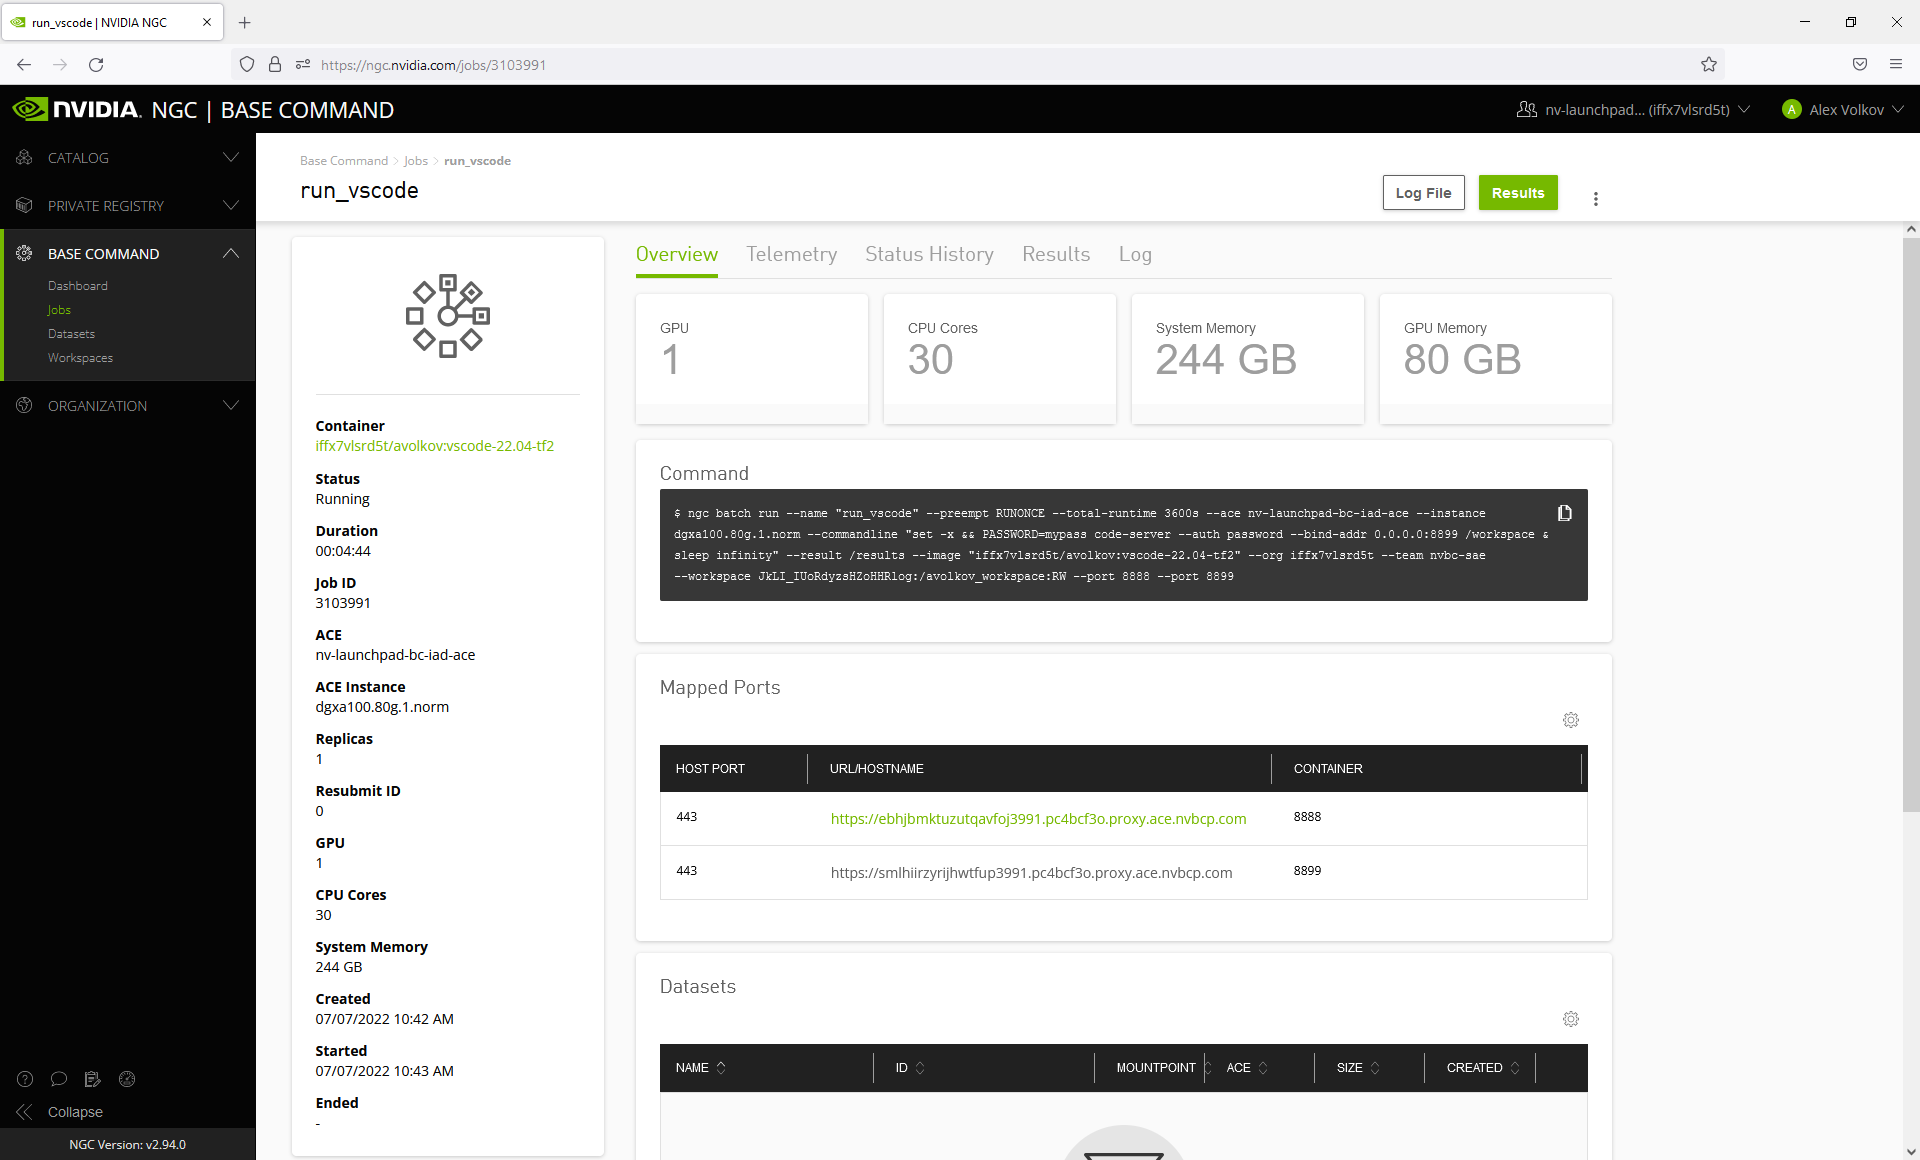
14.10.1.1. Building the Container
The following is a sample Dockerfile to create a container that can launch Visual Studio Code to be accessible via a web browser. It includes examples for downloading and installing extensions.
To build this container, you’ll need a system set up with Docker and the NVIDIA Container Toolkit. For more information, refer to the NVIDIA Container Toolkit documentation.
For more information, refer to the code-server documentation.
Create a Dockerfile for the container and extensions we’ll need to install. A sample Dockerfile is provided below.In this case, we’re starting from the base TensorFlow container from NGC, but any container of your choice can be used.
ARG FROM_IMAGE_NAME=nvcr.io/nvidia/tensorflow:22.04-tf2-py3
FROM ${FROM_IMAGE_NAME}

# Install code-server to enable easy remote development on a container
# More info about code-server be found here: https://coder.com/docs/code-server/v4.4.0
ADD https://github.com/coder/code-server/releases/download/v4.4.0/code-server_4.4.0_amd64.deb code-server_4.4.0_amd64.deb
RUN dpkg -i ./code-server_4.4.0_amd64.deb && rm -f code-server_4.4.0_amd64.deb

# Install extensions from the marketplace
RUN code-server --install-extension ms-python.python

# Can also download vsix files and install them locally
ADD https://github.com/microsoft/vscode-cpptools/releases/download/v1.9.8/cpptools-linux.vsix cpptools-linux.vsix
RUN code-server --install-extension cpptools-linux.vsix

# Download vsix from: https://marketplace.visualstudio.com/items?itemName=NVIDIA.nsight-vscode-edition
# https://marketplace.visualstudio.com/_apis/public/gallery/publishers/NVIDIA/vsextensions/nsight-vscode-edition/2022.1.31181613/vspackage
COPY NVIDIA.nsight-vscode-edition-2022.1.31181613.vsix NVIDIA.nsight-vscode-edition.vsix
RUN code-server --install-extension NVIDIA.nsight-vscode-edition.vsix
From the directory containing the Dockerfile, run the following commands to build and push the container to the appropriate team and org.
docker build -t nvcr.io/<org>/<team>/vscode-server:22.04-tf2 .
docker push nvcr.io/<org>/<team>/vscode-server:22.04-tf2
14.10.1.2. Starting a Job
Using the Web UI or NGC CLI, you can then run a job with the container. An example job command is provided below.
This job command selects the VS Code container that we just built and pushed to our private registry. It provides a port mapping in BCP corresponding with the
--bind-addrargument in the command, and provides the launch command with the necessary parameters to start VS Code. Note: The password to access the VS Code console is set as an environment variable in thecommandlineparameter. This environment variable should be set to a password of your choice.ngc base-command run \ --name "run_vscode" \ --ace <ace>\ --org <org> \ --team <team> \ --instance dgxa100.40g.1.norm \ --image "nvcr.io/<org>/<team>/vscode:22.04-tf2" \ --port 8899 \ --result /results \ --total-runtime 1h \ --commandline "\ PASSWORD=mypass code-server --auth password --bind-addr 0.0.0.0:8899 /workspace & \ sleep infinity"
Once the job has been created and is running, open the Web UI for Base Command Platform. In the Overview page for the job, click the link mapped to the port for code-server (in the example it is
8899).Then in the new window, enter the password (
mypassin the above example) to enter the Visual Studio Code IDE.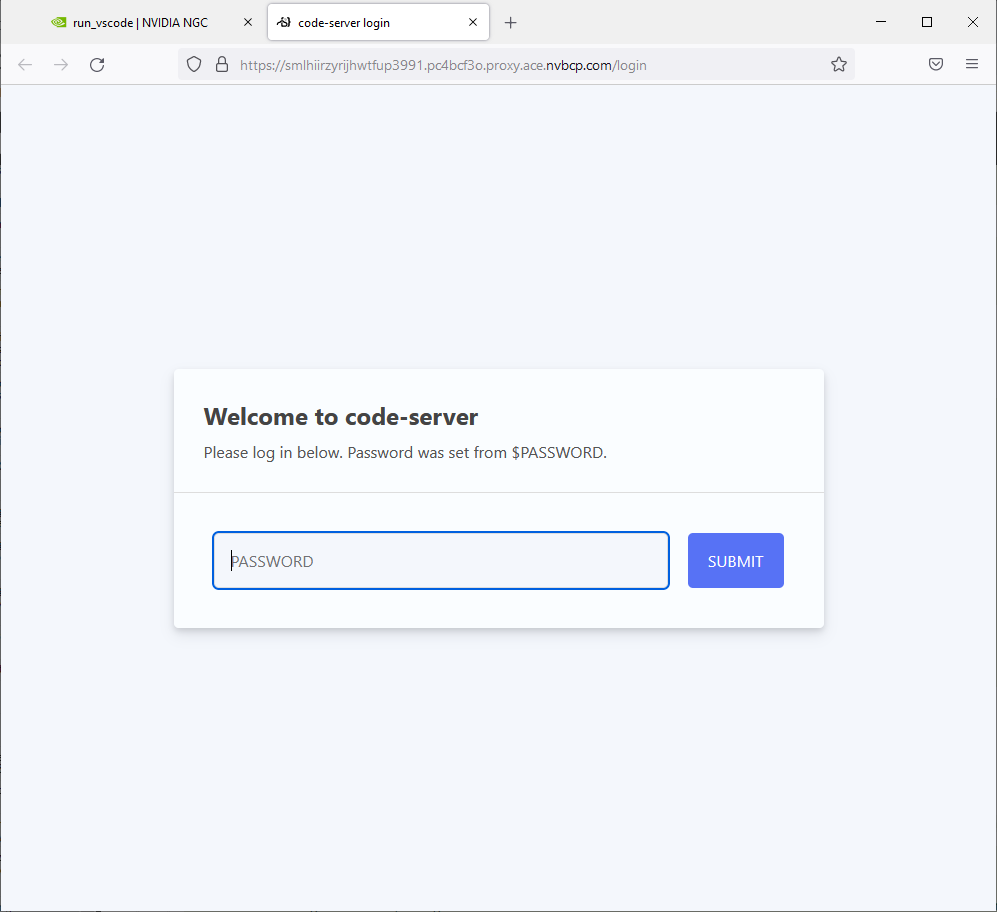
VS Code should come up after the password prompt. It might require a few quick setup steps such as trusting files/directories added to the VS Code, theme layout, etc. Once VS Code is up and running, you can edit files, and with Python and Cpp + Nsight extensions already installed, IntelliSense should also work.
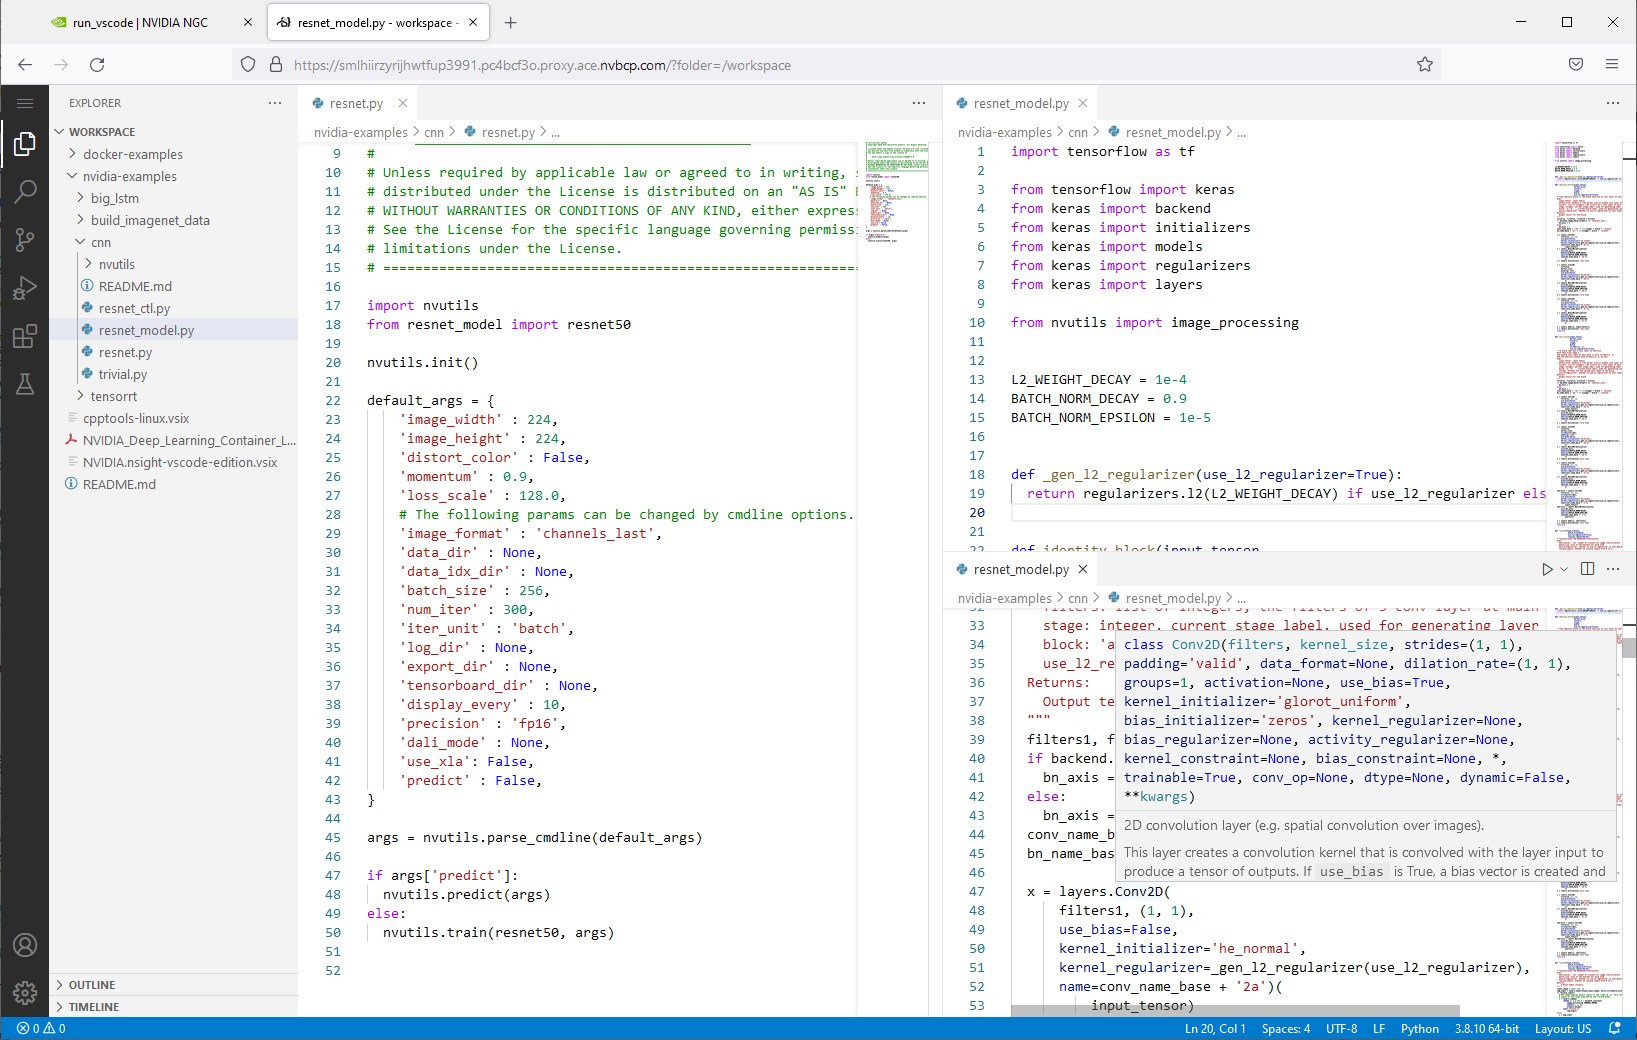
14.10.2. Adding Visual Studio Code Capability at Runtime
You can also install and run Visual Studio Code at runtime when launching an existing image.
The following example shows the NGC CLI command to install and launch Visual Studio Code as --commandline arguments for a Base Command job, using the nvidia/pytorch image.
ngc base-command run --image nvidia/pytorch:22.05-py3 --port 8899 \
--name "run_vscode" \
--ace <ace>\
--org <org> \
--team <team> \
--instance dgxa100.40g.1.norm \
--result /results \
--total-runtime 1h \
--commandline "wget -nc https://github.com/coder/code-server/releases/download/v4.4.0/code-server_4.4.0_amd64.deb -o code-server_4.4.0_amd64.deb && dpkg -i ./code-server_4.4.0_amd64.deb && PASSWORD=mypass code-server --auth password --bind-addr 0.0.0.0:8899"
14.10.3. Setting Up and Accessing Visual Studio Code via Remote Tunnel
This option is the simplest and most straightforward option for setting up and accessing Visual Studio Code from an already running Base Command Platform job, as it does not require port mappings to be configured at job runtime.
It leverages VS Code’s Remote Tunnels functionality, where we will install VS Code CLI in the job’s container, then create a remote tunnel for VS Code to the job that can be accessed through a web browser or your own VS Code instance.
Within the job, run the following commands to download and extract the VS Code CLI.
curl -Lk 'https://code.visualstudio.com/sha/download?build=stable&os=cli-alpine-x64' --output vscode_cli.tar.gz

tar -xf vscode_cli.tar.gz
You can create either a Dockerfile to build your own container image with this already installed, as described in the first example, or you can install this at runtime, as in the the previous example.
To install this in an already running job, you can exec into the job using the following command, then run the above commands.
$ ngc base-command exec <job_id>Once the CLI has been installed in the container and/or job, exec into the job, then run the below command. Follow the prompts to authenticate, and open the link provided to access VS Code from your browser.
root@5517702:/job_workspace# ./code tunnel
*


      Visual Studio Code Server

      By using the software, you agree to
      the Visual Studio Code Server License Terms (https://aka.ms/vscode-server-license) and
      the Microsoft Privacy Statement (https://privacy.microsoft.com/en-US/privacystatement).


✔ How would you like to log in to Visual Studio Code? · Microsoft Account
To sign in, use a web browser to open the page https://microsoft.com/devicelogin and enter the code EM2SACRJT to authenticate.

✔ What would you like to call this machine? · BCP-5517702
[2023-11-28 17:29:46] info Creating tunnel with the name: bcp-5517702

Open this link in your browser https://vscode.dev/tunnel/bcp-5517702/job_workspace
14.11. Running DeepSpeed
DeepSpeed is a deep learning optimization library that makes distributed training and inference easy, efficient, and effective. This section details how to launch a DeepSpeed example job on Base Command Platform.
14.11.1. Creating the DeepSpeed Container
The following is a sample Dockerfile to create a container image for a specific version of DeepSpeed. The NVIDIA PyTorch container image is used as the base image to provide the required PyTorch dependencies for DeepSpeed.
Define the container image:
 1# Example Dockerfile for building a DeepSpeed image
 2ARG FROM_IMAGE_NAME=nvcr.io/nvidia/pytorch:23.12-py3
 3FROM ${FROM_IMAGE_NAME}
 4
 5ENV TORCH_CUDA_ARCH_LIST="8.0 8.6 9.0+PTX"
 6
 7# libaio-dev required for async-io
 8# https://www.deepspeed.ai/docs/config-json/#asynchronous-io
 9RUN apt update && \
10   apt install -y --no-install-recommends libaio-dev
11
12RUN pip install --upgrade pip setuptools wheel && \
13   pip config set global.disable-pip-version-check true
14
15RUN cd /opt && \
16   pip list | \
17      awk '{print$1"=="$2}' | \
18      tail +3 > pip_constraints.txt
19
20RUN pip install --upgrade pip && \
21   pip install \
22      triton \
23      ninja \
24      hjson \
25      py-cpuinfo
26
27RUN python -m pip install --no-cache-dir -i https://pypi.anaconda.org/mpi4py/simple mpi4py
28
29RUN cd /opt && \
30   git clone https://github.com/microsoft/DeepSpeed.git && \
31   cd DeepSpeed && \
32   git checkout v0.12.6 && \
33   find . -type f -not -path '*/\.*' -exec \
34      sed -i 's%std=c++14%std=c++17%g' {} + && \
35   pip install pydantic==1.10.13 && \
36   pip install -c /opt/pip_constraints.txt deepspeed-kernels && \
37   DS_BUILD_OPS=1 DS_BUILD_SPARSE_ATTN=0 DS_BUILD_EVOFORMER_ATTN=0 \
38      pip install -vvv --no-cache-dir --global-option="build_ext" .
Build then push the container image using your BCP org private registry identifier as necessary. For example:
docker build -t nvcr.io/<your private org>/pytorch-deepspeed:0.12.6 -f Dockerfile .
After building and storing the image in your org’s private registry, you’ll need a script to launch a DeepSpeed example. We recommend using the CIFAR-10 tutorial in the DeepSpeed examples repo on GitHub.
 1#!/bin/bash
 2# file: run_cifar10_deepspeed.sh
 3
 4# Example reference code:
 5# https://github.com/microsoft/DeepSpeedExamples/blob/master/training/cifar/cifar10_deepspeed.py
 6
 7cd /deepspeed_scratch
 8
 9if [ ! -d DeepSpeedExamples ]; then
10git clone \
11--single-branch \
12--depth=1 \
13# tested using sha dd0f181
14# if necessary, do a deep clone then
15# git reset --hard dd0f181
16--branch=master \
17https://github.com/microsoft/DeepSpeedExamples.git ;
18fi
19
20export CODEDIR=/deepspeed_scratch/DeepSpeedExamples
21
22# Patch a bug:
23# https://github.com/microsoft/DeepSpeedExamples/issues/222
24sed -i 's%images, labels = dataiter.next()%images, labels = next(dataiter)%g' \
25${CODEDIR}/training/cifar/cifar10_deepspeed.py && \
26
27deepspeed \
28--launcher openmpi \
29--launcher_args="--allow-run-as-root" \
30--hostfile="/etc/mpi/hostfile" \
31--master_addr launcher-svc-${NGC_JOB_ID} \
32--no_ssh_check \
33${CODEDIR}/training/cifar/cifar10_deepspeed.py
After creating the launch script, upload it to the designated workspace within the ACE that you’ve already created. For example:
ngc workspace upload --ace <your ace> --org <your org> --team <your team> --source run_cifar10_deepspeed.sh <your workspace>
Note
An alternative technique would be to include the script as part of the container image build described earlier. By uploading to a workspace, you decouple the lifecycle of the launch script from that of the image which would be preferable in most cases.
Now you are ready to create a BCP job to launch the DeepSpeed training example. Assuming you used the same mount point as prescribed in the launch script (“deepspeed_scratch”), you can create a new job using the NGC CLI tool with this command:
 1ngc base-command run \
 2--name "run_cifar10_deepspeed" \
 3--org <your org> \
 4--team <your team> \
 5--ace <your ace> \
 6--instance dgxa100.80g.8.norm \
 7--array-type "PYTORCH" \
 8--replicas <node count> \
 9--image "<container with deepspeed installed>" \
10--result /results \
11--workspace <your workspace>:/deepspeed_scratch:RW \
12--total-runtime 15m \
13--commandline "bash /deepspeed_scratch/run_cifar10_deepspeed.sh"
Alternatively, you can also run the DeepSpeed example Python script using the
bcpruntool.bcprunwraps the orchestration of MPI and distributed PyTorch jobs, simplifying many of the number of arguments required for launch. For your DeepSpeed job, you would replace the previous command argument with a variation of this:1bcprun \ 2--nnodes $NGC_ARRAY_SIZE \ 3--npernode $NGC_GPUS_PER_NODE \ 4--env CODEDIR="/deepspeed_scratch/DeepSpeedExamples/training/cifar" \ 5--cmd "python \${CODEDIR}/cifar10_deepspeed.py"
15. Using NVIDIA Base Command Platform with Weights & Biases
15.1. Introduction
NVIDIA Base Command™ Platform is a premium infrastructure solution for businesses and their data scientists who need a world-class artificial intelligence (AI) development experience without the struggle of building it themselves. Base Command Platform provides a cloud-hosted AI environment with a fully managed infrastructure.
In collaboration with Weights & Biases (W&B), Base Command Platform users now have access to the W&B machine learning (ML) platform to quickly track experiments, version and iterate on datasets, evaluate model performance, reproduce models, visualize results, and spot regressions, and share findings with colleagues.
This guide explains how to get started with both Base Command Platform and W&B, as well as walks through a quick tutorial with an exemplary deep learning (DL) workflow on both platforms.
15.2. Setup
15.2.1. Base Command Platform Setup
Set up a Base Command Platform account.
Ask your team admin to add you to the team or org you want to join. After being added, you will receive an email invitation to join NVIDIA Base Command. Follow the instructions in the email invite to set up your account. Refer to the section Onboarding and Signup for more information on setting the context and configuring your environment
While logging in to the web UI, install and setup the CLI.
Follow instructions at https://ngc.nvidia.com/setup/installers/cli. The CLI is supported for Linux, Windows, and MacOS.
Generate an API key.
Once logged into Base Command Platform, go to the API key page and select “Generate API Key”. Store this key in a secure place. The API key will also be used to configure the CLI to authenticate your access to NVIDIA Base Command Platform.
Set the NGC context.
Use the CLI to log in and enter your API key and setting preferences. The key will be stored for future commands.
ngc config setYou will be prompted to enter your API key and then your context, which is your org/team (if teams are used), and the ace. Your context in NGC defines the default scope you operate in for collaboration with your team members and org.
15.2.2. Weights and Biases Setup
Access Weights & Biases.
Your Base Command Platform subscription automatically provides you with access to the W&B Advanced version. Create and set up credentials for your W&B account as your Base Command Platform account is not directly integrated with W&B – that is, W&B cannot be accessed with your Base Command Platform credentials.
Create a private workspace on Base Command Platform.
Using a private workspace is a convenient option to store your config files or keys so that you can access those in read-only mode from all your Base Command workloads. TIP: Name the workspace “homews-<accountname >” for consistency. Set your ACE and org name – here, “nv_eagledemo-ace” and “nv-eagledemo”.
ngc workspace create --name homews-<accountname> --ace nv-eagledemo-ace --org nv-eagledemo
Access your W&B API key.
Once the account has been created, you can access your W&B API key via your name icon on the top of the page → “Settings” → “API keys”. Refer to the “Execution” section for additional details on storing and using the W&B API key in your runs.
15.2.3. Storing W&B Keys in Base Command Platform
Your workload running on Base Command Platform must specify the credentials and configuration for your W&B account, for tracking jobs and experiments. Saving the W&B key in a Base Command Platform workspace needs to be performed only one time. The home workspace can be mounted to any Base Command Platform workload to access the previously recorded W&B key. This section shows how to generate and save W&B API key to your workspace.
Users have two options to configure the W&B API key to the private home workspace.
15.2.3.1. Option 1 | Using a Jupyter Notebook
Run an interactive JupyterLab job on Base Command Platform with the workspace mounted into the job.
In our example, we use homews-demouser as workspace. Make sure to replace the workspace name and context accordingly for your own use.
CLI:
ngc base-command run --name 'wandb_config' --ace nv-eagledemo-ace --instance dgxa100.40g.1.norm \
--result /results --image "nvidia/tensorflow:21.06-tf2-py3" --org nv-eagledemo \
--team nvtest-demo --workspace homews-demouser:/homews-demouser:RW --port 8888 \
--commandline "pip install wandb; jupyter lab --allow-root --ip=0.0.0.0 --no-browser --NotebookApp.token='' --NotebookApp.allow_origin='*' --notebook-dir=/"
Note that the home workspace (here, homews-demouser) is mounted in read / write mode.
When the job is running, start a session by clicking on the JupyterLab URL (as displayed on the “Overview” tab within a job).
Create new Jupyter notebook (e.g., “config”) and copy the following script into the notebook.
import wandb
import os
import requests
# 1. Login to W&B interactively to specify the API key
wandb.login()
# 2. Create a directory for configuration files
!mkdir -p /homews-demouser/bcpwandb/wandbconf
# 3. Copy the file into the configuration folder
!cp ~/.netrc /homews-demouser/bcpwandb/wandbconf/config.netrc
# 4. Set the login key to the stored W&B API key
os.environ["NETRC"]= "/homews-demouser/bcpwandb/wandbconf/config.netrc"
# 5. Check current W&B login status and username. Validate the correct API key
# The command will output {"email": "xxx@wandb.com", "username": "xxxx"}
res = requests.post("https://api.wandb.ai/graphql", json={"query": "query Viewer { viewer { username email } }"}, auth=("api", wandb.api.api_key))
res.json()["data"]["viewer"]
The W&B API key is now stored in the home workspace (homews-demouser).
15.2.3.2. Option 2 | Using a Script (via curl Command)
Run an interactive JupyterLab job on Base Command Platform with the workspace mounted into the job.
In our example, we use homews-demouser as workspace. Make sure to replace the workspace name and context accordingly for your own use.
CLI:
ngc base-command run --name 'wandb_config' --ace nv-eagledemo-ace --instance dgxa100.40g.1.norm \
--result /results --image "nvidia/tensorflow:21.06-tf2-py3" --org nv-eagledemo \
--team nvtest-demo --workspace homews-demouser:/homews-demouser:RW --port 8888 \
--commandline "pip install wandb; jupyter lab --allow-root --ip=0.0.0.0 --no-browser --NotebookApp.token='' --NotebookApp.allow_origin='*' --notebook-dir=/"
Note that the home workspace (here, homews-demouser) is mounted in read / write mode.
When the job is running, start a session by clicking on the JupyterLab URL (as displayed on the “Overview” tab within a job).
Start a terminal in JupyterLab and execute the following commands to create user credentials.
Make sure to replace the workspace name and context accordingly for your own use.
Terminal:
$ pip install wandb
$ curl -sL https://wandb.me/bcp_login | python - config <API key>
$ mkdir -p /homews-demouser/bcpwandb/wandbconf
$ cp config.netrc /homews-demouser/bcpwandb/wandbconf/config.netrc
$ python -c "os.environ["NETRC"]= "/homews-demouser/bcpwandb/wandbconf/config.netrc"
Terminal output: ‘API key written to config.netrc, use by specifying the path to this file in the NETRC environment variable’.
This command will create a configuration directory in your home workspace and store the W&B API key it in this workspace (homews-demouser) via a configuration file.
15.3. Using W&B with a JupyterLab Workload
After having followed the previous steps, the W&B API key is securely stored in a configuration file within your private workspace (here, homews-demouser). Now, this private workspace must be attached to a Base Command Platform workload to use the W&B account and features.
In the section below, you will create a JupyterLab notebook as an example to show the stored API key. MNIST handwritten digits classification using a Convolutional Neural Network with TensorFlow and Keras is an easily accessible, open-source model and dataset that we will use for this workflow (available via Keras here).
15.3.1. Create a Jupyter Notebook, Including W&B Keys for Experiment Tracking
Follow the first two steps in either option under Storing W&B Keys in Base Command Platform to create a job on Base Command Platform. After having accessed JupyterLab via the URL, start a new Jupyter notebook with the code below and save it as a file in your private workspace (/homews-demouser/bcpwandb/MNIST_example.ipynb).
The following exemplary script imports required packages, sets the environment, and initializes a new W&B run. Subsequently, it builds, trains, and evaluates the Convnet model with TensorFlow and Keras, as well as tracks several metrics with W&B.
# Imports
!pip install tensorflow
import numpy as np
from tensorflow import keras
from tensorflow.keras import layers
import wandb
import os

# 1. Import the W&B API key from private config workspace by defining NETRC fileos.environ["NETRC"]= "/homews-demouser/bcpwandb/wandbconf/config.netrc"

# 2. Initialize the W&B run
wandb.init(project = "nvtest-repro", id = "MNIST_run_epoch-128_bs-15", name = "NGC-JOB-ID_" + os.environ["NGC_JOB_ID"])

# 3. Prepare the data
# 3.1 Model / data parameters
num_classes = 10
input_shape = (28, 28, 1)

# 3.2 Split data between train and test sets
(x_train, y_train), (x_test, y_test) = keras.datasets.mnist.load_data()
x_train = x_train.astype("float32") / 255
x_test = x_test.astype("float32") / 255

# 3.3 Make sure images have the shape (28, 28, 1)
x_train = np.expand_dims(x_train, -1)
x_test = np.expand_dims(x_test, -1)
print("x_train shape:", x_train.shape)
print(x_train.shape[0], "train samples")
print(x_test.shape[0], "test samples")

# 3.4 Convert class vectors to binary class matrices
y_train = keras.utils.to_categorical(y_train, num_classes)
y_test = keras.utils.to_categorical(y_test, num_classes)

# 4. Build the model
model = keras.Sequential(
    [
        keras.Input(shape=input_shape),
        layers.Conv2D(32, kernel_size=(3, 3), activation="relu"),
        layers.MaxPooling2D(pool_size=(2, 2)),
        layers.Conv2D(64, kernel_size=(3, 3), activation="relu"),
        layers.MaxPooling2D(pool_size=(2, 2)),
        layers.Flatten(),
        layers.Dropout(0.5),
        layers.Dense(num_classes, activation="softmax"),
    ]
)
model.summary()

# 5. Train the model
batch_size = 128
epochs = 15

model.compile(loss="categorical_crossentropy", optimizer="adam", metrics=["accuracy"])
model.fit(x_train, y_train, batch_size=batch_size, epochs=epochs, validation_split=0.1)

# 6. Evaluate the trained model
score = model.evaluate(x_test, y_test, verbose=0)
print("Test loss:", score[0])
print("Test accuracy:", score[1])

# 7. Track metrics with wandb
wandb.log({'loss': score[0], 'accuracy': score[1]})

# 8. Track training configuration with wandb
wandb.config.batch_size = batch_size
wandb.config.epochs = epochs
After this step, your home workspace (homews-demouser) will include the configuration file and the exemplary Jupyter notebook created above.
Home workspace: /homews-demouser
Configuration file: /homews-demouser/bcpwandb/wandbconf/config.netrc
Jupyter notebook: /homews-demouser/bcpwandb/MNIST_example.ipynb
15.3.2. Running a W&B Experiment in Batch Mode
After having successfully completed all steps, including 4.1., proceed to run a W&B experiment in batch mode. Make sure to replace the workspace name and context accordingly for your own use.
Run Command:
ngc base-command run --name "MNIST_example_batch" --ace nv-eagledemo-ace --instance dgxa100.40g.1.norm \
--commandline "pip install wandb; jupyter lab --allow-root --ip=0.0.0.0 --no-browser --NotebookApp.token='' --NotebookApp.allow_origin='*' --notebook-dir=/ & date; \
cp /homews-demouser/bcpwandb/MNIST_example.ipynb /results && \
touch /results/nb-executing && \
jupyter nbconvert --execute --to=notebook --inplace -y --no-prompt --allow-errors --ExecutePreprocessor.timeout=-1 /results/MNIST_example.ipynb; \
sleep 2h" \
--result /results --image "nvidia/tensorflow:21.06-tf2-py3" --org nv-eagledemo --team nvtest-demo \
--workspace homews-demouser:/homews-demouser:RO --port 8888
pip install wandbensures that the wandb package is installed before the job is launched.The command jupyter nbconvert
--execute ...in the--commandlinearg will automatically execute the Jupyter notebook after the job launches.
After completion of the job, the results can be accessed on the W&B dashboard which provides an overview of all projects of a given user (here, nv-testuser). Within a W&B project, users can compare the tracked metrics (here, accuracy and loss) between different runs.
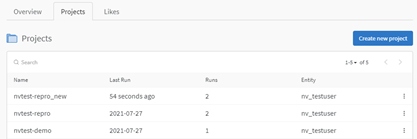
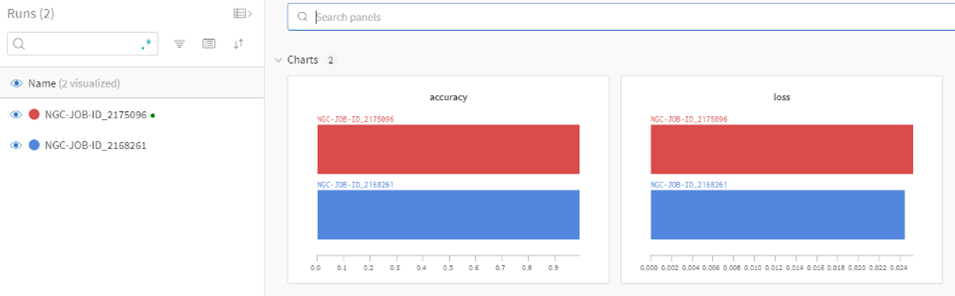
15.4. Best Practices for Running Multiple Jobs Within the Same Project
W&B only recognizes a new run upon a change in the run ID within the wandb.init( ) command. When only changing the run name, W&B will simply override the already existing run that has the same run ID. Alternatively, to log and track a new run separately, users can keep the same run ID but need to define the new run within a new project.
Runs can be customized within the wandb.init( ) command as follows:
wandb.init(project = "nvtest-demo", id = "MNIST_run_epoch-128_bs-15", name = "NGC-JOB-ID_" + os.environ["NGC_JOB_ID"])
Project: The W&B project name should correspond to your Base Command Platform team name. In this example, the Base Command Platform team name “nvtest-demo” is reflected as project name on W&B.
Team name on Base Command Platform:

Project name on W&B:
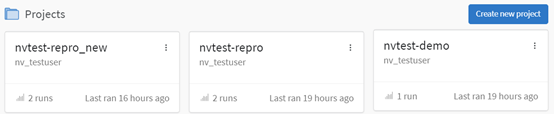
ID: The ID is unique to each run. It must be unique in a project and if a run is deleted, the ID can’t be reused. Refer to the W&B documentation for additional details. In this example, the ID is named after the Jupyter notebook and model configuration.
Name: The purpose of the run name is to identify each run in the W&B UI. In this example, we name each run according to the related NGC job ID and therefore ensure that each individual run has a different name to ensure easy differentiation between runs.
15.5. Supplemental Reading
Refer to other chapters in this document as well as the Weights & Biases documentations for additional information and details.
16. Deregistering
This chapter describes the features and procedures for de-registering users from the system.
Only org administrators can de-register users and remove artifacts (datasets, workspaces, results, container images, models etc). All artifacts owned by the user must be removed or archived before removing the user from the system.
Perform the following actions:
16.1. Remove all workspaces, datasets, and results
To archive, download each item:
ngc workspace download <workspace-id> --dest <path>ngc dataset download <dataset-id> --dest <path>ngc result download <result-id> --dest <path>
To remove the items:
ngc workspace remove <workspace-id>ngc dataset remove <dataset-id>ngc result remove <result-id>
16.2. Remove all container images, charts, and resources
To archive, download each item:
ngc registry image pull <repository-name>:<tag>ngc registry chart pull <chart-name>:<version>ngc registry resource download-version <resource-name>:<version>
To remove items:
ngc registry image remove <repository-name>:<tag>ngc registry chart remove <chart-name>:<version>ngc registry resource remove <resource-name>:<version>
16.3. Delete Users
list users in the current team:
ngc team list-usersRemove each user from the team:
ngc team remove-user <user-email>
16.4. Delete Teams
Once all users in a team have been removed, delete the team:
ngc org remove-team <team-name>
17. Best practices
This chapter contains best practices for working with Base Command Platform.
17.1. Data Management Best Practices
17.1.1. Understanding Data Movement Costs
The following is a guide to the different locations where data may reside:
Name |
Definition |
|---|---|
DGX Cloud |
DGX Cloud is a service operated at one of our Cloud Service Provider (CSP) partner locations. Data is stored in the customer’s ACE on a high-speed parallel file system in the form of /datasets, /workspaces, and /results accessed via BCP and mounted during a job. |
DGX Cloud Staging |
DGX Cloud Staging is an NVIDIA-provisioned object storage blob colocated with the customer’s ACE provisioned for their DGX Subscription. It is provided to allow customers to begin uploading their data over the internet to the DGX Cloud data center before their subscription starts. Once the subscription has started, customers can import that data into the BCP /datasets and /workspaces. It is not intended for long-term use and is only available for a short period at the start of the DGX Cloud subscription. |
BCP On-Premises |
A DGX SuperPOD at a customer’s premises or colocation facility with Base Command Platform deployed on it for management through the BCP interface. Storage on a SuperPOD is on one of the SuperPOD storage partner products. |
3rd Party Different Cloud |
Data that resides in a customer’s account on a CSP that differs from the CSP used for the DGX Cloud subscription location. |
3rd Party Same Cloud |
Data that resides in a customer’s account on a CSP that is the same CSP used for the DGX Cloud subscription location. |
3rd Party On-Premises |
Data that resides at a customer account colocated with their SuperPOD but not the primary storage of the SuperPOD. |
3rd Party Off-Premises |
Data not colocated with a BCP On-premises installation and unrelated to DGX Cloud or DGX Cloud Staging. |
Please note the following data transfer cost considerations:
From |
To |
Cost |
|---|---|---|
DGX Cloud |
DGX Cloud Staging |
Free |
DGX Cloud |
BCP On-premises |
Included up to your DGX Cloud subscription egress limit |
DGX Cloud |
3rd Party Different Cloud |
Included up to your DGX Cloud subscription egress limit |
DGX Cloud |
3rd Party Same Cloud |
Same Cloud Inter-VPC fees Same Cloud Multi-Region fees |
DGX Cloud |
Customer provided location |
Included up to your DGX Cloud subscription egress limit |
DGX Cloud Staging (Onboarding) |
DGX Cloud |
Included |
DGX Cloud Staging (Onboarding) |
BCP On-prem |
Not applicable |
DGX Cloud Staging (Offboarding) |
Customer provided location |
Arranged upon request |
BCP On-Premises |
DGX Cloud |
Customer’s internet service egress No DGX Cloud ingress fees |
BCP On-Premises |
DGX Cloud Staging |
Customer’s internet service egress fee |
BCP On-Premises |
3rd Party On-premises |
Customer internal |
BCP On-Premises |
3rd Party Off-premises |
Customer’s internet service egress fee |
3rd Party On-premises |
DGX Cloud |
Customer’s internet service egress fee No DGX Cloud ingress fees |
3rd Party On-premises |
DGX Cloud Staging |
Customer’s internet service egress fee No DGX Cloud ingress fees |
3rd Party On-premises |
BCP On-premises |
Customer internal |
3rd Party Different Cloud |
DGX Cloud |
3rd Party Different Cloud egress fees |
3rd Party Different Cloud |
DGX Cloud Staging |
3rd Party Different Cloud egress fees |
3rd Party Same Cloud |
DGX Cloud |
Same Cloud Inter-VPC fees Same Cloud Multi-Region fees |
3rd Party Same Cloud |
DGX Cloud Staging |
Same Cloud Inter-VPC fees Same Cloud Multi-Region fees |
3rd Party Off-premises |
BCP On-premises |
3rd Party Off-premises egress fees |
When transferring data into (ingress) DGX Cloud, there is no fee from DGX Cloud. The customer may have Customer Internet Service Egress from the service provider hosting their data - whether that be a cloud with explicit egress charges or on-premises with the internet service provider’s egress to internet charges.
In some circumstances, a pre-authenticated URL in the same region as a customer’s DGX Cloud instance can be provided to facilitate Staging for bulk transfers to DGX Cloud. This is used for the initial upload of datasets prior to a DGX Cloud subscription. Further, this DGX Cloud Staging area can be used to do a DGX Cloud data migration:
(Region A) -> DGX Cloud Staging (Region B) -> DGX Cloud (Region B)
There is no cost in transferring data between the DGX Cloud Staging object store and DGX Cloud BCP storage. However, the DGX Cloud Staging object store is intended for short-term use and is provided for customers’ convenience during limited periods of onboarding and off-boarding.
A customer may provide their own object store and use it directly for an AI Training job instead of using BCP datasets. The customer may also use their own object store to backup the training results if desired.
17.1.2. Deciding Whether to Import Data into BCP
Jobs can use datasets that are internal or external to BCP. For example, a job could run a container with direct access to the user’s S3 bucket in AWS.
Leaving data outside BCP
During experiment-based work, keeping your existing data in its current location may be cost-effective. The job runs inside BCP but accesses object-stored data elsewhere.
Bringing data into BCP
Customers may choose to bring their datasets into BCP for improved job performance. BCP-supporting environments (e.g., DGX Cloud, DGX SuperPOD) have performance-optimized filesystems to hold their datasets. This performance optimization supports cluster-wide parallel reads for large-scale training jobs.
During production work–or anytime more formal tracking is required–bringing the datasets into BCP provides several benefits: job tracking, job reproducibility, and in-platform, role-based dataset sharing.
Scenario |
Suggested Data Location |
Notes |
|---|---|---|
Only some of the dataset consumers are using BCP |
Original, external storage location |
Leaving data in the original location keeps it in a centralized location, preventing the need for synchronization mechanisms. |
Frequent Data Updates |
Original, external storage location |
Leaving data in the original location ensures that everyone on the team is working with the most current and consistent data, preventing potential versioning issues. |
Large Volume of Data |
Original, external storage location |
For exceptionally large datasets (e.g., petabytes), transferring data out of its current storage might be impractical or infeasible. However, since there is no cost to read a BCP dataset during a BCP job (i.e., no “GET” fee), transferring the dataset into BCP and accessing it repeatedly for free may be more cost-effective. |
Low-Latency Requirements |
Inside BCP |
Having data colocated with compute hardware during a job offers the lowest possible latency for data access. |
Job Reproducibility, Validation, or Auditability |
Inside BCP |
Having a job’s data located in BCP means the full dataset information is logged, and the job is 100% reproducible and reportable. |
Shared “Official” Datasets |
Inside BCP |
If the organization has official, unchanging datasets–perhaps even production-level datasets–they’d like to share across many users, moving them into BCP is efficient. |
17.1.3. Cost-efficient Data Management Outside BCP
Region-to-region transfer within the same cloud provider is generally lower cost than multi-region transfers or multi-cloud transfers. If you need to leave your data outside of BCP, having your data within the same region as your ACE may lower your cost.
17.1.4. Cost-efficient Data Management Inside BCP
If your workflow permits batching of data, you may reduce the number of egress requests. You can monitor available storage in the BCP Dashboard.
17.1.5. Cost-efficient Data Retrieval from BCP
If you’d like to move the contents of /results outside BCP after a job is complete, results data could be bundled and compressed (tar+gzip for example) to reduce the total amount of data to be transferred. That method reduces both size and number of transactions compared to transferring a high volume of smaller individual files. This method can lower the access costs (PUTS) to remote object stores as well as the time to egress and the cost.
17.1.6. Exercising Caution When Editing Existing Datasets
Dataset names must be unique across an ACE. So, if you try to add a dataset with a name that already exists in your ACE, you can either “append” this second dataset to the first dataset or cancel the import/upload.
Appending datasets permanently alters the existing dataset resource. Repeating and validating experiments, however, often requires reference to the exact dataset that was used originally. So, appending to existing datasets will invalidate those downstream tasks from previous jobs tasks.
If you do choose to append to the existing dataset in BCP,
any files with names not already in the BCP dataset will be added.
any files with names already in the BCP dataset will overwrite the original.
17.1.7. Leveraging ‘no-team’ for Resource Sharing
To share datasets and workspaces with your entire Organization, use the team argument “no team” instead. The absence of a specific team identifier, will share that resource at the Organization level.
Datasets shared with “no-team” will be available for all users in that Organization to view, mount during a job, and export.
Workspaces shared with “no-team” will be available for all users in that Organization to view, mount during a job, augment, and export.
Please work with your BCP Organization Administrator if you have questions about your organization’s best practices around sharing datasets and workspaces to the Organization.
17.1.8. Monitoring Per-User Data Quota
Monitoring user storage usage ensures users don’t suddenly hit their storage quota and become constrained on dataset movement. Users can select the Request Storage button (if enabled by your Organization) to request an increase in storage.
Users can check storage quota using the BCP Dashboard in the Web UI:
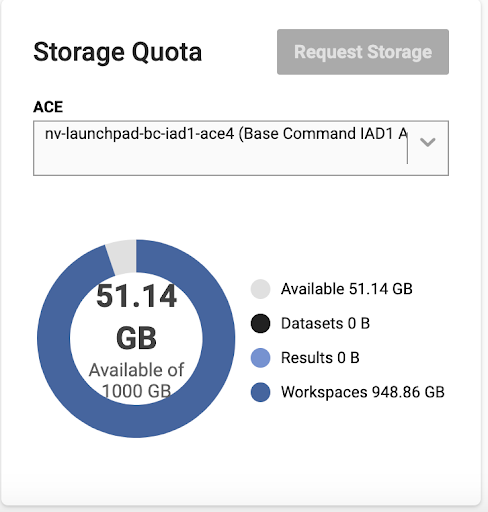
Users can also check their storage quota using the CLI:
$ ngc user storage
References
NGC CLI Documentation
With NVIDIA GPU Cloud (NGC) CLI, you can perform many of the same operations that are available from the NGC web application, such as running jobs, viewing Docker repositories and downloading AI models within your organization and team space.
NGC API Documentation
The NGC Web API is an interface for querying information from and enacting change in an NGC environment.
Notices
Notice
This document is provided for information purposes only and shall not be regarded as a warranty of a certain functionality, condition, or quality of a product. NVIDIA Corporation (“NVIDIA”) makes no representations or warranties, expressed or implied, as to the accuracy or completeness of the information contained in this document and assumes no responsibility for any errors contained herein. NVIDIA shall have no liability for the consequences or use of such information or for any infringement of patents or other rights of third parties that may result from its use. This document is not a commitment to develop, release, or deliver any Material (defined below), code, or functionality.
NVIDIA reserves the right to make corrections, modifications, enhancements, improvements, and any other changes to this document, at any time without notice.
Customer should obtain the latest relevant information before placing orders and should verify that such information is current and complete.
NVIDIA products are sold subject to the NVIDIA standard terms and conditions of sale supplied at the time of order acknowledgement, unless otherwise agreed in an individual sales agreement signed by authorized representatives of NVIDIA and customer (“Terms of Sale”). NVIDIA hereby expressly objects to applying any customer general terms and conditions with regards to the purchase of the NVIDIA product referenced in this document. No contractual obligations are formed either directly or indirectly by this document.
NVIDIA products are not designed, authorized, or warranted to be suitable for use in medical, military, aircraft, space, or life support equipment, nor in applications where failure or malfunction of the NVIDIA product can reasonably be expected to result in personal injury, death, or property or environmental damage. NVIDIA accepts no liability for inclusion and/or use of NVIDIA products in such equipment or applications and therefore such inclusion and/or use is at customer’s own risk.
NVIDIA makes no representation or warranty that products based on this document will be suitable for any specified use. Testing of all parameters of each product is not necessarily performed by NVIDIA. It is customer’s sole responsibility to evaluate and determine the applicability of any information contained in this document, ensure the product is suitable and fit for the application planned by customer, and perform the necessary testing for the application in order to avoid a default of the application or the product. Weaknesses in customer’s product designs may affect the quality and reliability of the NVIDIA product and may result in additional or different conditions and/or requirements beyond those contained in this document. NVIDIA accepts no liability related to any default, damage, costs, or problem which may be based on or attributable to: (i) the use of the NVIDIA product in any manner that is contrary to this document or (ii) customer product designs.
No license, either expressed or implied, is granted under any NVIDIA patent right, copyright, or other NVIDIA intellectual property right under this document. Information published by NVIDIA regarding third-party products or services does not constitute a license from NVIDIA to use such products or services or a warranty or endorsement thereof. Use of such information may require a license from a third party under the patents or other intellectual property rights of the third party, or a license from NVIDIA under the patents or other intellectual property rights of NVIDIA.
Reproduction of information in this document is permissible only if approved in advance by NVIDIA in writing, reproduced without alteration and in full compliance with all applicable export laws and regulations, and accompanied by all associated conditions, limitations, and notices.
THIS DOCUMENT AND ALL NVIDIA DESIGN SPECIFICATIONS, REFERENCE BOARDS, FILES, DRAWINGS, DIAGNOSTICS, LISTS, AND OTHER DOCUMENTS (TOGETHER AND SEPARATELY, “MATERIALS”) ARE BEING PROVIDED “AS IS.” NVIDIA MAKES NO WARRANTIES, EXPRESSED, IMPLIED, STATUTORY, OR OTHERWISE WITH RESPECT TO THE MATERIALS, AND EXPRESSLY DISCLAIMS ALL IMPLIED WARRANTIES OF NONINFRINGEMENT, MERCHANTABILITY, AND FITNESS FOR A PARTICULAR PURPOSE. TO THE EXTENT NOT PROHIBITED BY LAW, IN NO EVENT WILL NVIDIA BE LIABLE FOR ANY DAMAGES, INCLUDING WITHOUT LIMITATION ANY DIRECT, INDIRECT, SPECIAL, INCIDENTAL, PUNITIVE, OR CONSEQUENTIAL DAMAGES, HOWEVER CAUSED AND REGARDLESS OF THE THEORY OF LIABILITY, ARISING OUT OF ANY USE OF THIS DOCUMENT, EVEN IF NVIDIA HAS BEEN ADVISED OF THE POSSIBILITY OF SUCH DAMAGES. Notwithstanding any damages that customer might incur for any reason whatsoever, NVIDIA’s aggregate and cumulative liability towards customer for the products described herein shall be limited in accordance with the Terms of Sale for the product.
Trademarks
NVIDIA, the NVIDIA logo, and Base Command are trademarks and/or registered trademarks of NVIDIA Corporation in the United States and other countries. Other company and product names may be trademarks of the respective companies with which they are associated.
Copyright
© 2023-2026 NVIDIA Corporation and Affiliates. All rights reserved.