1. Introduction
This guide introduces Nsight Eclipse Edition and provides instructions necessary to start using this tool. For a detailed description of Nsight features consult the integrated help available from inside Nsight.
1.1. About Nsight Eclipse Edition
- Source editor with extended support for CUDA C and C++ syntax
- Projects and files management with version control management system integration. CVS and Git are supported out of the box with integrations for other systems available separately as IDE plug-ins.
- Configurable makefile-based NVCC build integration
- Graphical user interface for debugging heterogeneous applications
- Visual profiler with source code correlation for optimizing GPU code performance
- Version control management systems support
- Compiler integrations
- Language IDEs
- Application lifecycle management and collaboration solutions
For more information about Eclipse Platform, visit http://eclipse.org
2. New and Noteworthy
New in Nsight Eclipse Edition 9.0
- Nsight Eclipse Plugins
- Nsight Eclipse Plugins are now available as part of CUDA 9.0 toolkit that can be installed on your own Eclipse environment. Please refer to /usr/local/cuda-9.0/doc/pdf/Nsight_Eclipse_Plugins_Installation_Guide.pdf for details.
New in Nsight Eclipse Edition 7.5
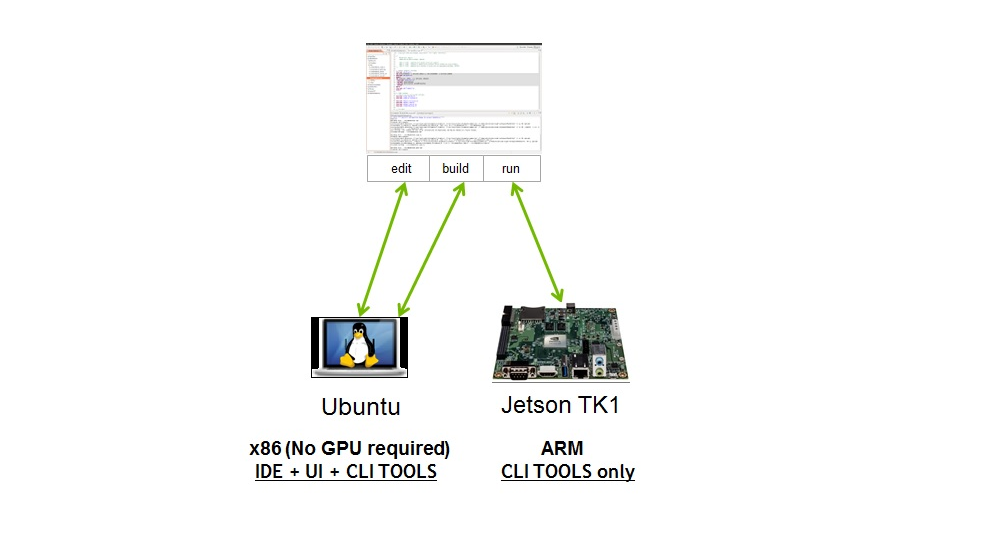
- Multiple Toolkit support
- Nsight Eclipse Edition is now capable of creating new CUDA that would use compiler/debugger from CUDA-6.5 or CUDA-7.0 toolkits. This feature would be mostly useful for remote-development on CUDA-capable Tegra products, like Jetson TK1 DevKit. Please note, that regardless of what toolkit was selected for compilation/debugging, profiling would always be performed using the most recent version of nvprof.
- Based on Eclipse-4.4 platform
- Nsight Eclipse Edition is now based on Eclipse-4.4 platform. This update is expected to fix multiple compatibility issues, like inability to remotely debug/profile application running on the OpenSSH-6.8p1 or later, as well as enhance C++11 code analysis capabilities.
New in Nsight Eclipse Edition 7.0
- Precise Error Attribution on Maxwell
- When debugging an application on an sm_50 or later GPU the debugger will report the precise exception location (as a precised PC value).
- POWER Cross-Compilation Support
- Nsight Eclipse Edition now allows POWER to be targeted from an x86 host. Using an x86 version of Nsight EE running on an x86 host system you can now cross-compile to product POWER targeted CUDA applications.
- Improved OpenGL Remote Development/Cross-Compilation Support
- Out-of-the-box remote-development/cross-compilation support for CUDA + OpenGL samples from Linux x86 to Linux ARMv7 and from OSX to Linux x86.
- C++11 Support
- A checkbox is added to the NVCC Compiler->Code Generation project properties tab to enable C++11 support in the compiler.
New in Nsight Eclipse Edition 6.5
- Stability release
- Version 6.5 improves the stability of network connections to target systems and fixes an an occasional hang that could occur after profiling CUDA applications in earlier versions.
New in Nsight Eclipse Edition 6.0
- Running Or Profiling Applications Remotely
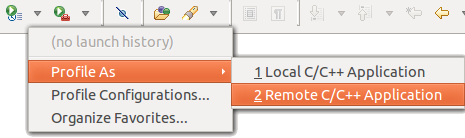
- In addition to remote debugging support introduced in Nsight Eclipse Edition 5.5, Nsight Eclipse Edition 6.0 is also able to run and profile applications on remote systems.
-
To run or profile on a remote system, select
Remote C/C++ Applicaton from the drop-down on
the main toolbar.
- Building Projects On A Remote System
-
Nsight Eclipse Edition can now perform build on a remote system.
Following actions will be performed:
- Nsight will connect to a remote system and will synchronize copies of the project files between local and remote systems. User may be prompted to resolve conflicts if there are any.
- make will be executed on a remote system to build the project.
- Build results will be copied back to the local system.
Note: Building project remotely requires Git to be available and set up on both the local and the remote system. -
Target systems for remote build can be setup during project creation
with the New CUDA Project wizard
or on the Build/Target Systems
project property page
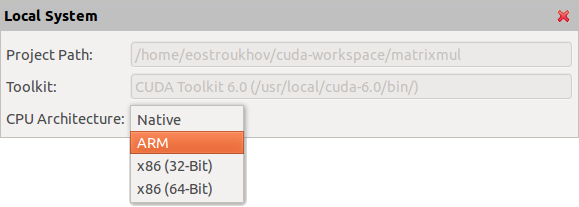
- ARMv7 Cross Development Support
-
Nsight Eclipse Edition can now target Linux systems running on ARMv7
processors.
Note: Please consult CUDA Toolkit Release Notes for information on enabling ARMv7 cross development support in CUDA Toolkit
-
CPU archicture for the project can be set during project creation with
the New CUDA Project wizard or using the
Build/Target Systems project property page
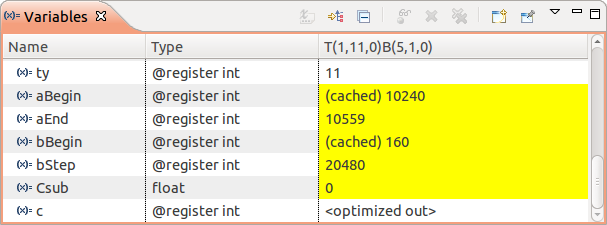
- Cached And Extrapolated Values In Visual Debugger
-
cuda-gdb now reports cached and extrapolated values for
variables in device code that were optimized out by the compiler.
New in Nsight Eclipse Edition 5.5
- Remote Debugging Support
-
Nsight supports debugging CUDA applications running on remote systems. Nsight can both upload for debugging executable built locally and debug executable built remotely.
- Kernel Launch Trace
-
Debug view now shows CDP launch trace.
- CDP Project Support
-
CDP support can be enabled from a new project wizard during project creation or from project properties for existing projects.
- Software Preemption Support
-
Software preeption debugging can be enabled from
Nsight preferences.
Note: Software preemption debugging is BETA and is only available on SM 3.5 and later devices. Consult cuda-gdb manual before enabling this setting.
- Floating Point Memory Rendering
-
Floating-point rendering support was added to the memory view.
- Remote System Explorer
-
Nsight Eclipse Edition now includes Remote System Explorer plug-in. This plugin enables accessing remote systems for file transfer, shell access and listing running processes.
- Eclipse Platform Update
-
Nsight Eclipse Edition 5.5 is based on Eclipse Platform 3.8.2 and Eclipse CDT 8.1.2 introducing a number of new features and enhancements to existing features.
Using Nsight Eclipse Edition
Installing Nsight Eclipse Edition
Nsight Eclipse Edition is installed as a part of the CUDA Toolkit package.
3.1. Installing CUDA Toolkit
To install CUDA Toolkit:
- Visit the NVIDIA CUDA Zone download page:http://www.nvidia.com/object/cuda_get.html
- Select appropriate operating system. Nsight Eclipse Edition is available in Mac OS X and Linux toolkit packages.
- Download and install the CUDA Driver.
- Download and install the CUDA Toolkit.
- Follow instructions to configure CUDA Driver and Toolkit on your system.
3.1.2. Mac OS X Additional Notes
Nsight Eclipse Edition requires Java Runtime Environment (JRE) to be available on the local system. Compatible JRE is included in CUDA Toolkit package on Linux platform.
Mac OS X users need to have JDK 7 or later installed on their system, which can be downloaded from Oracle's Java website
Nsight Eclipse Edition relies on command-line development tools to be installed on the system. To install those command-line tools, Xcode must be installed first.
$ xcode-select --install
Note: It is recommended to re-run the above command if Xcode is upgraded.
$ /usr/bin/cc --version
Running Nsight Eclipse Edition
nsight
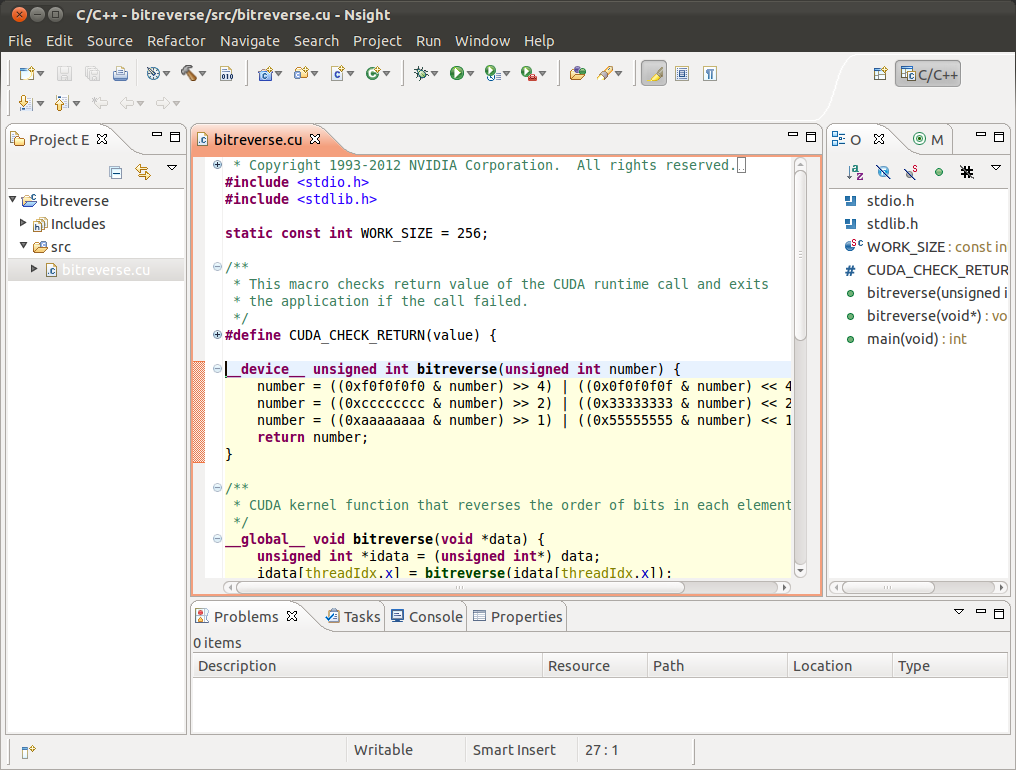
On the first run Nsight will ask to pick a workspace location. The workspace is a folder where Nsight will store its settings, local files history and caches. An empty folder should be selected to avoid overwriting existing files.
- Editor - displays source files that are opened for editing.
- Project Explorer - displays project files
- Outline - displays structure of the source file in the current editor.
- Problems - displays errors and warnings detected by static code analysis in IDE or by a compiler during the build.
- Console - displays make output during the build or output from the running application.
3.3. Creating a New Project
- From the main menu, open the new project wizard - File > New... > CUDA C/C++ Project
- Specify the project name and project files location.
- Select CUDA Runtime Project to create a simple CUDA runtime application.
-
Specify the project parameters on the next wizard page.
Note: By default Nsight will automatically detect and target CUDA hardware available locally. Nsight will default to SM 2.0 if no CUDA hardware is detected.
- Complete the wizard. The project will be shown in the Project Explorer view and source editor will be opened.
- Build the project by clicking on the hammer button on the main toolbar.
3.4. Importing CUDA Samples
- From the main menu, open the new project wizard - File > New... > CUDA C/C++ Project
- Specify the project name and project files location.
- Select Import CUDA Sample under Executable in the Project type tree.
- On the next wizard page select project sample you want to import. Press Next...
- Specify the project parameters on the next wizard page.
- Complete the wizard. The project will be shown in the Project Explorer view and source editor will be opened.
- Build the project by clicking on the hammer button on the main toolbar.
cuHook Sample
- From the main menu, open the new project wizard - File > New... > CUDA C/C++ Project
- Select project type "Makefile project" and choose "Empty Project"
- Specify the project name and project files location.
- Complete the wizard. The project will be shown in the Project Explorer view.
- Right click on the project - Import... > General > File System
- On the next wizard page, select the location of cuHook sample(Samples/7_CUDALibraries/cuHook)
- Select all the source files and makefile and Finish the wizard
- Build the project by clicking on the hammer button on the main toolbar.
- To run the sample, from the main menu - Run > Run Configurations... > Select the executable > Go to Environment tab > New... > enter Name=LD_PRELOAD, Value=./libcuhook.so.1 > Run will execute the sample
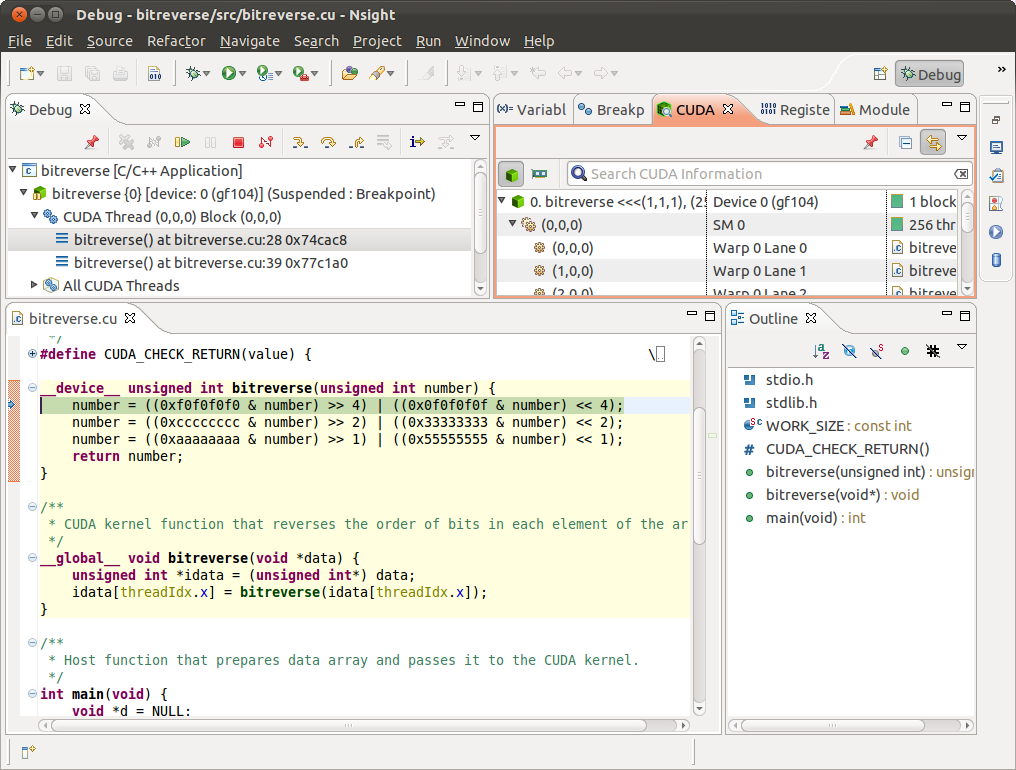
3.5. Debugging CUDA Applications
- In the Project Explorer view, select project you want to debug. Make sure the project executable is compiled and no error markers are shown on the project.
- On the main window toolbar press Debug button (green bug).
- You will be offered to switch perspective when you run debugger for the first time. Click "Yes". Perspective is a window layout preset specifically designed for a particular task.
- Application will suspend in the main function. At this point there is no GPU code running.
- Add a breakpoint in the device code. Resume the application.
Debugger will break when application reaches the breakpoint. You can now explore your CUDA device state, step through your GPU code or resume the application.
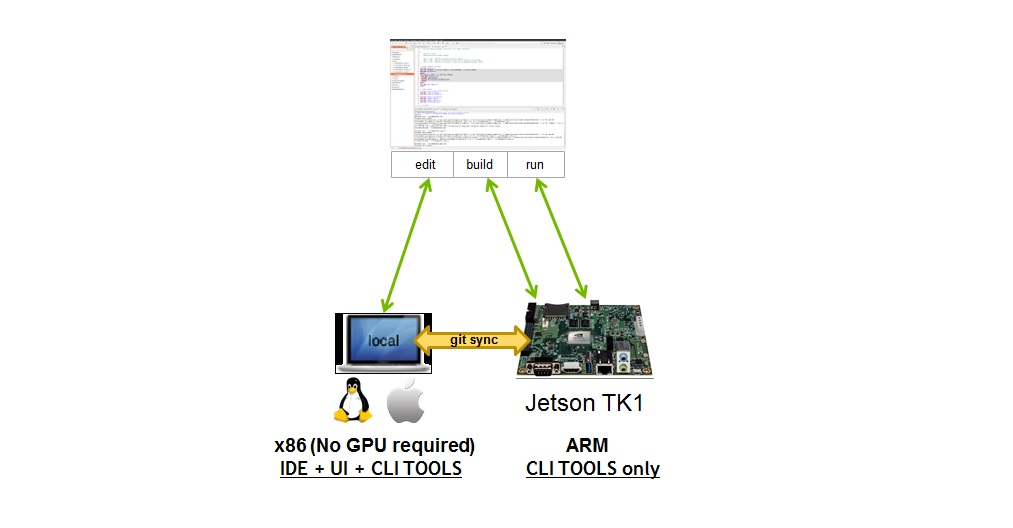
3.6. Remote development of CUDA Applications
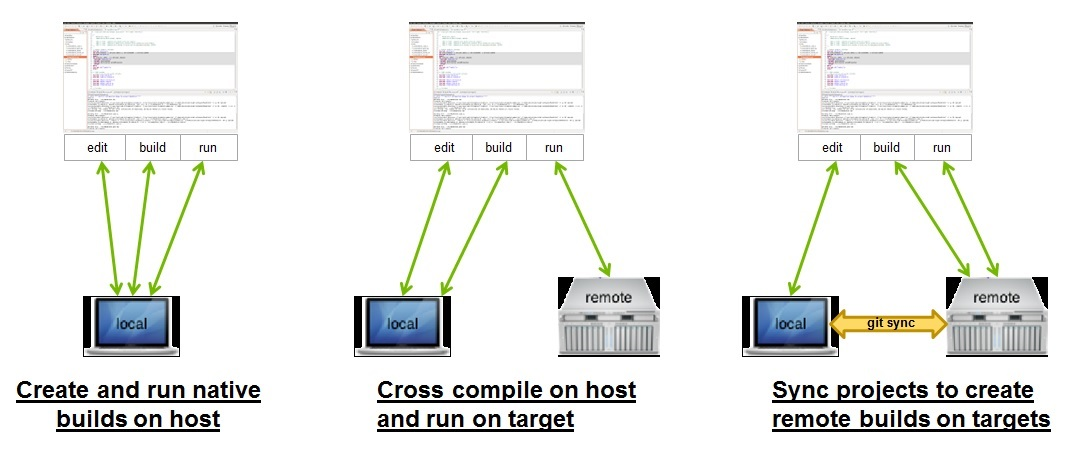
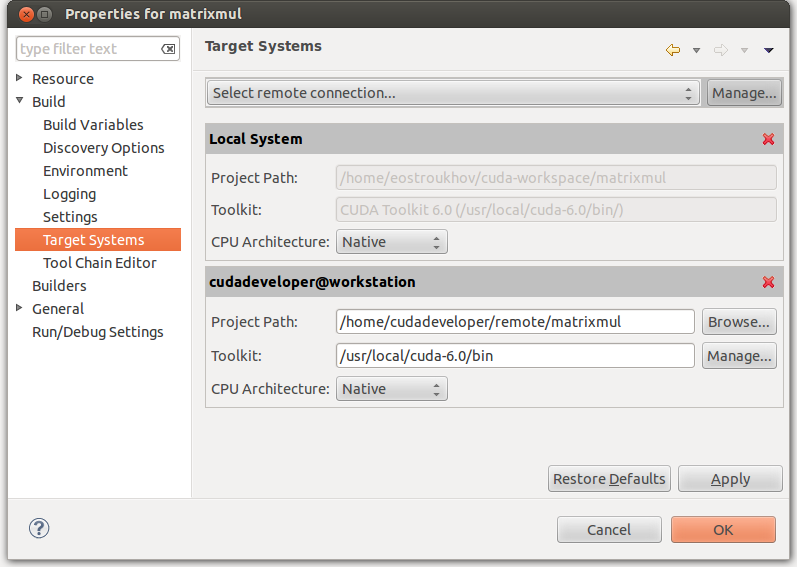
Nsight supports two remote development modes: the cross compilation mode and the remote synchronized project mode.
To cross compile select the target cross compile architecture in CPU architecture drop down:
To create native remote build using remote synchronized project mode click on Manage... button to add a remote system, then select the project path, toolkit and the CPU architecture of the target system:
- git config --global user.name <anyname>
- git config --global user.email <anyemail>
3.7. Debugging Remote CUDA Applications
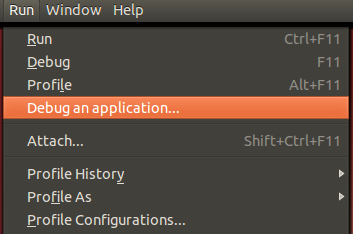
-
Select
Run>Debug an application
menu item.
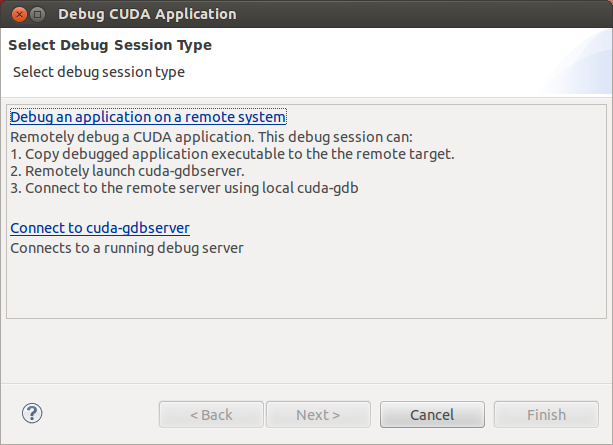
-
Select Debug an application on a remote system option.
-
Type the full path to a local executable or select one using the Local file... button.
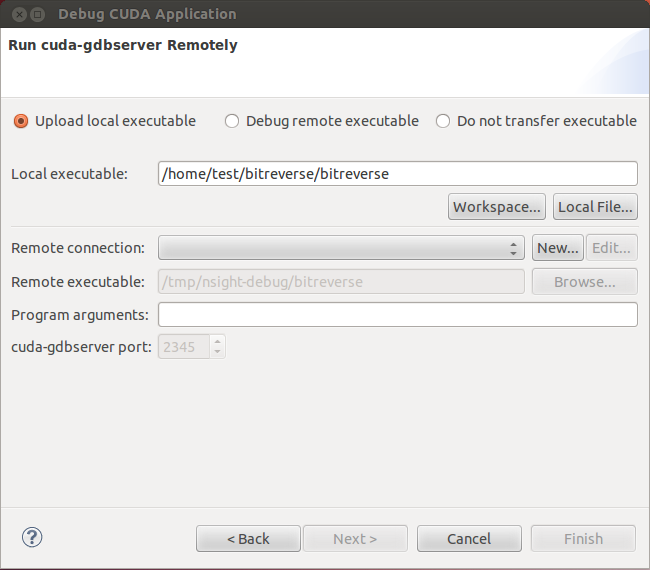
- Select a remote connection from a drop-down list or press the New... button to create a new one.
-
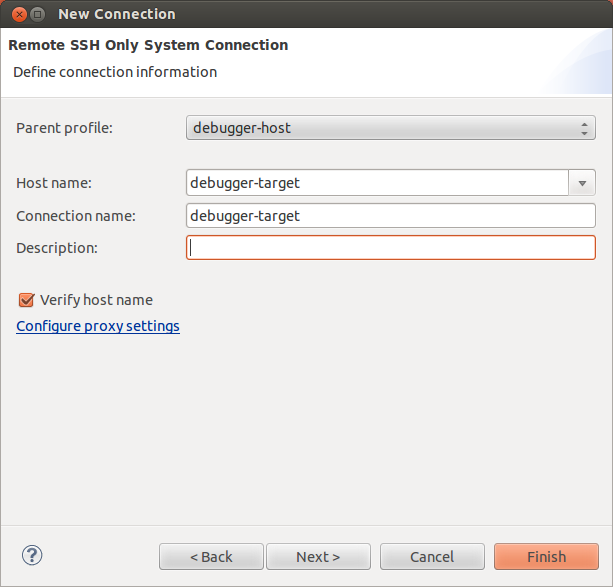
If you are creating a new remote connection,
select the SSH Only connection type,
press Next, and type
the host name(or IP address) as well as the connection name and
description (both are optional) and then press Finish.
- Optional: Press Connect to verify the selected remote connection.
- Press the Next button.
-
Type the full path to cuda-gdbserver on the remote system or
select one using the Browse... button.
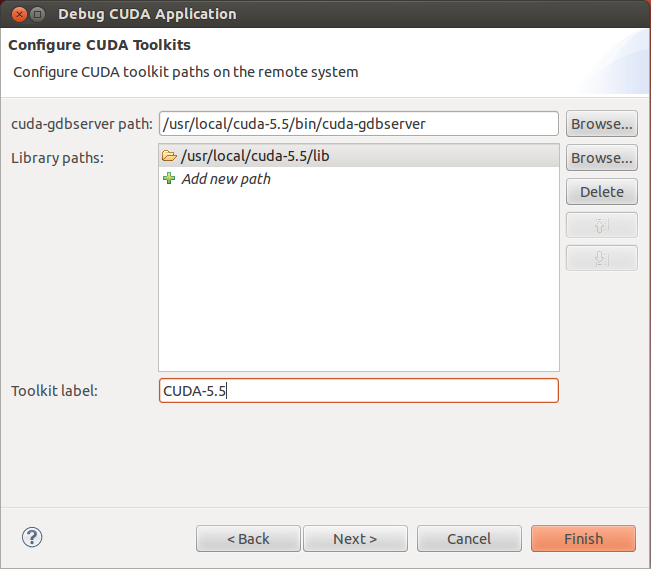
- Click on "Add new path" or on the Browse... button to specify the path to the shared libraries the remote application depends on.
- Click on the Finish button to finish the new debug configuration wizard and start debugging the application.
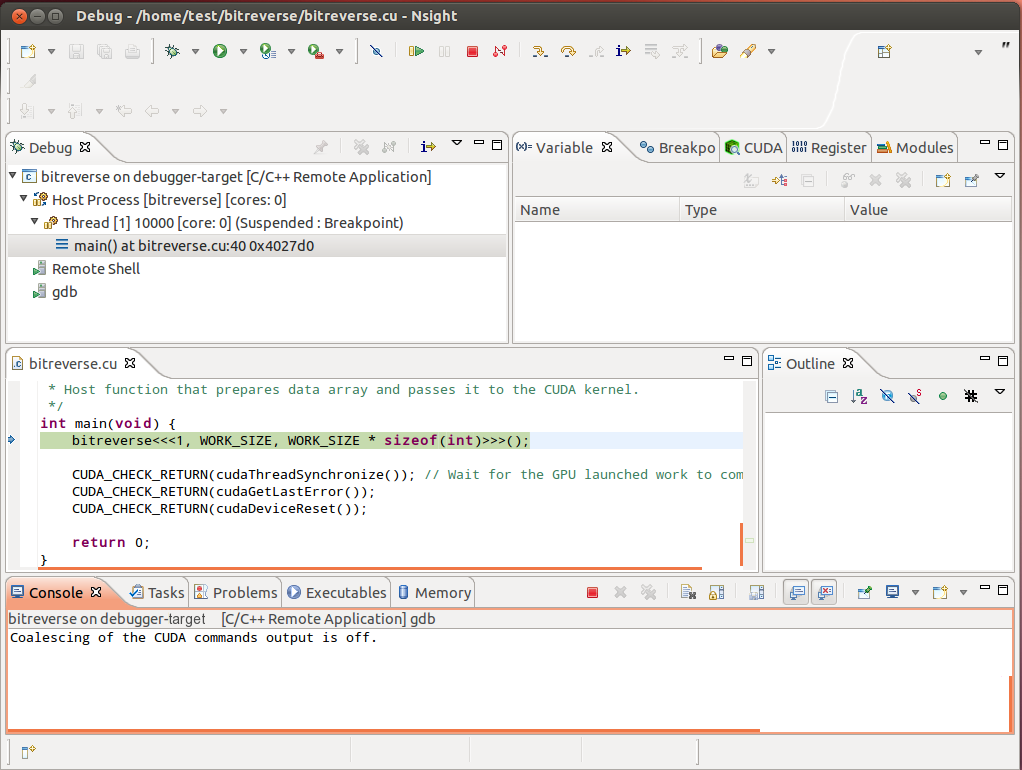
- You will be offered to switch perspective when you run the debugger for the first time. Click Yes. Perspective is a window layout preset specifically designed for a particular task.
The debugger will stop at the application main routine. You can now set breakpoints, or resume the application.
3.8. Profiling CUDA applications
- In the Project Explorer view, select project you want to profile. Make sure the project executable is compiled and no error markers are shown on the project.
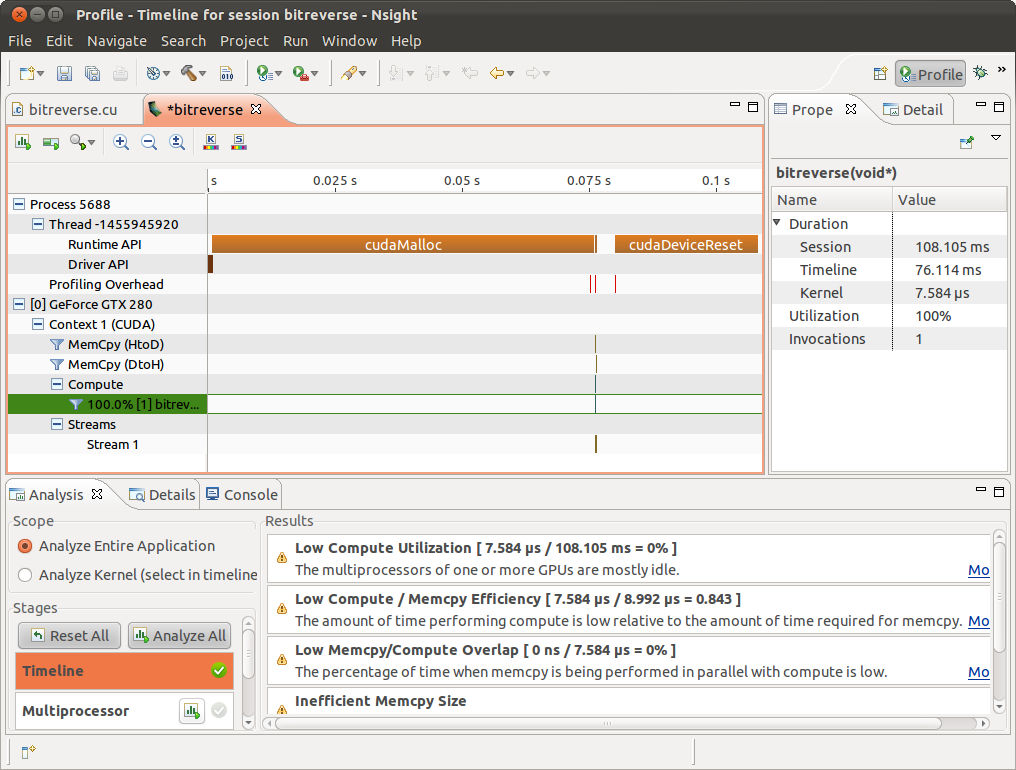
- On the main window toolbar press the Profile button.
- Press Yes when Nsight prompts to switch to the Profile perspective.
Nsight will switch to the Profile perspective and will display application execution timeline.
3.9. More Information
- Navigating debugged application state
- Enabling cuda-memcheck integration when debugging GPU applications
- Attaching to running applications
- Measuring GPU code efficiency
- Refactoring CUDA C/C++ source code
- Accessing CVS and Git repositories
- Installing Nsight Eclipse Edition plug-ins
More information about these and other topics is available in the Nsight built-in documentation. To access Nsight documentation select Help->Help Contents from the Nsight main menu.
More information about CUDA, CUDA Toolkit and other tools is available on CUDA web page at http://developer.nvidia.com/cuda
A. Platform Requirements
Nsight Eclipse Edition is supported on all Linux x86 and POWER versions and Mac OS X versions supported by the CUDA Toolkit.
A CUDA-capable GPU is not required for writing and compiling your CUDA application using Nsight Eclipse Edition. A CUDA-capable GPU is required for debugging and profiling CUDA applications. Debugging is supported on all CUDA-capable GPUs supported by the CUDA Toolkit.
A GPU that is running X11 (on Linux) or Aqua (on Mac) cannot be used to debug a CUDA application and will be hidden from the application ran in the debugger. Such GPU can still be used for profiling GPU applications.
Known Issues
Executable must exist in order to start debug session for the first time
Nsight will not automatically perform build when starting debug session for a given project for the first time. Build must be invoked manually. Nsight will automatically rebuild executable when starting subsequent debug sessions.
Source editors may show error markers on a valid code for the files in newly created projects.
These markers will be cleared after Nsight indexes included header files.
Mac OS X users may be prompted to install Java Runtime Environment (JRE) when running Nsight Eclipse Edition for the first time.
Nsight Eclipse Edition requires functioning Java Runtime Environment to be present on the local system to run.
Notices
Notice
ALL NVIDIA DESIGN SPECIFICATIONS, REFERENCE BOARDS, FILES, DRAWINGS, DIAGNOSTICS, LISTS, AND OTHER DOCUMENTS (TOGETHER AND SEPARATELY, "MATERIALS") ARE BEING PROVIDED "AS IS." NVIDIA MAKES NO WARRANTIES, EXPRESSED, IMPLIED, STATUTORY, OR OTHERWISE WITH RESPECT TO THE MATERIALS, AND EXPRESSLY DISCLAIMS ALL IMPLIED WARRANTIES OF NONINFRINGEMENT, MERCHANTABILITY, AND FITNESS FOR A PARTICULAR PURPOSE.
Information furnished is believed to be accurate and reliable. However, NVIDIA Corporation assumes no responsibility for the consequences of use of such information or for any infringement of patents or other rights of third parties that may result from its use. No license is granted by implication of otherwise under any patent rights of NVIDIA Corporation. Specifications mentioned in this publication are subject to change without notice. This publication supersedes and replaces all other information previously supplied. NVIDIA Corporation products are not authorized as critical components in life support devices or systems without express written approval of NVIDIA Corporation.