Building from source#
Basic build#
Users must have a working installation of the Legate library prior to installing cuPyNumeric. Installing cuPyNumeric by itself will not automatically install Legate.
As for other dependencies, the Dependencies section on the Legate build instructions also covers cuPyNumeric, so no additional packages are required.
Once Legate is installed, you can simply invoke ./install.py from the
cuPyNumeric top-level directory. The build will automatically pick up the
configuration used when building Legate (e.g. the CUDA Toolkit directory).
Advanced topics#
Building through pip & cmake#
cuPyNumeric uses the same cmake/scikit-build-based build workflow as Legate. See the Legate build instructions for an overview.
There are several examples in the scripts folder. We walk through the steps in
build-with-legate-separately-no-install.sh here.
We assume a pre-existing Legate build. For details on building Legate, consult the Legate repository.
First, the CMake build needs to be configured:
$ cmake -S . -B build -GNinja -D legate_ROOT:STRING=path/to/legate/build
We point cuPyNumeric to the Legate build tree, not an installation. This generates all build-dependent headers and Python files.
Once configured, we can build the C++ libraries:
$ cmake --build build
This will invoke Ninja (or make) to execute the build. Once the C++ libraries are available, we can do an editable (development) pip installation.
$ SKBUILD_BUILD_OPTIONS="-D FIND_CUPYNUMERIC_CPP=ON -D cupynumeric_ROOT=$(pwd)/build" \
  python3 -m pip install \
  --root / --no-deps --no-build-isolation
  --editable .
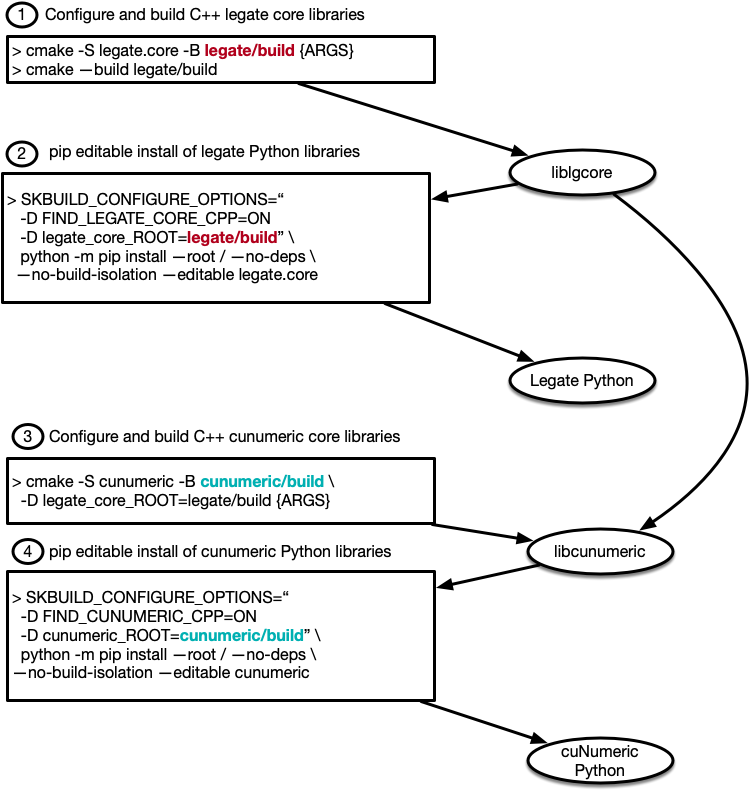
The Python source tree and CMake build tree are now available with the environment Python for running cuPyNumeric programs. The diagram below illustrates the complete workflow for building both Legate and cuPyNumeric.