Overview
Jarvis handles deployments of full pipelines, which can be composed of one or more NVIDIA Transfer Learning Toolkit (TLT) models and other pre-/post-processing components. Additionally, the TLT models have to be exported to an efficient inference engine and optimized for the target platform. Therefore, the Jarvis server cannot use NVIDIA NeMo or TLT models directly because they represent only a single model.
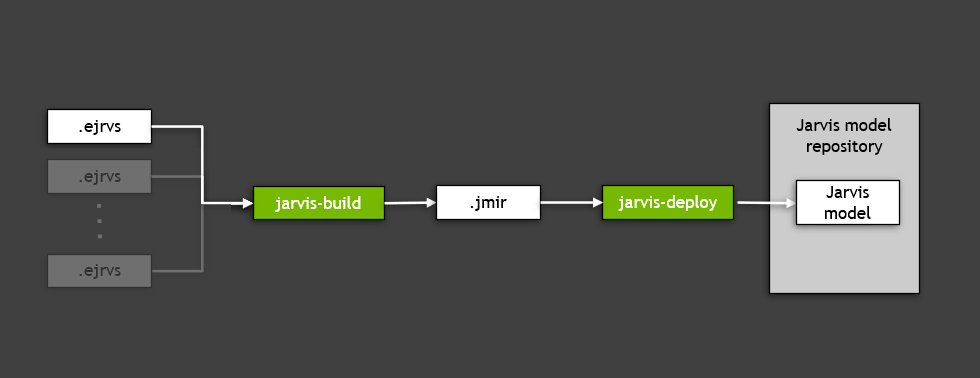
The process of gathering all the required artifacts (for example, models, files, configurations and user settings) and generating the inference engines, will be referred to as the Jarvis model repository generation. The Jarvis ServiceMaker Docker image has all the tools necessary to generate the Jarvis model repository and can be pulled from NGC as follows:
docker pull nvcr.io/nvidia/jarvis/jarvis-speech:1.3.0-beta-servicemaker
The Jarvis model repository generation is done in two phases:
Phase 1: The build phase. During the build phase, all the necessary artifacts (models, files, configurations, and user settings) required to deploy a Jarvis service are gathered together into an intermediate file called JMIR (Jarvis Model Intermediate Representation). For more information, continue to the next section.
Phase 2: The deploy phase. During the deploy phase, the JMIR file is converted into the Jarvis model repository and the neural networks in TLT or NeMo format are exported and optimized to run on the target platform. The deploy phase should be executed on the physical cluster on which the Jarvis server will be deployed. For more information, refer to the Jarvis Deploy section.
Model Development with TLT
Models trained from NVIDIA Transfer Learning Toolkit (TLT)
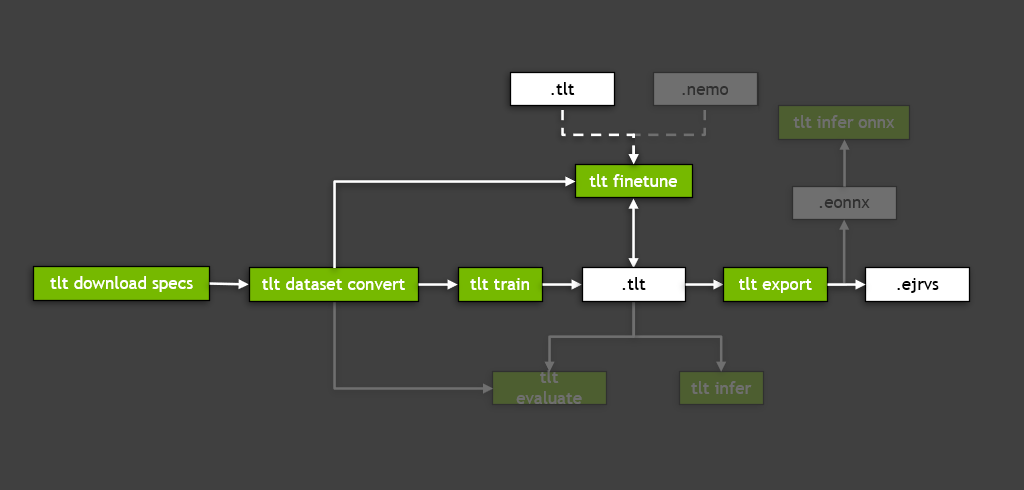
normally have the format .tlt. To use those models in Jarvis, users needs to convert the model
checkpoints to .ejrvs format for building and deploying with Jarvis ServiceMaker using tlt export.
TLT Export for TLT
Follow the TLT Launcher Quick Start Guide instructions to setup.
Configure the TLT launcher. The TLT launcher uses Docker containers for training and export tasks. The launcher instance can be configured in the
~/.tlt_mounts.jsonfile. Configuration requires mounting at least three separate directories wheredata,specification files, andresultsare stored. A sample is provided below.{ "Mounts":[ { "source": "~/tlt/data", "destination": "/data" }, { "source": "~/tlt/specs", "destination": "/specs" }, { "source": "~/tlt/results", "destination": "/results" }, { "source": "~/.cache", "destination": "/root/.cache" } ], "DockerOptions":{ "shm_size": "16G", "ulimits": { "memlock": -1, "stack": 67108864 } } }
Convert TLT checkpoints to the Jarvis format using
tlt … export. The example below demonstrates exporting a Jasper model trained in NeMo, where:-mis used to specify the Jasper model checkpoints location-eis used to specify the path to an experiment spec file-rindicates where the experiment results (logs, output, model checkpoints, etc.) are stored
tlt speech_to_text export -m /data/asr/jasper.tlt -e /specs/asr/speech_to_text/export.yaml -r /results/asr/speech_to_text/
Here is an example experiment spec file (
export.yaml):# Path and name of the input .nemo/.tlt archive to be loaded/exported. restore_from: /data/asr/jasper.tlt # Name of output file (will land in the folder pointed by -r) export_to: jasper.ejrvs
Note that TLT comes with default experiment spec files that can be pulled by calling:
tlt speech_to_text download_specs -o /specs/asr/speech_to_text/ -r /results/asr/speech_to_text/download_specs/
Besides speech_to_text from the ASR domain, TLT also supports several conversational AI tasks from the NLP domain:
intent_slot_classificationpunctuation_and_capitalizationquestion_answeringtext_classificationtoken_classification
More details can be found in tlt --help.
Model Development with NeMo
NeMo is an open source PyTorch-based toolkit for research in conversational AI. While TLT is the recommended path for typical users of Jarvis, some developers may prefer to use NeMo because it exposes more of the model and PyTorch internals. Jarvis supports the ability to import models trained in NeMo.
For more information, refer to the NeMo project page.
NeMo2Jarvis Export for NeMo
Models trained in NVIDIA NeMo will have the format .nemo. To use these models in Jarvis, users need to convert the model checkpoints to .ejrvs format for building and deploying with Jarvis ServiceMaker using the nemo2jarvis tool. The nemo2jarvis tool is currently packaged and available via Jarvis Quickstart.
Follow NeMo Installation instructions to setup a NeMo environment; version 1.1.0 or greater. From within your NeMo 1.1.0 environment:
pip3 install nvidia-pyindex
pip3 install nemo2jarvis-1.3.0_beta-py3-none-any.whl
nemo2jarvis --out /NeMo/<MODEL_NAME>.ejrvs /NeMo/<MODEL_NAME>.nemo
To export the HifiGan Model from NeMo to EJRVS format run the following after configuring the NeMo environment:
nemo2jarvis --out /NeMo/hifi.ejrvs /NeMo/tts_hifigan.nemo
Additional information and usage via help:
nemo2jarvis --help
Usage:
nemo2jarvis [-h] [--out OUT] [--validate] [--schema SCHEMA]
[--format FORMAT] [--verbose VERBOSE] [--key KEY] source
When converting NeMo models to Jarvis EFF input format, passing the input .nemo file as a parameter creates a .ejrvs next to the .nemo input.
If no --format is passed, the Jarvis-preferred format for the supplied model architecture will be selected automatically.
The format will also be derived from schema if the --schema argument is supplied, or if nemo2jarvis is able to find the schema for this NeMo model
among ‘known models’ - there is a set of YAML files in the nemo2jarvis/validation_schemas directory, or you can add your own.
If the --key argument is passed, the model graph in the output EFF file will be encrypted with that key.
- positional arguments:
source Source .nemo file
- optional arguments:
- -h, --help
Show this help message and exit
- --out OUT
Location to write resulting Jarvis EFF input to (default: None)
- --validate
Validate using schemas (default: False)
- --schema SCHEMA
Schema file to use for validation (default: None)
- --format FORMAT
Force specific export format: ONNX|TS|CKPT (default: None)
- --verbose VERBOSE
Verbose level for logging, numeric (default: None)
- --key KEY
Encryption key or file, default is None (default: None)
Jarvis Build
The jarvis-build tool is responsible for deployment preparation. It’s only output is an
intermediate format (called a JMIR) of an end-to-end pipeline for the supported
services within Jarvis. This tool can take multiple different types
of models as inputs. Currently, the following pipelines are supported:
speech_recognition(for ASR)speech_synthesis(for TTS)qa(for question answering)token_classification(for token level classification, for example, Named Entity Recognition)intent_slot(for joint intent and slot classification)text_classificationpunctuation
Launch an interactive session inside the Jarvis ServiceMaker image.
docker run --gpus all -it --rm -v <artifact_dir>:/servicemaker-dev -v <jarvis_repo_dir>:/data --entrypoint="/bin/bash" nvcr.io/nvidia/jarvis/jarvis-speech:1.3.0-beta-servicemakerwhere:
<artifact_dir>is the folder or Docker volume that contains the Jarvis.ejrvsfile and other artifacts required to
prepare the Jarvis model repository.
<jarvis_repo_dir>is the folder or Docker volume where the Jarvis model repository is generated.
Run the
jarvis-buildcommand from within the container.jarvis-build <pipeline> /servicemaker-dev/<jmir_filename>:<encryption_key> /servicemaker-dev/<ejrvs_filename>:<encryption_key> <optional_args>where:
<pipeline>must be one of the following:speech_recognitionspeech_synthesisqatoken_classificationintent_slottext_classificationpunctuation
<jmir_filename>is the name of the JMIR file that will be generated.<ejrvs_filename>is the name of theejrvsfile(s) to use as input.<args>are optional arguments that can be used to configure the Jarvis service. The next section covers the different ways
the ASR, NLP, and TTS services can be configured.
<encryption_key>is optional. In the case where the.ejrvsfile was generated without an encryption key, the input/output
files can be specified with
<ejrvs_filename>instead of<ejrvs_filename>:<encryption_key>.
Jarvis Deploy
The jarvis-deploy tool takes as input one or more Jarvis Model Intermediate
Representation (JMIR) files and a target model repository directory. It is
responsible for performing the following functions:
Function 1: Adds the Triton Inference Server custom backends for pre- and post-processing specifically for the given model.
Function 2: Generates the TensorRT engine for the input model.
Function 3: Generates the Triton Inference Server configuration files for each of the modules (pre-, post- processing and the model).
Function 4: Creates an ensemble configuration specifying the pipeline for the execution and finally writes all those assets to the output model repository directory.
The Jarvis model repository can be generated from the Jarvis .jmir file(s) with the following command:
jarvis-deploy /servicemaker-dev/<jmir_filename>:<encryption_key> /data/models