Storage
DGX Cloud Lepton provides a storage solution that allows you to store and access your data in a secure and scalable way.
Storage Type
There are two types of storage available on DGX Cloud Lepton:
- Node Local Volume: Node Local Volume is designed to persist data across workload lifecycles on the same node. It stores data directly on the node where your workload runs.
- Node Local Volume data is not replicated across different nodes.
- You are responsible for managing and cleaning up the data.
- Static NFS Volume: Static NFS Volume enables workloads on multiple nodes to share a common filesystem. The data resides on a NFS server that any workload can mount and use.
- All nodes with connectivity to the NFS server can read and write this data.
- Performance is governed by network bandwidth, latency, and the capacity of the NFS server.
- Data durability relies on the backup and reliability features provided by the underlying NFS server.
Add Storage for Node Group
You can add those two types of storage for your node group.
Navigate to the storage page on the DGX Cloud Lepton dashboard, you can see the storage list grouped by node groups.
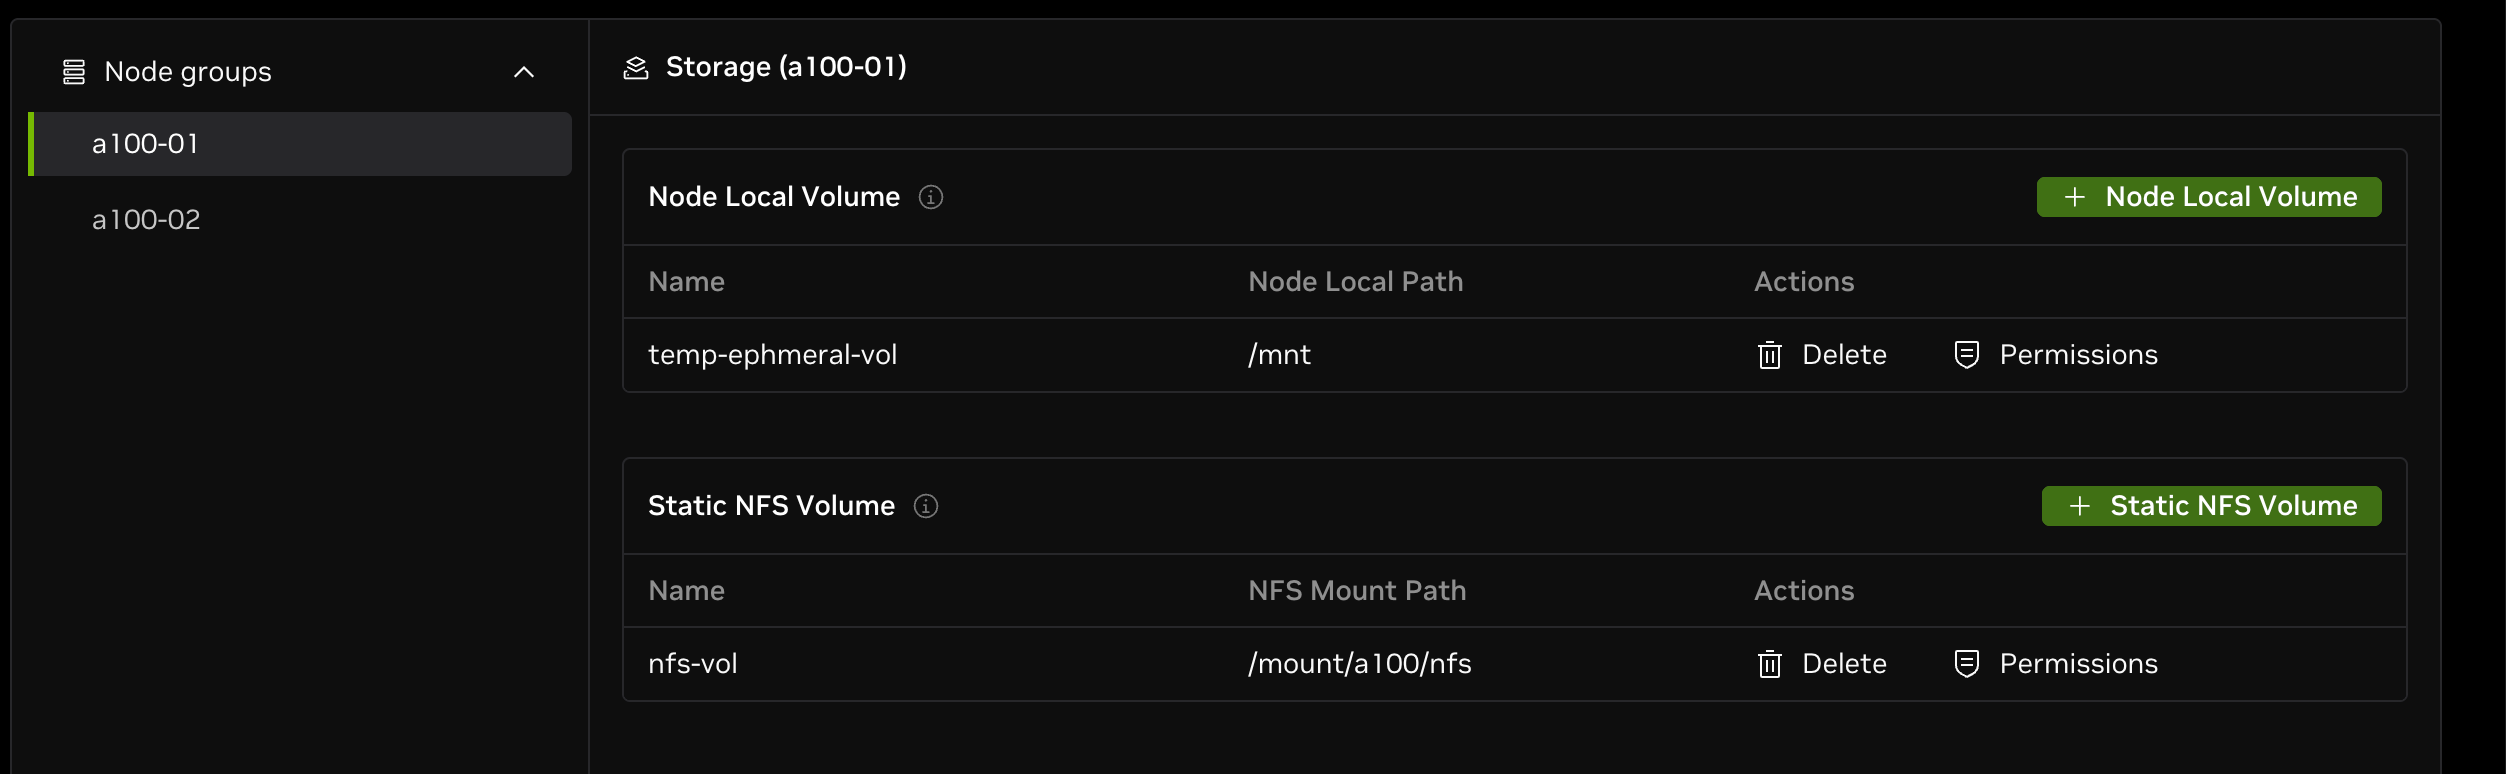
Each node group has its own Node Local Volume list and Static NFS Volume list. Add storage for each node group separately by clicking on the button on the top right corner of the section.
For both types of storage, specify the volume name and the mount path (on the node) when adding storage.
Before adding static NFS volume, please make sure NFS is already mounted on all nodes in the node group with the same mount path.
Permission management
Permissions allow administrators to configure volume sub-path permissions for users. The permissioning system checks if the user requesting a job with storage is allowed to mount the path before the job is executed. Once a job is started the mount will not be effected by permission changes.
The permissioning system is allowable to all when not configured, but once one rule is configured, all access must be explicitly allowed. Only allow rules exist, and an allow permission on a parent directory implies allowance to all sub-paths.
Manage the permission for paths within a volume by clicking on the Permission button in the volume row.

Path
In the Path field, you can specify the path prefix you want to grant access to. This Path is relative to the volume itself. Then the permission will only apply to the path prefix you specified.
For example, if you specify /data/test as the path prefix, then the permission will only apply to the path /data/test and all subfolders under /data/test.
Policy
There are two kinds of permission policies:
- Permitting selected members to specific path: This will only grant access to the selected members for the path you specified in the Path field.
- Access to subfolders if email username matches: This will automatically grant member access to all subfolders whose name matches the user email username(the part before the @ symbol).
Members
If you select the Permitting selected members to specific path policy, you can select the workspace members you want to grant access to.
Permision Example
Based on the volume directory layout show below we will use an example to demonstrate the rule precident.
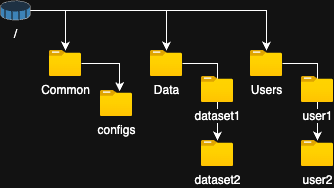
Rules:
- Permitting selected members to specific path -> Allow all-users to /Common
- Permitting selected members to specific path -> Allow user1 to /Data/dataset1
- Permitting selected members to specific path -> Allow user1 and user2 to /Data/dataset2
- Access to subfolders if email username matches -> Allow users /user/<username>
- Permitting selected members to specific path -> Allow admin1 and admin2 to /
Results in the following permissions:
- The 2 Admin users (admin1 and admin2) have access to everything within the volume.
- User1 has access to /Common, /Data/dataset1, /Data/dataset2 and /User/user1
- User2 has access to /Common, /Dataset/dataset2 and /user/user2
Use Storage for Workloads
After adding volumes, you can use them in your workloads.
For example, when you are creating a Dev Pod, you can specify the node group as the one you've added the storage to.
And then in the Storage section, click on the Mount storage button, you can select the volume you want to mount.
- Volume: You can select the specific volume you want to mount by the name, there will also be a indicator to show the volume type.
- From path: Specifies the directory path within the volume. For example, to mount the root of the volume, set the "From path" to
/. - Mount path: Specifies the the path where the directory will be mounted in the container. For example, to mount the volume's root directory to
/mntin the container, set the "Mount path" to/mnt.
You can mount multiple storages at the same time. After the pod is created, you can see the mounted storages in the details page.
