Fine-Tuning
No-code interface for fine-tuning Large Language Models
DGX Cloud Lepton provides a no-code interface for fine-tuning large language models (LLMs). Powered by NVIDIA NeMo Automodel, users can fine-tune most LLMs available on Hugging Face Hub with support for dozens of the most popular model architectures. Fine-tuning on DGX Cloud Lepton provides an easy way to experiment with tailoring the latest open source models to your unique needs. The tool runs directly on your hardware connected to DGX Cloud Lepton, providing a single-pane-of-glass for training, tuning, and deploying models in your own private workspace.
Model Architecture and Fine-Tuning Technique Support
DGX Cloud Lepton Fine-Tuning is designed to support a wide range of models including those built on some of the most popular architectures, such as Gemma 3, Llama, Mixtral/Mistral, Qwen3, Nemotron, and more. Base models can either be loaded directly from Hugging Face Hub, or loaded from mounted storage on DGX Cloud Lepton.
The Fine-Tuning feature currently supports both Supervised Fine-Tuning (SFT) and Low-Rank Adaptation (LoRA), giving users flexibility depending on their use-case. These techniques are described in more detail below.
Accessing DGX Cloud Lepton Fine-Tuning
The DGX Cloud Lepton Fine-Tuning feature can be accessed by clicking the Fine-Tuning button in the Explore page, or navigating directly to the Fine-Tuning page under Utilities.

The Fine-Tuning tab displays a list of jobs that have been run previously, if any.
To start a new fine-tuning job, click the green Create Fine-tune button on the page. This will open a new form to define the fine-tuning settings which are explained in the following sub-sections.
Technique

At the top of the form is an option for selecting the fine-tuning technique, either Supervised Fine-Tuning (SFT) or LoRA which is a Parameter-Efficient Fine-Tuning (PEFT) technique. SFT is selected by default.
SFT updates all or nearly all of the base model's weights using a supplied dataset containing many labeled examples. This approach builds on the base model's existing knowledge while allowing the fine-tuned model to specialize in specific domains or refine the output based on human preferences. Since it updates the full base model, SFT requires significant compute resources, particularly for very large models. The output is a full model checkpoint that can be deployed directly for inference.
Low-Rank Adaptation (LoRA) is a PEFT technique that freezes the base model weights and adds additional low-rank adapter modules, making it more computationally efficient and requiring fewer resources. This creates a small model adapter file that instructs a deployed model how to respond with the new weights. LoRA is best suited for targeted use cases and requires fewer examples to learn the expected output structure.
In summary, choose SFT if:
- You have lots of compute to fine-tune the model.
- You desire deep expertise in a broader field and accuracy is crucial.
- You have a dataset comprising thousands of examples of labeled data.
Choose LoRA if:
- You are compute constrained.
- You have a very targeted use-case with very specific examples.
- You have a small dataset with hundreds of examples.
Name

Give the fine-tuning job a name, such as my-finetuning-job. This is how the job will be referenced in the fine-tuning jobs list in the UI.
Resource
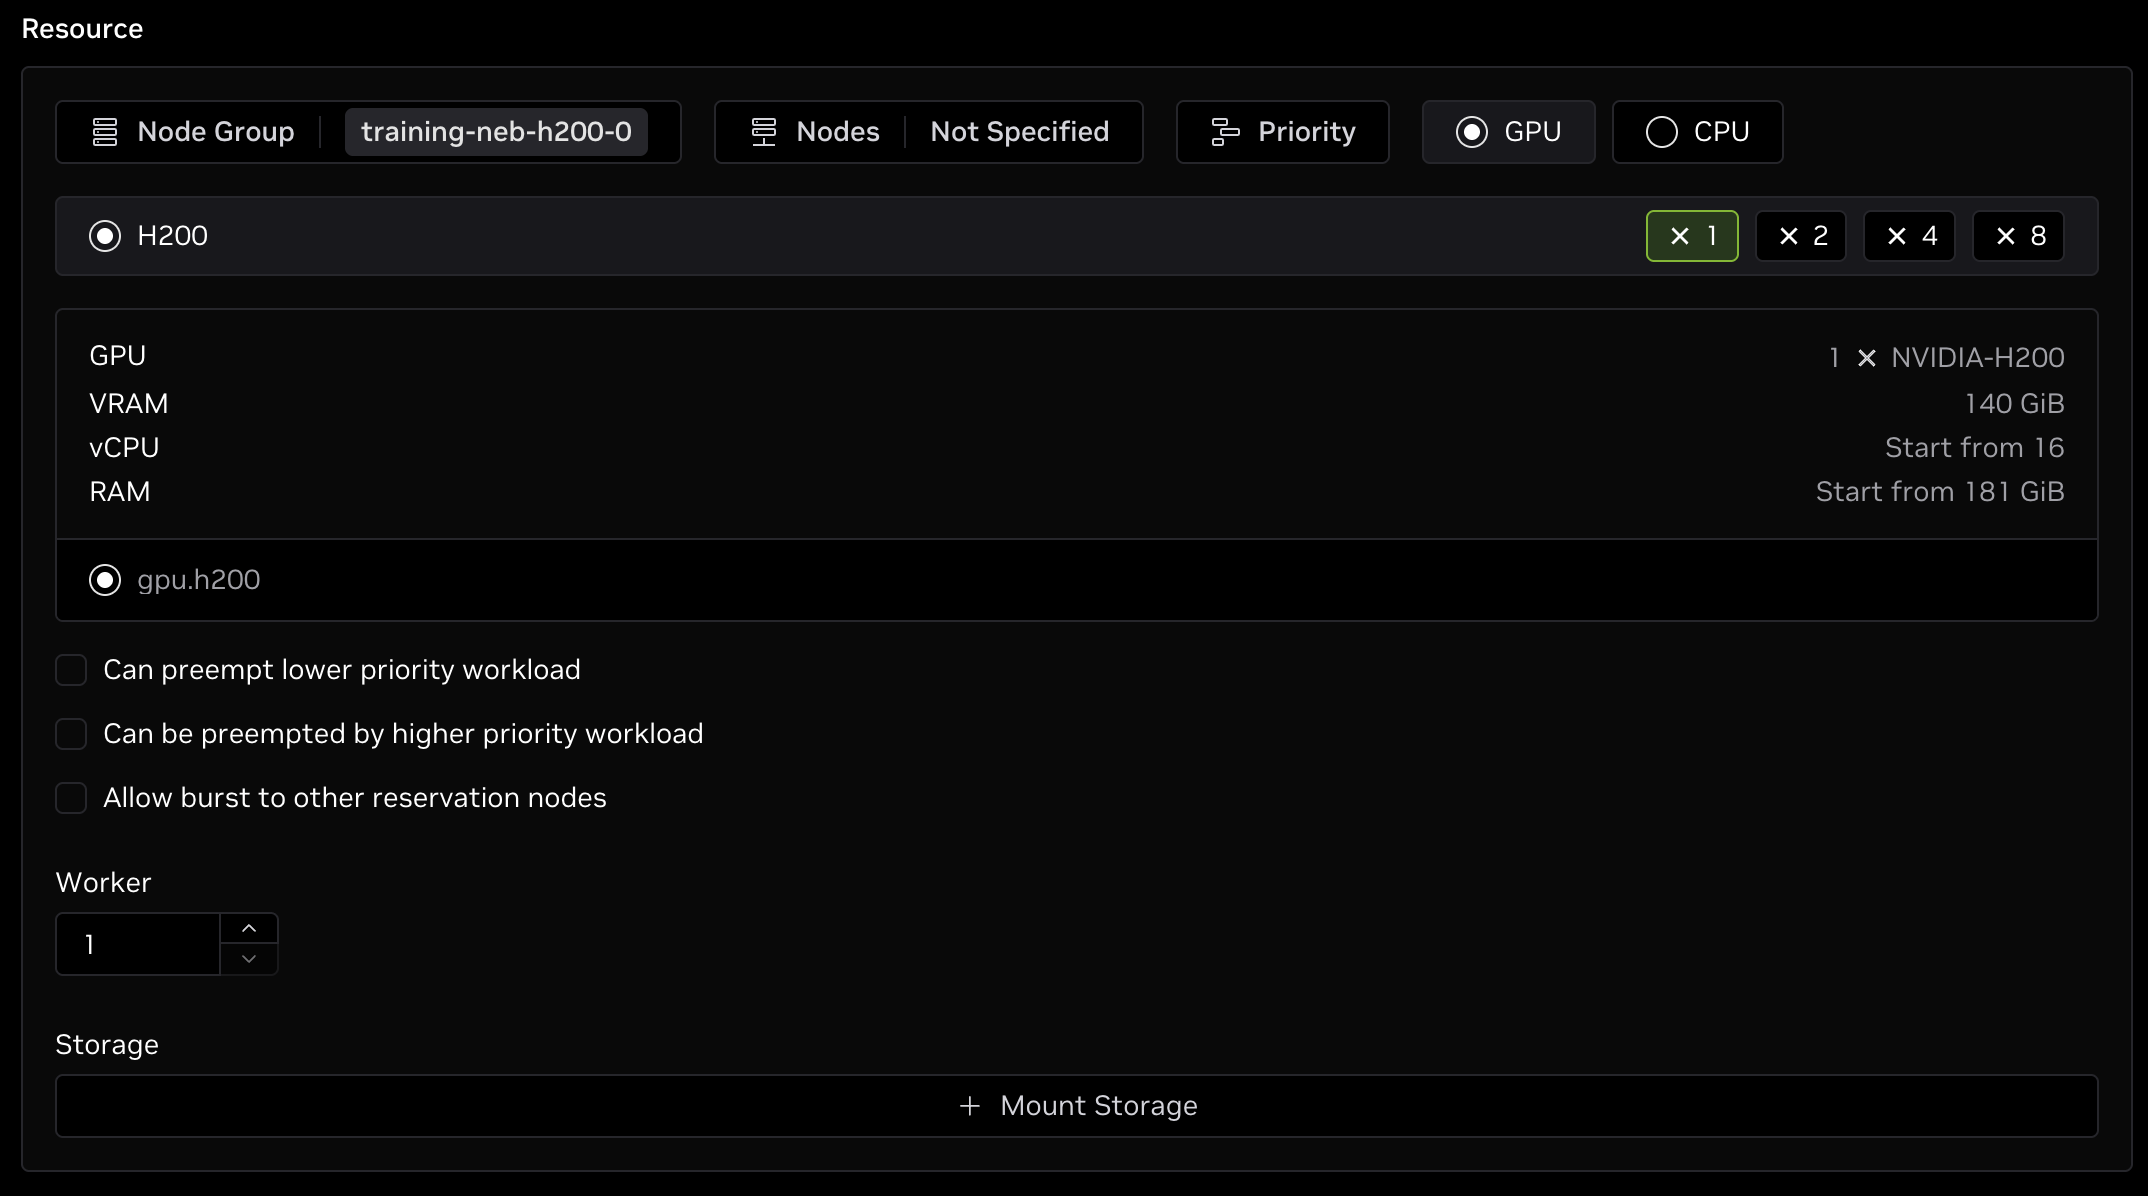
In this section, specify the Node Group and the resources to allocate for the job.
The Node Group is the specific compute resources the job will run on. If desired, select a subset of nodes to run the job on and/or a job priority to manage how the jobs get scheduled.
Determining GPU Resources
Select the number and type of GPUs to run on. While there is no standard rule for determining the required number of GPUs for any arbitrary model or dataset, the general guidelines are:
- Small models (that is, less than 8B parameters for dense models):
- LoRA: Single 80+ GB GPU
- SFT: Eight (8) 80+ GB GPUs
- Larger models: Additional resources will be required
Multiple nodes may be necessary, especially for SFT on larger models. To increase the number of nodes, update the Worker option to the desired amount.
Storage
Shared storage is required for checkpoints to be available after fine-tuning. The selected node group needs a shared storage volume connected to it which can be mounted in jobs. Select the desired volume and where it should be mounted inside the running job.
If storage is not added, any generated checkpoints will be lost after the job completes.
Model

Specify the base model to fine-tune with your dataset. There are two main options: loading from Hugging Face Hub or loading from shared storage.
Load from Hugging Face
To load a model directly from Hugging Face Hub, click the Load from Hugging Face button. The field will update with a drop-down list where you can specify the model to fine-tune. The drop-down list contains several of the most popular text-generation LLMs available on Hugging Face Hub. You can either click an item in the list or start entering the name of a model's Hugging Face repo ID and selecting it from the list. For example, to use NVIDIA's Nemotron-Nano-9B-v2, either enter the full repo ID of nvidia/NVIDIA-Nemotron-Nano-9B-v2 in the field, or start typing Nemotron and select the model from the list.
When loading a model from Hugging Face, the fine-tuning job will automatically download the model from Hugging Face into local container storage and begin the fine-tuning process using that model as a basis.
Note that if you are trying to access a gated model which requires approval, you must add your Hugging Face token in the job submission form. More on this below.
Load from Storage
Only models in *safetensors format are currently supported.
Users can also load a model directly from shared storage in case the model hasn't been uploaded to Hugging Face, such as models that shouldn't be shared publicly or early previews that were trained directly on the platform.
To load a model from storage, ensure the desired model checkpoint is available on the shared storage that was mounted in the resource configuration section above. The model must be saved to shared storage prior to launching the fine-tuning job.
After selecting the Load from storage option, the field will update with a Model file path textbox. Specify the absolute path to the directory where the model is saved in shared storage. For example, if you mounted a full NFS share as /nfs-storage in the resource configuration and your checkpoint is available at /my/custom/model inside the NFS, this path would be /nfs-storage/my/custom/model (as /nfs-storage inside the container maps to / of the NFS share). This assumes that the /nfs-storage/my/custom/model directory contains *.safetensors file(s), configs, and any other data that is required for loading the model with Hugging Face Transformers.
Datasets
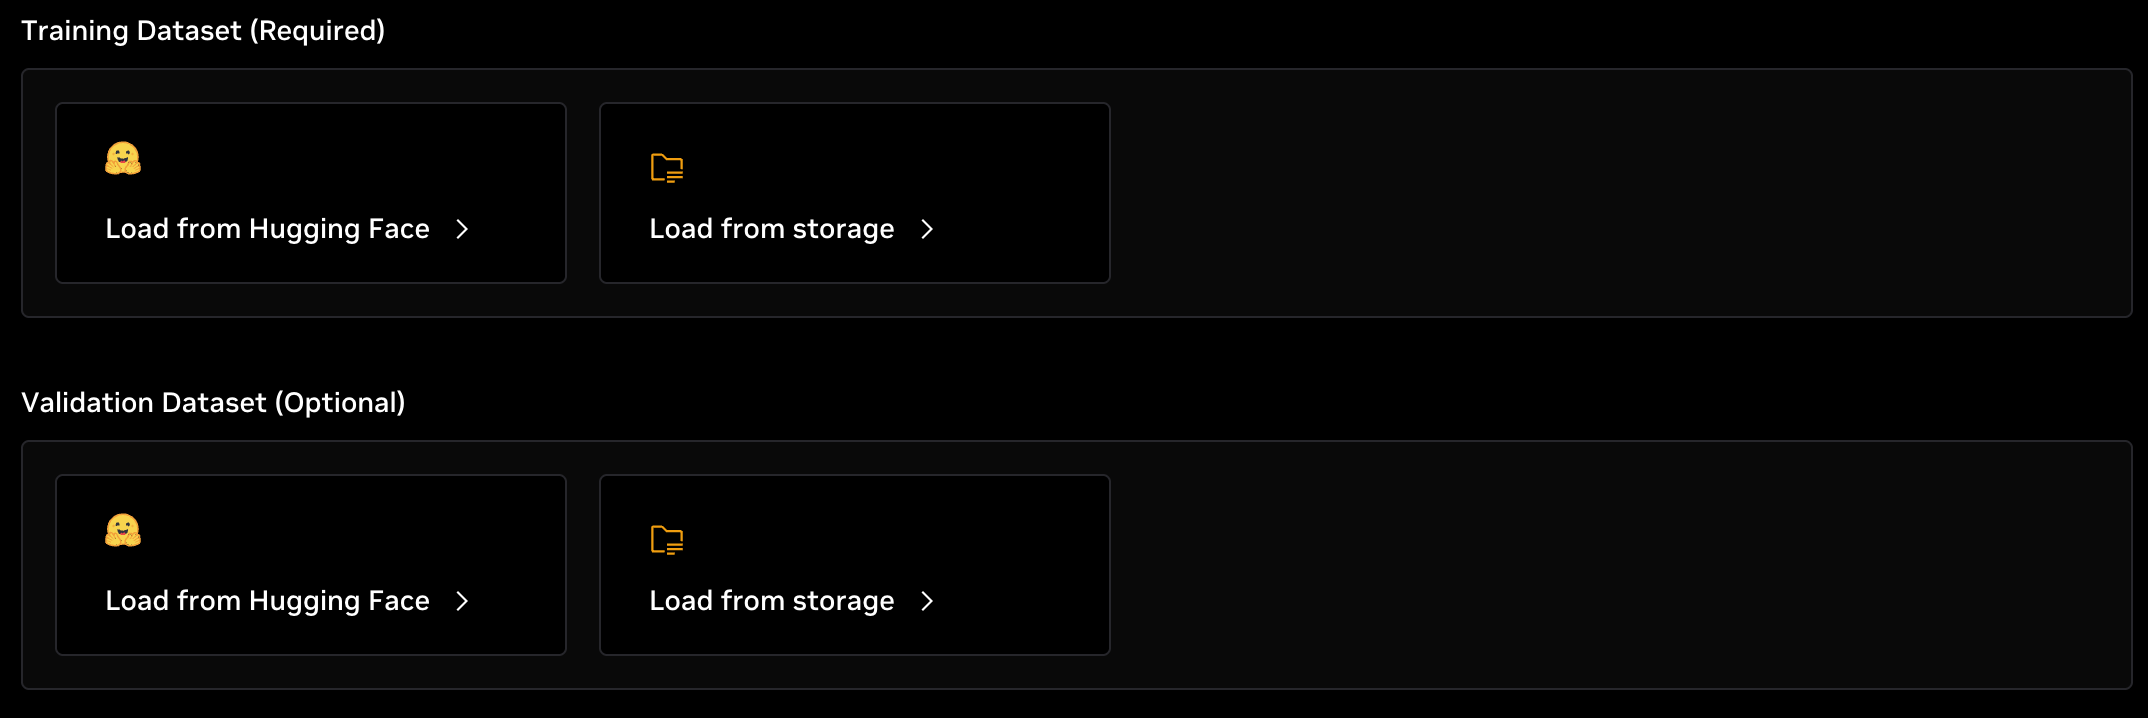
Fine-tuning an LLM requires a dataset for the model to learn from. Datasets must have at least one input and one output field. As with models, datasets can either be loaded directly from Hugging Face or from shared storage mounted in the container.
Load from Hugging Face
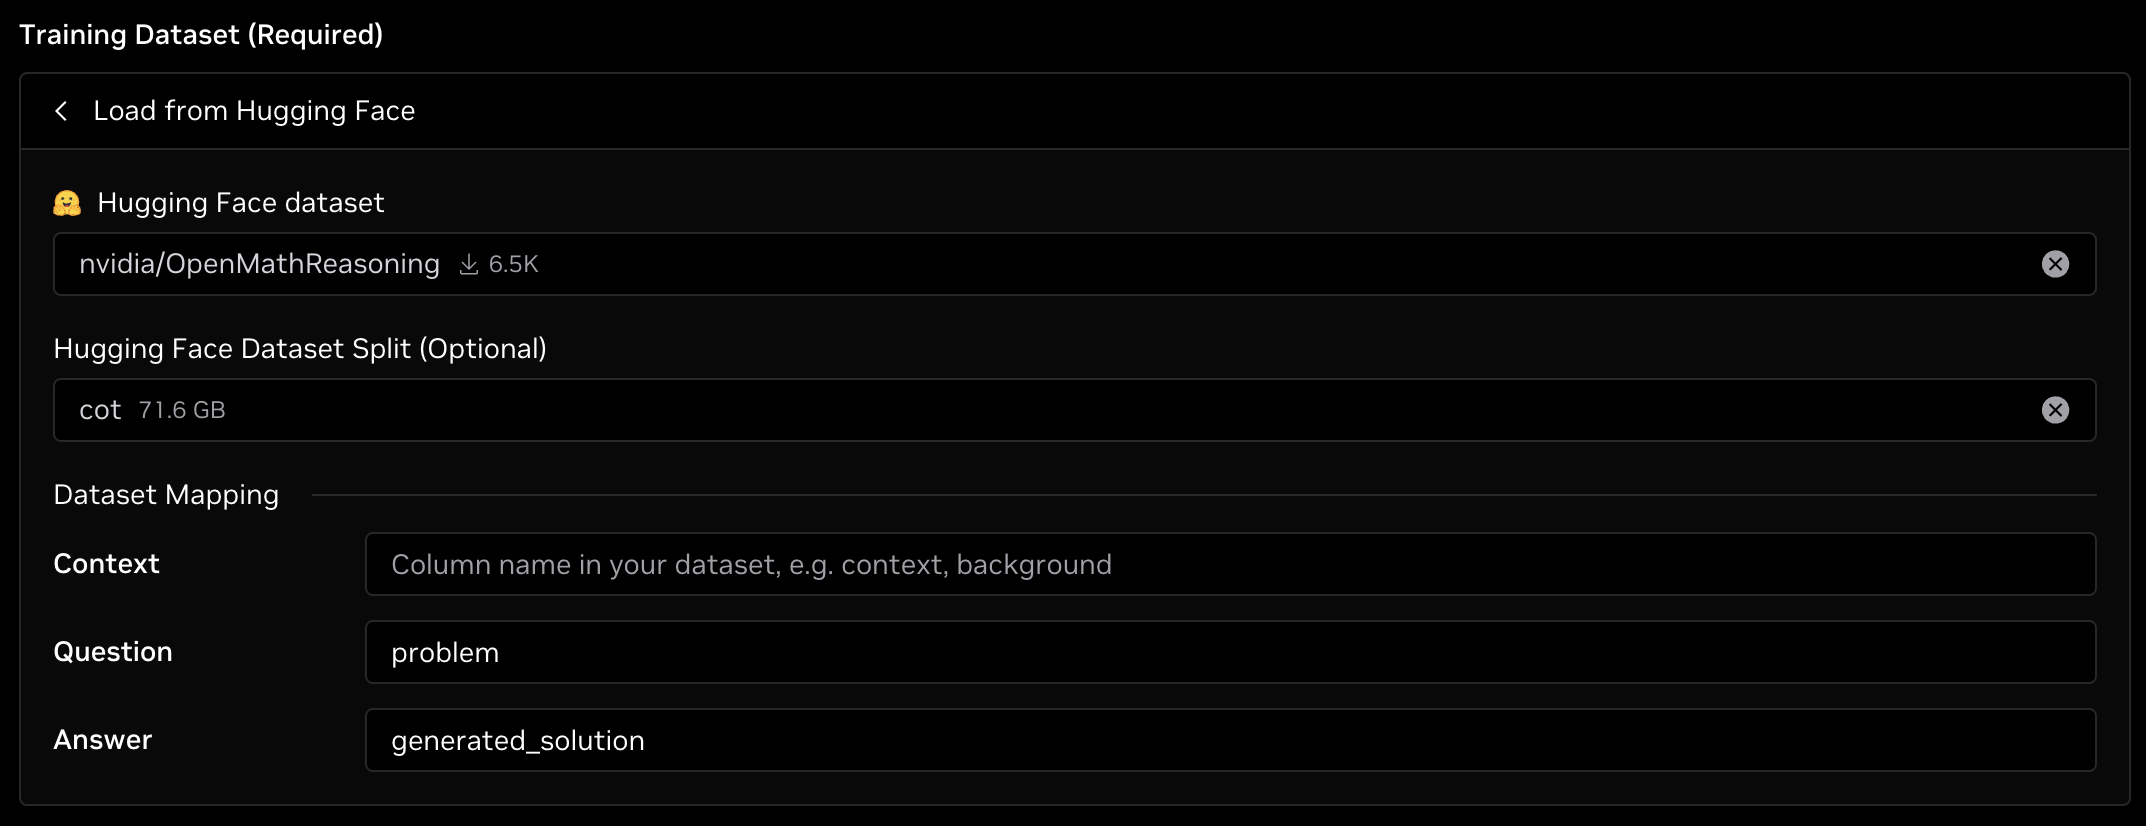
Datasets can be loaded directly from Hugging Face hub by clicking the Load from Hugging Face option and specifying the repo ID of a dataset, such as nvidia/OpenMathReasoning. When the job launches, this will download the requested dataset into local container storage and will be pre-processed before fine-tuning begins. You can also select a dataset from the drop-down list which contains several of the most popular datasets. Note that some of these datasets might not be a good target for fine-tuning, so only select datasets that you have inspected previously.
After selecting the dataset, optionally add the dataset split to use for fine-tuning. Most datasets have a default split of train which is used for training, but not all datasets will have this name and it needs to be specified. For example, the nvidia/OpenMathReasoning dataset has splits of cot, tir, genselect, and additional_problems. To fine-tune against the cot split, enter cot for the split.
Lastly, the Dataset Mapping needs to be specified. See below for more information on these fields.
Load from Storage
As with loading a model from storage, loading datasets from storage requires the dataset to be saved and pre-processed on shared storage that was mounted in the Resources section above. Currently, only .jsonl datasets are supported. The dataset needs to include at least one input and an output field. This must be done prior to launching the fine-tuning job.
To load the dataset from storage, specify the absolute path to the dataset file that is mounted in storage, such as /nfs-storage/my/custom/dataset.jsonl, assuming your shared storage was mounted as /nfs-storage.
Lastly, the Dataset Mapping needs to be specified. See below for more information on these fields.
Dataset Mapping
Regardless of how the dataset is loaded, the columns in the dataset need to be mapped to the expected fields for the code to understand. This is referred to as Dataset Mapping. The fine-tuning code will adjust each prompt in the dataset to the following format with the {context} field being optional:
If your dataset already has an input column named question and an output column named answer, you can copy those fields for the columns. If not, specify the column name in the dataset that maps to each field. For example:
- Context: Add this field if you have required context for the prompt. An example is a paragraph with contextual information, then a Question and Answer which can be found directly in that context. If no context is included, this can be left blank.
- Question: This is your input field or prompt. Note that it doesn't have to be a question—it is simply the input which maps to the Answer field below.
- Answer: This is your output field and is required. Note that it doesn't have to be a numerical/factual answer—it is simply the expected response to the prompt.
Answer is a required field. At least one of Question or Context must be provided for input.
In the case of the nvidia/OpenMathReasoning dataset, there isn't a question or answer column present and they need to be overridden. This dataset contains several columns, but the two important ones for fine-tuning are problem and generated_solution. problem is the input which maps to the Question field, and generated_solution is the response which maps to the Answer field.
A picture showing the fields filled out is below:
Validation Dataset
If you have a unique validation dataset, this process can be repeated specifically for inputting validation data. Refer to the steps above on filling out this information if needed.
Checkpoint Output Path

Specify the path to save all training logs, data, and the final checkpoints. This must be an absolute path and should be on mounted shared storage for the checkpoints to persist after the job is completed.
If you mounted your storage as /nfs-storage, the checkpoint path should begin with /nfs-storage/.
As training progresses, checkpoints will be periodically saved after a configurable number of steps. All checkpoints are in the *safetensors format for compatibility with Hugging Face and inference serving engines. Inside the checkpoint directory, there will be several files and sub-directories pertaining to the fine-tuning job. In particular, you will find several directories named epoch_X_step_YYYY where X is the current epoch number and YYYY is the current global step. Each of these directories contain model information from the indicated step at that time. The checkpoint can be found in the model/consolidated sub-directory within each epoch_X_step_YYYY directory. For example, if you mounted your shared storage as /nfs-storage and specified your checkpoint path as /nfs-storage/fine-tuning/my-fine-tune-model, the full checkpoint would be saved in /nfs-storage/fine-tuning/my-fine-tune-model/epoch_0_step_1000/model/consolidated. This will be the same any time the checkpoint is saved, so after another 1,000 steps, you will also have /nfs-storage/fine-tuning/my-fine-tune-model/epoch_0_step_2000/model/consolidated.
Each of these consolidated directories contain the full *safetensors files and associated configs so they can be deployed for inference. If you choose to deploy your model or publish it on Hugging Face, you must specify the consolidated directory.
Training Configuration
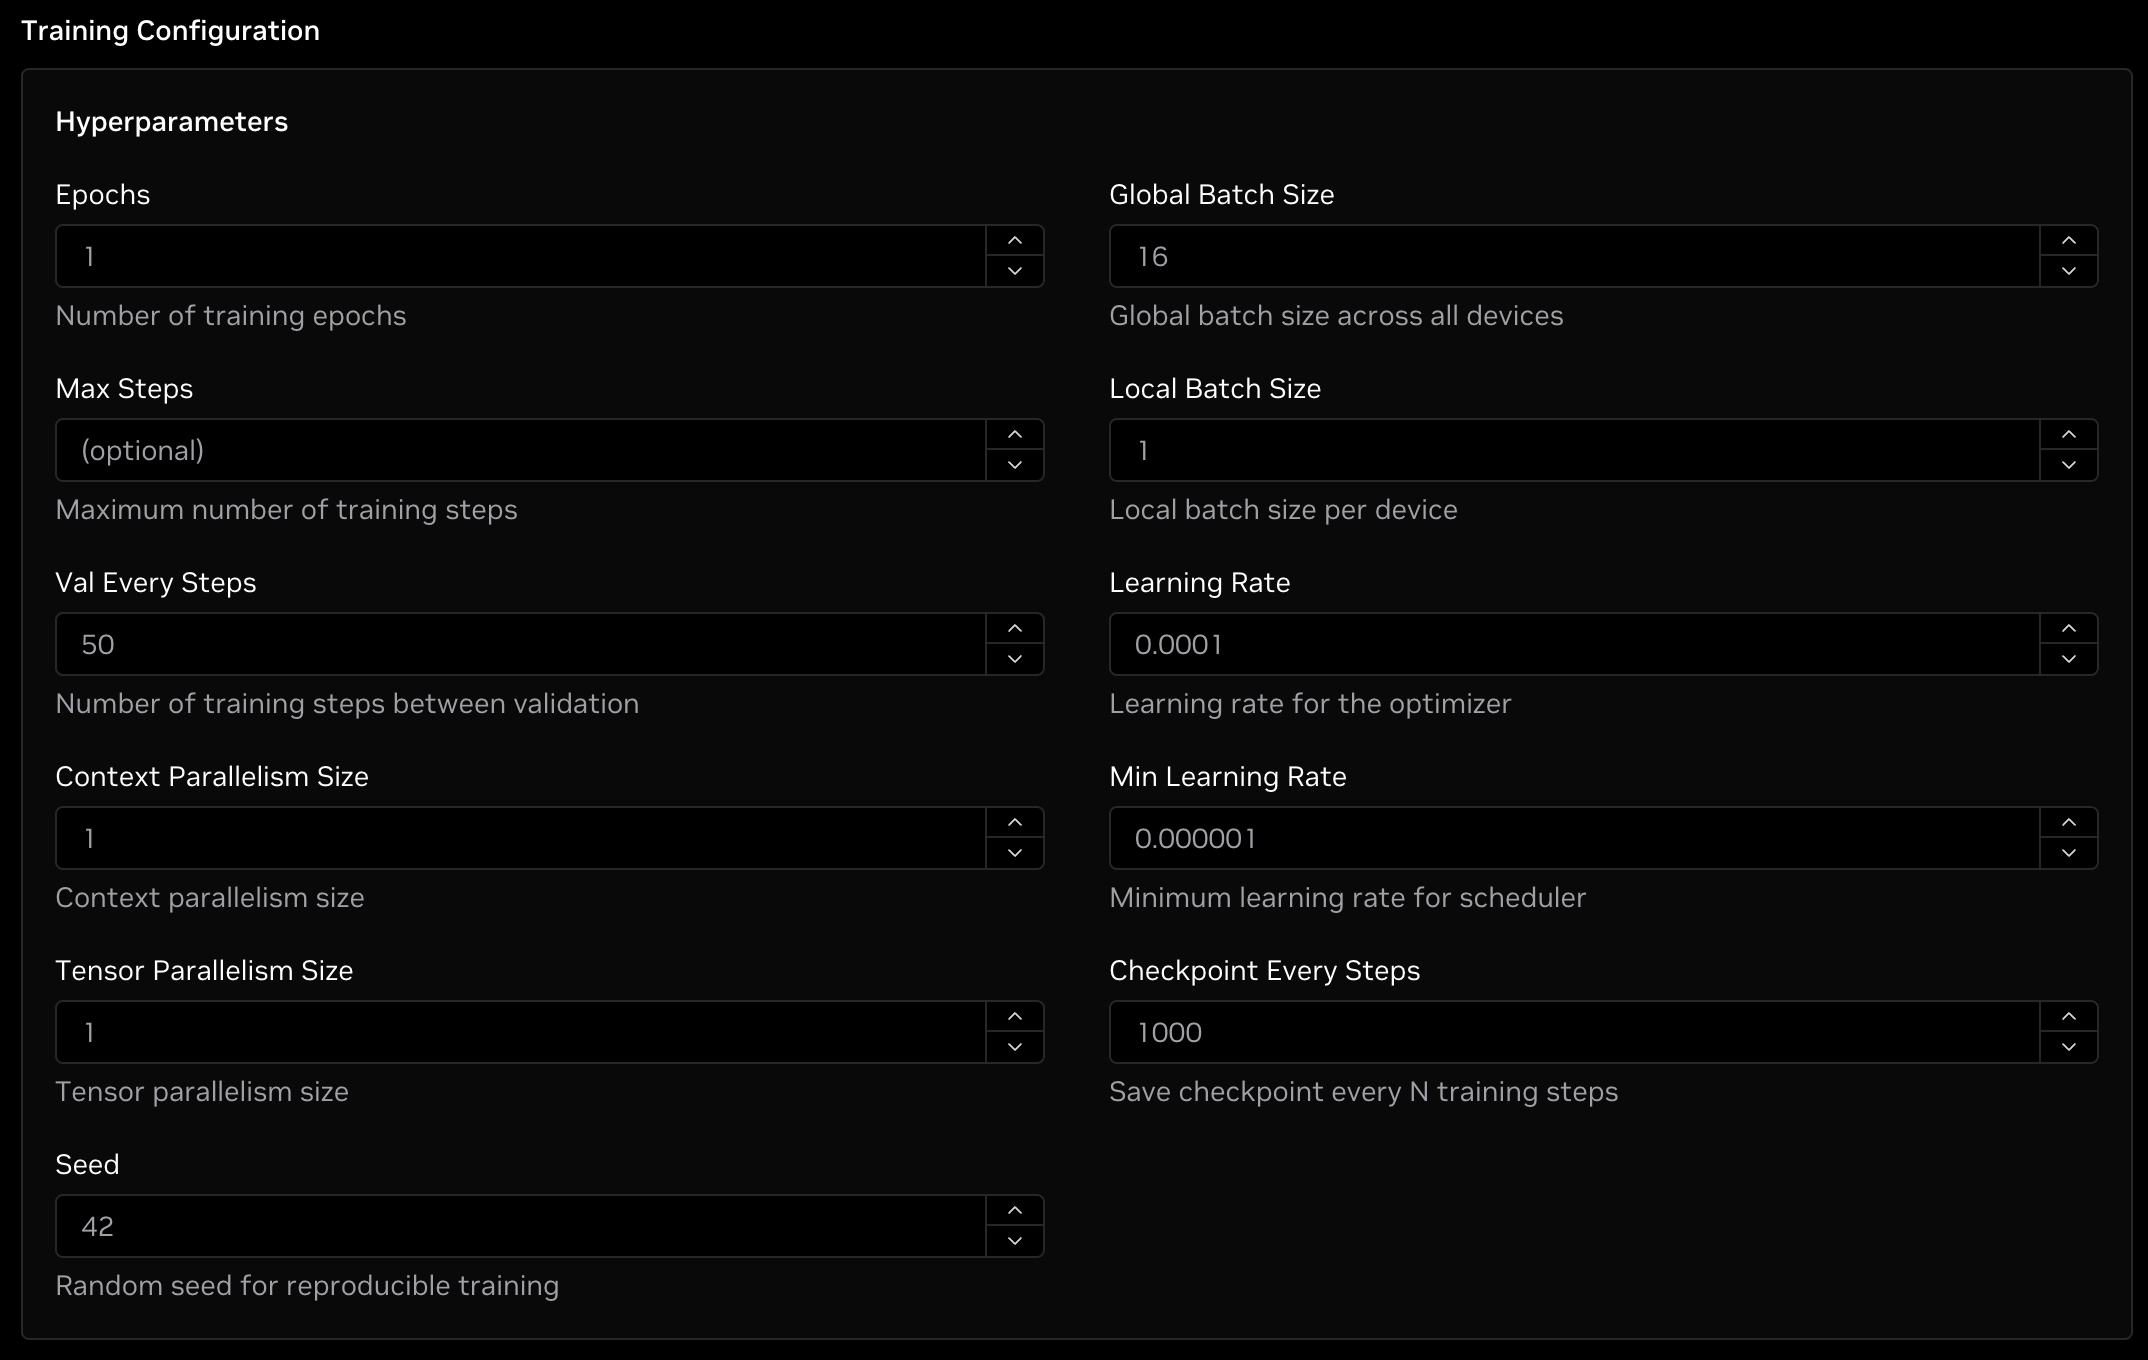
The Training Configuration field contains several hyperparameters that can be modified if needed. Any optional fields left blank will be filled with default values. The settings are as follows:
- Epochs: This is the number of full passes through the training dataset to complete. This must be a positive integer. Typical ranges are from 1-10. Note that if the Max Steps setting takes precedence over Epochs if the max steps has been reached prior to the desired number of epochs. Minimum: 1. Default: 1.
- Max Steps: This is the total number of backward passes to complete as the model learns. Once the Max Steps value is reached, fine-tuning will complete. This must be a positive integer. This can range from 10s to millions of steps depending on your dataset and other settings. If not specified, fine-tuning will run until the Epochs value is reached. Minimum: 1. Default: Infinite.
- Val Every Steps: This is how often to run a validation pass using the validation dataset to determine how the model is learning over time. This must be a positive integer. Typical ranges are from 50 - a few thousand steps depending on your dataset size. Minimum: 1. Default: 50.
- Context Parallelism Size: This splits your context across GPUs to lower GPU memory usage. This is useful for long input and/or output sequences in your dataset, particularly those that include reasoning traces as it reduces the amount of memory required for each GPU to process the prompts. This must be a power-of-two (1, 2, 4, 8, ...). This multiplied by the Tensor Parallelism Size must be less than or equal to the total number of GPUs for your job. If you have long input or output sequences, typically 32K or greater in length, it is recommended to add context parallelism. Minimum: 1. Default: 1.
- Tensor Parallelism Size: This distributes your model across GPUs to lower GPU memory usage. This is useful with larger models as it lowers the amount of GPU memory required to run the model. This must be a power-of-two (1, 2, 4, 8, ...). This multiplied by the Context Parallelism Size must be less than or equal to the total number of GPUs for your job. If your model is larger than 10B parameters, it is recommended to use tensor parallelism. Minimum: 1. Default: 1.
- Seed: This is the random seed used during fine-tuning. All other settings equal, fine-tuning will be deterministic when the same seed is used between runs. This must be a non-negative integer. Minimum: 0. Maximum: 65535. Default: 42.
- Global Batch Size: This is the number of sequences to process during each step of the training process. The global batch size is divided by the number of GPUs so each GPU processes
Batch / num GPUsequences during a training step. Higher batch sizes may result in greater training throughput at the cost of additional GPU memory. This must be a positive integer and is typically a power-of-two (1, 2, 4, 8, ...). This must be greater than or equal to the number of GPUs in the job. Minimum: 1. Default: 16. - Local Batch Size: This is the amount of pipelining to perform on each GPU. Increasing the local batch size can improve throughput at the cost of additional GPU memory. This must be a positive integer and is most commonly
1but additional throughput could be gained with2or4here as well. Minimum: 1. Default: 1. - Learning Rate: This is the learning rate used by the optimizer. It must be a positive float. Values typically range from 1e-7 to 1e-3 with most jobs being between 1e-5 and 5e-4. There isn't a perfect science for the optimal learning rate, so experimenting with different values could yield improved accuracy. Minimum: 0. Maximum: 1. Default: 0.0001.
- Min Learning Rate: This is the minimum learning rate used by the optimizer. It will decay to the minimum as the training progresses. This must be a positive float. Common practice has the minimum learning rate being 10x smaller than the maximum learning rate. Minimum: 0. Maximum: 1. Default: 0.000001.
- Checkpoint Every Steps: This is how frequently the fine-tuning job will save a checkpoint. After every
Nsteps, the checkpoint will be saved in theepoch_X_step_YYYY/model/consolidateddirectory within the checkpoint directory. Minimum: 1. Default: 1000.
Tensor Parallelism multiplied by Context Parallelism must be less than or equal to the total number of GPUs in your job.
If you selected LoRA for your fine-tuning technique, you will see two additional settings at the top of the box:
- LoRA Rank: This is the dimension to use for LoRA while fine-tuning and corresponds to the number of parameters in the adapter layers. Larger numbers tend to yield better results. Typical values are powers-of-two (1, 2, 4, 8, ...). This must be a positive integer. Minimum: 1. Default: 16.
- LoRA Alpha: This is the alpha parameter for scaling the adaptation strength. Higher values give stronger weight to the adapter layers. Typical values are powers-of-two (1, 2, 4, 8, ...). This must be a positive integer. Minimum: 1. Default: 32.
Advanced Configuration
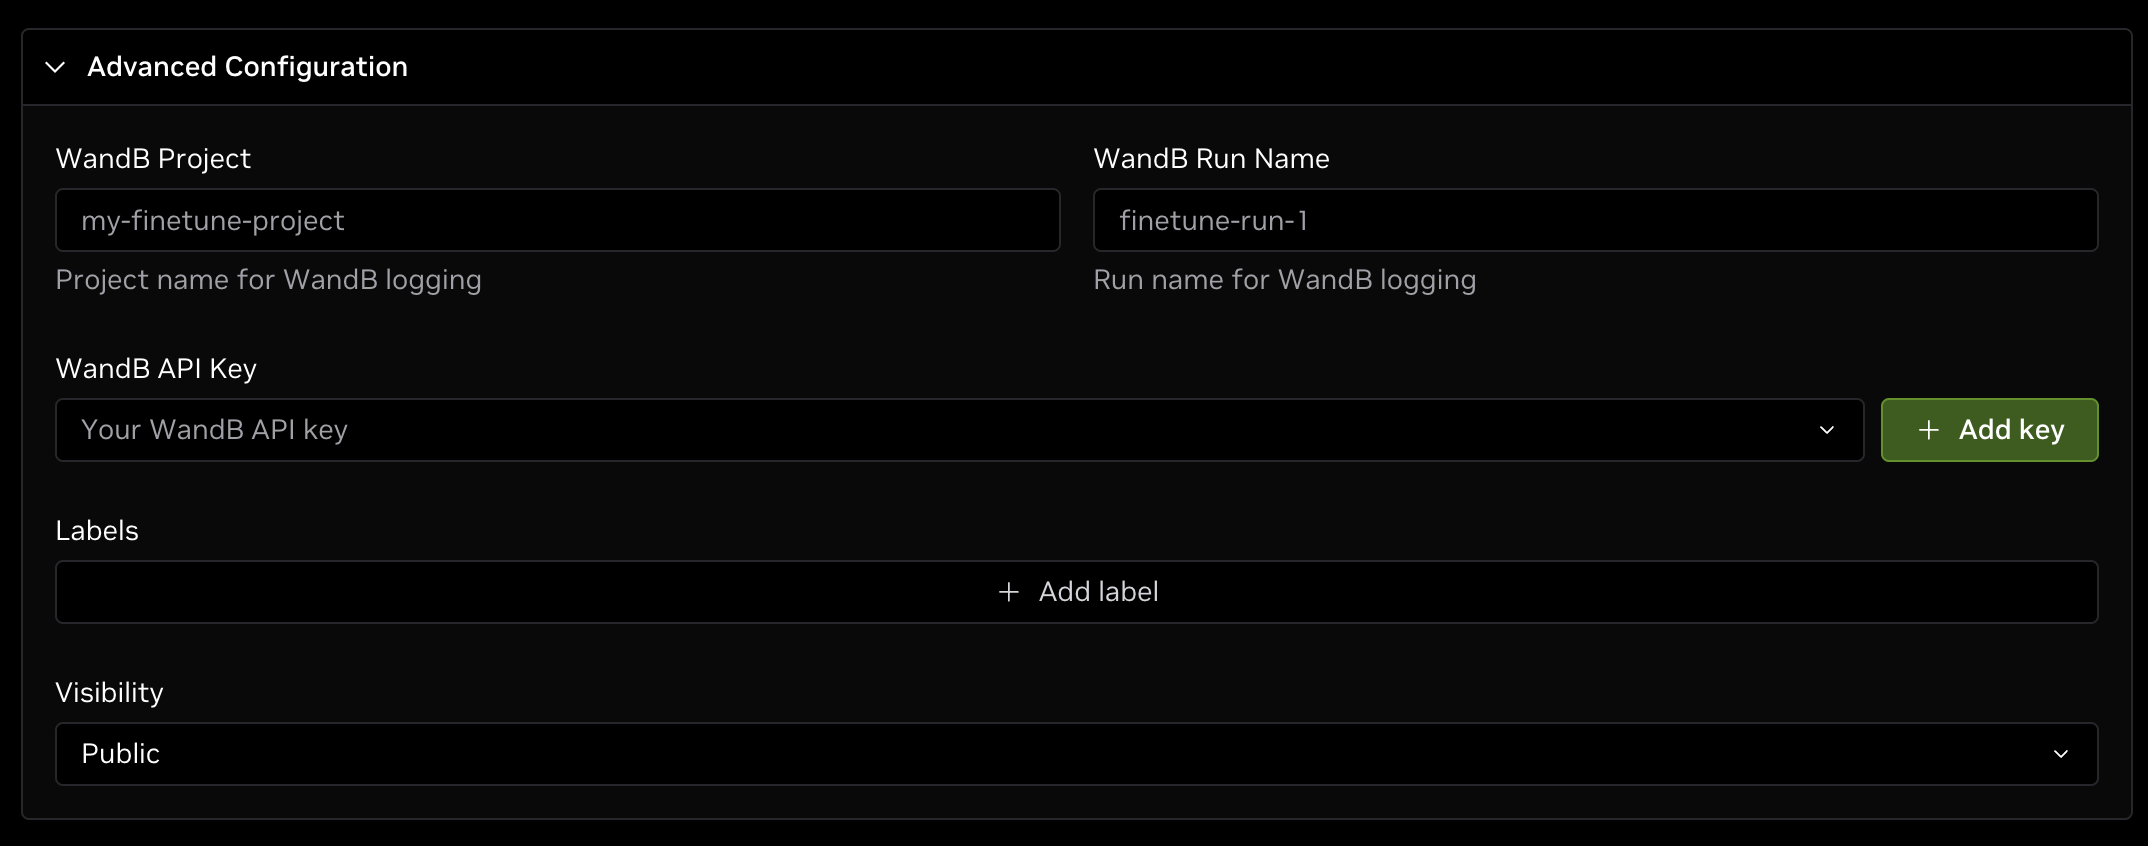
The Advanced Configuration section contains a few additional settings, mainly the Weights and Biases (W&B) integration. The fine-tuning feature has optional support for logging training metrics to W&B servers for an easy way to monitor training progress and compare different runs.
If you would like to log results with W&B, specify your desired Project name and the name of the Run for the fine-tuning job to be visible under in W&B. Next, add your W&B API key by either selecting it from the drop-down list or clicking the green + Add key button and following the prompts to add your W&B API key.
If the project, run, and API key for W&B are set in this section, your fine-tuning job will automatically be synced with W&B for further viewing.
In addition to W&B integration, you can also choose to add labels to your job or change the visibility as needed.
Launching the Job

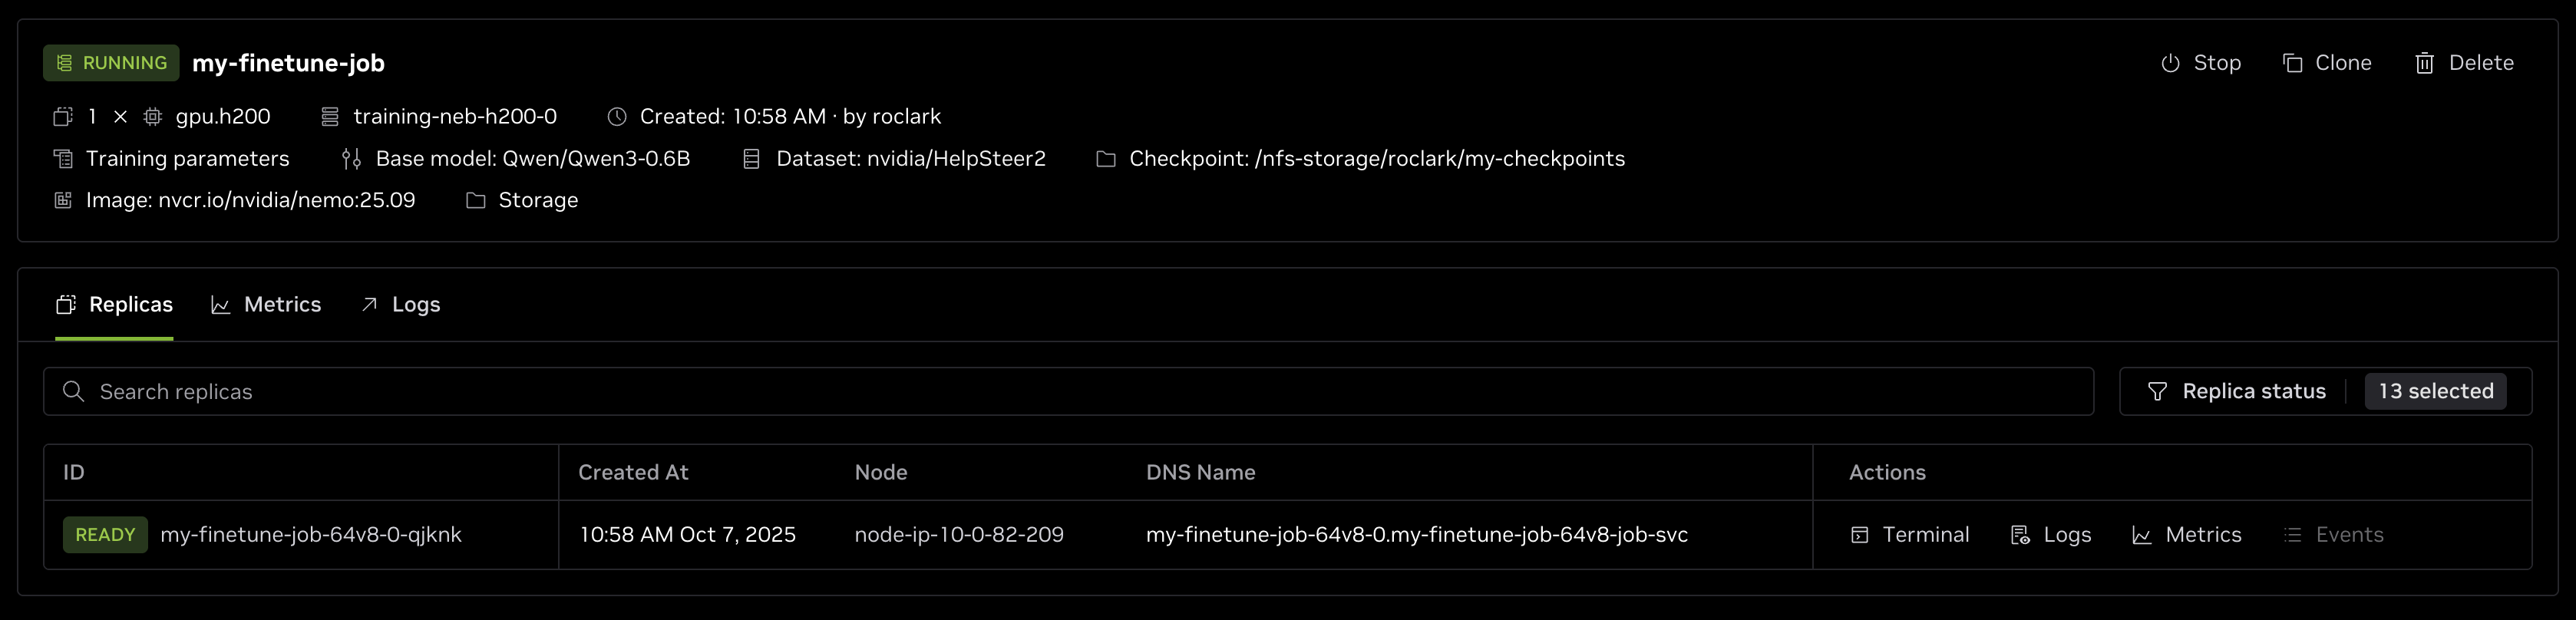
Once all settings in the form have been configured, click the green Create button at the bottom of the page. This will schedule a fine-tuning job on the cluster and run it once resources are ready. You will be taken back to the Fine-tune job page and should see the job listed at the top of the queue per the image above.
In the job tile you can view various information including:
- The requested GPU resources.
- Node group the job is running on.
- When the job was created and by whom.
- A list of the training parameters for the job.
- The base model used for fine-tuning.
- The training dataset.
- Where the checkpoint is saved.
- The container version the job is running in.
- The shared storage mounted in the job.
The typical state progression for jobs is Queued -> Starting -> Running -> Completed. The job will first be in the queue until resources are available. It will then transition to Starting once resources have been allocated. Note that a job could be in the Starting state for a while if the image needs to be pulled from the registry.
Once the container is ready, the job will be Running and the fine-tuning process begins. After fine-tuning finishes, it will transition to Completed and the resources are freed for other jobs.
Monitoring the Job
When the fine-tuning process starts, your job will be in the Running state. Clicking the job in the list will bring up more details. To view the live output including training progress, click the Logs button. This will display progress after each step indicating the latest training loss, the GPU memory usage at that step, how many steps have been completed, and more.
If you added your W&B credentials, you can view the training metrics at wandb.ai as in the image below:
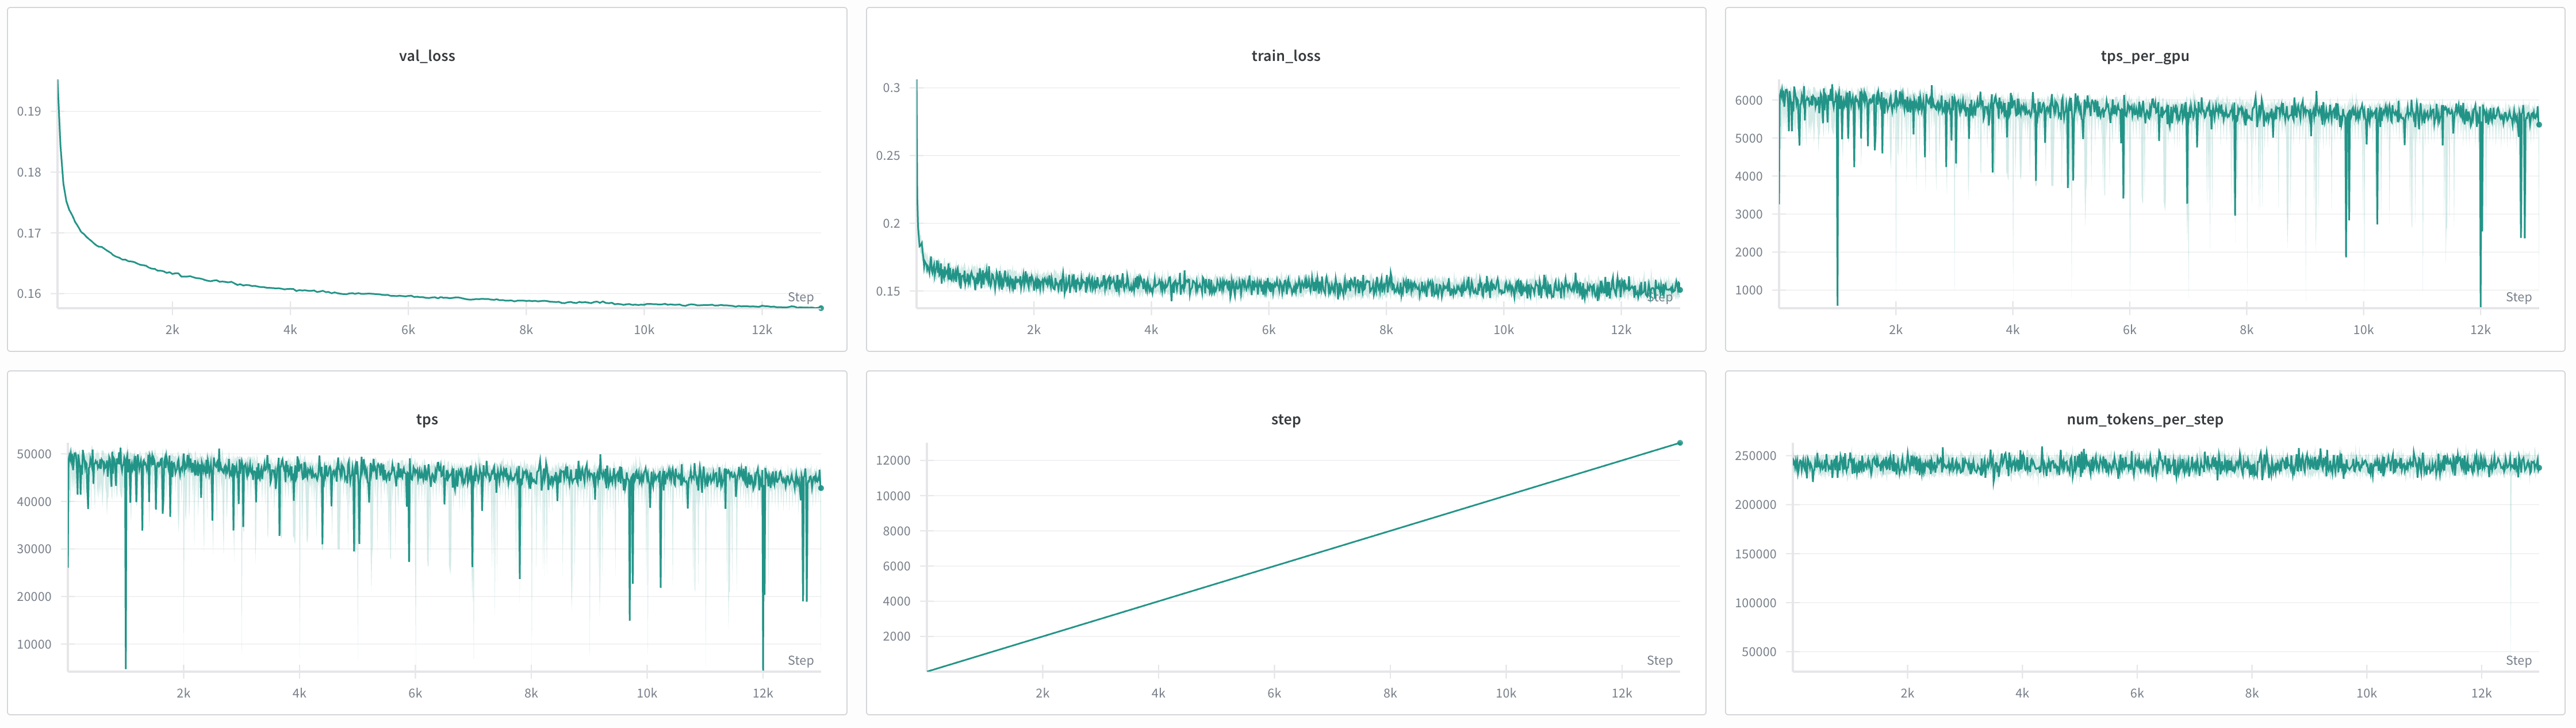
Ideally, you want your train_loss and val_loss to decrease over time like in the example above. This indicates the model is learning the target dataset.
View Checkpoints
While the job is running, you can open a terminal directly in the container to view checkpoints and other files.
To do so, open the job details page by clicking the job in the Fine-tunes list. Click the Replicas tab to list all containers and click the Terminal button for the first container to open a bash session inside the container at the bottom of the page.
To find your checkpoint, navigate to the location specified in Checkpoint Output Path section during job creation. For example, if you put /nfs-storage/fine-tuning/my-fine-tune-model for your checkpoint path, navigate to that directory with:
If you run ls in that directory you will find a list of sub-directories named epoch_X_step_YYYY where X is the epoch number and YYYY is the global step number. Each of these sub-directories contains the checkpoints at the indicated step count.
Navigate into the latest sub-directory which represents the highest step count. This is your most recent checkpoint. The final consolidated checkpoint will be located in the model/consolidated directory inside of the latest epoch_X_step_YYYY sub-directory.
Deploying the Model for Inference
After the fine-tuning job is completed, your checkpoint will be saved in the specified shared storage location. View the logs to see where the checkpoint is located - it will be listed towards the end of the logs.
To deploy the model for inference on DGX Cloud Lepton, refer to the Create LLM Endpoints with vLLM and SGLang guide. When prompted, load your model from storage and specify the full path to the checkpoint. This should end with epoch_X_step_YYYY/model/consolidated.
Troubleshooting
The table below includes common scenarios and their solutions.
| Problem | Solution |
|---|---|
I see AssertionError: Expected at least two columns in my logs | The dataset processing code was unable to read the specified keys from the column mapping while defining the dataset. Check to make sure that both the values next to Answer and Question in the dataset mapping are in the training dataset. For example, if you put response next to Answer in the column mapping, there must be a response column in the dataset. |
I see CUDA OOM errors in my logs | This happens when the dataset and or model are too large to fit in GPU memory. There are several ways to resolve this, typically in the following order. * Reduce Local Batch Size to 1 if not already.* Divide the Global Batch Size in half until the error is gone. * If your dataset has long input or output sequences, increase your Context Parallelism Size. If your model is 10B parameters or larger, increase your Tensor Parallelism Size. * Increase the number of GPUs for the job. There isn't a perfect way to find settings for any model and dataset, so some of these steps might need to be combined or repeated. |
| My dataset combines the input and output into a single column | In this case, you will need to do some pre-processing of the dataset on shared storage and split the input and output into different columns. One example is creating a Python script which reads in the dataset, iterates over each line, saves the input and output as different keys/values in a dictionary, and writes the data to a file. |