AWS-Based DGX Cloud Create Cluster Configuration#
This section provides specific details about configurations or customizations available in AWS-based DGX Cloud Create clusters.
Amazon Elastic Fabric Adapters#
DGX Cloud Create clusters in Amazon EKS provide Elastic Fabric Adapters (EFA) to enable high-speed distributed computing. DGXC customers can use this fabric to enable GPU Direct RDMA, NCCL, and MPI for distributed workloads.
While many container images built for distributed computing already bundle tools like MPI and NCCL, workloads that want to take advantage of EFA must use the Amazon-provided EFA/OFI/NCCL/MPI stack. To streamline the use of EFA, DGXC provides the Amazon stack, environment variables, and EFA devices automatically to pods launched as distributed MPIJob or PyTorchJob by mutating their pod definitions. This is referred to as Auto-Mounted EFA.
Taking Advantage of Auto-Mounted EFA#
The Auto-Mounted EFA feature consists of:
A volume mount at
/opt/amazon-efa-ofi.Added container resource requests of
vpc.amazonaws.com/efa: "32"andhugepages-2Mi: 5Gi.LD_LIBRARY_PATHprefixed with various directories in/opt/amazon-efa-ofi.Environment variables
OPAL_PREFIX,NVIDIA_GDRCOPY, andFI_EFA_USE_DEVICE_RDMAare set.
Some workloads will still require small modifications to take advantage of the mounted Amazon EFA stack:
Container images must be built using the C toolchain version 2.34 or later (generally, images built from at least Ubuntu 21.10 or ubi9).
If the distributed job is a PyTorchJob, generally no modifications are required. The Amazon stack will be found due to the value of
LD_LIBRARY_PATH.If the distributed job is an MPIJob, and the container entry point or scripting calls tools like
mpirun, these need to be modified to call the provided/opt/amazon-efa-ofi/openmpi/bin/mpiruninstead.It may also be necessary to pass along key environment variables from the launcher to the worker nodes, such as
/opt/amazon-efa-ofi/openmpi/bin/mpirun -x LD_LIBRARY_PATH -x OPAL_PREFIX -x FI_EFA_USE_DEVICE_RDMA.
Troubleshooting#
User wants to confirm that EFA is being used:
This can usually be done by setting the environment variable NCCL_INFO=DEBUG for workloads that use NCCL.
When the workload sends messages, it should print information in logs like:
NCCL INFO Channel 13/0 : 2[2] -> 10[2] [send] via NET/AWS Libfabric/2/GDRDMA
User pod fails to start, logs may display the following:
mpirun: /lib/x86_64-linux-gnu/libc.so.6: version 'GLIBC_2.34' not found
(required by /opt/amazon-efa-ofi/openmpi/lib/libopen-rte.so.40)
This means the container image’s C toolchain is too old to take advantage of Auto-Mounted EFA, or the wrong
mpirun binary is being called. To remediate:
Update the image or entrypoint script, which may involve tracking down base image updates.
Alternatively, compile and bundle the Amazon EFA stack into the image manually and opt out of Auto-Mounted EFA.
User is running distributed PyTorch and seeing os.fork() throw error:
OSError: Cannot allocate memory
Set the environment variable FI_EFA_USE_HUGE_PAGE=0. This causes a small performance hit but prevents fork failures
due to the OS running out of huge pages. More info is available at the
AWS OFI NCCL repository.
User wants to confirm the C toolchain version in their image:
This can be done by running and inspecting the libc.so.6 in the image. Example:
$ docker run -it --entrypoint bash redhat/ubi9

[root@54fbddf47d15 /]# find / -name libc.so.6
/usr/lib64/libc.so.6

[root@54fbddf47d15 /]# /usr/lib64/libc.so.6
GNU C Library (GNU libc) stable release version 2.34.
EFA is observed in launcher pod even when the GPU request for workers is less than 8:
Due to an implementation detail, the DGX Cloud Create infrastructure that automatically mutates a pod for EFA cannot distinguish whether the launcher pod is part of a distributed training job where the workers have requested a full node (8 GPU) or not. In general, EFA is not supported for partial node workloads (requests of less than 8 GPU). See the Opt-Out section next for details on completely disabling any EFA injection.
Opt-Out#
In some cases, users may want to disable Auto-Mounted EFA entirely. This is useful when:
The container image’s C toolchain is incompatible.
The image bundles its own build of Amazon EFA.
The user wants to opt out of EFA for any reason.
This is achieved by adding an annotation to workloads: disable-auto-efa: "true". How to add this annotation depends
on how the workload is submitted:
NVIDIA Run:ai CLI
runai submit-dist … --annotation "disable-auto-efa=true"
NVIDIA Run:ai UI
When submitting a new distributed training workload, find the General section and select + Annotation.
YAML Files
Add
disable-auto-efa: "true"to the metadata annotations section of any pod specs.
(Optional) Private Access#
AWS PrivateLink#
Introduction#
This document provides instructions on configuring NVIDIA Run:ai Private Access using AWS PrivateLink manually using the AWS CLI. NVIDIA also provides Terraform bringup of this configuration. Contact your NVIDIA DGX Cloud Create Technical Account Management (TAM) team for more information.
NVIDIA Run:ai Private Access enables access to NVIDIA DGX Cloud Create deployment without traversing the public internet. In this configuration, user access to the dedicated cluster and the NVIDIA Run:ai control plane is routed through a private connection that never leaves the AWS network.
Assumptions#
Enabling Private Access in DGX Cloud Create deployment on AWS requires coordinated network configuration between NVIDIA and customer AWS accounts. This section lists the prerequisites for private access:
An AWS account
Ability to provision AWS resources in the supported region:
us-east-1Permissions to manage AWS resources and their configuration (see Required Permissions section for details)
NVIDIA DGX Cloud Create provisioned NVIDIA Run:ai cluster and Private Access configuration information (contact your NVIDIA TAM team for details)
Configuration#
Before starting the DGX Cloud Create Private Access configuration process, make sure you have all the required information and assets. If necessary, contact the NVIDIA TAM team.
AWS Region where the DGX Cloud Create cluster has been provisioned
$RUNAI_REGION(e.g.us-east-1)
AWS PrivateLink Endpoint Service name, Fully Qualified Domain Names (FQDNs), and a list of supported AWS Availability Zones (AZ) for each one of the required services:
Kubernetes Endpoint:
$RUNAI_K8S_SERVICE_NAME$RUNAI_K8S_SERVICE_FQDN$RUNAI_K8S_SERVICE_AZ
NVIDIA Run:ai Ingress
$RUNAI_INGRESS_SERVICE_NAME$RUNAI_INGRESS_SERVICE_FQDN$RUNAI_INGRESS_SERVICE_AZ
NVIDIA Run:ai Control Plane
$RUNAI_CONTROLPLANE_SERVICE_NAME$RUNAI_CONTROLPLANE_SERVICE_FQDN$RUNAI_CONTROLPLANE_SERVICE_AZ
Researcher configuration file (aka
kubeconfig)
You will also need the following information about the AWS account from where you will be creating the Private Access connection.
AWS Account ID (
$ACCOUNT_ID)AWS CLI configured for that AWS account
VPC ID (
$VPC_ID)Subnet IDs (
$SUBNET_ID)Must be in the same VPC
Span physical AZs supported by each one of the AWS PrivateLink Endpoint Services provided by the NVIDIA TAM team
Have DNS hostname enabled
Have security group that allows egress on port TCP/443
$RUNAI_SG_ID
Validation#
Start by verifying that your AWS Account ID has been added to each one of the AWS PrivateLink Endpoint Services.
aws ec2 describe-vpc-endpoint-services \
    --service-names \
        $RUNAI_CONTROLPLANE_SERVICE_NAME \
        $RUNAI_K8S_SERVICE_NAME \
        $RUNAI_INGRESS_SERVICE_NAME \
    --region $RUNAI_REGION \
    --query "ServiceDetails[].[
        ServiceName,
        join(',', ServiceType[].ServiceType),
        join(',', AvailabilityZones)
    ]"
Example output:
[
    {
        "ServiceName": "com.amazonaws.vpce.us-east-1.vpce-svc-0a1e071742f609eee",
        "ServiceType": "Interface",
        "AZs": "us-east-1a,us-east-1b,us-east-1c,us-east-1d,us-east-1e,us-east-1f"
    },
    {
        "ServiceName": "com.amazonaws.vpce.us-east-1.vpce-svc-0b7351ed12fc0463b",
        "ServiceType": "Interface",
        "AZs": "us-east-1a,us-east-1d"
    },
    {
        "ServiceName": "com.amazonaws.vpce.us-east-1.vpce-svc-07c82355c0854a8da",
        "ServiceType": "Interface",
        "AZs": "us-east-1a,us-east-1b,us-east-1c,us-east-1d"
    }
]
If the response has an error, resolve it before proceeding to the next step.
PrivateLink Endpoints#
Note
To create an AWS PrivateLink Endpoint, you will need a VPC with subnets that meet the requirements outlined in the Configuration section. See Creating AWS VPC and Creating AWS Subnet for more information.
To create AWS PrivateLink Endpoints, run the following command for each provided PrivateLink Endpoint Services. To illustrate, let’s use the NVIDIA Run:ai Kubernetes endpoint service ($RUNAI_K8S_SERVICE):
aws ec2 create-vpc-endpoint \
    --vpc-id $VPC_ID \
    --vpc-endpoint-type Interface \
    --service-name $RUNAI_K8S_SERVICE_NAME \
    --subnet-ids $SUBNET_ID1 $SUBNET_ID2 \
    --security-group-ids $RUNAI_SG_ID \
    --tag-specifications 'ResourceType=vpc-endpoint,Tags=[{Key=Name,Value=<VPCE_NAME>}]'
The output from the above command will include vpc-endpoint-id. You can use that ID to verify the created VPC endpoint:
aws ec2 describe-vpc-endpoints \
    --vpc-endpoint-ids $VPC_ENDPOINT_ID \
    --query 'VpcEndpoints[0].{State: State, DNS: DnsEntries[*].DnsName}'
The output from the above command should have the endpoint state available and a list of DNS entries. Capture the DNS entries to use in the next sections of the deployment:
{
    "State": "available",
    "DNS": [
        "vpce-02b6d592bc0bf3956-av79pfkj.vpce-svc-0a1e071742f609eee.us-east-1.vpce.amazonaws.com",
        "vpce-02b6d592bc0bf3956-av79pfkj-us-east-1a.vpce-svc-0a1e071742f609eee.us-east-1.vpce.amazonaws.com",
        "vpce-02b6d592bc0bf3956-av79pfkj-us-east-1b.vpce-svc-0a1e071742f609eee.us-east-1.vpce.amazonaws.com"
        ]
}
Repeat this process for each of the PrivateLink Endpoint Services:
$RUNAI_INGRESS_SERVICE$RUNAI_CONTROLPLANE_SERVICE
DNS#
Because the traffic routed via PrivateLink will not traverse the public internet, the VPC in which you deployed the PrivateLink endpoints will need to resolve the FQDNs to the PrivateLink endpoint DNS names.
For example, the FQDN provided by the NVIDIA TAM team for RUNAI_K8S_SERVICE_FQDN would need to resolve to each one of the DNS entries returned in the PrivateLink Endpoints section.
One way to manage DNS inside of your VPC is to use the AWS Route53 service. If you choose to configure your DNS that way, you must perform the following steps for each of the provided FQDNs. For demonstration purposes here, we will use app.run.ai:
Manage DNS in AWS Route53.
Create Route53 Hosted Zones:
Using the ID of your selected VPC, create a private DNS zone using the following command:
aws route53 create-hosted-zone --name run.ai \
--caller-reference runai \
--hosted-zone-config PrivateZone=true \
--vpc VPCRegion=us-east-1,VPCId=vpc-0de96abdd45763f49
Create Private DNS records in Route53 Hosted Zone:
Using the
$HOSTED_ZONE_ID, create DNS entries for each one the CNAMEs returned by theaws ec2 escribe-vpc-endpointscommand in the PrivateLink Endpoints section:aws route53 change-resource-record-sets \ --hosted-zone-id $HOSTED_ZONE_ID \ --change-batch '{ "Changes": [ { "Action": "UPSERT", "ResourceRecordSet": { "Name": "app", "Type": "CNAME", "TTL": 60, "ResourceRecords": [ { "Value": "vpce-02b6d592bc0bf3956-av79pfkj.vpce-svc-0a1e071742f609eee.us-east-1.vpce.amazonaws.com" }, { "Value": "vpce-02b6d592bc0bf3956-av79pfkj-us-east-1a.vpce-svc-0a1e071742f609eee.us-east-1.vpce.amazonaws.com" }, { "Value": "vpce-02b6d592bc0bf3956-av79pfkj-us-east-1b.vpce-svc-0a1e071742f609eee.us-east-1.vpce.amazonaws.com" } ] } } ] }'Validate DNS record:
The DNS entries will take a couple of minutes to propagate. When completed, you should be able to dig the record from within the VPC and resolve it to the created CNAMEs:
dig app.run.ai +short CNAME
The result should include the same DNS entries you defined above:
vpce-02b6d592bc0bf3956-av79pfkj.vpce-svc-0a1e071742f609eee.us-east-1.vpce.amazonaws.com.
vpce-02b6d592bc0bf3956-av79pfkj-us-east-1a.vpce-svc-0a1e071742f609eee.us-east-1.vpce.amazonaws.com.
vpce-02b6d592bc0bf3956-av79pfkj-us-east-1b.vpce-svc-0a1e071742f609eee.us-east-1.vpce.amazonaws.com.
Usage#
Before you can use NVIDIA Run:ai over Private Access, there are a few assumptions:
Verify the NVIDIA Run:ai and kubectl CLI are installed by following the steps in Accessing the NVIDIA Run:ai CLI.
NVIDIA Run:ai is accessed from within your AWS account.
The AWS account has been successfully configured with PrivateLink Endpoints.
DNS has been configured, pointing to all PrivateLink FQDN Endpoints.
After following Setting up Your Kubernetes Configuration File, you should able to use runai and kubectl commands against the cluster over a private, secure connection without ever traversing a public network.
Note
While not covered in this document, if proxied via the same VPC, your browser connection will also be routed over AWS PrivateLink.
Resources#
Required Permissions#
The policy document below captures the key permissions required to configure NVIDIA Run:ai Private Access in your AWS account:
{
    "Version": "2024-08-28",
    "Statement": [
        {
            "Effect": "Allow",
            "Action": [
                "ec2:CreateSubnet",
                "ec2:DescribeSubnets",
                "ec2:CreateVpc",
                "ec2:DescribeVpc",
                "ec2:DescribeVpcAttribute",
                "ec2:ModifyVpcAttribute",
                "ec2:DescribeVpcEndpoints",
                "ec2:DescribeVpcEndpointConnectionNotifications",
                "ec2:DescribeVpcEndpointConnections",
                "ec2:DescribeVpcEndpointServiceConfigurations",
                "ec2:DescribeVpcEndpointServicePermissions",
                "ec2:DescribeVpcEndpointServices",
                "route53:CreateHostedZone",
                "route53:ChangeResourceRecordSetsNormalizedRecordNames",
                "route53:ChangeResourceRecordSetsRecordTypes",
                "route53:ChangeResourceRecordSetsActions"
            ],
            "Resource": "*"
        }
    ]
}
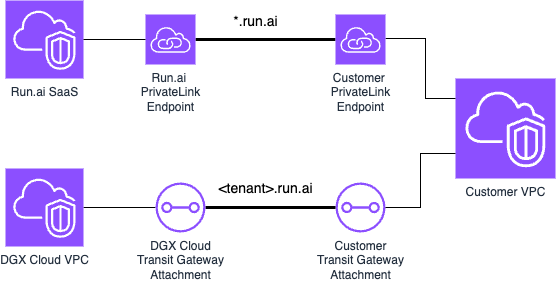
AWS Transit Gateway#
Introduction#
NVIDIA Run:ai Private Access enables access to NVIDIA DGX Cloud Create deployment without traversing the public internet. In this configuration, user access to the dedicated cluster and the NVIDIA Run:ai control plane is routed through a private connection that never leaves the AWS network.
Assumptions#
This document assumes that the following is already configured and accessible.
AWS Account (AWS reference)
AWS VPC (AWS reference)
AWS Transit Gateway (AWS reference)
Getting Started#
Share your existing Transit Gateway with Nvidia managed AWS Account where your cluster is deployed using AWS Resource Access Management (RAM):
Enable resource sharing within AWS Organizations
Create a resource share
Create AWS PrivateLink to route traffic from customer VPC to NVIDIA Run:ai control plane over AWS network:
Create a VPC endpoint
Create Route 53 Hosted Zone for run.ai
Creating DNS records for *.run.ai
(Example) AWS Transit Gateway Private Access Deployment#
Prior to starting the AWS Transit Gateway configuration process make sure you have all the required information and assets. If necessary, please contact the Nvidia Technical Account Management team:
Information about the pre-provisioned NVIDIA Run:ai on AWS cluster:
AWS Account identifier ($DGXC_ACCOUNT_ID, 12-digit number)
AWS Region (e.g. us-east-1)
Subnet CIDRs used for the VPC in which the cluster is located ($RAI_CIDR e.g. 10.0.3.0/24, and 10.0.4.0/24)
Information on NVIDIA Run:ai access:
Researcher configuration file (aka kubeconfig)
In addition, you will also need following information about the AWS account from where you will be creating the Private Access connection. If necessary, consult AWS account console in customer account, or contact their network administrator, for assistance:
AWS VPC ($VPC_ID)
AWS VPC CIDR (10.0.3.0/24, and 10.0.4.0/24), must not overlap with the VPC CIDR of the DGX Cloud Create cluster
Private subnet with outbound internet connectivity ($SUBNET_ID)
AWS Region ($REGION e.g. us-east-1)
Create Transit Gateway
aws ec2 create-transit-gateway \
    --description "Run-ai Transit Gateway" \
    --amazon-side-asn 65000 \
    --options AutoAcceptSharedAttachments=enable \
    --tag-specifications "ResourceType=transit-gateway,Tags=[{Key=Name,Value=dgxc-runai-tgw}]"
This command will output the TransitGatewayId and TransitGatewayARN ($TGW_ID, $TGW_ARN)
Create Transit Gateway VPC Attachment
Using TransitGatewayId and VpcId, create the attachment:
aws ec2 create-transit-gateway-vpc-attachment \
    --transit-gateway-id $TGW_ID \
    --vpc-id $VPC_ID \
    --subnet-ids $SUBNET_ID \
    --tag-specifications "ResourceType=transit-gateway-attachment,Tags=[{Key=Name,Value=dgxc-runai-tgw-att}]"
This command will output the TransitGatewayAttachmentId ($TGW_ATT_ID)
Create Transit Gateway Route Table
Create a route table for the Transit Gateway:
aws ec2 create-transit-gateway-route-table \
    --transit-gateway-id $TGW_ID \
    --tag-specifications "ResourceType=transit-gateway-route-table,Tags=[{Key=Name,Value=dgxc-runai-tgw-rt}]"
Create Transit Gateway Route
After obtaining the TransitGatewayRouteTableId ($TGW_RT_ID), create a default route:
aws ec2 create-transit-gateway-route \
    --destination-cidr-block "0.0.0.0/0" \
    --transit-gateway-route-table-id $TGW_RT_ID \
    --transit-gateway-attachment-id $TGW_ATT_ID
Update VPC Route Tables
For VPC’s that need to reach the NVIDIA Run:ai VPC, update their route tables to the NVIDIA Run:ai VPC CIDR:
aws ec2 create-route \
    --route-table-id $TGW_RT_ID \
    --destination-cidr-block $RAI_CIDR \
    --transit-gateway-id $TGW_ID
Create RAM Resource Share
Create a Resource Access Manager (RAM) share:
aws ram create-resource-share \
    --name dgxc-runai-tgw-ram \
    --allow-external-principals \
    --tags "Key=Name,Value=dgxc-runai-tgw-ram"
This command will output the $RAM_SHARE_ARN
Associate Transit Gateway with RAM Resource Share
aws ram associate-resource-share \
    --resource-share-arn $TGW_ARN \
    --resource-arn $RAM_SHARE_ARN
Associate Principal with RAM Resource Share
To associate a principal (another AWS account or organization):
aws ram associate-resource-share \
    --resource-share-arn $RAM_SHARE_ARN \
    --principal $DGXC_ACCOUNT_ID
Create Security Group for Private Link
For creating a Security Group:
aws ec2 create-security-group \
    --group-name dgxc-runai-pl \
    --description "Private Link Security Group" \
    --vpc-id $VPC_ID
This command will return $PL_SG_ID. Now, add inbound and outbound rules:
aws ec2 authorize-security-group-ingress \
    --group-id $PL_SG_ID \
    --protocol tcp \
    --port 443 \
    --cidr $VPC_CIDR
aws ec2 authorize-security-group-egress \ --group-id $PL_SG_ID \ --protocol "-1" \ --port 0-0 \ --cidr "0.0.0.0/0"Create VPC Endpoint
For creating the VPC Endpoint:
aws ec2 create-vpc-endpoint \
    --vpc-id $VPC_ID \
    --service-name dgxc-runai-pl \
    --vpc-endpoint-type Interface \
    --subnet-ids $SUBNET_ID \
    --security-group-ids $PL_SG_ID \
    --tag-specifications "ResourceType=vpc-endpoint,Tags=[{Key=Name,Value=dgxc-runai-pl}]"
This command will return $VPC_PT_DNS
Create Route 53 Hosted Zone
For Route 53 zone creation:
aws route53 create-hosted-zone \
    --name "run.ai" \
    --vpc VPCRegion=$REGION,VPCId=$VPC_ID \
    --caller-reference dgxc-runai-dns-req1 \
    --tags Key=Name,Value=dgxc-runai-zone
This command will return $DNS_ZONE_ID
Create Route 53 Record Set
Create the DNS record:
aws route53 change-resource-record-sets \
    --hosted-zone-id $DNS_ZONE_ID\
    --change-batch '{
        "Changes": [{
            "Action": "CREATE",
            "ResourceRecordSet": {
            "Name": "*.run.ai",
            "Type": "CNAME",
            "TTL": 300,
            "ResourceRecords": [{"Value": $VPC_PT_DNS}]
            }
        }]
    }'