

PXE Boot Setup#
The UEFI BIOS on DGX systems supports PXE boot. Several manual customization steps are required to PXE boot the DGX OS image.
Caution
This appendix provides reference examples, not complete site-specific DHCP, HTTP, and TFTP server configurations. Configure these services to fit your organization’s environment and security guidelines.
Note
The examples in this appendix use DGX OS 8.0.0 version numbers, ISO names,
and paths. When installing a different DGX OS release, replace those example
values with the corresponding values for the release being installed and use
the kernel, initrd, and UEFI boot files from that release’s ISO.
Note
For general PXE server setup and validation guidance, refer to Ubuntu’s UEFI PXE netboot documentation.
Note
ARM64 PXE installation information is included for a future DGX OS 8 release that supports ARM64 systems.
Requirements#
TFTP server
The
tftpd-hpapackage, configured to serve the TFTP directory.
HTTP server
An HTTP server is used to transfer large files, such as the ISO image and
initrd. Alternatively, TFTP can be used for this purpose. HTTP is used in the following example.
DHCP server
Software that provides Dynamic Host Configuration Protocol (DHCP) service.
Note
The TFTP server, HTTP server, and DHCP server can all be configured on the same system, or they can each be on different systems.
GRUB UEFI bootloader
TFTP server IP address:
<TFTP_Server_IP>
This topic provides some guidance on how to set up a PXE boot environment for DGX systems.
For complete details, refer to online documentation for setting up a PXE boot server.
In this example, tftpd-hpa provides TFTP service and GRUB is the UEFI
bootloader. Configure the DHCP service to match your infrastructure.
Overview of the PXE Server#
The PXE server requires configuration in the following areas:
bootloader (GRUB)
TFTP contents (the kernel and
initrd)In this example, TFTP is configured to serve files from
/local/tftp/. You will need to configure your TFTP server to serve files from/local/tftpor the directory you desire to use.HTTP contents (the ISO image)
In this example, HTTP is configured to serve files from
/local/http/. You will need to configure your HTTP server to serve files from/local/httpor the directory you desire to use.DHCP
PXE Server Configuration#
x86_64 Instructions
In this example, the directory structure on the HTTP and TFTP server looks like this:
/local/
   http/
      dgx_os_8.0.0/
         DGXOS-8.0.0-<date>-amd64.iso
   tftp/
      grub2/
         grub.cfg
         bootx64.efi
         grubx64.efi
         dgx_os_8.0.0/
            vmlinuz
            initrd
Note
The vmlinuz and initrd files are specified relative to the TFTP root,
/local/tftp/, and the location of the ISO, DGXOS-8.0.0-<date>-amd64.iso, is relative to the HTTP
root, /local/http/.
Here, the DHCP and PXE servers use the preceding directory structure. Adjust the directory names and layout to fit your infrastructure, then configure the HTTP and TFTP servers to serve the corresponding directories.
The contents of the GRUB configuration file,
/local/tftp/grub2/grub.cfg, should look something like this:
set default=0
set timeout=-1
insmod all_video

menuentry 'Install DGX OS 8.0.0' {
  linux /grub2/dgx_os_8.0.0/vmlinuz autoinstall fsck.mode=skip nouveau.modeset=0 rebuild-raid nopersistent ip=dhcp url=http://<HTTP_Server_IP>/dgx_os_8.0.0/DGXOS-8.0.0-<date>-amd64.iso
  initrd /grub2/dgx_os_8.0.0/initrd
}
Note
The kernel boot parameters should match the contents of the corresponding ISO’s boot
menu found in /mnt/boot/grub/grub.cfg.
When the system being installed boots via PXE, boot files located on /local/tftp are
retrieved from the TFTP server. In this example, configure tftpd-hpa to serve
/local/tftp. When a system is PXE booted, the bootx64.efi file
that is designated in the DHCP server configuration is retrieved by TFTP transfer
(see Configure Your DHCP Server ). By default, after the bootx64.efi is booted, the
PXE boot GRUB configuration file, grub2/grub.cfg in this example, provides
menu options for booting further. The GRUB configuration file specifies the
locations of the kernel and initrd files relative to the TFTP directory.
Configure the HTTP Directory:
Configure the HTTP file directory and ISO image by placing a copy of the DGX OS 8.0.0 ISO in directory
/local/http/dgx_os_8.0.0/. In this example, the full path is/local/http/dgx_os_8.0.0/DGXOS-8.0.0-<date>-amd64.iso.Configure the TFTP Directory By Using the Following Steps:
Mount the DGX OS 8.0.0 ISO. Assume your mount point is
/mnt:sudo mount -o loop /local/http/dgx_os_8.0.0/DGXOS-8.0.0-<date>-amd64.iso /mnt
Copy the kernel and
initrdfrom the ISO to the TFTP directory:sudo cp /mnt/casper/vmlinuz /local/tftp/grub2/dgx_os_8.0.0/ sudo cp /mnt/casper/initrd /local/tftp/grub2/dgx_os_8.0.0/
Copy the signed x86_64 UEFI boot files from the mounted DGX OS ISO to the TFTP directory:
sudo cp -p /mnt/EFI/BOOT/BOOTX64.EFI /local/tftp/grub2/bootx64.efi sudo cp -p /mnt/EFI/BOOT/grubx64.efi /local/tftp/grub2/grubx64.efi
BOOTX64.EFIis the signed UEFI boot file that the DHCP configuration provides to the PXE client. Use the boot files from the same DGX OS ISO as the kernel andinitrd. Do not mix GRUB or shim binaries from another Linux distribution or ISO release.Unmount the DGX OS 8.0.0 ISO:
sudo umount /mnt
Validate the PXE boot flow, including Secure Boot when it is enabled, before deploying the configuration to production systems.
For more information, refer to How to netboot the server installer on amd64.
x86_64 Alternate Instructions If initrd File Transfer Times Out Over TFTP
In some cases, the transfer of the initrd can time out over TFTP. A workaround for this is to host
the requisite files - initrd, vmlinuz, and the ISO - over HTTP instead. Hosting these over HTTP
makes the transfer faster and more reliable. In this example, assume the HTTP server files are
hosted from /local/http. The directory structure on the HTTP and TFTP server looks like this:
/local/
http/
dgx_os_8.0.0/
DGXOS-8.0.0-<date>-amd64.iso
vmlinuz
initrd
tftp/
grub2/
grub.cfg
bootx64.efi
grubx64.efi
Note
In this alternate configuration method, the vmlinuz and initrd files and the ISO,
DGXOS-8.0.0-<date>-amd64.iso, are now all specified relative to the HTTP root, /local/http/.
The GRUB EFI binary used for this configuration must include, or be able to
load, the net, efinet, and http modules.
When configured this way, the GRUB configuration file, grub.cfg, will
contain text that will look something like this:
set default=0
set timeout=-1
insmod all_video
insmod net
insmod efinet
insmod http
net_bootp
menuentry 'Install DGX OS 8.0.0' {
linux (http,<HTTP_Server_IP>)/dgx_os_8.0.0/vmlinuz autoinstall fsck.mode=skip nouveau.modeset=0 rebuild-raid nopersistent ip=dhcp url=http://<HTTP_Server_IP>/dgx_os_8.0.0/DGXOS-8.0.0-<date>-amd64.iso
initrd (http,<HTTP_Server_IP>)/dgx_os_8.0.0/initrd
}
Note
The kernel boot parameters should match the contents of the corresponding ISO’s boot menu, found in
/mnt/boot/grub/grub.cfg.
Before deploying this configuration, perform a PXE boot and confirm that
GRUB loads the kernel and initrd from the HTTP server. If GRUB cannot
load a required module or retrieve the files over HTTP, use a GRUB EFI binary
for the same DGX OS release that provides the required network and HTTP
modules.
ARM64 Instructions
For the TFTP-based configuration, use an ARM64 DGX OS ISO. The directory structure on the HTTP and TFTP server is similar to the x86_64 configuration:
/local/
http/
dgx_os_8.0.0/
DGXOS-8.0.0-arm64.iso
tftp/
grub2/
grub.cfg
grubaa64.efi
dgx_os_8.0.0/
vmlinuz
initrd
The ARM64 GRUB configuration file, /local/tftp/grub2/grub.cfg, contains
the ARM64 ISO name and loads the kernel and initrd from TFTP:
set default=0
set timeout=-1
insmod all_video
menuentry 'Install DGX OS 8.0.0' {
linux /grub2/dgx_os_8.0.0/vmlinuz autoinstall fsck.mode=skip nouveau.modeset=0 rebuild-raid nopersistent ip=dhcp url=http://<HTTP_Server_IP>/dgx_os_8.0.0/DGXOS-8.0.0-arm64.iso
initrd /grub2/dgx_os_8.0.0/initrd
}
Mount the ARM64 ISO and copy its kernel, initrd, and ARM64 UEFI boot file:
sudo mount -o loop /local/http/dgx_os_8.0.0/DGXOS-8.0.0-arm64.iso /mnt
sudo cp /mnt/casper/vmlinuz /local/tftp/grub2/dgx_os_8.0.0/
sudo cp /mnt/casper/initrd /local/tftp/grub2/dgx_os_8.0.0/
sudo cp -p /mnt/EFI/BOOT/grubaa64.efi /local/tftp/grub2/grubaa64.efi
sudo umount /mnt
The DHCP configuration provides grubaa64.efi to ARM64 UEFI clients. Use
the boot file from the same DGX OS ISO as the kernel and initrd.
Note
The kernel boot parameters should match the contents of the corresponding ISO’s boot menu,
found in /mnt/boot/grub/grub.cfg.
ARM64 Alternate Instructions If initrd File Transfer Times Out Over TFTP
When TFTP transfer of the initrd times out, host the ARM64 ISO, kernel,
and initrd on the HTTP server. The directory structure is:
/local/
   http/
      dgx_os_8.0.0/
         DGXOS-8.0.0-arm64.iso
         vmlinuz
         initrd
   tftp/
      grub2/
         grub.cfg
         grubaa64.efi
The ARM64 GRUB EFI binary must include, or be able to load, the net,
efinet, and http modules. Configure grub.cfg as follows:
set default=0
set timeout=-1
insmod all_video
insmod net
insmod efinet
insmod http
net_bootp

menuentry 'Install DGX OS 8.0.0' {
    linux (http,<HTTP_Server_IP>)/dgx_os_8.0.0/vmlinuz autoinstall fsck.mode=skip nouveau.modeset=0 rebuild-raid nopersistent ip=dhcp url=http://<HTTP_Server_IP>/dgx_os_8.0.0/DGXOS-8.0.0-arm64.iso
    initrd (http,<HTTP_Server_IP>)/dgx_os_8.0.0/initrd
}
Before deploying this configuration, perform a PXE boot and confirm that GRUB
loads the kernel and initrd from the HTTP server.
TFTP and HTTP Server Verification#
After you have set up all elements of your PXE server, before a PXE installation, verify that the TFTP and HTTP servers are working properly.
TFTP Server Verification
Verify that the tftpd-hpa service is active:
sudo systemctl status tftpd-hpa.service
To verify that the TFTP server has been set up correctly, from a different system on the same subnet,
use tftp to get one of the files that will be obtained via tftp during the PXE boot. In this example,
the TFTP server has been set up to serve files from /local/tftp. The GRUB configuration file,
grub.cfg is located on /local/tftp/grub2/grub.cfg; therefore, from the TFTP command prompt, request grub.cfg via
get grub2/grub.cfg.
cd /tmp
tftp <TFTP_Server_IP>
get grub2/grub.cfg
quit
HTTP Server Verification
To verify that the HTTP server has been set up correctly, use the wget command to get one of
the files that will be obtained via HTTP during the PXE boot. In this example, the HTTP server has been
set up to serve files from /local/http. The ISO, DGXOS-8.0.0-<date>-amd64.iso,
is located on /local/http/dgx_os_8.0.0/DGXOS-8.0.0-<date>-amd64.iso; therefore, test the HTTP request to
retrieve DGXOS-8.0.0-<date>-amd64.iso by running the following commands:
cd /tmp
wget http://<HTTP_Server_IP>/dgx_os_8.0.0/DGXOS-8.0.0-<date>-amd64.iso
For ARM64, use the ARM64 ISO name when verifying the HTTP server:
cd /tmp
wget http://<HTTP_Server_IP>/dgx_os_8.0.0/DGXOS-8.0.0-arm64.iso
Useful Parameters for Configuring Your System’s Network Interfaces#
ip=dhcp: tells the initramfs to automatically configure the system’s interfaces using DHCP.
If only one interface is connected to the network, this should be sufficient.
If multiple interfaces are connected to the network, the first interface that receives a reply will be used.
Parameters Unique to the DGX OS Installer#
rebuild-raidtells the installer to rebuild the data RAID if specified. Installing from the factory should always specify this, but it is optional otherwise.md5checkdiscwill not perform an installation when this is specified. It will simply unpack the ISO and check that its contents match what is described inmd5sum.txt.offwhendonepowers off the system after the installation. Otherwise, we reboot when done. Factory installs will specify this.nooemconfigskips oemconfig and creates default usernvidia, seeding initial password. Used for touchless install in PXE install or automatic VM creation/installation.force-aiallows you to supply your autoinstall file. If the networking is set up, you can provide a URL. Otherwise, this has to be one that exists in the installer.
For example:
force-ai=/ai/dgx_a100-ai.yaml
force-ai=http://your-server.com/your-ai.yaml
Note
Refer to the note in the Autoinstall Customizations section for special formatting considerations when using custom autoinstall files along with the force-ai parameter.
Configure Your DHCP Server#
Configure the DHCP service to provide the TFTP server address and the appropriate boot file for each PXE client. DGX OS 8 PXE boot supports x86_64 and ARM64 UEFI clients.
Client architecture |
DHCP architecture code |
Boot file |
|---|---|---|
x86_64 UEFI |
|
|
ARM64 UEFI |
|
|
Note
The syntax for configuring these values varies by DHCP implementation. Use the DHCP service supported by your environment, such as Kea, dnsmasq, or an existing corporate DHCP service. For Ubuntu DHCP-server guidance, refer to About DHCP documentation from Ubuntu.
(Optional) Configure ConnectX Cards for PXE Boot#
DGX systems can PXE boot using supported NVIDIA ConnectX cards. Use the manual steps below to enable the UEFI PXE ROM for the card from which the system will PXE boot.
When you are logged in to the DGX system host OS, you can run
/usr/sbin/mlnx_pxe_setup.bash to enable the UEFI PXE ROM for every NVIDIA
ConnectX InfiniBand device that it finds. Otherwise, use the manual steps
below.
sudo /usr/sbin/mlnx_pxe_setup.bash
Enable UEFI for ConnectX Cards#
To PXE boot from a supported NVIDIA ConnectX card, you must first enable the UEFI PXE ROM of the card you wish to PXE boot from because it is disabled by default. Run these commands against the target DGX host’s ConnectX device.
Follow these steps after installing the DOCA-OFED package.
To determine the device name and current configurations of the NVIDIA ConnectX cards, run the
sudo mlxconfig querycommand:sudo mlxconfig query
Example output:
Device #1:
----------

Device type:    ConnectX
Name:           <ConnectX-device-name>
Description:    NVIDIA ConnectX adapter card
Device:         <ConnectX-device>

Configurations:                              Next Boot
         ...
         ...
         EXP_ROM_UEFI_ARM_ENABLE             False(0)
         EXP_ROM_UEFI_x86_ENABLE             False(0)
         ...
         ...
Use the value in the
Devicefield in place of<ConnectX-device>in the following commands.Enable the ConnectX card’s UEFI PXE ROM for your system’s architecture:
sudo mlxconfig -y -d <ConnectX-device> set EXP_ROM_UEFI_x86_ENABLE=1
sudo mlxconfig -y -d <ConnectX-device> set EXP_ROM_UEFI_ARM_ENABLE=1
Reboot the server for the change to take effect.
sudo rebootUpon reboot, confirm that the configuration was set.
sudo mlxconfig query
Example output:
Device #1:
----------

Device type:    ConnectX
Name:           <ConnectX-device-name>
Description:    NVIDIA ConnectX adapter card
Device:         <ConnectX-device>

Configurations:                              Next Boot
         ...
         ...
         EXP_ROM_UEFI_ARM_ENABLE             True(1)
         EXP_ROM_UEFI_x86_ENABLE             True(1)
         ...
         ...
(Optional) Configure the DGX System to PXE Boot Automatically#
Add PXE to the Top of the UEFI Boot Order#
On systems with a BMC, you can configure the DGX system to PXE boot by adding it to the top of the UEFI boot order. This can be done out-of-band through IPMI.
export IPMI_PASSWORD='<PASSWORD>'
ipmitool -I lanplus -H <DGX_BMC_IP> -U <ADMIN> -E chassis bootdev pxe options=efiboot
Warning
Do not use -P with an actual password because it can be visible in the
process command line. Use your organization’s approved credential-handling
method instead.
Note
This only sets the DGX system to PXE boot, but does not specify the order of network devices to attempt PXE from. This is a limitation of the current UEFI and BMC firmware. See the following section to specify the network device boot order.
Configure Network Boot Priorities#
The UEFI Network Drive BBS Priorities allows you to specify the order of network devices to PXE boot from. To modify this, reboot the DGX system and enter the UEFI boot selection menu by pressing F2 or Del when you see the splash screen. Navigate to the Boot menu, and then scroll down to UEFI NETWORK Drive BBS Priorities.
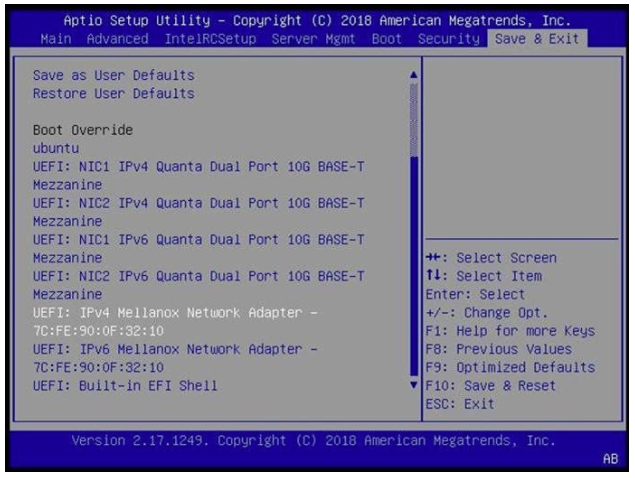
Configure the order of devices to attempt network boots from using this menu.
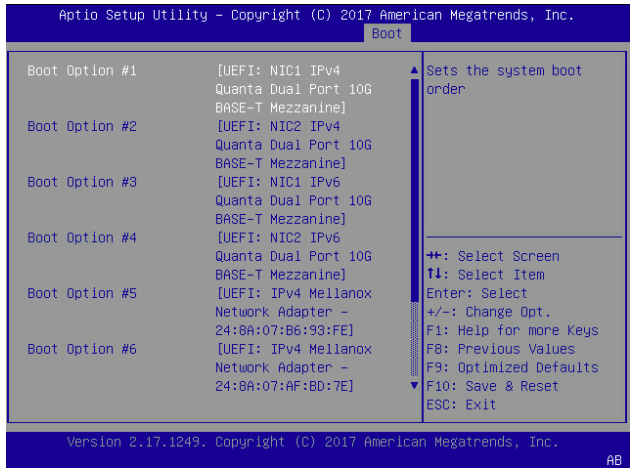
Save and Exit.
After you finish ordering the network boot priorities, save your changes and reset.
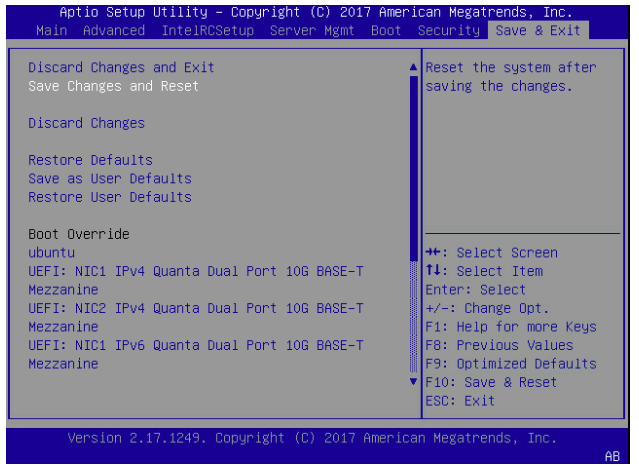
Make the DGX System PXE Boot#
Automated PXE Boot Process#
If you followed the optional steps above, you can now reboot and UEFI will attempt PXE boot using the devices in order specified in the Network Drive BBS Priorities list.
Manual PXE Boot Process#
If you want to manually trigger the PXE boot, reboot the DGX system and enter the UEFI boot selection menu by pressing F2 or Del when you see the splash screen.
Navigate to the Save & Exit menu, scroll down to the Boot Override section, and choose the appropriate network port to boot from. The MLNX cards will only appear if you enable the UEFI PXE ROM of that card.
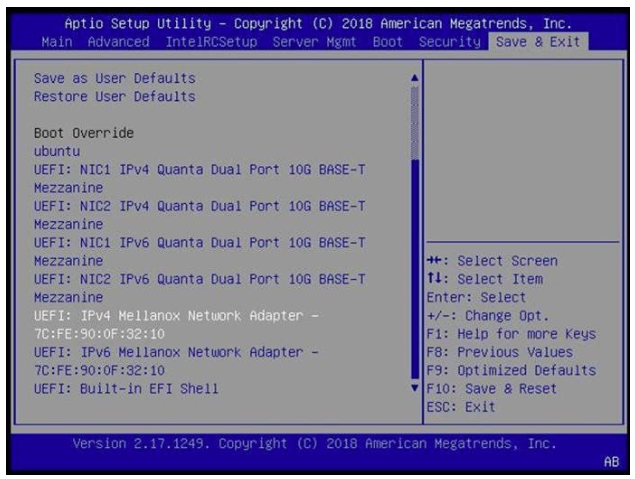
Alternatively, you can press F12 at the SBIOS splash screen, and SBIOS will iterate through each NIC and try PXE on each one. The order of the NICs attempted is specified by the Network Drive BBS Priorities.
Other IPMI Boot Options#
For more information about specifying boot order via IPMI, see the chassis command and bootdev subcommand
in the ipmitool man page.
For more information about the IPMI specification, refer to Intelligent Platform Management Interface Specification v2.0 rev. 1.1.
Autoinstall Customizations#
There are many autoinstall files that you can reference inside the DGX OS 8 ISO; these are contained in:
casper/ubuntu-server-minimal.ubuntu-server.installer.kernel.nvidia.squashfs
You can mount the ISO and then mount this squashfs to view the many autoinstall files that are packed within:
mkdir -p /tmp/iso_mnt
mkdir -p /tmp/squash_mnt
sudo mount /path/to/DGXOS-<version>-<date>.iso /tmp/iso_mnt/
sudo mount /tmp/iso_mnt/casper/ubuntu-server-minimal.ubuntu-server.installer.kernel.nvidia.squashfs /tmp/squash_mnt/
find /tmp/squash_mnt/ai/ -name '*.yaml'
For some deployments, you might want to use your own autoinstall files. This section will describe some sections contained in the built-in autoinstall files as well as how to perform some common customizations.
Note
The installer expects a unified autoinstall file rather than the typical split vendor/user/meta-data format.
This means that the user-supplied autoinstall file will need to account for some formatting differences,
namely, the autoinstall: keyword needs to be dropped and the indentations adjusted accordingly:
#
# typical user-data file
#
#cloud-config
autoinstall:
  version: 1
  identity:
    realname: '<real-name>'
    username: <username>
    password: '<encrypted-password-hash>'

#
# unified autoinstall file
#
version: 1
identity:
  realname: '<real-name>'
  username: <username>
  password: '<encrypted-password-hash>'
Note
Replace the identity placeholders with deployment-specific values. Generate
the encrypted password hash securely, for example, by running openssl
passwd -6 and entering the password interactively. Quote the hash in the
autoinstall file. For password requirements and additional hash-generation
options, refer to the Autoinstall configuration reference.
NVIDIA-Specific Autoinstall Variables#
The autoinstall files contained in the ISO are platform-specific, and serve as a good starting point for custom versions.
Many of them contain variables, prefixed with CHANGE_, which will be substituted by the installer:
CHANGE_STORAGE_REGThis gets removed and uncommented when the boot parameterai-encrypt-rootis not present. Uncommenting this stanza results in the standard disk partitioning scheme without LUKS encryption.CHANGE_STORAGE_ENCThis gets removed and uncommented when the boot parameterai-encrypt-rootis present. Uncommenting this stanza results in an encrypted root partition.CHANGE_BOOT_DISK_NAME_xThis is a disk-name, without the/devprefix. There may be multiple ones (for example,CHANGE_BOOT_DISK_NAME_1andCHANGE_BOOT_DISK_NAME_2) for platforms that expect a RAIDed boot device as is the case for DGX A100.Note
The installer will find the appropriate disk name to substitute here. Alternatively, the
force-bootdiskparameter can be used to specify the disk name(s).CHANGE_BOOT_DISK_PATH_xThis is the same as theCHANGE_BOOT_DISK_NAME_xvariable above, except that it is prefixed with/dev/.CHANGE_DESC_PLATFORMThe installer will substitute this with a platform-specific descriptive name.CHANGE_SERIAL_NUMBERThe installer will substitute this with the serial number reported by dmidecode.CHANGE_INSTALL_PKGSThe installer will substitute this value with a list of packages specific to the platform. The lists of packages are specified by the*-pkgsfiles in thesquashfs.Note
The list of packages here will include oem-config and its dependencies. When you supply your own autoinstall file, you also want to perform the additional setup steps provided by oem-config and have these steps performed during autoinstall instead. For this use case we recommend adding, in the late-commands section, a step to remove the oem-config and ubiquity packages:
late-commands:
 ...
 - curtin in-target -- apt-get purge -y oem-config ubiquity
CHANGE_REBUILD_RAIDThis gets replaced with eithertrueorfalsebased on whether or not therebuild-raidboot parameter is present.CHANGE_IPMISOLThis gets replaced with eithertrueorfalsebased on whether or not theai-encrypt-rootboot parameter is present. When we set the system up with encryption, we also undo the IPMI serial-over-LAN configuration to ensure that the LUKS passphrase prompt shows up on the console rather than the serial-over-LAN interface.
Attention
While it is possible to replace these values on your own, we strongly recommend letting the installer handle this.
Common Customizations#
In this section, we will describe some common customizations that may be useful in more custom deployments.
Network Configuration#
To configure the network at install time, you can add a network section to your autoinstall file. In this example we will create a netplan configuration file that sets the enp1s0f0 interface to use DHCP:
network:
 version: 2
 ethernets:
   enp1s0f0:
    dhcp4: yes
Creating a User#
To create a user at install time, you can add an identity section to your autoinstall file.
The following example uses placeholders for the system hostname, username, and
encrypted password hash.
identity:
  hostname: <hostname>
  password: '<encrypted-password-hash>'
  username: <username>
For more examples, refer to the Autoinstall configuration reference manual in the Ubuntu installation documentation.