

Deploying Ubuntu and the BaseOS Software#
This section explains the steps for installing and configuring Ubuntu and the NVIDIA BaseOS software on DGX systems.
DGX OS provides a customized Ubuntu installation with additional software from NVIDIA to provide a turnkey solution for running AI and analytics workloads. The NVIDIA BaseOS software comprises platform-specific configurations, diagnostic and monitoring tools, and drivers that are required for a stable, tested, and supported OS to run AI, machine learning, and analytics applications on DGX systems.
You also have the option to install the NVIDIA BaseOS software on Ubuntu while still benefiting from the advanced DGX features. This installation method supports more flexibility, such as custom partition schemes.
Cluster deployments also benefit from this installation method through
the standardized, automated, and non-interactive Ubuntu installation process.
Starting with Ubuntu 20.04, the installer introduced a new mechanism
for automating the installation, allowing system administrators to install a
system unattended and non-interactively. You can find information about creating
such a cloud-init configuration file in Cloud-init Configuration File.
Refer to Ubuntu Automated Server Installation.
The intended audience is IT professionals managing a cluster of DGX systems and integration partners.
Prerequisites#
The following prerequisites are required or recommended, where indicated.
Ubuntu Software Requirements#
The DGX BaseOS 9 Software requires the following software versions:
Ubuntu 26.04
Linux kernel 7.0
Access to Software Repositories#
The BaseOS software is available from repositories that can be accessed from the internet. If your installation does not allow connection to the internet, refer to Air-Gapped Installations for information about installing and upgrading software on air-gapped systems.
If you are using a proxy server, refer to Network Configuration for setting up a proxy configuration.
Installation Considerations#
Installing the NVIDIA BaseOS software on Ubuntu allows you to select from additional configuration options that would otherwise not be available with the preconfigured DGX OS installer. These include drive partitioning, filesystem choices, and software selection.
Before you start installing Ubuntu and the NVIDIA BaseOS software, evaluate the following options. The installation and configuration instructions are covered in the respective sections of this document.
System Drive Mirroring (RAID-1) [recommended]#
The DGX B200/B300, DGX H100/H200, and DGX A100/A800 systems embed two system drives for mirroring the OS partitions (RAID-1). This ensures data resiliency if one drive fails. To enable mirroring, enable it during the drive configuration of the Ubuntu installation. It cannot be enabled after the installation.
Data Drive RAID-0 or RAID-5#
DGX systems are equipped with multiple data drives that can be configured as RAID-0 for performance or RAID-5 for resiliency. RAID-0 provides the maximum storage capacity and performance but does not provide any redundancy. If a single SSD in the array fails, all data stored on the array is lost.
RAID-0 is recommended for data caching. You can use cachefilesd to provide
caching for Network File System (NFS) shares. NFS is required to take
advantage of the cache file system. Use RAID-5 for persistent data
storage.
You have the option to configure RAID and data caching during the initial Ubuntu
installation, or after installation using the configure_raid_array.py script.
The configure_raid_array.py script is recommended for manual installation.
System Drive Encryption [optional]#
Root filesystem encryption is a software-based method to protect the content stored in the system partitions from unauthorized access by encrypting the data in real time. It requires you to unlock the filesystem on every boot, either manually by entering a passphrase or automatically using a centralized key server.
System drive encryption can only be enabled during the installation of Ubuntu.
Data Drive Encryption [optional]#
Data drive encryption is only supported on DGX B300, DGX B200, DGX H100/H200, and DGX A100
systems that are equipped with self-encrypting drives (SED). It can be enabled
after Ubuntu is installed using the nv-disk-encrypt tool. It requires either
storing the keys in the TPM or using external key management.
System Drive Partitioning#
Ubuntu uses only a single partition for the entire filesystem by default. This can be configured during the Ubuntu installation for deployments that require a more detailed partition scheme for security reasons. The recommended partitioning scheme is to use only a single partition for the Linux root partition with the ext4 filesystem.
Installing Ubuntu#
There are several methods for installing Ubuntu as described in the Ubuntu Server Guide.
For convenience, this section provides additional instructions that are specific to DGX for installing Ubuntu following the Basic Installation. If you have a preferred method for installing Ubuntu, skip this section.
Steps that are covered in this section:
Connecting to the DGX system
Booting from the installation media
Running the Ubuntu installer (including network and storage configuration steps)
Booting from the Installation Media#
During the installation and configuration steps, connect to the console of the DGX system. Refer to Connecting to the DGX System.
Boot the Ubuntu ISO image in one of the following ways:
Remotely through the baseboard management controller (BMC) for systems that provide a BMC
For instructions, refer to Installing the DGX OS Image Remotely Through the BMC.
Locally from a UEFI-bootable USB flash drive or DVD-ROM
For instructions, refer to Installing the DGX OS Image from a USB Flash Drive or DVD-ROM.
Running the Ubuntu Installer#
After booting the ISO image, the Ubuntu installer starts and guides you through the installation process.
Note
The screenshots in the following steps are taken from a DGX A100. Other DGX systems have differences in drive partitioning and networking.
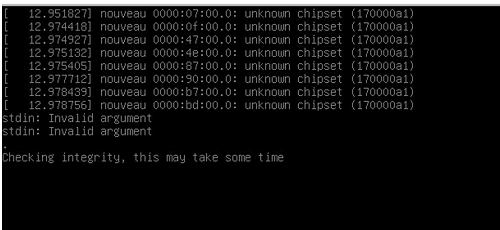
During the boot process of the ISO image, you might encounter some error messages due to older drivers, but they can be safely disregarded.
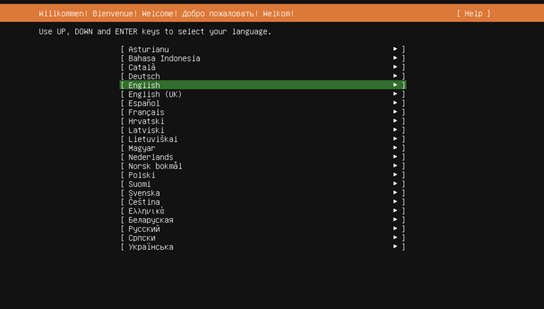
Select your language at the welcome screen, and then follow the instructions to select whether to update the installer (if offered) and to choose your keyboard.
At the Network connections screen, configure your network.
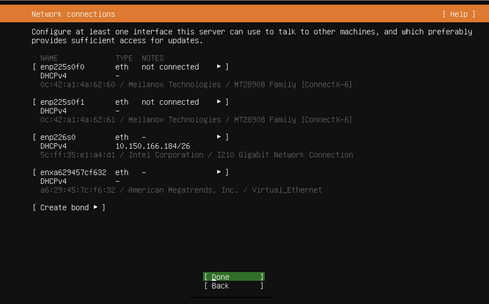
The installer tries to automatically retrieve a DHCP address for all network interfaces, so you can continue without any changes. However, you also have the option to manually configure the interfaces.
At the Guided storage configuration screen, configure the partitioning and file systems. All DGX systems are shipped preinstalled with DGX OS. The drives are, therefore, already partitioned and formatted. The DGX OS installer configures a single ext4 partition for the root partition in addition to the EFI boot partition. You have the following options:
Keep the current partition layout and formatting [recommended].
Create a custom partition scheme [advanced].
Use a single disk with the default Ubuntu partition scheme.
Creating a new custom partition scheme with a RAID configuration is a more involved process and is outside the scope of this document. Refer to the Ubuntu installation guide. When you choose the option to use an entire disk, Ubuntu uses only one of the two redundant boot drives.
Note
The RAID level for the data drive can be changed after the installation of Ubuntu.
The following instructions describe the steps for keeping the current partition layout. It still requires you to recreate and reformat the partitions.
Select Custom storage layout, and then select Done.
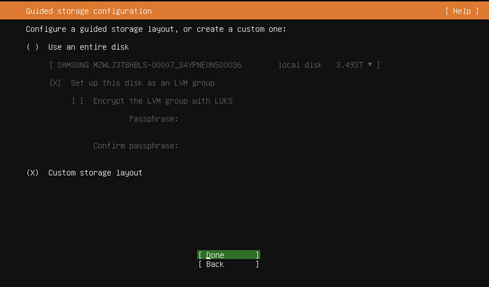
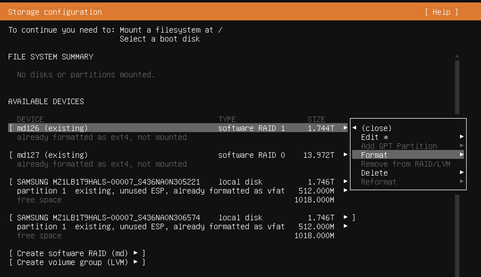
Identify the system drive.
The system drive on the DGX A100/A800, DGX H100/H200, and DGX B200/B300 systems is a RAID 1 array, and you can find it easily.
Select the system drive, and then select Format.
Set Format to
ext4.Do not select
Leave formatted as <filesystem>.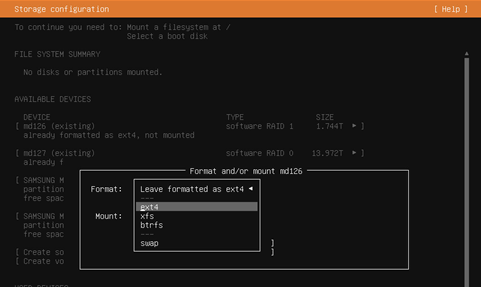
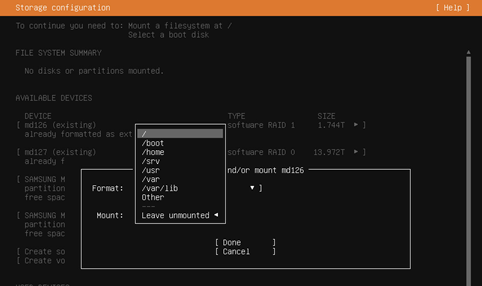
Set Mount to
/.
Set the boot flag on the raw devices.
Identify the system drives under
AVAILABLE DEVICES(not the RAID array) and selectUse as Boot Devicefor the first device. On DGX A100, DGX H100/H200, DGX B200, and DGX B300 systems that have two drives, repeat this process for the second drive and selectUse as Another Boot Device.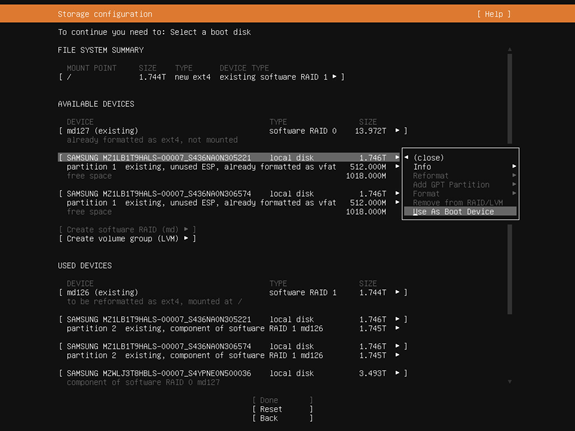
Complete the configuration.
RAID 0 array: In most cases, the RAID 0 array for the data drives is already created from the factory. If it has not been created, you can create the array either in the Storage Configurations dialog or by using the
configure_raid_array.pyscript after completing the Ubuntu installation.Optional: Enable drive encryption: Encryption can only be enabled during the Storage configuration; it cannot be changed after the installation. To change the encryption state again, reinstall the OS. To enable drive encryption, you have to create a virtual group and volume. This falls outside the scope of this document. Refer to the Ubuntu documentation.
Swap partition: The default installation does not define a swap partition. Linux uses any configured swap partition for temporarily storing data when the system memory is full, incurring a performance hit. With the large memory of DGX systems, swapping is not recommended.
The
FILE SYSTEM SUMMARYat the top of the page should display the root partition on the RAID 1 array and aboot/efipartition (the two drives show up as a single entry).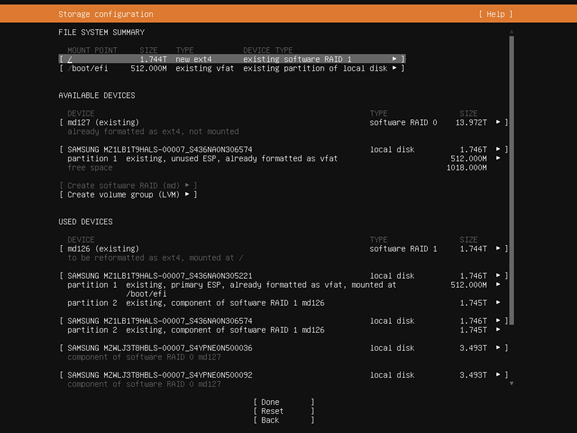
Select Done and accept all changes.
Follow the instructions for the remaining tasks.
Create a default user in the Profile setup dialog and choose any additional Snap packages you want to install in the Featured Server Snaps screen.
Note
Do not install Docker as a snap package. DGX OS installs
docker.io; installing Docker separately as a snap might cause conflicts with thenvidia-container-toolkitpackage.Wait for the installation to complete.
Log messages are presented while the installation is running.
Select Reboot Now when the installation is complete to restart the system.
After reboot, you can log in using the username and password for the user you created.
Installing the BaseOS Software#
This section requires that you have already installed Ubuntu on the DGX system and rebooted the system.
Attention
By installing the BaseOS software, you are confirming that you have read and agree to be bound by the NVIDIA Software License Agreement. You are also confirming that you understand that any pre-release software and materials available that you elect to install on a DGX may not be fully functional, may contain errors or design flaws, and may have reduced or different security, privacy, availability, and reliability standards relative to commercial versions of NVIDIA software and materials, and that you use pre-release versions at your risk.
Installing DGX System Configurations and Tools#
The NVIDIA BaseOS software includes system-specific configurations and tools to leverage the advanced DGX features. They are provided from NVIDIA repositories in the form of software packages that can be installed on top of a typical Ubuntu installation. All system-specific software components are bundled into metapackages specific to a system:
system-configurations
system-tools
system-tools-extra
For details about the content of these packages, refer to the Release Notes.
The following steps configure access to the NVIDIA and DGX repositories and install the system-specific packages.
Configure access to the NVIDIA and DGX repositories by extracting the repository information.
This archive adds the URIs, configuration preferences, and GNU Privacy Guard (GPG) keys required to install the BaseOS software. Download the archive with strict
curlflags before extracting it; do not process downloaded content directly as root.For x86_64 systems:
curl --proto '=https' --tlsv1.2 -fsSLo /tmp/dgx-repo-files.tgz \
  https://repo.download.nvidia.com/baseos/9/ubuntu/resolute/x86_64/dgx-repo-files.tgz
For ARM64 systems:
curl --proto '=https' --tlsv1.2 -fsSLo /tmp/dgx-repo-files.tgz \
  https://repo.download.nvidia.com/baseos/9/ubuntu/resolute/arm64/dgx-repo-files.tgz
Check the file contents:
tar tzf /tmp/dgx-repo-files.tgz
The output shows the following contents:
./usr/
./usr/share/
./usr/share/keyrings/
./usr/share/keyrings/nvidia-hpcsdk-archive-keyring.gpg
./usr/share/keyrings/cuda_debian_prod.gpg
./usr/share/keyrings/docker-key.gpg
./usr/share/keyrings/nvidia-doca-debian-gpg-public-key.gpg
./usr/share/keyrings/ai-workbench-desktop-key.gpg
./usr/share/keyrings/GPG-KEY-Mellanox.gpg
./usr/share/keyrings/dgx_debian_prod.gpg
./etc/
./etc/apt/
./etc/apt/sources.list.d/
./etc/apt/sources.list.d/dgx.sources
./etc/apt/sources.list.d/nvidia.sources
./etc/apt/preferences.d/
./etc/apt/preferences.d/nvidia-dgx
Verify that the archive contents match the expected repository files. If they do not, do not continue; confirm that the download command used matches the download command in the previous step and that the archive was not corrupted.
After verifying the archive contents, extract the archive and remove the temporary file:
sudo tar xzf /tmp/dgx-repo-files.tgz -C /
rm -f /tmp/dgx-repo-files.tgz
Update the APT package list to retrieve packages from the configured repositories.
sudo apt update
Recommended: Upgrade all software packages to the latest versions.
sudo apt upgrade
Install the DGX system tools and configurations.
Install core DGX system packages required for performance.
sudo apt install nvidia-system-core
Install the NVIDIA driver pinning package.
Replace
<driver-version>with the major driver version that matches the GPU driver listed in Current Software Versions for the DGX OS release that you are installing. For example, GPU driver595.91.07requiresnvidia-driver-pinning-595.sudo apt install nvidia-driver-pinning-<driver-version>
Install DGX system packages, such as automake, build-essential, and vim for development.
sudo apt install nvidia-system-extra
Install additional language packages.
sudo apt install nvidia-system-extra-localization
Install diagnostic tools.
sudo apt install nvidia-system-diag
Install NVIDIA system utility packages.
sudo apt install nvidia-system-utils
Install DGX-specific utilities that include the installation of the
nvidia-motdpackage.sudo apt install dgx-system-utils
If you are installing on a DGX workstation, install the DGX Station packages.
Install the DGX Station package set. The
nvidia-system-stationmetapackage installsnvidia-system-station-core, which includes the DGX Station GRUB customizer and core desktop software. Thenvidia-system-station-apps,nvidia-system-station-games, andnvidia-system-station-localizationpackages add desktop applications, games, and language support, respectively.sudo apt install nvidia-system-station nvidia-system-station-apps \ nvidia-system-station-games nvidia-system-station-localization
Install the DGX Station platform packages, if they are not already installed. The
nvidia-settingspackage provides the NVIDIA X Server Settings application. Thenvidia-xconfigpackage provides NVIDIA X configuration support. Thenv-docker-gpuspackage prevents Docker and containerd from accessing the system display GPU. Themlnx-nvme-dkmsandmlnx-nfsrdma-dkmspackages are DKMS packages that build the Mellanox NVMe peer-memory and NFS-over-RDMA kernel modules, respectively.sudo apt install nvidia-settings nvidia-xconfig nv-docker-gpus \ mlnx-nvme-dkms mlnx-nfsrdma-dkms
Install the
linux-toolspackage for your kernel.For x86_64 systems:
sudo apt install -y linux-tools-nvidia
Install the remaining packages commonly used by DGX OS.
Install
docker.io, which provides the Docker Engine for running containers.sudo apt install -y docker.io
Install
dracut, which generates the initial RAM filesystem (initramfs) used during system startup.sudo apt install -y dracut
Install
nvidia-modprobe, which loads NVIDIA kernel modules and creates NVIDIA device files when needed.sudo apt install -y nvidia-modprobe
Install
dpkg-dev, which provides Debian package development utilities for building and inspecting packages.sudo apt install -y dpkg-dev
Install the CUDA NVML development package. Replace
<cuda-major>and<cuda-minor>with the major and minor CUDA Toolkit versions listed in Current Software Versions for the DGX OS release being installed. For example, CUDA Toolkit13.3 Update 1requirescuda-nvml-dev-13-3.sudo apt install -y cuda-nvml-dev-<cuda-major>-<cuda-minor>
Install the NVIDIA Data Center GPU Manager (DCGM). Replace
<dcgm-major>with the major DCGM version and<cuda-major>with the major CUDA Toolkit version listed in Current Software Versions. Do not include the CUDA update number in either package name. For example, DCGM4.6.1and CUDA Toolkit13.3 Update 1requiredatacenter-gpu-manager-4-cuda13.sudo apt install -y datacenter-gpu-manager-<dcgm-major>-cuda<cuda-major>
For DGX servers, install the DGX server GRUB customizer.
sudo apt install dgx-server-grub
Recommended: Disable unattended upgrades.
Ubuntu periodically checks for security and other bug fixes and automatically installs updated software packages typically overnight. Because this can be disruptive, regularly check for updates and install them manually.
sudo apt purge -y unattended-upgrades
Configuring Data Drives#
The data drives in the DGX systems can be configured as RAID 0 or RAID 5. RAID 0 provides the maximum storage capacity and performance but does not provide any redundancy.
RAID 0 is often used for data caching. You can use cachefilesd to provide a
cache for NFS shares.
Important
You can change the RAID level later, but this destroys the data on those drives.
You can configure the RAID array during the Ubuntu installation. If you have already configured the RAID array during the Ubuntu installation, you can skip the first step and go to step 2.
Configure the
/raidpartition.All DGX systems support RAID 0 and RAID 5 arrays.
To create a RAID 0 array:
sudo /usr/bin/configure_raid_array.py -c -f
To create a RAID 5 array:
sudo /usr/bin/configure_raid_array.py -c -f -5
The command creates the
/raidmount point and RAID array and adds a corresponding entry in/etc/fstab.Optional: Install tools for managing the self-encrypting drives (SED) for the data drives on the DGX A100, DGX H100/H200, DGX B200, or DGX B300.
Refer to Managing Self-Encrypting Drives.
Optional: Configure NFS caching.
The
nvidia-tuned-profilespackage configurescachefilesdto use the/raidpartition. To configure an NFS mount to use this cache, follow the instructions in Configuring NFS Caching with cachefilesd.
Installing the GPU Driver and Platform Packages#
DGX OS supports only the qualified NVIDIA GPU driver of the BaseOS release. The following steps install the release-qualified NVIDIA open GPU driver and platform packages for this release. Do not select a different driver branch or independently upgrade individual GPU driver packages. For supported component versions, refer to Current Software Versions. When a newer supported driver becomes available, update the complete BaseOS software, including DOCA.
To install the GPU driver and platform packages:
Refresh the package list.
sudo apt update
Install the NVIDIA Linux kernel.
sudo apt install -y linux-nvidia
Install the NVIDIA open GPU driver and DGX platform packages.
sudo apt install -y \
  nvidia-open \
  libnvidia-nscq \
  nvidia-fabricmanager \
  nvidia-persistenced \
  nvidia-mig-manager \
  open-nvdebug \
  nvfwupd \
  nvsm
For DGX B200 and DGX B300 systems, install the NVIDIA Validation and Configuration Tool (NVVCT).
sudo apt install -y nvvct
Enable the NVIDIA Fabric Manager, the NVIDIA Persistence Daemon, and the DCGM systemd services:
sudo systemctl enable nvidia-fabricmanager nvidia-persistenced nvidia-dcgm
Reboot the system to load the drivers and to update system configurations.
Reboot the system.
sudo rebootAfter the system has rebooted, verify that the drivers have been loaded and are managing the NVIDIA devices.
nvidia-smi
The output should show all available GPUs and Persistence-Mode On:
+--------------------------------------------------------------------------------+
| NVIDIA-SMI <driver-ver>  Driver Version: <driver-ver>  CUDA Version: <CUDA-ver>|
|--------------------------------+-----------------------+-----------------------+
| GPU Name         Persistence-M | Bus-Id         Disp.A | Volatile Uncorr.  ECC |
| Fan Temp Perf    Pwr:Usage/Cap |          Memory-Usage | GPU-Util   Compute M. |
|                                |                       |                MIG M. |
|================================+=======================+=======================|
|   0  NVIDIA B200           On  | 000000000:1B:00.0 Off |                     0 |
| N/A   33C    P0   188W / 1000W |      0MiB / 183359MiB |   0%          Default |
|                                |                       |              Disabled |
+--------------------------------+-----------------------+-----------------------+
|   1  NVIDIA B200           On  | 000000000:43:00.0 Off |                     0 |
| N/A   34C    P0   190W / 1000W |      0MiB / 183359MiB |   0%          Default |
|                                |                       |              Disabled |
+--------------------------------+-----------------------+-----------------------+
...
+--------------------------------+-----------------------+-----------------------+
|   7  NVIDIA B200           On  | 000000000:DF:00.0 Off |                     0 |
| N/A   38C     P0  197W / 1000W |      0MiB / 183359MiB |   0%          Default |
|                                |                       |              Disabled |
+--------------------------------+-----------------------+-----------------------+
+--------------------------------------------------------------------------------+
| Processes:                                                                     |
| GPU   GI   CI          PID     Type      Process name               GPU Memory |
|       ID   ID                                                       Usage      |
|================================================================================|
| No running processes found                                                     |
+--------------------------------------------------------------------------------+
Note
DGX OS supports GPU driver updates only as part of an upgrade to a newer BaseOS release. When a BaseOS release that includes a newer supported GPU driver is available, follow Upgrading BaseOS Using the CLI to upgrade DGX OS to that release.
Installing the DOCA-OFED Package#
DGX systems include high-performance network cards to connect to other systems over InfiniBand or Ethernet. The NVIDIA DOCA™ OFED software provides the same functionality as MLNX_OFED, including kernel drivers, user space libraries, and management tools for NVIDIA networking products. For more information about what DOCA-OFED is, refer to DOCA Framework Guide. For more detailed information about installing DOCA, refer to the NVIDIA DOCA Installation Guide for Linux.
Install NVIDIA DOCA-OFED from the NVIDIA and DGX repositories configured in Installing DGX System Configurations and Tools, then install the DOCA-OFED and supporting MLNX driver packages. These steps match the DOCA-OFED repository, package, and MLNX service configuration performed by the DGX OS ISO installation.
Refresh the package list.
In Installing DGX System Configurations and Tools, extracting
dgx-repo-files.tgzinstalls the repository source files, signing keys, and APT preferences.Refresh the package list to retrieve package information from the configured NVIDIA and DGX repositories.
sudo apt update
Install DOCA-OFED and the supporting MLNX driver packages.
The
doca-ofedmetapackage installs DOCA-OFED and its dependencies. Thenvidia-system-mlnx-driversmetapackage installs DGX-specific MLNX driver packages.sudo apt install -y nvidia-system-mlnx-drivers doca-ofed
For DGX B200 and DGX B300 systems, install the remaining platform packages.
The packages provide CollectX bring-up diagnostics, the NVSwitch Device Monitoring (NVSDM) library, and the NVLink Subnet Manager (NVLSM), respectively.
sudo apt install -y \
  collectx-bringup \
  libnvsdm \
  nvlsm
Configure the MLNX services.
If you plan to PXE boot from an NVIDIA ConnectX adapter on a DGX A100/A800, DGX H100/H200/H800, or DGX B200/B300 system, run
mlnx_pxe_setup.bashto configure the MLNX PXE environment.sudo mlnx_pxe_setup.bashEnable the OpenIB service, which configures the installed NVIDIA ConnectX adapters and their InfiniBand drivers at system startup.
sudo systemctl enable openibd.service
To verify that the OpenIB service completed the adapter and driver startup configuration successfully, run:
sudo systemctl status openibd.service
The OpenIB service performs its configuration and then exits. A status of
active (exited)withstatus=0/SUCCESSindicates successful configuration.Disable services that are not enabled by the ISO.
sudo systemctl disable srp_daemon.service srptools.service
Configuring Docker and the NVIDIA Container Toolkit#
Containers provide isolated environments with a full filesystem of the required software for specific applications. To use the NVIDIA-provided containers for AI and other frameworks on the DGX system and GPUs, configure Docker and the NVIDIA Container Toolkit. They provide GPU access to software running inside the container.
These tools are also required by the Firmware Update Containers for upgrading the system firmware.
Configure Docker to use the NVIDIA Container Runtime, then restart Docker.
The preceding system package installation installs
docker.io. Thenvidia-system-utilsmetapackage installsnvidia-container-toolkit. Run the following commands to configure Docker to use the NVIDIA Container Runtime and restart Docker to apply the change.sudo nvidia-ctk runtime configure --runtime=docker
sudo systemctl restart docker
To validate the installation, run a container and check that it can access the GPUs. The following instructions assume that the NVIDIA GPU driver has been installed and loaded.
Note
This validation downloads a container image and requires that the system has internet access.
Run
nvidia-smiin a CUDA container.Select a published
nvidia/cudaimage tag from the NVIDIA CUDA container image tags. An image tag is the version-specific identifier after the colon in a container image name, such as13.2.0-base-ubuntu24.04innvidia/cuda:13.2.0-base-ubuntu24.04.Select an image whose CUDA runtime version is supported by the installed NVIDIA driver. The CUDA version shown by
nvidia-smiis the maximum CUDA version supported by that driver.Run the following command, replacing the placeholders with values from the image tag you selected:
In the command, replace
<cuda-version>with the CUDA runtime version in the image tag, such as13.2.0, and replace<ubuntu-version>with the Ubuntu release in the image tag, such as24.04. These placeholders are not literal values.sudo docker run --rm --gpus all nvidia/cuda:<cuda-version>-base-ubuntu<ubuntu-version> nvidia-smi
For example:
sudo docker run --rm --gpus all nvidia/cuda:13.2.0-base-ubuntu24.04 nvidia-smi
Verify that the output shows all available GPUs and has Persistence-Mode set to On.
Installing the NVIDIA System Management (NVSM) Tool [Recommended]#
The NVIDIA System Management (NVSM) is a software framework for monitoring NVIDIA DGX nodes in a data center. It allows you to get a quick system health report and is typically required by the NVIDIA support team to resolve issues.
The following steps configure NVSM.
The system package installation in Installing DGX System Configurations and Tools should install NVSM. If the
nvsmpackage is not installed, run:sudo apt install -y nvsm
The
dgx-system-utilsmetapackage installed earlier includesnvidia-motd, which configures the message-of-the-day (MOTD) with NVSM health monitoring alerts and release information.The package enables the
60-nvidia-healthMOTD hook, which summarizes NVSM alerts, and the00-header-nvidiahook, which reads release information from/etc/dgx-release. To preview the resulting MOTD, run:sudo run-parts /etc/update-motd.d
To display details for any NVSM alerts reported in the MOTD, run:
sudo nvsm show alerts
Additional Software Installed By DGX OS#
The Ubuntu and the NVIDIA repositories provide many additional software packages for a variety of applications. The DGX OS Installer, for example, installs several additional software packages that are not installed by default to aid system administration and developers.
To match the additional software included with a DGX OS ISO installation, install the following packages.
Install any remaining software for system administration tasks:
gdiskmanages GUID Partition Table (GPT) partition tables.sysstatcollects and reports system performance statistics.These packages might already be installed by Ubuntu or as dependencies of a previously installed package. If so, the following APT command reports that these packages are already installed and makes no changes.
sudo apt install -y gdisk sysstat
Install additional software for development tasks:
gcc-multilibandg++-multilibprovide support for building 32-bit C and C++ applications on 64-bit systems. On x86_64, they also provide support for the x32 ABI.sudo apt install -y gcc-multilib g++-multilib
You can install NVIDIA tools from the NVIDIA CUDA Developer repository, including the Compute Unified Device Architecture (CUDA) Toolkit, the NVIDIA CUDA Deep Neural Network library (cuDNN), and the NVIDIA Collective Communications Library (NCCL).
Next Steps and Additional Information#
For further installation and configuration options, also refer to these chapters:
Installing Additional Software - installing additional software
Network Configuration - additional network options and configurations
Data Storage Configuration - RAID configurations and encryption information
Running NGC Containers - running NGC containers on the system