Flashing AURIX
This topic provides instructions for flashing AURIX for NVIDIA DRIVE™ PX 2 platforms.
Note: | The use of AURIX is intended for system evaluation, and development debugging and sanity checking purposes only. |
Note: | From this release onwards, although the firmware binaries differ for AutoChauffeur and AutoCruise platforms, the AURIX firmware version is unified and the same. To make this distinction, the firmware version starts with a new series of 4.00.00. |
Upgrading the Firmware on Windows
The AURIX firmware is programmed into the chip at the factory. However the firmware can be upgraded in the field as new versions become available.
The AURIX firmware version released with the DRIVE PX 2 SDK is found in the SDK Release Notes.
For detailed information on flashing the AURIX firmware see the Elektrobit EB-DRIVE PX-BSL Users Guide for the EB TriLoad BootStrap Loader available in PDF format in the Elektrobit ZIP archive at:
• For NVIDIA DRIVE™ PX 2 (P2379)
$HOME/nvidia/nvidia_sdk/DRIVE/Linux/5.0.10.3/[OS|OSPDK]/Drive[SDK|PDK]/drive-t186ref-foundation/utils/scripts/DPX2-P2379-EB-V4.02.04_release.zip
• For NVIDIA DRIVE™ PX 2 (P3407)
$HOME/nvidia/nvidia_sdk/DRIVE/Linux/5.0.10.3/[OS|OSPDK]/Drive[SDK|PDK]/drive-t186ref-foundation/utils/scripts/DPX2-P3407-EB-V4.02.04_release.zip
• For DRIVE PX 2 AutoCruise, the run file is at:
drive-t186ref-foundation-5.0.10.3-<
build>-p3407specific.run
• For DRIVE PX 2 AutoChauffeur, the run file is at:
<top>/drive-t186ref-foundation-5.0.10.3-<build>-p2379specific.run
Prerequisites
Note: | Flashing the AURIX firmware requires a PC running Microsoft Windows. |
Flashing the AURIX firmware requires:
• A Windows host system to execute the Elektrobit TriLoad.bat flash programming utility
• The Elektrobit release package which contains:
• The AURIX firmware
• Flash programming utilities
• Documentation
The Elektrobit release package is installed by DriveInstall on the Ubuntu host, and is in the DriveInstall installation directory.
Configuring the Windows COM Port
A Windows COM port is required to communicate to AURIX and reprogram the firmware.
To establish a COM port connection
1. Unplug all other serial USB devices from the Windows host system to simplify the identification of COM ports.
2. Connect a USB cable between the Windows system and the NVIDIA DRIVE™ PX 2 debug USB port.
3. Open the Device Manager Control Panel and expand the Ports (COM & LPT) navigation tree.
A list of the COM ports is displayed. The list contains at least 8 USB Serial COM ports when DRIVE PX 2 is connected.
4. Using a Windows terminal program such as Putty, attempt to establish a connection to each of the COM ports.
The terminal configuration must use the following settings:
• 115200 baud
• 8 bits
• no parity
• 1 stop bit
• no flow control
The AURIX console will generally be the second USB Serial COM port in the ports tree.
5. After connecting, press ENTER in the terminal window.
A shell prompt is displayed when you are connected to the AURIX console.
6. Disconnect the terminal program when you have determined the correct COM port.
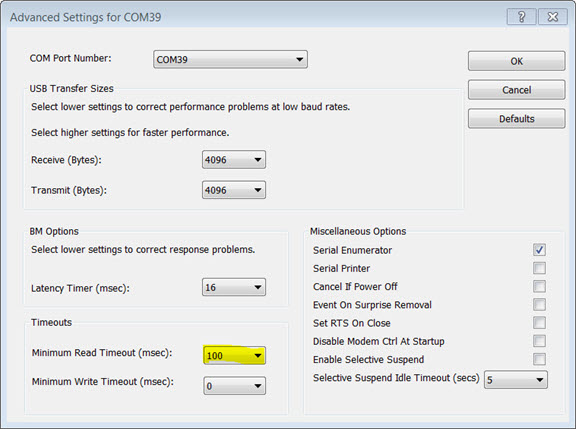
Setting the Minimum Read Timeout
For proper flash programming communication, the COM port Read Timeout must be lengthened.
To lengthen the COM port Read Timeout
1. Right click on the COM port you identified above in the Device Manager port list, and then select Properties.
2. Navigate to the Port Settings tab and select the Advanced button.
3. In the Advanced Settings window, select the drop-down menu for Minimum Read Timeout (msec) and change the timeout to 100 msec.
4. Click OK to close the Advanced Settings Window, and then click OK again to close the Properties window.
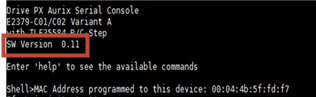
Determining the Installed Version
Determine which AURIX version is currently installed with the following procedure.
To determine the AURIX version currently installed
2. At the prompt, enter the “version”.
Setting Up the Elektrobit Software on Windows Host
Follow the steps below to set up the Windows Host.
To set up the Windows Host
1. Copy the following Elektrobit release files from the Ubuntu host system to your Windows host system.
The Elektrobit files are located at:
• For NVIDIA DRIVE™ PX 2 (P2379)
<
top>/drive-t186ref-foundation/utils/scripts/DPX2-P2379-EB-V<aurix_fw_version>_release.zip
• For NVIDIA DRIVE™ PX 2 (P3407)
<
top>/drive-t186ref-foundation/utils/scripts/DPX2-P3407-EB-V<aurix_fw_version>_release.zip
2. Optionally, replace the AURIX firmware HEX file.
• For DRIVE PX 2 (P3407), the HEX firmware is located at:
<Elektrobit_release_folder>/bin/EB-DrivePX-Aurix
• For DRIVE PX 2 (P2379), the HEX firmware is located at:
<Elektrobit_release_folder>/bin/EB-DrivePX-Aurix
This contains HEX firmware that will be flashed into AURIX. This folder initially contains the AURIX firmware delivered with the DRIVE PX 2 SDK. To update the firmware to a different version than was delivered with the SDK, replace this HEX file.
Flashing the AURIX Firmware
Flash the AURIX firmware with the procedure in this topic.
To flash the firmware
1. On the Windows system, navigate to the location of the AURIX flashing script:
<aurix_version>/bin/EB-DrivePX-BSL
2. With a text editor, open Triload.bat and modify it as follows:
set uart_comport=COM39
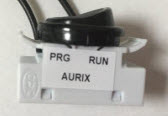
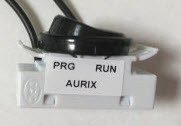
3. Place the AURIX switch into programming (PRG) mode.
The AURIX UART flashing switch on the vehicle harness enables AURIX firmware programming.
The PRG mode is also referred to as ASC bootloader mode.
Note: | The flashing switch is only evaluated by AURIX at power-up. |
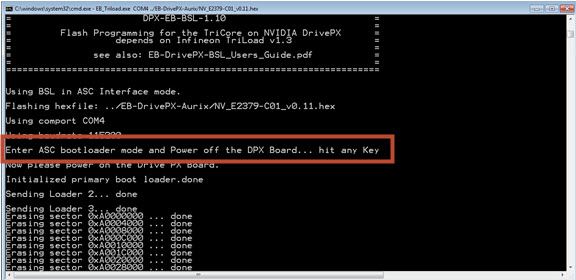
4. To flash the main Aurix FW, launch the Triload.bat script. For example, by double-clicking the file in the Windows Explorer window.
The following console window opens.
5. When prompted, power off the DRIVE PX 2 platform and follow the instructions on the screen.
The program starts flashing the AURIX. This may take 2-3 minutes. Once completed, the AURIX and Tegra devices are booted.
6. To flash the update Aurix FW, launch the Triload_update.bat script. For example, by double-clicking the file in the Windows Explorer window.
A similar console window opens.
7. When prompted, power off the DRIVE PX 2 platform and follow the instructions on the screen.
The program starts flashing the AURIX. This may take 2-3 minutes. Once completed, the AURIX and Tegra devices are booted.
8. Set the AURIX switch to the RUN position.
After flashing is complete, the AURIX UART flashing switch must be set to the RUN position to prevent AURIX from re-entering programming mode at the next DRIVE PX 2 power-up cycle.
9. Optionally, check the new AURIX firmware version by connecting to the AURIX console using a terminal program and entering the command version. Or, power cycle the DRIVE PX 2 platform to view the installed firmware version.
Flashing the AURIX Firmware OTA Update
You can update both the AURIX EB and UPDATE firmwares using the Windows-based flashing tool or using the Over-the-Air (OTA) update feature. Using the OTA feature, both AURIX firmwares can be updated from Tegra. This feature is supported starting with AURIX EB firmware version 1.03.00 for ACH and 1.XX for ACR.
Note: | For ACH and ACR, this release is not backward compatible with older release AURIX firmware (versions < 2.02.04) and vice-versa. |
Prerequisites
It is necessary to update AURIX firmware from the Windows host if it has older firmware than v1.01.03 (P3407) or v1.03 (P2379). To do this, you must flash two firmware files on AURIX for each NVIDIA DRIVE
™ PX 2 system. First, the latest EB firmware must be flashed, then the update firmware must be flashed, as described in
Flashing the AURIX Firmware below.
Flashing the AURIX Firmware For Linux OS
This release includes a systemd service nv_aurix_check_fw, which checks the AURIX firmware version on boot. If the EB firmware is already the latest version, it displays a corresponding message at the console and masks itself. If the EB firmware version is old and needs to be updated, it automatically updates the EB and Update firmware. The system reboots twice during this update.
Once the AURIX firmware is updated to latest firmware version, the nv_aurix_check_fw service masks itself.
If you want this service to check the firmware version again, enter:
sudo /bin/bash /etc/systemd/scripts/nv_aurix_check_fw.sh
To manually update the AURIX firmware using the Tegra side application, use the following procedure:
Checking the AURIX firmware version on boot
1. For ACH, the nv_aurix_check_fw script only runs on Tegra A.
2. For ACH, ensure that the eth0.200 interface is setup and the communication between Tegra and AURIX using Ethernet is functional. For ACR, ensure that SPI-TP daemon is running and spi communication between Tegra and AURIX is functional
3. Ensure that both Elektrobit AURIX firmware and UPDATE firmware files are in the root filesystem.
The name of the AURIX firmware must follow the naming convention:
DRIVE-V5.0.10.3-<platform>-EB-Aurix[-With3LSS][-UPDATE]-<major-no>.<minor-no>.<revision>.hex
DRIVE-V5.0.10.3-<platform>-NV-Aurix[-UPDATE]-<major-no>.<minor-no>.<revision>.hex
Where:
• <major-no> contains a 1 numeric digit long
• <minor-no> contains a 2 numeric digit long
• <revision> contains a 2 numeric digit
• <platform> is P2379 for ACH and P3407 for ACR
Parts within [] are optional.
The name of UPDATE firmware is similar to the above with the UPDATE keyword.
See the SDK Release Notes for information on the AURIX FW version included in the current release.
Updating the Firmware Manually
Update the firmware with the following command.
• For ACH:
sudo /bin/bash /etc/systemd/scripts/nv_aurix_check_fw.sh -auto_update
• For ACR:
sudo /bin/bash /etc/systemd/scripts/nv_aurix_check_fw.sh -auto_update
Where EB and Update firmware is present in the root filesystem at the default path (/lib/firmware/).
<update_fw_file_path> is the path to the UPDATE firmware in the root file system. The default path is /lib/firmware/*<platform>-Aurix-UPDATE -*.
This first compares the firmware version between the already flashed version and the one placed in rootfs. It updates the firmware only when you have a higher firmware version in rootfs. The command resets the Tegra device. When the Tegra device boots again, rerun the command. This resets the Tegra device a second time. After two resets, the AURIX EB firmware is updated.
Run the command above for a third time to update UPDATE firmware. nv_aurix_update always checks first for the EB firmware to be the latest. Once EB firmware is updated to the latest, it checks for UPDATE firmware version and updates if it is required.
Auto invocation of this script is disabled after printing the status update following the next boot or if the command above is executed four times.
Note: | The AURIX flashing program/erase cycle is only around 1000. To avoid wear on the AURIX flash components, flash the firmware only when necessary. |
Note: | The AURIX EB and UPDATE firmwares update requires a maximum of two Tegra resets, and 3 invocations of nv_aurix_update app. |
Note: | For ACH (P2379), before updating EB and UPDATE firmwares from Tegra, the network cable must be removed as the previously released firmwares don’t have VLAN solution implemented. Once updated to the latest, you can plug the network cable back. |