Image USB Camera Capture (nvmimg_usbcap)
This sample demonstrates how to capture frames from UVC compliant USB camera nodes and render to a display using EGLStreams.
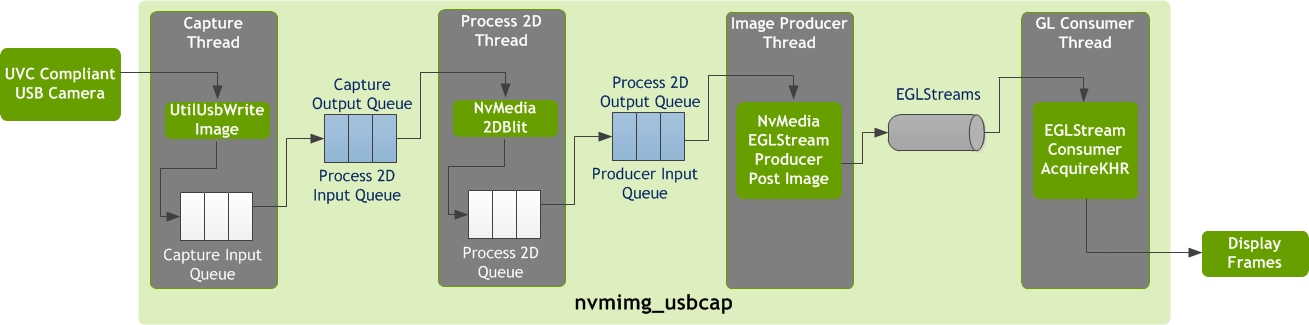
The NvMedia Image USB Camera Capture sample application nvmimg_usbcap captures frames from UVC compliant USB camera nodes and renders to a display using EGLStreams. It operates by acquiring the buffers from the UVC driver and copies them to create an NvMediaImage buffer. This buffer is mapped to GL using EGLStreams.
The following provides the pipeline structure of the application.
Features
The USB Camera Capture application requirements are as follows:
• USB cameras are supported that can capture the input frames in YUYV format.
• GL consumer is supported for input buffers mapped to GL textures.
• Saving of captured frames is supported in RGBA format even if the output surface format is 420p.
Components
The sample application consists of three components:
• Capture
• Process2D
• Interoperability for Producer and Consumer
Each component is spawned as an individual thread.
Besides these components, a main thread is also running. The main thread processes the command line option and creates threads for all components. After all threads start running, the main thread keeps polling the status variable quit. The status variable is set by the event handler when the user quits the application, by pressing CTRL+C, or if a fatal error occurred. If the global status variable is set, the main thread stops all threads and release resources.
Capture
The capture component is responsible for acquiring the frames from the UVC compliant USB camera connected to the target. It consists of input and output queues.
The input queue contains the allocated NvMediaImage buffers that hold the captured input frames.
The output queue is connected to the input of the Process2D component.
During a capture, the frames are copied from v4l2 buffers onto NvMediaImage buffers and placed in the output queue for Process2D consumption.
The following code snippet shows how to setup and use the USB camera capture component.
/* initialize the config before calling capture init */
captureDevice = UtilUsbSensorInit (config);
/* get the updated width, height and format set by USB driver */
updatedWidth = config->width;
updatedHeight = config->height;
updatedFormat = config->fmt;
/* create NvMedia device */
device = NvMediaDeviceCreate ();
/* create a NvMediaImage for holding the captured frame */
capImage = NvMediaImageCreate (device,
inputSurfType,
NVMEDIA_IMAGE_CLASS_SINGLE_IMAGE,
1,
updatedWidth,
updatedHeight,
inputSurfAttributes,
&inputSurfAdvConfig);
/* start capture */
ret = UtilUsbSensorStartCapture (captureDevice);
while(1) {
/* read image from USB camera sensor */
ret = UtilUsbSensorGetFrame (captureDevice,
capImage,
GET_FRAME_TIMEOUT);
}
/* stop capture */
ret = UtilUsbSensorStopCapture (captureDevice);
/* capture deinit */
ret = UtilUsbSensorDeinit (captureDevice);
/* destroy NvMedia device */
NvMediaDeviceDestroy (device);
Process 2D
The Process2D component converts the color format of the captured input NvMediaImage buffers to a given output surface format suitable for mapping to GL. It consists of three queues:
• Input queue: connected to the output queue of the capture to receive the captured frames.
• Process2D queue: contains the allocated NvMediaImage buffers that hold the color format converted captured frames.
• Output queue: connected to the input of the Image Producer component.
During capture, the captured frames are converted using NvMedia2DBlit engine, and the processed frames are placed in the output queue for Image Producer consumption. The captured frames are then released back to the capture queue.
The output surface format can be set by the user through the command line options.
The following code snippet shows how to setup and use the Process2D component.
/* create NvMedia device */
device = NvMediaDeviceCreate ();
/* create the i2D handle for 2D processing */
i2d = NvMedia2DCreate (device);
/* create a NvMediaImage for holding the processed frame */
procImage = NvMediaImageCreate (device,
outputSurfType,
NVMEDIA_IMAGE_CLASS_SINGLE_IMAGE,
1,
updatedWidth,
updatedHeight,
outputSurfAttributes,
&outputSurfAdvConfig);
/* initialize the 2DBlit params before calling NvMedia2DBlit */
while(1) {
ret = NvMedia2DBlit (i2d,
procImage,
dstRect,
capImage,
srcRect,
blitParams);
}
/* destroy the i2D handle */
NvMedia2DDestroy (i2d);
/* destroy NvMedia device */
NvMediaDeviceDestroy (device);
Interoperability
Interoperability comprises of two components:
• Image Producer: receives the NvMediaImage buffers from the Process2D and sends it to the GL consumer through EGLStreams.
• GL Consumer: acquires the frames and renders the to the display.
Upon rendering, the consumer releases the frame back to the producer, which then releases them back to the Process2D queue.
The following code snippet shows how to setup and use the Image Producer and GL consumer interoperability components.
/* create NvMedia device */
device = NvMediaDeviceCreate ();
/* initialize access to the display system */
display = eglGetPlatformDisplayEXT (EGL_PLATFORM_DEVICE_EXT,
(void*)availDisplays[0],
NULL);
/* initialize EGL and window system resources */
eglStatus = eglInitialize (display, 0, 0);
/* create eglstream and set its attributes */
eglStream = eglCreateStreamKHR (display, fifoMode);
/* create EGL surface for the consumer */
surface = eglCreateWindowSurface (display,
config,
(NativeWindowType)XWindow,
srfAttrs);
/* create an EGL context */
context = eglCreateContext (display,
config,
NULL,
ctxAttrs);
/* make the context and surface current for rendering */
eglStatus = eglMakeCurrent (display,
surface,
surface,
context);
/* setup the GL and connect the GL Consumer textures to eglstream */
eglStreamConsumerGLTextureExternalKHR (display, eglStream);
/* connect the Image Producer to the eglstream */
producer = NvMediaEglStreamProducerCreate (device,
display,
eglStream,
outputSurfType,
updatedWidth,
updatedHeight);
/* Producer Thread */
while(1) {
/* post image to eglstream */
status = NvMediaEglStreamProducerPostImage (producer,
procImage,
&timeStamp);
/* get back image from the eglstream */
status = NvMediaEglStreamProducerGetImage (producer,
&releaseImage,
100);
}
/* consumer thread */
while(1) {
/* pull in fresh texture */
eglStreamConsumerAcquireKHR (display, eglStream);
/* Render the texture */
glDrawArrays (GL_TRIANGLE_STRIP, 0, 4);
/* post EGL buffer to native window */
eglSwapBuffers (display, surface);
}
/* release the consumer */
eglStreamConsumerReleaseKHR (display, eglStream);
/* destroy the producer */
NvMediaEglStreamProducerDestroy (producer);
/* destroy eglStream */
eglDestroyStreamKHR (display, eglStream);
/* destroy the EGL context */
eglStatus = eglDestroyContext (display, context);
/* destroy the EGL surface */
eglStatus = eglDestroySurface (display, surface);
/* terminate EGL */
eglStatus = eglTerminate (display);
/* terminate access to the display system and release window system resources */
Command Line Usage
Use the following command to run the sample.
To run the USB Image Camera Capture sample application
• Run the following command:
./nvimg_usbcap [options]
The following table shows the command line options.
Option | Parameter | Description | Default Settings |
-dev | <path> | Specifies the device path of the USB camera node connected. The available camera nodes connected to the target are listed during runtime. | Default: /dev/video0 |
-fr | <wxh> | Specifies the width and height of the imaged to be captured. | Default: 960x720 |
-ot | <type> | Specifies the output surface type suitable for mapping to GL. Possible types include: 420p rgba | Default: 420p |
-wpos | [x:y] | Specifies the window start position. | Default start position: 0:0 |
-s | <file> | Saves the displayed frames to a file. | Default: Frames are not saved to the file. |
-d | [id] | Specifies the display ID. | N/A |
-h | N/A | Prints the usage syntax. | N/A |
-v | N/A | Shows verbose output. | N/A |
Troubleshooting
Users of this application have encountered the following issues.
UtilUsbSensor Device Open Fails
The error message is as follows:
./nvmimg_usbcap
nvmedia: ERROR: UtilUsbSensor Device open failed
nvmedia: ERROR: UtilUsbSensor open failed
nvmedia: ERROR: CaptureInit: Failed to create image capture context
If there are no cameras connected, the error message is as follows:
No capture devices found
The connected USB camera cannot be opened. Possible causes include:
• The kernel may not be built with UVC device support. Verify that you are able to see the video0 directory in /dev/ after the USB camera is connected.
• The camera may not be connected.
Device Busy Retrying
This issue is encountered if the capture has been initiated, but the device is not ready to capture the frames.
A possible cause is the device is taking some time to initialize. A few seconds after capture is started, the frames get captured.
ERROR: X Failed to Open Display
The error message is as follows:
nvmedia: ERROR: Error in VIDIOC_S_FMT: Device or resource busy
This error is encountered if the X server was not started before running the application. Verify that the Xserver is running in the background.
To run the X server
• Invoke the following commands:
startx &
export DISPLAY=:0
Example Commands
The following examples represent commonly used commands.
To capture 640x480 input frames
• Run:
./nvmimg_usbcap -fr 640x480
To capture default resolution input frames with RGBA output surface type
• Run:
./nvmimg_usbcap -ot rgba
To capture input frames and save to a file
• Run:
./nvmimg_usbcap -fr 960x720 -ot 420p -s cameradump.rgba
To capture input frames from the second camera (if two cameras are connected)
• Run:
./nvmimg_usbcap -dev /dev/video2 -fr 960x720
By default /dev/video0 node is present, therefore the first camera is video1 node. For the second camera node use video2 or higher.