Setting Up a Development Environment
This topic provides instructions to set up a development environment consisting of a Linux host system and a DRIVE PX 2 platform. The Linux system is the host system and the DRIVE PX 2 platform is the target system.
Prerequisites
• A Linux host system.
• NVIDIA DRIVE™ Foundation SDK installed on the host system. This is required to access to the DRIVE PX 2 toolchain.
• NVIDIA DRIVE™ Linux SDK installed on the host system. This is required to access the target libraries and headers required to cross-compile target software.
• CUDA installed on the host system.
Types of Cross-Compilation Workflow
To cross-compile target software you must set up one of these types of workflow:
• A complete cross-compilation workflow using Ubuntu MultiArch. Use this method if you do not have access to a DRIVE PX 2, or you share one with other users.
• A hybrid workflow that uses the host system and a DRIVE PX 2 mounted over NFS. Use this method if you have a DRIVE PX 2 of your own.
Note: | You do not need to set up either type of workflow to cross-compile the kernel. |
Complete Cross-Compilation Workflow
In this workflow, use the DRIVE PX 2 toolchain to build arm64 binaries on the host system, then download the binaries to a target for execution.
To set up a complete cross-compilation workflow
1. List the properties of the currently supported architecture on your host system:
$ dpkg --print-foreign-architectures
i386
aarch64
2. If arm64 is not in the list, run the following command.
sudo dpkg --add-architecture arm64
3. List the properties of the architecture again. The list now includes arm64:
$ dpkg --print-foreign-architectures
i386
aarch64
arm64
4. Use sudo and a text editor to create a file that defines the Ubuntu ports for arm64. The file must be stored in the following directory.
/etc/apt/sources.list.d/
5. Use the following name for the filename.
arm64-xenial.list
Ensure the file contains the following definitions:
deb [arch=arm64] http://ports.ubuntu.com/ubuntu-ports/ xenial main restricted
deb-src [arch=arm64] http://ports.ubuntu.com/ubuntu-ports/ xenial main restricted
deb [arch=arm64] http://ports.ubuntu.com/ubuntu-ports/ xenial-updates main restricted
deb-src [arch=arm64] http://ports.ubuntu.com/ubuntu-ports/ xenial-updates main restricted
deb [arch=arm64] http://ports.ubuntu.com/ubuntu-ports/ xenial universe
deb-src [arch=arm64] http://ports.ubuntu.com/ubuntu-ports/ xenial universe
deb [arch=arm64] http://ports.ubuntu.com/ubuntu-ports/ xenial-updates universe
deb-src [arch=arm64] http://ports.ubuntu.com/ubuntu-ports/ xenial-updates universe
deb [arch=arm64] http://ports.ubuntu.com/ubuntu-ports/ xenial multiverse
deb-src [arch=arm64] http://ports.ubuntu.com/ubuntu-ports/ xenial multiverse
deb [arch=arm64] http://ports.ubuntu.com/ubuntu-ports/ xenial-updates multiverse
deb-src [arch=arm64] http://ports.ubuntu.com/ubuntu-ports/ xenial-updates multiverse
6. On the host system, update the list of available packages.
sudo apt-get update
7. Install the arm64 libraries:
sudo apt-get install <package>:arm64
Where <package> is the name of the arm64 package.
sudo installs the libraries on the host system in the directory /usr/lib/aarch64-linux-gnu/.
Hybrid Cross-Compilation Workflow Using NFS
In this workflow, the target mounts the file system on the host over a network. This gives the host direct access to the target file system, including the arm64 libraries. The toolchain uses this access to store the arm64 binary directly on the target.
The target file system is mounted on the host at:
<
top>/drive-t186ref-linux/targetfs/
Where <top> is the directory where the SDK is installed.
To set up a hybrid cross-compilation workflow
1. Use the Ethernet cable on the harness to connect DRIVE PX 2 to the Ethernet port on the host system.
Do not use a shared Ethernet port, such as the port that connects the host system to the Internet.)
2. Connect the USB cable from the host system to the Tegra A or Tegra B port on the DRIVE PX 2, depending on which CPU you want to configure for NFS.
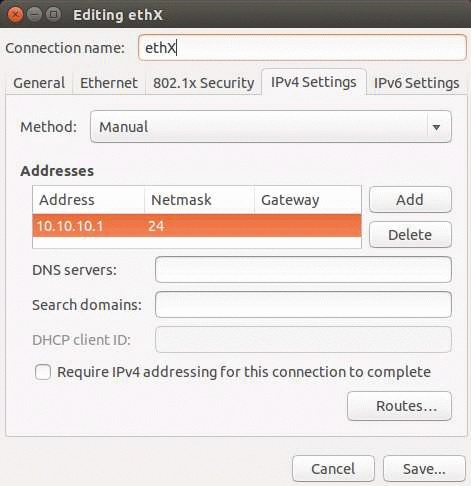
4. Use the Network Connections application on the host system to configure the host interface that is connected to your target with a static IP address:
• Method: Manual
• Address: 10.10.10.1
• Netmask: 24
5. Specify the location where the target file system is to be mounted on the host system.
6. On the target system, set the NFS server.
7. Update the NFS server by running the command:
sudo exportfs -a
8. Configure the DHCP server.
9. Make a working copy of the bootburn configuration file and modify the os_args declaration to replace the device name eth0 with usb0.
The modified declaration is as follows:
os_args="root=/dev/nfs nfsdev=usb0 console=ttyS0,115200n8"
10. Using the AURIX console, consult the instructions in
Flashing to put the Tegra processor into recovery mode.
11. Use the instructions provided in
Flashing and Using the Board to re-flash the DRIVE PX 2 Tegra
processor (Tegra A or Tegra B, whichever you want to configure for NFS).
12. Once re-flashed, set the recovery mode off and power cycle DRIVE PX 2.
Note: | If you later want to revert to the SDMMC file system, reflash the Tegra processor with the following command: ./bootburn.sh -b <TBD_board_and_rev> -s The -s option directs bootburn to skip flashing the file system. |
13. After you power-cycle the Tegra the target displays the following message on its console, followed by a command prompt. This confirms that the Tegra is booting on the NFS file system:
Sending DHCP request for ip and root-path ...
nfsroot path = 10.10.10.1:<top>/drive-t186ref-linux/targetfs
14. When the command prompt appears, enter the following commands to configure the target file system:
./drive-setup.sh install-run-once-pkgs
reboot
The target reboots and installs additional packages in the background. This process can take up to about 30 minutes. Wait for the following message to appear on the console, indicating that installation is complete:
All run_on_boot scripts completed executing
Please check /var/log/syslog for more details
15. Reboot the target again to complete the setup.
You can now make binaries available to the target after cross-compiling them on the host system by copying them into the <top>/drive-t186reflinux/targetfs/root/ directory.
To give the target access to the Internet (optional)
1. Configure the host system to act as an Internet gateway.
Create a shell script on the host, named target-internet.sh, with this content:
#!/bin/bash
TARGET_IFACE=ethX # Replace ethX with the Host interface connected to target
INTERNET_IFACE=ethY # Replace ethY with the Host interface connected to the Internet
sudo sysctl -w net.ipv4.ip_forward=1
sudo iptables -F
sudo iptables -t nat -A POSTROUTING -o ${INTERNET_IFACE} -j MASQUERADE
sudo iptables -t nat -A POSTROUTING -o ${TARGET_IFACE} -j MASQUERADE
Enter these commands to make the script executable and execute it:
chmod +x target-internet.sh
./target-internet.sh
2. Configure the gateway of the target system to the DHCP server on the host, using the following command on the target console:
dhclient usb0
The target now has access to the Internet through the DHCP server on the host via the USB connection to communicate with the DHCP server, and the Ethernet connection to communicate with Internet services.
When you need a specific library for cross-compilation, you can install it from the target with apt-get command. The library is available to the host through the <top>/drive-t186ref-linux/targetfs/ directory.