Tegra Combined UART and tcu_muxer Utility
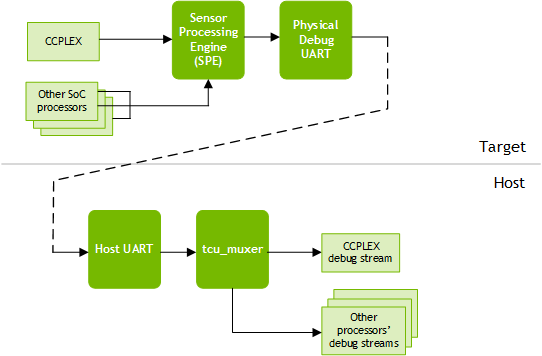
Tegra SOC supports many independent clusters. Software running on each of these clusters needs access to debug UART. To meet this requirement, a software based protocol to share physical UART is implemented. In this architecture, physical UART in Tegra is managed by the firmware running in SPE/AON R5 cluster. All other clusters (CCPLEX and R5s) send their debug console output to SPE using the software protocol.
The Tegra Combined UART (TCU) is a system that multiplexes debug information from the processors in the CCPLEX cluster with information from other processors. The multiplexing is accomplished in the Sensor Processing Engine (SPE), but involves all of the processors that supply information.
The tcu_muxer tool is a utility application that runs on a host system and helps in muxing and demuxing debug UART output streams to/from these SOC clusters. This is achieved using a tagging protocol implemented between tcu_muxer tool and SPE.
The relationship of the components for a native (non-virtualized) target.
Using tcu_muxer Tool
The tcu_muxer binary is available in the following SDK directory:
<top>/drive-t186ref-foundation/tools/host/tcu_muxer/
Usage
tcu_muxer <options>
Where <options> represents any meaningful combination of the command line options described below.
The tcu_muxer tool writes demultiplexed output to a set of consoles with device names in the form /dev/pts/<n>, where <n> is an integer. It lists the consoles’ device names and the type of output written to each on stdout.
Command Line Options
This table describes the command line options recognized by tcu_muxer:
Command line option | Meaning |
-h | Prints a help message summarizing command format and options. |
-i | Enable the patch for line ending. This option adds extra <cr> or <lf> so that all the data streams end lines with the uniform <cr><lf> (Windows style). Enable this option only when streams do not provide the line endings. |
-u | Use separate uart_muxer tool for guest console. Write the CCPLEX data to a single output stream, to be demultiplexed by uart_muxer. |
-g <consoles> Applies to: virtualized targets only | Spawn the specified number of consoles to create for VMs in the CCPLEX cluster. Defaults to 1. |
-d <device> | Specify device name of the host UART for communication, that receives debug data from the target. Defaults to /dev/ttyUSB3. |
-r <rate> | Specify data I/O rate of the UART in bits/second. Defaults to 115200. |
-b <console> Applies to: virtualized targets only | Send Hypervisor debug information only to the specified console number. For example, ‑b 3 makes tcu_muxer send Hypervisor debug information only to console: 3. If ‑b is not used, tcu_muxer sends Hypervisor debug information on all of the consoles. |
-s <path> | Save output streams to the directory specified by <path>. Each output stream is written to a .txt file whose name represents the source: SCE.txt, SPE.txt, etc. CCPLEX output is written to a single multiplexed file named CCPLEX.txt. |
-l <path> | Save the raw output with tags to the log file in the directory specified by <path>. |
Usage Example on NVIDIA Native OS System
The following shows the typical usage of tcu_muxer tool:
$ tcu_muxer -d <device>
/dev/pts/52 RCE
/dev/pts/55 BPMP
/dev/pts/56 SCE
/dev/pts/57 SPE
/dev/pts/58 TZ
/dev/pts/59 CCPLEX: 0
This will create multiple pseudo terminals for each R5 and CCPLEX. The native OS shell can be accessed through the terminal corresponding to CCPLEX.
Usage example on NVIDIA Virtualization Systems
The NVIDIA Virtualization System executing on a CCPLEX cluster additionally has multiple UART streams corresponding to partition(s) running over hypervisor. The tcu_muxer tool supports Virtualization and allows creation of pseudo terminals for each of the partition.
Usage
tcu_muxer -g <guest_nr> -b <hyp_nr> -d <device>
Where
• <guest_nr>: represents the number of virtual machines
• <hyp_nr>: represents the pseudo terminal for hypervisor
Example 1
In this example, tools similar to minicom are used to attach to each of the UART terminals.
$ tcu_muxer -g 11 -b 10 -d /dev/ttyUSB2
Opening: /dev/pts/16 RCE
Opening: /dev/pts/17 BPMP
Opening: /dev/pts/18 SCE
Opening: /dev/pts/19 SPE
Opening: /dev/pts/20 TZ
Opening: /dev/pts/22 CCPLEX: 0
Opening: /dev/pts/23 CCPLEX: 1
Opening: /dev/pts/24 CCPLEX: 2
Opening: /dev/pts/25 CCPLEX: 3
Opening: /dev/pts/26 CCPLEX: 4
Opening: /dev/pts/27 CCPLEX: 5
Opening: /dev/pts/28 CCPLEX: 6
Opening: /dev/pts/29 CCPLEX: 7
Opening: /dev/pts/30 CCPLEX: 8
Opening: /dev/pts/31 CCPLEX: 9
Opening: /dev/pts/32 CCPLEX: 10
################################# 001 ##
/dev/pts/22 [Guest 0]
/dev/pts/23 [BPMP]
/dev/pts/24 [Resource Manager]
/dev/pts/25 [Monitor Partition]
/dev/pts/26 [System Manager]
/dev/pts/27 [Storage]
/dev/pts/28 [Security Engine]
/dev/pts/29 [Debug Server]
/dev/pts/30 [TrustZone Server]
/dev/pts/32 [Hypervisor]
In the above example, CCPLEX: 0 corresponds to VM0, CCPLEX: 1 corresponds to VM1 and so on. CCPLEX:10 corresponds to Hypervisor as mentioned by "-b" switch.
Example 2 (per terminal logging)
In this example, output from each of the terminals is logged in their respective log file.
$ tcu_muxer -g 11 -b 10 -d /dev/ttyUSB2 -s /<path_to_logging>/dir/
Opening: /dev/pts/16 RCE
Opening: /dev/pts/17 BPMP
Opening: /dev/pts/18 SCE
Opening: /dev/pts/19 SPE
Opening: /dev/pts/20 TZ
Opening: /dev/pts/22 CCPLEX: 0
Opening: /dev/pts/23 CCPLEX: 1
Opening: /dev/pts/24 CCPLEX: 2
Opening: /dev/pts/25 CCPLEX: 3
Opening: /dev/pts/26 CCPLEX: 4
Opening: /dev/pts/27 CCPLEX: 5
Opening: /dev/pts/28 CCPLEX: 6
Opening: /dev/pts/29 CCPLEX: 7
Opening: /dev/pts/30 CCPLEX: 8
Opening: /dev/pts/31 CCPLEX: 9
Opening: /dev/pts/32 CCPLEX: 10
################################# 001 ##
/dev/pts/22 [Guest 0]
/dev/pts/23 [BPMP]
/dev/pts/24 [Resource Manager]
/dev/pts/25 [Monitor Partition]
/dev/pts/26 [System Manager]
/dev/pts/27 [Storage]
/dev/pts/28 [Security Engine]
/dev/pts/29 [Debug Server]
/dev/pts/30 [TrustZone Server]
/dev/pts/32 [Hypervisor]
$ ls /<path_to_logging>/dir/
BPMP.txt CCPLEX10.txt CCPLEX2.txt CCPLEX4.txt CCPLEX6.txt CCPLEX8.txt raw-logs.txt SCE.txt TZ.txt
CCPLEX0.txt CCPLEX1.txt CCPLEX3.txt CCPLEX5.txt CCPLEX7.txt CCPLEX9.txt RCE.txt SPE.txt
In the above example, each of the .txt file contains the respective terminal’s output.
Example 3 (raw logging)
In this example, an additional raw file gets created containing the output of all the terminals.
$ tcu_muxer -g 11 -b 10 -d /dev/ttyUSB2 -l /<path_to_logging>/file
Opening: /dev/pts/16 RCE
Opening: /dev/pts/17 BPMP
Opening: /dev/pts/18 SCE
Opening: /dev/pts/19 SPE
Opening: /dev/pts/20 TZ
Opening: /dev/pts/22 CCPLEX: 0
Opening: /dev/pts/23 CCPLEX: 1
Opening: /dev/pts/24 CCPLEX: 2
Opening: /dev/pts/25 CCPLEX: 3
Opening: /dev/pts/26 CCPLEX: 4
Opening: /dev/pts/27 CCPLEX: 5
Opening: /dev/pts/28 CCPLEX: 6
Opening: /dev/pts/29 CCPLEX: 7
Opening: /dev/pts/30 CCPLEX: 8
Opening: /dev/pts/31 CCPLEX: 9
Opening: /dev/pts/32 CCPLEX: 10
################################# 001 ##
/dev/pts/22 [Guest 0]
/dev/pts/23 [BPMP]
/dev/pts/24 [Resource Manager]
/dev/pts/25 [Monitor Partition]
/dev/pts/26 [System Manager]
/dev/pts/27 [Storage]
/dev/pts/28 [Security Engine]
/dev/pts/29 [Debug Server]
/dev/pts/30 [TrustZone Server]
/dev/pts/32 [Hypervisor]
In the above example, /<path_to_logging>/file contains the raw file with the control characters which can be demuxed offline using the script /<path_to>/tcu_muxer_raw_log_dump.py.
$ /<path_to>/tcu_muxer_raw_log_dump.py -h
Usage: ./tcu_muxer_raw_log_dump.py -l <path> [-g|-c]
-l, --logfile : Path of the file containing the raw logs captured using tcu_muxer -l option
-g, --guestid : Guest ID. Prints Hypervisor log if no value is passed
-c, --cluster : Cluster Name. One of: "RCE", "BPMP", "SCE", "SPE", "TZ", "CCPLEX"
$ /<path_to>/tcu_muxer_raw_log_dump.py -l /<path_to_logging>/file -c BPMP
dumps the BPMP logs on the stdout extracted from /path/to/logging/file
$ /<path_to>/tcu_muxer_raw_log_dump.py -l /<path_to>/logging/file -g 5
dump the CCPLEX: 5 logs on the stdout extracted from /path/to/logging/file
The raw log file is helpful in knowing the time line of events across the terminals and also in representing the state of the system in a single file allowing the recipient to extract the logs of their interest.
Note: | Both "-s" and "-l" options can be used together. |
Example 4 (tmux with tcu_muxer)
This example uses a wrapper over the tcu_muxer tool that creates tmux session with separate window for each terminal.
$ tcu_muxer_tmux.sh -g 11 -b 10 -d /dev/ttyUSB2 -s /<path_to_logging>/dir/ -l <path_to_logging>/file
Opening: /dev/pts/16 RCE
Opening: /dev/pts/17 BPMP
Opening: /dev/pts/18 SCE
Opening: /dev/pts/19 SPE
Opening: /dev/pts/20 TZ
Opening: /dev/pts/22 CCPLEX: 0
Opening: /dev/pts/23 CCPLEX: 1
Opening: /dev/pts/24 CCPLEX: 2
Opening: /dev/pts/25 CCPLEX: 3
Opening: /dev/pts/26 CCPLEX: 4
Opening: /dev/pts/27 CCPLEX: 5
Opening: /dev/pts/28 CCPLEX: 6
Opening: /dev/pts/29 CCPLEX: 7
Opening: /dev/pts/30 CCPLEX: 8
Opening: /dev/pts/31 CCPLEX: 9
Opening: /dev/pts/32 CCPLEX: 10
################################# 001 ##
/dev/pts/22 [Guest 0]
/dev/pts/23 [BPMP]
/dev/pts/24 [Resource Manager]
/dev/pts/25 [Monitor Partition]
/dev/pts/26 [System Manager]
/dev/pts/27 [Storage]
/dev/pts/28 [Security Engine]
/dev/pts/29 [Debug Server]
/dev/pts/30 [TrustZone Server]
/dev/pts/32 [Hypervisor]
Then use the following command:
$ tmux attach
This command attaches to the tmux session. There are two windows, one for all the R5 clusters and the other for all the CCPLEX terminals.
The panes and windows can be selected using the mouse. To select text, hold shift and select. Otherwise the selection is captured by tmux and will not be copied to the system clipboard.
Note: | All the options passed to tcu_muxer can be passed to tcu_muxer_tmux.sh. |
Using along with uart_muxer Tool
The uart_muxer tool is originally developed to mux/demux uart streams from Virtual Machines. The functionality of uart_muxer is now integrated with in the tcu_muxer. There are still a few subtle differences in the features provided by tcu_muxer and uart_muxer tools. To maintain the interface provided uart_muxer, it is possible to run tcu_muxer and uart_muxer in cascade form. In this configuration tcu_muxer will be responsible for mux/demux of uart streams from different clusters and then CCPLEX uart stream is forwarded by tcu_muxer to uart_muxer and which then mux/demux uart streams from different Virtual Machines.
Usage
tcu_muxer -u -d <device>
Open the uart_muxer on the CCPLEX ports:
<TOP>/hypervisor/tools/uart_muxer/uart_muxer -g <guest_nr> -b <hyp_nr> -d <device>
Where
• <guest_nr>: represents the number of virtual machines
• <hyp_nr>: represents the pseudo terminal for hypervisor
Example
$ tcu_muxer -u -d /dev/ttyUSB2
/dev/pts/38 RCE
/dev/pts/84 BPMP
/dev/pts/91 SCE
/dev/pts/95 SPE
/dev/pts/103 TZ
/dev/pts/104 CCPLEX: 0
# <TOP>/hypervisor/tools/uart_muxer/uart_muxer -g 9 -b 8 -d /dev/pts/104
################################# 001 ##
/dev/pts/106 [Guest 0]
/dev/pts/107 [BPMP]
/dev/pts/115 [Resource Manager]
/dev/pts/116 [Monitor Partition]
/dev/pts/118 [I2C]
/dev/pts/122 [System Manager]
/dev/pts/128 [Storage]
/dev/pts/131 [Security Engine]
/dev/pts/132 [Hypervisor]
Finding the Number of VM Partitions
The tcu_muxer tool takes the number of terminals to launch as an input parameter (-g). The required number of terminals is dependent on the number of virtual machines/partitions present in a given virtualized system configuration.
A special tool called pctdump is provided, which can get this information by reading the configuration blob.
Usage
pctdump <pct configuration blob>
Here is an example (for E3550 T194 Hypervisor Linux Configuration):
$<TOP>/virtualization/tools/t18x/pctdump_x86/pctdump <TOP>/virtualization/hypervisor/t19x/configs/t194ref-release/pct/linux-linux/pct.bin
Guest Names
[0] Guest 0
[1] BPMP
[2] Resource Manager
[3] Monitor Partition
[4] System Manager
[5] Storage
[6] Security Engine
To the total 7 VMs, add 2 VMs for internal debug and TZ server + 1 VM for Hypervisor. The final count is 10 and the tcu_muxer command will be as follows:
$ tcu_muxer -g 10 -b 9 -d /dev/ttyUSB2