Terminal Emulation
With utilities Putty and Minicom, you can communicate from the host machine to the target board over a serial line. NVIDIA produces several target boards with varying capabilities. sdk installs a Minicom configuration file for each supported target board.
In addition to Minicom, you can use Android Debug Bridge (adb) to communicate with your platform. adb is an open-source, Android debug tool that communicates over USB.
Determining the USB Port and Serial ID
This topic explains how to get the USB port number and serial number port settings of your target device. Use this information to configure Minicom, depending on your product.
On Linux hosts, USB serial ports typically appear as:
/dev/ttyUSB<number>
Where <number> is the port number.
Applies to: Releases supporting Windows:
In Cygwin, USB serial ports appear as one of the /dev/ttyS<n> files. In general, a Windows COMx port corresponds to a /dev/ttyS<x-1> file in Cygwin. For example, COM1 corresponds to /dev/ttyS0.
A host machine may contain internal hardware for serial ports that have no external connector. So, if the host machine contains one normal serial connector in the back of the machine and one hidden internal serial port, then the serial port on the back can appear as /dev/ttyS2 not /dev/ttyS1.
To get the device USB port number and serial ID
Navigate to the /etc/minicom directory on the Linux host.AURIX is minirc.drivepx2.aurix, pr port = /dev/ttyUSB1
Tegra A is minirc.v41_device.a, pr port /dev/ttyUSB2
Tegra B is minirc.v4l_device.b, pr port = /dev/ttyUSB6
About Putty
Putty is both a serial communication program and a terminal emulator that uses the SSH or TELNET protocol. Putty supports the full UTF-8 character-set.
Installing Putty
Putty is installable via apt-get from Canonical mirrors. Use the following command to install Putty:
$ sudo apt-get install putty
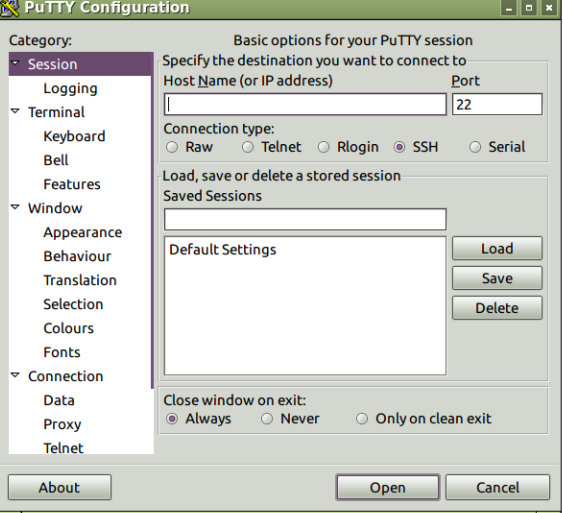
Putty: Connect to Serial Port
In order to connect to serial port, Putty must be started as superuser (or as root user) using following command, which opens the putty configuration dialog box.
$ sudo putty
In the above dialog box:
1. Choose Connection type as Serial.
2. In Serial line enter the USB Serial port path obtained above /dev/ttyUSB<number>.
3. Enter Speed to 112500.
4. Click Open
Steps 1-3 opens a new window to receive serial data from DRIVE platform.
Putty: Save and Load sessions
Putty allows users to save entered configuration into session entry which can be loaded later.
To save a session, enter the terminal settings from above section from steps 1-3 and enter in Saved Sessions box, your choice of session-name.
When putty is launched, it lists saved sessions in a list. Please click the choice of session, click load and click open. This loads and opens the chosen saved session.
About Minicom
Minicom is a serial communication program that enables an admin user to communicate using the serial port. In DRIVE OS SDK, we use to communicate from host machine to DRIVE platform.
Configuring Minicom
This topic explains how to modify the Minicom configuration file for the USB port and serial ID for your device. The default serial port settings depend on your development board. If your port differs from the default, you must modify the Minicom configuration file for your device (procedure below).
Note: | Although the Minicom configuration file contains the following statement, it is recommended that you manually edit the file for your changes. This approach is less error-prone than using the Minicom -s option. # Machine-generated file - use "minicom -s" to change parameters. |
Port Settings
By default, the serial port settings are shown below. You must modify the port to the actual device for the serial port.
port /dev/ttyS0
baudrate 115200
bits 8
parity N
stopbits 1
rtscts No
xonxoff No
To configure Minicom
1. Locate and edit the Minicom configuration file for your target device. Because the file is write-protected, you must use administrative privileges.
For Android and Windows (Cygwin) installations, the Minicom configuration files are at:
/etc/minirc.<platform-name>
For Ubuntu Linux installations, the Minicom configuration files are stored in:
/etc/minicom/minirc.<platform-name>
2. Modify your settings as needed.
Running Minicom
This topic explains how to run Minicom.
Note: | Before unplugging the power cable (from the power socket or the target), quit minicom/kermit before powering up the board. This step is not required if you use any of the following to reset/power-cycle the target. |
Methods Not Requiring Quitting Minicom before Powering On
• POWER OFF/ON rocker/button
• Reset button
Prerequisites
• You have modified the Minicom configuration file for your device’s USB port and serial ID.
• You have connected the device to your host system.
• The device is on and awake.
• The hardware flow control is turned off.
To run Minicom
• In a shell window, enter the following command:
sudo minicom -w drive-t186ref-linux -R utf8 -t xterm
The -w option enables line-wrapping, -R utf8 enables UTF-8 character set.
Toggling the Line Wrap Setting on Minicom
The Minicom command line in Running Minicom includes the -w option, which enables line wrapping. You can use the W configuration setting to change that behavior.
To toggle line wrap on/off
• In the Minicom console, enter the following command (without spaces between the letters):
CTRL-A Z W
Toggling the Line Feed Setting on Minicom
By default, Minicom enables line-wrapping. With that option, Minicom adds a line feed before every carriage return displayed on the screen.
Some terminals, have poor attribute handling (serial instead of parallel). If you are using such a terminal, you must start minicom with the following option:
-a off
Or you must toggle off the line feed, as described in the following instructions.
To toggle line feed on/off
• In the Minicom console, enter the following command (without spaces between the letters):
CTRL-A Z A