Host/Target Setup and Configuration
This topic describes how to setup the networking between the host system and the target system, target user account setup and environment for cross-compilation.
DRIVE OS Linux OEM-Config
DRIVE OS LINUX ships with OEM-config application that allows the end-user to setup a user account using wizard prompts in the UART interface. When the target device boots for the first time after flashing, it automatically runs OEM-config.
Before the target system boots for the first time, you must start a serial application on the host computer. For more instructions please check the terminal utility page in the SDK documentation.
Please use the following steps to set up the DRIVE OS LINUX on the target:
1. Allow the system to power on and boot up the operating system.
Once the operating system boots, OEM-config will start and splash the UI on the terminal as shown below.
Select the type of user to be added (either admin or non admin user), then select (by pressing <tab> key) OK and press ENTER.

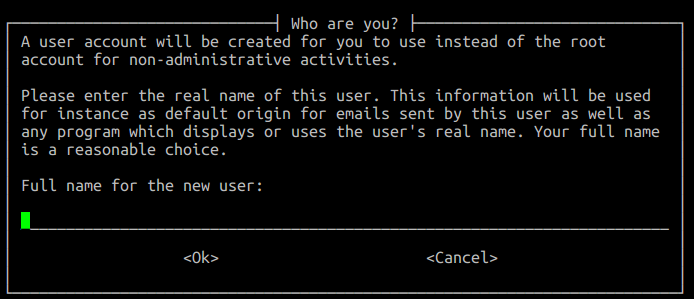
2. Add the full name of the user, then select OK and press ENTER.
3. Add the username for your user account, then select OK and ENTER.
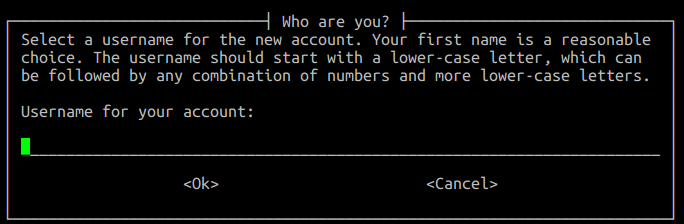
A valid username that satisfies the regex ^[a-z_][a-z0-9_-]{0,31}$ is required and this implies:
• The username must not be empty.
• The username must start with only lowercase letters or an underscore(_).
• The second and subsequent characters can be a lowercase letters, numbers, underscores(_), or a hyphen(-).
• The username must be less than or equal to 32 characters long.
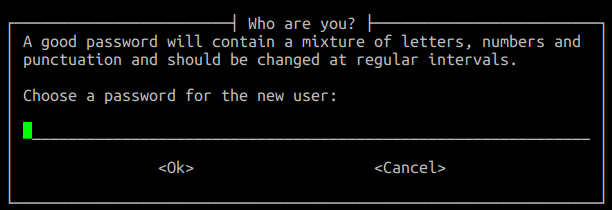
4. Add the password for your user account, then select OK and press ENTER.
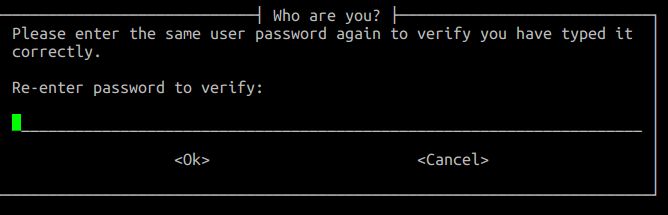
5. Re-enter the same password for your user account, then select OK and press ENTER.
6. The system will warn the user if the password is weak and recommends for a correction. Select NO and press ENTER to go back step 4 and change the password. Otherwise, select YES and press ENTER to move forward.

7. Select YES if another user should be created, else select NO and press ENTER. Selecting <Yes> takes you back to step 1 to add another user account. Selecting <No> takes you to next step.

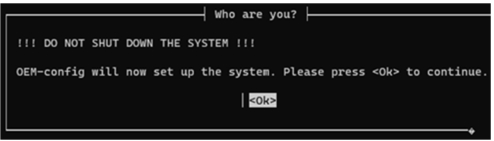
8. After this prompt, OEM-config will configure the system. End-user must ensure not to power off the system after pressing <Ok> below. After about 10 seconds, you will get prompt from step 9.
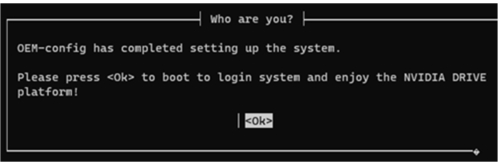
9. At this point, OEM-config has completed the system setup, press <Ok> to let the system boot to login prompt.
If yes is selected in step 8, OEM-Config loops back to Step 1 to create another user account. Otherwise, the system is now configured with the user accounts created by using the steps above.
Wait for OEM-config to finish and provide you with the login prompt.
DRIVE OS Linux User Management
- Steps to Change the Username and Password
NVIDIA DRIVE OS Linux uses Ubuntu’s tools to manage users. Only admin-users (i.e., sudoers or root user) can change user accounts. The following steps assume that you are an admin user. Enter the password of your current user.
Steps to Change the Username and Password
The following steps describe how to change your username and password in the DRIVE OS Linux filesystem.
Changing the Username
1. Enable administrative account.
• Enable the root administrative account by setting a password for the root account. Use the following command to set a password for root account. You will be prompted for the password of your current user.
$ sudo passwd
2. Close existing user sessions.
• Log out of any and all sessions, including GUI and consoles of the user that you are changing the username for. You cannot change the username if a session is still alive.
• Use the following command to exit console sessions:
$ exit
3. Log into the system as root account.
• After completing step #2, you will be presented with a login prompt. Proceed to log in using the credentials you established for the root account.
4. Change the username.
• Change the username of the user from ${USERNAME1} to ${USERNAME2} with the following commands:
$ usermod -m -d /home/${USERNAME2} -l ${USERNAME2} ${USERNAME1}
$ groupmod -n ${USERNAME2} ${USERNAME1}
• Log out of the root account using the following command:
$ exit
You have successfully changed the username. Proceed to log in with the new username.
Changing the Password
1. Enter the following command to update password.
$ passwd
Enter your existing password and enter the new password.
Changing password for <user>.
(current) UNIX password:
Enter new UNIX password:
Retype new UNIX password:
passwd: password updated successfully.
passwd: password updated successfully.
2. Enter the current password and then the new password.
Adding a Non-Admin User
Execute adduser with the new username as input and fill in the information when prompted.
$ sudo adduser <user>
# Where,
# <user> is the username to be added
# <user> is the username to be added
Note: | Non-Admin user can be added to specific groups to get privileged access to components that is otherwise accessible only if the user is root. See section ' Common Groups Used in DRIVE OS Linux Filesystems'. Ensure the Non-Admin user is not added to the 'sudo' or 'adm' group, as this will allow them to run any commands using sudo. |
Execute usermod to add the user to the required groups as per the use case requirements of the user.
$ sudo usermod -aG <groups> <user>
# Where,
# <groups> is the list of groups separated by comma.
# <user> is the username of the user.
Example
$ sudo adduser test
Adding user `test' ...
Adding new group `test' (1001) ...
Adding new user `test' (1001) with group `test' ...
Creating home directory `/home/test' ...
Copying files from `/etc/skel' ...
Enter new UNIX password:
Retype new UNIX password:
passwd: password updated successfully
Changing the user information for test
Enter the new value, or press ENTER for the default
Full Name []:
Room Number []:
Work Phone []:
Home Phone []:
Other []:
Is the information correct? [Y/n] Y
Adding an Admin User
Create an admin user with the following two steps:
1. Create a non-admin user <user> by following the instructions in the section Adding a Non-Admin User above.
2. Make the created user <user> an admin user by adding the user to all the groups specified in 'Common Groups Used in DRIVE OS Linux Filesystems' following the instructions in the section Adding a Non-Admin User above.
Common Groups Used in DRIVE OS Linux Filesystems
Group | Description |
adm | Group adm is used for system monitoring tasks. Members of this group can read many log files in /var/log. |
audio | This group can be used to give a set of users, access to sound devices. (E.g. sound timers) |
dialout | Members of this group gets full and direct access to serial ports. |
plugdev | Allows members to mount (only with the options nodev and nosuid, for security reasons) and umount removable devices through pmount. |
sudo | Members of this group can execute any command with sudo (/etc/sudoers) |
video | This group can be used to give a set of users access to a video device (like the framebuffer, the videocard or a webcam). Users may require to be added to this group to run DRIVE OS graphics samples. |
debug | This group can be used to give a set of users, access to profile and debug data of GPUs in the system. |
Removing a User
The steps to remove an admin or non-admin users are identical. Removing users using the steps below also removes their /home/<user> directory.
To remove a user:
$ sudo deluser --backup --remove-home <user>
This backs up and creates a tarball (<user>.tar.bz2) of the deleted user data in the current working directory.
Setting Password as an Admin User
As admin-users are sudoers, they can set the password of any user account with username <username> using the command below. Enter the password of your current user.
$ sudo passwd <username>
Enter new UNIX password:
Retype new UNIX password:
passwd: password updated successfully.
passwd: password updated successfully.
Updating Self-Password as a Non-Admin User
Non-admin users can only update their own passwords. The steps below update your user account’s password:
1. Enter the following command:
$ passwd
Enter your existing password and enter the new password.
Changing password for <user>.
(current) UNIX password:
Enter new UNIX password:
Retype new UNIX password:
passwd: password updated successfully.
passwd: password updated successfully.
2. Enter the current password and then the new password.
Disabling user account
The below step allows an admin user (i.e., sudoer) to disable the user account with a username $USER:
$ sudo usermod --expiredate 1 $USER
Disabling the user account ensures, that user account is unusable in any context in the filesystem. The disabled user ($USER) can be re-enabled using the step below:
$ sudo usermod --expiredate “” $USER
DRIVE OS Linux SSH Server
Note: | In DRIVE OS Linux filesystems, SSH server key and user accounts are not persistent across flashing. After re-flashing, new user accounts and new SSH server keys are created and the old ones destroyed. |
The shipped NVIDIA DRIVE OS LINUX filesystem driveos-oobe-rfs contains SSH server. However, driveos-core-rfs does not include SSH server. Use the steps below to install SSH server.
Install/Update SSH Server
The steps below assume that the platform is connected to the internet. To install the SSH server, follow the steps below.
1. Update the existing apt database:
# apt-get update
2. Install SSH server package:
# apt-get install ssh
3. When prompted by apt-get (see prompt below), choose the option keep the local version currently installed to ensure DRIVE OS SSH configuration is applied.
Setting Up SSH Server Service
After SSH server is available in the filesystem, use the steps below as root user to start and configure SSH server service to run on every boot:
1. Remove the stamp file to unblock SSH server:
$ sudo rm -f /etc/ssh/sshd_not_to_be_run
2. Start SSH server service on the current boot:
$ sudo systemctl start ssh
3. Start service to add SSH host-keys to the target:
$ sudo systemctl start nv_ssh_host_keys
After completing the steps above, the SSH server service is started, and is run on every boot. SSH clients may now connect to this SSH server.
SSH Server Configuration File
NVIDIA DRIVE OS Linux contains an SSH server configuration file sshd_config that pre-configures the following :
• Permits only connections with Elliptic Curve Digital Signature Algorithm (ECDSA) host key.
• Disables compression.
• Permits specific key exchange, host signature, and session encryption algorithms.
NVIDIA DRIVE OS Linux recommends that you configure strong security options for the following SSH parameters:
• Client Verification via key exchange: Parameter KexAlgorithms from sshd_config to set the supported key type(s) for client verification.
• Host Signature: Parameter HostbasedAcceptedKeyTypes from sshd_config to set the supported key type(s) for host verification.
• Session Encryption: Parameter Ciphers from sshd_config to set the supported ssh session encryption algorithm(s).
The table below suggests recommended strong values to enable recommended security features; the default option is highlighted in the table below.:
Option | Client Verification | Host Signature | Session Encryption |
1 | ecdh-sha2-nistp256 ECDH [SP 800-56A] over secp256r1 [SEC2-V2] with SHA-256 [FIPS 180-4] | ecdsa-sha2-nistp256-cert-v01@openssh.com ECDSA [FIPS 186-4][ANS X9.62] over secp256r1 [SEC2-V2] with SHA-256 [FIPS 180-4] | aes128-gcm@openssh.com GCM [SP 800-38D] with AES-128 [FIPS 197] |
2 | ecdh-sha2-nistp384 ECDH [SP 800-56A] over secp384r1 [SEC2-V2] with SHA-384 [FIPS 180-4] | ecdsa-sha2-nistp384-cert-v01@openssh.com ECDSA [FIPS 186-4][ANS X9.62] over secp384r1 [SEC2-V2] with SHA-384 [FIPS 180-4] | aes256-gcm@openssh.com GCM [SP 800-38D] with AES-256 [FIPS 197] |
3 | (Default) ecdh-sha2-nistp521 ECDH [SP 800-56A] over secp521r1 [SEC2-V2] with SHA-512 [FIPS 180-4] | (Default) ecdsa-sha2-nistp521-cert-v01@openssh.com ECDSA [FIPS 186-4][ANS X9.62] over secp521r1 [SEC2-V2] with SHA-512 [FIPS 180-4] | (Default) aes256-gcm@openssh.com GCM [SP 800-38D] with AES-256 [FIPS 197] |
Switching Options in the SSHD Configuration File
DRIVE OS Linux contains the snippets for all three (3) options with exactly one option (option 3) enabled as shown below. The options 1, 2, and 3 are mutually exclusive and exactly only one option can be active at a time.
# option 1
# Use algorithms as per DRIVE recommended options: 1,2, or 3
#KexAlgorithms ecdh-sha2-nistp256
#HostbasedAcceptedKeyTypes ecdsa-sha2-nistp256-cert-v01@openssh.com
#Ciphers aes128-gcm@openssh.com
# option 2
#KexAlgorithms ecdh-sha2-nistp384
#HostbasedAcceptedKeyTypes ecdsa-sha2-nistp384-cert-v01@openssh.com
#Ciphers aes256-gcm@openssh.com
# option 3 (default)
KexAlgorithms ecdh-sha2-nistp521
HostbasedAcceptedKeyTypes ecdsa-sha2-nistp521-cert-v01@openssh.com
Ciphers aes256-gcm@openssh.com
To switch from one option to another
1. Comment out the three (3) lines corresponding to the current option.
2. Uncomment the three (3) lines corresponding to the new option.
3. Restart SSHD using the command below as the root user:
$ sudo systemctl restart ssh
As an example, assume that the current option is option 3 (from the snippet above). To switch to option 2, execute the following steps:
1. Comment out the three (3) lines following # option 3.
2. Uncomment the three (3) lines from the line below # option 2 until the line above # option 3.
3. Restart SSHD using the command below as the root user:
$ sudo systemctl restart ssh
4. SSHD now uses encryption algorithms from option 2.
SSH Key-Based Authentication from Clients to Server
DRIVE OS Linux shipped SSHD tries key-based authentication first and falls back to password-based authentication when the former is unavailable. The following sections describe how to set up a user-specific authentication key, add it to the list of trusted-keys, and use the key to authenticate (instead of the password) to the ssh-server.
Create a new key-pair at the client side
The first step is to create a public/private key pair using the command:
$ ssh-keygen -t ecdsa
Continue through the prompts by pressing ENTER and these steps save the key to ~/.ssh.
Set up the server side to register key
The next step is to add the contents of the client (user-specific authentication) public key ~/.ssh/id_ecdsa.pub into the text file ~/.ssh/authorized_keys.
Use the new key at the client side to connect to the server
Only the user who created the key can log in to the SSHD server (using the registered keys). At the client side, connect to the server using the ssh command:
$ ssh <user>@<target_ip>
The setup done above is one-directional (i.e., from client to server). To similarly setup in a reverse direction (i.e., from server to client), the above steps must be swapped with regards to client/server and executed to setup key-based authentication from the server to client-side.