Flashing AURIX
AURIX is intended for debugging and sanity checking purposes.
Note: | In this section, <top> refers to the guest VM’s root directory. |
Identifying the AURIX Step Version
The platform is equipped with an updated version of the AURIX chip called Step B. Step B is not software compatible with the previous silicon Step A. Consequently, a different binary is used for Step A and Step B boards.
To ensure successful flashing with memtool, the AURIX Step version must be identified for your board.
To identify the AURIX step version for the board
1. From the AURIX console, execute the command:
version
• If TC397 Step A is returned output, or if the returned output does not indicate a step version (may be due to an older version of the firmware) the AURIX chip version is Step A.
Proceed with these instructions to further identify the chip version.
• If TC397 StepBB or TC397 Step BC is returned, the AURIX chip version is up-to-date with Version Step B.
Proceed with the instructions for Setting Up MemTool on the Windows Host.
2. In a system console, execute this command to launch the AURIX Update application that reads the AURIX firmware version.
nvidia@tegra-ubuntu:/usr/bin$ nv_aurix_update -get_fw_version
Examine the returned output to locate the chip revision. Matching the chip revision to the AURIX Step version is as follows:
• Step A = Chip revision: 00
• Step BB = Chip revision: 17
• Step BC = Chip revision: 18
3. Locate the board label to identify your board revision number.
The board label is located on the underside of the platform board. For example, the E3550 board label is :
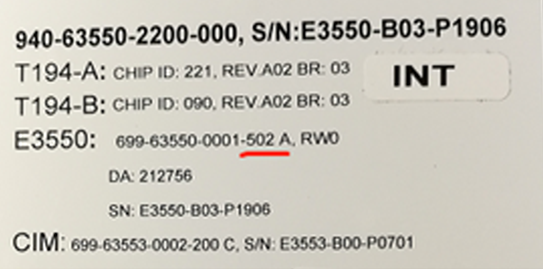
Notice that the label indicates E3550: 699-63550-001-502 A, RW0.
• Revision 500 or 501 = AURIX Step A
• Revision 502 or 503 = AURIX Step B
The AURIX Step A binaries are as follows:
• AURIX Step A:
DRIVE-V5.2.0-E3550-AFW-Aurix-With3LSS-StepA-4.02.02.hex
DRIVE-V5.2.x-E3550-NV-Aurix-UPDATE-StepA-1.29.15.hex
DRIVE-V5.2.0-P3479-AFW-Aurix-With3LSS-StepA-4.02.02.hex
DRIVE-V5.2.x-P3479-NV-Aurix-UPDATE-StepA-1.29.15.hex
DRIVE-V5.2.x-E3550-NV-Aurix-IFW-StepA-1.29.15.hex
• AURIX Step B:
DRIVE-V5.2.x-E3550-NV-Aurix-IFW-StepB-1.36.15.hex
DRIVE-V5.2.0-E3550-AFW-Aurix-With3LSS-StepB-4.02.02.hex
DRIVE-V5.2.x-E3550-NV-Aurix-UPDATE-StepB-1.36.15.hex
DRIVE-V5.2.0-P3479-AFW-Aurix-With3LSS-StepB-4.02.02.hex
DRIVE-V5.2.x-P3479-NV-Aurix-UPDATE-StepB-1.36.15.hex
Warning: | Ensure the correct binary is flashed based on the AURIX Step Version. If the wrong binary is flashed, for example Step A binary into a Step B chip, AURIX does not boot and the AURIX updater does not function as expected. To mitigate, use the memtool to re-flash with the correct hex file. |
Upgrading the Firmware
The AURIX MCU firmware is programmed into the chip at the factory. However, the firmware can be upgraded in the field as new versions become available.
Consult the Release Notes to identify the AURIX MCU version provided with this release, as well as the firmware binaries.
Upgrading the AURIX MCU firmware requires a Windows host system to execute the MemTool flashing program utility.
Obtain the Infineon MemTool utility from Infineon at:
https://www.infineon.com/dgdlc/en?dcId=8a8181663431cb50013431cb500b0000&downloadTitle=Infineon-Memtool-DT-v04_75-EN.exe&download=L2RnZGwvSW5maW5lb24tTWVtdG9vbC1EVC12MDRfNzUtRU4uZXhlP2ZpbGVJZD01NTQ2ZDQ2MjUxOGZmZDg1MDE1MjU1MzdjMTk3MjA2Zg
Identifying the COM Port
A Windows COM port is required to communicate with AURIX and to re-program the firmware.
To identify the COM port
1. Unplug all other serial USB devices from the Windows host system to simplify the identification of COM ports.
2. Connect a USB cable between the Windows system and the platform debug USB port.
3. Open the Device Manager Control Panel and expand the COM and LPT ports navigation tree.
A list of the COM ports is displayed. The list contains 16 USB Serial COM ports when the platform is connected.
4. Using a Windows terminal program, such as Putty, attempt to establish a connection to each of the COM ports.
The terminal configuration must use these settings:
• 115200 baud
• 8 bits
• no parity
• 1 stop bit
• no flow control
The AURIX MCU console is generally the fourth USB Serial COM port in the ports tree.
5. After connecting, press ENTER in the terminal window.
Once connected to the AURIX MCU console, a shell prompt is displayed.
6. After determining the correct COM port, disconnect the terminal.
Determining the Installed Version
Use these procedures to determine the installed AURIX. Upgrading the installed version of the AURIX MCU to the latest available version may be required.
To determine the installed AURIX MCU version
1. Use a Windows terminal program to connect to the AURIX MCU COM port as identified in Identifying the COM Port.
2. Power the platform OFF and ON, or type version in the AURIX MCU console.
The AURIX MCU console displays the AURIX software version.
Setting Up MemTool on the Windows Host
Use these procedures to setup Memtool.
To setup MemTool on the Windows host
1. Ensure the MemTool package is on the host system and execute the command:
Infineon-Memtool-DT-v04_73-EN.exe
2. Follow the instructions as prompted to complete the installation.
The MemTool requires the configuration file to connect the AURIX firmware. Consult the Creating the MCU Configuration File procedure to create the required file.
Creating the MCU Configuration File
The MemTool requires selecting or creating a default configuration file for the TriBoard with TC39x to connect the AURIX MCU firmware. If this is the first time running the MemTool, the default configuration file must be created. Otherwise, it can be selected from the list.
To create the MCU firmware configuration file
1. Ensure the MCU Programming Switch, on the platform harness, is set to the PRG position.

2. On the Windows system, run the MemTool executable available at:
<top>/Infineon/Memtool 4.7/IMTMemtool.exe
The MemTool dialog displays.
3. Select Target > Change to display an additional popup dialog window.
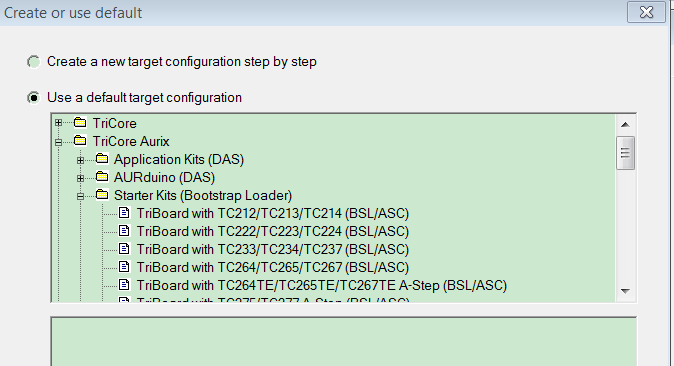
4. Select New, from the drop-down menu, select Use a default target configuration.
5. Select Tricore Aurix > Starter Kits (Bootstrap Loader).
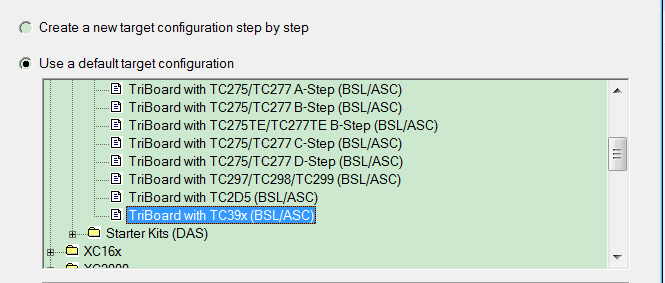
6. Scroll down to select TriBoard with TC39x (BSL/ASC).
7. From the Select Target Configuration window Folder to browse field, browse to the path of the configuration file directory. Additionally, in the Files in folder field, select TriBoard with TC39x (BSL/ASC).
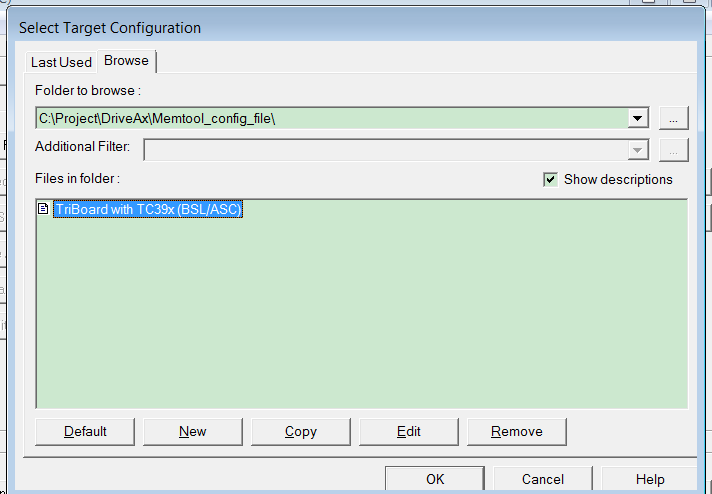
This MCU configuration file is required for UART flashing.
8. Click OK to create the selected file.
9. Navigate to Target > Change once again, and browse to select the folder where you saved the MCU configuration file.
10. Select TriBoard with TC39x (BSL/ASC) and click OK.
11. Navigate to Target > Setup and select the radio button to Remember device name (e.g., COM1).
12. In the Access Device drop-down, choose the COM port as identified in To Identify the COM Port and click OK.
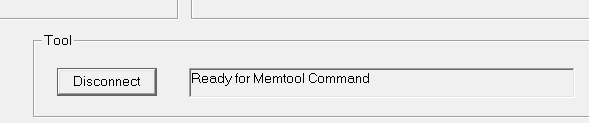
13. Click Connect.
Upon connection, a Ready for Memtool command is displayed.
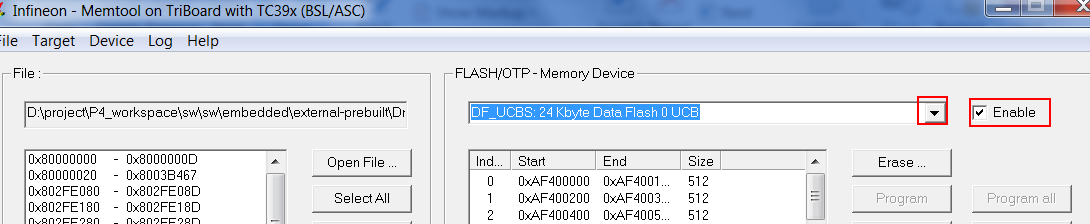
14. Click Open File and select the hex file to flash.
15. From the FLASH/OTP - Memory Device selector, ensure the Enable radio button is checked, then click the drop-down and select DF_UCBs.
16. To add the binary data to the tool and prepare it for flashing, click Select ALL, then Add Sel.
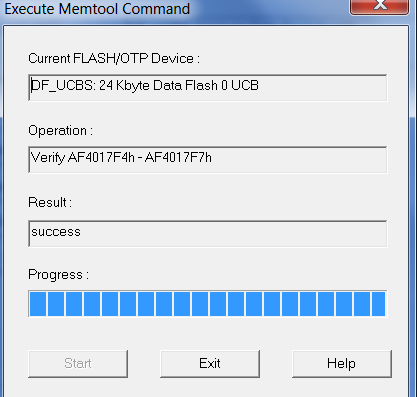
17. Click Program All and wait for the programming to finish.
Upon successfully flashing a popup window displays.
18. Click Exit.
19. Click Disconnect to disconnect the programmer from the device.
20. Set the MCU Programming Switch to the RUN position and power cycle the platform.
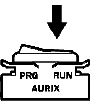
After flashing is complete, set the MCU Programming Switch to the RUN position to prevent AURIX from re-entering programming mode.
If you wish the verify the new AURIX firmware version, connect to the AURIX MCU console using a terminal program and enter the command version. Or, power cycle the platform to view the installed firmware version.
Flashing the AURIX UPDATE Firmware
The NVIDIA AURIX MCU UPDATE (NV) firmware is pre-flashed in the AURIX chip. However, if required, it can be flashed using the MemTool utility as described in Setting Up MemTool on the Windows Host.
When performing an upgrade, verify that the Xavier Jumper J44 is open.
Flashing AURIX on Xavier
The nv_aurix_check_fw script is provided to check the AURIX firmware version on boot and is available at
• If the AURIX firmware is the latest version, a corresponding message is displayed at the console.
• If the AURIX Main firmware version requires updating, the AURIX update command runs automatically and updates the firmware to the latest version.
The correct hex file for flashing is chosen from the root file system at:
/lib/firmware
• Once the Main AURIX firmware is updated, the version of the Update firmware is checked and the Update firmware is flashed if a newer version is found.
To check the firmware version again from the SoC
• Execute the command:
To update the AURIX firmware
1. Ensure both the Main (NV-IFW or AFW) AURIX firmware and the UPDATE(NV) firmware files are in the root filesystem.
2. Ensure the files follow the naming convention as follows:
DRIVE-<branch>-<platform>-[NV/AFW]-Aurix-[UPDATE]-[ForHyperion]-<Board>-<major>.<minor>.<revision>[-SNAPSHOT-<snapshot>].hex
Where:
• The path to the AFW firmware and UPDATE firmware is:
• /lib/firmware/*<platform>-AFW-Aurix-*
• /lib/firmware/*<platform>-NV-Aurix-UPDATE*
• NV indicates NVIDIA internal firmware.
• AFW indicates AUTOSAR firmware from the vendors EB or Vector
• <platform> is the board number, such as E3550.
• <FW_Type> IFW / UPDATE / With3LSS.
• <Board> StepA / StepB
• <major> contains one numeric digit.
• <minor> contains two numeric digits.
• <revision> contains two numeric digits.
• <snapshot> contains two numeric digits.
• Items in brackets [ ] are optional.
• Version numbers with 1.x.x indicate internal firmware, 3.x.x indicate the AFW from vendor EB, and 4.x.x is the AFW from vendor Vector.
3. Update the firmware by executing the command:
sudo /bin/bash /etc/systemd/scripts/nv_aurix_check_fw.sh -auto_update
Where the path to the EB firmware and UPDATE firmware is as follows:
/lib/firmware/*<platform>-AFW-Aurix-*.
/lib/firmware/*<platform>-NV-Aurix-*.
Updating the firmware includes:
• Comparing the firmware version between the flashed version and the one on the root filesystem.
• Updating the firmware if a higher firmware version is in the root filesystem.
• Resetting the platform.
4. When the platform boots again, re-run the command to reset it a second time.
After two resets, the AURIX MAIN firmware is updated.
5. Re-run the command again to update the UPDATE firmware.
Note: | The AURIX flashing program/erase cycle is 1000. To avoid wear on the AURIX flash components, flash the firmware only when necessary. The flashing of AURIX MAIN and UPDATE firmware requires a maximum of two SoC resets, and three invocations of the nv_aurix_update application. |
6. B-Step boards support only the Vector AFW (Versions 4.x.x) and NV internal firmware (version 1.x.x). When the Vector AFW hex file is not packaged in the /lib/firmware folder, the auto update script chooses NV internal FW as an alternative.
7. A-Step boards support the Vector AFW, EB AFW, and NV internal firmware. When the Vector AFW hex file is not packaged in the /lib/firmware folder, the auto update script choses EB AUTOSAR firmware as an alternative.