Tegra Combined UART and the tcu_muxer Utility
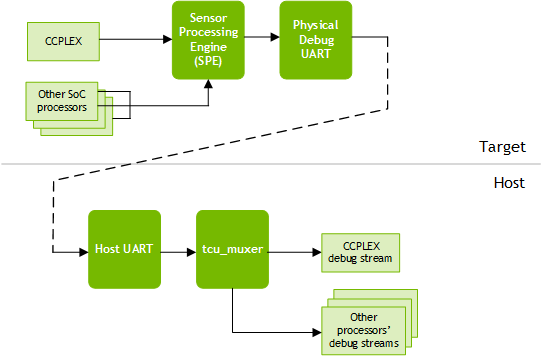
The Tegra Combined UART (TCU) is a system that multiplexes debug information from the processors in the CCPLEX cluster with information from other processors. The multiplexing is accomplished in the Sensor Processing Engine (SPE), but involves all of the processors that supply information.
tcu_muxer is a utility which runs on a host system and demultiplexes the debug information multiplexed by the TCU.
This diagram shows the relationship of the components for a native (non-virtualized) target.
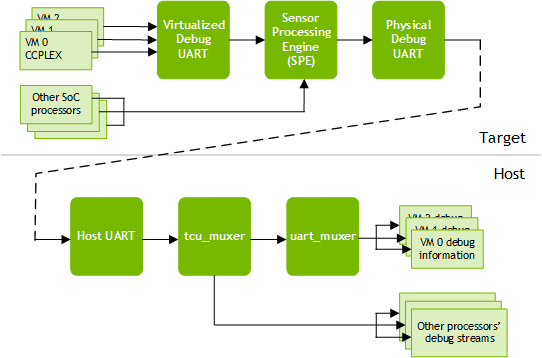
On a virtualized target, the Virtualized Debug UART multiplexes debug information from the VMs in the CCPLEX cluster and passes the multiplexed data stream to the TCU. The TCU multiplexes it with debug information from the other R5 components. On the host, the CCPLEX debug information customarily is passed from tcu_muxer to uart_muxer, which demultiplexes the individual VMs’ debug information.
This diagram shows the relationship of the components in a virtualized system.
tcu_muxer Tool
Usage
./tcu_muxer [OPTION] …
This table describes the command line options recognized by tcu_muxer:
Command line option | Meaning |
|---|---|
-h | Prints this help screen. |
-i | Disables the patch for line ending. |
-u | Use separate uart_muxer tool for Guest console. |
-g <int> | Spawns <int> consoles for Hypervisor. Defaults to 1. |
-d <dev> | Specifies the device name of the host UART that receives debug data from the target. Defaults to /dev/ttyUSB3. |
-r <rate> | Specifies data rate of the UART in bits/second. Defaults to 115200. |
-b <int> | Print Hypervisor broadcast only on console <int>.This value starts from 0 (zero). |
-s <path> | Saves the output to a directory <path>. |
-l <path> | Saves the raw output with tags to a log file <path> |
Output
tcu_muxer displays pseudo terminal number mapping to different CPU clusters. All messages from these CPU clusters are redirected to the corresponding pseudo terminal.
In the developer environment, tcu_muxer is built as part of foundation and are located at:
$<top>/out/embedded-foundation-t186ref-*/nvidia/tools/tcu_muxer/tmake-hostcc/tcu_muxer
The tcu_muxer helper scripts are located at:
$<top>/tools/tcu_muxer/
tcu_muxer and the helper scripts are located at:
$<top>/drive-t186ref-foundation/tools/host/tcu_muxer/
tcu_muxer Usage in NVIDIA Native OS System
This creates multiple pseudo terminals for each R5 and CCPLEX. Access Native OS shell through the terminal corresponding to CCPLEX.
$ /path/to/tcu_muxer -d <device>
/dev/pts/52 RCE
/dev/pts/55 BPMP
/dev/pts/56 SCE
/dev/pts/57 SPE
/dev/pts/58 TZ
/dev/pts/59 CCPLEX: 0
tcu_muxer Usage in NVIDIA Virtualization System
Virtualization System executing on CCPLEX cluster additionally has multiple UART streams corresponding to partition(s) running over Hypervisor. The tcu_muxer tool supports Virtualization and allows creation of pseudo terminals for each of the partition.
Usage
$ /path/to/tcu_muxer -g <guest_nr> -b <hyp_nr> -d <device>
Where:
• guest_nr: represents the number of virtual machines
• hyp_nr: represents the pseudo terminal for Hypervisor
Depending on the requirement, the tcu_muxer tool can be launched in different modes:
Usage mode #1
In this mode, tools similar to minicom are used to attach to each of the UART terminal.
$ /path/to/tcu_muxer -g 11 -b 10 -d /dev/ttyUSB2
Opening: /dev/pts/16 RCE
Opening: /dev/pts/17 BPMP
Opening: /dev/pts/18 SCE
Opening: /dev/pts/19 SPE
Opening: /dev/pts/20 TZ
Opening: /dev/pts/22 CCPLEX: 0
Opening: /dev/pts/23 CCPLEX: 1
Opening: /dev/pts/24 CCPLEX: 2
Opening: /dev/pts/25 CCPLEX: 3
Opening: /dev/pts/26 CCPLEX: 4
Opening: /dev/pts/27 CCPLEX: 5
Opening: /dev/pts/28 CCPLEX: 6
Opening: /dev/pts/29 CCPLEX: 7
Opening: /dev/pts/30 CCPLEX: 8
Opening: /dev/pts/31 CCPLEX: 9
Opening: /dev/pts/32 CCPLEX: 10
################################# 001 ##
/dev/pts/22 [Guest 0]
/dev/pts/23 [BPMP]
/dev/pts/24 [Resource Manager]
/dev/pts/25 [Monitor Partition]
/dev/pts/26 [System Manager]
/dev/pts/27 [Storage]
/dev/pts/28 [Security Engine]
/dev/pts/29 [Debug Server]
/dev/pts/30 [TrustZone Server]
/dev/pts/32 [Hypervisor]
CCPLEX: 0 corresponds to VM0, CCPLEX: 1 corresponds to VM1 and so on. CCPLEX:10 corresponds to Hypervisor as mentioned by -b switch.
Usage mode #2 (terminal logging)
In this mode, output from all the terminals is logged in their respective log file.
$ /path/to/tcu_muxer -g 11 -b 10 -d /dev/ttyUSB2 -s /path/to/logging/dir/
Opening: /dev/pts/16 RCE
Opening: /dev/pts/17 BPMP
Opening: /dev/pts/18 SCE
Opening: /dev/pts/19 SPE
Opening: /dev/pts/20 TZ
Opening: /dev/pts/22 CCPLEX: 0
Opening: /dev/pts/23 CCPLEX: 1
Opening: /dev/pts/24 CCPLEX: 2
Opening: /dev/pts/25 CCPLEX: 3
Opening: /dev/pts/26 CCPLEX: 4
Opening: /dev/pts/27 CCPLEX: 5
Opening: /dev/pts/28 CCPLEX: 6
Opening: /dev/pts/29 CCPLEX: 7
Opening: /dev/pts/30 CCPLEX: 8
Opening: /dev/pts/31 CCPLEX: 9
Opening: /dev/pts/32 CCPLEX: 10
################################# 001 ##
/dev/pts/22 [Guest 0]
/dev/pts/23 [BPMP]
/dev/pts/24 [Resource Manager]
/dev/pts/25 [Monitor Partition]
/dev/pts/26 [System Manager]
/dev/pts/27 [Storage]
/dev/pts/28 [Security Engine]
/dev/pts/29 [Debug Server]
/dev/pts/30 [TrustZone Server]
/dev/pts/32 [Hypervisor]
$ ls /path/to/logging/dir/
BPMP.txt CCPLEX10.txt CCPLEX2.txt CCPLEX4.txt CCPLEX6.txt CCPLEX8.txt raw-logs.txt SCE.txt TZ.txt
CCPLEX0.txt CCPLEX1.txt CCPLEX3.txt CCPLEX5.txt CCPLEX7.txt CCPLEX9.txt RCE.txt SPE.txt
Each file contains the respective terminal’s output.
Usage mode #3 (raw logging)
In this mode, a raw file is additionally created that contains the output of all the terminals.
$ /path/to/tcu_muxer -g 11 -b 10 -d /dev/ttyUSB2 -l /path/to/logging/file
Opening: /dev/pts/16 RCE
Opening: /dev/pts/17 BPMP
Opening: /dev/pts/18 SCE
Opening: /dev/pts/19 SPE
Opening: /dev/pts/20 TZ
Opening: /dev/pts/22 CCPLEX: 0
Opening: /dev/pts/23 CCPLEX: 1
Opening: /dev/pts/24 CCPLEX: 2
Opening: /dev/pts/25 CCPLEX: 3
Opening: /dev/pts/26 CCPLEX: 4
Opening: /dev/pts/27 CCPLEX: 5
Opening: /dev/pts/28 CCPLEX: 6
Opening: /dev/pts/29 CCPLEX: 7
Opening: /dev/pts/30 CCPLEX: 8
Opening: /dev/pts/31 CCPLEX: 9
Opening: /dev/pts/32 CCPLEX: 10
################################# 001 ##
/dev/pts/22 [Guest 0]
/dev/pts/23 [BPMP]
/dev/pts/24 [Resource Manager]
/dev/pts/25 [Monitor Partition]
/dev/pts/26 [System Manager]
/dev/pts/27 [Storage]
/dev/pts/28 [Security Engine]
/dev/pts/29 [Debug Server]
/dev/pts/30 [TrustZone Server]
/dev/pts/32 [Hypervisor]
/path/to/logging/file contains the raw file with the control characters that can be demuxed offline using the /path/to/tcu_muxer_raw_log_dump.py script.
$ /path/to/tcu_muxer_raw_log_dump.py -h
Usage: ./tcu_muxer_raw_log_dump.py -l path [-g|-c]
-l, --logfile : Path of the file containing the raw logs captured using tcu_muxer -l option
-g, --guestid : Guest ID. Prints Hypervisor log if no value is passed
-c, --cluster : Cluster Name. One of: "RCE", "BPMP", "SCE", "SPE", "TZ", "CCPLEX"
The dumps the BPMP logs on the stdout extracted from /path/to/logging/file:
$ /path/to/tcu_muxer_raw_log_dump.py -l /path/to/logging/file -c BPMP
Dump the CCPLEX: 5 logs on the stdout extracted from /path/to/logging/file:
$ /path/to/tcu_muxer_raw_log_dump.py -l /path/to/logging/file -g 5
Use the raw log file to see the timeline of events across terminals and to represent the state of the system in a single file to allow the recipient to extract the logs they are interested in.
The -s and -l option can be used together.
Usage mode#4 (tmux with tcu_muxer)
This is a wrapper over the tcu_muxer tool that creates a tmux session with a separate window for each terminal.
$ /path/to/tcu_muxer_tmux.sh -g 11 -b 10 -d /dev/ttyUSB2 -s /path/to/logging/dir/ -l /path/to/logging/file
Opening: /dev/pts/16 RCE
Opening: /dev/pts/17 BPMP
Opening: /dev/pts/18 SCE
Opening: /dev/pts/19 SPE
Opening: /dev/pts/20 TZ
Opening: /dev/pts/22 CCPLEX: 0
Opening: /dev/pts/23 CCPLEX: 1
Opening: /dev/pts/24 CCPLEX: 2
Opening: /dev/pts/25 CCPLEX: 3
Opening: /dev/pts/26 CCPLEX: 4
Opening: /dev/pts/27 CCPLEX: 5
Opening: /dev/pts/28 CCPLEX: 6
Opening: /dev/pts/29 CCPLEX: 7
Opening: /dev/pts/30 CCPLEX: 8
Opening: /dev/pts/31 CCPLEX: 9
Opening: /dev/pts/32 CCPLEX: 10
################################# 001 ##
/dev/pts/22 [Guest 0]
/dev/pts/23 [BPMP]
/dev/pts/24 [Resource Manager]
/dev/pts/25 [Monitor Partition]
/dev/pts/26 [System Manager]
/dev/pts/27 [Storage]
/dev/pts/28 [Security Engine]
/dev/pts/29 [Debug Server]
/dev/pts/30 [TrustZone Server]
/dev/pts/32 [Hypervisor]
$ tmux attach
Attaches to the tmux session. There are two windows: one for all the R5 clusters and the other for all the CCPLEX terminals. Select the panes and windows using the mouse. To select text, hold shift and select; otherwise, the selection is captured by tmux and is not copied to the system clipboard.
Finding the Number of VM Partitions
tcu_muxer takes the number of terminals to launch as an input parameter, -g. The required number of terminals depends on the number of virtual machines/partitions present in a given virtualized system configuration.
The tool pctdump can get this information by reading the configuration blob.
Usage
pctdump <pct configuration blob>
Here is an example (for E3550 T194 Hypervisor Linux Configuration):
$ <TOP>/virtualization/tools/t18x/pctdump_x86/pctdump <TOP>/virtualization/hypervisor/t19x/configs/t194ref-release/pct/linux-linux/pct.bin
Guest Names
[0] Guest 0
[1] BPMP
[2] Resource Manager
[3] Monitor Partition
[4] System Manager
[5] Storage
[6] Security Engine
To the total of 7 VMs, add 2 VMs for internal debug and TZ server and 1 VM for Hypervisor. The final count is 10, and the tcu_muxer command is:
$ tcu_muxer -g 10 -b 9 -d /dev/ttyUSB2