Open topic with navigation
Projects
A new Android project can be created using the File > New > Project menu. Normal Visual C++ projects are created and set to use a custom Android platform. Projects can be set to build in the Visual Studio environment or using external build files.
Project Templates
Nine project templates are available in the Android category.
1. Android Application
This template creates a basic Android application that contains only Java sources. The project is created with one defined Activity.
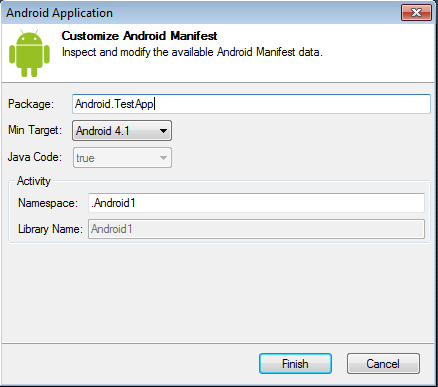
- Package — Sets the package name for the application.
- Min Target — Sets the minimum target API level for the application. The application will not run on a device using a lower API.
- Namespace — Sets the namespace to use for the application.
2. Android Application with Native Library
This template creates a basic Android project that includes a Native library. The project includes both Java and native C sources. One Activity is defined and includes a native JNI method that is implemented in the C source.
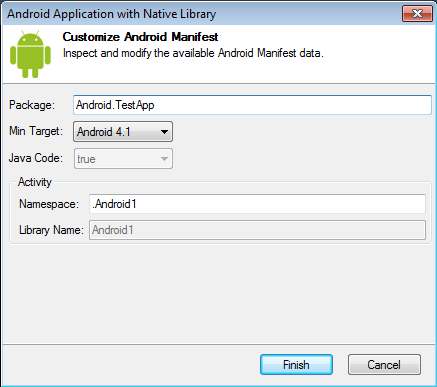
- Package — Sets the package name for the application.
- Min Target — Sets the minimum target API level for the application. The application will not run on a device using a lower API.
- Namespace –— Sets the namespace to use for the application.
3. Android Hello World Demo
This project builds a sample “Hello World” application. It includes both Java and native C sources. The Java sources make JNI calls to the C sources to obtain text that is displayed on the screen. This project will build in the Visual Studio environment.
4. Android Native Application Project
This template creates a native activity application. The project does not contain Java sources and uses the NativeActivity class, http://developer.android.com/reference/android/app/NativeActivity.html.
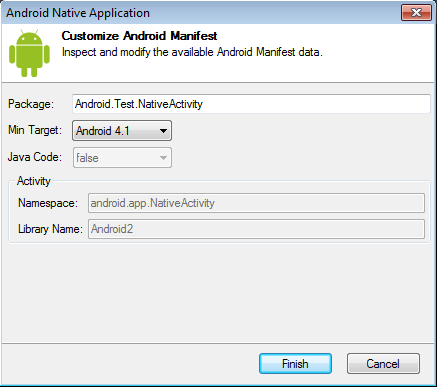
- Package — Sets the package name for the application.
- Min Target — Sets the minimum target API level for the application. The application will not run on a device using a lower API.
5. Android Project (External Build System)
This template creates a VC++ Makefile-like project to call external tools to build the Android project. This project allows debugging the built application as well as external APKs without the need to build them at all. It replaces the old "Debug Only" project type.
When you select this project type, you will be presented with the External Build System Project Wizard.
This allows you to set many of the options that you will later find on the Debugging Properties page.
- Attach — Select whether you would like to attach to the process instead of launching it.
- Working Directory — Set the directory where the tool will search for important files, such as the source, manifest, etc. Other paths may be absolute or relative to the working directory. If other path properties are not overridden, they are typically assumed to match the standard Tegra-Android project output.
- Path to APK — (optional) Set the path to the APK that will be deployed to the target device, if debugging is launched instead of attached.
- Path to gdb.setup — (optional) Choose where to find the optional setup file that can be used to issue GDB commands. Your external build system might not produce a setup file. Overrides the default relative to working directory.
- Symbols directories — (optional) Select path(s) to directories where
.so files reside with symbol information. Note that there are typically two copies of each .so file, so be sure to use the directory with the file that has not been stripped (typically the larger one). You can use Cygwin nm.exe to inspect the .so files.
- Native source code directories — (optional) Set extra paths where source code may be found, if the paths built into the symbols are insufficient for GDB to resolve the source.
- Java class directories — (optional) Select the path to the compiled Java files, before they were converted to Android format.
- Java source code directories — (optional) Set the base path to the Java source code.
Note that this template is not called Makefile like Microsoft’s project type, to avoid confusion with makefiles used in other Android project types which utilize the NDK. Please see standard Microsoft VC++ Makefile help for more details.
6. Dynamic Library for Android Application
This template creates a basic dynamic native library for use in the Android applications. This project may contain only C/C++ code.
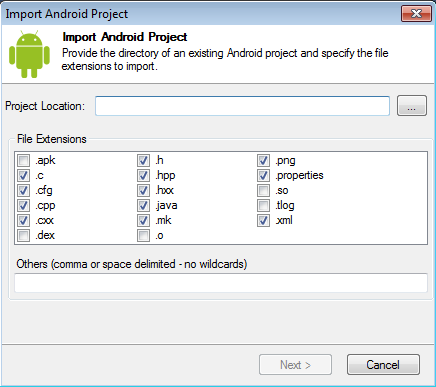
7. Import Android Project
This template creates a Visual Studio project for an existing Android SDK and/or NDK project. The sources for the existing project are imported into the Visual Studio project. The template includes a wizard to specify the location of the existing project and what files should be imported into the Visual Studio project.
The configuration type for this project will be set to Make Application. It will build with ANT and the NDK tools ndk-build.cmd script.

8. Import Android Project and Create JNI Library
This template creates a Visual Studio project for an existing Android SDK project. It is used when you want to add native C sources to an existing Android Java project. It will add template JNI C source files and build a native library.
9. Static Library for Android Application
This template creates a basic static native library for use in the Android applications. This project may contain only C/C++ code.
Project Properties
Project properties can be accessed through the normal means of right-clicking on the desired project and selecting the Properties menu.
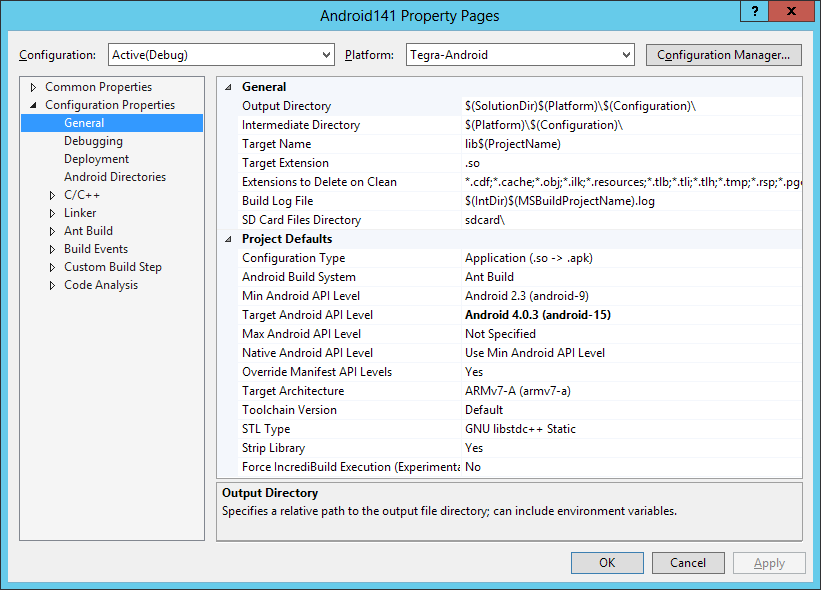
General Properties
This page contains the general properties for the project.
- Output Directory — Sets the directory where native output files are created. This setting is not available for Make Application projects.
- Intermediate Directory — Sets the directory where native intermediate files are created. This setting is not available for Make Application projects.
- Target Name — Sets the name of the native library that is created. This setting is not available for Make Application projects.
 | Note: If you are making an .so file, you must prefix the name with lib. However, when loading from Java System.loadLibrary(), then you pass in the name without the lib prefix. This is the standard Android convention. |
- Target Extension — Sets the extension of the native library. For Android platforms, this should be set to .so. This setting is not available for Make Application projects.
- Extensions to Delete on Clean — Sets the extensions of files to delete when the project is cleaned.
- Build Log File — Sets the location of the log file that is created with build results.
- Configuration Type — Sets the type of build to perform.
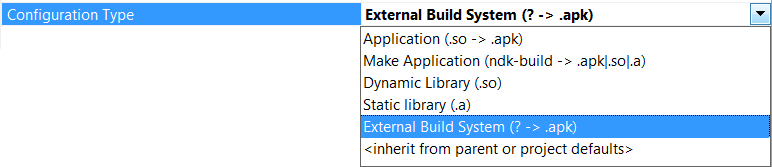
The Configuration Type can be one of the following:- Application — Builds the native C/C++ sources into a shared library. Java sources are built using the Android SDK ANT to produce the final application package (
.apk) file. For debug builds, a copy of gdbserver is included in the application and a GDB initialization file, gdb.setup, is created. - Make Application — Builds the native C/C++ sources using external make files and the
ndk-build script. Java sources are built using the Android SDK ANT to produce the final application package file. - Dynamic Library — Builds C/C++ sources into a dynamic shared library. No ANT build is performed and no application package file is produced.
- Static Library — Builds the C/C++ sources into a static library. No ANT build is performed and no application package file is produced.
- External Build System — A VC++ Makefile-like project to run a different build system (such as Eclipse or Unreal Build Tools). Not all systems may work, but if compatible, then you should be able to sync, launch, and debug with Nsight Tegra. This project can be also used for the debugging purposes exclusively. In that case, the user points the properties in the debug page at a
.apk that is not built by this project. The .apk could be built by a different Nsight Tegra project or come from the other sources. This project type replaces "Debug Only" projects.
- Min Android API Level — This is the minimum API level required for the application to run. The Android system will prevent the user from installing the application if the system's API level is lower than the value specified here.
- Target Android API Level — Sets the Android API level to use for the project. The project output can only be installed to devices that support this level or higher. For Make Application projects, this setting ensures that the correct toolset header files are found for Intellisense.
- Max Android API Level — If the application's
maxSdkVersion attribute is lower than the API level used by the system itself, the system will not allow the application to be installed. Generally you should only set this attribute if you plan to make different versions of your app for different API ranges; otherwise, it's recommended to leave this setting blank, which provides no maximum limit.
- Native Android API Level — Sets the Android API level to use for building native code. It is recommended that Native Android API Level matches Min Android API Level.
- Override Manifest API Levels — Choose whether or not to override API levels that had their values set in
AndroidManifest.xml.
- Target Architecture (only visible in the Tegra-Android platform) — Sets the target architecture for the project build. For Make Application projects, this setting ensures that the correct toolset header files are found for IntelliSense.
- Platforms to Package (only visible if Target Architecture is Multiple) — Sets the platforms to package into the APK. Can be any combination of the following: ARM, AArch64, x86, x64, separated by semicolons. For example:
ARM;x86.
- Toolchain Version — Sets the NSK toolchain version for the project. Some of the toolchains are not available in each of the supported NDKs, in such cases a build error message will be displayed.
- STL Type — Sets the type of STL support for the project. For Make Application projects, this setting ensures that the correct toolset header files are found for IntelliSense.
- Strip Library — Sets whether or not to strip the unneeded info from a shared library. This does not affect the debugging process, because the unstripped version is always preserved.
- Force IncrediBuild Execution (Experimental) — Sets whether or not to force tool execution when building with IncrediBuild. This may increase the building speed, but the tool output, errors and warnings will not be reported in Output window and Error List.
Debugging Properties
This page selects the debugger and options. The Android Debugger is used to debug the projects.
- Attach — Sets whether the debugger will install and run the project output or attach to an already running application on the Android device.
- Debug Mode — Sets the type of code to debug. One of the following can be selected:
- Java code — Only Java code will be debugged. Any native breakpoints will not be set.
- Native code — Only Native C/C++ code will be debugged. Any Java breakpoints will not be set.
- Java and Native code — Both Java code and Native C/C++ code will be debugged. All breakpoints will be set.
- Suspend on Launch — Sets whether the Android application will be started in suspended mode.
- Override APK Path — Sets the location of the
.apk that will be debugged if you are using one that is not in build.xml.
- Additional Library Symbols Directories — Sets one or more directories which should be used to search for library debug symbols.
- Additional GDB Directories —Sets any source code directories that cannot be added automatically to the build system. This property is only used by non NDK-build projects.
- GDB Working Directory — Sets the path to the
build.xml file folder.
- gdb.setup File Folder — Sets the path to the
gdb.setup file folder. If one is not specified, the default path will be used.
- Java Source Directory — Sets the path to the Java source code root folder. If empty, this will use the path from the Ant Build page. (If Ant Build is disabled, then the
src relative to the build.xml path will be used.)
- Java Classes Directory — Sets the path to the Java classes folder. If empty, then
bin\classes relative to the build.xml path will be used.
Deployment
This page allows you to edit the deploy options of the project.
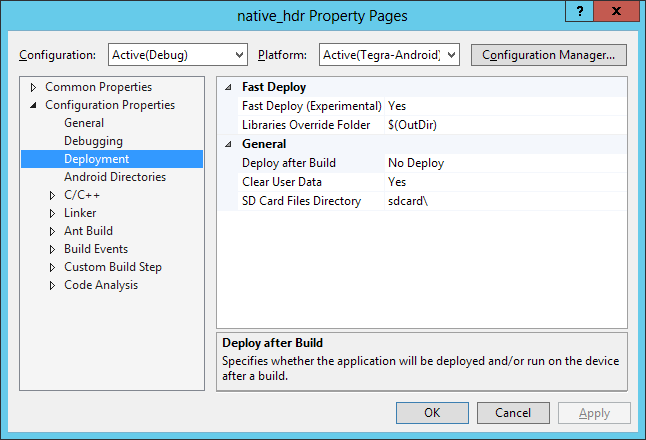
- Fast Deploy (Experimental) — Sets whether to allow faster deployment by replacing only the native libraries when possible. This feature is experimental. If the changes made to the native code are not visible in run-time (i.e. if it feels like a previous version of native code is running on the device), turn this feature off.
- Libraries Override Folder — Sets the folder with the library overrides for fast deploy. The folder must contain the stripped versions of the libraries, names of which are prefixed with
stripped_. For example, stripped_libAndroid1.so.
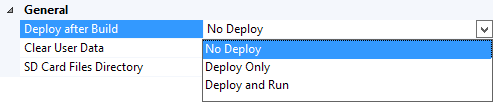
- Deploy after Build — Sets whether the application is installed to the device and/or run after a successful build of the project.
- Clear User Data — Sets whether an application’s user data is deleted one the target when the application is launched.
- SD Card Files Directory — Sets the location of the SD Card files directory.
Android Directories
This page allows you to edit the locations of the Android SDK, Android ANT, JDK, and Android NDK.
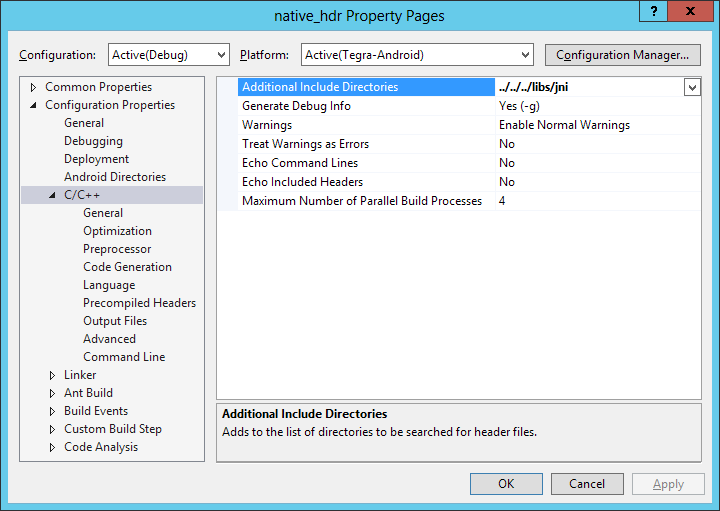
C/C++ Properties
This category contains pages for configuring C/C++ compiler options, such as additional include directories, or whether or not to generate debug info.
Using Precompiled Headers
Nsight Tegra supports the use of precompiled headers.
On the Precompiled Header tab, you can select whether to create or use a precompiled header during the build.

To use the precompiled header, first set Precompiled Header to Use on the project level, and create two files for the precompiled header: stdafx.h and stdafx.cpp. Names of the files without the extension must match the Precompiled Header File property. In stdafx.cpp add the only line:
#include "stdafx.h"
Include any headers you want to precompile in the stdafx.h.
Nsight Tegra forces inclusion of the precompiled header into every file that has the Precompiled Header property set to Use. However, it is better to include it manually; otherwise, the Visual Studio Intellisense might not work as expected. Note that precompiled header files are not passed to the linker/librarian.
It is also possible to print the included headers in the Output window. To configure this, set C/C++ > General > Echo Included Headers to Yes. This will make the compiler print the name of each header file used, indented with dots based on #include depth. If you are using GCC, precompiled headers will also be printed; invalid ones are printed with x and valid ones are printed with !. Clang does not print included precompiled headers at all.
On the Language tab, you can select the language standard that you want the compiler to use.
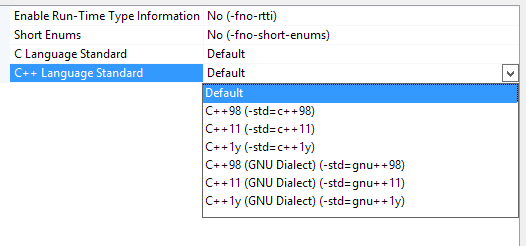
This property dictates which rules the GCC or Clang compiler will use when processing the files. This affects what grammar is correct, and what language features are supported and recognized.
Linker Properties
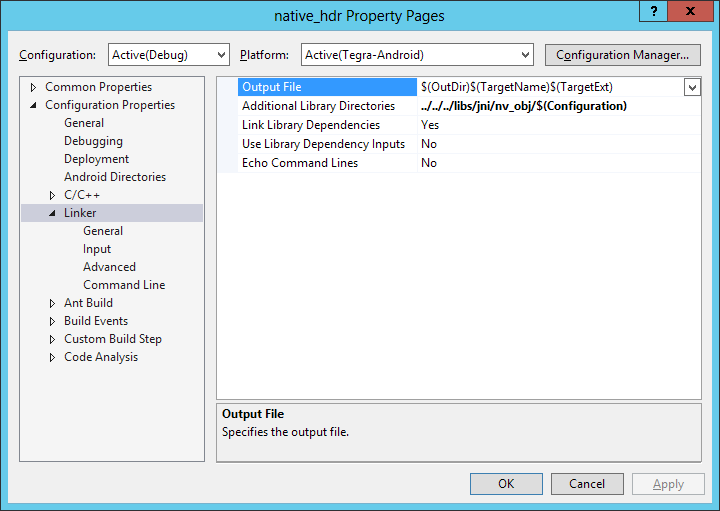
This category contains pages for linker options.
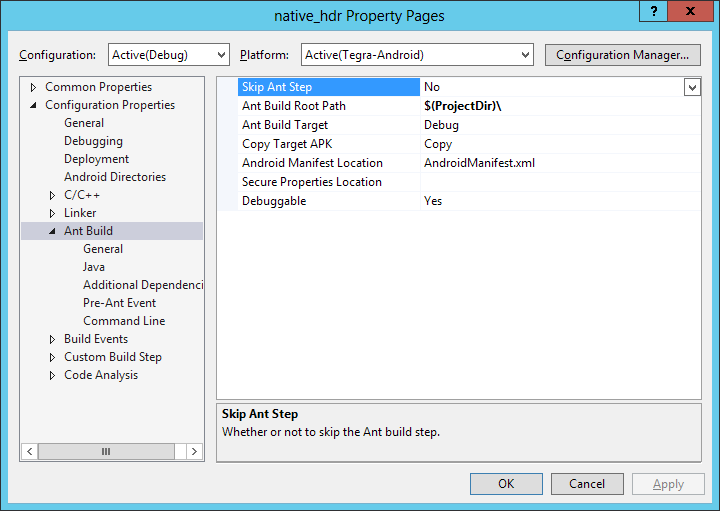
Ant Build Properties
This page contains options for the Android SDK ANT build.
- Skip Ant Step — Sets whether or not to skip the Ant build step. The "If Dependencies Are Up-to-Date" option skips the Ant step when only the native code has changed. It is meant to be used with the Fast Deploy feature.
- Ant Build Root Path — Sets the root directory for the ANT build.
- Ant Build Target — Sets the Ant build target: Debug, Release, or any other. Debug targets should end with "debug." Debug builds are signed with a debug key.
- Copy Target APK — The options here are: (a) copy the APK to the Output folder, (b) move the APK to the Output folder, (c) create a hard link to the APK, or (d) do nothing.
- Android Manifest Location — States the path to the Android manifest file. This should either be absolute or relative to the project directory.
- Secure Properties Location — States the location of the secure properties file. Either use an existing one, or use the Signing Options context menu command to generate it and set this property automatically.
- Debuggable — States whether or not to allow debugging projects. This setting overrides the
android:debuggable attribute in the manifest file. This does not affect ndk-build projects, as they're controlled by the NDK_APP_DEBUGGABLE variable in the *.mk file instead.
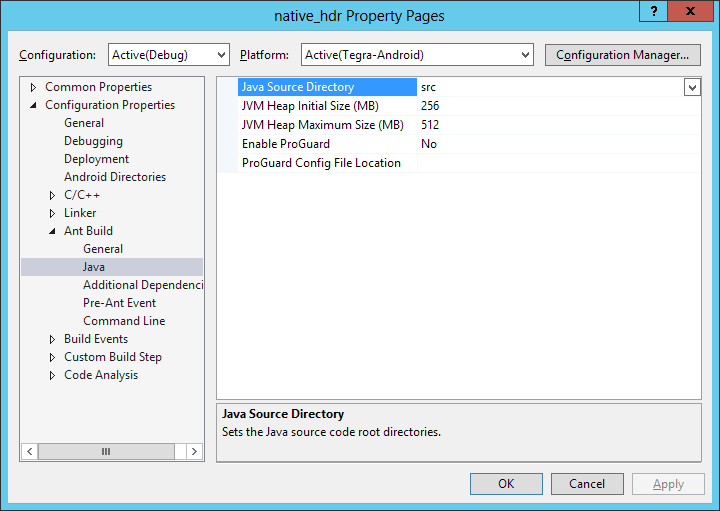
- Java Source Directory — Sets the path to the Java source directory.
- JVM Heap Initial Size (MB) — Sets the VM initial heap size used for the build.
- JVM Heap Maximum Size (MB) — Sets the VM maximum heap sized used for the build.
- Enable ProGuard — Whether to use ProGuard to shrink, optimize and obfuscate the code by removing unused code and renaming classes, fields, and methods with semantically obscure names.
- ProGuard Config File Location — Location of the ProGuard config file. Leave empty to use the default one.
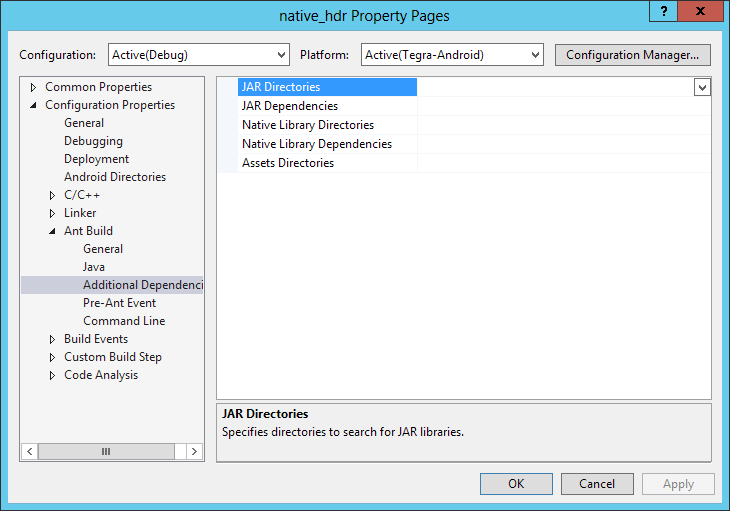
- JAR Directories — Specifies directories to search for JAR libraries.
- JAR Dependencies — Specifies JAR dependencies.
- Native Library Directories — Specifies directories to search for
.so libraries.
- Native Library Dependencies — Specifies
.so dependencies.
- Assets Directories — Specifies assets directories to copy into the main assets folder before build.
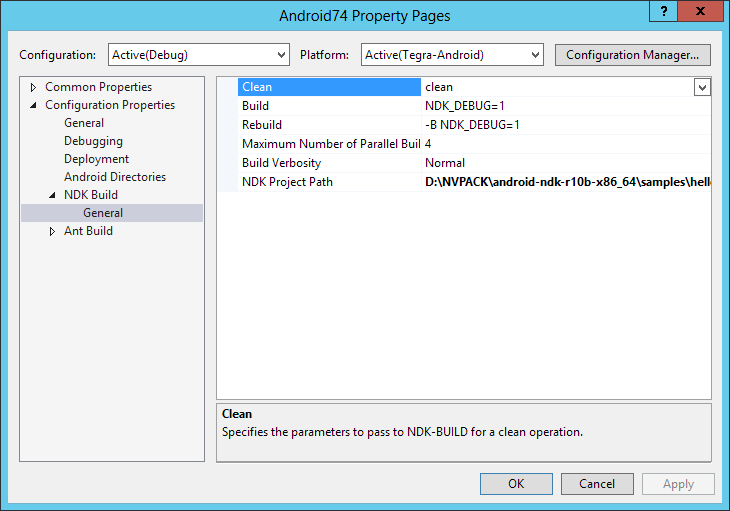
NDK Build Properties
This page displays properties for projects that build with NDK-BUILD. It is only available when the configuration type is set to Make Application.
- Clean — Sets the arguments that will be passed to
NDK-BUILD when the project is cleaned.
- Build — Sets the arguments that will be passed to
NDK-BUILD when the project is incrementally built.
- Rebuild — Sets the arguments that will be passed to
NDK-BUILD when the project is rebuilt.
-
Maximum Number of Parallel Build Processes — Sets the maximum number of simultaneous processes that compile native source files.
-
Build Verbosity — Specifies whether the Build, Rebuild and Clean operations should be performed verbosely.
-
NDK Project Path — Specifies a folder in which ndk-build will be run.
Installing Applications
There are two ways to install a project application on a device. The project can be set to automatically install and run applications after a successful build. This can be set in the project properties (see Ant Build Properties).
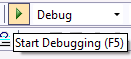
The project can also be launched using the Visual Studio Start Debugging button. This will install the application on the currently selected device and start a debug session.

NVIDIA® GameWorks™ Documentation Rev. 1.0.211026 ©2014-2021. NVIDIA Corporation and affiliates. All Rights Reserved.