GRID Virtual GPU User Guide
NVIDIA GRID™ vGPU™ enables multiple virtual machines (VMs) to have simultaneous, direct access to a single physical GPU, using the same NVIDIA graphics drivers that are deployed on non-virtualized Operating Systems. By doing this, GRID vGPU provides VMs with unparalleled graphics performance and application compatibility, together with the cost-effectiveness and scalability brought about by sharing a GPU among multiple workloads.
1.1. How this guide is organized
GRID Virtual GPU User Guide is organized as follows:
- This chapter introduces the architecture and features of vGPU.
- Getting Started provides a step-by-step guide to getting started with vGPU on Citrix XenServer and VMware ESXi.
- Using vGPU on Linux describes using vGPU with Linux VMs.
- Performance monitoring covers vGPU performance monitoring on XenServer.
- XenServer vGPU Management covers vGPU management on XenServer.
- XenServer Performance Tuning covers vGPU performance optimization on XenServer.
- Troubleshooting provides guidance on troubleshooting.
1.2. GRID vGPU architecture
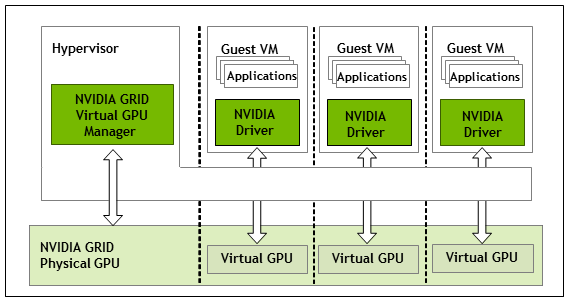
GRID vGPU’s high-level architecture is illustrated in Figure 1. Under the control of NVIDIA’s GRID Virtual GPU Manager running under the hypervisor, GRID physical GPUs are capable of supporting multiple virtual GPU devices (vGPUs) that can be assigned directly to guest VMs.
Guest VMs use GRID virtual GPUs in the same manner as a physical GPU that has been passed through by the hypervisor: an NVIDIA driver loaded in the guest VM provides direct access to the GPU for performance-critical fast paths, and a paravirtualized interface to the GRID Virtual GPU Manager is used for non-performant management operations.
Figure 1. GRID vGPU System Architecture
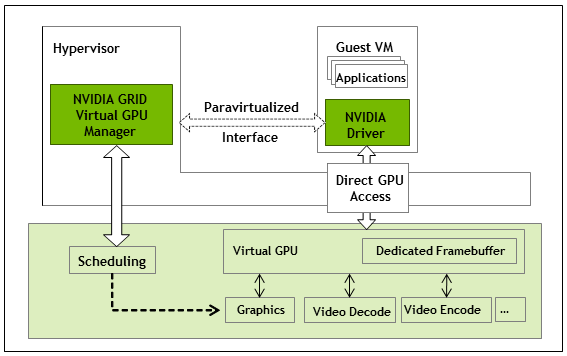
GRID vGPUs are analogous to conventional GPUs, having a fixed amount of GPU framebuffer, and one or more virtual display outputs or “heads”. The vGPU’s framebuffer is allocated out of the physical GPU’s framebuffer at the time the vGPU is created, and the vGPU retains exclusive use of that framebuffer until it is destroyed.
All vGPUs resident on a physical GPU share access to the GPU’s engines including the graphics (3D), video decode, and video encode engines.
Figure 2. GRID vGPU Internal Architecture
1.3. Supported GPUs
GRID vGPU is supported on NVIDIA GRID K1, K2, and is available as a licensed feature on Tesla M60, M6. Refer to the release notes for a list of recommended server platforms to use with GRID GPUs.
1.3.1. Virtual GPU types
GRID K1, K2, and Tesla M60 each implement multiple physical GPUs; K2 and M60 have 2 GPUs onboard; GRID K1 has 4 GPUs. Tesla M6 implements a single physical GPU.
Each physical GPU can support several different types of virtual GPU. Virtual GPU types have a fixed amount of frame buffer, number of supported display heads and maximum resolutions, and are targeted at different classes of workload
The virtual GPU types supported by GRID GPUs are defined in Table 1, Table 2, Table 3, and Table 4.
Due to their differing resource requirements, the maximum number of vGPUs that can be created simultaneously on a physical GPU varies according to the vGPU type. For example, a GRID K2 physical GPU can support up to 4 K240Q vGPUs on each of its two physical GPUs, for a total of 8 vGPUs, but only 2 K260Qs vGPUs, for a total of 4 vGPUs.
| Physical GPUs | GRID Virtual GPU | Intended Use Case | Frame Buffer (Mbytes) | Virtual Display Heads | Maximum Resolution per Display Head | Maximum vGPUs per GPU | Maximum vGPUs per Board |
|---|---|---|---|---|---|---|---|
| 4 | K180Q | Power User | 4096 | 4 | 2560×1600 | 1 | 4 |
| 4 | K160Q | Power User | 2048 | 4 | 2560×1600 | 2 | 8 |
| 4 | K140Q | Power User | 1024 | 2 | 2560×1600 | 4 | 16 |
| 4 | K120Q | Power User | 512 | 2 | 2560×1600 | 8 | 32 |
| 4 | K100 | Knowledge Worker | 256 | 2 | 1920×1200 | 8 | 32 |
| Physical GPUs | GRID Virtual GPU | Intended Use Case | Frame Buffer (Mbytes) | Virtual Display Heads | Maximum Resolution per Display Head | Maximum vGPUs per GPU | Maximum per Board |
|---|---|---|---|---|---|---|---|
| 2 | K280Q | Designer | 4096 | 4 | 2560×1600 | 1 | 2 |
| 2 | K260Q | Power User, Designer | 2048 | 4 | 2560×1600 | 2 | 4 |
| 2 | K240Q | Power User, Designer | 1024 | 2 | 2560×1600 | 4 | 8 |
| 2 | K220Q | Power User, Designer | 512 | 2 | 2560×1600 | 8 | 16 |
| 2 | K200 | Knowledge Worker | 256 | 2 | 1920×1200 | 8 | 16 |
| Physical GPUs | GRID Virtual GPU | Intended Use Case | Frame Buffer (Mbytes) | Virtual Display Heads | Maximum Resolution per Display Head | Maximum vGPUs per GPU | Maximum vGPUs per Board |
|---|---|---|---|---|---|---|---|
| 2 | M60-8Q | Designer | 8192 | 4 | 4096×2160 | 1 | 2 |
| 2 | M60-4Q | Designer | 4096 | 4 | 4096×2160 | 2 | 4 |
| 2 | M60-2Q | Designer | 2048 | 4 | 4096×2160 | 4 | 8 |
| 2 | M60-1Q | Power User, Designer | 1024 | 2 | 4096×2160 | 8 | 16 |
| 2 | M60-0Q | Power User, Designer | 512 | 2 | 2560×1600 | 16 | 32 |
| 2 | M60-1B | Power User | 1024 | 4 | 2560×1600 | 8 | 16 |
| 2 | M60-0B | Power User | 512 | 2 | 2560×1600 | 16 | 32 |
| 2 | M60-8A | Virtual Application User | 8192 | 1 | 1280×1024 | 1 | 2 |
| 2 | M60-4A | Virtual Application User | 4096 | 1 | 1280×1024 | 2 | 4 |
| 2 | M60-2A | Virtual Application User | 2048 | 1 | 1280×1024 | 4 | 8 |
| 2 | M60-1A | Virtual Application User | 1024 | 1 | 1280×1024 | 8 | 16 |
| Physical GPUs | GRID Virtual GPU | Intended Use Case | Frame Buffer (Mbytes) | Virtual Display Heads | Maximum Resolution per Display Head | Maximum vGPUs per GPU | Maximum vGPUs per Board |
|---|---|---|---|---|---|---|---|
| 1 | M6-8Q | Designer | 8192 | 4 | 4096×2160 | 1 | 1 |
| 1 | M6-4Q | Designer | 4096 | 4 | 4096×2160 | 2 | 2 |
| 1 | M6-2Q | Designer | 2048 | 4 | 4096×2160 | 4 | 4 |
| 1 | M6-1Q | Power User, Designer | 1024 | 2 | 4096×2160 | 8 | 8 |
| 1 | M6-0Q | Power User, Designer | 512 | 2 | 2560×1600 | 16 | 16 |
| 1 | M6-1B | Power User | 1024 | 4 | 2560×1600 | 8 | 8 |
| 1 | M6-0B | Power User | 512 | 2 | 2560×1600 | 16 | 16 |
| 1 | M6-8A | Virtual Application User | 8192 | 1 | 1280×1024 | 1 | 1 |
| 1 | M6-4A | Virtual Application User | 4096 | 1 | 1280×1024 | 2 | 2 |
| 1 | M6-2A | Virtual Application User | 2048 | 1 | 1280×1024 | 4 | 4 |
| 1 | M6-1A | Virtual Application User | 1024 | 1 | 1280×1024 | 8 | 8 |
GRID vGPU is a licensed feature on Tesla M6/M60. A software license is required to use full vGPU features within the guest VM. For more details, see Licensing vGPU on Windows, Licensing GRID vGPU on Linux, and GRID Licensing User Guide.
Virtualized applications are rendered in an off-screen buffer. Therefore, the maximum resolution for the A series of GRID vGPUs is independent of the maximum resolution of the display head.
GRID vGPUs with less than 1 Gbyte of frame buffer support only 1 virtual display head on a Windows 10 guest OS.
1.3.2. Homogeneous virtual GPUs
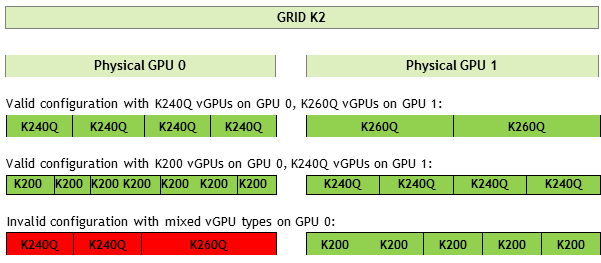
This release of GRID vGPU supports homogeneous virtual GPUs: at any given time, the virtual GPUs resident on a single physical GPU must be all of the same type. However, this restriction doesn’t extend across physical GPUs on the same card. Each physical GPU on a K1 or K2 may host different types of virtual GPU at the same time.
For example, a GRID K2 card has two physical GPUs, and can support five types of virtual GPU; GRID K200, K220Q, K240Q, K260Q, and K280Q. Figure 3 shows some example virtual GPU configurations on K2:
Figure 3. Example vGPU configurations on GRID K2
1.4. Guest VM support
GRID vGPU supports Windows and Linux guest VM operating systems. The supported vGPU types depend on the guest VM OS.
For details of the supported releases of Windows and Linux, and for further information on supported configurations, see the driver release notes for your hypervisor.
1.4.1. Windows guest VM support
Windows guest VMs are supported on all GRID virtual GPU types.
1.4.2. Linux guest VM support
64-bit Linux guest VMs are supported on the following virtual GPU types:
| Tesla M60 | Tesla M6 |
|---|---|
| M60-8Q | M6-8Q |
| M60-4Q | M6-4Q |
| M60-2Q | M6-2Q |
| M60-1Q | M6-1Q |
| M60-0Q | M6-0Q |
1.5. GRID vGPU features
This release of GRID vGPU includes support for:
- DirectX 12, Direct2D, and DirectX Video Acceleration (DXVA)
- OpenGL 4.5.
- NVIDIA GRID SDK (remote graphics acceleration).
CUDA and OpenCL are supported on these virtual GPUs:
- GRID M60-8Q, M6-8Q
This chapter provides a step-by-step guide to booting a Windows VM on Citrix XenServer and VMware vSphere with NVIDIA Virtual GPU.
2.1. Citrix XenServer
The following topics step you through the process of setting up a single Citrix XenServer VM to use GRID vGPU. After the process is complete, the VM is capable of running the full range of DirectX and OpenGL graphics applications.
These setup steps assume familiarity with the XenServer skills covered in XenServer Basics.
Prerequisites
Before proceeding, ensure that you have these prerequisites:
- NVIDIA GRID K1,K2, or Tesla M6, M60 cards.
- A server platform capable of hosting XenServer and the NVIDIA GRID or Tesla cards. Refer to the release notes for a list of recommended servers.
- The NVIDIA GRID vGPU software package for Citrix XenServer, consisting of the GRID Virtual GPU Manager for XenServer, and NVIDIA GRID vGPU drivers for Windows, 32- and 64-bit.
- Citrix XenServer 6.2 SP1 with applicable hotfixes, or later, obtainable from Citrix.
- An installed Windows VM to be enabled with vGPU.
To run Citrix XenDesktop with virtual machines running NVIDIA Virtual GPU, you will also need:
- Citrix XenDesktop 7.1 or later, obtainable from Citrix.
Earlier versions of Citrix XenServer and XenDesktop are not supported for use with NVIDIA Virtual GPU.
Review the release notes and known issues for GRID Virtual GPU before proceeding with installation.
2.1.2. Installing Citrix XenServer and XenCenter
Install Citrix XenServer and any applicable patches, following Citrix’s installation instructions.
Install the Citrix XenCenter management GUI on a PC.
2.1.3. Changing the Mode of a Tesla M60 or M6 GPU
Tesla M60 and M6 GPUs support compute mode and graphics mode. GRID vGPU requires GPUs that support both modes to operate in graphics mode.
Recent Tesla M60 GPUs and M6 GPUs are supplied in graphics mode. However, your GPU might be in compute mode if it is an older Tesla M60 GPU or M6 GPU, or if its mode has previously been changed.
If your GPU supports both modes but is in compute mode, you must use the gpumodeswitch tool to change the mode of the GPU to graphics mode. If you are unsure which mode your GPU is in, use the gpumodeswitch tool to find out the mode.
For more information, see gpumodeswitch User Guide.
2.1.4. Installing and Updating the NVIDIA Virtual GPU Manager for XenServer
The NVIDIA Virtual GPU Manager runs in XenServer’s dom0. For all supported XenServer releases, the NVIDIA Virtual GPU Manager is provided as an RPM file. Starting with the XenServer 6.5 SP1 release, the NVIDIA Virtual GPU Manager is also supplied as a Supplemental Pack.
There are separate Virtual GPU Manager files for different versions of XenServer. Consult the release notes for guidance on which package to use for each version of XenServer.
2.1.4.1. Installing the RPM package for XenServer
The RPM file must be copied to XenServer’s dom0 prior to installation (see Copying files to dom0).
- Use the rpm command to install the package:
            [root@xenserver ~]# rpm -iv  NVIDIA-vGPU-xenserver-6.2-361.40.i386.rpm
Preparing packages for installation...
NVIDIA-vGPU-xenserver-6.2-361.40
[root@xenserver ~]#
- Reboot the XenServer platform:
            [root@xenserver ~]# shutdown –r now

Broadcast message from root (pts/1) (Fri Dec 6 14:24:11 2013):

The system is going down for reboot NOW!
[root@xenserver ~]#
2.1.4.2. Updating the RPM package for XenServer
If an existing GRID Virtual GPU Manager is already installed on the system and you want to upgrade, follow these steps:
- Shut down any VMs that are using GRID vGPU.
- Install the new package using the –U option to the rpm command, to upgrade from the previously installed package:
            [root@xenserver ~]# rpm -Uv NVIDIA-vGPU-xenserver-6.2-361.40.i386.rpm
Preparing packages for installation...
NVIDIA-vGPU-xenserver-6.2-361.40
[root@xenserver ~]#
Note:You can query the version of the current GRID package using the rpm –q command:
            [root@xenserver ~]# rpm –q NVIDIA-vGPU-xenserverNVIDIA-vGPU-xenserver-6.2-361.40
[root@xenserver ~]#
If an existing NVIDIA GRID package is already installed and you don’t select the upgrade (-U) option when installing a newer GRID package, the rpm command will return many conflict errors.
Preparing packages for installation...
        file /usr/bin/nvidia-smi from install of NVIDIA-vGPU-xenserver-6.2-361.40.i386 conflicts with file from package NVIDIA-vGPU-xenserver-6.2-331.59.i386
        file /usr/lib/libnvidia-ml.so from install of NVIDIA-vGPU-xenserver-6.2-361.40.i386 conflicts with file from package NVIDIA-vGPU-xenserver-6.2-331.59.i386
        ...
- Reboot the XenServer platform:
            [root@xenserver ~]# shutdown –r now
Broadcast message from root (pts/1) (Fri Dec 6 14:24:11 2013):

The system is going down for reboot NOW!
[root@xenserver ~]#
Note:GRID Virtual GPU Manager and Guest VM drivers must be matched from the same release. After updating vGPU Manager, guest VMs will boot with vGPU disabled until their guest vGPU driver is updated to match the vGPU Manager version. Consult the release notes for further details.
2.1.4.3. Installing or Updating the Supplemental Pack for XenServer
XenCenter can be used to install or update Supplemental Packs on XenServer hosts. The NVIDIA GRID Virtual GPU Manager supplemental pack is provided as an ISO.
NVIDIA GRID Virtual GPU Manager supplemental pack installation and update are supported from XenServer 6.5 SP1 and XenCenter version 6.5 (build 6.5.2.2477) onwards.
- Select Install Update from the Tools menu.
- Click Next after going through the instructions on the Before You Start section.
- Click Add on the Select Update section and open NVIDIA’s XenServer Supplemental Pack ISO.
Figure 4. GRID vGPU Manager supplemental pack selected in XenCenter

- Click Next on the Select Update section.
- In the Select Servers section select all the XenServer hosts on which the Supplemental Pack should be installed on and click Next.
- Click Next on the Upload section once the Supplemental Pack has been uploaded to all the XenServer hosts.
- Click Next on the Prechecks section.
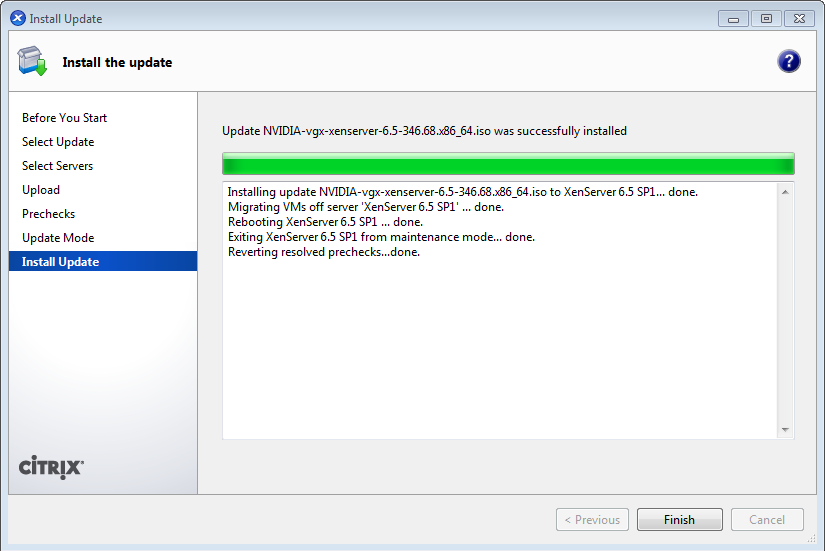
- Click Install Update on the Update Mode section.
- Click Finish on the Install Update section.
Figure 5. Successful installation of GRID vGPU Manager supplemental pack
2.1.4.4. Verifying the installation of the XenServer GRID package
After the XenServer platform has rebooted, verify the installation of the GRID package for XenServer by performing the following steps:
- Verify that the GRID package installed and loaded correctly by checking for the NVIDIA kernel driver in the list of kernel loaded modules.
            [root@xenserver ~]# lsmod | grep nvidia
nvidia               9522927  0
i2c_core               20294  2 nvidia,i2c_i801
[root@xenserver ~]#
- Verify that the NVIDIA kernel driver can successfully communicate with the GRID physical GPUs in your system by running the nvidia-smi command. The nvidia-smi command is described in more detail in Using nvidia-smi to monitor performance.
Running the nvidia-smi command should produce a listing of the GPUs in your platform.
            [root@xenserver ~]# nvidia-smi
Mon Nov 10 18:46:50 2014
+------------------------------------------------------+
| NVIDIA-SMI 361.40     Driver Version: 361.40         |
|-------------------------------+----------------------+----------------------+
| GPU  Name                     | Bus-Id        Disp.  | Volatile Uncorr. ECC |
| Fan  Temp  Perf  Pwr:Usage/Cap| Memory-Usage         | GPU-Util  Compute M. |
|===============================+======================+======================|
|   0  GRID K1                  | 0000:04:00.0     Off |                  N/A |
| N/A   27C    P0    13W /  31W |   0%    9MB / 4095MB |      0%      Default |
+-------------------------------+----------------------+----------------------+
|   1  GRID K1                  | 0000:05:00.0     Off |                  N/A |
| N/A   25C    P0    13W /  31W |   0%    9MB / 4095MB |      0%      Default |
+-------------------------------+----------------------+----------------------+
|   2  GRID K1                  | 0000:06:00.0     Off |                  N/A |
| N/A   21C    P0    13W /  31W |   0%    9MB / 4095MB |      0%      Default |
+-------------------------------+----------------------+----------------------+
|   3  GRID K1                  | 0000:07:00.0     Off |                  N/A |
| N/A   23C    P0    13W /  31W |   0%    9MB / 4095MB |      0%      Default |
+-------------------------------+----------------------+----------------------+
|   4  GRID K1                  | 0000:86:00.0     Off |                  N/A |
| N/A   24C    P0    13W /  31W |   0%    9MB / 4095MB |      0%      Default |
+-------------------------------+----------------------+----------------------+
|   5  GRID K1                  | 0000:87:00.0     Off |                  N/A |
| N/A   24C    P0    13W /  31W |   0%    9MB / 4095MB |      0%      Default |
+-------------------------------+----------------------+----------------------+
|   6  GRID K1                  | 0000:88:00.0     Off |                  N/A |
| N/A   25C    P0    13W /  31W |   0%    9MB / 4095MB |      0%      Default |
+-------------------------------+----------------------+----------------------+
|   7  GRID K1                  | 0000:89:00.0     Off |                  N/A |
| N/A   25C    P0    12W /  31W |   0%    9MB / 4095MB |      0%      Default |
+-------------------------------+----------------------+----------------------+
+-----------------------------------------------------------------------------+
| Compute processes:                                               GPU Memory |
|  GPU       PID  Process name                                     Usage      |
|=============================================================================|
|  No running compute processes found                                         |
+-----------------------------------------------------------------------------+
[root@xenserver ~]#
If nvidia-smi fails to run or doesn’t produce the expected output for all the NVIDIA GPUs in your system, see Troubleshooting for troubleshooting steps.
2.1.5. Configuring a XenServer VM with Virtual GPU
XenServer supports configuration and management of virtual GPUs using XenCenter, or the xe command line tool that is run in a XenServer dom0 shell. Basic configuration using XenCenter is described in the following sections. Command line management using xe is described in XenServer vGPU Management.
To configure a XenServer VM to use virtual GPU, follow these steps:
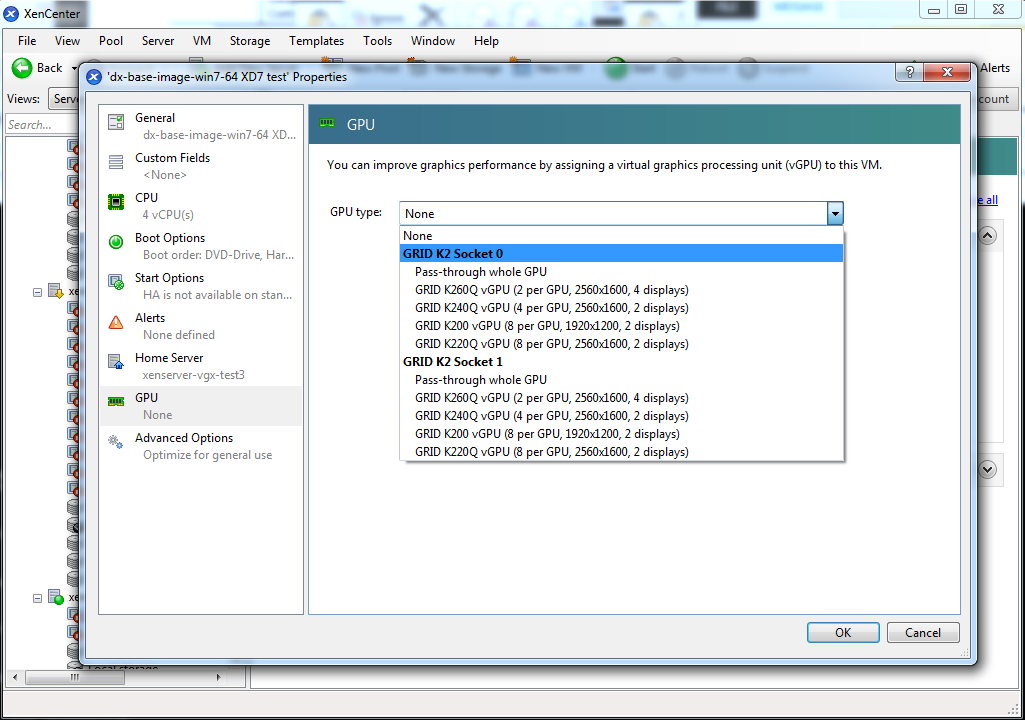
- Ensure the VM is powered off.
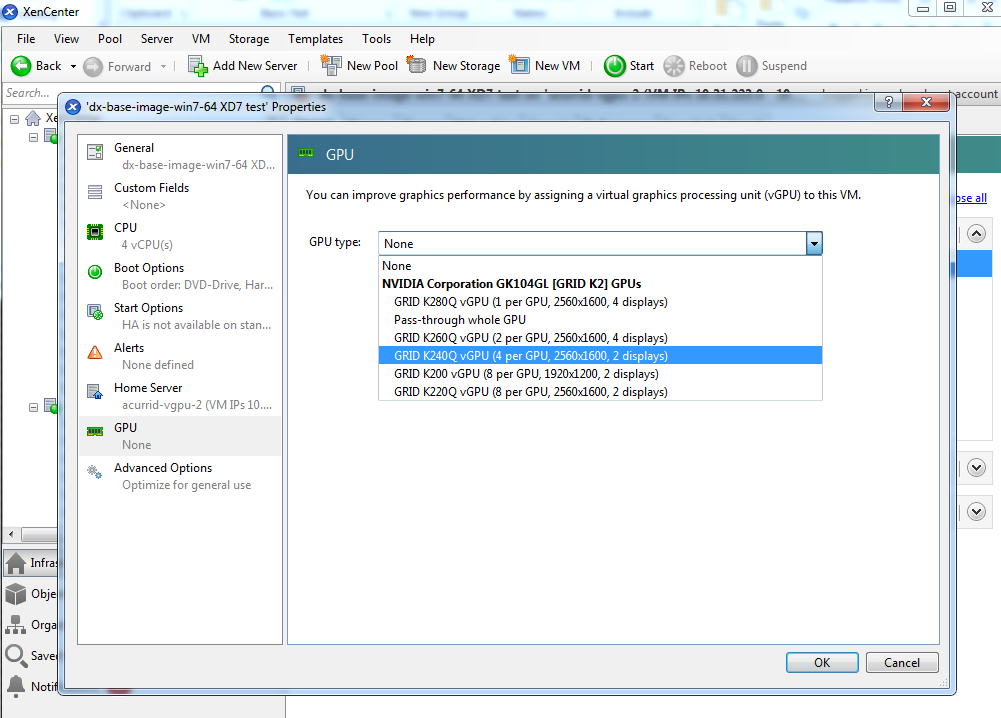
- Right-click on the VM in XenCenter, select Properties to open the VM’s properties, and select the GPU property. The available GPU types are listed in the GPU type dropdown:
Figure 6. Using XenCenter to configure a VM with a vGPU
2.1.6. Booting the XenServer VM and Installing Drivers
Once you have configured a XenServer VM with a vGPU, start the VM, either from XenCenter or by using xe vm-start in a dom0 shell.
Viewing the VM’s console in XenCenter, the VM should boot to a standard Windows desktop in VGA mode at 800×600 resolution. The Windows screen resolution control panel may be used to increase the resolution to other standard resolutions, but to fully enable vGPU operation, as for a physical NVIDIA GPU, the NVIDIA driver must be installed.
- Copy the 32-bit or 64-bit NVIDIA Windows driver package to the guest VM and execute it to unpack and run the driver installer:
Figure 7. NVIDIA driver installation in the guest VM
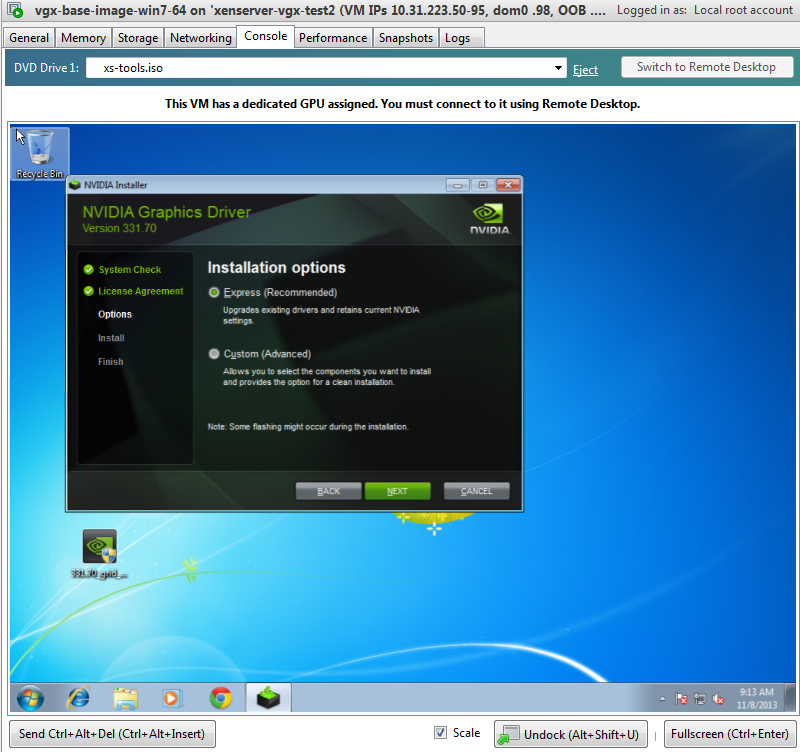
- Click through the license agreement.
- Select Express Installation. Once driver installation completes, the installer may prompt you to restart the platform.
- If prompted to restart the platform, do one of the following:
- Select Restart Now to reboot the VM.
- Exit the installer and reboot the VM when ready.
Once the VM restarts, it will boot to a Windows desktop.
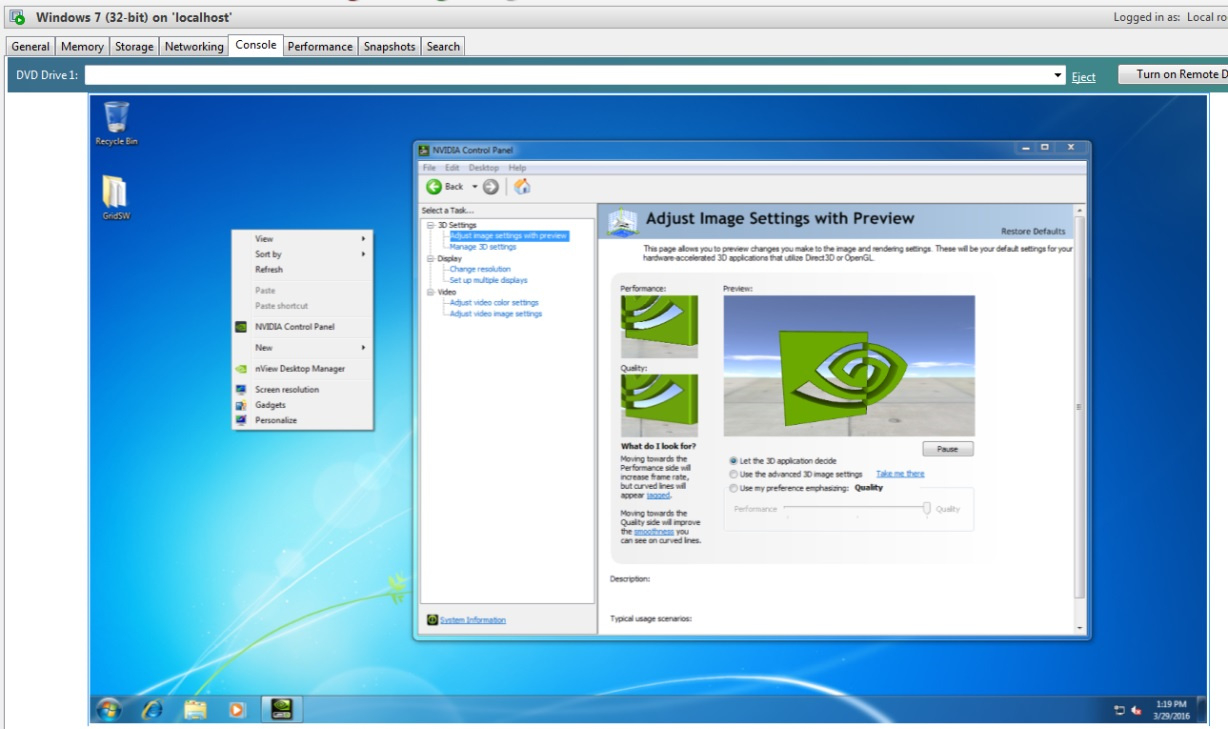
- Verify that the NVIDIA driver is running:
- Right-click on the desktop. The NVIDIA Control Panel will be listed in the menu.
- Select the NVIDIA Control Panel to open it.
- Select System Information in the NVIDIA Control Panel to report the Virtual GPU that the VM is using, its capabilities, and the NVIDIA driver version that is loaded.
Figure 8. Verifying NVIDIA driver operation using NVIDIA Control Panel
This task completes the process of setting up a single XenServer VM to use GRID vGPU. The VM is now capable of running the full range of DirectX and OpenGL graphics applications.
2.1.7. Applying a vGPU license
GRID vGPU is a licensed feature on Tesla M6, M60. When booted on these GPUs, a vGPU runs at full capability even without a license. However, until a license is acquired, users are warned each time a vGPU tries and fails to obtain a license. You may optionally configure a license server to provide licenses to a vGPU. See Licensing vGPU on Windows for details on how to configure licensing on Windows.
2.1.8. Removing a XenServer VM’s vGPU configuration
You can remove a virtual GPU assignment from a VM, such that it no longer uses a virtual GPU, by using either XenCenter or the xe command.
The VM must be in the powered-off state in order for its vGPU configuration to be modified or removed.
2.1.8.1. Removing a VM’s vGPU configuration by using XenCenter
- Set the GPU type to None in the VM’s GPU Properties, as shown in Figure 9.
Figure 9. Using XenCenter to remove a vGPU configuration from a VM
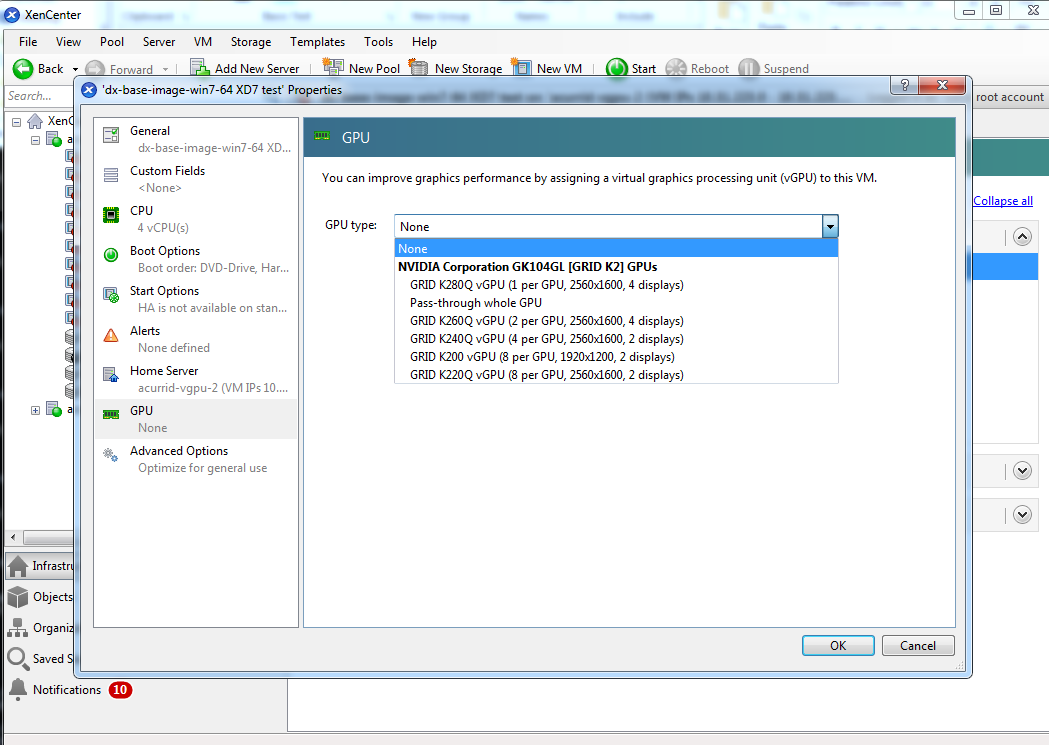
- Click OK.
2.1.8.2. Removing a VM’s vGPU configuration by using xe
- Use vgpu-list to discover the vGPU object UUID associated with a given VM:
            [root@xenserver ~]# xe vgpu-list vm-uuid=e71afda4-53f4-3a1b-6c92-a364a7f619c2
uuid ( RO)              : c1c7c43d-4c99-af76-5051-119f1c2b4188
           vm-uuid ( RO): e71afda4-53f4-3a1b-6c92-a364a7f619c2
    gpu-group-uuid ( RO): d53526a9-3656-5c88-890b-5b24144c3d96
- Use vgpu-destroy to delete the virtual GPU object associated with the VM:
            [root@xenserver ~]# xe vgpu-destroy uuid=c1c7c43d-4c99-af76-5051-119f1c2b4188
[root@xenserver ~]#
2.2. VMware vSphere
The following topics step you through the process of setting up a single VMware vSphere VM to use GRID vGPU. After the process is complete, the VM is capable of running the full range of DirectX and OpenGL graphics applications.
2.2.1. Prerequisites
Before proceeding, ensure that you have these prerequisites:
- NVIDIA GRID K1,K2, or Tesla M60, M6 cards.
- A server platform capable of hosting VMware vSphere Hypervisor (ESXi) and the NVIDIA GRID or Tesla cards. Refer to the release notes for a list of recommended servers.
- The NVIDIA GRID vGPU software package for VMware vSphere, consisting of the GRID Virtual GPU Manager for ESXi, and NVIDIA GRID vGPU drivers for Windows, 32- and 64-bit.
- VMware vSphere 2015 or later, obtainable from VMware.
- An installed Windows VM to be enabled with vGPU.
To run VMware Horizon with virtual machines running NVIDIA Virtual GPU, you will also need:
- VMware Horizon 6.1 or later, obtainable from VMware.
Earlier versions of VMware vSphere and Horizon are not supported for use with NVIDIA Virtual GPU.
Review the release notes and known issues for GRID Virtual GPU before proceeding with installation.
2.2.2. Installing VMware vSphere
Install these VMware software products, following VMware’s installation instructions:
- VMware vSphere Hypervisor (ESXi)
- VMware vCenter Server
2.2.3. Changing the Mode of a Tesla M60 or M6 GPU
Tesla M60 and M6 GPUs support compute mode and graphics mode. GRID vGPU requires GPUs that support both modes to operate in graphics mode.
Recent Tesla M60 GPUs and M6 GPUs are supplied in graphics mode. However, your GPU might be in compute mode if it is an older Tesla M60 GPU or M6 GPU, or if its mode has previously been changed.
If your GPU supports both modes but is in compute mode, you must use the gpumodeswitch tool to change the mode of the GPU to graphics mode. If you are unsure which mode your GPU is in, use the gpumodeswitch tool to find out the mode.
For more information, see gpumodeswitch User Guide.
2.2.4. Installing and Updating the NVIDIA Virtual GPU Manager for vSphere
The NVIDIA Virtual GPU Manager runs on ESXi host. It is provided as a VIB file, which must be copied to the ESXi host and then installed.
2.2.4.1. Installing the NVIDIA Virtual GPU Manager Package for vSphere
To install the vGPU Manager VIB you need to access the ESXi host via the ESXi Shell or SSH. Refer to VMware’s documentation on how to enable ESXi Shell or SSH for an ESXi host.
Before proceeding with the vGPU Manager installation make sure that all VMs are powered off and the ESXi host is placed in maintenance mode. Refer to VMware’s documentation on how to place an ESXi host in maintenance mode.
- Use the esxcli command to install the vGPU Manager package:
            [root@esxi:~] esxcli software vib install -v /NVIDIA-vGPU-VMware_ESXi_6.0_Host_Driver_361.40-1OEM.600.0.0.2159203.vib
Installation Result
   Message: Operation finished successfully.
   Reboot Required: false
   VIBs Installed: NVIDIA_bootbank_NVIDIA-vGPU-VMware_ESXi_6.0_Host_Driver_361.40-1OEM.600.0.0.2159203
   VIBs Removed:
   VIBs Skipped:
- Reboot the ESXi host and remove it from maintenance mode.
CAUTION:
GRID Virtual GPU Manager and Guest VM drivers must be matched from the same release. After updating vGPU Manager, guest VMs will boot with vGPU disabled until their guest vGPU driver is updated to match the vGPU Manager version. Consult the release notes for further details.
2.2.4.2. Updating the NVIDIA Virtual GPU Manager Package for vSphere
Update the vGPU Manager VIB package if you want to install a new version of GRID Virtual GPU Manager on a system where an existing version is already installed.
To update the vGPU Manager VIB you need to access the ESXi host via the ESXi Shell or SSH. Refer to VMware’s documentation on how to enable ESXi Shell or SSH for an ESXi host.
Before proceeding with the vGPU Manager update, make sure that all VMs are powered off and the ESXi host is placed in maintenance mode. Refer to VMware’s documentation on how to place an ESXi host in maintenance mode
- Use the esxcli command to update the vGPU Manager package:
            [root@esxi:~] esxcli software vib update -v /NVIDIA-vGPU-VMware_ESXi_6.0_Host_Driver_361.40-1OEM.600.0.0.2159203.vib

Installation Result
   Message: Operation finished successfully.
   Reboot Required: false
   VIBs Installed: NVIDIA_bootbank_NVIDIA-vGPU-VMware_ESXi_6.0_Host_Driver_361.40-1OEM.600.0.0.2159203
   VIBs Removed: NVIDIA_bootbank_NVIDIA-vGPU-VMware_ESXi_6.0_Host_Driver_352.70-1OEM.600.0.0.2494585
   VIBs Skipped:
- Reboot the ESXi host and remove it from maintenance mode.
CAUTION:
GRID Virtual GPU Manager and Guest VM drivers must be matched from the same release. After updating vGPU Manager, guest VMs will boot with vGPU disabled until their guest vGPU driver is updated to match the vGPU Manager version. Consult the release notes for further details.
2.2.4.3. Verifying the installation of the vSphere GRID package
After the ESXi host has rebooted, verify the installation of the GRID package for vSphere by performing the following steps:
- Verify that the GRID package installed and loaded correctly by checking for the NVIDIA kernel driver in the list of kernel loaded modules.
            [root@esxi:~] vmkload_mod -l | grep nvidia
nvidia                   5    8420
- If the NVIDIA driver is not listed in the output, check dmesg for any load-time errors reported by the driver.
- Verify that the NVIDIA kernel driver can successfully communicate with the GRID physical GPUs in your system by running the nvidia-smi command. The nvidia-smi command is described in more detail in Using nvidia-smi to monitor performance.
Running the nvidia-smi command should produce a listing of the GPUs in your platform.
            [root@esxi:~] nvidia-smi
Tue Mar 10 17:56:22 2015
+------------------------------------------------------+
| NVIDIA-SMI 361.40     Driver Version: 361.40         |
|-------------------------------+----------------------+----------------------+
| GPU  Name        Persistence-M| Bus-Id        Disp.A | Volatile Uncorr. ECC |
| Fan  Temp  Perf  Pwr:Usage/Cap|         Memory-Usage | GPU-Util  Compute M. |
|===============================+======================+======================|
|   0  GRID K2             On   | 0000:04:00.0     Off |                  Off |
| N/A   27C    P8    27W / 117W |     11MiB /  4095MiB |      0%      Default |
+-------------------------------+----------------------+----------------------+
|   1  GRID K2             On   | 0000:05:00.0     Off |                  Off |
| N/A   27C    P8    27W / 117W |     10MiB /  4095MiB |      0%      Default |
+-------------------------------+----------------------+----------------------+
|   2  GRID K2             On   | 0000:08:00.0     Off |                  Off |
| N/A   32C    P8    27W / 117W |     10MiB /  4095MiB |      0%      Default |
+-------------------------------+----------------------+----------------------+
|   3  GRID K2             On   | 0000:09:00.0     Off |                  Off |
| N/A   32C    P8    27W / 117W |     10MiB /  4095MiB |      0%      Default |
+-------------------------------+----------------------+----------------------+
|   4  GRID K2             On   | 0000:86:00.0     Off |                  Off |
| N/A   24C    P8    27W / 117W |     10MiB /  4095MiB |      0%      Default |
+-------------------------------+----------------------+----------------------+

+-----------------------------------------------------------------------------+
| Processes:                                                       GPU Memory |
|  GPU       PID  Type  Process name                               Usage      |
|=============================================================================|
|  No running processes found                                                 |
+-----------------------------------------------------------------------------+
If nvidia-smi fails to report the expected output for all the NVIDIA GPUs in your system, see Troubleshooting for troubleshooting steps.
2.2.5. Configuring a vSphere VM with Virtual GPU
VMware vSphere does not support VM console in vSphere Web Client for VMs configured with vGPU. Make sure that you have installed an alternate means of accessing the VM (such as VMware Horizon or a VNC server) before you configure vGPU.
VM console in vSphere Web Client will become active again once the vGPU parameters are removed from the VM’s configuration.
To configure vGPU for a VM:
- Select Edit Settings after right-clicking on the VM in the vCenter Web UI.
- Select the Virtual Hardware tab.
- In the New device list, select Shared PCI Device and click Add. The PCI device field should be auto-populated with NVIDIA GRID vGPU, as shown in Figure 10.
Figure 10. VM settings for vGPU
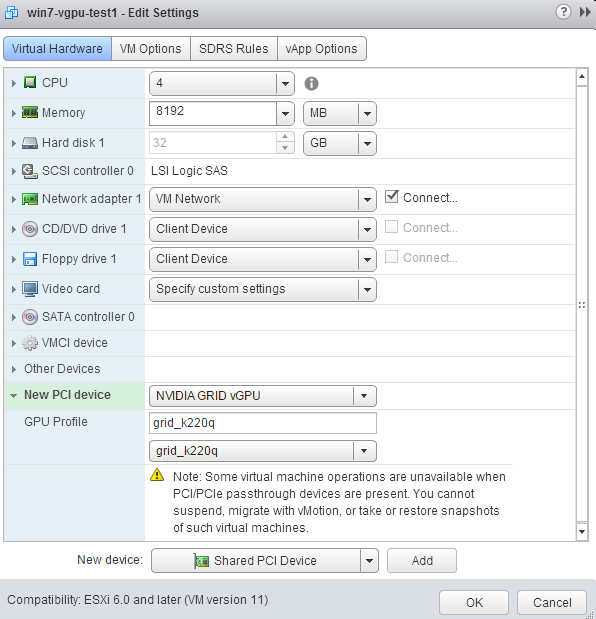
- From the GPU Profile dropdown menu, choose the type of vGPU you want to configure.
- Ensure that VMs running vGPU have all their memory reserved:
- Select Edit virtual machine settings from the vCenter Web UI.
- Expand the Memory section and click Reserve all guest memory (All locked).
2.2.6. Booting the vSphere VM and Installing Drivers
Once you have configured a vSphere VM with a vGPU, start the VM. VM console in vSphere Web Client is not supported in this vGPU release. Therefore, use VMware Horizon or VNC to access the VM’s desktop.
The VM should boot to a standard Windows desktop in VGA mode at 800×600 resolution. The Windows screen resolution control panel may be used to increase the resolution to other standard resolutions, but to fully enable vGPU operation, as for a physical NVIDIA GPU, the NVIDIA driver must be installed.
- Copy the 32-bit or 64-bit NVIDIA Windows driver package to the guest VM and execute it to unpack and run the driver installer.
- Click through the license agreement.
- Select Express Installation. Once driver installation completes, the installer may prompt you to restart the platform.
- If prompted to restart the platform, do one of the following:
- Select Restart Now to reboot the VM.
- Exit the installer and reboot the VM when ready.
Once the VM restarts, it will boot to a Windows desktop.
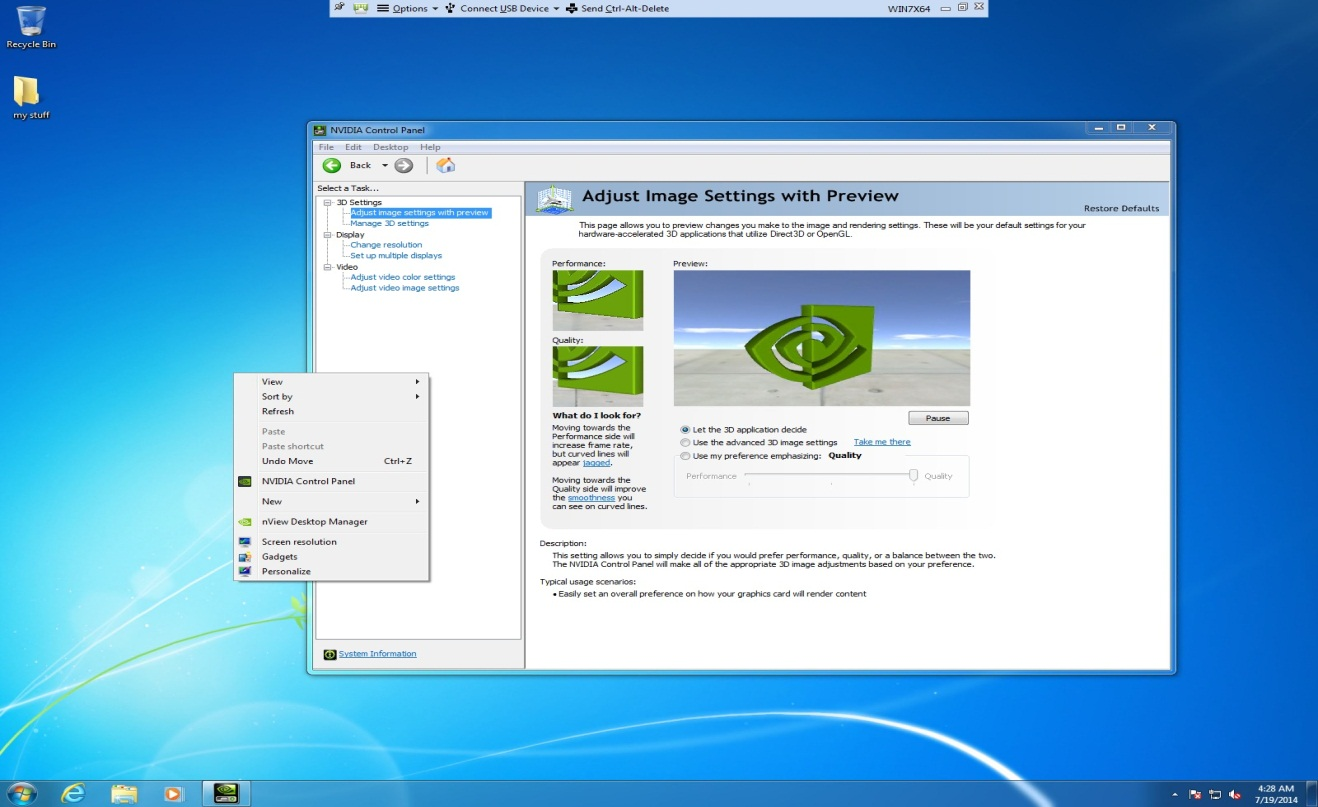
- Verify that the NVIDIA driver is running:
- Right-click on the desktop. The NVIDIA Control Panel will be listed in the menu.
- Select the NVIDIA Control Panel to open it.
- Select System Information in the NVIDIA Control Panel to report the Virtual GPU that the VM is using, its capabilities, and the NVIDIA driver version that is loaded.
Figure 11. Verifying NVIDIA driver operation using NVIDIA Control Panel
This task completes the process of setting up a single vSphere VM to use GRID vGPU. The VM is now capable of running the full range of DirectX and OpenGL graphics applications.
2.2.7. Applying a vGPU license
GRID vGPU is a licensed feature on Tesla M6, M60. When booted on these GPUs, a vGPU runs at full capability even without a license. However, until a license is acquired, users are warned each time a vGPU tries and fails to obtain a license. You may optionally configure a license server to provide licenses to a vGPU. See Licensing vGPU on Windows for details on how to configure licensing on Windows.
2.2.8. Removing a vSphere VM’s vGPU configuration
To remove a vSphere vGPU configuration from a VM:
- Select Edit settings after right-clicking on the VM in the vCenter Web UI.
- Select the Virtual Hardware tab.
- Mouse over the PCI Device entry showing NVIDIA GRID vGPU and click on the (X) icon to mark the device for removal.
- Click OK to remove the device and update the VM settings.
2.2.9. Modifying GPU assignment for vGPU-Enabled VMs
VMware vSphere Hypervisor (ESXi) by default uses a breadth-first allocation scheme for vGPU-enabled VMs; allocating new vGPU-enabled VMs on an available, least loaded physical GPU. This policy generally leads to higher performance because it attempts to minimize sharing of physical GPUs, but in doing so it may artificially limit the total number of vGPUs that can run.
ESXi also provides a depth-first allocation scheme for vGPU-enabled VMs. The depth-first allocation policy attempts to maximize the number of vGPUs running on each physical GPU, by placing newly-created vGPUs on the physical GPU that can support the new vGPU and that has the most number of vGPUs already resident. This policy generally leads to higher density of vGPUs, particularly when different types of vGPUs are being run, but may result in lower performance because it attempts to maximize sharing of physical GPUs.
To switch to depth-first allocation scheme add the following parameter to /etc/vmware/config:
vGPU.consolidation = true
2.3. Licensing vGPU on Windows
GRID vGPU is a licensed feature on Tesla M6 and Tesla M60 GPUs. When booted on these GPUs, a vGPU runs at full capability even without a license. However, until a license is acquired, users are warned each time a vGPU tries and fails to obtain a license. These warnings cease after a license is acquired.
Full information on configuring and using GRID licensed features, including vGPU, is given in GRID Licensing User Guide. Basic configuration information is given here.
To configure vGPU licensing on Windows:
- Open NVIDIA Control Panel and select the Manage License task in the Licensing section of the navigation pane.
- Enter the address of your local GRID License Server in the License Server field. The address can be a fully-qualified domain name such as
gridlicense.example.com, or an IP address such as10.31.20.45. - Leave the Port Number field unset. It will default to
7070, which is the default port number used by NVIDIA GRID License Server. - Click Apply to assign the settings. The system will request the appropriate license for the current vGPU from the configured license server.
If the system fails to obtain a license, refer to GRID Licensing User Guide for guidance on troubleshooting.
Tesla M6 and Tesla M60 GPUs support vGPU on Linux VMs. 64-bit Linux guest VMs are supported on the following virtual GPU types:
| Tesla M60 | Tesla M6 |
|---|---|
| M60-8Q | M6-8Q |
| M60-4Q | M6-4Q |
| M60-2Q | M6-2Q |
| M60-1Q | M6-1Q |
| M60-0Q | M6-0Q |
Refer to the driver release notes for further information on supported hypervisor and Linux VM configurations.
3.1. Installing vGPU drivers on Linux
After creating and booting a Linux VM on the hypervisor, the steps to install NVIDIA Linux vGPU drivers are largely the same as those for installing NVIDIA GPU drivers on a VM running pass-through GPU, or on bare-metal Linux.
3.1.1. Prerequisites for installing the NVIDIA Linux driver
Installation of the NVIDIA Linux driver requires:
- Compiler toolchain
- Kernel headers
3.1.2. Running the driver installer
- Copy the NVIDIA GRID Linux driver package, for example NVIDIA-Linux_x86_64-352.47-grid.run, to the Linux VM.
- Before attemting to run the driver installer, exit the X server and terminate all OpenGL applications.
- On Red Hat Enterprise Linux and CentOS systems, exit the X server by transitioning to runlevel 3:
[nvidia@localhost ~]$ sudo init 3
- On Ubuntu platforms, do the following:
- Use CTRL-ALT-F1 to switch to a console login prompt.
- Log in and shut down the display manager:
[nvidia@localhost ~]$ sudo service lightdm stop
- On Red Hat Enterprise Linux and CentOS systems, exit the X server by transitioning to runlevel 3:
- From a console shell, run the driver installer as the root user.
sudo sh ./ NVIDIA-Linux_x86_64-352.47-grid.run
Figure 12. NVIDIA Linux driver installer
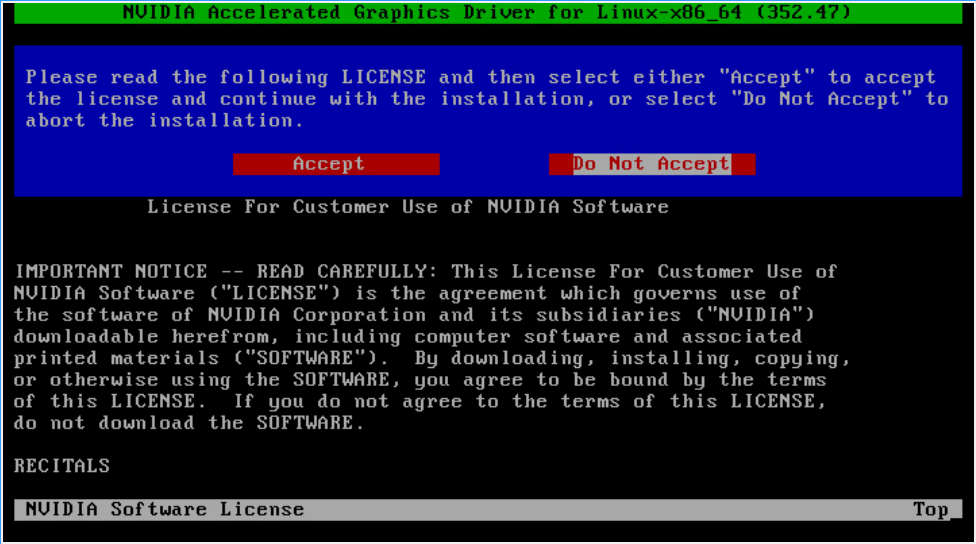
- Accept the license agreement to continue with the driver installation. In some instances the installer may fail to detect the installed kernel headers and sources. In this situation, re-run the installer, specifying the kernel source path with the --kernel-source-path option:
            sudo sh ./ NVIDIA-Linux_x86_64-352.47-grid.run \
–kernel-source-path=/usr/src/kernels/3.10.0-229.11.1.el7.x86_64
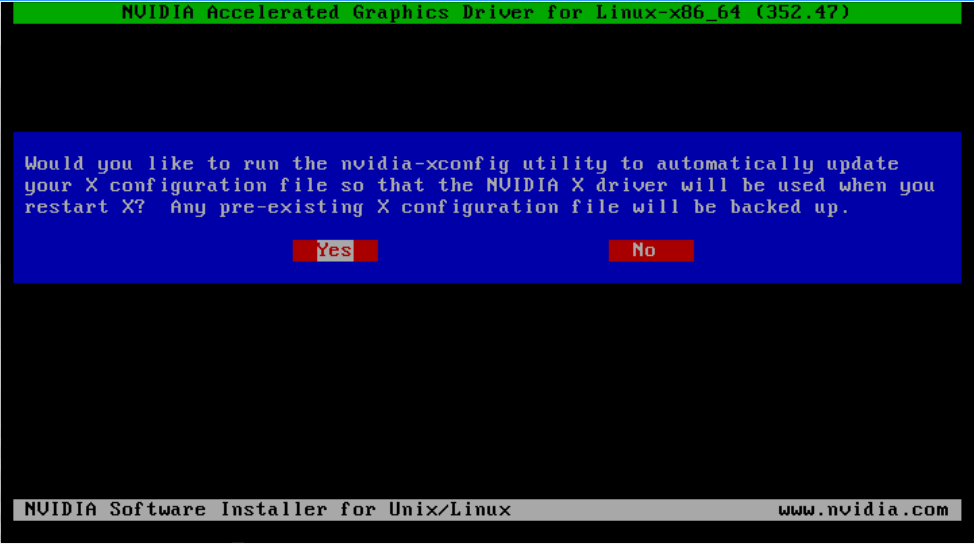
- When prompted, accept the option to update the X configuration file (xorg.conf) settings as shown in Figure 13:
Figure 13. Update xorg.conf settings
- Once installation has completed, select OK to exit the installer.
- Verify that the NVIDIA driver is operational with vGPU:
- Reboot the system and log in.
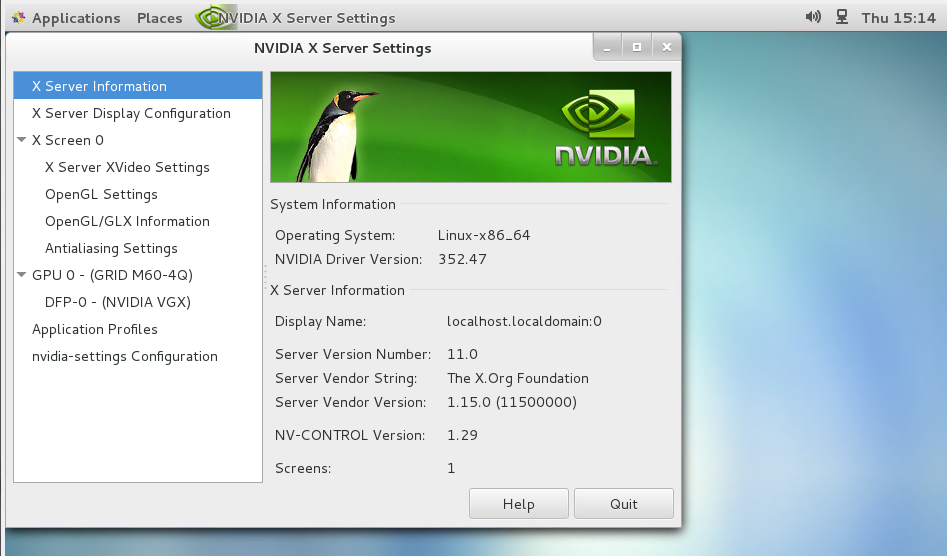
- Run nvidia-settings.
[nvidia@localhost ~]$ nvidia-settings
Figure 14. Verifying operation with nvidia-settings
3.2. Licensing GRID vGPU on Linux
GRID vGPU is a licensed feature on Tesla M6 and Tesla M60 GPUs. When booted on these GPUs, a vGPU runs at full capability even without a license.
Full information on configuring and using GRID licensed features, including vGPU, is given in the GRID Licensing User Guide. Basic configuration information is given here.
To license GRID vGPU on Linux:
- As root, open the file /etc/nvidia/gridd.conf in a plain-text editor, such as vi.
[nvidia@localhost ~]$ sudo vi /etc/nvidia/gridd.conf
Note:You can create the /etc/nvidia/gridd.conf file by copying the supplied template file /etc/nvidia/gridd.conf.template.
- Set
ServerAddressto the address of your local NVIDIA GRID License Server. The address can be a fully-qualified domain name such asgridlicense.example.com, or an IP address such as10.31.20.45. - Optional: Set
ServerPortto the port number of your local NVIDIA GRID License Server. If you do not setServerPort, it will default to7070, which is the default port number that is used by the NVIDIA GRID License Server. - Set
FeatureTypeto 1, to license vGPU. - Save your changes to the /etc/nvidia/gridd.conf file.
- Restart the nvidia-gridd service:
[nvidia@localhost ~]$ sudo service nvidia-gridd restart
- Optional: Confirm that the service has obtained a license by examining the log messages written to /var/log/messages:
            [nvidia@localhost ~]$ sudo grep gridd /var/log/messages
…
Aug 5 15:40:06 localhost nvidia-gridd: Started (4293)
Aug 5 15:40:24 localhost nvidia-gridd: License acquired successfully.
Once configured in gridd.conf, licensing settings persist across reboots and need only be modified if the license server address changes, or the VM is switched to running GPU passthrough.
gridd.conf file for GRID vGPU
The following example shows a gridd.conf file for GRID vGPU in which ServerAddress is set to gridlicense.example.com, ServerPort is set to 7070, and FeatureType is set to 1.
            # /etc/nvidia/gridd.conf - Configuration file for NVIDIA Grid Daemon

# This is a template for the configuration file for NVIDIA Grid Daemon.
# For details on the file format, please refer to the nvidia-gridd(1)
# man page.

# Description: Set License Server Address
# Data type: string
# Format:  "<address>"
ServerAddress=gridlicense.example.com

# Description: Set License Server port number
# Data type: integer
# Format: <port>, default is 7070
ServerPort=7070

# Description: Set Feature to be enabled
# Data type: integer
# Possible values:
#    1 => for GRID vGPU
#    2 => for GRID Virtual Workstation
FeatureType=1

# Description: Parameter to enable or disable Grid Licensing tab in nvidia-settings
# Data type: boolean
# Possible values: TRUE or FALSE, default is TRUE
#EnableUI=TRUE

# Description: Set license borrow period in minutes
# Data type: integer
# Possible values: 10 to 10080 mins(7 days), default is 10080
#Licenselnterval=10080
Physical GPU performance monitoring can be done using the nvidia-smi command line utility and, on Citrix XenServer platforms, using Citrix XenCenter.
It is not currently possible to monitor the performance of GPUs being used for GPU pass-through.
4.1. Using nvidia-smi to monitor performance
NVIDIA System Management Interface, nvidia-smi, reports management information for NVIDIA physical GPUs present in the system. nvidia-smi is a command line tool that you run from the XenServer dom0 or ESXi host shells.
nvidia-smi will not list any GPU currently allocated for GPU pass-through.
In this release of GRID vGPU, nvidia-smi provides basic reporting of vGPU instances running on physical GPUs. Each vGPU instance is reported in the Compute processes section, together with its physical GPU index and the amount of framebuffer memory assigned to it.
To get a summary of all GPUs in the system, along with PCI bus IDs, power state, temperature, current memory usage, and so on, invoke nvidia-smi without additional arguments.
In the example that follows, five vGPUs are running: one vGPU on physical GPU 0, and four vGPUs on physical GPU 1:
            [root@xenserver ~]# nvidia-smi
Mon Nov 10 18:46:50 2014
+------------------------------------------------------+
| NVIDIA-SMI 361.40     Driver Version: 361.40         |
|-------------------------------+----------------------+----------------------+
| GPU  Name                     | Bus-Id        Disp.  | Volatile Uncorr. ECC |
| Fan  Temp  Perf  Pwr:Usage/Cap| Memory-Usage         | GPU-Util  Compute M. |
|===============================+======================+======================|
|   0  GRID K1                  | 0000:04:00.0     Off |                  N/A |
| N/A   27C    P8     8W /  31W |   7%  270MB / 4095MB |      0%      Default |
+-------------------------------+----------------------+----------------------+
|   1  GRID K1                  | 0000:05:00.0     Off |                  N/A |
| N/A   26C    P8     8W /  31W |  26% 1048MB / 4095MB |      0%      Default |
+-------------------------------+----------------------+----------------------+
|   2  GRID K1                  | 0000:06:00.0     Off |                  N/A |
| N/A   22C    P0    13W /  31W |   0%    9MB / 4095MB |      0%      Default |
+-------------------------------+----------------------+----------------------+
|   3  GRID K1                  | 0000:07:00.0     Off |                  N/A |
| N/A   25C    P0    13W /  31W |   0%    9MB / 4095MB |      0%      Default |
+-------------------------------+----------------------+----------------------+
|   4  GRID K1                  | 0000:86:00.0     Off |                  N/A |
| N/A   27C    P0    14W /  31W |   0%    9MB / 4095MB |      0%      Default |
+-------------------------------+----------------------+----------------------+
|   5  GRID K1                  | 0000:87:00.0     Off |                  N/A |
| N/A   27C    P0    13W /  31W |   0%    9MB / 4095MB |      0%      Default |
+-------------------------------+----------------------+----------------------+
|   6  GRID K1                  | 0000:88:00.0     Off |                  N/A |
| N/A   29C    P0    13W /  31W |   0%    9MB / 4095MB |      0%      Default |
+-------------------------------+----------------------+----------------------+
|   7  GRID K1                  | 0000:89:00.0     Off |                  N/A |
| N/A   28C    P0    12W /  31W |   0%    9MB / 4095MB |      0%      Default |
+-------------------------------+----------------------+----------------------+
+-----------------------------------------------------------------------------+
| Compute processes:                                               GPU Memory |
|  GPU       PID  Process name                                     Usage      |
|=============================================================================|
|    0     10300  /usr/lib/xen/bin/vgpu                                256MB  |
|    1     10350  /usr/lib/xen/bin/vgpu                                256MB  |
|    1     10321  /usr/lib/xen/bin/vgpu                                256MB  |
|    1     11512  /usr/lib/xen/bin/vgpu                                256MB  |
|    1     10210  /usr/lib/xen/bin/vgpu                                256MB  |
+-----------------------------------------------------------------------------+
[root@xenserver ~]#
For a list of commands supported by nvidia-smi, run nvidia-smi -h. Note that not all commands apply to GRID supported GPUs.
4.2. Using Citrix XenCenter to monitor performance
If you are using Citrix XenServer as your hypervisor, you can monitor GPU performance in XenCenter.
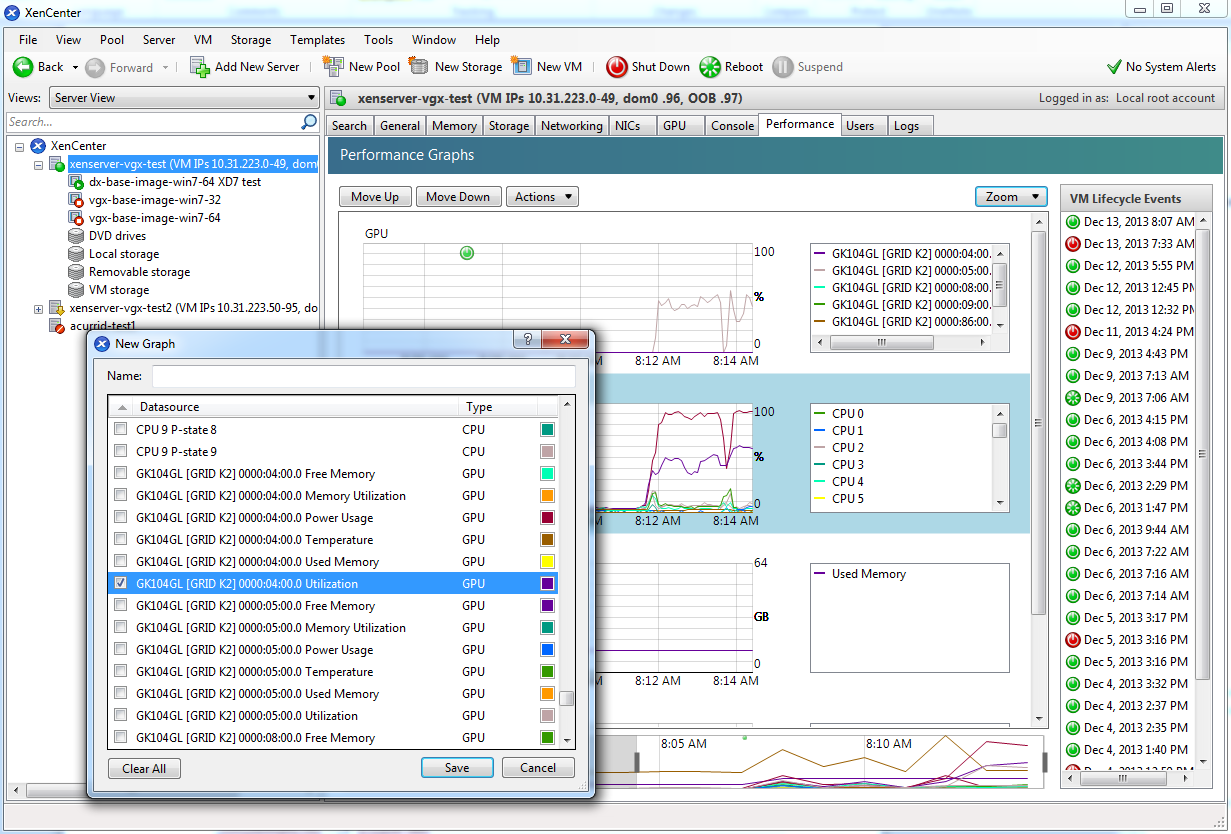
- Click on a server’s Performance tab.
- Right-click on the graph window, then select Actions and New Graph.
- Provide a name for the graph.
- In the list of available counter resources, select one or more GPU counters.
Counters are listed for each physical GPU not currently being used for GPU pass-through.
Figure 15. Using XenCenter to monitor GPU performance
This chapter describes Citrix XenServer advanced vGPU management techniques using XenCenter and xe command line operations.
5.1. Management objects for GPUs
XenServer uses four underlying management objects for GPUs: physical GPUs, vGPU types, GPU groups, and vGPUs. These objects are used directly when managing vGPU by using xe, and indirectly when managing vGPU by using XenCenter.
5.1.1.
pgpu
- physical GPU
A pgpu object represents a physical GPU, such as one of the multiple GPUs present on a GRID K1 or K2 card. XenServer automatically creates pgpu objects at startup to represent each physical GPU present on the platform.
5.1.1.1. Listing the
pgpu
objects present on a platform
To list the physical GPU objects present on a platform, use xe pgpu-list.
For example, this platform contains a single GRID K2 card with two physical GPUs:
            [root@xenserver ~]# xe pgpu-list
uuid ( RO)              : 7c1e3cff-1429-0544-df3d-bf8a086fb70a
       vendor-name ( RO): NVIDIA Corporation
       device-name ( RO): GK104GL [GRID K2]
    gpu-group-uuid ( RW): be825ba2-01d7-8d51-9780-f82cfaa64924

uuid ( RO)              : d07fa627-7dc9-f625-92be-ce5d2655e830
       vendor-name ( RO): NVIDIA Corporation
       device-name ( RO): GK104GL [GRID K2]
    gpu-group-uuid ( RW): be825ba2-01d7-8d51-9780-f82cfaa64924
[root@xenserver ~]#
5.1.1.2. Viewing detailed information about a
pgpu
object
To view detailed information about a pgpu, use xe pgpu-param-list:
            [root@xenserver ~]# xe pgpu-param-list uuid=d07fa627-7dc9-f625-92be-ce5d2655e830
uuid ( RO)                    : d07fa627-7dc9-f625-92be-ce5d2655e830
             vendor-name ( RO): NVIDIA Corporation
             device-name ( RO): GK104GL [GRID K2]
          gpu-group-uuid ( RW): 315a1e1e-6d0c-1cb3-7903-1602d236a33a
    gpu-group-name-label ( RO): Group of NVIDIA Corporation GK104GL [GRID K2] GPUs
               host-uuid ( RO): 2305cc32-c2d8-4fbd-b1aa-d0b0121ba454
         host-name-label ( RO): acurrid-vgpu-2 (VM IPs 10.31.223.0 - 10.31.223.19)
                  pci-id ( RO): 0000:0a:00.0
            dependencies (SRO):
            other-config (MRW):
    supported-VGPU-types ( RO): c18ab767-ba72-b286-9350-d8010bab4f30; 7cd190db-e4fe-e824-cf4a-ff1604882323; 24a7baa3-a70a-8c7b-ee7d-f437e0857eca; bfcfb8cd-c01b-2691-272c-8e908937922d; 0d581f02-c601-a9b1-f440-f852f31f583e; 2c210411-7de3-37f5-c58c-9635b40d50f6
      enabled-VGPU-types (SRW): c18ab767-ba72-b286-9350-d8010bab4f30; 7cd190db-e4fe-e824-cf4a-ff1604882323; 24a7baa3-a70a-8c7b-ee7d-f437e0857eca; bfcfb8cd-c01b-2691-272c-8e908937922d; 0d581f02-c601-a9b1-f440-f852f31f583e; 2c210411-7de3-37f5-c58c-9635b40d50f6
          resident-VGPUs ( RO):
[root@xenserver ~]#
5.1.1.3. Viewing physical GPUs in XenCenter
To view physical GPUs in XenCenter, click on the server’s GPU tab:
Figure 16. Physical GPU display in XenCenter
5.1.2.
vgpu-type
- virtual GPU type
A vgpu-type represents a type of virtual GPU, such as GRID K100, K140Q, K200, etc. An additional, pass-through vGPU type is defined to represent a physical GPU that is directly assignable to a single guest VM.
XenServer automatically creates vgpu-type objects at startup to represent each virtual type supported by the physical GPUs present on the platform.
5.1.2.1. Listing the
vgpu-type
objects present on a platform
To list the vgpu-type objects present on a platform, use xe vgpu-type-list.
For example, as this platform contains multiple GRID K2 cards, the vGPU types reported are solely those supported by GRID K2:
            [root@xenserver ~]# xe vgpu-type-list
uuid ( RO)              : 7cd190db-e4fe-e824-cf4a-ff1604882323
       vendor-name ( RO): NVIDIA Corporation
        model-name ( RO): GRID K240Q
         max-heads ( RO): 2
    max-resolution ( RO): 2560x1600


uuid ( RO)              : 2c210411-7de3-37f5-c58c-9635b40d50f6
       vendor-name ( RO): NVIDIA Corporation
        model-name ( RO): GRID K220Q
         max-heads ( RO): 2
    max-resolution ( RO): 2560x1600


uuid ( RO)              : 24a7baa3-a70a-8c7b-ee7d-f437e0857eca
       vendor-name ( RO): NVIDIA Corporation
        model-name ( RO): GRID K260Q
         max-heads ( RO): 4
    max-resolution ( RO): 2560x1600


uuid ( RO)              : 0d581f02-c601-a9b1-f440-f852f31f583e
       vendor-name ( RO): NVIDIA Corporation
        model-name ( RO): GRID K200
         max-heads ( RO): 2
    max-resolution ( RO): 1920x1200


uuid ( RO)              : c18ab767-ba72-b286-9350-d8010bab4f30
       vendor-name ( RO):
        model-name ( RO): passthrough
         max-heads ( RO): 0
    max-resolution ( RO): 0x0


uuid ( RO)              : bfcfb8cd-c01b-2691-272c-8e908937922d
       vendor-name ( RO): NVIDIA Corporation
        model-name ( RO): GRID K280Q
         max-heads ( RO): 4
    max-resolution ( RO): 2560x1600

[root@xenserver ~]#
5.1.2.2. Viewing detailed information about a
vgpu-type
object
To see detailed information about a vgpu-type, use xe vgpu-type-param-list:
            [root@xenserver ~]# xe vgpu-type-param-list uuid=7cd190db-e4fe-e824-cf4a-ff1604882323
uuid ( RO)                       : 7cd190db-e4fe-e824-cf4a-ff1604882323
                vendor-name ( RO): NVIDIA Corporation
                 model-name ( RO): GRID K240Q
           framebuffer-size ( RO): 939524096
                  max-heads ( RO): 2
             max-resolution ( RO): 2560x1600
         supported-on-PGPUs ( RO): d72b9b0d-ae86-a1fa-4432-a46bcef4a4ab; f17f00fc-dff2-ecb0-5bdb-8f050da2fd8b; 13cfa311-93fe-79e5-f94f-1e8c38a88486; a9474d47-ddba-ab3a-8f44-58163ffa49f8; 8d147385-40a5-7305-95ea-de92ed4bcfc8; d3984345-f8e1-c5fe-c5fc-78d2225f0382; 50493ce6-f3b1-1bd9-c012-2457472f2a92; 4778208a-97a9-cbf0-cedf-a20cd28f91f3
           enabled-on-PGPUs ( RO): d72b9b0d-ae86-a1fa-4432-a46bcef4a4ab; f17f00fc-dff2-ecb0-5bdb-8f050da2fd8b; 13cfa311-93fe-79e5-f94f-1e8c38a88486; a9474d47-ddba-ab3a-8f44-58163ffa49f8; 8d147385-40a5-7305-95ea-de92ed4bcfc8; d3984345-f8e1-c5fe-c5fc-78d2225f0382; 50493ce6-f3b1-1bd9-c012-2457472f2a92; 4778208a-97a9-cbf0-cedf-a20cd28f91f3
    supported-on-GPU-groups ( RO): 315a1e1e-6d0c-1cb3-7903-1602d236a33a
      enabled-on-GPU-groups ( RO): 315a1e1e-6d0c-1cb3-7903-1602d236a33a
                 VGPU-uuids ( RO): b6242c9c-87ad-92e9-5a24-a6bd1a3d8950
[root@xenserver ~]#
5.1.3.
gpu-group
- collection of physical GPUs
A gpu-group is a collection of physical GPUs, all of the same type. XenServer automatically creates gpu-group objects at startup to represent the distinct types of physical GPU present on the platform.
5.1.3.1. Listing the
gpu-group
objects present on a platform
To list the gpu-group objects present on a platform, use xe gpu-group-list.
For example, a system with a single GRID K2 card contains a single GPU group of type GRID K2:
            [root@xenserver ~]# xe gpu-group-list
uuid ( RO)                : be825ba2-01d7-8d51-9780-f82cfaa64924
          name-label ( RW): Group of NVIDIA Corporation GK104GL [GRID K2] GPUs
    name-description ( RW):

[root@xenserver ~]#
5.1.3.2. Viewing detailed information about a
gpu-group
object
To view detailed information about a gpu-group, use xe gpu-group-param-list:
            [root@xenserver ~]# xe gpu-group-param-list uuid=be825ba2-01d7-8d51-9780-f82cfaa64924
uuid ( RO)                    : be825ba2-01d7-8d51-9780-f82cfaa64924
              name-label ( RW): Group of NVIDIA Corporation GK104GL [GRID K2] GPUs
        name-description ( RW):
              VGPU-uuids (SRO): 6493ff45-d895-764c-58d8-96f1bc0307aa; 8481cb68-66e5-25e6-a0c0-bd691df682b3; b73cbd30-096f-8a9a-523e-a800062f4ca7
              PGPU-uuids (SRO): a4a4df34-4e5f-de9f-82d6-2134d9e339dc; 84c76e93-555c-5ffa-e9a9-0d6fcb9ff48d; d07fa627-7dc9-f625-92be-ce5d2655e830; 7c1e3cff-1429-0544-df3d-bf8a086fb70a
            other-config (MRW):
      enabled-VGPU-types ( RO): d1fb00dd-02e6-e7df-ccd5-1944965ece55; 1a312df9-5397-bd44-c447-c6da804d2fe7; fa50b0f0-9705-6c59-689e-ea62a3d35237; 3f318889-7508-c9fd-7134-003d4d05ae56
    supported-VGPU-types ( RO): d1fb00dd-02e6-e7df-ccd5-1944965ece55; 1a312df9-5397-bd44-c447-c6da804d2fe7; fa50b0f0-9705-6c59-689e-ea62a3d35237; 3f318889-7508-c9fd-7134-003d4d05ae56
    allocation-algorithm ( RW): depth-first

[root@xenserver ~]
5.1.4.
vgpu
- virtual GPU
A vgpu object represents a virtual GPU. Unlike the other GPU management objects, vgpu objects are not created automatically by XenServer. Instead, they are created as follows:
- When a VM is configured through XenCenter or through xe to use a vGPU
- By cloning a VM that is configured to use vGPU, as explained in Cloning vGPU-enabled VMs
5.2. Creating a vGPU using xe
Use xe vgpu-create to create a vgpu object, specifying the type of vGPU required, the GPU group it will be allocated from, and the VM it is associated with:
            [root@xenserver ~]# xe vgpu-create vm-uuid=e71afda4-53f4-3a1b-6c92-a364a7f619c2 gpu-group-uuid=be825ba2-01d7-8d51-9780-f82cfaa64924 vgpu-type-uuid=3f318889-7508-c9fd-7134-003d4d05ae56b73cbd30-096f-8a9a-523e-a800062f4ca7
[root@xenserver ~]#
Creating the vgpu object for a VM does not immediately cause a virtual GPU to be created on a physical GPU. Instead, the vgpu object is created whenever its associated VM is started. For more details on how vGPUs are created at VM startup, see Controlling vGPU allocation.
The owning VM must be in the powered-off state in order for the vgpu-create command to succeed.
A vgpu object’s owning VM, associated GPU group, and vGPU type are fixed at creation and cannot be subsequently changed. To change the type of vGPU allocated to a VM, delete the existing vgpu object and create another one.
5.3. Controlling vGPU allocation
Configuring a VM to use a vGPU in XenCenter, or creating a vgpu object for a VM using xe, does not immediately cause a virtual GPU to be created; rather, the virtual GPU is created at the time the VM is next booted, using the following steps:
- The GPU group that the
vgpuobject is associated with is checked for a physical GPU that can host a vGPU of the required type (i.e. thevgpuobject’s associatedvgpu-type). Because vGPU types cannot be mixed on a single physical GPU, the new vGPU can only be created on a physical GPU that has no vGPUs resident on it, or only vGPUs of the same type, and less than the limit of vGPUs of that type that the physical GPU can support. - If no such physical GPUs exist in the group, the
vgpucreation fails and the VM startup is aborted. - Otherwise, if more than one such physical GPU exists in the group, a physical GPU is selected according to the GPU group’s allocation policy, as described in GPU allocation policy
5.3.1. GPU allocation policy
XenServer creates GPU groups with a default allocation policy of depth-first. The depth-allocation policy attempts to maximize the number of vGPUs running on each physical GPU within the group, by placing newly-created vGPUs on the physical GPU that can support the new vGPU and that has the most number of vGPUs already resident. This policy generally leads to higher density of vGPUs, particularly when different types of vGPUs are being run, but may result in lower performance because it attempts to maximize sharing of physical GPUs.
Conversely, a breadth-first allocation policy attempts to minimize the number of vGPUs running on each physical GPU within the group, by placing newly-created vGPUs on the physical GPU that can support the new vGPU and that has the least number of vGPUs already resident. This policy generally leads to higher performance because it attempts to minimize sharing of physical GPUs, but in doing so it may artificially limit the total number of vGPUs that can run.
5.3.1.1. Controlling GPU allocation policy by using xe
The allocation policy of a GPU group is stored in the allocation-algorithm parameter of the gpu-group object.
To change the allocation policy of a GPU group, use gpu-group-param-set:
            [root@xenserver ~]# xe gpu-group-param-get uuid=be825ba2-01d7-8d51-9780-f82cfaa64924 param-name=allocation-algorithmdepth-first
[root@xenserver ~]# xe gpu-group-param-set uuid=be825ba2-01d7-8d51-9780-f82cfaa64924 allocation-algorithm=breadth-first
[root@xenserver ~]#
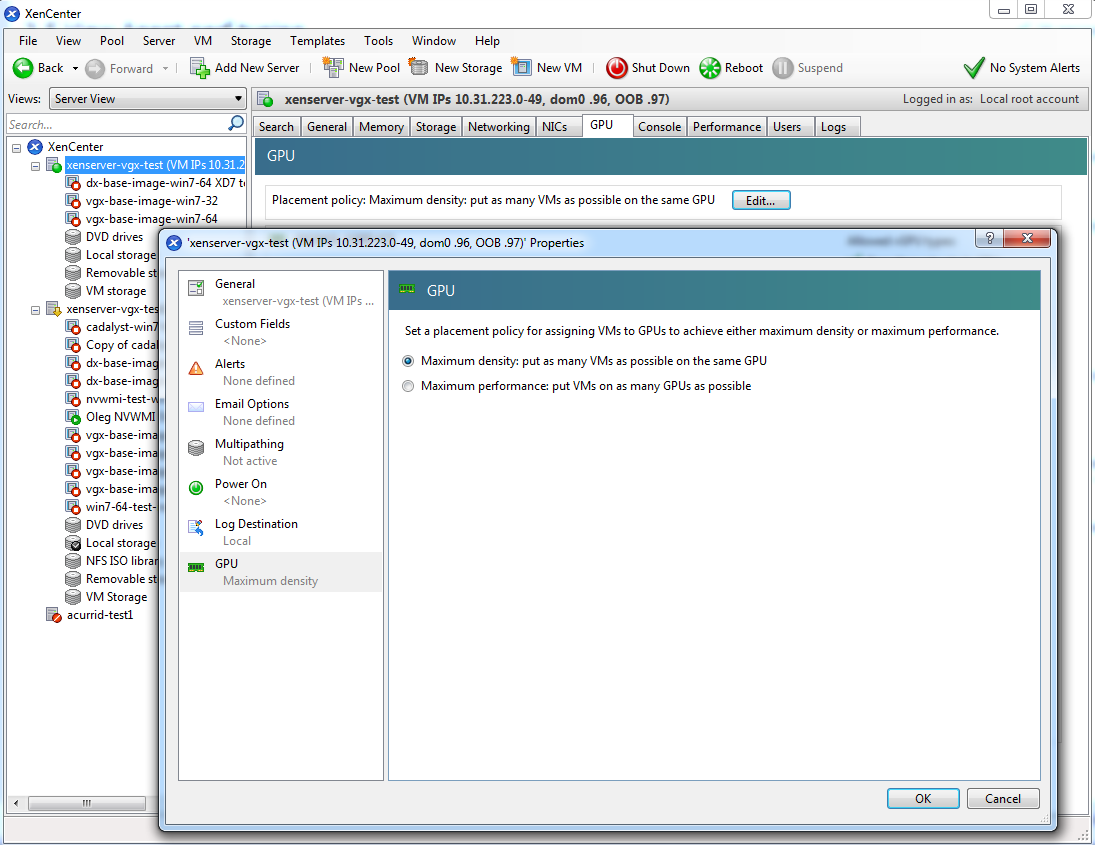
5.3.1.2. Controlling GPU allocation policy by using XenCenter
You can control GPU allocation policy from the GPU tab in XenCenter.
Figure 17. Modifying GPU placement policy in XenCenter
5.3.2. Determining the physical GPU that a virtual GPU is resident on
The vgpu object’s resident-on parameter returns the UUID of the pgpu object for the physical GPU the vGPU is resident on.
To determine the physical GPU that a virtual GPU is resident on, use vgpu-param-get:
            [root@xenserver ~]# xe vgpu-param-get uuid=8481cb68-66e5-25e6-a0c0-bd691df682b3 param-name=resident-on
a4a4df34-4e5f-de9f-82d6-2134d9e339dc

[root@xenserver ~]# xe pgpu-param-list uuid=a4a4df34-4e5f-de9f-82d6-2134d9e339dc
uuid ( RO)                    : a4a4df34-4e5f-de9f-82d6-2134d9e339dc
             vendor-name ( RO): NVIDIA Corporation
             device-name ( RO): GK104GL [GRID K2]
          gpu-group-uuid ( RW): be825ba2-01d7-8d51-9780-f82cfaa64924
    gpu-group-name-label ( RO): Group of NVIDIA Corporation GK104GL [GRID K2] GPUs
               host-uuid ( RO): 6f6209a6-0f11-4c51-b12d-2bce361e9639
         host-name-label ( RO): xenserver (VM IPs 10.31.213.50-95, dom0 .98, OOB .99)
                  pci-id ( RO): 0000:09:00.0
            dependencies (SRO):
            other-config (MRW):
    supported-VGPU-types ( RO): fa50b0f0-9705-6c59-689e-ea62a3d35237; 1a312df9-5397-bd44-c447-c6da804d2fe7; d1fb00dd-02e6-e7df-ccd5-1944965ece55; 3f318889-7508-c9fd-7134-003d4d05ae56
      enabled-VGPU-types (SRW): fa50b0f0-9705-6c59-689e-ea62a3d35237; 1a312df9-5397-bd44-c447-c6da804d2fe7; d1fb00dd-02e6-e7df-ccd5-1944965ece55; 3f318889-7508-c9fd-7134-003d4d05ae56
          resident-VGPUs ( RO): 8481cb68-66e5-25e6-a0c0-bd691df682b3

[root@xenserver ~]#
If the vGPU is not currently running, the resident-on parameter is not instantiated for the vGPU, and the vgpu-param-get operation returns:
<not in database>
5.3.3. Controlling the vGPU types enabled on specific physical GPUs
Physical GPUs support several vGPU types, as defined in Supported GPUs and the “pass-through” type that is used to assign an entire physical GPU to a VM (see Using GPU pass-through).
5.3.3.1. Controlling vGPU types enabled on specific physical GPUs by using XenCenter
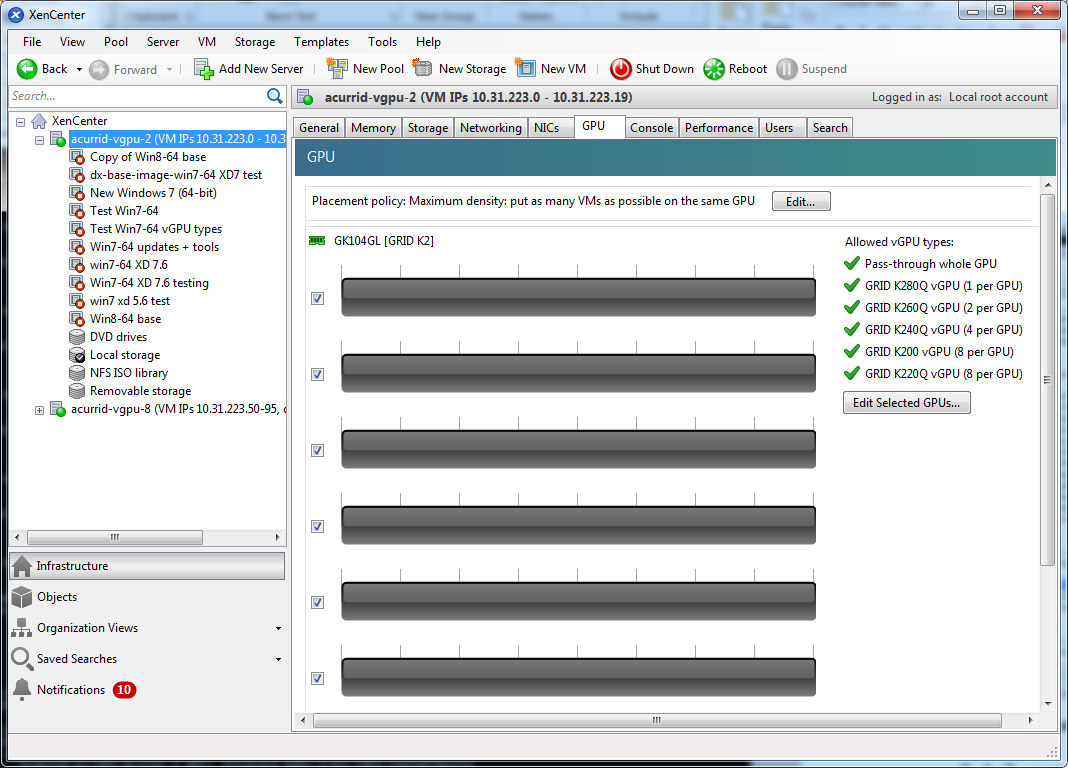
To limit the types of vGPU that may be created on a specific physical GPU:
- Open the server’s GPU tab in XenCenter.
- Select the box beside one or more GPUs on which you want to limit the types of vGPU.
- Select Edit Selected GPUs.
Figure 18. Editing a GPU’s enabled vGPU types using XenCenter

5.3.3.2. Controlling vGPU types enabled on specific physical GPUs by using xe
The physical GPU’s pgpu object’s enabled-vGPU-types parameter controls the vGPU types enabled on specific physical GPUs.
To modify the pgpu object’s enabled-vGPU-types parameter , use xe pgpu-param-set:
            [root@xenserver ~]# xe pgpu-param-list uuid=f2607117-5b4c-d6cc-3900-00bf712e33f4
uuid ( RO)                    : f2607117-5b4c-d6cc-3900-00bf712e33f4
             vendor-name ( RO): NVIDIA Corporation
             device-name ( RO): GK104GL [GRID K2]
          gpu-group-uuid ( RW): f4662c69-412c-abc5-6d02-f74b7703cccd
    gpu-group-name-label ( RO): GRID K2 Socket 0
               host-uuid ( RO): d9eb9118-a5c5-49fb-970e-80e6a8f7ff98
         host-name-label ( RO): xenserver-vgx-test (VM IPs 10.31.223.0-49, dom0 .96, OOB .97)
                  pci-id ( RO): 0000:08:00.0
            dependencies (SRO):
            other-config (MRW):
    supported-VGPU-types ( RO): a724b756-d108-4c9f-0ea3-8f3a1553bfbc; 63d9d912-3454-b020-8519-58dedb3b0117; 0bdf4715-e035-19c3-a57d-5ead20b3e5cd; a7838abe-0d73-1918-7d29-fd361d3e411f
      enabled-VGPU-types (SRW): a724b756-d108-4c9f-0ea3-8f3a1553bfbc; 63d9d912-3454-b020-8519-58dedb3b0117; 0bdf4715-e035-19c3-a57d-5ead20b3e5cd; a7838abe-0d73-1918-7d29-fd361d3e411f
          resident-VGPUs ( RO):


[root@xenserver-vgx-test ~]# xe pgpu-param-set uuid=f2607117-5b4c-d6cc-3900-00bf712e33f4 enabled-VGPU-types=a724b756-d108-4c9f-0ea3-8f3a1553bfbc
5.3.4. Creating vGPUs on specific physical GPUs
To precisely control allocation of vGPUs on specific physical GPUs, create separate GPU groups for the physical GPUs you wish to allocate vGPUs on. When creating a virtual GPU, create it on the GPU group containing the physical GPU you want it to be allocated on.
For example, to create a new GPU group for the physical GPU at PCI bus ID 0000:05:0.0, follow these steps:
- Create the new GPU group with an appropriate name:
            [root@xenserver ~]# xe gpu-group-create name-label="GRID K2 5:0.0" 585877ef-5a6c-66af-fc56-7bd525bdc2f6
[root@xenserver ~]#
- Find the UUID of the physical GPU at
0000:05:0.0that you want to assign to the new GPU group:[root@xenserver ~]# xe pgpu-list pci-id=0000:05:00.0 uuid ( RO) : 7c1e3cff-1429-0544-df3d-bf8a086fb70a vendor-name ( RO): NVIDIA Corporation device-name ( RO): GK104GL [GRID K2] gpu-group-uuid ( RW): be825ba2-01d7-8d51-9780-f82cfaa64924 [root@xenserver ~]
Note:The
pci-idparameter passed to the pgpu-list command must be in the exact format shown, with the PCI domain fully specified (for example,0000) and the PCI bus and devices numbers each being two digits (for example,05:00.0). - Ensure that no vGPUs are currently operating on the physical GPU by checking the
resident-VGPUsparameter:[root@xenserver ~]# xe pgpu-param-get uuid=7c1e3cff-1429-0544-df3d-bf8a086fb70a param-name=resident-VGPUs [root@xenserver ~]#
- If any vGPUs are listed, shut down the VMs associated with them.
- Change the
gpu-group-uuidparameter of the physical GPU to the UUID of the newly-created GPU group:[root@xenserver ~]# xe pgpu-param-set uuid=7c1e3cff-1429-0544-df3d-bf8a086fb70a gpu-group-uuid=585877ef-5a6c-66af-fc56-7bd525bdc2f6 [root@xenserver ~]#
Any vgpu object now created that specifies this GPU group UUID will always have its vGPUs created on the GPU at PCI bus ID 0000:05:0.0.
You can add more than one physical GPU to a manually-created GPU group – for example, to represent all the GPUs attached to the same CPU socket in a multi-socket server platform - but as for automatically-created GPU groups, all the physical GPUs in the group must be of the same type.
In XenCenter, manually-created GPU groups appear in the GPU type listing in a VM’s GPU Properties. Select a GPU type within the group from which you wish the vGPU to be allocated:
Figure 19. Using a custom GPU group within XenCenter
5.4. Cloning vGPU-enabled VMs
XenServer’s fast-clone or copying feature can be used to rapidly create new VMs from a “golden” base VM image that has been configured with GRID vGPU, the NVIDIA driver, applications, and remote graphics software.
When a VM is cloned, any vGPU configuration associated with the base VM is copied to the cloned VM. Starting the cloned VM will create a vGPU instance of the same type as the original VM, from the same GPU group as the original vGPU.
5.4.1. Cloning a vGPU-enabled VM by using xe
To clone a vGPU-enabled VM from the dom0 shell, use vm-clone:
            [root@xenserver ~]# xe vm-clone new-name-label="new-vm" vm="base-vm-name" 7f7035cb-388d-1537-1465-1857fb6498e7
[root@xenserver ~]#
5.4.2. Cloning a vGPU-enabled VM by using XenCenter
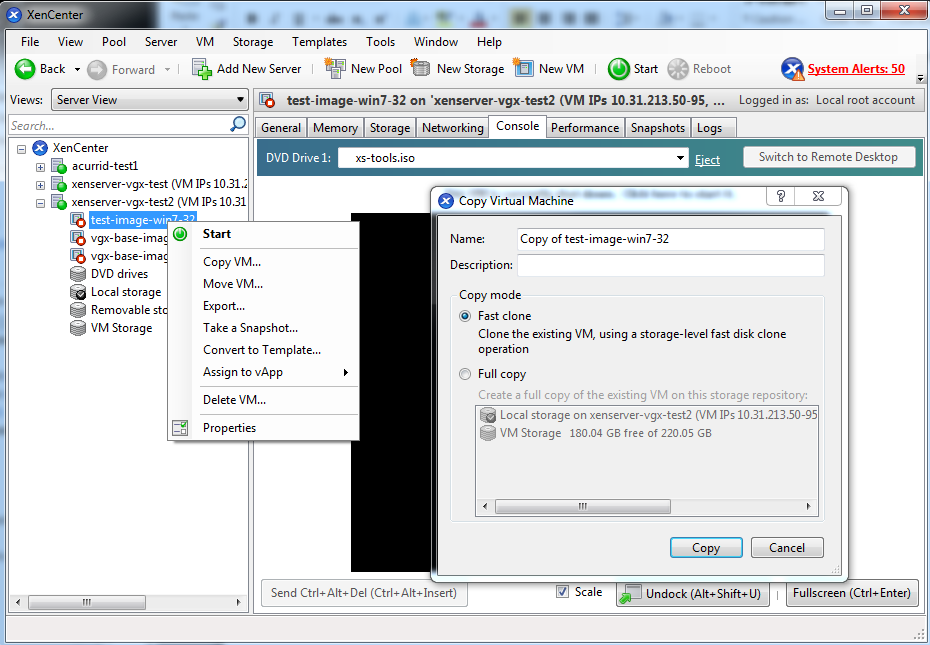
To clone a vGPU-enabled VM by using XenCenter, use the VM’s Copy VM command as shown in Figure 20.
Figure 20. Cloning a VM using XenCenter
5.5. Using GPU pass-through
GPU pass-through is used to directly assign an entire physical GPU to one VM, bypassing the GRID Virtual GPU Manager. In this mode of operation, the GPU is accessed exclusively by the NVIDIA driver running in the VM to which it is assigned; the GPU is not shared among VMs.
GPU pass-through can be used in a server platform alongside GRID vGPU, with some restrictions:
- A physical GPU can host GRID vGPUs, or can be used for pass-through, but cannot do both at the same time.
- The performance of a physical GPU passed through to a VM cannot be monitored through XenCenter or nvidia-smi (see Performance monitoring).
- Pass-through GPUs do not provide console output via XenCenter’s VM Console tab. Use a remote graphics connection directly into the VM to access the VM’s OS.
5.5.1. Configuring a VM for GPU pass-through by using XenCenter
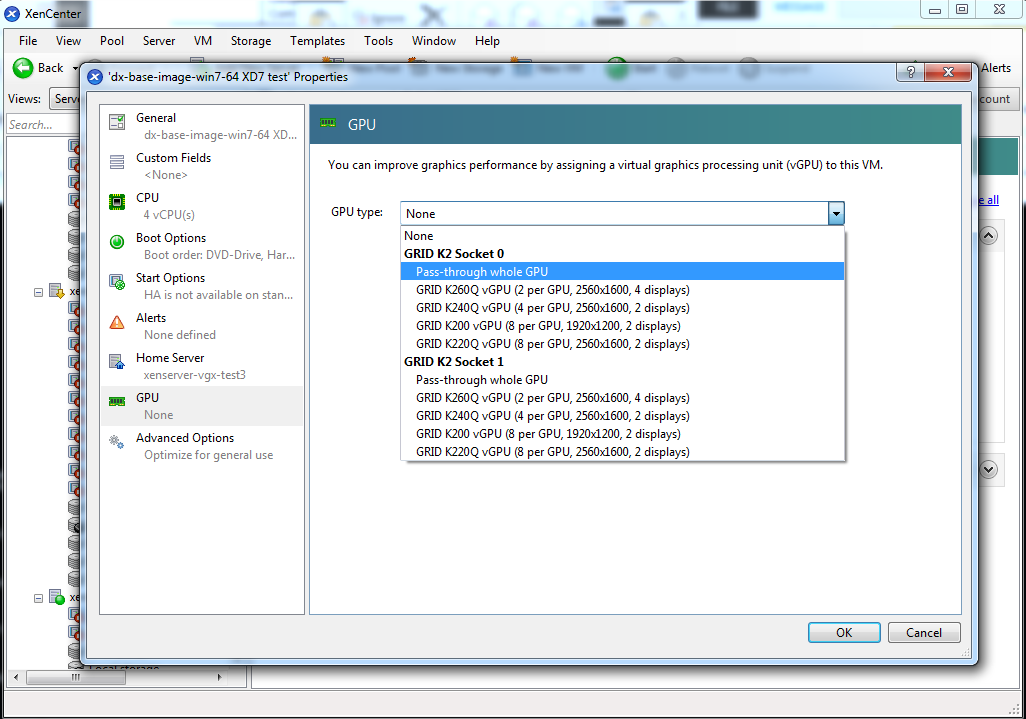
Select the Pass-through whole GPU option as the GPU type in the VM’s Properties:
Figure 21. Using XenCenter to configure a pass-through GPU
5.5.2. Configuring a VM for GPU pass-through by using xe
Create a vgpu object with the passthrough vGPU type:
            [root@xenserver ~]# xe vgpu-type-list model-name="passthrough"
uuid ( RO)                : fa50b0f0-9705-6c59-689e-ea62a3d35237
         vendor-name ( RO):
          model-name ( RO): passthrough
    framebuffer-size ( RO): 0

[root@xenserver ~]# xe vgpu-create vm-uuid=753e77a9-e10d-7679-f674-65c078abb2eb vgpu-type-uuid=fa50b0f0-9705-6c59-689e-ea62a3d35237 gpu-group-uuid=585877ef-5a6c-66af-fc56-7bd525bdc2f6
6aa530ec-8f27-86bd-b8e4-fe4fde8f08f9
[root@xenserver ~]#
Do not assign pass-through GPUs using the legacy other-config:pci parameter setting. This mechanism is not supported alongside the XenCenter UI and xe vgpu mechanisms, and attempts to use it may lead to undefined results.
This chapter provides recommendations on optimizing performance for VMs running with GRID vGPU on Citrix XenServer.
6.1. XenServer tools
To get maximum performance out of a VM running on Citrix XenServer, regardless of whether you are using GRID vGPU, you must install Citrix XenServer tools within the VM. Without the optimized networking and storage drivers that the XenServer tools provide, remote graphics applications running on GRID vGPU will not deliver maximum performance.
6.2. Using remote graphics
GRID vGPU implements a console VGA interface that permits the VM’s graphics output to be viewed through XenCenter’s console tab. This feature allows the desktop of a vGPU-enabled VM to be visible in XenCenter before any NVIDIA graphics driver is loaded in the virtual machine, but it is intended solely as a management convenience; it only supports output of vGPU’s primary display and isn’t designed or optimized to deliver high frame rates.
To deliver high frames from multiple heads on vGPU, NVIDIA recommends that you install a high-performance remote graphics stack such as Citrix XenDesktop® with HDX 3D Pro remote graphics and, after the stack is installed, disable vGPU’s console VGA.
Using Windows Remote Desktop (RDP) to access Windows 7 or Windows Server 2008 VMs running GRID vGPU will cause the NVIDIA driver in the VM to be unloaded. GPU-accelerated DirectX, OpenGL, and the NVIDIA control panel will be unavailable whenever RDP is active. Installing a VNC server in the VM will allow for basic, low-performance remote access while leaving the NVIDIA driver loaded and vGPU active, but for high performance remote accesses, use an accelerated stack such as XenDesktop.
6.2.1. Disabling console VGA
The console VGA interface in vGPU is optimized to consume minimal resources, but when a system is loaded with a high number of VMs, disabling the console VGA interface entirely may yield some performance benefit.
Once you have installed an alternate means of accessing a VM (such as XenDesktop or a VNC server), its vGPU console VGA interface can be disabled by specifying disable_vnc=1 in the VM’s platform:vgpu_extra_args parameter:
            [root@xenserver ~]# xe vm-param-set uuid=e71afda4-53f4-3a1b-6c92-a364a7f619c2 platform:vgpu_extra_args="disable_vnc=1"
[root@xenserver ~]#
The new console VGA setting takes effect the next time the VM is started or rebooted. With console VGA disabled, the XenCenter console will display the Windows boot splash screen for the VM, but nothing beyond that.
If you disable console VGA before you have installed or enabled an alternate mechanism to access the VM (such as XenDesktop), you will not be able to interact with the VM once it has booted.
You can recover console VGA access by making one of the following changes:
- Removing the
vgpu_extra_argskey from theplatformparameter - Removing
disable_vnc=1from thevgpu_extra_argskey - Setting
disable_vnc=0, for example:[root@xenserver ~]# xe vm-param-set uuid=e71afda4-53f4-3a1b-6c92-a364a7f619c2 platform:vgpu_extra_args="disable_vnc=0"
6.3. Allocation strategies
Strategies for pinning VM CPU cores to physical cores on Non-Uniform Memory Access (NUMA) platforms and for allocating VMs to CPUs and vGPUs to physical GPUs can improve performance for VMs running with GRID vGPU.
6.3.1. NUMA considerations
Server platforms typically implement multiple CPU sockets, with system memory and PCI Express expansion slots local to each CPU socket, as illustrated in Figure 22:
Figure 22. A NUMA server platform
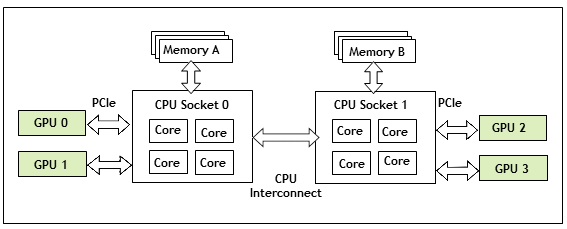
These platforms are typically configured to operate in Non-Uniform Memory Access (NUMA) mode; physical memory is arranged sequentially in the address space, with all the memory attached to each socket appearing in a single contiguous block of addresses. The cost of accessing a range of memory from a CPU or GPU varies; memory attached to the same socket as the CPU or GPU is accessible at lower latency than memory on another CPU socket, because accesses to remote memory must additionally traverse the interconnect between CPU sockets.
To obtain best performance on a NUMA platform, NVIDIA recommends pinning VM vCPU cores to physical cores on the same CPU socket to which the physical GPU hosting the VM’s vGPU is attached. For example, using as a reference, a VM with a vGPU allocated on physical GPU 0 or 1 should have its vCPUs pinned to CPU cores on CPU socket 0. Similarly, a VM with a vGPU allocated on physical GPU 2 or 3 should have its vCPUs pinned to CPU cores on socket 1.
See Pinning VMs to a specific CPU socket and cores for guidance on pinning vCPUs, and How GPU locality is determined for guidance on determining which CPU socket a GPU is connected to. Controlling the vGPU types enabled on specific physical GPUs describes how to precisely control which physical GPU is used to host a vGPU, by creating GPU groups for specific physical GPUs.
6.3.2. Maximizing performance
To maximize performance as the number of vGPU-enabled VMs on the platform increases, NVIDIA recommends adopting a breadth-first allocation: allocate new VMs on the least-loaded CPU socket, and allocate the VM’s vGPU on an available, least-loaded, physical GPU connected via that socket.
XenServer creates GPU groups with a default allocation policy of depth-first. See GPU allocation policy for details on switching the allocation policy to breadth-first.
Due to vGPU’s requirement that only one type of vGPU can run on a physical GPU at any given time, not all physical GPUs may be available to host the vGPU type required by the new VM.
This chapter describes basic troubleshooting steps for GRID vGPU on Citrix XenServer and VMware vSphere, and how to collect debug information when filing a bug report.
7.1. Known issues
Before troubleshooting or filing a bug report, review the release notes that accompany each driver release, for information about known issues with the current release, and potential workarounds.
7.2. Troubleshooting steps
If a vGPU-enabled VM fails to start, or doesn’t display any output when it does start, follow these steps to narrow down the probable cause.
7.2.1. Verifying the NVIDIA kernel driver is loaded
- Use the command that your hypervisor provides to verify that the kernel driver is loaded:
- On Citrix XenServer, use lsmod:
            [root@xenserver ~]# lsmod|grep nvidia
nvidia               9604895  84
i2c_core               20294  2 nvidia,i2c_i801
[root@xenserver ~]#
- On VMware vSphere, use vmkload_mod:
            [root@esxi:~] vmkload_mod -l | grep nvidia
nvidia                   5    8420
- On Citrix XenServer, use lsmod:
- If the nvidia driver is not listed in the output, check dmesg for any load-time errors reported by the driver (see Examining NVIDIA kernel driver output).
- On XenServer, also use the rpm -q command to verify that the NVIDIA GPU Manager package is correctly installed (see Installing the RPM package for XenServer).
7.2.2. Verifying that nvidia-smi works
If the NVIDIA kernel driver is correctly loaded on the physical GPU, run nvidia-smi and verify that all physical GPUs not currently being used for GPU past-through are listed in the output. For details on expected output, see Using nvidia-smi to monitor performance.
If nvidia-smi fails to report the expected output, check dmesg for NVIDIA kernel driver messages.
7.2.3. Examining NVIDIA kernel driver output
Information and debug messages from the NVIDIA kernel driver are logged in kernel logs, prefixed with NVRM or nvidia.
Run dmesg on both Citrix XenServer and VMware vSphere and check for the NVRM and nvidia prefixes:
            [root@xenserver ~]# dmesg | grep -E "NVRM|nvidia"
[   22.054928] nvidia: module license 'NVIDIA' taints kernel.
[   22.390414] NVRM: loading
[   22.829226] nvidia 0000:04:00.0: enabling device (0000 -> 0003)
[   22.829236] nvidia 0000:04:00.0: PCI INT A -> GSI 32 (level, low) -> IRQ 32
[   22.829240] NVRM: This PCI I/O region assigned to your NVIDIA device is invalid:
[   22.829241] NVRM: BAR0 is 0M @ 0x0 (PCI:0000:00:04.0)
[   22.829243] NVRM: The system BIOS may have misconfigured your GPU.
7.2.4. Examining GRID Virtual GPU Manager messages
Information and debug messages from the GRID Virtual GPU Manager are logged to the hypervisor’s log files, prefixed with vmiop.
7.2.4.1. Examining Citrix XenServer vGPU Manager messages
For Citrix Xenserver, GRID Virtual GPU Manager messages are written to /var/log/messages.
Look in the /var/log/messages file for the vmiop prefix:
            [root@xenserver ~]# grep vmiop /var/log/messages
Nov  8 09:17:44 xenserver-vgx-test2 fe: vgpu-2[14901]: vmiop_log: notice: vmiop-env: guest_max_gpfn:0x10efff
Nov  8 09:17:44 xenserver-vgx-test2 fe: vgpu-2[14901]: vmiop_log: notice: pluginconfig: /usr/share/nvidia/vgx/grid_k100.conf,disable_vnc=0,gpu-pci-id=0000:88:00.0
Nov  8 09:17:44 xenserver-vgx-test2 fe: vgpu-2[14901]: vmiop_log: notice: Loading Plugin0: libnvidia-vgx
Nov  8 09:17:45 xenserver-vgx-test2 fe: vgpu-2[14901]: vmiop_log: notice: vgpu_type : vdi
Nov  8 09:17:45 xenserver-vgx-test2 fe: vgpu-2[14901]: vmiop_log: notice: Framebuffer: 0x10000000
Nov  8 09:17:45 xenserver-vgx-test2 fe: vgpu-2[14901]: vmiop_log: notice: Virtual Device Id: 0x0FE7:0x101E
Nov  8 09:17:45 xenserver-vgx-test2 fe: vgpu-2[14901]: vmiop_log: notice: ######## vGPU Manager Information: ########
Nov  8 09:17:45 xenserver-vgx-test2 fe: vgpu-2[14901]: vmiop_log: notice: Driver Version: 331.59
Nov  8 09:17:45 xenserver-vgx-test2 fe: vgpu-2[14901]: vmiop_log: notice: VGX Version: 1.1
Nov  8 09:17:45 xenserver-vgx-test2 fe: vgpu-2[14901]: vmiop_log: notice: Init frame copy engine: syncing...
Nov  8 09:18:03 xenserver-vgx-test2 fe: vgpu-2[14901]: vmiop_log: notice: ######## Guest NVIDIA Driver Information: ########
Nov  8 09:18:03 xenserver-vgx-test2 fe: vgpu-2[14901]: vmiop_log: notice: Driver Version: 331.82
Nov  8 09:18:03 xenserver-vgx-test2 fe: vgpu-2[14901]: vmiop_log: notice: VGX Version: 0.5[root@xenserver ~]
#
7.2.4.2. Examining VMware vSphere vGPU Manager messages
For VMware vSphere, GRID Virtual GPU Manager messages are written to the vmware.log file in the guest VM’s storage directory.
Look in the vmware.log file for the vmiop prefix:
            [root@esxi:~] grep vmiop /vmfs/volumes/datastore1/win7-vgpu-test1/vmware.log
2015-04-28T14:02:21.275Z| vmx| I120: DICT   pciPassthru0.virtualDev = "vmiop"
2015-04-28T14:02:21.344Z| vmx| I120: GetPluginPath testing /usr/lib64/vmware/plugin/libvmx-vmiop.so
2015-04-28T14:02:21.344Z| vmx| I120: PluginLdr_LoadShared: Loaded shared plugin libvmx-vmiop.so from /usr/lib64/vmware/plugin/libvmx-vmiop.so
2015-04-28T14:02:21.344Z| vmx| I120: VMIOP: Loaded plugin libvmx-vmiop.so:VMIOP_InitModule
2015-04-28T14:02:21.359Z| vmx| I120: VMIOP: Initializing plugin vmiop-display
2015-04-28T14:02:21.365Z| vmx| I120: vmiop_log: gpu-pci-id : 0000:04:00.0
2015-04-28T14:02:21.365Z| vmx| I120: vmiop_log: vgpu_type : quadro
2015-04-28T14:02:21.365Z| vmx| I120: vmiop_log: Framebuffer: 0x74000000
2015-04-28T14:02:21.365Z| vmx| I120: vmiop_log: Virtual Device Id: 0x11B0:0x101B
2015-04-28T14:02:21.365Z| vmx| I120: vmiop_log: ######## vGPU Manager Information: ########
2015-04-28T14:02:21.365Z| vmx| I120: vmiop_log: Driver Version: 361.40
2015-04-28T14:02:21.365Z| vmx| I120: vmiop_log: VGX Version: 2.0
2015-04-28T14:02:21.445Z| vmx| I120: vmiop_log: Init frame copy engine: syncing...
2015-04-28T14:02:37.031Z| vthread-12| I120: vmiop_log: ######## Guest NVIDIA Driver Information: ########
2015-04-28T14:02:37.031Z| vthread-12| I120: vmiop_log: Driver Version: 347.52
2015-04-28T14:02:37.031Z| vthread-12| I120: vmiop_log: VGX Version: 2.0
2015-04-28T14:02:37.093Z| vthread-12| I120: vmiop_log: Clearing BAR1 mapping
2015-07-06T23:39:55.726Z| vmx| I120: VMIOP: Shutting down plugin vmiop-display
[root@esxi:~]
7.3. Capturing configuration data for filing a bug report
When filing a bug report with NVIDIA, capture relevant configuration data from the platform exhibiting the bug in one of the following ways:
- On any supported hypervisor, run nvidia-bug-report.sh.
- On Citrix XenServer, create a XenServer server status report.
7.3.1. Capturing configuration data by running nvidia-bug-report.sh
The nvidia-bug-report.sh script captures debug information into a gzip-compressed log file on the server.
Run nvidia-bug-report.sh from Citrix XenServer’s dom0 shell or VMware ESXi’s host shell.
This example runs nvidia-bug-report.sh on Citrix XenServer, but the procedure is the same on vSphere ESXi.
            [root@xenserver ~]# nvidia-bug-report.sh

nvidia-bug-report.sh will now collect information about your
system and create the file 'nvidia-bug-report.log.gz' in the current
directory.  It may take several seconds to run.  In some
cases, it may hang trying to capture data generated dynamically
by the Linux kernel and/or the NVIDIA kernel module.  While
the bug report log file will be incomplete if this happens, it
may still contain enough data to diagnose your problem.

For Xen open source/XCP users, if you are reporting a domain issue,
please run: nvidia-bug-report.sh --domain-name <"domain_name">

Please include the 'nvidia-bug-report.log.gz' log file when reporting
your bug via the NVIDIA Linux forum (see devtalk.nvidia.com)
or by sending email to 'linux-bugs@nvidia.com'.

Running nvidia-bug-report.sh...

If the bug report script hangs after this point consider running with
--safe-mode command line argument.

 complete

[root@xenserver ~]#
7.3.2. Capturing configuration data by creating a XenServer status report
- In XenCenter, from the Tools menu, choose Server Status Report.
- Select the XenServer instance from which you want to collect a status report.
- Select the data to include in the report.
- To include GRID vGPU debug information, select NVIDIA-logs in the Report Content Item list.
- Generate the report.
Figure 23. Including NVIDIA logs in a XenServer status report
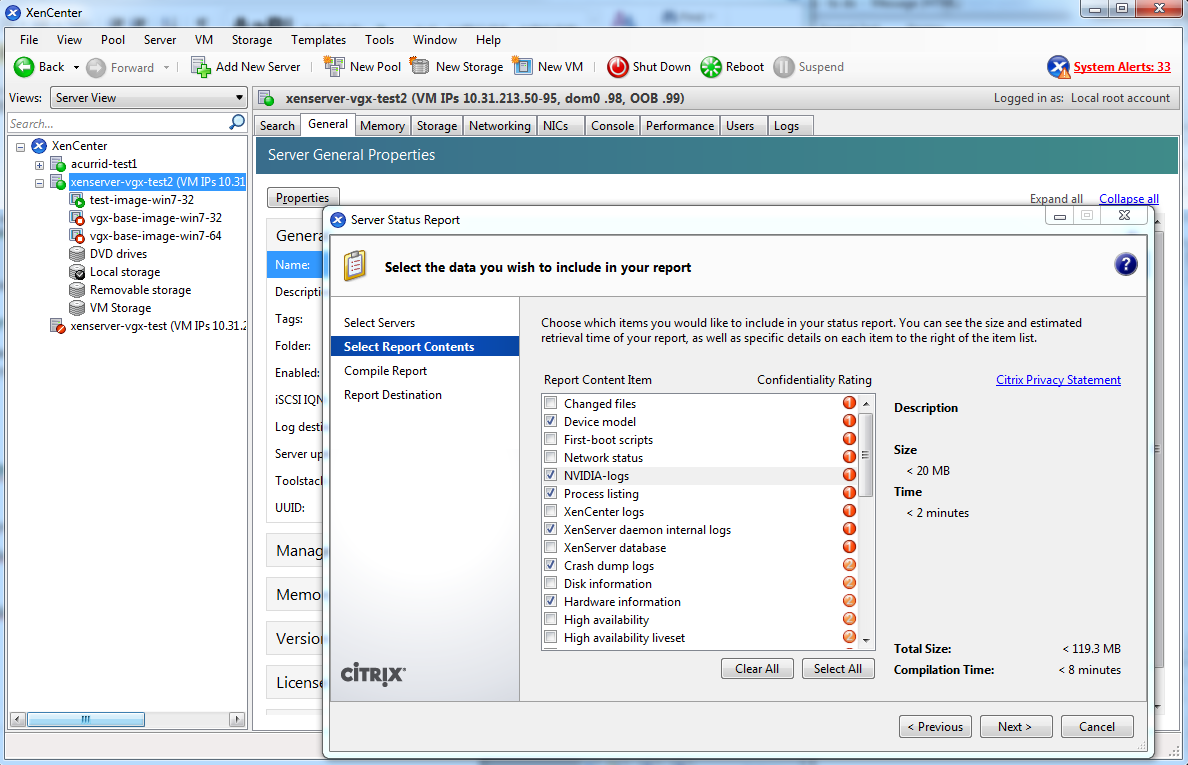
This appendix outlines basic operations on XenServer that are needed in order to install and configure GRID vGPU, and optimize XenServer operation with vGPU.
A.1. Opening a dom0 shell
Most configuration commands must be run in a command shell on XenServer’s dom0. You can open a shell on XenServer’s dom0 in any of the following ways:
- Using the console window in XenCenter
- Using a standalone secure shell (SSH) client
A.1.1. Accessing the dom0 shell through XenCenter
- In the left pane of the XenCenter window, select the XenServer host that you want to connect to.
- Click on the Console tab to open the XenServer’s console.
- Press Enter to start a shell prompt.
Figure 24. Connecting to the dom0 shell by using XenCenter

A.1.2. Accessing the dom0 shell through an SSH client
- Ensure that you have an SSH client suite such as PuTTY on Windows, or the SSH client from OpenSSH on Linux.
- Connect your SSH client to the management IP address of the XenServer host.
- Log in as the root user.
A.2. Copying files to dom0
You can easily copy files to and from XenServer dom0 in any of the following ways:
- Using a Secure Copy Protocol (SCP) client
- Using a network-mounted file system
A.2.1. Copying files by using an SCP client
The SCP client to use for copying files to dom0 depends on where you are running the client from.
-
If you are running the client from dom0, use the secure copy command scp.
The scp command is part of the SSH suite of applications. It is implemented in dom0 and can be used to copy from a remote SSH-enabled server:
            [root@xenserver ~]# scp root@10.31.213.96:/tmp/somefile .
The authenticity of host '10.31.213.96 (10.31.213.96)' can't be established.
RSA key fingerprint is 26:2d:9b:b9:bf:6c:81:70:36:76:13:02:c1:82:3d:3c.
Are you sure you want to continue connecting (yes/no)? yes
Warning: Permanently added '10.31.213.96' (RSA) to the list of known hosts.
root@10.31.213.96's password:
somefile                                     100%  532     0.5KB/s   00:00
[root@xenserver ~]#
-
If you are running the client from Windows, use the pscp program.
The pscp program is part of the PuTTY suite and can be used to copy files from a remote Windows system to XenServer:
            C:\Users\nvidia>pscp somefile root@10.31.213.98:/tmp
root@10.31.213.98's password:
somefile             | 80 kB |  80.1 kB/s | ETA: 00:00:00 | 100%

C:\Users\nvidia>
A.2.2. Copying files by using a CIFS-mounted file system
You can copy files to and from a CIFS/SMB file share by mounting the share from dom0.
The following example shows how to mount a network share \\myserver.example.com\myshare at /mnt/myshare on dom0 and how to copy files to and from the share. The example assumes that the file share is part of an Active Directory domain called example.com and that user myuser has permissions to access the share.
- Create the directory /mnt/myshare on dom0.
[root@xenserver ~]# mkdir /mnt/myshare
- Mount the network share \\myserver.example.com\myshare at /mnt/myshare on dom0.
            [root@xenserver ~]# mount -t cifs -o username=myuser,workgroup=example.com //myserver.example.com/myshare /mnt/myshare
Password:
[root@xenserver ~]#
- When prompted for a password, enter the password for
myuserin theexample.comdomain. - After the share has been mounted, copy files to and from the file share by using the cp command to copy them to and from /mnt/myshare:
            [root@xenserver ~]# cp /mnt/myshare/NVIDIA-vGPU-xenserver-6.2-331.59.i386.rpm .
[root@xenserver ~]#
A.3. Determining a VM’s UUID
You can determine a virtual machine’s UUID in any of the following ways:
- Using the xe vm-list command in a dom0 shell
- Using XenCenter
A.3.1. Determining a VM’s UUID by using xe vm-list
Use the xe vm-list command to list all VMs and their associated UUIDs or to find the UUID of a specific named VM.
-
To list all VMs and their associated UUIDs, use
xe vm-listwithout any parameters:[root@xenserver ~]# xe vm-list uuid ( RO) : 6b5585f6-bd74-2e3e-0e11-03b9281c3ade name-label ( RW): vgx-base-image-win7-64 power-state ( RO): halted uuid ( RO) : fa3d15c7-7e88-4886-c36a-cdb23ed8e275 name-label ( RW): test-image-win7-32 power-state ( RO): halted uuid ( RO) : 501bb598-a9b3-4afc-9143-ff85635d5dc3 name-label ( RW): Control domain on host: xenserver power-state ( RO): running uuid ( RO) : 8495adf7-be9d-eee1-327f-02e4f40714fc name-label ( RW): vgx-base-image-win7-32 power-state ( RO): halted
-
To find the UUID of a specific named VM, use the
name-labelparameter to xe vm-list:[root@xenserver ~]# xe vm-list name-label=test-image-win7-32 uuid ( RO) : fa3d15c7-7e88-4886-c36a-cdb23ed8e275 name-label ( RW): test-image-win7-32 power-state ( RO): halted
A.3.2. Determining a VM’s UUID by using XenCenter
- In the left pane of the XenCenter window, select the VM whose UUID you want to determine.
- In the right pane of the XenCenter window, click the General tab.
The UUID is listed in the VM’s General Properties.
Figure 25. Using XenCenter to determine a VM's UUID
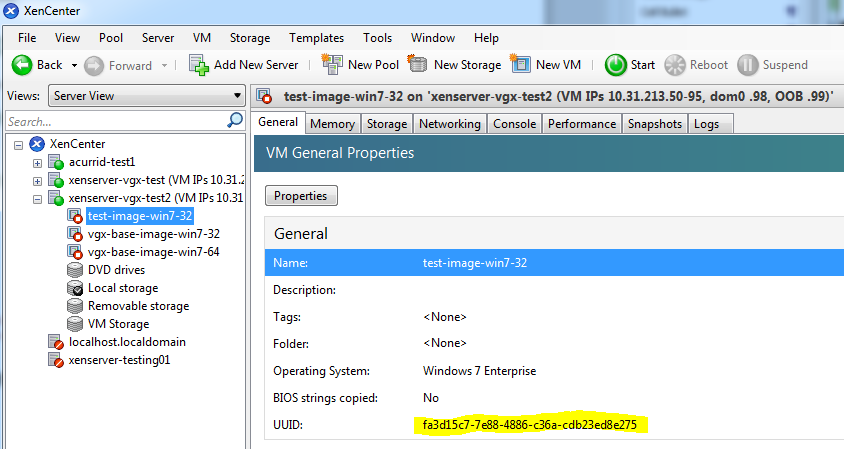
A.4. Using more than two vCPUs with Windows client VMs
Windows client operating systems support a maximum of two CPU sockets. When allocating vCPUs to virtual sockets within a guest VM, XenServer defaults to allocating one vCPU per socket. Any more than two vCPUs allocated to the VM won’t be recognized by the Windows client OS.
To ensure that all allocated vCPUs are recognized, set platform:cores-per-socket to the number of vCPUs that are allocated to the VM:
[root@xenserver ~]# xe vm-param-set uuid=vm-uuid platform:cores-per-socket=4 VCPUs-max=4 VCPUs-at-startup=4
vm-uuid is the VM’s UUID, which you can obtain as explained in Determining a VM’s UUID.
A.5. Pinning VMs to a specific CPU socket and cores
- Use xe host-cpu-info to determine the number of CPU sockets and logical CPU cores in the server platform. In this example the server implements 32 logical CPU cores across two sockets:
            [root@xenserver ~]# xe host-cpu-info
cpu_count                : 32
             socket_count: 2
                   vendor: GenuineIntel
                    speed: 2600.064
                modelname: Intel(R) Xeon(R) CPU E5-2670 0 @ 2.60GHz
                   family: 6
                    model: 45
                 stepping: 7
                    flags: fpu de tsc msr pae mce cx8 apic sep mtrr mca cmov pat clflush acpi mmx fxsr sse sse2 ss ht nx constant_tsc nonstop_tsc aperfmperf pni pclmulqdq vmx est ssse3 sse4_1 sse4_2 x2apic popcnt aes hypervisor ida arat tpr_shadow vnmi flexpriority ept vpid
                 features: 17bee3ff-bfebfbff-00000001-2c100800
    features_after_reboot: 17bee3ff-bfebfbff-00000001-2c100800
        physical_features: 17bee3ff-bfebfbff-00000001-2c100800
                 maskable: full
- Set
VCPUs-params:maskto pin a VM’s vCPUs to a specific socket or to specific cores within a socket. This setting persists over VM reboots and shutdowns. In a dual socket platform with 32 total cores, cores 0-15 are on socket 0, and cores 16-31 are on socket 1. In the examples that follow, vm-uuid is the VM’s UUID, which you can obtain as explained in Determining a VM’s UUID.- To restrict a VM to only run on socket 0, set the mask to specify cores 0-15:
[root@xenserver ~]# xe vm-param-set uuid=vm-uuid VCPUs-params:mask=0,1,2,3,4,5,6,7,8,9,10,11,12,13,14,15
- To restrict a VM to only run on socket 1, set the mask to specify cores 16-31:
[root@xenserver ~]# xe vm-param-set uuid=vm-uuid VCPUs-params:mask=16,17,18,19,20,21,22,23,24,25,26,27,28,29,30,31
- To pin vCPUs to specific cores within a socket, set the mask to specify the cores directly:
[root@xenserver ~]# xe vm-param-set uuid=vm-uuid VCPUs-params:mask=16,17,18,19
- To restrict a VM to only run on socket 0, set the mask to specify cores 0-15:
- Use xl vcpu-list to list the current assignment of vCPUs to physical CPUs:
            [root@xenserver ~]# xl vcpu-list
Name                                ID  VCPU   CPU State  Time(s)  CPU Affinity
Domain-0                             0     0   25   -b-   9188.4   any cpu
Domain-0                             0     1   19   r--   8908.4   any cpu
Domain-0                             0     2   30   -b-   6815.1   any cpu
Domain-0                             0     3   17   -b-   4881.4   any cpu
Domain-0                             0     4   22   -b-   4956.9   any cpu
Domain-0                             0     5   20   -b-   4319.2   any cpu
Domain-0                             0     6   28   -b-   5720.0   any cpu
Domain-0                             0     7   26   -b-   5736.0   any cpu
test-image-win7-32                  34     0    9   -b-     17.0   4-15
test-image-win7-32                  34     1    4   -b-     13.7   4-15
A.6. Changing dom0 vCPU Default configuration
By default, dom0 vCPUs are configured as follows:
- The number of vCPUs assigned to dom0 is 8.
- The dom0 shell’s vCPUs are unpinned and able to run on any physical CPU in the system.
A.6.1. Changing the number of dom0 vCPUs
The default number of vCPUs assigned to dom0 is 8.
- Modify the
dom0_max_vcpusparameter in the Xen boot line.For example:
[root@xenserver ~]# /opt/xensource/libexec/xen-cmdline --set-xen dom0_max_vcpus=4
- After applying this setting, reboot the system for the setting to take effect by doing one of the following:
- Run the following command:
shutdown –r
- Reboot the system from XenCenter.
- Run the following command:
A.6.2. Pinning dom0 vCPUs
By default, dom0’s vCPUs are unpinned, and able to run on any physical CPU in the system.
- To pin dom0 vCPUs to specific physical CPUs, use xl vcpu-pin.
For example, to pin dom0’s vCPU 0 to physical CPU 18, use the following command:
[root@xenserver ~]# xl vcpu-pin Domain-0 0 18
CPU pinnings applied this way take effect immediately but do not persist over reboots.
- To make settings persistent, add xl vcpu-pin commands into /etc/rc.local.
For example:
            xl vcpu-pin 0 0 0-15
xl vcpu-pin 0 1 0-15
xl vcpu-pin 0 2 0-15
xl vcpu-pin 0 3 0-15
xl vcpu-pin 0 4 16-31
xl vcpu-pin 0 5 16-31
xl vcpu-pin 0 6 16-31
xl vcpu-pin 0 7 16-31
A.7. How GPU locality is determined
As noted in NUMA considerations, current multi-socket servers typically implement PCIe expansion slots local to each CPU socket and it is advantageous to pin VMs to the same socket that their associated physical GPU is connected to.
For current Intel platforms, CPU socket 0 typically has its PCIe root ports located on bus 0, so any GPU below a root port located on bus 0 is connected to socket 0. CPU socket 1 has its root ports on a higher bus number, typically bus 0x20 or bus 0x80 depending on the specific server platform.
Notice
ALL NVIDIA DESIGN SPECIFICATIONS, REFERENCE BOARDS, FILES, DRAWINGS, DIAGNOSTICS, LISTS, AND OTHER DOCUMENTS (TOGETHER AND SEPARATELY, "MATERIALS") ARE BEING PROVIDED "AS IS." NVIDIA MAKES NO WARRANTIES, EXPRESSED, IMPLIED, STATUTORY, OR OTHERWISE WITH RESPECT TO THE MATERIALS, AND EXPRESSLY DISCLAIMS ALL IMPLIED WARRANTIES OF NONINFRINGEMENT, MERCHANTABILITY, AND FITNESS FOR A PARTICULAR PURPOSE.
Information furnished is believed to be accurate and reliable. However, NVIDIA Corporation assumes no responsibility for the consequences of use of such information or for any infringement of patents or other rights of third parties that may result from its use. No license is granted by implication of otherwise under any patent rights of NVIDIA Corporation. Specifications mentioned in this publication are subject to change without notice. This publication supersedes and replaces all other information previously supplied. NVIDIA Corporation products are not authorized as critical components in life support devices or systems without express written approval of NVIDIA Corporation.
HDMI
HDMI, the HDMI logo, and High-Definition Multimedia Interface are trademarks or registered trademarks of HDMI Licensing LLC.
OpenCL
OpenCL is a trademark of Apple Inc. used under license to the Khronos Group Inc.
Trademarks
NVIDIA and the NVIDIA logo are trademarks or registered trademarks of NVIDIA Corporation in the U.S. and other countries. Other company and product names may be trademarks of the respective companies with which they are associated.