Gst-nvmsgconv
The Gst-nvmsgconv plugin parses NVDS_EVENT_MSG_META (NvDsEventMsgMeta) type metadata attached to the buffer as user metadata of frame meta and generates the schema payload. For the batched buffer, metadata of all objects of a frame must be under the corresponding frame meta.
The generated payload (NvDsPayload) is attached back to the input buffer as NVDS_PAYLOAD_META type user metadata.
DeepStream 5.0 supports two variations of the schema, full and minimal. The Gst-nvmsgconv plugin can be configured to use either one of the schemas.
By default, the plugin uses the full DeepStream schema to generate the payload in JSON format. The full schema supports elaborate semantics for object detection, analytics modules, events, location, and sensor. Each payload has information about a single object.
You can use the minimal variation of the schema to communicate minimal information with the back end. This provides a small footprint for the payload to be transmitted from DeepStream to a message broker. Each payload can have information for multiple objects in the frame.

Inputs and Outputs
• Inputs
• Gst Buffer with NvDsEventMsgMeta
• Control parameters
• config
• msg2p-lib
• payload-type
• comp-id
• Output
• Same Gst Buffer with additional NvDsPayload metadata. This metadata contains information about the payload generated by the plugin.
Features
The following table summarizes the features of the plugin.
Features of the Gst-nvmsgconv plugin | ||
|---|---|---|
Feature | Description | Release |
Payload in JSON format | Message payload is generated in JSON format | DS 3.0 |
Supports DeepStream schema specification | DeepStream schema spec implementation for messages | DS 3.0 |
Custom schema specification | Provision for custom schemas for messages | DS 3.0 |
Key-value file parsing for static properties | Read static properties of sensor/place/module in the form of key-value pair from a text file | DS 3.0 |
CSV file parsing for static properties | Read static properties of sensor/place/module from a CSV file | DS 3.0 |
DeepStream 4.0.1 minimalistic schema | Minimal variation of the DeepStream message schema | DS 4.0 |
Gst Properties
The following table describes the Gst-nvmsgconv plugin’s Gst properties.
Gst-nvmsgconv plugin, Gst properties | ||||
|---|---|---|---|---|
Property | Meaning | Type and Range | Example Notes | Platforms |
config | Absolute pathname of a configuration file that defines static properties of various sensors, places, and modules. | String | config=msgconv_config.txt or config=msgconv_config.csv | dGPU Jetson |
msg2p-lib | Absolute pathname of the library containing a custom implementation of the nvds_msg2p_* interface for custom payload generation. | String | msg2p-lib=libnvds_msgconv_custom.so | dGPU Jetson |
payload-type | Type of schema payload to be generated. Possible values are: PAYLOAD_DEEPSTREAM: Payload using DeepStream schema. PAYLOAD_DEEPSTREAM_MINIMAL: Payload using minimal DeepStream schema. PAYLOAD_CUSTOM: Payload using custom schemas. | Integer, 0 to 4,294,967,295 | payload-type=0 or payload-type=257 | dGPU Jetson |
comp-id | Component ID of the plugin from which metadata is to be processed. | Integer, 0 to 4,294,967,295 | comp-id=2 Default is NvDsEventMsgMeta | dGPU Jetson |
Schema Customization
This plugin can be used to implement a custom schema in two ways:
• By modifying the payload generator library: To perform a simple customization of DeepStream schema fields, modify the low-level payload generation library file sources/libs/nvmsgconv/nvmsgconv.cpp.
• By implementing the nvds_msg2p interface: If a library that implements the custom schema needs to be integrated with the DeepStream SDK, wrap the library in the nvds_msg2p interface and set the plugin’s msg2p-lib property to the library’s name. Set the payload-type property to PAYLOAD_CUSTOM.
See sources/libs/nvmsgconv/nvmsgconv.cpp for an example implementation of the nvds_msg2p interface.
Payload with Custom Objects
You can add a group of custom objects to the NvDsEventMsgMeta structure in the extMsg field and specify their size in the extMsgSize field. The meta copy (copy_func) and free (release_func) functions must handle the custom fields accordingly.
The payload generator library handles some standard types of objects (Vehicle, Person, Face, etc.) and generates the payload according to the schema selected. To handle custom object types, you must modify the payload generator library nvmsgconv.cpp.
See deepstream-test4 for details about adding custom objects as NVDS_EVENT_MSG_META user metadata with buffers for generating a custom payload to send to back end.
Gst-nvmsgbroker
This plugin sends payload messages to the server using a specified communication protocol. It accepts any buffer that has NvDsPayload metadata attached and uses the nvds_msgapi_* interface to send the messages to the server. You must implement the nvds_msgapi_* interface for the protocol to be used and specify the implementing library in the proto-lib property.

Inputs and Outputs
• Inputs
• Gst Buffer with NvDsPayload
• Control parameters
• Config
• conn-str
• proto-lib
• comp-id
• topic
• Output
• None, as this is a sink component
Features
The following table summarizes the features of the Gst-nvmsgbroker plugin.
Features of the Gst-nvmsgbroker plugin | ||
|---|---|---|
Feature | Description | Release |
Payload in JSON format | Accepts message payload in JSON format | DS 3.0 |
Kafka protocol support | Kafka protocol adapter implementation | DS 3.0 |
Azure IOT support | Integration with Azure IOT framework | DS 4.0 |
AMQP support | AMQP 0-9-1 protocol adapter implementation | DS 4.0 |
Custom protocol support | Provision to support custom protocol through a custom implementation of the adapter interface | DS 3.0 |
Configurable parameters | Protocol specific options through configuration file | DS 3.0 |
Gst Properties
The following table describes the Gst properties of the Gst-nvmsgbroker plugin.
Gst-nvmsgbroker plugin, Gst Properties | ||||
|---|---|---|---|---|
Property | Meaning | Type and Range | Example Notes | Platforms |
config | Absolute pathname of configuration file required by nvds_msgapi_* interface | String | config=<msgapi_config.txt> | dGPU Jetson |
conn-str | Connection string as end point for communication with server | String Format must be <name>;<port>;<specifier> | conn-str=foo.bar.com;80 ;user-id | dGPU Jetson |
proto-lib | Absolute pathname of library that contains the protocol adapter as an implementation of nvds_msgapi_* | String | proto-lib=<libnvds_kafka_proto.so> | dGPU Jetson |
comp-id | ID of component from which metadata should be processed | Integer, 0 to 4,294,967,295 | comp-id=3 Default: plugin processes metadata from any component | dGPU Jetson |
topic | Message topic name | String | topic=dsapp1 | dGPU Jetson |
subscribe-topic-list | Topic names to subscribe for consuming messages | String | subscribe-topic-list=topic1; topic2; topic3 | dGPU Jetson |
nvds_msgapi: Protocol Adapter Interface
You can use the DeepStream messaging interface, nvds_msgapi, to implement a custom protocol message handler and integrate it with DeepStream applications. Such a message handler, known as a protocol adapter, enables you to integrate DeepStream applications with backend data sources, such as data stored in the cloud.

The Gst-nvmsgbroker plugin calls the functions in your protocol adapter as shown in the figure above. These functions support:
• Creating a connection
• Sending messages by synchronous or asynchronous means
• Terminating the connection
• Coordinating the client’s and protocol adapter’s use of CPU resources and threads
• Getting the protocol adapter’s version number
The nvds_msgapi interface is defined in the header file source/includes/nvds_msgapi.h. This header file defines a set of function pointers which provide an interface analogous to an interface in C++.
The following sections describe the methods defined by the nvds_msgapi interface.
nvds_msgapi_connect(): Create a Connection
NvDsMsgApiHandle nvds_msgapi_connect(char *connection_str,
nvds_msgapi_connect_cb_t connect_cb, char *config_path
);
The function accepts a connection string and configures a connection. The adapter implementation can choose whether the function makes a connection to accommodate connectionless protocols such as HTTP.
Parameters
• connection_str: A pointer to a string that specifies connection parameters in the general format "<url>;<port>;<specifier>".
• <url> and <port> specify the network address of the remote entity.
• <specifier> specifies information specific to a protocol. Its content depends on the protocol’s implementation. It may be, for example, a client identifier for making the connection.
Note that this connection string format is not binding, and an adapter may omit some fields (e.g.: specifier) from its format, provided the omission is described in its documentation.
A special case of such connection string adaptation is where the adapter expects all connection parameters to be specified as fields in the configuration file (see config path below), in which case the connection string is passed as NULL.
• connect_cb: A callback function for events associated with the connection.
• config_path: The pathname of a configuration file that defines protocol parameters used by the adapter.
Return Value
A handle for use in subsequent interface calls if successful, or NULL otherwise.
nvds_msgapi_send() and nvds_msgapi_send_async(): Send an event
NvDsMsgApiErrorType nvds_msgapi_send(NvDsMsgApiHandle *h_ptr,
char *topic, uint8_t *payload, size_t nbuf
);
NvDsMsgApiErrorType nvds_msgapi_send_async(NvDsMsgApiHandle h_ptr,
char *topic, const uint8_t *payload, size_t nbuf,
nvds_msgapi_send_cb_t send_callback, void *user_ptr
);
Both functions send data to the endpoint of a connection. They accept a message topic and a message payload.
The nvds_send() function is synchronous. The nvds_msgapi_send_async() function is asynchronous; it accepts a callback function that is called when the “send” operation is completed.
Both functions allow the API client to control execution of the adapter logic by calling nvds_msgapi_do_work(). See the description of the nvds_msgapi_do_work() function.
Parameters
• h_ptr: A handle for the connection, obtained by a call to nvds_msgapi_connect().
• topic: A pointer to a string that specifies a topic for the message; may be NULL if topic is not meaningful for the semantics of the protocol adapter.
• payload: A pointer to a byte array that contains the payload for the message.
• nbuf: Number of bytes to be sent.
• send_callback: A pointer to a callback function that the asynchronous function calls when the “send” operation is complete. The signature of the callback function is of type nvds_msgapi_send_cb_t, defined as:
typedef void (*nvds_msgapi_send_cb_t)(void *user_ptr,
NvDsMsgApiErrorType completion_flag
);
Where the callback’s parameters are:
• user_ptr: The user pointer (user_ptr) from the call to nvds_msgapi_send() or nvds_msgapi_send_async() that initiated the “send” operation. Enables the callback function to identify the initiating call.
• completion_flag: A code that indicates the completion status of the asynchronous send operation.
nvds_msgapi_subscribe(): Consume data by subscribing to topics
NvDsMsgApiErrorType nvds_msgapi_subscribe (NvDsMsgApiHandle h_ptr, char ** topics, int num_topics, nvds_msgapi_subscribe_request_cb_t cb, void *user_ctx);
This API is used to subscribe to topic(s) and consume messages from the external entity.
The API is asynchronous and must be called with an already created valid Kafka connection handle as parameter. The caller must also provide a pointer to the callback function to receive the consumed messages from the connection endpoint and an optional user_ctx pointer for specifying user context
Parameters
• h_ptr: A handle for the connection, obtained by a call to nvds_msgapi_connect()
• topics: A 2d pointer which points to a char array of topic names
• num_topics: num of topics to subscribe
• cb: A pointer to a callback function to get notified of the consumed messages on subscribed topic(s)
• user_ctx: user ptr to be passed to callback for context
The pointer to a callback function which is specified as a param in subscribe API is of type nvds_msgapi_subscribe_request_cb_t defined as:
typedef void (*nvds_msgapi_subscribe_request_cb_t)(NvDsMsgApiErrorType flag, void *msg, int msg_len, char *topic, void *user_ptr);
Where the callback’s parameters are:
• flag: To specify the error status of message consumed
• msg: Consumed message / payload
• msg_len: Length of message in bytes
• topic: Topic name where the message was received
• user_ptr: pointer passed during subscribe() for context
nvds_msgapi_do_work(): Incremental Execution of Adapter Logic
void nvds_msgapi_do_work();
The protocol adapter must periodically surrender control to the client during processing of nvds_msgapi_send() and nvds_msgapi_send_async() calls. The client must periodically call nvsd_msgapi_do_work() to let the protocol adapter resume execution. This ensures that the protocol adapter receives enough CPU resources. The client can use this convention to control the protocol adapter’s use of multi-threading and thread scheduling. The protocol adapter can use it to support heartbeat functionality, if the underlying protocol requires that.
The nvds_msgapi_do_work() convention is needed when the protocol adapter executes in the client thread. Alternatively, the protocol adapter may execute time-consuming operations in its own thread. In this case the protocol adapter need not surrender control to the client, the client need not call nvsd_msgapi_do_work(), and the implementation of nvds_msgapi_do_work() may be a no-op.
The protocol adapter’s documentation must specify whether the client must call nvds_msgapi_do_work(), and if so, how often.
nvds_msgapi_disconnect(): Terminate a Connection
NvDsMsgApiErrorType nvds_msgapi_disconnect(NvDsMsgApiHandle h_ptr);
The function terminates the connection, if the underlying protocol requires it, and frees resources associated with h_ptr.
Parameters
• h_ptr: A handle for the connection, obtained by a call to nvds_msgapi_connect().
nvds_msgapi_getversion(): Get Version Number
char *nvds_msgapi_getversion();
This function returns a string that identifies the nvds_msgapi version supported by this protocol adapter implementation. The string must use the format "<major>.<minor>", where <major> is a major version number and <minor> is a minor version number. A change in the major version number indicates an API change that may cause incompatibility. When the major version number changes, the minor version number is reset to 1.
nvds_kafka_proto: Kafka Protocol Adapter
The DeepStream 5.0 release includes a protocol adapter that supports Apache Kafka. The adapter provides out-of-the-box capability for DeepStream applications to publish messages to Kafka brokers.
Installing Dependencies
The Kafka adapter uses librdkafka for the underlying protocol implementation. This library must be installed prior to use.
To install librdkakfa, enter these commands:
git clone https://github.com/edenhill/librdkafka.git
cd librdkafka
git reset --hard 7101c2310341ab3f4675fc565f64f0967e135a6a
./configure
make
sudo make install
sudo cp /usr/local/lib/librdkafka* /opt/nvidia/deepstream/deepstream-5.0/lib
Install additional dependencies:
sudo apt-get install libglib2.0 libglib2.0-dev
sudo apt-get install libjansson4 libjansson-dev
Using the Adapter
You can use the Kafka adapter in an application by setting the Gst-nvmsgbroker plugin’s proto-lib property to the pathname of the adapter’s shared library, libnvds_kafka_proto.so. The plugin’s conn-str property must be set to a string with format:
<kafka broker address>;<port>
This instantiates the Gst-nvmsgbroker plugin and makes it use the Kafka protocol adapter to publish messages that the application sends to the broker at the specified broker address and topic.
Configuring Protocol Settings
You can define configuration setting for the Kafka protocol adapter as described by the documentation at:
You can set these options in the Gst-nvmsgbroker configuration file. Like the rest of DeepStream, the configuration file uses the “gkey” format. The Kafka settings must be in a group named [message-broker] and must be specified as part of a key named proto-cfg. The settings can be a series of key-value pairs separated by semicolons. For example:
[message-broker]
proto-cfg="message.timeout.ms=2000;retries=5"
consumer-group-id = groupid
partition-key = keyid
The Kafka adapter lets you specify the name of the field in messages that is to be used to define the partition key. For each message, the specified message field is extracted and send to the topic partitioner along with the message. The partitioner uses it to identify the partition in the Kafka cluster that handles the message. The partition key information must be specified in the Gst-nvmsgbroker configuration file’s [message-broker] group, using an entry named partition-key.
Fields embedded in a hierarchy of JSON objects in the message are specified using dotted notation. For example, for the sample JSON message shown below, the id field in the sensor object is identified as sensor.id,
{
"sensor" {
"id": "cam1"
}
}
Additionally, the Kafka adapter lets you specify the consumer group id. The consumer group is a string that uniquely identifies the group of consumer processes to which this Kafka consumer belongs. The key name consumer-group-id can be specified in the Gst-nvmsgbroker configuration file’s [message-broker] group. If this field is unspecified, the default consumer group name "test-consumer-group" will be used.
Note: | For the DeepStream reference application and the 360‑D application, both distributed with the DeepStream SDK, you can add the proto-cfg setting to the [message-broker] group of the top-level configuration file passed to the application. |
Programmatic Integration
You can integrate the Kafka adapter into custom user code by using the nvds_msgapi interface to call its functions. Note the following points regarding the functions defined by the interface:
• The connection string passed to the nvdm_msgapi_connect() has the format <kafka broker address>;<port>.
• For both “send” functions, the topic name must be passed as param to nvds_msgapi_send(). or nvds_msgapi_send_async()
• For the subscribe API, a 2D pointer to a char array of topic-names must be passed as param. Also, a pointer to a user callback function must be provided. When there’s a new message from the remote entity, the Kafka consumer will forward the message to the application by calling the user callback function.
• The application must call nvds_msgapi_do_work() at least once a second, and preferably more often. The frequency of calls to nvds_msgapi_do_work() determines the rate at which messages waiting to be sent are processed.
• It is safe for multiple application threads to share connection handles. The library librdkafka is thread-safe, so Kafka protocol adapter does not need to implement separate locking mechanisms for functions calling directly to this library.
• The Kafka protocol adapter expects the client to manage usage and retirement of the connection handle. The client must ensure that once a handle is disconnected, it is not used for either a “send” call or a call to nvds_msgapi_do_work(). While the library attempts to ensure graceful failure if the application calls these functions with retired handles, it does not do so in a thread-safe manner.
Security for Kafka
Starting with DeepStream 5.0, the Kafka adaptor supports secure communication. Security includes the following aspects:
• Authentication: Kafka brokers can restrict clients (producers and consumers) connecting to a cluster based on credentials. DeepStream applications, starting with the 5.0 release, can authenticate themselves to brokers using TLS mutual authentication mechanism to send (and receive) messages to such clusters. This is particularly important for clusters executing outside of company networks, and thereby exposed to public networks.
• Encryption: Encryption ensures that confidentiality is maintained from third parties for messages sent by DeepStream applications to Kafka brokers.
• Tampering: The added security support prevents messages between application and broker from being tampered in flight.
• Authorization: Limit the operations allowed for a client connecting to the broker. Identity of the client (the DeepStream application in this case) is established during the authentication step.
2-way TLS Authentication
DeepStream 5.0 enables Kafka security based on the 2-way TLS Authentication mechanism. TLS (Transport Layer Security) is a successor to SSL, but the two terms are still used interchangeably in literature. TLS/SSL is used commonly for secure communication while connecting to servers (e.g. HTTPS) is used for secure communication on the web. 2-way communication ensures that both clients and servers can authenticate each other and communicate securely.
Overview of Steps
This section provides high level guidance and considerations while enabling security for Kafka.
For detailed setup instructions regarding setting up SSL security, please refer to the “Secure_Setup.md” document in the DeepStream 5.0 SDK in sources/libs/kafka_protocol_adaptor/ folder.
Follow the steps below to enable DeepStream apps with Kafka:
1. Setup Kafka broker with TLS authentication enabled
2. Create and deploy certificates for broker and DeepStream application
3. Copy CA certificates to the broker and client truststores
4. Configure TLS options in Kafka config file (see CFG_FILE param above)
TLS Version
As part of the initial TLS handshake, clients like DeepStream applications and servers agree on the TLS protocol to use. The recommendation is to use TLSv1.2 or later in production. You can verify which version of TLS your broker supports by connecting to the broker using the openssl utility. The openssl utility can be deployed by installing the openssl package, available for Ubuntu and other Linux distributions. Run the command as follows:
openssl s_client -connect <broker address>:<broker port> -tls1_2
This operation connects to the broker using the openssl_s client while using TLSv1.2. In case of error, review logs for issues during handshake indicating that TLSv1.2 is not supported.
Key generation
The security setup document describes use of the keytool utility to generate a key pair. The user has an option of specifying the algorithm used to generate the key pair. RSA is a popular algorithm, offering 2048-bit key option for increased security. Others include DSA and ECDSA with varying speeds in signing and verifying as described here: https://wiki.mozilla.org/Security/Server_Side_TLS
Certificate Signing
While the security setup document provides instructions to create a token certificate authority (CA) to sign the client certificate, in production, the user would create certificates signed by third party CAs. These are created using a certificate signing request (CSR) See https://en.wikipedia.org/wiki/Certificate_signing_request for more information.
Client requesting a certificate creates a key pair, but only includes the public key with other information, notably the “common name”, which is the fully qualified domain name (FQDN) of the machine for which the certificate is being requested. This information is signed by the user using the private key, which needs to be kept confidential.
Choice of Cipher
As part of TLS configuration option while deploying the DeepStream application, the user can specify the cipher suite to be used. The cipher suite defines a collection of underlying algorithms used through the lifetime of the TLS connection. These algorithms address:
• Key exchange (during initial handshake)
• Digital signature (during initial handshake)
• Bulk encryption (confidentiality during data communication)
• Message authentication (tamper prevention during data communication). Numerous ciphers exist that are supported by OpenSSL (and in turn librdkafka and the Kafka adaptor in DeepStream).
Recommendations for above algorithms as described below:
• ECDHE for as the key exchange algorithm; it is based on Elliptic Key crypto cryptography while using ephemeral keys, thereby offering forward secrecy.
• ECDSA or RSA for digital signature
• AES for bulk encryption. AES offers both 128- and 256-bit key sizes. Tradeoff is between computational overhead and additional protection.
It is also suggested to use bulk encryption algorithms that support authenticated encryption, which uses a tag in addition to the ciphertext. Use of tags enables detection of improperly constructed ciphertexts, which could for instance be specially chosen for attack. AES_GCM and AES_CBC are examples of block cipher that support authentication encryption.
In summary, examples of TLSv1.2 ciphers that conform to these recommendations include:
TLS_ECDHE_ECDSA_WITH_AES_256_GCM_SHA384
TLS_ECDHE_ECDSA_WITH_AES_128_GCM_SHA256
TLS_ECDHE_RSA_WITH_AES_256_GCM_SHA384
TLS_ECDHE_RSA_WITH_AES_128_GCM_SHA256
TLS_ECDHE_ECDSA_WITH_AES_256_CBC_SHA384
TLS_ECDHE_ECDSA_WITH_AES_128_CBC_SHA256
TLS_ECDHE_RSA_WITH_AES_256_CBC_SHA384
TLS_ECDHE_RSA_WITH_AES_128_CBC_SHA256
Configure TLS options in Kafka config file for DeepStream
Configuration options provided by the Kafka message adaptor to the librdkafka library needs to be modified for SSL. The DeepStream documentation in the Kafka adaptor section describes various mechanisms to provide these config options, but this section addresses these steps based on using a dedicated config file.
A list of parameters must be defined within the config file using the proto-cfg entry within the message-broker section as shown in the example below.
[message-broker]
proto-cfg = "security.protocol=ssl;ssl.ca.location=<path to your ca>/ca-client-cert;ssl.certificate.location=<path to your certificate >/client1_cert.pem;ssl.key.location=<path to your private key>/client1_private_key.pem;ssl.key.password=test1234;ssl.key.password=abcdefgh;
ssl.cipher.suites=ECDHE-RSA-AES256-GCM-SHA384; debug=broker,security"
The various options specified in the config file are described below:
• security.protocol.ssl: use SSL as the authentication protocol
• ssl.ca.location: path where your client CA certificate is stored
• ssl.certificate.location: path where your client certificate is stored
• ssl.key.location: path where your protected private key is stored
• ssl.cipher.suites=ECDHE-RSA-AES256-GCM-SHA384
• ssl.key.password: password for your private key provided while extracting it from the p12 file
The ssl.cipher.suites option allows the user to pick the cipher to be used for connecting to the broker. Given that the underlying librdkafka library uses OpenSSL, the list of supported ciphers can be identified from the OpenSSL documentation: https://www.openssl.org/docs/man1.0.2/man1/ciphers.html
librdkafka supports several other security related options that can be enabled as part of the Kafka adapter config file. Refer to the librdkafka configuration page for a complete list of options:
Performance
Enabling TLS-based security will incur a computational overhead on the processor in your system. Several aspects influence the overhead, including message size, frame rate and choice of cipher suite. While the key exchange algorithms in the cipher suite incur a one-time overhead during the initial connection establishment, the bulk encryption and message authentication algorithms are run during data transfer, and hence need to be considered for performance. For instance, AES offers two variants, based on 128- and 256-bit keys. While the latter is more secure, it incurs a larger performance overhead. It is necessary to ensure that your processor supports AES instructions; most modern Xeon processors do, as do Jetson’s processors. See https://developer.nvidia.com/embedded/develop/hardware for more information on Jetson processors.
Monitor Adapter Execution
The Kafka adapter generates log messages based on the nvds_logger framework to help you monitor execution. The adapter generates separate logs for the INFO, DEBUG, and ERROR severity levels, as described in nvds_logger: The Logger Framework. You can limit the log messages generated by setting the level at which log messages are filtered as part of the logging setup script.
Note: | If the severity level is set to DEBUG, the nvds_logger framework logs the entire contents of each message sent by the Kafka protocol adapter. |
Azure MQTT Protocol Adapter Libraries
The DeepStream 5.0 release includes protocol adapters that supports direct messaging from device to cloud (using the Azure device client adapter) and through Azure IoT Edge runtime (using the Azure module client adapter). The adapters provide out-of-the-box capability for DeepStream applications to publish messages to Azure IoT Hub using the MQTT protocol.
The Azure IoT protocol adapters are encapsulated by their respective shared libraries found within the DeepStream package at the location:
/opt/nvidia/deepstream/deepstream-5.0/lib
The Azure device client adapter library is named libnvds_azure_proto.so.
The Azure module client adapter library is named libnvds_azure_edge_proto.so.
Installing Dependencies
Azure adapters use libiothub_client.so from the Azure IoT C SDK (v1.2.8) for the underlying protocol implementation. After you install the deepstream package you can find the precompiled library at:
/opt/nvidia/deepstream/deepstream-5.0/lib/libiothub_client.so
You can also compile libiothub_client.so manually by entering these commands:
git clone -b 2018-07-11 --recursive https://github.com/Azure/azure-iot-sdk-c.git
cd azure-iot-sdk-c
mkdir cmake
cd cmake
cmake ..
cmake --build . # append '-- -j <n>' to run <n> jobs in parallel
To install some other required dependencies, enter one of these commands.
• For an x86 computer using Ubuntu 18.04:
sudo apt-get install -y libcurl3 libssl-dev uuid-dev libglib2.0 libglib2.0-dev
• For other platforms or OS:
sudo apt-get install -y libcurl4-openssl-dev libssl-dev uuid-dev libglib2.0 libglib2.0-dev
Setting Up Azure IoT
Azure IoT adapter needs a functioning Azure IoT Hub instance to which is can publish messages. To set up an Azure IoT Hub instance if required, see the instructions at:
https://docs.microsoft.com/en-us/azure/iot-hub/tutorial-connectivity
After you create the Azure IoT instance, create a device entry corresponding to the device that is running DeepStream.
To set up Azure IoT Edge runtime on the edge device, see the instructions at:
https://docs.microsoft.com/en-us/azure/iot-edge/how-to-install-iot-edge-linux
Configuring Adapter Settings
Place Azure IoT specific information in a custom configuration file named, e.g., cfg_azure.txt. The entries in the configuration file vary slightly between the Azure device client and the module client.
• For an Azure device client:
[message-broker]
connection_str = HostName=<my-hub>.azure-devices.net;DeviceId=<device_id>;
SharedAccessKey=<my-policy-key>
shared_access_key = <my-policy-key>
custom_msg_properties = <key1>=<value1>; <key2>=<value2>; <key3>=<value3>;
• For an Azure module client:
[message-broker]
#custom_msg_properties = <key1>=<value1>; <key2>=<value2>; <key3>=<value3>;
Here is useful information about some of the configuration file properties:
• connection_str: You can obtain the Azure connection string from the Azure IoT Hub web interface. A connection string uniquely identifies each device associated with the IoT Hub instance. It is under the “Primary Connection String” entry in the “Device detail” section.
• shared_access_key: You can obtain the shared access key from the “Primary key” entry in the “Device detail” section.
• custom_msg_properties: Use this property to embed custom key/value pairs in the MQTT messages sent from the device to Azure IoT. You can embed multiple key values separated by semicolons, as in this example:
custom_msg_properties = ex2: key1=value1;key2=value2;key3=value3;
Note: | The connection_str, shared_access_key, and custom_msg_properties strings are each limited to 512 characters. |
Using the Adapter
To use the Azure device client adapter in an application, set the Gst-nvmsgbroker plugin’s proto-lib property to the pathname of the adapter’s shared library - libnvds_azure_proto.so for the device client case, or libnvds_azure_edge_proto.so for the module client case.
The next step in using the adapter is to specify the connection details. The procedure for specifying connection details is different for the Azure device client and module client cases, as described in the following sections.
Connection Details for the Device Client Adapter
Set the plugin’s conn-str property to the full Azure connection string in the format:
HostName=<my-hub>.azure-devices.net;DeviceId=<device_id>;SharedAccessKey=<my-policy-key>
Alternatively, you can specify the connection string details in the Azure configuration file:
[message-broker]
connection_str = HostName=<my-hub>.azure-devices.net;DeviceId=<device_id>;SharedAccessKey=<my-policy-key>
Connection Details for the Module Client Adapter
Leave the connection string empty, since the Azure IoT Edge library automatically fetches the connection string from the file /etc/iotedge/config.yaml.
Once the connection details have been configured, you can integrate the Azure device client and module client adapters into custom user code by using the nvds_msgapi interface to call its functions. Note the following points about the functions defined by the interface:
• The connection string passed to nvds_msgapi_connect() may be NULL for both the Azure device client and the module client. For the device client the Azure configuration file has an option to specify a connection string. For the module client the connection string is always specified in /etc/iotedge/config.yaml.
• Both “send” functions use the topic name specified in the Gst-nvmsgbroker plugin’s property “topic.” It may be null.
• The application must call nvds_msgapi_do_work() after each call to nvds_msgapi_send_async(). The frequency of calls to nvds_msgapi_do_work() determines the rate at which messages waiting to be sent are processed.
• It is safe for multiple application threads to share connection handles. The library libiothubclient is thread-safe, so Azure protocol adapters need not implement separate locking mechanisms for functions calling this library directly.
• The Azure protocol adapters expects the client to manage usage and retirement of the connection handle. The client must ensure that once a handle is disconnected, it is not used for either a “send” call or a call to nvds_msgapi_do_work(). While the library attempts to ensure graceful failure if the application calls these functions with retired handles, it does not do so in a thread-safe manner.
Monitor Adapter Execution
The Azure device client and module client use different logging mechanisms.
Azure device client library log messages
The Azure device client adapter uses the nvds_logger framework to generate log messages which can help you monitor execution. The adapter generates separate logs for the INFO, DEBUG, and ERROR severity levels, as described in nvds_logger: Logging Framework. You can limit the generated log messages by setting the level at which log messages are filtered in the logging setup script.
Note: | If the severity level is set to DEBUG, the nvds_logger framework logs the entire contents of each message sent by the Azure device client protocol adapter. |
Azure Module Client Library Log Messages
The log messages from the Azure module client adapter library are emitted to stdout, and the log output is captured in the docker/iotedge module logs.
Message Topics and Routes
You can specify a message topic in a GStreamer property topic. However, the Azure device client and module client use the topic property in different ways.
The Azure device client does not support topics. Thus, the value of the topic property is ignored, and you cannot use it to filter messages on Azure IoT Hub.
The Azure module client uses the topic property to determine the route of messages, i.e. how messages are passed within a system. For more information about message routes, see:
https://docs.microsoft.com/en-us/azure/iot-edge/module-composition#declare-routes)
AMQP Protocol Adapter
DeepStream release 5.0 includes an AMQP protocol adapter that DeepStream applications can use out of the box to publish messages using AMQP 0-9-1 message protocol.
The AMQP protocol adapter shared library is in the deepstream package at:
/opt/nvidia/deepstream/deepstream-5.0/lib/libnvds_amqp_proto.so
Installing Dependencies
AMQP protocol adapter for DeepStream uses the librabbitmq.so library, built from rabbitmq-c (v0.8.0) for the underlying AMQP protocol implementation. To build the library, enter these commands:
git clone -b v0.8.0 --recursive https://github.com/alanxz/rabbitmq-c.git
mkdir build && cd build
cmake ..
cmake --build .
To copy the built librabbitmq.so library to its final location, enter this command.
• For x86:
sudo cp ./librabbitmq/librabbitmq.so.4 /usr/lib/
• For Jetson:
sudo cp ./librabbitmq/librabbitmq.so.4 /usr/lib/aarch64-linux-gnu/
Install additional dependencies:
sudo apt-get install libglib2.0 libglib2.0-dev
AMQP broker
The AMQP protocol communicates with an AMQP 0-9-1 compliant message broker. If you do not have a functioning broker already, you can deploy one by installing the rabbitmq-server package, available at:
You can install this package on your local system or on the remote machine where you want the broker to be installed.
To install the package, enter the command:
sudo apt-get install rabbitmq-server
To determine whether the rabbitmq service is running, enter the command:
sudo service rabbitmq-server status
If rabbitmq is not running, enter this command to start it:
sudo service rabbitmq-server start
Configure Adapter Settings
You can place AMQP protocol adapter specific information in a custom configuration named, for example, cfg_amqp.txt. Here is an example of configuration file entries for an AMQP broker installed on the local machine:
[message-broker]
hostname = localhost
username = guest
password = guest
port = 5672
exchange = amq.topic
topic = topicname
The properties in the configuration file are:
• hostname: Hostname of the host on which the AMQP broker is installed
• username: Username used to log in to the broker
• password: Password used to log in to the broker
• port: Port used to communicate with the AMQP broker
• exchange: Name of the exchange on which to publish messages
• topic: Message topic
Using the Adapter
To use the AMQP protocol client adapter in a DeepStream application, set the Gst-nvmsgbroker plugin’s proto-lib property to the pathname of the adapter’s shared library, libnvds_amqp_proto.so.
proto-lib = <path to libnvds_amqp_proto.so>
You can specify the AMQP connection details in the AMQP adapter specific configuration file (e.g., cfg_amqp.txt) as described above. This is the recommended method. The path to the AMQP configuration file is specified by the Gst property config:
config = <path to cfg_amqp.txt>
Alternatively, you can specify the AMQP protocol’s hostname, port number, and username in the Gst plugin’s conn-str property, and specify the password in the configuration file. In the Gst properties:
conn-str = hostname;5672;username
config = <pathname of AMQP configuration file>
In the AMPQ configuration file:
[message-broker]
password = <password>
You can set the Gst-nvmsgbroker plugin’s topic property to specify the message topic.
topic = <topicname>
Alternatively, you can specify a topic in the AMQP configuration file (cfg_amqp.txt). In the Gst properties, set:
config = <path to cfg_amqp.txt>
In the AMQP configuration file:
[message-broker]
Topic = topicname
Programmatic Integration
Once you have configured the connection, you can integrate the AMQP protocol adapter into your application by using the nvds_msgapi interface to call its functions. Note the following points about the functions defined by the interface:
• The connection string passed to nvds_msgapi_connect() has the format Hostname;<port>;username.
• For both “send” functions, the topic name is specified either by the Gst-nvmsgbroker plugin’s topic property or by the topic parameter in the AMQP configuration file.
• The application must call nvds_msgapi_do_work() after each call to nvds_msgapi_send_async(). The frequency of calls to nvds_msgapi_do_work() determines the rate at which messages waiting to be sent are processed.
The AMQP protocol adapter expects the client to manage usage and retirement of the connection handle. The client must ensure that once a handle is disconnected, it is not used for either a “send” call or a call to nvds_msgapi_do_work(). While the library attempts to ensure graceful failure, if the application calls these functions with retired handles, it does not do so in a thread-safe manner.
Note: | As stated at https://github.com/alanxz/rabbitmq-c#threading, you cannot share a socket, an amqp_connection_state_t, or a channel between threads using the librabbitmq library. This library is designed for use by event-driven, single-threaded applications, and does not yet meet the requirements of threaded applications. To deal with this limitation, your application must open an AMQP connection (and an associated socket) per thread. If it needs to access a single AMQP connection or any of its channels from more than one thread, you must implement an appropriate locking mechanism. It is generally simpler to have a connection dedicated to each thread. |
Monitor Adapter Execution
The AMQP protocol adapter uses the nvds_logger framework to generate log messages which can help you monitor execution. The adapter generates separate logs for the INFO, DEBUG, and ERROR severity levels, as described in nvds_logger: Logging Framework. You can limit the log messages being generated by setting the level at which log messages are filtered in the logging setup script.
Note: | If the severity level is set to DEBUG, nvds_logger logs the entire contents of each message sent by the AMQP protocol adapter. |
nvds_logger: Logging Framework
DeepStream provides a logging framework named nvds_logger. The Kafka protocol adapter uses this framework to generate a run time log. nvds_logger is based on syslog, and offers many related features, including:
• Choice of priorities (log levels)
• Log filtering and redirection
• Shared logging across different DeepStream instances running concurrently
• Log retirement and management using logrotate
• Cross-platform support
Enabling Logging
To enable logging, run the setup_nvds_logger.sh script. Note that this script must be run with sudo. You may have to modify the permissions associated with this script to make it executable.
The script accepts an optional parameter specifying the pathname of log file to be written. By default, the pathname is /tmp/nvds/ds.log.
Once logging is enabled, you can access the generated log messages by reading the log file.
By default, you must have sudo permissions to read the log file. Standard techniques for syslog-based logging configuration can eliminate this requirement.
Filtering Logs
nvds_logger allows logs to be associate with a severity level similar to that which syslog offers. You can filter log messages based on severity level by modifying the setup script. By default, the script enables logging for messages at the INFO level (level 6) and above. You can modify this as outlined in the comments in the script:
# Modify log severity level as required and rerun this script
# 0 Emergency: system is unusable
# 1 Alert: action must be taken immediately
# 2 Critical: critical conditions
# 3 Error: error conditions
# 4 Warning: warning conditions
# 5 Notice: normal but significant condition
# 6 Informational: informational messages
# 7 Debug: debug-level messages
# refer https://tools.ietf.org/html/rfc5424.html for more information
echo "if (\$syslogtag contains 'DSLOG') and (\$syslogseverity <= 6) then $nvdslogfilepath" >> 11-nvds.conf
Retiring and Managing Logs
It is recommended that you limit the size of log files by retiring them periodically. logrotate is a popular utility for this purpose. You can use it in cron jobs so that the log files are automatically archived periodically and are discarded after a desired interval.
Generating Logs
You can implement modules that use the logger by including sources/includes/nvds_logger.h in the source code and linking to the libnvds_logger.so library.
Generating logs programmatically involves three steps:
1. Call nvds_log_open() before you write any log messages.
2. Call nvds_log() to write log messages.
3. Call nvds_log_close() upon completion to flush and close the logs.
Note the nvds_logger is a process-based logging mechanism, so the recommended procedure is to call nvds_log_open() from the main application routine rather than the individual plugins. Similarly, call nvds_log_close() from the main application when it shuts down the application before exit.
Gst-nvdsanalytics
This plugin performs analytics on metadata attached by nvinfer (primary detector) and nvtracker. Analytics refer to Region of Interest (ROI) Filtering, Overcrowding Detection, Direction Detection and Line Crossing. The plugin operates in batch mode, it handles the context for each stream independently. ROI based analytics work on primary detector output, but Direction Detection and Line Crossing requires a tracker-id as previous history/state is required to do both the analytics. The configuration for the rules for analytics is achieved using a configuration file.
The gst-nvdsanalytics plugin extracts the metadata from the batched buffer sent by the upstream (nvtracker/nvinfer) element and passes it to the low-level nvdsanalytics library. The low-level library performs analytics based on the configured rules for each feature for each of the streams, the library returns the analytics output, which is for each tracked object as well for the complete frame.
The analytics output (Frame level) is encapsulated in the NvDsAnalyticsFrameMeta structure and is added as user meta with meta_type set to NVDS_USER_FRAME_META_NVDSANALYTICS.The user meta is added to the frame_user_meta_list member of NvDsFrameMeta.
The analytics output (per detected Object) is encapsulated in the NvDsAnalyticsObjInfo structure and is added as user meta with meta_type set to NVDS_USER_OBJ_META_NVDSANALYTICS. The user meta is added to the obj_user_meta_list member of NvDsObjectMeta.
The definition of NvDsAnalyticsObjInfo NvDsAnalyticsFrameMeta is available in sources/includes/nvds_analytics_meta.h header file.
For guidance on how to access user metadata, see User/Custom Metadata Addition Inside NvDsBatchMeta and Tensor Metadata.

Inputs and Outputs
• Inputs
• GStreamer buffer containing NV12/RGBA frame(s) with attached metadata
• Control Parameters
• enable: True Enables the plugin, False sets it in pass-through mode
• config-file: Configuration file which consist of the analytics rules
• Output
• Original NV12/RGBA batched buffer
• NvDsAnalyticsFrameMeta (meta containing information about individual frames in the batched buffer)
• NvDsAnalyticsObjInfo (meta containing information about individual objects in the individual frames of batched buffer)
Features
The following table summarizes the features of the plugin.
Features of the Gst-nvdsanalytics plugin | ||
Feature | Description | Release |
ROI Filtering | This feature detects presence of objects in the ROI, the result is attached as metadata for every object, as well as total count of objects in ROI per frame. | DS 5.0 |
Overcrowding Detection | This feature detects presence of objects in the ROI, the result is attached as metadata for every object, as well as total count of objects in ROI per frame along with overcrowding status, i.e. no of objects in ROI exceed a pre-configured threshold. | DS 5.0 |
Direction Detection | Checks using history of position of object and the current frame information if it is following a preconfigured direction. The result is attached as metadata for every object. | DS 5.0 |
Line Crossing | This feature checks if object is following a preconfigured direction for the virtual line and if it has crossed the virtual line. The result is attached to object when Line crossing also frame meta where cumulative count along with per frame count of line crossing is attached. | DS 5.0 |
Gst Properties
The following table describes the Gst properties of the Gst-nvdsanalytics plugin.
Gst-nvdsanalytics plugin, Gst properties | |||
Property | Meaning | Type and Range | Example Notes |
unique-id | Unique identification unsigned integer value for element to identify the output attached by the element | Integer, 0 to 4,294,967,295 | unique-id=17 |
enable | True Enables the plugin, False sets it in pass-through mode | Boolean | enable=1 |
config-file | Configuration file which consist of the analytics rules | String | config-file=config_nvdsanalytics.txt |
Configuration File Parameters
The Gst-nvdsanalytics configuration file uses a “Key File” format described in:
• The [property] group configures the general behavior of the plugin. It is the only mandatory group.
• The [roi-filtering-stream-<n>] group configures ROI filtering rules parameters for stream specified by <n>. For example, classes. [roi-filtering-stream-0] configures ROI filtering rules for stream ID 0.
• The [overcrowding-<n>] group configures Overcrowding parameters for a stream specified by <n>.
• The [direction-detection-<n>] group configures Direction Detection parameters for a stream specified by <n>.
• The [line-crossing-<n>] group configures Line Crossing parameters for a stream specified by <n>.
The following table respectively describe the keys supported for [property] groups and [<feature>-stream-<n>] groups.
Gst-nvdsanalytics plugin, configuration file, parameters | ||||
Property | Applicable Groups | Meaning | Type and Range | Example Notes |
enable | [property] [<feature>-stream-<n>] | Common property to enable or disable the plugin or feature | Boolean | enable=1 |
config-width | [property] | Width for which the analytics rules are configured | Integer, >0 | config-width=1280 |
config-height | [property] | Height for which the analytics rules are configured | Integer, >0 | config-height=720 |
roi-<label> | [roi-filtering-stream-<n>] [overcrowding-stream-<n>] | The ROI can be specified using roi key followed by its corresponding label (roi-<label>) the value consist of semi-colon delimited coordinates of the polygon (roi-<label>=x1;y1;x2;y2;x3;y3;x4;y4;x5;y5) . The user can specify a simple polygon with > 3 points. The points should be sequentially specified, as the relative position of points is required to check object in polygon. | String | roi-RF= 295;643;579;634;642;913;56;828 roi-OC= 295;643;579;634;642;913;56;828 |
inverse-roi | [roi-filtering-stream-<n>] | If the flag set true, it indicates the object outside the configured ROI be attached with the ROI label, and count the objects outside the ROI and send as frame level output | Boolean | inverse-roi=0 |
class-id | [<feature>-stream-<n>] | The class ID on which analytic rules are applied. -1 indicate that the rules should be applied to all the classes | Integer, >0 or -1 | class-id=-1 |
object-threshold | [overcrowding-stream-<n>] | The total count after which overcrowding flag should be indicated in the frame metadata. | Integer, >=0 | object-threshold=10 |
direction-<label> | [direction-detection-stream-<n>] | The value indicates the direction (x1;y1;x2;y2) which corresponds to the configured <label>. When object is moving in configured direction, the label of the particular rule is attached to the object as user metadata | String | direction-South=284;840;360;662 |
line-crossing-<label> | [line-crossing-stream-<n>] | The value indicates 2 coordinates of direction followed by 2 coordinates of virtual line. These coordinates are delimited using semi-colon (line-crossing-<label>=x1d;y1d;x2d;y2d;x1c;y1c;x2c;y2c). The direction indicates the direction of object in which it should be moving that can be considered for counting, so the object should be in direction x1d,y1d to x2d,y2d, which indicates a direction vector. The line crossing coordinates x1c,y1c and x2c,y2c indicate a virtual line which when an object following a configured direction crosses is then accounted for line crossing. <label> is string identification of the rule. Multiple line-crossings can be defined for a single stream | String | line-crossing-Exit=789;672;1084;900;851;773;1203;732 |
Note: | The config-width, config-height, indicate the resolution at which analytics rules have been configured. If the runtime stream resolution is different than the configuration resolution. The plugin handles the resolution change and scales the rules for the runtime resolution. The configuration rules are not present in absolute pixel values. |
The following pipelines demonstrate plugin’s usage.
• For dGPU:
gst-launch-1.0 filesrc location=streams/sample_1080p.mp4 ! qtdemux ! h264parse ! nvv4l2decoder ! m.sink_0 nvstreammux name=m width=1920 height=1080 batch-size=1 live-source=1 ! nvinfer config-file-path= config_infer_primary.txt ! nvtracker ll-lib-file = /opt/nvidia/deepstream/deepstream/lib/libnvds_nvdcf.so ll-config-file= tracker_config.yml tracker-width=640 tracker-height=384 ! nvdsanalytics config-file= config_nvdsanalytics.txt ! nvmultistreamtiler ! nvvideoconvert ! nvdsosd ! nveglglessink
• For Jetson:
gst-launch-1.0 filesrc location=streams/sample_1080p.mp4 ! qtdemux ! h264parse ! nvv4l2decoder ! m.sink_0 nvstreammux name=m width=1920 height=1080 batch-size=1 live-source=1 ! nvinfer config-file-path= config_infer_primary.txt ! nvtracker ll-lib-file = /opt/nvidia/deepstream/deepstream/lib/libnvds_nvdcf.so ll-config-file= tracker_config.yml tracker-width=640 tracker-height=384 ! nvdsanalytics config-file= config_nvdsanalytics.txt ! nvmultistreamtiler ! nvvideoconvert ! nvdsosd ! nvegltransform ! nveglglessink
The configuration files are located at sources/apps/sample_apps/deepstream-nvdsanalytics-test/config_nvdsanalytics.txt.
Miscellaneous Features
DeepStream 5.0 supports the following additional features.
Smart Video Record
This module can be used for event (local or cloud) based recording of original data feed. This way data feed having only events of importance is recorded and hence avoiding the need to save the whole feed all the time. This recording happens in parallel to the inference pipeline running over the feed.
A video cache is maintained so that recorded video not only has frames after the event is generated but it can also have frames just before the event. This size of video cache can be configured as per use case.
In smart record, encoded frames are itself cached to save on CPU memory and to avoid transcoding and based on the event these cached frames are encapsulated under the container of choice to generate the recorded video. There is one downside to this approach. We can’t start recording until we have an Iframe and hence some of the frames from the cache are dropped in case the first frame in the cache is not an Iframe. Therefore, duration of the generated video might be less than the specified value.
Below diagram shows the smart record architecture:

This module provides the following APIs. Please refer gst-nvdssr.h for more details.
• NvDsSRStatus NvDsSRCreate (NvDsSRContext **ctx, NvDsSRInitParams *params);
• This function creates the instance of smart record and returns the pointer to an allocated NvDsSRContext. The params structure must be filled with initialization parameters required to create the instance.
• recordbin of NvDsSRContext is the gstbin which must be added to the pipeline. It expects encoded frames which will be muxed and saved to the file. Add this bin after parser element in the pipeline.
• Call NvDsSRDestroy() to free resources allocated by this function.
• NvDsSRStatus NvDsSRStart (NvDsSRContext *ctx, NvDsSRSessionId *sessionId, guint startTime, guint duration, gpointer userData);
• This function starts writing the cached video data to a file. It returns the session id which later can be used in NvDsSRStop() to stop the corresponding recording.
• Here startTime specifies the seconds before the current time and duration specifies the seconds after the start of recording.
• If current time is t1, content from t1 - startTime to t1 + duration will be saved to file. Therefore, a total of startTime + duration seconds of data will be recorded. In case duration is set to zero, recording will be stopped after defaultDuration seconds set in NvDsSRCreate().
• NvDsSRStatus NvDsSRStop (NvDsSRContext *ctx, NvDsSRSessionId sessionId);
• This function stops the previously started recording.
• NvDsSRStatus NvDsSRDestroy (NvDsSRContext *ctx);
• This function releases the resources previously allocated by NvDsSRCreate()
Please refer deepstream_source_bin.c for more details on usage of this module.
In existing deepstream-test5-app only RTSP sources are enabled for smart record. To enable smart record in deepstream-test5-app set the following under [sourceX] group:
• smart-record=1
This will enable smart record with default configuration. By default, smart record Start / Stop events will be generated every 10 seconds. Following are the default values of configuration parameters:
video cache size = 30 seconds,
container = MP4,
default duration = 10 seconds,
interval = 10 seconds,
file prefix = Smart_Record etc.
Following fields can be used under [sourceX] groups to configure these parameters.
• smart-rec-video-cache=<val in seconds>
Size of video cache in seconds. This parameter will increase the overall memory usages of the application.
• smart-rec-duration=<val in seconds>
Duration of recording.
• smart-rec-start-time=<val in seconds>
Here, start time of recording is the number of seconds earlier to the current time to start the recording.
E.g. if t0 is the current time and N is the start time in seconds that means recording will start from t0 – N. For it to work, the video cache size must be greater than the N.
• smart-rec-default-duration=<val in seconds>
In case a Stop event is not generated. This parameter will ensure the recording is stopped after a predefined default duration.
• smart-rec-container=<0/1>
MP4 and MKV containers are supported.
• smart-rec-interval=<val in seconds>
This is the time interval in seconds for SR start / stop events generation.
In the deepstream-test5-app, to demonstrate the use case smart record Start / Stop events are generated every interval second.
• smart-rec-file-prefix=<file name prefix>
Prefix of file name for generated video. By default, “Smart_Record” is the prefix in case this field is not set. For unique names every source must be provided with a unique prefix.
• smart-rec-dir-path=<path of directory to save the file>
Path of directory to save the recorded file. By default, the current directory is used.
Bidirectional Messaging
DeepStream reference application (deepstream-test5-app) can be configured to work as message consumer for cloud messages using Kafka. After parsing the message and based on the content of the message specific action can be triggered. By default, the application prints the received message to the console.
Here is the current implementation:

Message subscribers can be enabled in test5 application by adding the following group in the configuration file.
[message-consumerX]
enable=1
proto-lib=/opt/nvidia/deepstream/deepstream-5.0/lib/libnvds_kafka_proto.so
conn-str= <connection string as host;port >
config-file=../cfg_kafka.txt
subscribe-topic-list=<topic1>;<topic2>;<topicN>
Here X should be replaced with integer value e.g. 0,1,2 etc.
On the Fly Model Update:
One of the desirable requirements for IVA applications is to change the Model on the fly. Current release supports this feature with the assumption that the Model being updated should have the same network parameters. This is an alpha feature and only supported in deepstream-test5-app. DeepStream subsequent releases will address mentioned assumptions for on the fly model update.
Currently on the fly model update helps to deploy newly trained models with better accuracy without the necessity of stopping and re-launching the running DeepStream application / container.
This feature helps to apply model-update with no/zero DeepStream application downtime.
The figure below shows how on the fly models works currently:
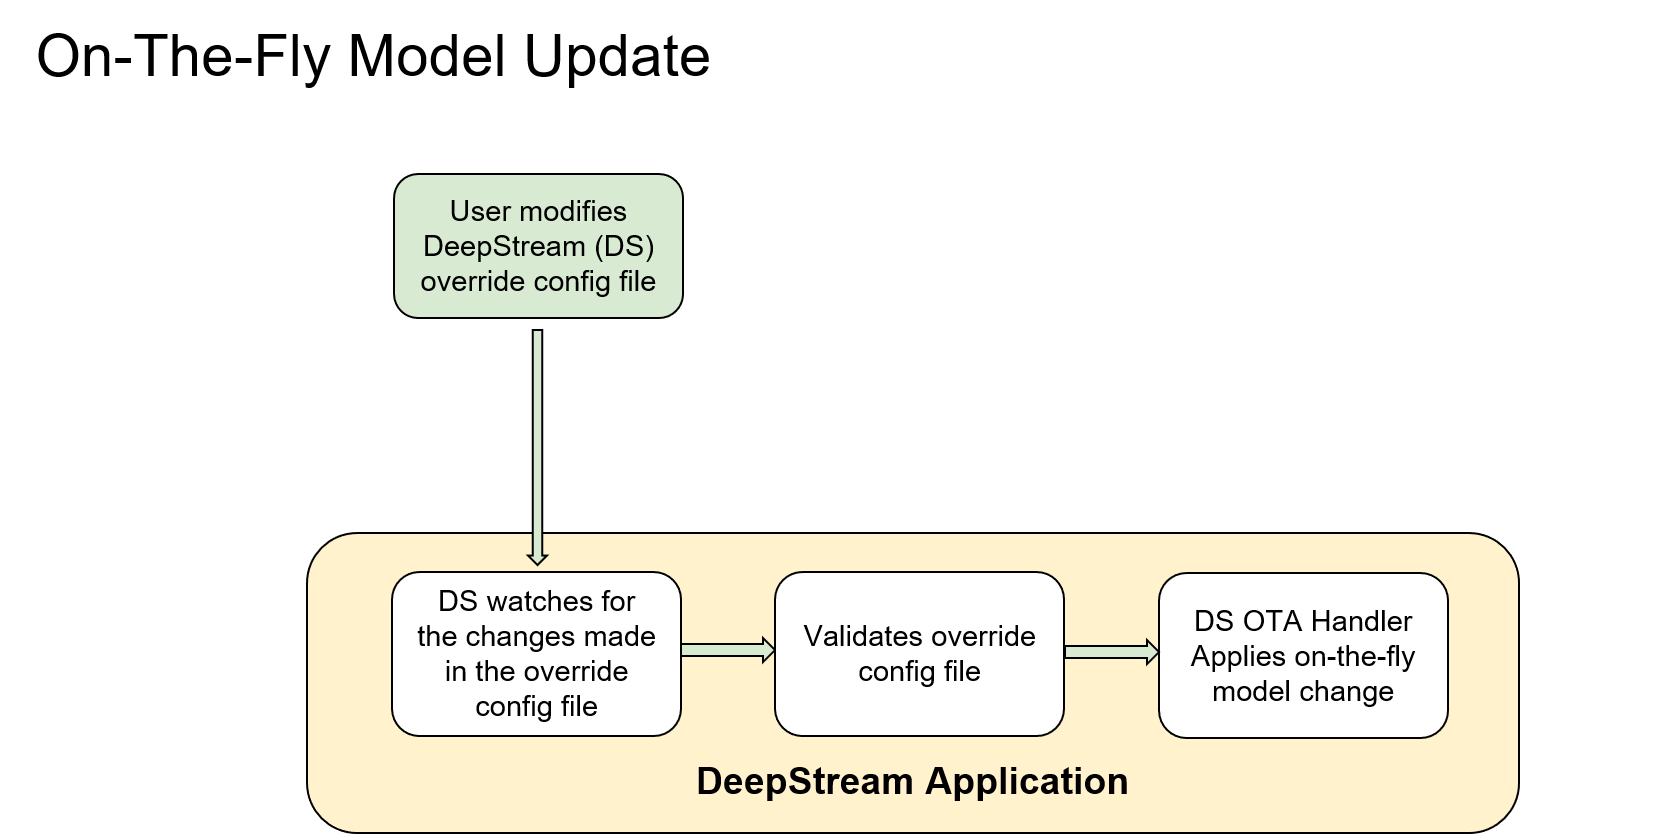
Refer to deepstream-test5-app/README section 7 for instructions on how to test model update feature.
Assumptions
1. New model must have same network parameter configuration as of previous model (e.g. network resolution, network architecture, number of classes)
2. Engine file or cache file of new model to be provided by developer
3. Other primary gie configuration parameters like group-threshold, bbox color, gpu-id, nvbuf-memory-type etc. updated parameters if provided in the override file, will not have any effect after model switch.
NTP Timestamp in DeepStream
DeepStream 5.0 supports setting NTP timestamps per frame. Calculated NTP timestamp will be available in ntp_timestamp field of NvDsFrameMeta.
DeepStream calculates NTP timestamps in 2 ways.
1. Host system time as NTP timestamp: when the frame is received by the NvStreamMux plugin in the DeepStream pipeline.
To attach host system time as NTP timestamp, user needs to set "attach-sys-ts" to TRUE on nvstreammux.
In DeepStream reference app this can be done by setting "attach-sys-ts-as-ntp" config parameter to 1 in [streammux] group of the application configuration file.
For this method user must synchronize host system to NTP clock.
2. NTP timestamp when attached at RTSP source: This is supported only if RTSP sources send RTCP Sender Reports (SR).
To configure the pipeline to attach these timestamps:
• user needs to set "attach-sys-ts" to FALSE on nvstreammux. In deepstream reference app this can be done by setting "attach-sys-ts-as-ntp" config parameter to 0 in [streammux] group of the application configuration file
• After creating an "rtspsrc" element or an "uridecodebin" element, application must call configure_source_for_ntp_sync() function and pass the pointer to the GstElement to this API.
(Refer to create_rtsp_src_bin() in deepstream_source_bin.c file) The API will internally configure the pipeline to parse sender report and calculate NTP timestamps for each frame.
• Make sure RTSP source can send RTCP Sender Reports.
This can be verified by starting streaming from the source on a host and viewing the packets in a tool like wireshark/tshark on the same host to confirm the presence of Sender Reports (SR).
Example method to check if RTSP source sends RTCP sender reports using a tool like tshark. We assume RTSP source has IP address 192.168.1.100.
1. Install tshark on a host
sudo apt-get install tshark
2. Find the host network interface that would be receiving the RTP/RTCP packets.
$ sudo tshark -D
...
eno1
...
3. Start the monitoring using tshark tool. Replace the network interface and source IP as applicable.
$ sudo tshark -i eno1 -f "src host 192.168.1.100" -Y "rtcp"
4. On the same host, start streaming from the RTSP source only after starting the monitoring tool. Any client may be used.
$ gst-launch-1.0 rtspsrc location= <RTSP URL e.g. rtsp://192.168.1.100/stream1> ! fakesink
5. The output of the tshark monitoring tool should have lines containing "Sender Report Source description". Sample output as follows:
6041 10.500649319 192.168.1.100 → 192.168.1.101 RTCP 94 Sender Report Source description