HowTo Configure NVIDIA GPU Device in VMDirectPath IO Passthrough Mode on VMware ESXi 6.x Server
Created on Jun 9, 2019
Introduction
This
post describes th
e procedure of how to configure Nvidia GPU device VMDirectPath I/O passthrough mode on VMware ESXi 6.x server.
About VMDirectPath I/O passthrough devices
16 Devices is supported maximum for passthrough devices per VMs on ESXi 6.x.

Configuring passthrough Nvidia GPU device
Before configuring a device for PCI Passthrough, ensure that platform and device meets the PCI Passthrough requirements, see VMware vSphere VMDirectPath I/O: Requirements for Platforms and Devices (2142307).
To configure passthrough devices on an ESXi host:
1. Select an ESXi host from the Inventory of VMware vSphere Client.
2. Enter Maintenance Mode the ESXi host.
3. In the Navigator click Manage, Hardware and PCI Devices. The passthrough Configuration page lists all available pass-through devices.
4. Select the devices and click Toggle passthrough.

5. Reboot host for the change to take effect. After rebooting, the devices are marked with a green icon and are enabled.
Note: The configuration changes are saved in the /etc/vmware/esx.conf file.
The PCI slot number where the device was connected is 04:00.0. It is recorded as:
/device/00000:004:00.0/owner = = "passthru"
6. To verify it:
In UI:
a. Select an ESXi host from the Inventory of VMware vSphere Client.
b. Enter Maintenance Mode the ESXi host.
c. In the Navigator click Manage, Hardware and PCI Devices. The passthrough Configuration page lists all available pass-through devices.
d. Verify:

In CLI:
a. Enable SSH Access to ESXi server.
b. Log into ESXi vSphere Command-Line Interface with root permissions.
c.Edit the /etc/vmware/esx.conf file by changing the owner of the PCI device from passthru to vmkernel.
ESXi Console
# vi /etc/vmware/esx.conf
Find /device/<PCI_ID>/owner = "passthru".
Write:
/passthru
d. Check:
/device/00000:004:00.0/owner = = "passthru"
6. Reboot the ESXi host.
7. Exit Maintenance Mode the ESXi host.
To configure a PCI device on a virtual machine:
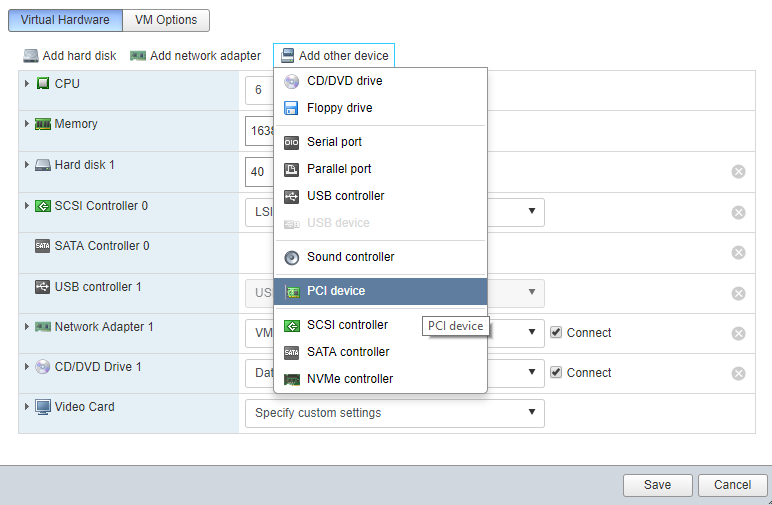
1. From the Navigator in vSphere Client, right-click the virtual machine and click Edit Settings.
2. Select the Virtual Hardware tab.
3. Click Add other device.

Choose the PCI Device.

Click Save.
Note: When the device is assigned, the virtual machine must have a memory reservation for the full configured memory size.

Done!
Configuring non-passthrough Nvidia GPU device
To force the change to non-passthrough mode, complete these steps:
Enable SSH Access to ESXi server.
Log into ESXi vSphere Command-Line Interface with root permissions.
Enter Maintenance Mode the ESXi host.
Edit the /etc/vmware/esx.conf file by changing the owner of the PCI device from passthru to vmkernel.
ESXi Console
# vi /etc/vmware/esx.conf
Find /device/<PCI_ID>/owner = "passthru".
/passthruChange from:
ESXi Console
/device/00000:004:00.0/owner = = "passthru"
Change to:
ESXi Console
/device/00000:004:00.0/owner = = "vmkernel"
7. Reboot the ESXi host.
8. Verify.
ESXi Console
            # lspci | grep Mellanox

0000:04:00.0 Display controller: NVIDIA Corporation GP100GL [Tesla P100 PCIe 16GB]

9. Exit Maintenance Mode the ESXi host.
Done!
Authors
|

|
Boris Kovalev Boris Kovalev has worked for the past several years as a Solutions Architect, focusing on NVIDIA Networking/Mellanox technology, and is responsible for complex machine learning, Big Data and advanced VMware-based cloud research and design. Boris previously spent more than 20 years as a senior consultant and solutions architect at multiple companies, most recently at VMware. He has written multiple reference designs covering VMware, machine learning, Kubernetes, and container solutions which are available at the Mellanox Documents website. |