Getting Started#
Core Workflows of VISTA-3D#
Segment everything: This feature enables comprehensive exploration of the whole body, which is vital for understanding complex diseases that affect multiple organs and devising holistic treatment plans.
Segment using classes: It provides detailed sectional views based on specific classes, key for focused disease analysis or organ mapping, such as pinpointing tumors in critical organs.
Interactive Point-Prompt Segmentation: By allowing user-directed, click-based selection, this workflow significantly improves segmentation precision, facilitating the rapid creation of accurate ground-truth data for medical imaging analysis.
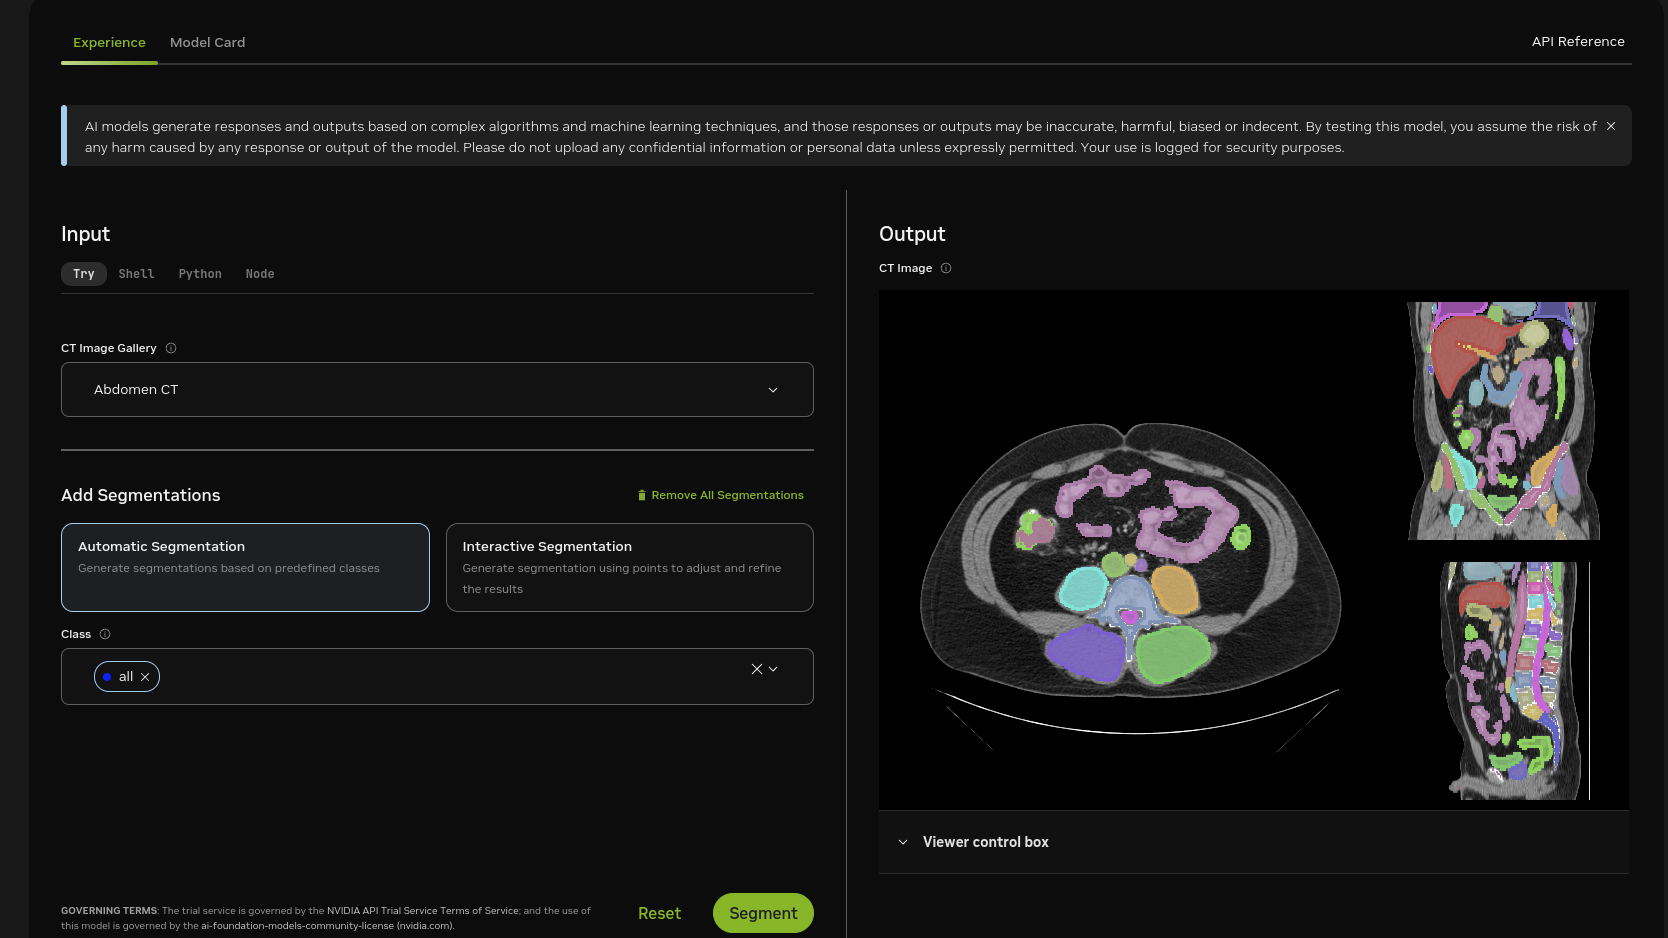
Playground Demonstration: https://build.nvidia.com/nvidia/vista-3d
Setup and Prerequisites#
Hardware Requirements#
Minimum GPU memory (GB): 48 GB
CPU x86-64 >= 8 core (Recommended)
Memory >= 32 GB (Recommended)
Minimum Storage: 20 GB (8 GB container size)
Validated on A100, H100, and L40
Software Requirements#
Minimum NVIDIA Driver Version: 470
Install Docker
Install the NVIDIA Container Toolkit
NGC (NVIDIA GPU Cloud) Account Setup#
Set
NGC_API_KEY:export NGC_API_KEY=<Your NGC API Key>
Docker log in with your NGC API key using
docker login nvcr.io --username='$oauthtoken' --password=$NGC_API_KEY
NGC CLI Tool Setup#
Download the NGC CLI tool for your OS.
Set up your NGC CLI Tool locally (You’ll need your API key for this!):
ngc config set
After you enter your API key, you may see multiple options for the org and team. Select as desired or hit enter to accept the default.
Usage Instructions#
Running NIM#
Pull the NIM container:
docker pull nvcr.io/nim/nvidia/vista3d:1.0.0
Run the NIM container:
docker run --rm -it --name vista3d \
   --runtime=nvidia -e CUDA_VISIBLE_DEVICES=0 \
   --shm-size=8G \
   -p 8000:8000 \
   -e NGC_API_KEY=$NGC_API_KEY \
   nvcr.io/nim/nvidia/vista3d:1.0.0
Monitor progress with docker logs:
docker logs --follow vista3d
Health and Liveness Checks#
Readiness check:
curl localhost:8000/v1/health/readyLiveness check:
curl localhost:8000/v1/health/liveWait for the health check to return status code
200:Bash:
base_url="http://localhost:8000"
endpoint="/v1/health/ready"

response=$(curl -s -o /dev/null -w "%{http_code}" "$base_url$endpoint")

while [ "$response" -ne 200 ]; do
   echo "Waiting for the service to be ready..."
   sleep 5
   response=$(curl -s -o /dev/null -w "%{http_code}" "$base_url$endpoint")
done

echo "Service is ready!"
Python:
import requests
import time

base_url = "http://localhost:8000"

while True:
    try:
        response = requests.get(f"{base_url}/v1/health/ready")
        if response.status_code == 200:
            print("Server is ready")
            break
    except requests.exceptions.ConnectionError:
        print("Server is not ready yet, waiting...")
    time.sleep(5)
Running Inference#
Prepare your NIfTI images or use the sample image.
(optional) Download and install 3D Slicer for viewing results.
Note: For a more detailed set of instructions for setting up your data, refer to our blog Running VISTA-3D with your data
Note: For region of interest, typically user’s data doesn’t cover all components that contains all anatomies, classes can be empty if the image doesn’t contain the class or even wrong class. For example, “brain” and “liver” may not exist in the same time, providing these two class prompts can result in wrong predictions. The reference image (example-1.nii.gz) is an abdomen CT scan, which contains most abdominal organs, vessels, and vertebrae classes.
Method 1: Segment All Labels#
Bash:
LOCAL_URL='http://localhost:8000/v1/vista3d/inference'
DATA=$(cat <<EOF
{
    "image": "https://assets.ngc.nvidia.com/products/api-catalog/vista3d/example-1.nii.gz"
}
EOF
)
response=$(curl -s -o output.zip  -w "%{http_code}" -X POST -H "Content-Type: application/json" -d "$DATA" $LOCAL_URL)
if [ "$response" -eq 200 ]; then
  echo "Response Success, save inference results into folder: output"
  unzip -o "output.zip" -d "output"
else
  echo "Request failed with status $response"
fi
Python:
import requests
import zipfile

base_url = "http://localhost:8000"

data = {
    "image": "https://assets.ngc.nvidia.com/products/api-catalog/vista3d/example-1.nii.gz",
}

def unzip_file(zip_filepath, dest_dir):
    with zipfile.ZipFile(zip_filepath, 'r') as zip_ref:
        zip_ref.extractall(dest_dir)

response = requests.post(f"{base_url}/v1/vista3d/inference", json=data)
if response.status_code == 200:
    output_folder = "output"
    output_zip_name = "output.zip"

    with open(output_zip_name, "wb") as f:
        f.write(response.content)

    unzip_file(output_zip_name, output_folder)
Method 2: Segment Specific Organs#
Bash:
LOCAL_URL='http://localhost:8000/v1/vista3d/inference'
DATA=$(cat <<EOF
{
    "image": "https://assets.ngc.nvidia.com/products/api-catalog/vista3d/example-1.nii.gz",
    "prompts": {"classes": ["spleen", "liver"]}
}
EOF
)
response=$(curl -s -o output.zip -w "%{http_code}" -X POST -H "Content-Type: application/json" -d "$DATA" $LOCAL_URL)

if [ "$response" -eq 200 ]; then
  echo "Response Success, save inference results into folder: output"
  unzip -o "output.zip" -d "output"
else
  echo "Request failed with status $response"
fi
Python:
import requests
import zipfile

base_url = "http://localhost:8000"

data = {
    "image": "https://assets.ngc.nvidia.com/products/api-catalog/vista3d/example-1.nii.gz",
    "prompts": {"classes": ["spleen", "liver"]}
}

def unzip_file(zip_filepath, dest_dir):
    with zipfile.ZipFile(zip_filepath, 'r') as zip_ref:
        zip_ref.extractall(dest_dir)

response = requests.post(f"{base_url}/v1/vista3d/inference", json=data)
if response.status_code == 200:
    output_folder = "output"
    output_zip_name = "output.zip"

    with open(output_zip_name, "wb") as f:
        f.write(response.content)

    unzip_file(output_zip_name, output_folder)
Method 3: Single Organ with User Points#
Bash:
LOCAL_URL='http://localhost:8000/v1/vista3d/inference'
DATA=$(cat <<EOF
{
    "image": "https://assets.ngc.nvidia.com/products/api-catalog/vista3d/example-1.nii.gz",
    "prompts": {"classes": ["spleen"], "points": {"spleen": [[97, 249, 87]]}}
}
EOF
)
response=$(curl -s -o output.zip  -w "%{http_code}" -X POST -H "Content-Type: application/json" -d "$DATA" $LOCAL_URL)
if [ "$response" -eq 200 ]; then
  echo "Response Success, save inference results into folder: output"
  unzip -o "output.zip" -d "output"
else
  echo "Request failed with status $response"
fi
Python:
import requests
import zipfile

base_url = "http://localhost:8000"

data = {
    "image": "https://assets.ngc.nvidia.com/products/api-catalog/vista3d/example-1.nii.gz",
    "prompts": {"classes": ["spleen"], "points": {"spleen": [[97, 249, 87]]}}
}

def unzip_file(zip_filepath, dest_dir):
    with zipfile.ZipFile(zip_filepath, 'r') as zip_ref:
        zip_ref.extractall(dest_dir)

response = requests.post(f"{base_url}/v1/vista3d/inference", json=data)
if response.status_code == 200:
    output_folder = "output"
    output_zip_name = "output.zip"

    with open(output_zip_name, "wb") as f:
        f.write(response.content)

    unzip_file(output_zip_name, output_folder)
Stopping the Container#
To stop the container, run:
docker stop vista3d
Visualization with 3D Slicer#
Users can visualize the VISTA3D NIM generated segmentation results by viewers such as 3D Slicer, in this document, we provide simple tutorial of installing 3D Slicer and rendering of the VISTA3D segmentation.
Installation#
To begin with 3D Slicer, you’ll need to download and install stable and preview versions. For more information on installing 3D Slicer, check out the 3D Slicer Documentation.
Extract the compressed files, and double click “3D Slicer” application, follow necessary installation steps on different operation systems.
Visualization and Rendering#
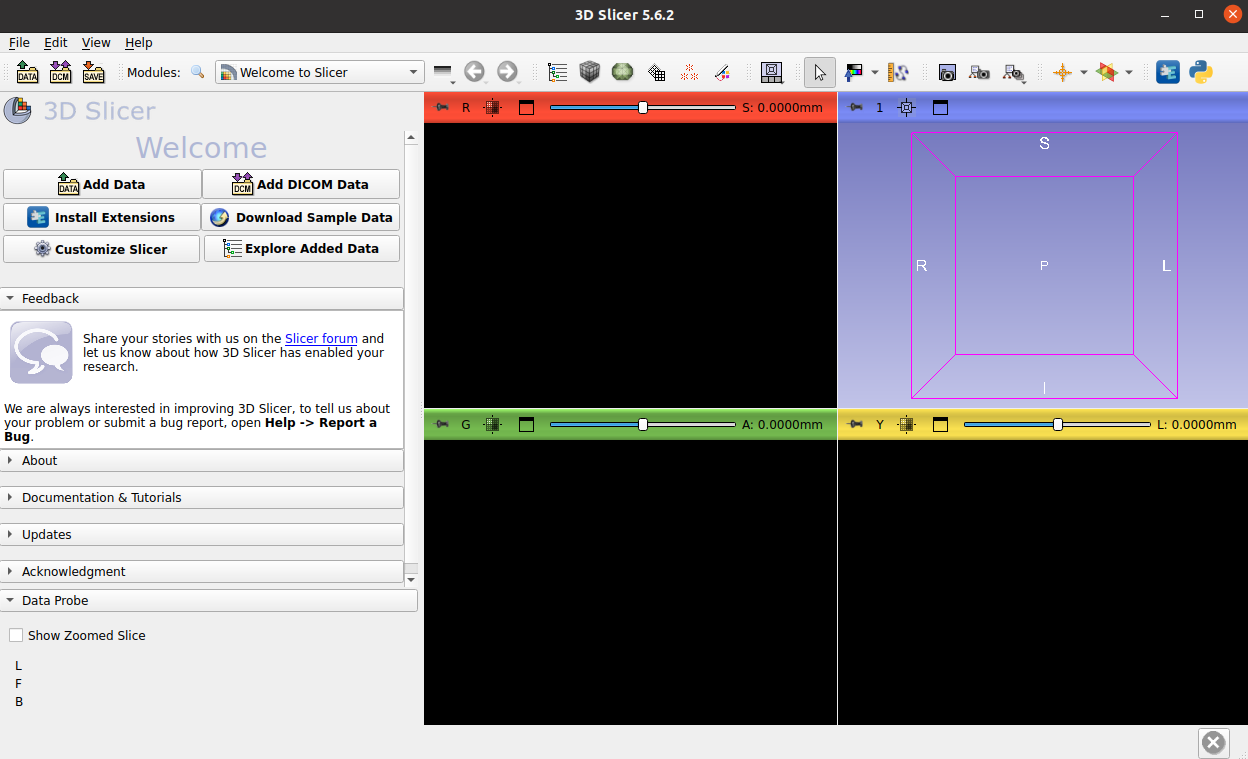
Open the 3D Slicer app, under launchpad viewer:
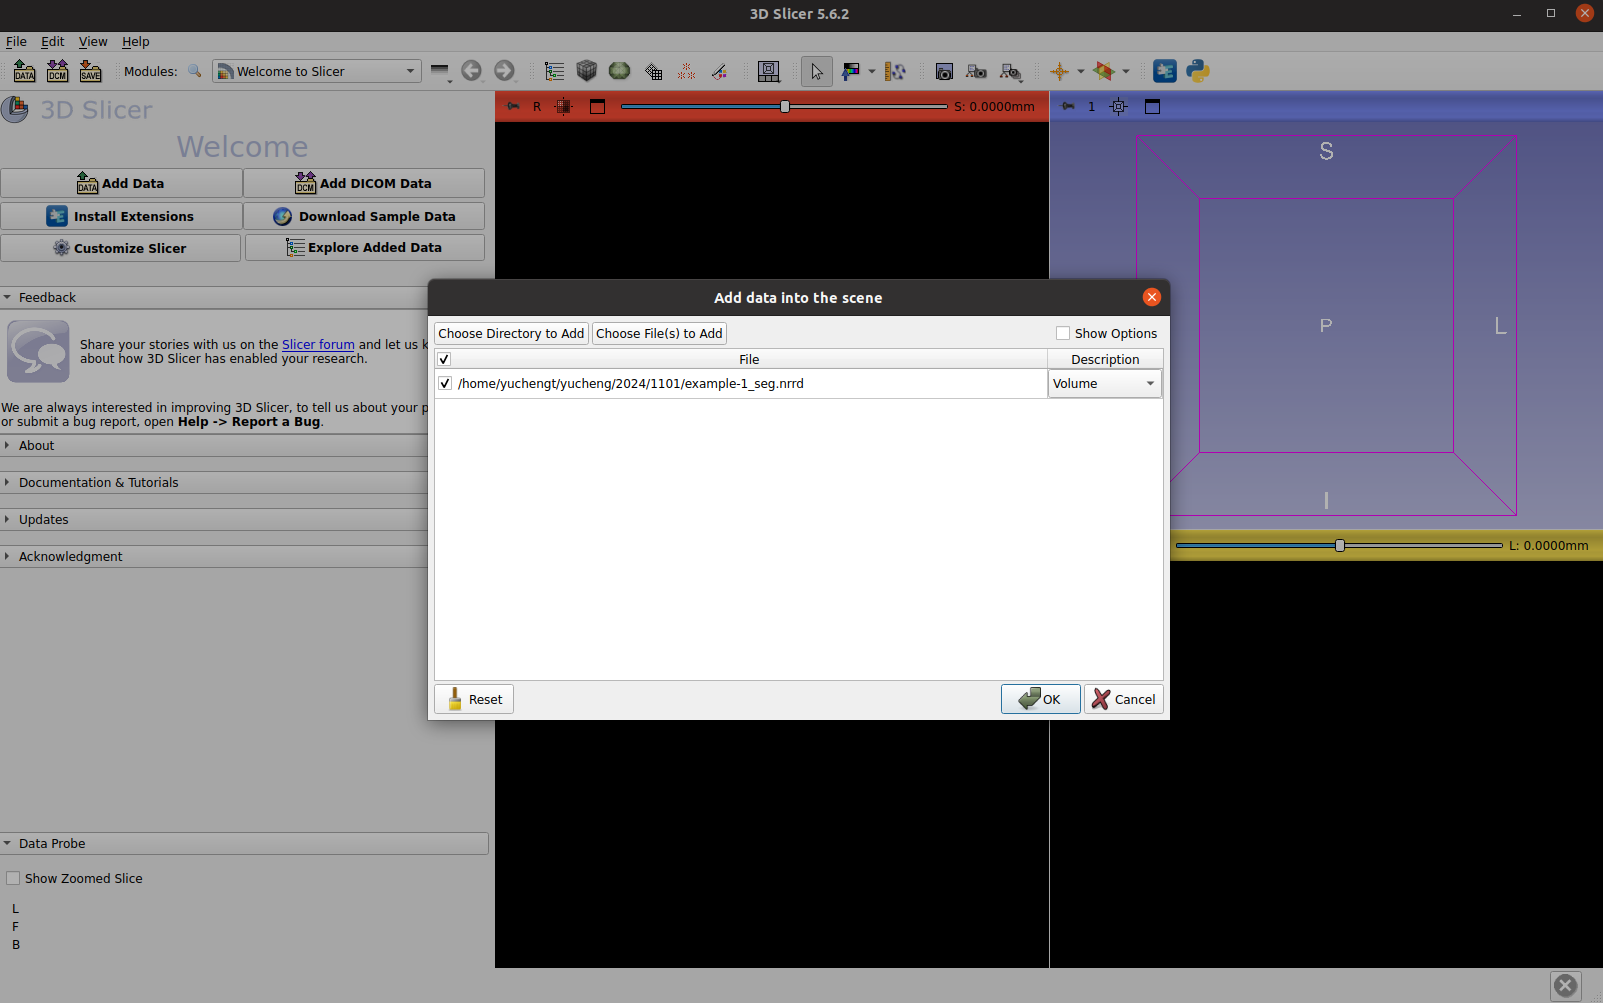
Open the VISTA3D NIM generated segmentation file, it can be either NRRD or NIFTI files. Drag the file or import from the menu. In the pop-up window, if you would like to load the file alone, go with the volume option. Or you can select “segmentation” mode if you would like to edit the segments.
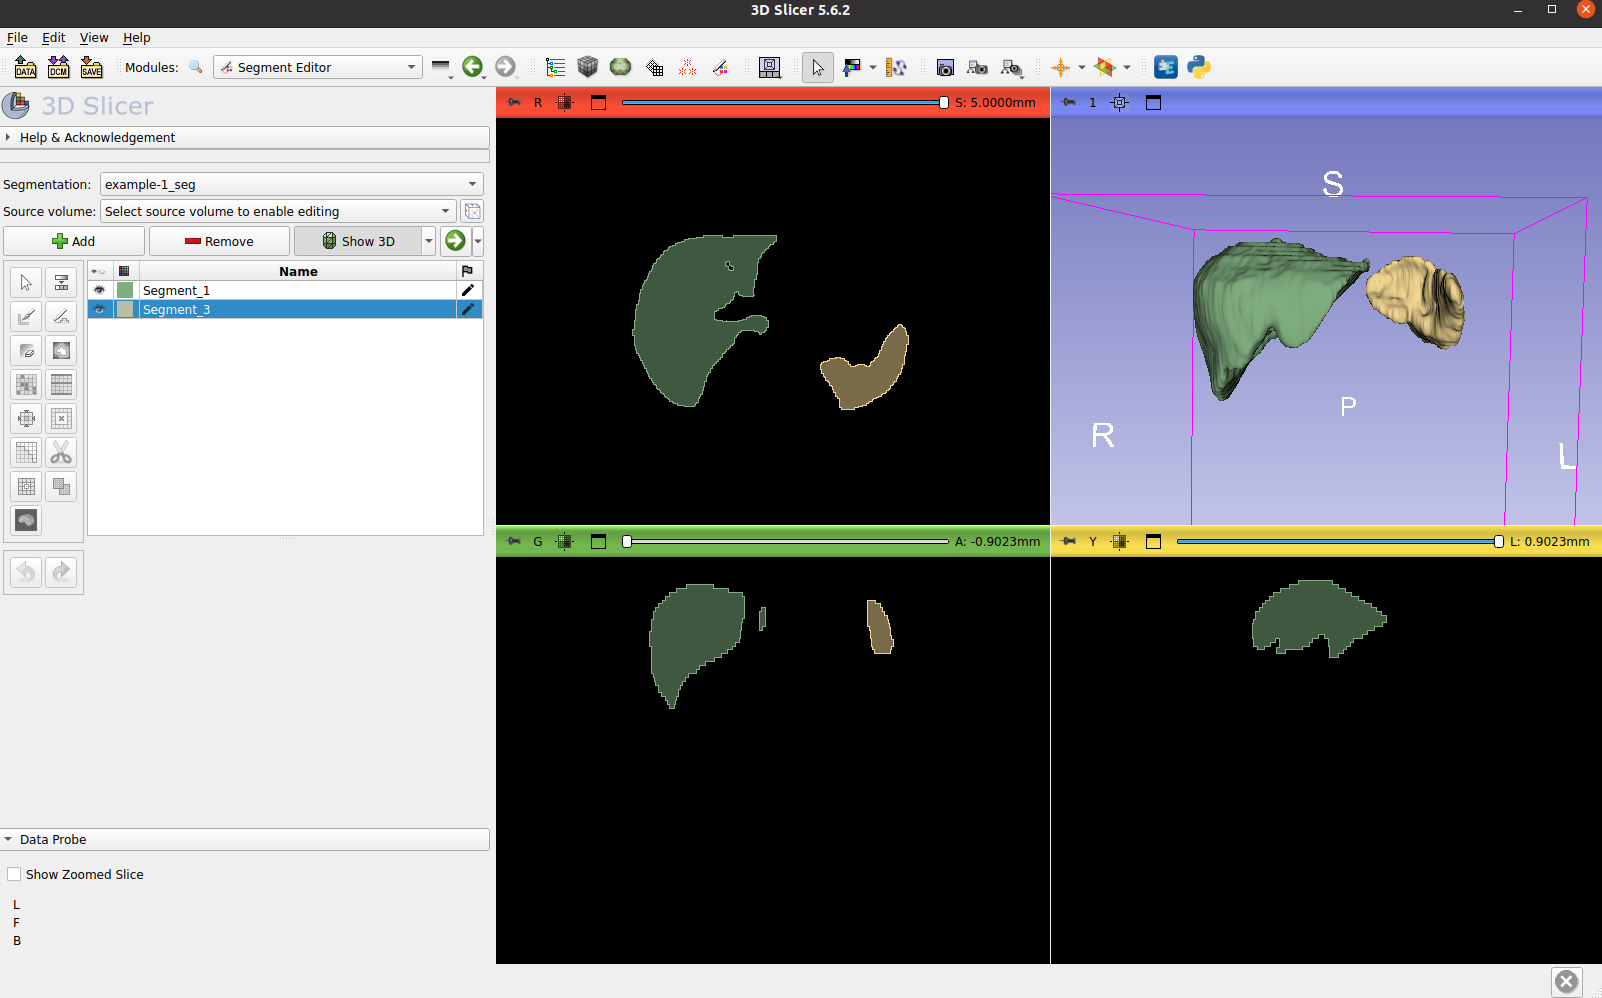
Visualize the labels generated, such as liver and spleen:
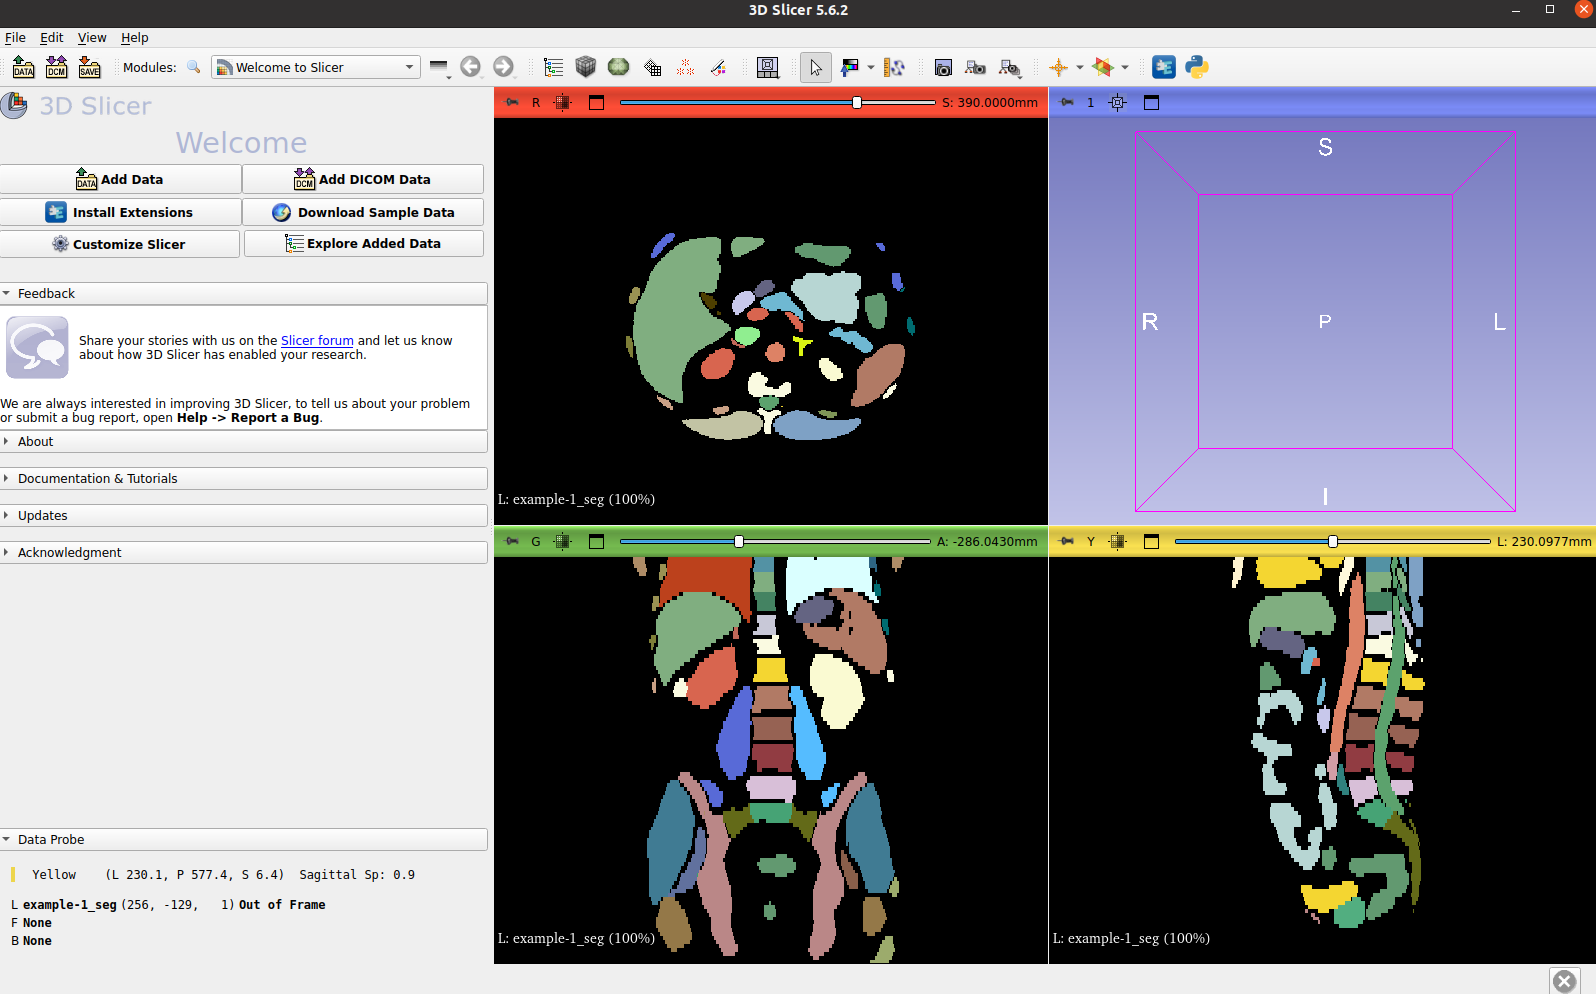
Visualize the all the anatomies generated:
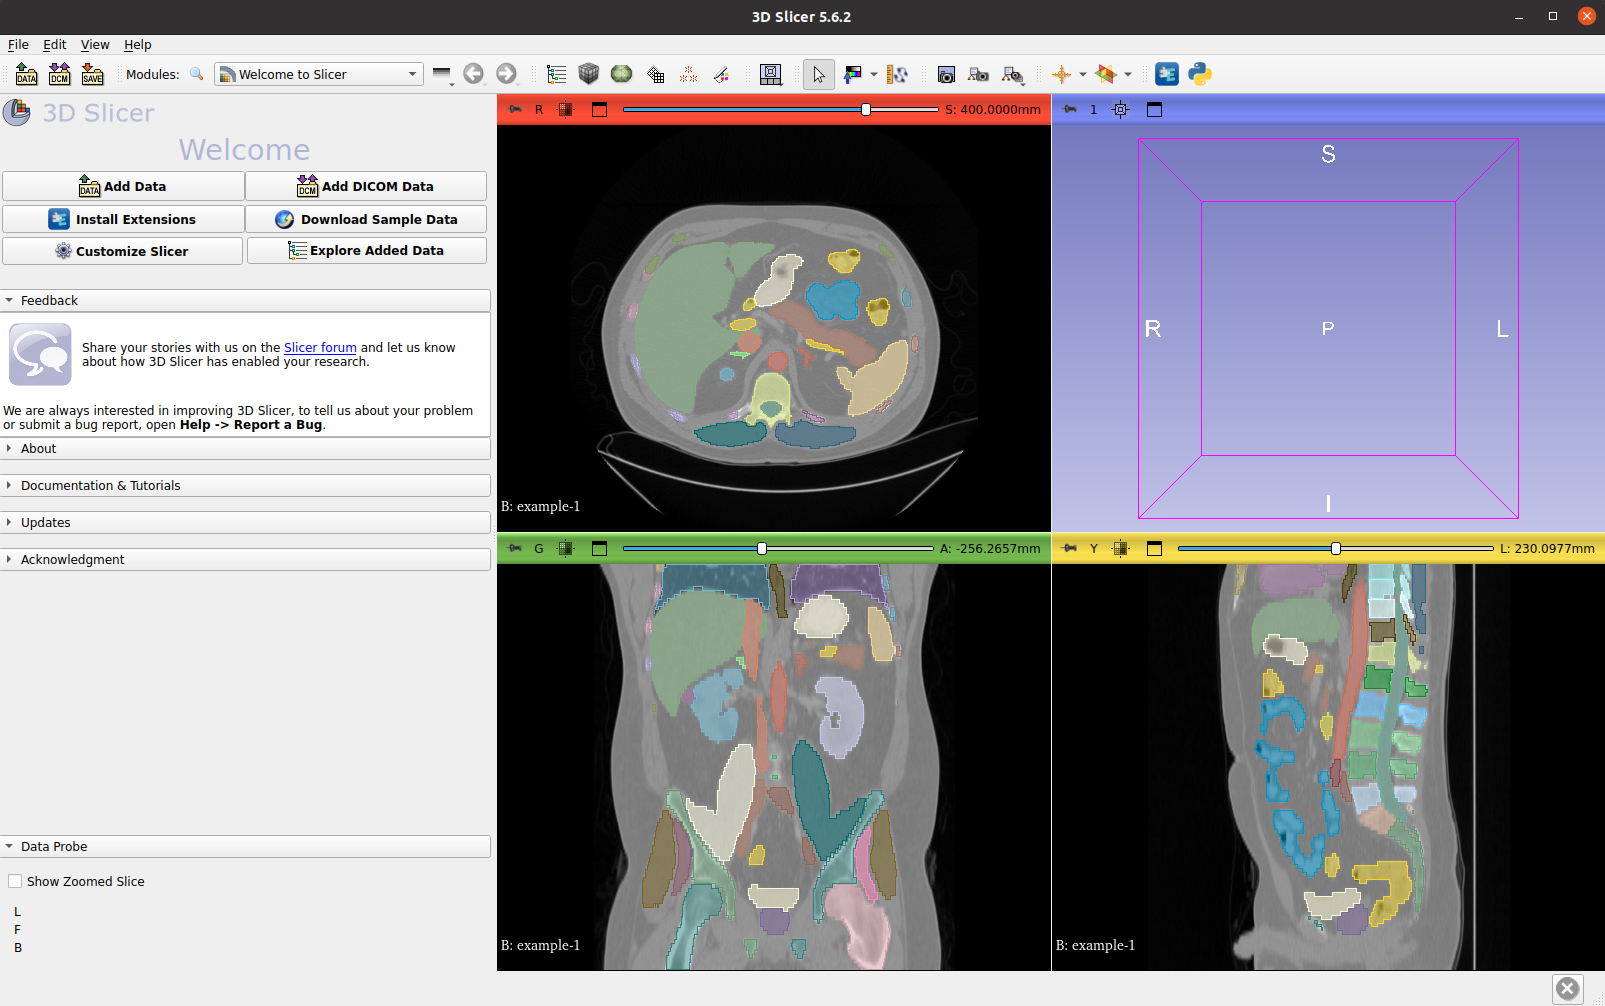
Visualize both the CT image and its VISTA3D inference labels:
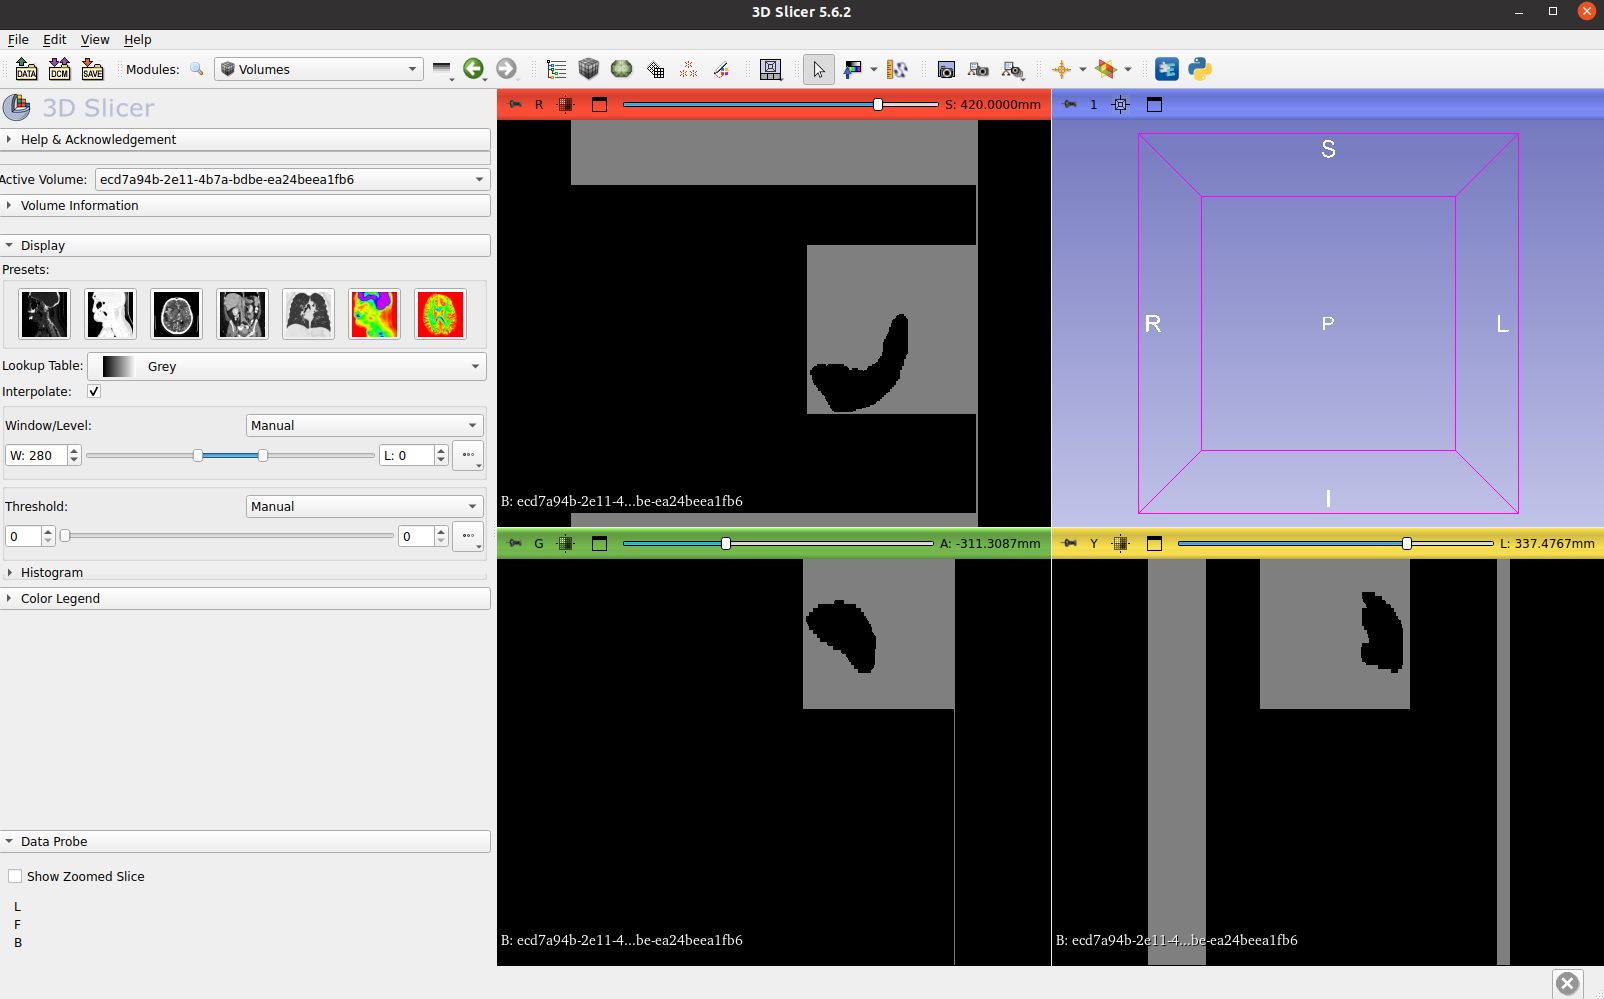
Visualize the point prompt patch: If you would like to use 3D Slicer to see the point prompt inference results, which are patch-based predictions with NRRD or NIFTI format. You can load it as “volume” mode in Slicer, then click “volume” panel on the top 3D Slicer menu. Then adjust the constrast and threshhold around 0-3, as the prediction values from point propt ranges from 0-1. Then you can see the results.