Installation and Setup#
Installation and Setup Essentials for NVIDIA Nsight Visual Studio Edition
Installation and Setup Essentials#
To reduce the chance of encountering problems when installing the NVIDIA Nsight Visual Studio Edition tools, consider several items in advance. For example, determine whether you want to run the tools on one machine and debug your application on another, or if you will debug on a single machine. Performing remote debugging can be advantageous because the Visual Studio environment will continue to run on the host machine even if the target machine has to be rebooted because an application crash.
Remote debugging allows you to debug over a network, which means that a target machine can be made easily available to a development team, or to members who do not have physical access to the target GPU.
Before You Start
Task |
For more information, see… |
|---|---|
Review the hardware and software requirements for the product to make sure that you have the minimum or recommended configurations. |
|
Review the overview of installation procedures to make sure you understand the ways that you can configure your development system. |
System Requirements for NVIDIA Nsight VSE Software#
Minimum |
Recommended |
|
|---|---|---|
Operating System[1] : |
Windows® 11 Windows Server 2022 (64-bit) |
Minimum or higher |
CPU |
Intel(R) Pentium(R) Dual-core CPU or equivalent @ 1.6 GHz minimum |
Intel(R) >Pentium(R) Dual-core CPU or equivalent@ 2.2 GHz or higher |
Memory |
Host machine (with Visual Studio): 2 GB minimum Target machine: 2 GB minimum * |
Host machine (with Visual Studio): 2 GB or more Target machine: 4 GB or more |
Hard Disk Space |
330 MB for NVIDIA Nsight™ VSE software |
On a 64-bit machine with NVIDIA Nsight™ VSE Host software: 330 MB plus space for your project files. If using remote machine to run/debug target application, remote machine: 240 MB plus space for the debug version of your target application. |
Display Driver |
You must install an NVIDIA display driver that supports NVIDIA Nsight™ VSE. Please see the release notes for compatible driver versions. |
same as minimum |
Local debugging hardware (host and target on same machine) |
One or more GPUs (for more information, see https://developer.nvidia.com/nsight-visual-studio-edition-requirements) For compute debugging, see Compute Debugger Supported Configurations. |
same as minimum |
Local debugging software (host and target are the same machine) |
Note Although individual versions of Visual Studio (e.g. 2022 or 2026) can be selected during installation, NVIDIA Nsight™ VSE will install onto all instances of each of the selected versions. |
same as minimum |
Remote debugging (host and target on different machines) |
Not currently supported. |
|
Networking |
Internet connection to download installer For remote debugging: TCP/IP network to connect host machine to target machine |
same as minimum |
[1] Support for Windows Server 2019 has been dropped as of 2024.1.0.
[2] Support for Visual Studio 2019 and earlier has been dropped as of version 2025.5.0.
NVIDIA Nsight Visual Studio Edition supports four flexible hardware configurations:
Single GPU System: For developers working on API level frame debugging[*], profiling, and GPGPU developer debugging with the NVIDIA Nsight™ VSE CUDA Debugger.
Dual GPU System: The recommended single machine configuration for a GPGPU developer. This configuration supports both the NVIDIA Nsight™ VSE CUDA Debugger and Analyzer[*].
Two systems, each with one GPU: The recommended configuration for graphics developers who need the additional power of the graphics API Frame Debugger[*] and Range Profiler[*], or developers doing both GPGPU and graphics tasks. Supports every GPGPU and graphics debugging[*], profiling[*], and analysis[*] features of the Nsight family of tools.
Notebook equipped with NVIDIA Optimus technology: The recommended single notebook machine configuration for a GPGPU developer. This configuration supports both the NVIDIA Nsight™ VSE CUDA Debugger using NVIDIA Optimus technology.
[*] Note that NVIDIA Nsight Visual Studio Edition only supports GPGPU debugging.
Graphics Range Profiling and Graphics Frame Debugging can be done with Nsight Graphics using NVIDIA Nsight Integration,
System Trace Analysis should be done with Nsight Systems using NVIDIA Nsight Integration, and
Kernel profiling may be accomplished with Nsight Coompute using NVIDIA Nsight Integration
Supported Graphics Cards#
As of CUDA Toolkit 13.0, support for the Maxwell, Pascal, and Volta GPU architectures has been removed. CUDA debugging is supported on Turing or later GPUs, with the exception of NVIDIA’s dedicated professional (cryptocurrency) mining GPUs. For more information on Nsight Visual Studio Edition’s hardware and software requirements, see Nsight Visual Studio Edition Requirements.
Compute Debugger Supported Configurations#
See the Archives for documentation of previous versions of the CUDA debugger.
The CUDA Debugger is supported on Windows 10 and 11 using driver versions r445 or greater for the following NVIDIA GPUs architectures:
Supported NVIDIA GPU architecture |
|||
|---|---|---|---|
Driver mode |
WDDM RS4 |
TCC |
MCDM |
Driver version |
r445+ |
r445+ |
r555+ |
Volta or earlier GPUs |
UNSUPPORTED |
||
Turing Ampere Ada Hopper Blackwell |
SUPPORTED |
||
How To: Install the Suite of NVIDIA Nsight Developer Tools#
Among the many tools NVIDIA provides for GPU-based application development, the NVIDIA Nsight suite of tools integrate into Visual Studio. In order to use the full suite of NVIDIA Nsight tools within Visual Studio, you’ll need to download and install the following tools:
NVIDIA Nsight Tool |
Purpose |
Requires NVIDIA Nsight Integration for Use in Microsoft Visual Studio |
|---|---|---|
NVIDIA Nsight Visual Studio Edition |
CPU+GPU CUDA debugger for integrated Visual Studio development, build, debugging, code correctness, and core dump analysis. |
No, this tool self-integrates |
NVIDIA Nsight Compute |
CUDA application interactive kernel profiler |
Visual Studio extension allowing integration of participating NVIDIA Nsight tools. |
NVIDIA Nsight Graphics |
Graphics application frame debugger and profiler |
|
NVIDIA Nsight Systems |
System-wide-performance analysis tool |
|
[1] Install this extension from either of the following:
|
For More Information about Using This Extension#
Please visit the following for NVIDIA Nsight Developer Tools Visual Studio Integration:
Download NVIDIA Nsight Integration from the Visual Studio Marketplace#
Install this extension from either of the following:
Visual Studio main menu > Extensions > Manage Extensions > Browse > Nsight Developer Tools Integration
For More Information about NVIDIA Developer Tools#
NVIDIA provides a host of tools for GPU-based application development targeted at many hardware platforms and operating systems. To learn more, please visit:
Install the NVIDIA Nsight VSE Software#
Obtain the installer from NVIDIA. Choose the version of the installer that is appropriate for your operating system.
Run the installer.
The next page asks for permission to collect anonymous usage data to help NVIDIA improve Nsight Visual Studio Edition.
Note that your preference may be changed at any time using the Visual Studio main menu > Nsight > Options > Feedback menu. (See Host Basics for more information.)
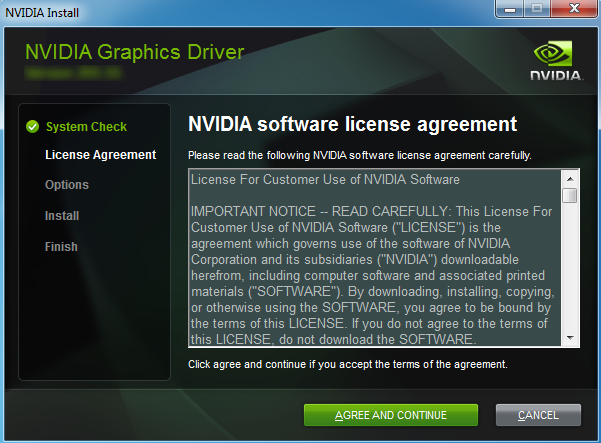
On the first screen, accept the license agreement, and click Next.
The next screen allows you to customize the features that will be installed. These include:
NVIDIA Nsight for Visual Studio[1] 2022, or 2026[2].
Note
For Visual Studio 2022, and 2026 the NVIDIA Nsight™ VSE installation setting will apply to all instances of the respective version.
Click Install to begin the installation process. You may get a warning message, asking you to verify that the software you are installing is from a trusted source. In this case, click Yes and the installation will continue.
Click Finish to complete the installation.
- We recommend installing to the default secure location under Program Files. The default installation directory is:
C:\Program Files (x86)\NVIDIA Corporation\Nsight Visual Studio Edition <version>
[1] Support for Visual Studio 2019 and earlier has been dropped as of Nsight™ VSE version 2025.5.0.
[2] Refer to Release Notes for information about early access support for Visual Studio 2026.
Host Basics#
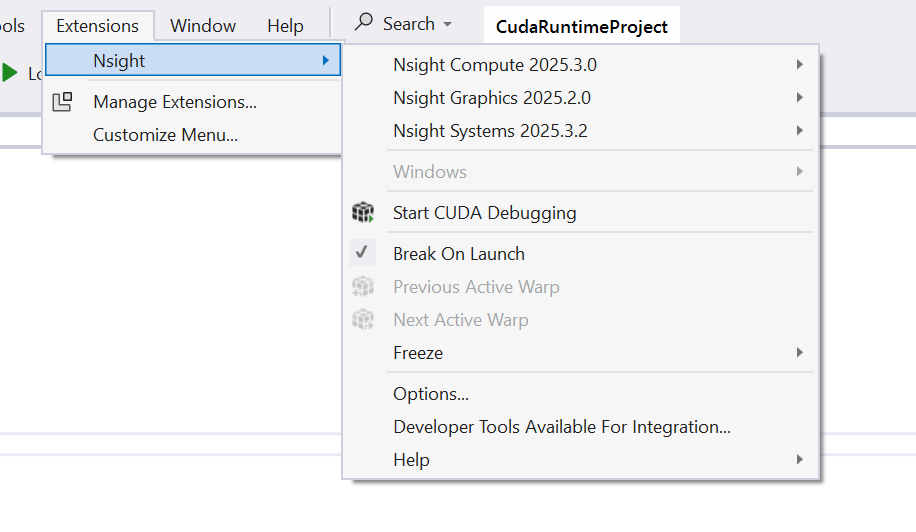
After you install NVIDIA Nsight™ VSE on your computer, you will see a new sub-menu called Nsight under the Extensions menu in the Visual Studio menu bar.
Feel free to explore the various options on this menu.
Setup Hybrid Mode#
NVIDIA Nsight Visual Studio Edition is able to profile and debug applications on laptops using Windows 10 Hybrid mode. In order to do so, you will need to configure your machine to use the high-performance NVIDIA GPU for NVIDIA Nsight™ VSE.
There are two methods to direct an application to use the NVIDIA GPU.
Configure all applications use the NVIDIA GPU.
Configure only specific applications to use the NVIDIA GPU.
The first option is the easiest to control, but may adversely affect overall system performance. The second option is more fine grain and allows the system to maintain lower power.
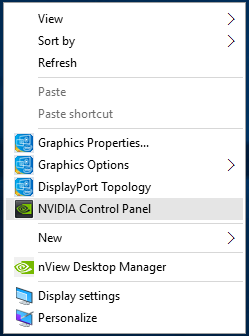
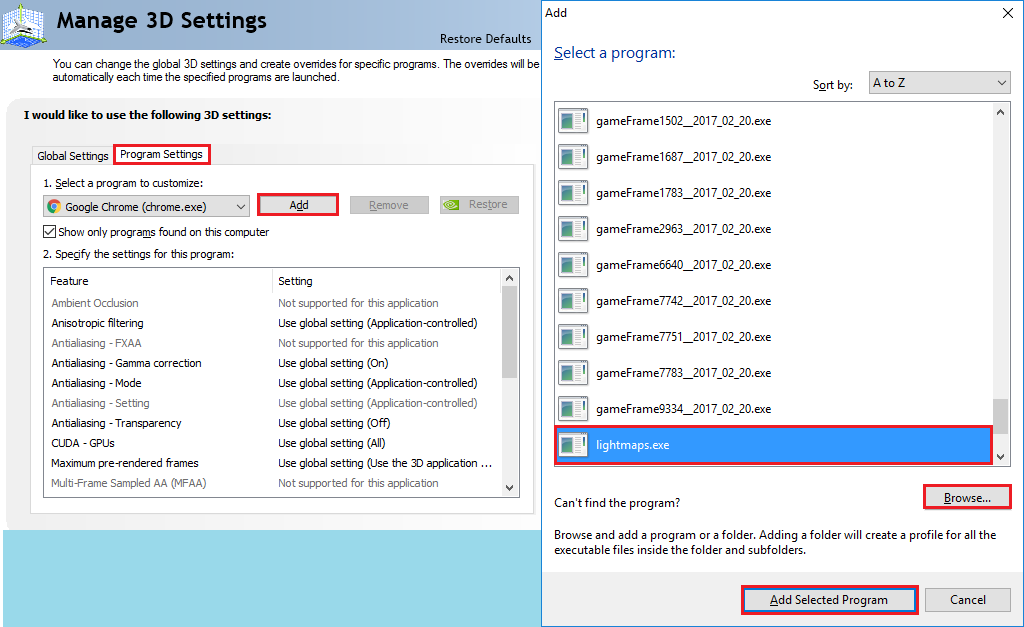
To get started, right-click on your desktop, and open the NVIDIA Control Panel.
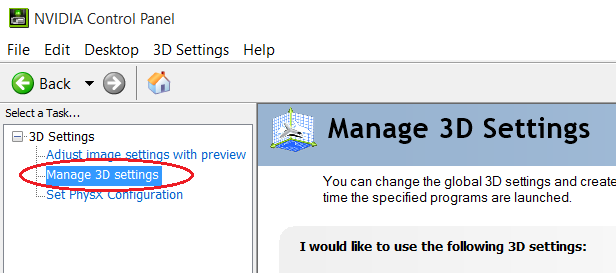
Once the NVIDIA Control Panel has opened, click Manage 3D Settings.
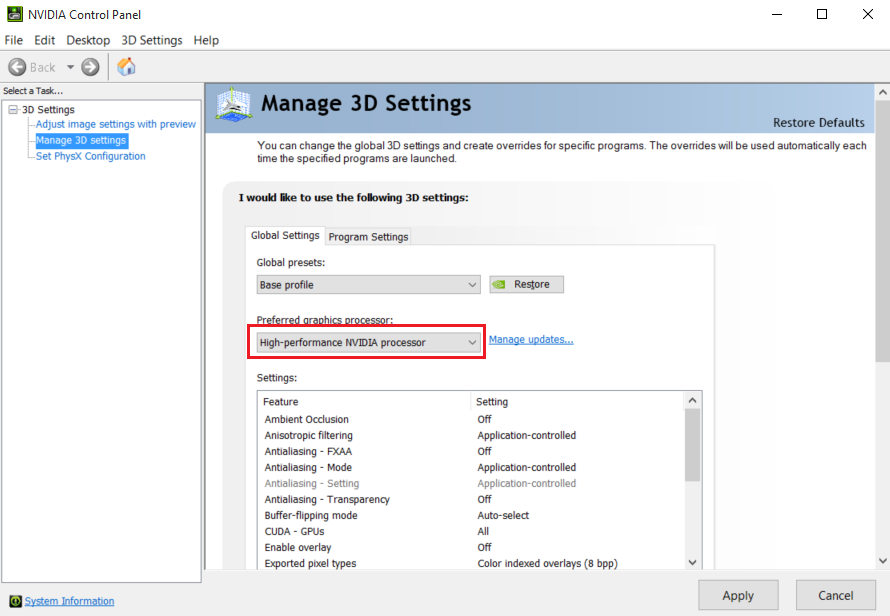
Option 1: Global Settings#
On the Global Settings tab, select the drop-down menu under Preferred graphics processor, and select High Performance NVIDIA processor.
Click Apply to save the changes. All applications can now be profiled, traced, and debugged in Hybrid mode.
Option 2: Program Settings#
On the Program Settings tab, you can add each application that should run on the NVIDIA GPU.
Under 1. Select a program to customize, press Add to select a running instance of the executable to be debugged, profiled, and/or traced. You may also Browse directly to the location of the desired executable.
If you plan on running a serialized frame capture, the solution (and built executable) are typically found in:
C:\Users\<user>\Documents\NVIDIA Nsight\Captures\<TimeStampedCaptureProcess>
with the built executable in the subdirectory:
<architecture>\<build>\<TimeStampedCaptureProcess>.exe
Press Add Selected Program to confirm your selection.
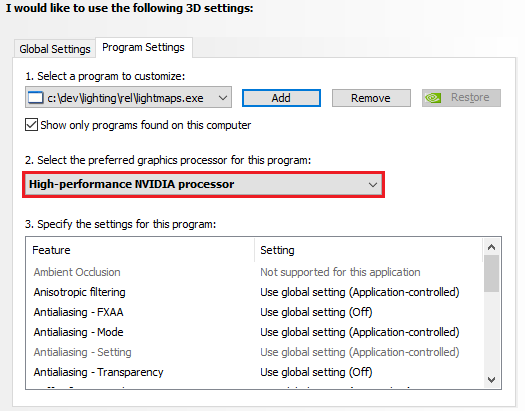
Click the drop-down menu under 2. Select the preferred graphics processor for this program:, and select High-performance NVIDIA processor.
Click Apply to save the changes. The specified application(s) can now be profiled, traced, and debugged in Hybrid mode.
Setup Local Headless GPU Debugging#
On a computer that has two GPUs, you can designate one GPU as the “headless GPU.” In this case, the term “headless” refers to a configuration in which the additional GPU does not send display information to a display monitor.
The reason that you may choose to use headless GPU debugging is because the Windows operating system normally requires a desktop to be assigned to every usable GPU. This can cause problems when trying to debug a CUDA-based application locally. If a desktop is running on the same GPU that is running a CUDA-based application that is being debugged, the CUDA Debugger can have problems communicating with the application that is being debugged. The CUDA Debugger disables breakpoints automatically when attempting to debug locally on a GPU that has displays attached.
The following procedure allows you to work around the desktop requirement.
To run headless:
Make sure you have at least one CUDA-capable NVIDIA GPU installed.
Make sure that the NVIDIA display driver installed on your system matches the display driver recommended in release notes. If you install a new display driver, reboot the Windows operating system.
If you have a physical monitor cable attached to each GPU, turn off the display for one of the GPUs from the NVIDIA Control Panel.
Right-click on your desktop, and select NVIDIA Control Panel.
In the left-hand pane, under Displays, select Setup Multiple Displays.
Unmark the checkbox of the display that is to be used as the target (the headless GPU).
Click the Apply button.
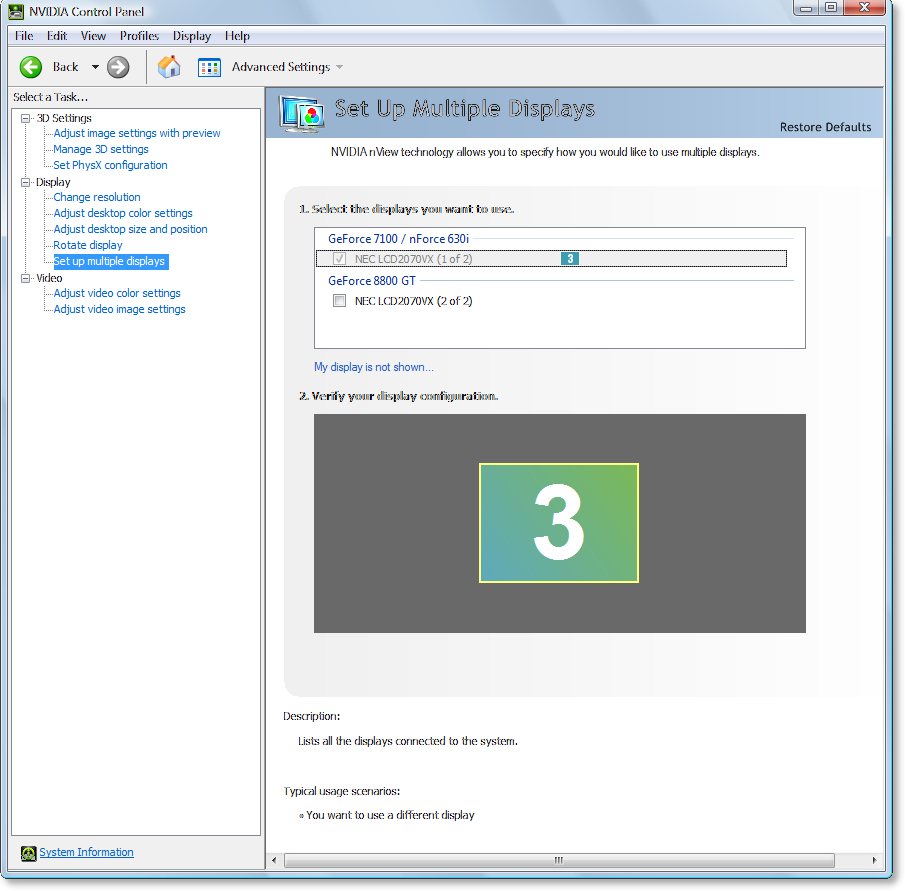
Close the NVIDIA Control Panel.
Make sure that your CUDA source code specifies the non-desktop device as the device that will execute the CUDA portion of your code.
If you aren’t sure which device is the headless GPU, use the DeviceQueryDrv sample from the CUDA SDK Toolkit, then set the
CUDA_VISIBLE_DEVICESenvironment variable.
Note: |
For a local debugging configuration, make sure that you first disable D3D acceleration for WPF. For assistance, see Setup Local Debugging. |
How To: Install the NVIDIA Display Driver#
It is recommended that you install an NVIDIA display driver that NVIDIA Nsight™ VSE 2020.1.1 requires. See the release notes for more information.
If you have an NVIDIA graphics card installed on your target machine, you probably already have an NVIDIA display driver. However, NVIDIA Nsight Visual Studio Edition requires an updated version of the driver in order to function properly. Please see the latest release notes for instructions on compatible driver versions:
Install the NVIDIA Display Driver:
Run the NVIDIA Display Driver installer.
The Display Driver Installer appears.
Follow installer directions until final screen. Do not reboot.

When prompted, select No, I will restart my computer later.
Click Finish.
See Also
Reference
Working with Samples#
There is one primary source for samples that you can use with the NVIDIA Nsight Visual Studio Edition tools:
Using Visual Studio#
Note
As of Nsight Visual Studio Edition version 2025.5, support for all versions of Visual Studio prior to Visual Studio 2022 (including Visual Studio 2019) has been dropped. Please use Visual Studio 2022 or later for CUDA debugging.
Creating a New Project
As with all Visual Studio projects, you can create a new CUDA project using:
the Create a new project button on the Visual Studio start page or,
the File > New > Project menu option from inside the main IDE window.
Once on the Create a new project window, you can find CUDA project types by typing CUDA in the search filter or by selecting CUDA from the Language drop-down next to the search filter. Once you select the CUDA project type with your desired CUDA version, you can proceed to the next page to name and create your project.

Targeting a New CUDA Toolkit Version
CUDA projects by default remain tied to the CUDA Toolkit version that was used when creating the project. It is often the case that when installing a new version of the CUDA Toolkit, you may want to update your existing projects to use the new version. In such a scenario, you can change the CUDA Toolkit version used by your project by following these steps:
Right-click on your project in the Solution Explorer window and select Build Dependencies > Build Customizations for Visual Studio 2022 or just Build Customizations for Visual Studio 2026 from the context menu.
In the Visual C++ Build Customizations Files dialog that appears, uncheck the box next to the currently selected CUDA version and check the box next to the desired CUDA version.

Starting CUDA Debugging
To debug CUDA applications, you can use the Start CUDA Debugging menu item under the Nsight menu under Extensions. For more information on how to debug your CUDA applications, refer to the CUDA Debugger section of the documentation.
Using Visual Studio 2026#
While the debugging experience provided by Nsight VSE remains the same in Microsoft Visual Studio 2026, to build your projects in Visual Studio 2026, you currently need additional steps that we will describe below.
Note
Compiler support for the new Microsoft Visual C/C++ v145 is still experimental and can lead to compilation failures or incorrect runtime program behavior. Please either use MSVC v145 at your own risk or continue targeting previous MSVC versions (e.g. v143 delivered with Visual Studio 2022). Both options are described below.
Using MSVC v145 (at your own risk)
You will need: Visual Studio 2022 (in addition to Visual Studio 2026) and CUDA Toolkit 13.1 installed. The CUDA Toolkit needs to have been installed after Visual Studio 2022 to ensure the CUDA support extensions have properly been copied to your Visual Studio installation.
Note
Before proceeding, ensure that your CUDA project is targeting CUDA Toolkit 13.1. You can change the targeted CUDA version by following the steps described in the Targeting a New CUDA Toolkit Version sub-section under Using Visual Studio.
To build your CUDA projects with the new MSVC v145, you need a copy of the MSBuild extensions for CUDA projects. For previous versions of Visual Studio (e.g. VS 2022), the CUDA Toolkit installer copies these files to your Visual Studio installation so MSBuild can find them. However, while we are working on extending this support to Visual Studio 2026 in future versions of the CUDA Toolkit, currently this step is manual and you need to copy:
CUDA 13.1.propsCUDA 13.1.Version.propsCUDA 13.1.targetsCUDA 13.1.xmlNvda.Build.CudaTasks.v13.1.dll
from your previous Visual Studio installation’s MSBuild/MSVC build customizations path:
C:\Program Files\Microsoft Visual Studio\2022\<SKU>\MSBuild\Microsoft\VC\v170\BuildCustomizationswith
<SKU>beingCommunity,Professional, orEnterprise, to your new, Visual Studio 2026’s MSBuild/MSVC build customizations path:C:\Program Files\Microsoft Visual Studio\<Version>\<SKU>\MSBuild\Microsoft\VC\v180\BuildCustomizationsreplacing the two placeholder portions inside
<and>with the right values to match the Visual Studio 2026 installation path on your machine.Add the additional
-allow-unsupported-compilercompilation argument by going to your project properties (Solution Explorer > right-click on your project node > Properties), navigating to Configuration Properties > CUDA C/C++ > Command Line and adding-allow-unsupported-compilerin the Additional Options box.Note
As mentioned previously, using MSVC v145 to build CUDA projects is still experimental and can lead to compilation failures or incorrect runtime program behavior.
Build and run your project.
Using MSVC v143 (delivered with Visual Studio 2022)
This option allows more reliable program behavior while allowing you to enjoy the new features in VS 2026. To use this option:
Navigate to your project properties (Solution Explorer > right-click on your project node > Properties).
Under “Configuration Properties” > General > “Platform Toolset”, select “Visual Studio 2022 (v143)”.
Once you can build your program, you can run and debug programs as before.