Open topic with navigation
If you have projects that you created before you installed NVIDIA Nsight, you might need to modify your project to work with the tools.
For example, you need to configure the project to use the CUDA compiler that ships with the debugger software. Why? Because the compiler that ships with the debugger software generates the appropriate debug symbolics. If you use a different compiler, such as the compiler that ships with an early version of the CUDA SDK, your application will not necessarily contain the debug symbolics that the debugger and the analysis tools require.
You can use the configuration files to configure your existing project so that the project (and resulting build output) works properly with the debugger and analysis tools.
To configure an existing project to work with the NVIDIA Nsight tools:
- Configure the project to use custom build rules.
- Configure properties of .cu files.
The procedures on this page explain how to perform the above tasks.
Configure the Project to Use Custom Build Rules
- Start Visual Studio.
- Open the existing project.
- From the File menu, choose Open > Project/Solution.
- Open the project you want to convert for use with the debugger.
- Select the project in the Solution Explorer pane. (Make sure the project name is highlighted.)
- Enable the CUDA build rule.
- From the Project menu, choose Custom Build Rules.
The Visual C++ Custom Build Rule Files dialog box opens. - Click Find Existing... button.
- Browse to:
{$(VCInstallDir)}\VCProjectDefaults
The default location of the {$(VCInstallDir)\VCProjectDefaults} directory is:
On a 32-bit system: C:\Program Files\Microsoft Visual Studio 9.0\VC\VCProjectDefaults
On a 64-bit system: C:\Program Files (x86)\Microsoft Visual Studio 9.0\VC\VCProjectDefaults
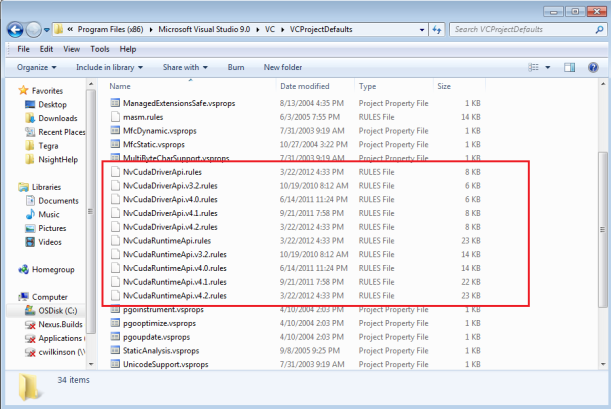
- If your project uses the:
CUDA Driver API and compiler v.4.0, select: NsightCudaDriverApi.v4.0.rules
CUDA Driver API and compiler v.4.1, select: NvCudaDriverApi.v4.1.rules
CUDA Driver API and compiler v.4.2, select: NvCudaDriverApi.v4.2.rules
CUDA Runtime API and compiler v.4.0, select: NsightCudaRuntimeApi.v4.0.rules
CUDA Runtime API and compiler v.4.1, select: NvCudaRuntimeApi.v4.1.rules
CUDA Runtime API and compiler v.4.2, select: NsightCudaRuntimeApi.v4.2.rules
Note: The "v4.0," "v4.1," or "v4.2" in the filenames refer to version of the NVIDIA CUDA Toolkit.
- Click the Open button.
- If prompted to add the CUDA rule to the search path, click Yes.
- Mark the checkbox next to the name of the CUDA rule file to enable the new build rule.
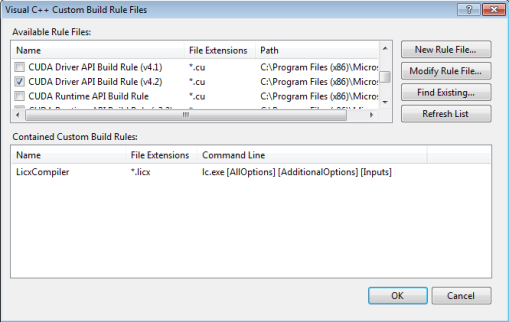
- Click OK.
The project now uses the build rule you enabled. The .rules file defines several properties that Visual Studio uses to build the project. For example, one of the properties is called "Compiler Path," for which the default value, in the case of the CUDA Driver API Build Rule (v4.2), is:
DefaultValue="$(CUDA_PATH_V4_2)\bin\nvcc.exe"
|
|
NVIDIA Nsight defines CUDA_PATH_V4_2 as a system environment variable. For more information, see Environment Variables. |
Configure Properties of .cu Files
To change .cu file properties:
- Right-click on any .cu file in the Project Explorer. Drop-down menu appears.
NOTE: You can also right-click on the project node, and the setting will be inherited by all .cu files in the project. Configure only the .cu files that are to be compiled. If the .cu file is included in another .cu file, typically only the outermost parent can be built.
- Select Properties.
Property Page window opens for that file type.
- Click on General.
- Next to Tool:
- select Runtime API or
- select CUDA Driver API.
The tool you select should match the build rule you specified. For example, if you chose the NvCudaRuntimeApi.v4.2.rules build rule so that the project would be compatible with CUDA Runtime API, then select Runtime API.
Build Options on the Command Line
The compiler that ships with the NVIDIA Nsight supports a switch for generating debug symbolics: - G0.
If you use the command line to build your project, make sure to add:
-G0
to the NVIDIA CUDA Compiler (nvcc) command line. The switch causes the compiler to generate CUDA debug symbolics.
You only need this when building from source files containing GPU code. You might notice a runtime slowdown when you are actively debugging code built with the -G0 switch. We recommend that you include CUDA debug symbolics only as needed. Building only the few files of interest with -G0 will give you a better debugging experience.
See Also
NVIDIA® Nsight™ Development Platform, Visual Studio Edition User Guide Rev. 3.2.131009 ©2009-2013. NVIDIA Corporation. All Rights Reserved.
Open topic with navigation
