Plugin SDK Samples
The NVIGI Plugins SDK includes both a 3D-rendered, multi-plugin, GUI-based sample and a set of command-line samples that show the basics of several common app use cases. The following sections describe how to configure and run these samples.
The 3D Sample
NOTE: With the 1.3.0 release, the NVIGI 3D Sample has been moved into the main SDK itself for ease of use. The name has changed from
NVIGISample.exetonvigi.3d.exeto reflect this change. The sample is now built as part of the SDK build, and is available in the<SDK_ROOT>/bin/x64directory. The source code for the sample is in the<SDK_ROOT>/source/samples/nvigi.3ddirectory.
The 3D sample, nvigi.3d combines NVIGI and Donut https://github.com/NVIDIAGameWorks/donut to create a sample app demonstrating an NVIGI AI integration. Using NVIGI, it’s possible to support multiple backends within single application. Sample app shows one such usecase using GGML CPU, CUDA, Vulkan and D3D12-based backends. Support for multiple backends ensures application developer can create wide variety of inference pipelines. In the sample, based on user selection, particular type of backend is instantiated and used for inferencing.
The Donut-based NVIDIA NVIGI (In-Game Inference) 3D Sample is an interactive 3D application that is designed to show how one might integrate such AI features as speech recognition (ASR) and chatbots (GPT/LLM) into a UI-based workflow. The focus in the sample is showing how to present the options to the user and run AI workflows without blocking the 3D interaction or rendering. The sample defaults to rendering with Direct3D 12, but via a command-line option can switch to rendering via Vulkan.
IMPORTANT: For important changes and bug fixes included in the current release, please see the release notes for the SDK BEFORE use.
Requirements
Hardware:
Same as overall SDK.
Software:
Same as overall SDK.
Etc:
An NVIDIA Integrate API key, needed to use the GPT cloud plugin. Contact your NVIDIA NVIGI developer relations representative for details if you have not been provided one.
If you wish to use OpenAI cloud models, an OpenAI account API key is needed.
Setting up and Launching the Sample
There are several steps that are required in order to be able to use all of the NVIGI features shown in the sample:
Downloading the models as noted above. These represent models that an application would bundle with their installer. NOTE if you manually download a model while the sample is running, you will need to exit and restart the sample application in order for the model to be shown as an option in the UI.
Setting up the NVIDIA Cloud API key. The enables the use of the example cloud GPT plugin.
Setting up the GPT Cloud Plugin
The NVIGI Cloud GPT plugin that is supported by this sample uses a setup based upon an API key from a developer account on https://build.nvidia.com/explore/discover. The basic steps to set this up are:
Navigate your browser to https://build.nvidia.com/explore/discover
Sign up or sign on to a developer account
Navigate to the model that the sample currently supports: https://build.nvidia.com/meta/llama-3_1-405b-instruct
Next to the Python code example, click the “Get API Key” button and save the key for reference
Set this key into your environment as the value of
NVIDIA_INTEGRATE_KEY
If you wish to use the OpenAI cloud models, you will need to generate an OpenAI API key as per their instructions and set it as the value of the environment variable OPENAI_KEY
IMPORTANT: After setting an API Key as an environment variable in the system properties, Visual Studio (if used) or the command prompt used to launch the Sample must be restarted to read the new environment variable.
Launching the Sample
For those using a prebuilt NVIGI binary pack, the sample executable is available immediately and can be run. For those building from source, building the SDK tree will also build the 3D Sample.
To launch the sample, run <SDK_ROOT>/bin/x64/nvigi.3d.exe, either by double-clicking the executable in Windows Explorer or by running it from a command prompt. The sample will launch a window with a 3D scene and a UI on the left side of the window.
The sample requires and looks for AI models and rendering media relative to the executable path. Specifically, it looks for:
The models directory, which it finds by starting at the executable directory, looking for
<dir>/data/nvigi.modelssuch that it containsnvigi.plugin.gpt.ggml. The code will check upward from the executable directory several times to find this. This is done so that pre-built binary and GitHub source layouts are trivially supported with no user effort.The media directory, which it finds by starting at the executable directory, looking for
<dir>/data/nvigi.test/nvigi.3d. The code will check upward from the executable directory several times to find this. This is done so that pre-built binary and GitHub source layouts are trivially supported with no user effort.
If required, the models directory may be specified explicitly via the command line argument -pathToModels <path>. This is recommended if you have a non-standard layout.
To run the rebuilt sample from within the debugger, simply set nvigi.3d as the startup project in Visual Studio and launch with debugging.
The LLM System Prompt
By default, the LLM model uses the following system prompt:
“You are a helpful AI agent. Your goal is to provide information about queries. Generate only medium size answers and avoid describing what you are doing physically.
Avoid using specific words that are not part of the dictionary.”
You can customize this prompt using the -systemPromptGPT parameter.
Example:
.\nvigi.3d.exe -systemPromptGPT "You are a helpful AI assistant answering user questions."
Using the Sample
Main UI
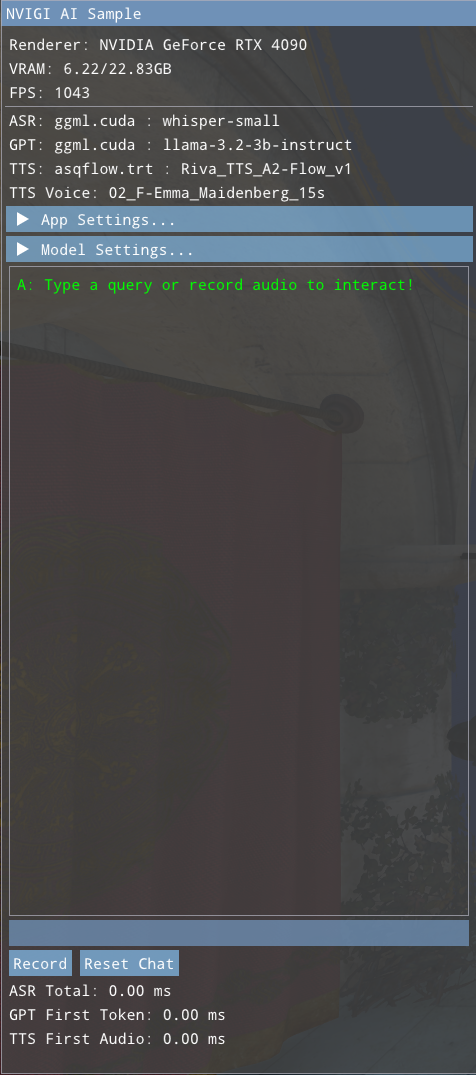
On launch, the sample will show a UI box on the left side of the window as shown above, and will show a 3D rendered scene at the same time. This is the main UI:
At the top are GPU, system and performance info.
Directly below is a listing of the current models/backends in use
Below this is the “App Settings” collapsable for setting priority modes and limiting the frame rate (Details below)
Next is the “Model Settings…” collapsable that allows switching models for each stage (Details below)
Finally, we have the interaction area:
The chat text window, which shows the results of GPT (and of ASR when used).
Below this are the interaction controls for ASR, GPT and TTS. Details of their use are below.
Below this are three performance numbers:
End-to-end audio-to-text inference time for ASR
Time from start of inference to first text response for GPT
Time from first text input to first audio for TTS
The main UI’s interaction area includes controls that allow the user to type in queries to the LLM or record a spoken query to be converted to text by ASR, then passed to the LLM and finally passed to TTS. In addition, the “Reset Chat” button clears the chat window and resets the LLM’s history context, “forgetting” previous discussion. Typed and spoken input is handled as follows:
Speech. Click the “Record” button to start recording (the “Record” button will be replaced by a “Stop” button. Then, speak a question, and conclude by pressing the “Stop” button. The ASR plugin will compute speech recognition and print the recognized text, which will then be sent to the LLM for a response that will be printed in the UI. In the case of the GPT plugin being deactivated, the text will be sent directly to TTS. If the text returned from ASR is a form of “[BLANK AUDIO]”, then check you Windows microphone settings, as the audio may not be getting routed correctly in Windows. To test different microphones, user should select microphone from Windows settings. The model shipping with this release is the Whisper Small Multi-lingual, which supports a wide range of languages, with varying levels of quality/coverage.
Typing. Click in the small, blank text line at the bottom of the UI, type your query and press the Enter or Return key. The text will be sent to the LLM and the result printed to the UI. If the GPT plugin is deactivated, the text will be sent directly to TTS.
Text To Speech By default, no TTS model is selected. Please choose one in the model settings to use TTS. The target voice can be changed through the UI.
App Settings UI Panel
By expanding the “App Settings” caret, the user can access two sets of application-related settings:
A drop-down to set the 3D-vs-compute/inference prioritization to one of the following:
Prioritize Graphics: Give more GPU priority to 3D rendering, at the expensive of inference latency
Prioritize Inference: Give more GPU priority to compute, improving inference latency at the potential expense of rendering time (Does not currently affect Vulkan backend plugins)
Balanced: A more even split between the two
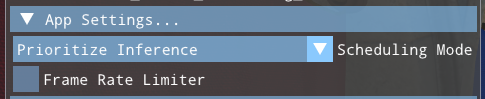
An option frame-rate limiter. If the “Frame Rate Limiter” box is checked, a typein allows the user to specify the max frame rate for rendering to avoid the sample (and its minimal 3D load) running at many hundreds of FPS.
Model Settings UI Panels
To change the selected models, the UI provides two modes: Manual and Automatic. To expand the Settings panel, click the “Model Settings…” triangle on the Main UI. This will show the currently-enabled settings panel, which initially defaults to the Manual Settings panel. It will also shorten the text results box to make space. Note that when a given AI feature is actively running (e.g. an LLM is generating text), that feature’s settings will be grayed (and disabled for interaction).
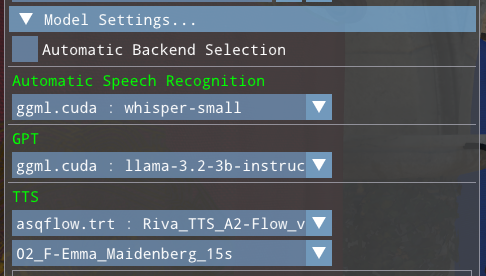
Upon expanding the Manual Settings panel, the UI adds:
A checkbox to switch between the Manual and Automatic backend selection modes
The currently-selected model/backend pairs for each feature
Drop-downs to select a model/backend pairing for each feature
In Manual mode, the drop-downs show all model/backend pairings available, grouped by model. For example:
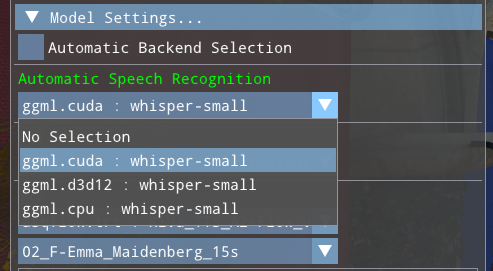
Note that both local CUDA and remote cloud backends are shown for the model “llama-3.2-3b-instruct”. There may be multiple available backends for some models.
Selecting each type of model behaves slightly differently:
Selecting locally-available models will immediately load the model from disk. This will disable ASR or GPT or TTS until the new model is loaded, as the sample shuts down the previous model before loading the new one.
Selecting a cloud model will make a connection to the cloud. Generally, the UI will be immediately available again, as there is no local loading to be done.
Clicking the “Automatic Backend Selection” checkbox will switch to the Automatic Settings panel:
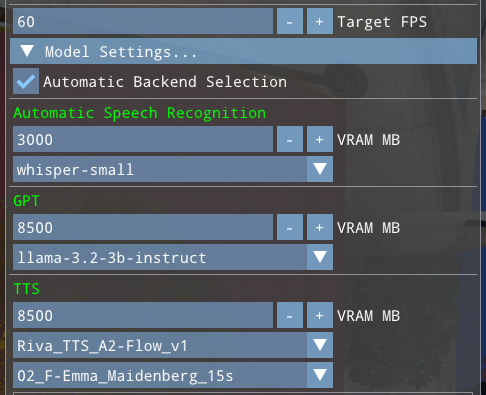
This panel is similar to the Manual Settings UI with some important differences:
Each feature dropdown only shows models, not backends. Each model will appear once
Each feature has an integer VRAM budget adjustment that sets the amount of VRAM that the model may use.
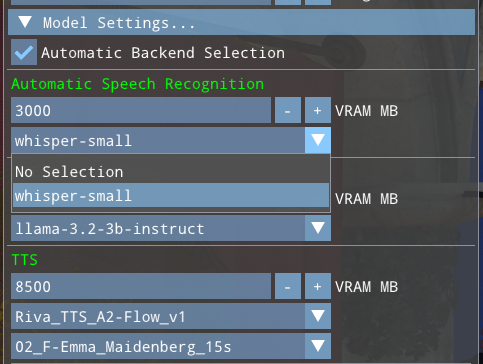
Unlike Manual mode, the user only selects a model in Automatic mode. The backend is selected automatically by code in the sample. Currently, that code selects in the following order:
If an NVIDIA GPU is present and a CUDA-based backend that is within the VRAM budget exists, select it
If a GPU is present and a GPU-based backend that is within the VRAM budget exists, select it
If a cloud API key is set for the domain (via the environment variables) and a matching cloud backend exists, select it
Select a CPU backend if available.
Adjusting the VRAM budget for a given feature can cause a new backend to be selected as the user is interacting.
This selection metric can be changed by changing the behavior of the function SelectAutoPlugin in NVIGIContext.cpp.
Logging from the Sample
By default, the pre-built sample will use Development plugins and core, and will launch a log window that shows the NVIGI log messages during init, creation, runtime and shutdown. In addition, logging to file may be enabled by specifying a path (directory-only) to where logs should be written:
nvigi.3d.exe -logToFile ..\logs <...>
With this option example a log file would be written to ..\logs\nvigi-log.txt
Logs can be useful when debugging issues or sending support questions.
In addition, if the GGML LLM/GPT plugin is used, the plugin may write a llama.log to the runtime directory. This file is written by the GGML code itself, and contains model-specific debugging output as per https://github.com/ggerganov/ggml
(Re)Building the Sample
The 3D Sample is automatically rebuilt along with the SDK. However, the default build uses a pre-built version of the Donut rendering framework, pulled from packman. It is also possible to rebuild the Sample against a locally-built version of Donut, which is useful for debugging or testing changes to the Sample itself. To do this, you will need CMake installed on the development system and in the PATH. Then, follow these steps:
Open a VS2022 Developer Command Prompt to
<SDK_ROOT>/source/samples/nvigi.3d/opt-local-donutDownload the Donut source code by running the script
01_pull.bat. By default, this will checkout the commit that was used to generate the pre-built version of Donut used in the sample.NOTE: This script has git use the SSH protocol to clone the repositories from GitHub; therefore, it expects you to have your git client set up with the proper SSH keys for your GitHub account. You can modify this script to use git with the HTTPS protocol instead if you would prefer not to worry about SSH keys.
If desired, checkout a newer commit of Donut from within the new
<SDK_ROOT>/source/samples/nvigi.3d/opt-local-donut/Donutdirectory, or edit the Donut code as desired.Run the script
02_setup.batrun CMake to create the build files.Run the script
03_build.batto build all three configurations of Donut. This will create a prebuilt pack of Donut in the<SDK_ROOT>/source/samples/nvigi.3d/opt-local-donut/_packagedirectory.NOTE: If this script fails with the following error:
cl : command line error D8040: error creating or communicating with child process, please simply re-run it and it should succeed.
Edit the Premake file for the sample
<SDK_ROOT>/source/samples/nvigi.3d/premake.luato:Comment out
donut_dir = externaldir.."donut"Uncomment
donut_dir = ROOT.."source/samples/nvigi.3d/opt-local-donut/_package/donut"
Re-run the top-level
<SDK_ROOT>/setup.batRebuild the SDK
Rerun the top-level copy/packaging (
package.bat -<cfg>if provided,copy_sdk_binaries.bat <cfg>if not)
This will build the sample against the locally-built Donut code, which can then be debugged or tested as needed.
Command-line Options
A subset including the most interesting options to the most common users:
Arguments |
Effect |
|---|---|
|
Required for just about any use - documented above, should point to the downloaded and unzipped models tree. Defaults to |
|
Sets the destination directory for logging. The log will be written to |
|
Sets system prompt for the LLM model. Default : See the “Launching the Sample” section. |
More Useful Command Line Arguments:
Arguments |
Effect |
|---|---|
|
Use Vulkan for rendering and show only vulkan-compatible NVIGI plugins |
|
Sets width |
|
Sets height |
|
Allows vebose info level logging logging |
|
Enables NVRHI and Graphics API validation Layer |
|
Does not do NVIGI dll signiture check |
|
Enables Vsync |
|
Sets number of frames to render before the app shuts down |
|
Disable the use of CUDA in Graphics optimization (for debugging/testing purposes) |
Notes:
The Vulkan rendering mode and its associated inference are experimental at this time
The sample is designed for use with local systems - use of the sample on remote desktop is not recommended. Support for remote desktop is being investigated for an upcoming release.
The Command-Line Basic Sample
The basic sample, nvigi.basic shows the basics of running a workflow of WAV (microphone) audio -> ASR (speech recognition) -> GPT (LLM). It is automatically built as a part of the SDK build. It allows direct typing “to” the LLM or “talking to” the LLM via a microphone and ASR.
NOTE: This sample makes use of a CUDA-based backend, and therefore will not work on non-NVIDIA hardware. This will be fixed in future releases.
Because of the SDK layout, once the components are built they will be under the _artifacts tree; in order for the SDK to run an app like the sample, all of these DLLs and the executable must be in the same directory. We do this by copying the DLLs and EXE into the bin\x64 directory, and running the app from within that directory, so all plugins are available.
Normally, whether the plugins have been built from a binary, “standard layout” app developer pack or from GitHub source, this is done via the copy_sdk_binaries.bat, whose use is described in the base documentation for the binary app developer pack or GitHub README. The rest of this document assumes that the binaries are up to date and have been copied.
These instructions make reference to a set of directories; the location of these directories differ between binary app developer pack and GitHub source. The documentation for each of these define the locations for these directories in the particular use:
<SDK_ROOT>: the root of the SDK Plugins tree, which contains thebindirectory for the plugins<SDK_MODELS>: the root of the models tree for the SDK plugins, normally namednvigi.models<SDK_TEST>: : the root of the test data tree for the SDK plugins, normally namednvigi.test
Download Required Models
The basic sample requires the following models:
Plugin |
Model Name |
GUID |
|---|---|---|
nvigi.plugin.asr.ggml.* |
Whisper Small |
5CAD3A03-1272-4D43-9F3D-655417526170 |
nvigi.plugin.gpt.ggml.* |
Llama3.2 3b Instruct |
01F43B70-CE23-42CA-9606-74E80C5ED0B6 |
nvigi.plugin.tts.asqflow-trt |
Riva Magpie-TTS-Flow |
81320D1D-DF3C-4CFC-B9FA-4D3FF95FC35F |
See the top-level documentation that shipped with your development pack for information on how to download these models.
Cloud Models
Plugin |
Model Name |
GUID |
URL |
|---|---|---|---|
nvigi.plugin.gpt.cloud.rest |
gpt-3.5-turbo |
E9102ACB-8CD8-4345-BCBF-CCF6DC758E58 |
https://api.openai.com/v1/chat/completions |
nvigi.plugin.gpt.cloud.rest |
Llama 3.2 3B Instruct |
01F43B70-CE23-42CA-9606-74E80C5ED0B6 |
https://integrate.api.nvidia.com/v1/chat/completions |
NOTE: These are just two popular models, for more details on model repository please read the
ProgrammingGuideAIlocated in the NVIGI Core SDK.
How to Use the Basic Sample
When run, the sample should launch a console (or use the one from which it was run); it will await user input. The user may do one of three things at the prompt:
Type a chat query as text and press enter. This will be passed directly to the LLM and the LLM response printed.
Type an exit command; “Q”, “q” or “quit”. This will cause the sample to exit.
Press enter with no text. This will start recording from the default Windows/DirectX recording device (e.g. a headset microphone). Pressing enter again will stop recording. Once the recording is complete, the audio will be sent to the ASR plugin and then the result of ASR printed to the console and passed to the LLM for response.
Run at Command Line
To run nvigi.basic from the command line, take the following steps (--models is a required argument):
Open a command prompt in
<SDK_ROOT>Run the command:
bin\x64\nvigi.basic.exe --models <SDK_MODELS> --targetPathSpectrogram <SDK_TEST>/nvigi.tts/asqflow/mel_spectrograms_targets/03_M-Tom_Sawyer_15s_se.bin
In a standard layout binary development pack or GitHub source tree, launching from a current working directory of the
<SDK_ROOT>directory, this is:
bin\x64\nvigi.basic.exe --models data/nvigi.models --targetPathSpectrogram data/nvigi.test/nvigi.tts/asqflow/mel_spectrograms_targets/03_M-Tom_Sawyer_15s_se.bin
Here are the command line options:
Usage: nvigi.basic [options]

  -m, --models              model repo location (REQUIRED)
  --asr-guid                asr model guid in registry format (default: {5CAD3A03-1272-4D43-9F3D-655417526170})
  -a, --audio               audio file location (default: )
  --extendedPhonemeDict     path to the extendend phonemes dictionary for ASqFlow TTS model
  --gpt                     gpt mode, 'local' or 'cloud' - model GUID determines the cloud endpoint (default: local)
  --gpt-guid                gpt model guid in registry format (default: {01F43B70-CE23-42CA-9606-74E80C5ED0B6})
  -s, --sdk                 sdk location, (default: exe location)
  -t, --token               authorization token for the cloud provider (default: )
  --targetPathSpectrogram   target path of the spectrogram of the voice you want to clone
  --tts-guid                gpt model guid in registry format (default: {81320D1D-DF3C-4CFC-B9FA-4D3FF95FC35F})
  --vram                    the amount of vram to use in MB (default: 8192)
Run in Debugger
To run nvigi.basic in the debugger, we must ensure that all of the plugins and the nvigi.basic.exe app are copied into one directory, the SDK bin directory. Then, MSVC’s debugger must know to launch the copy, not the original, or it will not find the plugins. Take the following steps:
One-time setup in the project file (needs to be redone if
_projectis deleted):In the MSVC IDE, edit the project config settings for
nvigi/samples/nvigi.basicNavigate to the “Debugging” settings
Set “Command” to
<SDK_ROOT>\bin\x64\nvigi.basic.exeSet “Command Arguments” as needed (see the command line options in the above section)
Set “Working Directory” to
<SDK_ROOT>/bin/x64
Build the desired non-production config of the SDK; Release is recommended (it is optimized, but contains symbols)
After each (re-)build, re-run
copy_sdk_binaries.bat <cfg>The sample can now be run in the debugger.
The Command-Line Function Calling Sample
The function calling sample, nvigi.fcall shows the basics of having an LLM call a function and returning the results of that function for the LLM to then use to answer the user’s query.
NOTE: This sample makes use of a CUDA-based backend, and therefore will not work on non-NVIDIA hardware. This will be fixed in future releases.
Because of the SDK layout, once the components are built they will be under the _artifacts tree; in order for the SDK to run an app like the sample, all of these DLLs and the executable must be in the same directory. We do this by copying the DLLs and EXE into the bin\x64 directory, and running the app from within that directory, so all plugins are available.
Download Required Models
The function calling sample requires the following models:
Plugin |
Model Name |
GUID |
|---|---|---|
nvigi.plugin.gpt.ggml.* |
Qwen3 8B Instruct |
545F7EC2-4C29-499B-8FC8-61720DF3C626 |
See the top-level documentation that shipped with your development pack for information on how to download these models.
NOTE: This is just a popular model. Other models trained on function calling, such as Qwen3-4B-instruct-2507, may be used. For more details on model repository please read the
ProgrammingGuideAIlocated in the NVIGI Core SDK.
How to Use the Function Calling Sample
When run, the sample should launch a console (or use the one from which it was run); it will await user input. The user may do one of four things, which are also described when the app starts.:
Type in “exit” then Enter, which will exit the sample
Type “disable_tools” then Enter. This will not allow any tool usage by the model. It will also reset the internal chat history.
Type “enable_tools” then Enter. This will allow tool usage by the model. It will also reset the internal chat history. This is the default state on start
Type in a Question to the LLM. Depending on the nature of the question, the LLM will have the option of using one of two tools to answer the question. The two tools are either a fake CurrentTempTool or a WikiSearchTool. The CurrentTempTool is hardcoded to return fake temperatures in three cities: Durham, Austin and Santa Clara. CurrentTempTool serves as a basic example of how all the plumbing is hooked up. WikiSearchTool will use libCurl and an internet connection to perform a naive search on wikipedia, find the first search result, and use the extract (first few sentences of the opening summary) to help answer the question. This tool uses a bit more assistance in constructing the tool schema.
Run at Command Line
To run nvigi.fcall from the command line, take the following steps:
Open a command prompt in
<SDK_ROOT>Run the command:
bin\x64\nvigi.fcall.exe <SDK_MODELS>
In a standard layout binary development pack or GitHub source tree, launching from a current working directory of the
<SDK_ROOT>directory, this is:
bin\x64\nvigi.fcall.exe data/nvigi.models
Run in Debugger
To run nvigi.fcall in the debugger, we must ensure that all of the plugins and the nvigi.fcall.exe app are copied into one directory, the SDK bin directory. Then, MSVC’s debugger must know to launch the copy, not the original, or it will not find the plugins. Take the following steps:
One-time setup in the project file (needs to be redone if
_projectis deleted):In the MSVC IDE, edit the project config settings for
nvigi/samples/nvigi.fcallNavigate to the “Debugging” settings
Set “Command” to
<SDK_ROOT>\bin\x64\nvigi.fcall.exeSet “Command Arguments” to
<SDK_MODELS>(use forward slashes in all cases)Set “Working Directory” to
<SDK_ROOT>/bin/x64
Build the desired non-production config of the SDK; Release is recommended (it is optimized, but contains symbols)
After each (re-)build, re-run
copy_sdk_binaries.bat <cfg>The sample can now be run in the debugger.
The Command-Line Pipeline Sample
The AI Pipeline sample, nvigi.pipeline shows the basics of running a multi-plugin workflow via a single eval call using the pipeline plugin. In this case, the workflow is WAV (file) audio -> ASR (speech recognition) -> GPT (LLM). It is automatically built as a part of the SDK build. It runs multiple AI plugins in a single evaluate call, using the AI Pipeline plugin.
NOTE: This sample makes use of a CUDA-based backend, and therefore will not work on non-NVIDIA hardware. This will be fixed in future releases.
Because of the SDK layout, once the components are built they will be under the _artifacts tree; in order for the SDK to run an app like the sample, all of these DLLs and the executable must be in the same directory. We do this by copying the DLLs and EXE into the bin\x64 directory, and running the app from within that directory, so all plugins are available.
Download Required Models
The pipeline sample requires the following models:
Plugin |
Model Name |
GUID |
|---|---|---|
nvigi.plugin.asr.ggml.* |
Whisper) |
5CAD3A03-1272-4D43-9F3D-655417526170 |
nvigi.plugin.gpt.ggml.* |
Llama3.2 3b Instruct |
01F43B70-CE23-42CA-9606-74E80C5ED0B6 |
See the top-level documentation that shipped with your development pack for information on how to download these models.
How to Use the Pipeline Sample
When run, the sample will load the specified wav file and pass it through a pipeline of ASR followed by an LLM, logging the result of each step.
Run at Command Line
To run nvigi.pipeline from the command line, take the following steps:
Open a command prompt in
<SDK_ROOT>Run the command:
bin\x64\nvigi.pipeline.exe <SDK_MODELS> <SDK_TEST>/nvigi.asr/jfk.wav
In a standard layout binary development pack or GitHub source tree, launching from a current working directory of the
<SDK_ROOT>directory, this is:
bin\x64\nvigi.pipeline.exe data/nvigi.models data/nvigi.test/nvigi.asr/jfk.wav
Run in Debugger
To run nvigi.pipeline in the debugger, we must ensure that all of the plugins and the nvigi.pipeline.exe app are copied into one directory, the SDK bin directory. Then, MSVC’s debugger must know to launch the copy, not the original, or it will not find the plugins. Take the following steps:
One-time setup in the project file (needs to be redone if
_projectis deleted):In the MSVC IDE, edit the project config settings for
nvigi/samples/nvigi.pipelineNavigate to the “Debugging” settings
Set “Command” to
<SDK_ROOT>\bin\x64\nvigi.pipeline.exeSet “Command Arguments” to
<SDK_MODELS> <SDK_TEST>/nvigi.asr/jfk.wav (use forward slashes in all cases)(use forward slashes in all cases)Set “Working Directory” to
<SDK_ROOT>/bin/x64
Build the desired non-production config of the SDK; Release is recommended (it is optimized, but contains symbols)
After each (re-)build, re-run
copy_sdk_binaries.bat <cfg>The sample can now be run in the debugger.
The Command-Line RAG Sample
The RAG sample, nvigi.rag shows an example of an LLM-based chatbot that uses RAG to provide the LLM with detailed context from which it should answer questions. The built-in system prompt and provided context text (data/nvigi.test/nvigi.rag/LegendOfDoria_Corpus.txt) file describes a fantasy game world. The user can type in questions that will be passed to the LLM to be answered in-game.
NOTE: This sample makes use of a CUDA-based backend, and therefore will not work on non-NVIDIA hardware. This will be fixed in future releases.
Because of the SDK layout, once the components are built they will be under the _artifacts tree; in order for the SDK to run an app like the sample, all of these DLLs and the executable must be in the same directory. We do this by copying the DLLs and EXE into the bin\x64 directory, and running the app from within that directory, so all plugins are available.
Download Required Models
The RAG sample requires the following models:
Plugin |
Model Name |
GUID |
|---|---|---|
nvigi.plugin.embed.ggml.* |
E5 Large Unsupervised |
5D458A64-C62E-4A9C-9086-2ADBF6B241C7 |
nvigi.plugin.gpt.ggml.* |
Nemotron Mini 4B |
8E31808B-C182-4016-9ED8-64804FF5B40D |
See the top-level documentation that shipped with your development pack for information on how to download these models.
How to Use the RAG Sample
When run, the sample should launch a console (or use the one from which it was run); it will await user input. The user may do one of two things:
Type in “exit” then Enter, which will exit the sample
Type in a Question to the LLM, which will answer them based upon context passed in via the provided text file.
Run at Command Line
To run nvigi.rag from the command line, take the following steps:
Open a command prompt in
<SDK_ROOT>Run the command:
bin\x64\nvigi.rag.exe <SDK_MODELS> <text file>
In a standard layout binary development pack or GitHub source tree, launching from a current working directory of the
<SDK_ROOT>directory, this might be:
bin\x64\nvigi.rag.exe data/nvigi.models data/nvigi.test/nvigi.rag/LegendOfDoria_Corpus.txt
Run in Debugger
To run nvigi.rag in the debugger, we must ensure that all of the plugins and the nvigi.rag.exe app are copied into one directory, the SDK bin directory. Then, MSVC’s debugger must know to launch the copy, not the original, or it will not find the plugins. Take the following steps:
One-time setup in the project file (needs to be redone if
_projectis deleted):In the MSVC IDE, edit the project config settings for
nvigi/samples/nvigi.ragNavigate to the “Debugging” settings
Set “Command” to
<SDK_ROOT>/bin/x64/nvigi.rag.exeSet “Command Arguments” to
<SDK_MODELS> <text file>(use forward slashes in all cases)Set “Working Directory” to
<SDK_ROOT>/bin/x64
Build the desired non-production config of the SDK; Release is recommended (it is optimized, but contains symbols)
After each (re-)build, re-run
copy_sdk_binaries.bat <cfg>The sample can now be run in the debugger.
The Command-Line Reload Sample
The D3D12 model-reloading sample, nvigi.reload shows how a D3D12-based NVIGI application can manually load and unload models for D3D12 GGML-based plugins to/from VRAM. This allows an application to reclaim VRAM when inference is not in use, or to have two model instances ready to quickly swap in and out of VRAM as desired, avoiding having to choose between time-consuming load-from file and keeping multiple models in VRAM at once. It is automatically built as a part of the SDK build. It allows direct typing “to” an LLM as well as the ability to select when to switch models without reloading from file. It shows the current VRAM use along the way.
Because of the SDK layout, once the components are built they will be under the _artifacts tree; in order for the SDK to run an app like the sample, all of these DLLs and the executable must be in the same directory. We do this by copying the DLLs and EXE into the bin\x64 directory, and running the app from within that directory, so all plugins are available.
Normally, whether the plugins have been built from a binary, “standard layout” app developer pack or from GitHub source, this is done via the copy_sdk_binaries.bat, whose use is described in the base documentation for the binary app developer pack or GitHub README. The rest of this document assumes that the binaries are up to date and have been copied.
These instructions make reference to a set of directories; the location of these directories differ between binary app developer pack and GitHub source. The documentation for each of these define the locations for these directories in the particular use:
<SDK_ROOT>: the root of the SDK, which contains thebindirectory for the SDK<SDK_MODELS>: the root of the models tree for the SDK, normally nameddata/nvigi.models<SDK_TEST>: the root of the test data tree for the SDK, normally nameddata/nvigi.test
Download Required Models
The reload sample requires the following models:
Plugin |
Model Name |
GUID |
|---|---|---|
nvigi.plugin.gpt.ggml.* |
Llama3.2 3b Instruct |
01F43B70-CE23-42CA-9606-74E80C5ED0B6 |
nvigi.plugin.gpt.ggml.* |
Nemotron Mini 4B |
8E31808B-C182-4016-9ED8-64804FF5B40D |
See the top-level documentation that shipped with your development pack for information on how to download these models.
How to Use the Command-Line Reload Sample
When run, the sample should launch a console (or use the one from which it was run); it will await user input. The user may do one of three things at the prompt:
Type a chat query as text and press enter. This will be passed directly to the LLM and the LLM response printed.
Type an exit command; “Q”, “q” or “quit”. This will cause the sample to exit.
Type
<unload>and press enter. This will unload all loaded models.Type
<llama3>and press enter. This will load the Llama3.2 3b Instruct model if it is not already loaded, or switch to it if it is already loaded. It will unload the other modelType
<nemotron>and press enter. This will load the Nemotron Mini 4B model if it is not already loaded, or switch to it if it is already loaded. It will unload the other model
Run at Command Line
To run nvigi.reload from the command line, take the following steps (--models is a required argument):
Open a command prompt in
<SDK_ROOT>Run the command:
bin\x64\nvigi.reload.exe --models <SDK_MODELS>
In a standard layout binary development pack or GitHub source tree, launching from a current working directory of the
<SDK_ROOT>directory, this is:
bin\x64\nvigi.reload.exe --models data/nvigi.models
Here are the command line options:
Usage: nvigi.reload [options]

  -m, --models              model repo location (REQUIRED)
  -s, --sdk                 sdk location, (default: exe location)
  --vram                    the amount of vram to use in MB (default: 8192)
Run in Debugger
To run nvigi.reload in the debugger, we must ensure that all of the plugins and the nvigi.reload.exe app are copied into one directory, the SDK bin directory. Then, MSVC’s debugger must know to launch the copy, not the original, or it will not find the plugins. Take the following steps:
One-time setup in the project file (needs to be redone if
_projectis deleted):In the MSVC IDE, edit the project config settings for
nvigi/samples/nvigi.reloadNavigate to the “Debugging” settings
Set “Command” to
<SDK_ROOT>\bin\x64\nvigi.reload.exeSet “Command Arguments” as needed (see the command line options in the above section)
Set “Working Directory” to
<SDK_ROOT>/bin/x64
Build the desired non-production config of the SDK; Release is recommended (it is optimized, but contains symbols)
After each (re-)build, re-run
copy_sdk_binaries.bat <cfg>The sample can now be run in the debugger.