1. Install Jetson Software with SDK Manager
This section is intended to help you use the NVIDIA SDK Manager GUI to successfully configure your development environment.
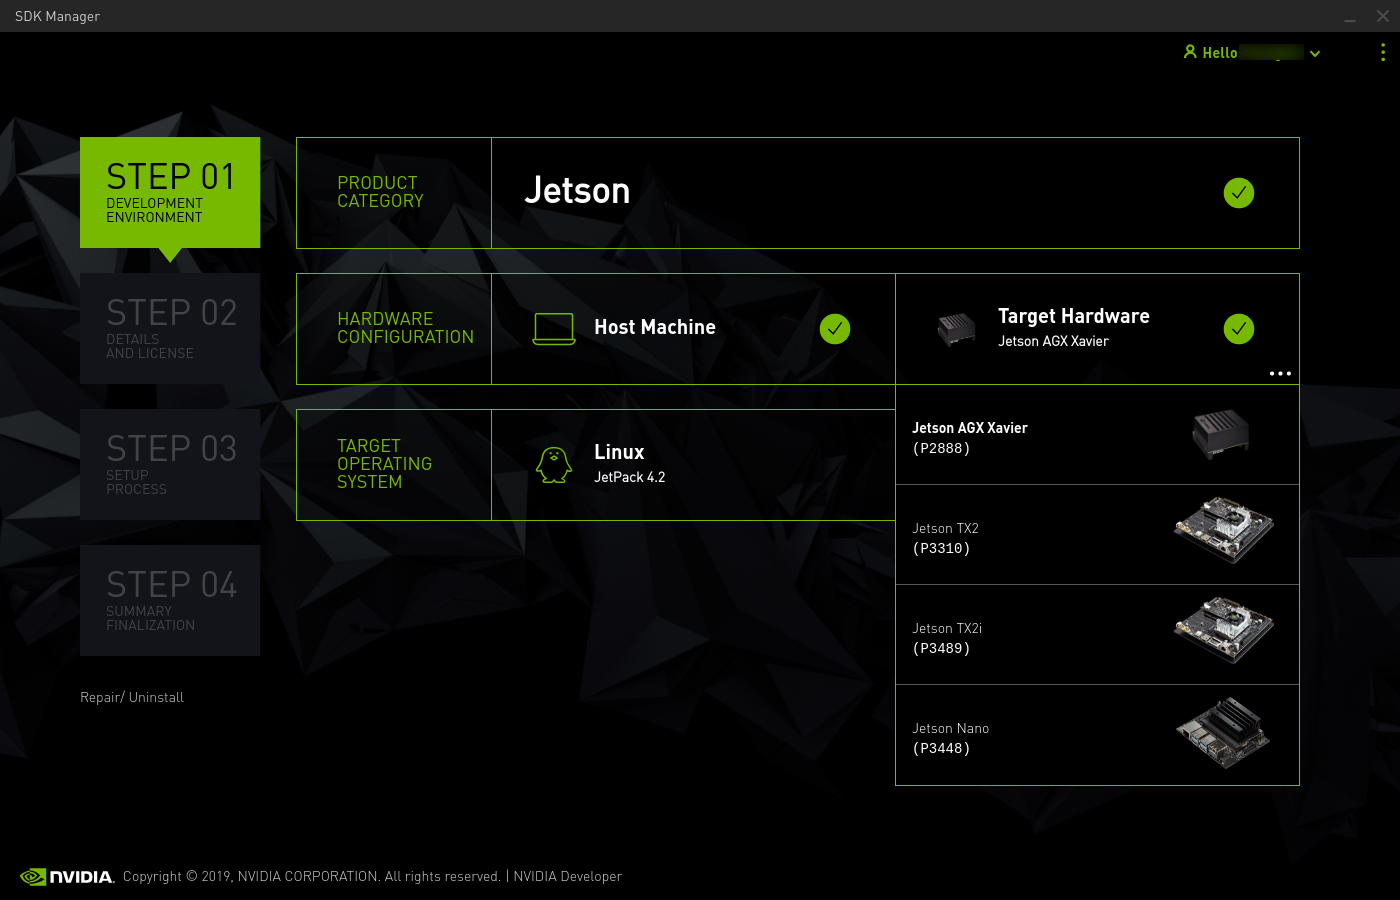
Step 1: Setup the Development Environment
-
From the Step 01 Development Environment window, select the following:
-
From the Product Category panel, select Jetson.
-
From the Hardware Configuration panel, select the host machine and target hardware.
-
From the Target Operating System panel, select the operating system and JetPack version.
An ellipsis (...) in the bottom right corner of a category box indicates that more than one option is available. Click on the ellipsis to show a drop-down menu of available options.
Note:
Your display may differ from the one shown here. The information in this screen is populated from your NVIDIA user account access and permissions. If you don't see your product category in the available selections, you may need to verify that your NVIDIA account is registered to the required programs.
-
-
Click Continue to proceed to the next step.
Step 2: Review Components and Accept Licenses
-
From Step 02 Details and License, you can expand the host components and target components panels to review the components that will be installed on your system.
-
To review the licenses, click on the license agreements hyperlink at the bottom of the page.
-
Enable the checkbox to accept the terms and conditions of the license agreements.
-
If you want SDK Manager to download all setup files to a location other than the default path, expand the Download & Install Options drop-down menu, then select the path you wish to use.

For more information about the Download & Install Options, see Offline Install.
-
Select Continue to proceed to the next step.
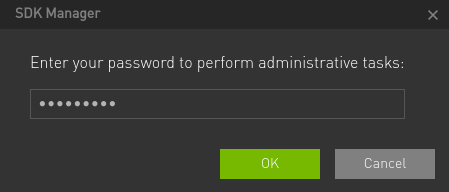
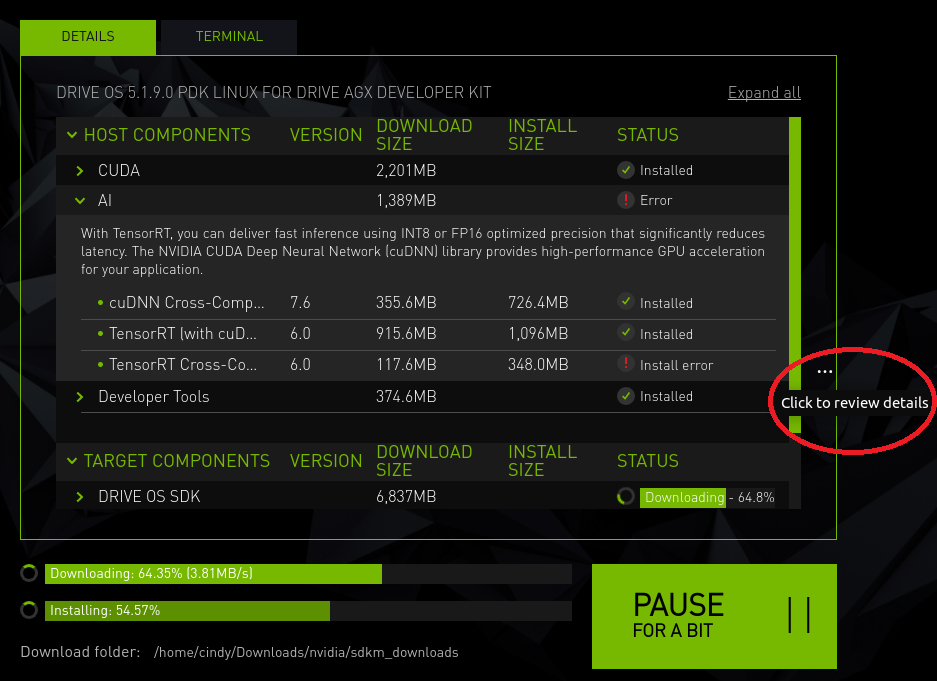
Step 3: Installation
-
Before the installation begins, SDK Manager prompts you to enter your sudo password.
-
The display shows the progress of the download and installation of the software.
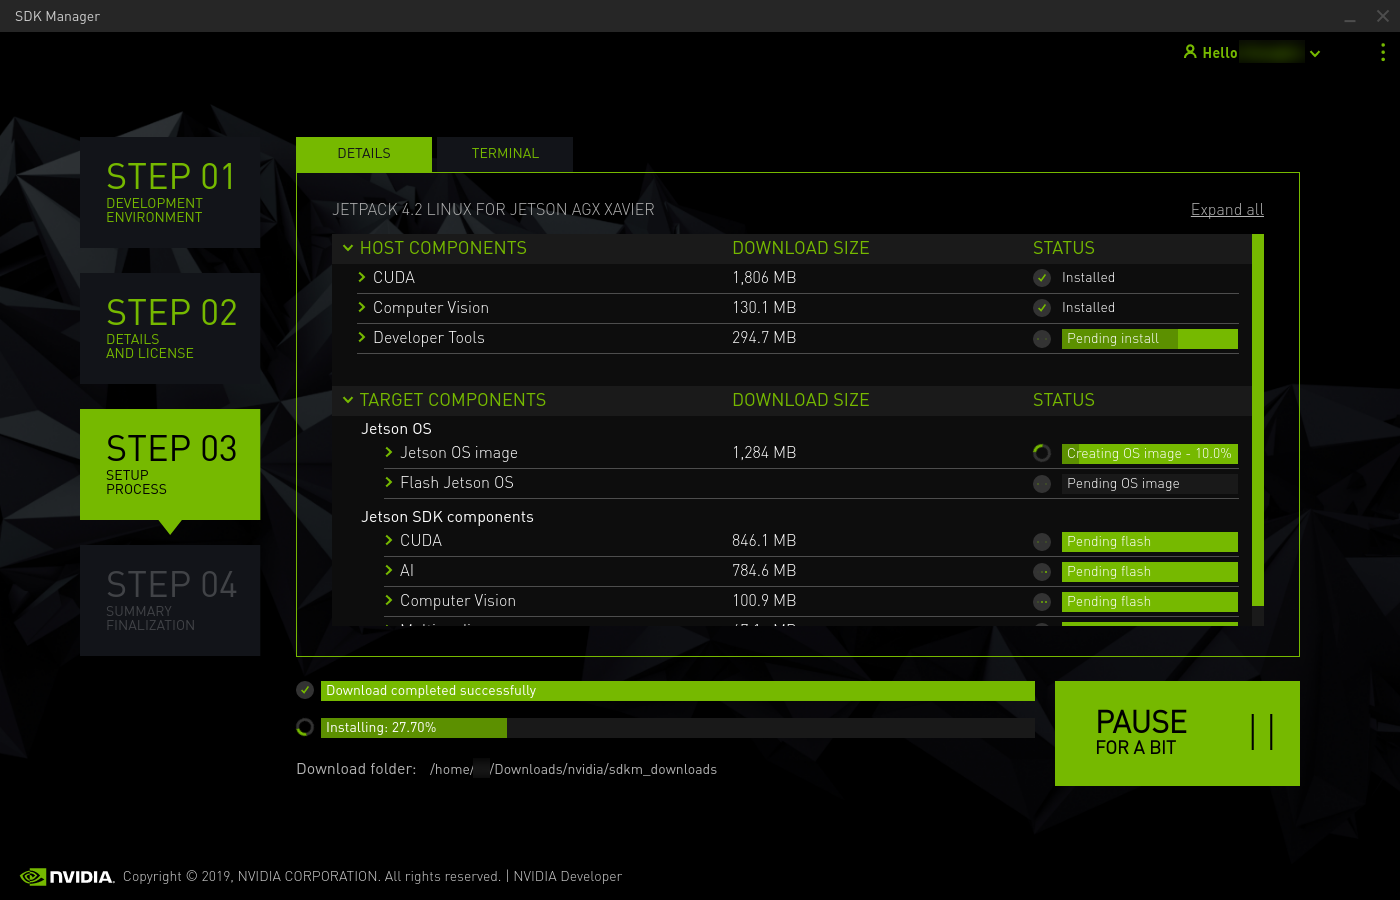
Select Pause / Resume to toggle the download and installation process.
-
At the top, you can toggle between the Details and Terminal tabs. The Terminal tab shows detailed information about the download and installation, with any errors highlighted.
-
On the Terminal tab, you can use the Filter text field to filter and search for specific information.
-
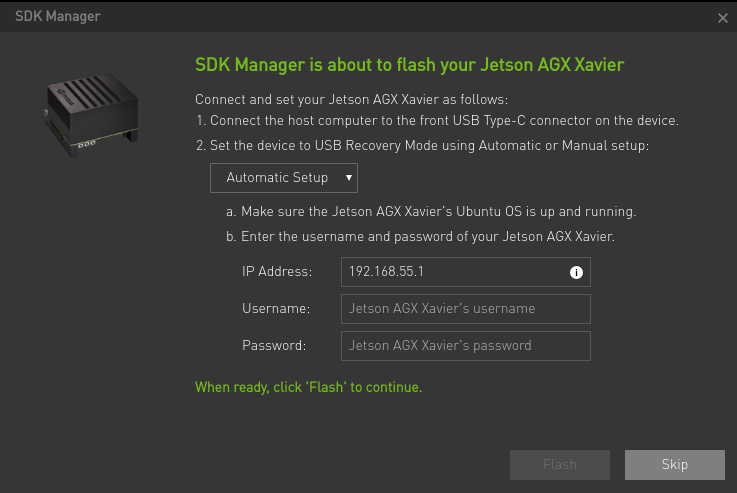
SDK Manager opens a dialog when it is ready to flash your target device. A prompt provides instructions for preparing your device to get it ready for flashing.
Note:
The instructions in the flashing dialog vary based on your host and target environment settings.
Note:
Jetson Nano Developer Kit users need to insert a microSD card into the slot on the underside of the Jetson Nano module, or else the flashing process will fail.
-
After SDK Manager completes the flashing process, the monitor connected to your Jetson system will show a prompt for initial setup.
-
As part of the initial setup process, select a username and password for the Jetson system.
-
After the initial setup process is complete, the Jetson system boots to the Linux desktop.
-
Enter the same username and password you created during the Jetson configuration into SDK Manager's post-flash installation dialog.
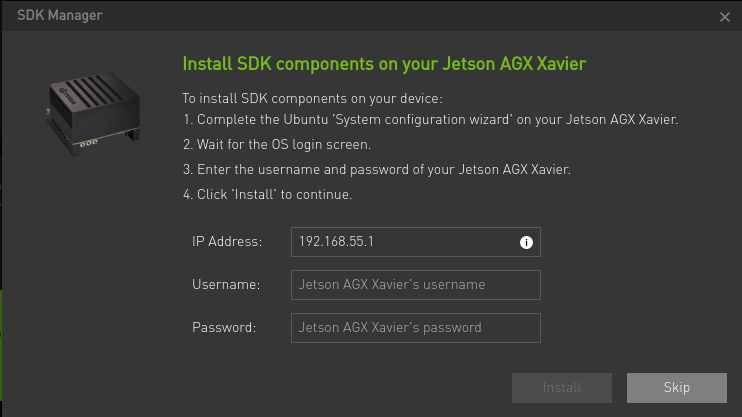
SDK Manager will now complete the installation of the software libraries. Skipping this step will not install any SDK components on your target hardware, and will keep a clean operating system on your device.
-
Step 4: Finalize Setup
-
From Step 04 Summary Finalization, there is a summary of the components that were installed, along with any warnings or errors that were encountered.
-
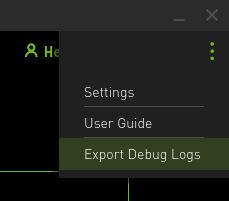
The Export Debug Logs link creates a ZIP file of all log files created during installation. This ZIP file is located in the same folder path where the SDK Manager installer downloaded all components.
Alternatively, click the menu icon in the top right corner of the window ("⋮"), and choose Export Debug Logs from the drop-down menu in the top-right corner.
-
Consult the Error Messages for information about any errors you may encounter.
-
Click Finish and Exit to complete the installation.
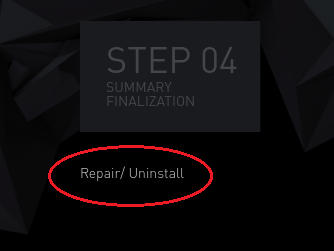
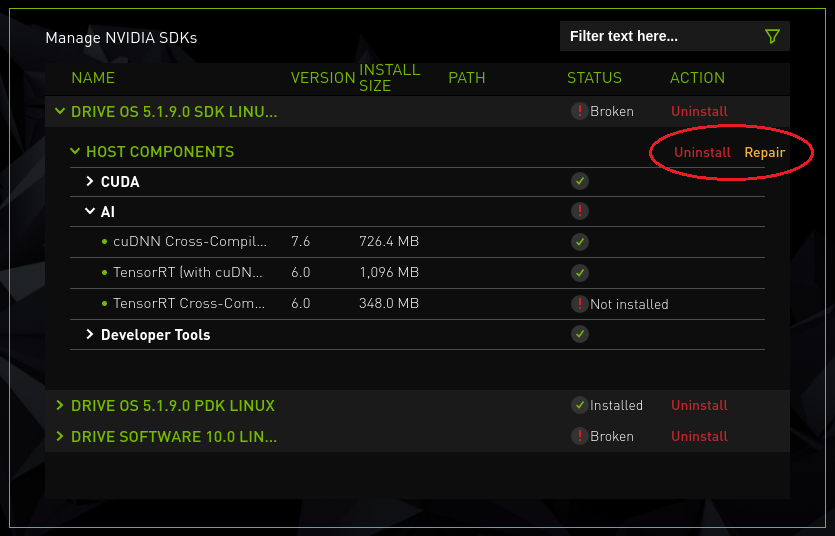
2. Repair and Uninstall
To update or uninstall an SDK on your system, launch SDK Manager again.
-
On Step 1, under the installation step numbers, click the Repair / Uninstall hyperlink.
-
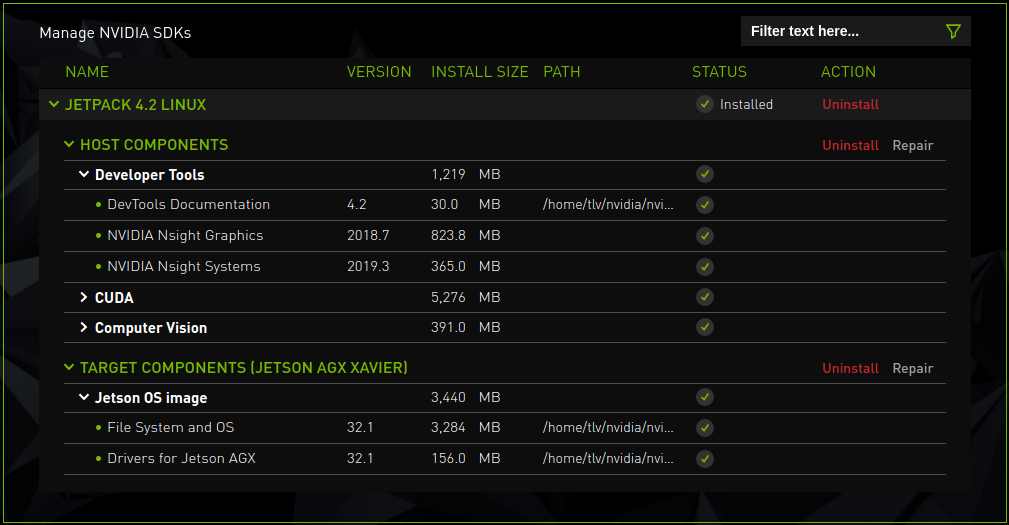
The Manage NVIDIA SDKs screen shows what has been installed on your system. You can select whether to repair a broken installation, update an existing SDK, or uninstall an SDK.
2.1. Recommended Recovery Steps
There are many causes of various installation errors. Below is a checklist of common installation issues, which may help you recover from a broken installation.
-
Review the summary table to identify which component failed.
-
Expand the group with the "Error" status.
-
When you find the failed component, click the ellipses (...) to the right of the Install Error icon to be redirected to the Terminal tab, which will display the exact error.
-
-
If the error is related to an environment issue, such as a broken apt repository or missing prerequisite, try to fix it manually, then click the Retry Failed Items button.

-
Retrying the installation is also available in two other ways:
-
Finally, try to uninstall and reinstall the relevant SDK.
Notices
Notice
THE INFORMATION IN THIS GUIDE AND ALL OTHER INFORMATION CONTAINED IN NVIDIA DOCUMENTATION REFERENCED IN THIS GUIDE IS PROVIDED “AS IS.” NVIDIA MAKES NO WARRANTIES, EXPRESSED, IMPLIED, STATUTORY, OR OTHERWISE WITH RESPECT TO THE INFORMATION FOR THE PRODUCT, AND EXPRESSLY DISCLAIMS ALL IMPLIED WARRANTIES OF NONINFRINGEMENT, MERCHANTABILITY, AND FITNESS FOR A PARTICULAR PURPOSE. Notwithstanding any damages that customer might incur for any reason whatsoever, NVIDIA’s aggregate and cumulative liability towards customer for the product described in this guide shall be limited in accordance with the NVIDIA terms and conditions of sale for the product.
THE NVIDIA PRODUCT DESCRIBED IN THIS GUIDE IS NOT FAULT TOLERANT AND IS NOT DESIGNED, MANUFACTURED OR INTENDED FOR USE IN CONNECTION WITH THE DESIGN, CONSTRUCTION, MAINTENANCE, AND/OR OPERATION OF ANY SYSTEM WHERE THE USE OR A FAILURE OF SUCH SYSTEM COULD RESULT IN A SITUATION THAT THREATENS THE SAFETY OF HUMAN LIFE OR SEVERE PHYSICAL HARM OR PROPERTY DAMAGE (INCLUDING, FOR EXAMPLE, USE IN CONNECTION WITH ANY NUCLEAR, AVIONICS, LIFE SUPPORT OR OTHER LIFE CRITICAL APPLICATION). NVIDIA EXPRESSLY DISCLAIMS ANY EXPRESS OR IMPLIED WARRANTY OF FITNESS FOR SUCH HIGH RISK USES. NVIDIA SHALL NOT BE LIABLE TO CUSTOMER OR ANY THIRD PARTY, IN WHOLE OR IN PART, FOR ANY CLAIMS OR DAMAGES ARISING FROM SUCH HIGH RISK USES.
NVIDIA makes no representation or warranty that the product described in this guide will be suitable for any specified use without further testing or modification. Testing of all parameters of each product is not necessarily performed by NVIDIA. It is customer’s sole responsibility to ensure the product is suitable and fit for the application planned by customer and to do the necessary testing for the application in order to avoid a default of the application or the product. Weaknesses in customer’s product designs may affect the quality and reliability of the NVIDIA product and may result in additional or different conditions and/or requirements beyond those contained in this guide. NVIDIA does not accept any liability related to any default, damage, costs or problem which may be based on or attributable to: (i) the use of the NVIDIA product in any manner that is contrary to this guide, or (ii) customer product designs.
Other than the right for customer to use the information in this guide with the product, no other license, either expressed or implied, is hereby granted by NVIDIA under this guide. Reproduction of information in this guide is permissible only if reproduction is approved by NVIDIA in writing, is reproduced without alteration, and is accompanied by all associated conditions, limitations, and notices.
Trademarks
NVIDIA, the NVIDIA logo, and cuBLAS, CUDA, CUDA-GDB, CUDA-MEMCHECK, cuDNN, cuFFT, cuSPARSE, DIGITS, DGX, DGX-1, DGX Station, NVIDIA DRIVE, NVIDIA DRIVE AGX, NVIDIA DRIVE Software, NVIDIA DRIVE OS, NVIDIA Developer Zone (aka "DevZone"), GRID, Jetson, NVIDIA Jetson Nano, NVIDIA Jetson AGX Xavier, NVIDIA Jetson TX2, NVIDIA Jetson TX2i, NVIDIA Jetson TX1, NVIDIA Jetson TK1, Kepler, NGX, NVIDIA GPU Cloud, Maxwell, Multimedia API, NCCL, NVIDIA Nsight Compute, NVIDIA Nsight Eclipse Edition, NVIDIA Nsight Graphics, NVIDIA Nsight Systems, NVLink, nvprof, Pascal, NVIDIA SDK Manager, Tegra, TensorRT, Tesla, Visual Profiler, VisionWorks and Volta are trademarks and/or registered trademarks of NVIDIA Corporation in the United States and other countries. Other company and product names may be trademarks of the respective companies with which they are associated.