Install RAPIDS SDK with SDK Manager#
This section is intended to help you use the NVIDIA SDK Manager GUI to configure your development environment successfully.
Note
For comprehensive RAPIDS documentation – including installation guides, API references, deployment strategies, and developer resources – refer to the RAPIDS Documentation Portal.
For Windows users, NVIDIA SDK Manager 2.3.0 introduces a Windows client that automates Windows Subsystem for Linux (WSL) setup for RAPIDS SDK 25.04 and later, simplifying the installation process.
Previously, Windows users had to manually set up WSL, run the Linux version of SDK Manager inside it, then use SDK Manager to install RAPIDS SDK. Now, Windows clients automatically set up the WSL instance and then install RAPIDS SDK within it.
Important
Windows users need to make sure an updated GPU driver is installed prior to SDK Manager installation.
Note
For known installation issues when installing RAPIDS SDK via SDK Manager, refer to RAPIDS known issues.
GPU Prerequisites on Windows#
GPU Requirements#
GPUs with Compute Capability 7.0 or higher (16GB + GPU RAM) are recommended.
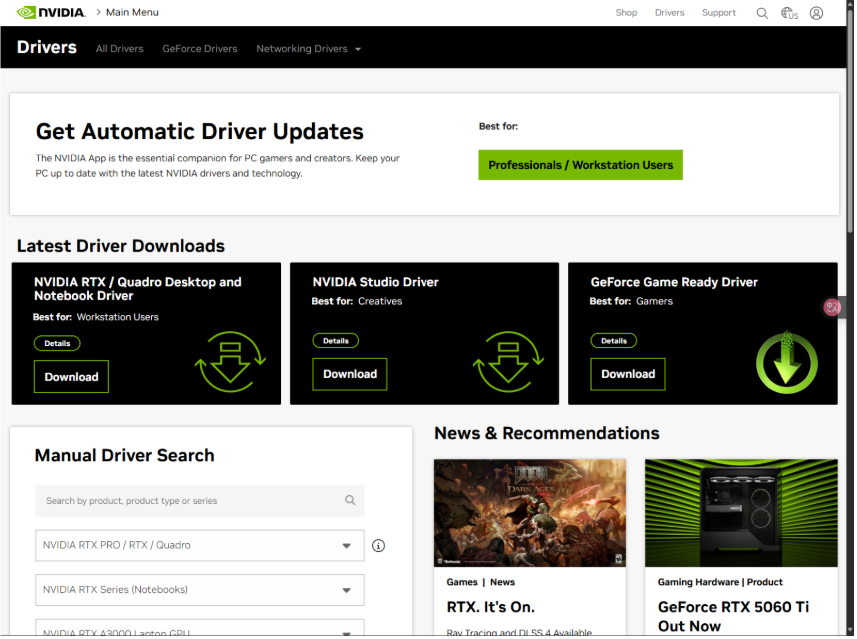
GPU Driver Installation#
Install GPU drivers from NVIDIA Drivers.
There are three GPU driver installation options:
Automatic Driver Updates – Let the system find and install the latest compatible driver.
Latest Driver Downloads – Manually select the most recent driver for your specific GPU model.
Manual Driver Search – Browse and choose from previous driver versions.
Select your preferred installation method to proceed.
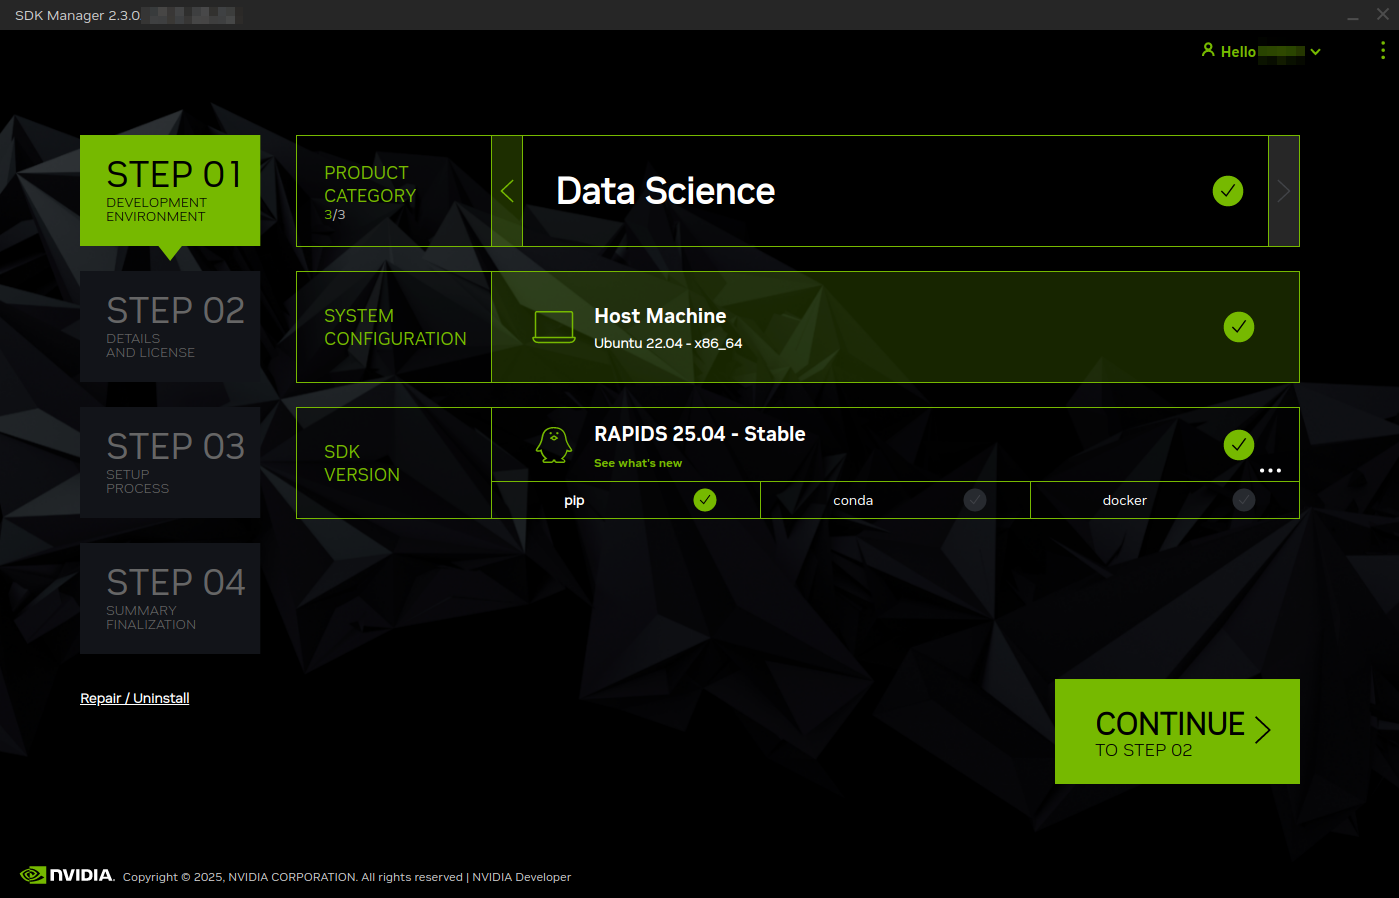
STEP 01: Set Up the Development Environment#
From the STEP 01 Development Environment window, select the following:
From the Product Category panel, select Data Science.
From the SDK Version panel, select the RAPIDS software version and select the installation method: PIP, Conda, or Docker.
Note
You must select only one installation method.
To switch methods (e.g., from PIP to Conda):
First uninstall the existing installation method.
Return to STEP 01 and select your preferred new method.
An ellipsis (…) in the bottom right corner of a category box indicates that more than one option is available. Click on the ellipsis to show a drop-down menu of available options.
Note
Your display may differ from the one shown here. The information in this screen is populated from your NVIDIA user account access and permissions. If you don’t see your product category in the available selections, verify that your NVIDIA account is registered to the required programs.
Click Continue to proceed to the next step.
STEP 02: Review Components and Accept Licenses#
From STEP 02 Details and License, you can expand the host components and target components panels to review the components that will be installed on your system and select/deselect them.
To review the licenses, click on the license agreements hyperlink at the bottom of the page.
Enable the checkbox to accept the terms and conditions of the license agreements.
If you want SDK Manager to download all setup files to a location other than the default path, go to the Download folder located at the bottom of the screen, then update the path you want to use.

Select or deselect RAPIDS components in the UI.
As an example with the Docker installation, you can choose one or more containers, including the following:
Docker Base – contains a RAPIDS environment ready for use. Best for integration as part of a workflow pipeline.
Docker Notebooks – extends the rapidsai/base image by adding a jupyterlab server, example notebooks, and dependencies. Best for daily work, prototyping, and exploring RAPIDS through notebooks and examples.
RAPIDS + PyTorch – combines NVIDIA’s RAPIDS libraries (cuDF, cuML, etc.) with PyTorch, enabling seamless GPU-accelerated data preprocessing and Deep Learning workflows.
RAPIDS + TensorFlow – combines NVIDIA’s RAPIDS libraries (cuDF, cuML, etc.) with TensorFlow, enabling high-performance end-to-end GPU workflows – from data preprocessing to Deep Learning model training.
Select Continue to proceed to the next step.
STEP 03: Installation#
Linux users: Before the installation begins, SDK Manager prompts you to enter your
sudopassword.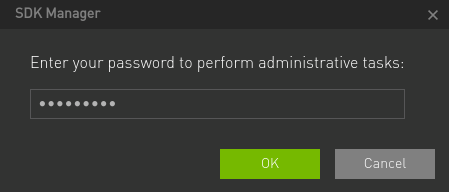
Windows users: SDK Manager checks your GPU driver readiness before the installation begins. If it doesn’t meet GPU and driver requirements, a dialog appears with instructions to resolve this issue.
Refer to GPU Driver Installation to install the driver. After completion, click Retry to rerun the check.
Note
Skipping the GPU driver check may allow installation to complete, but it will cause runtime failures for GPU-dependent applications.

The display shows the progress of the download and installation of the software.
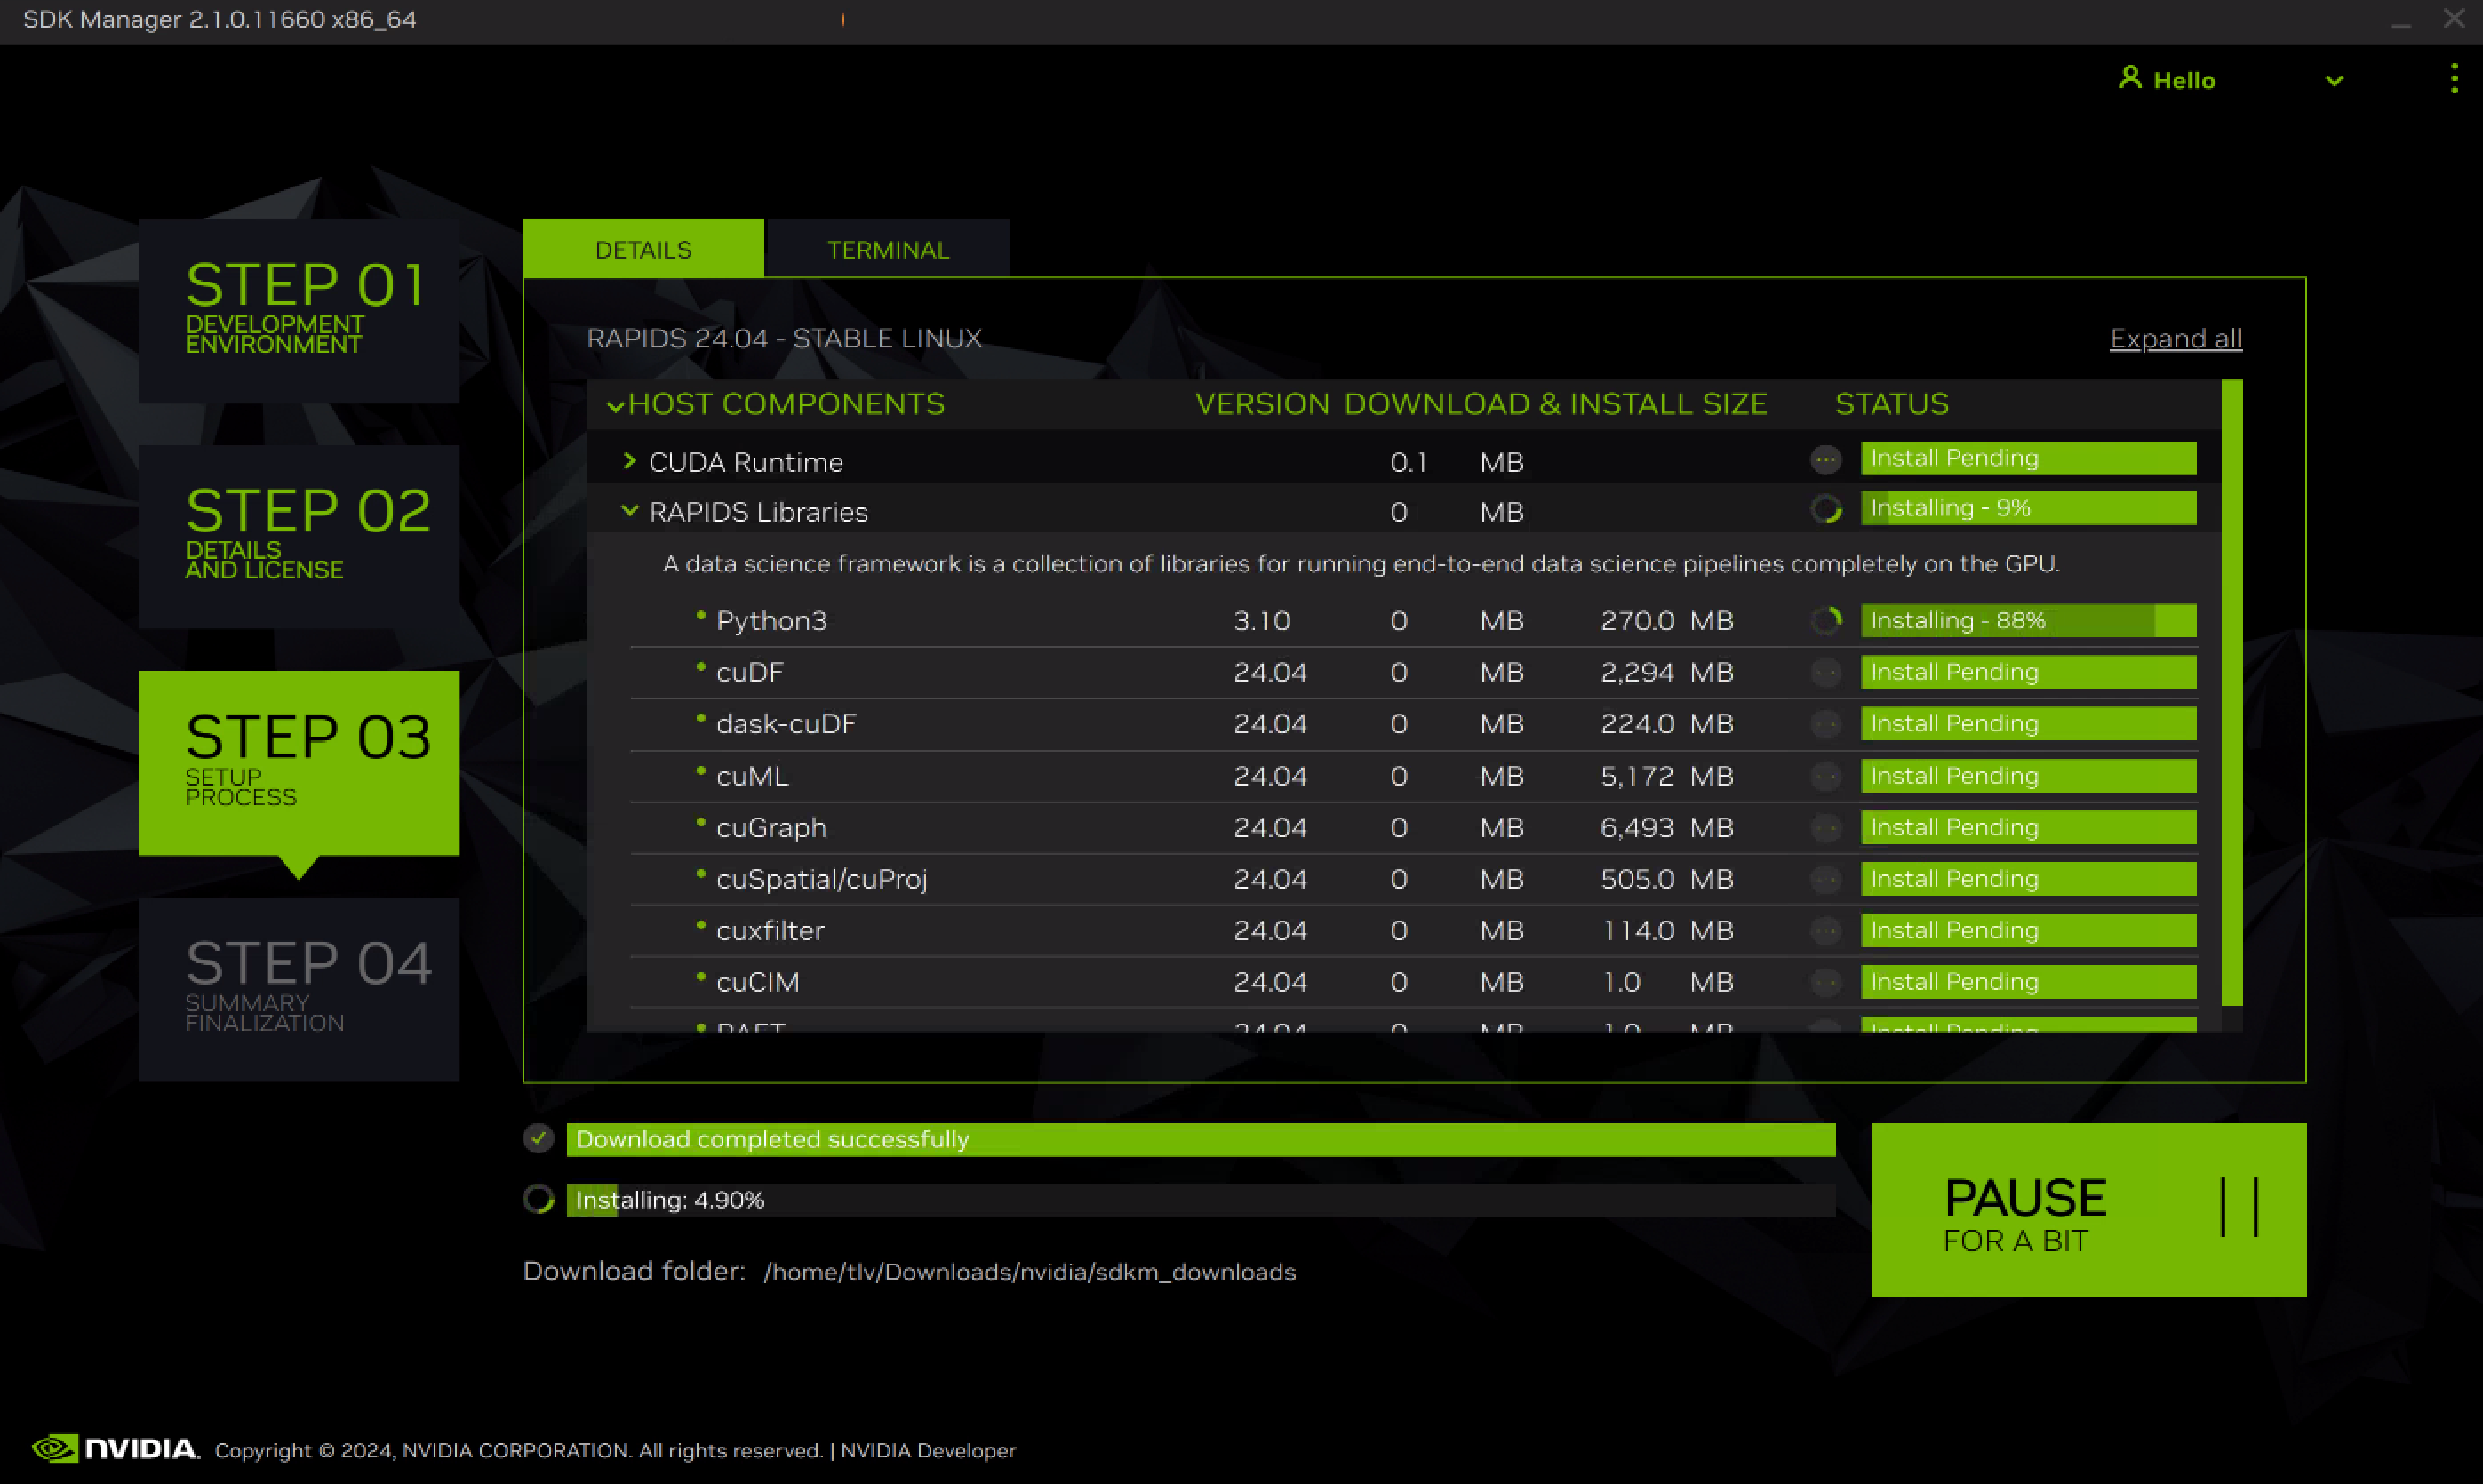
Select Pause / Resume to toggle the download and installation process.
At the top, you can toggle between the Details and Terminal tabs. The Terminal tab displays detailed information about the download and installation, with any errors highlighted.
On the Terminal tab, you can use the Filter text field to filter and search for specific information.
STEP 04: Finalize Setup#
From STEP 04 Summary Finalization, there is a summary of the components that were installed, along with any warnings or errors that were encountered.
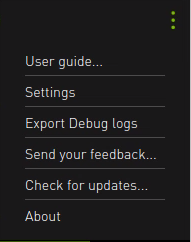
The Export Debug Logs link creates a ZIP file of all log files created during installation. This ZIP file is located in the same folder path where the SDK Manager installer downloaded all components.
Alternatively, click the menu icon in the top right corner of the window (”⋮”), and choose Export Debug Logs from the drop-down menu in the top-right corner.
Consult the Error Messages for information about any errors you may encounter.
Click Finish and Exit to complete the installation.
For Windows users: After installation, two desktop shortcuts will be created if you selected either the PIP or Conda installation method.
Launch RAPIDS WSL Python Console
Launch RAPIDS WSL2 JupyterLab
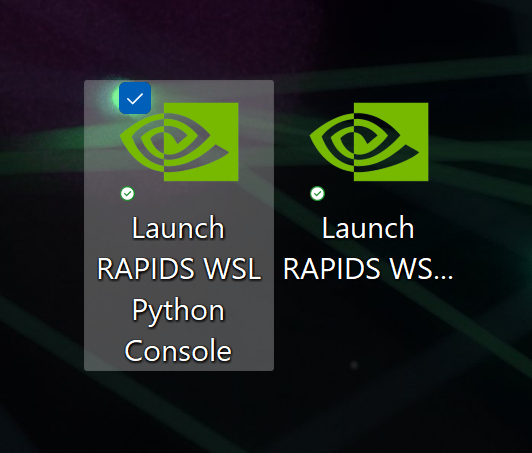
Using the shortcuts:
Python console: Double-click Launch RAPIDS WSL Python Console to open the interactive Python environment with RAPIDS pre-configured.
Example: Run
import cudfto import the cuDF library.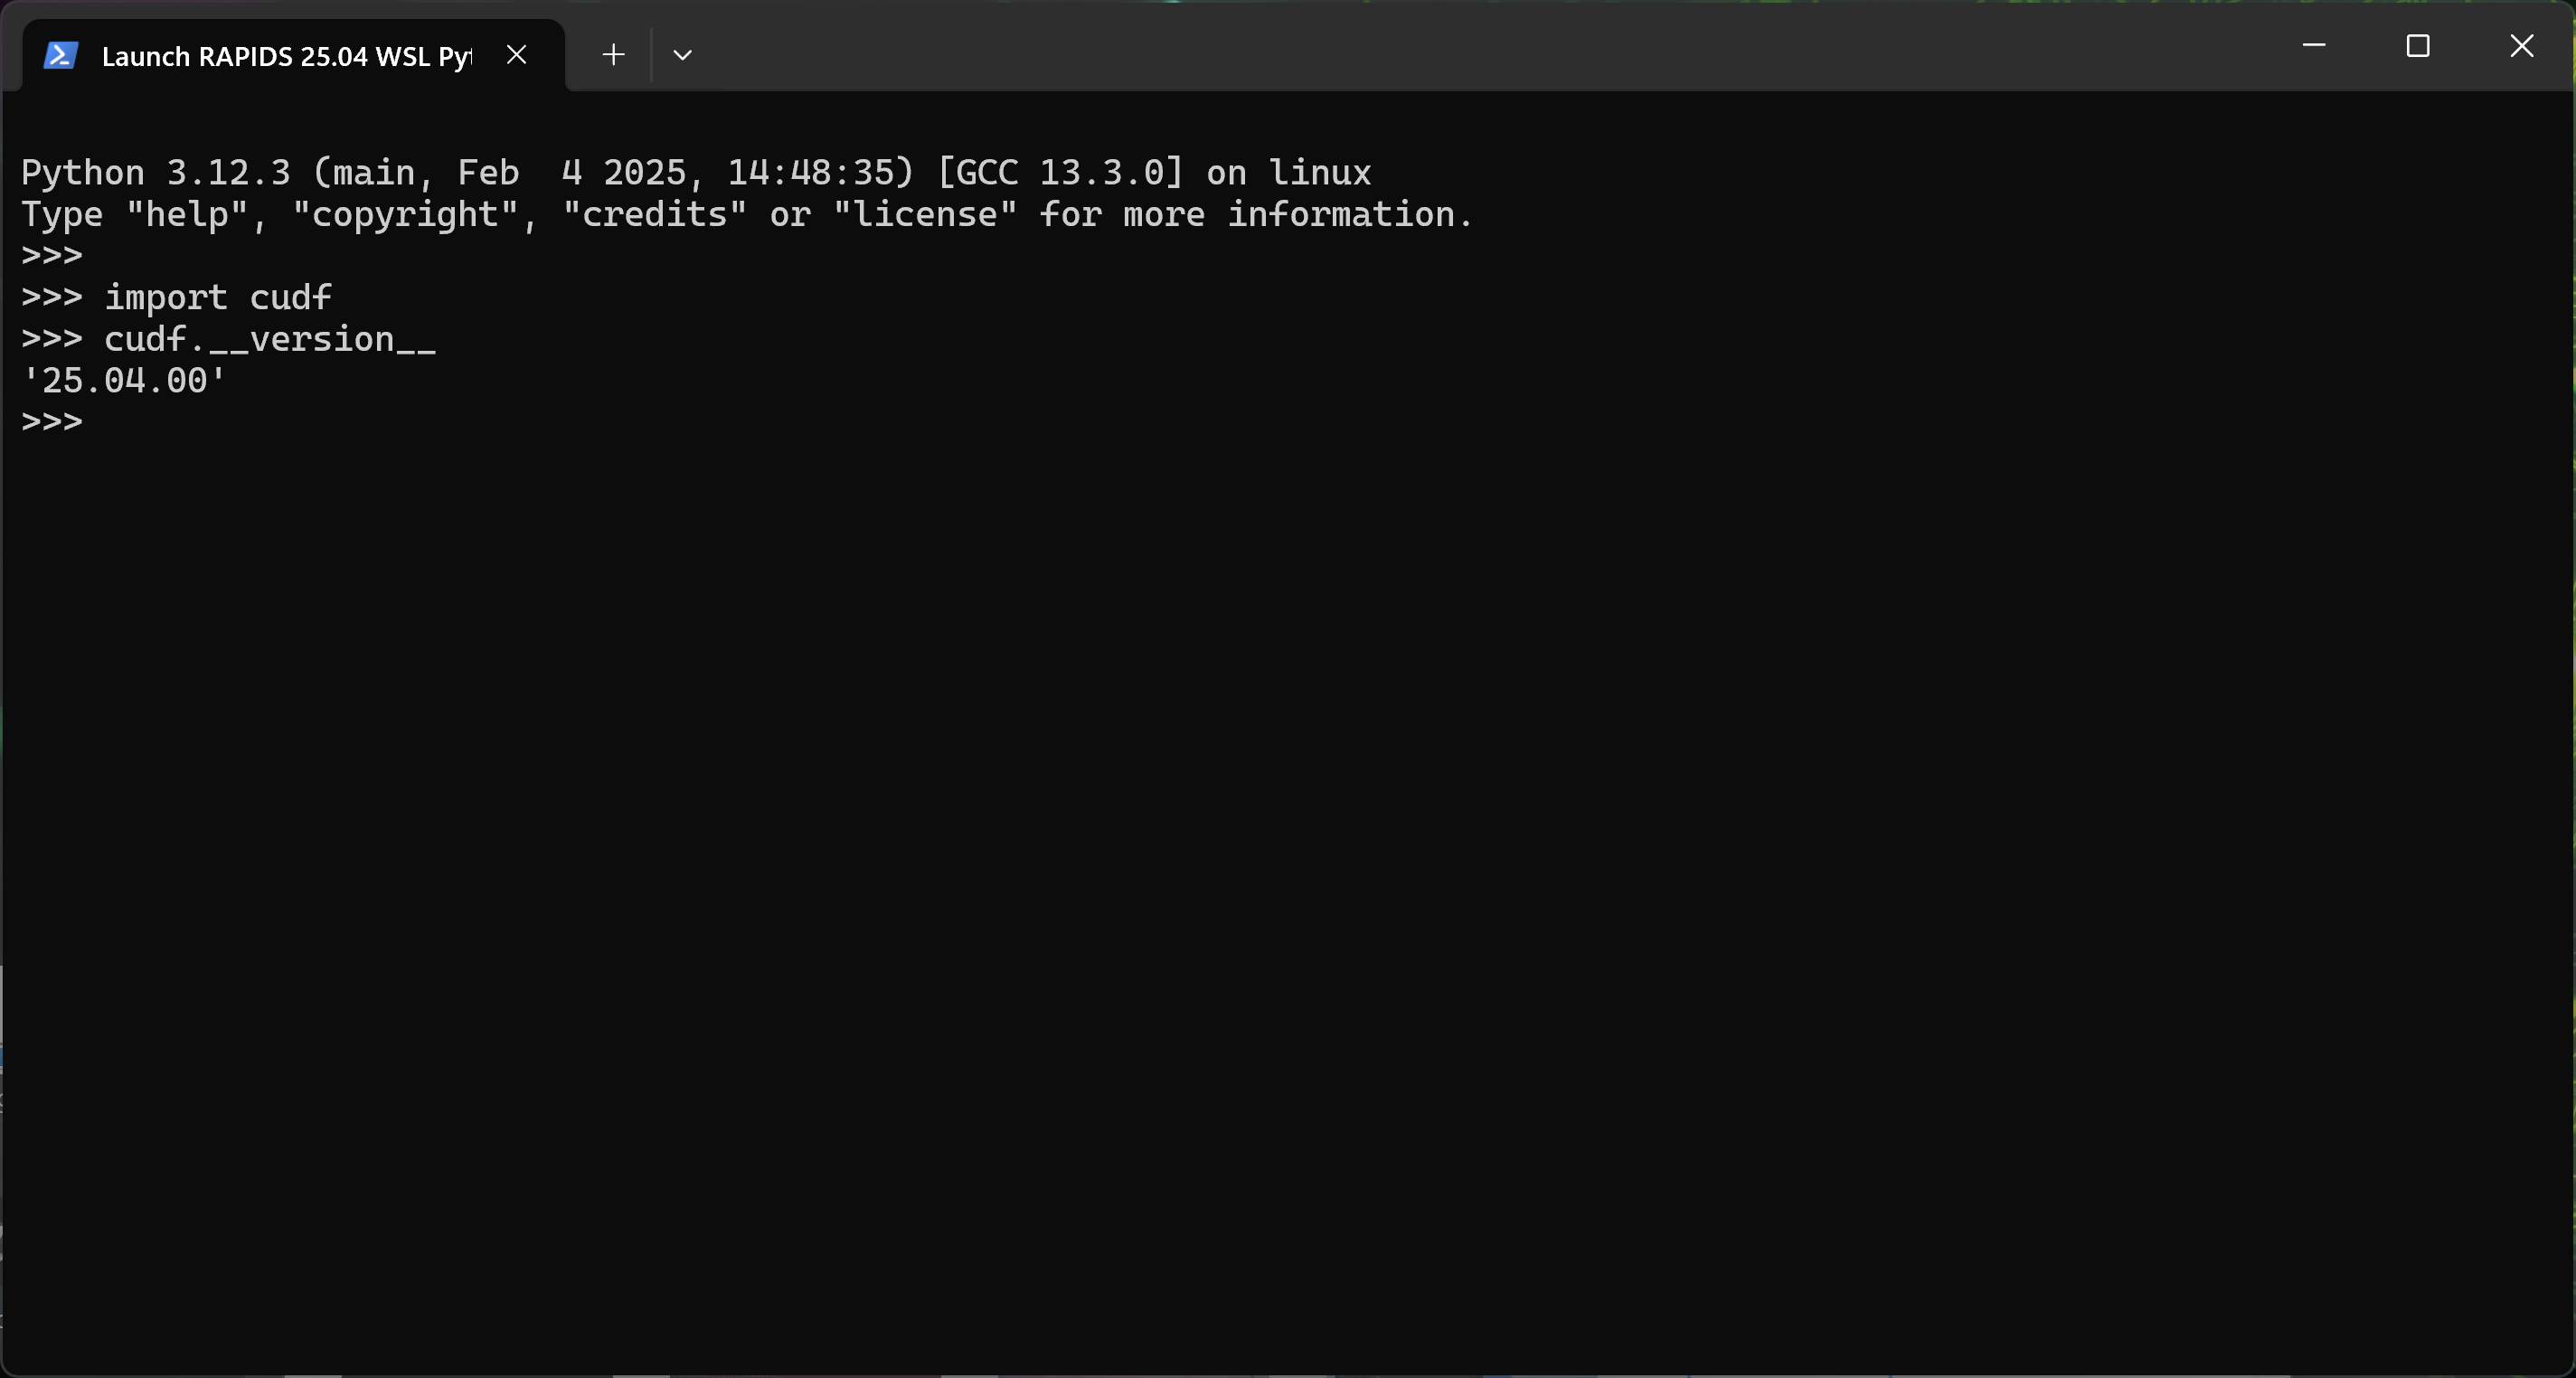
JupyterLab: Double-click Launch RAPIDS WSL2 JupyterLab to start the JupyterLab server in your default browser.

For RAPIDS 25.04 Windows users: If you selected the Docker installation method, there is no desktop shortcut created. This will be added in a future release.
Here is the example of how to create a desktop shortcut for notebooks:
$winDocsPath = [System.Environment]::GetFolderPath('MyDocuments')
$driveLetter = $winDocsPath.Substring(0,1).ToLower()
$unixPath = $winDocsPath.Substring(2).Replace('\','/')
$wslDocsPath = "/mnt/$driveLetter$unixPath"
wsl -e bash -c "docker run --user root --gpus all --rm -it --shm-size=1g --ulimit memlock=-1 -p 8888:8888 -p 8787:8787 -p 8786:8786 -v '$wslDocsPath':/home/rapids/notebooks/extra nvcr.io/nvidia/rapidsai/notebooks:25.04-cuda12.8-py3.12 jupyter-lab --notebook-dir=/home/rapids/notebooks --ip=0.0.0.0 --no-browser --NotebookApp.token='' --NotebookApp.allow_origin='*' --allow-root"
In this case, 25.04 is the RAPIDS installed version and
-vis a volumized folder that shortcuts to the RAPIDS notebooks folder, so they have the example notebooks ready for them.
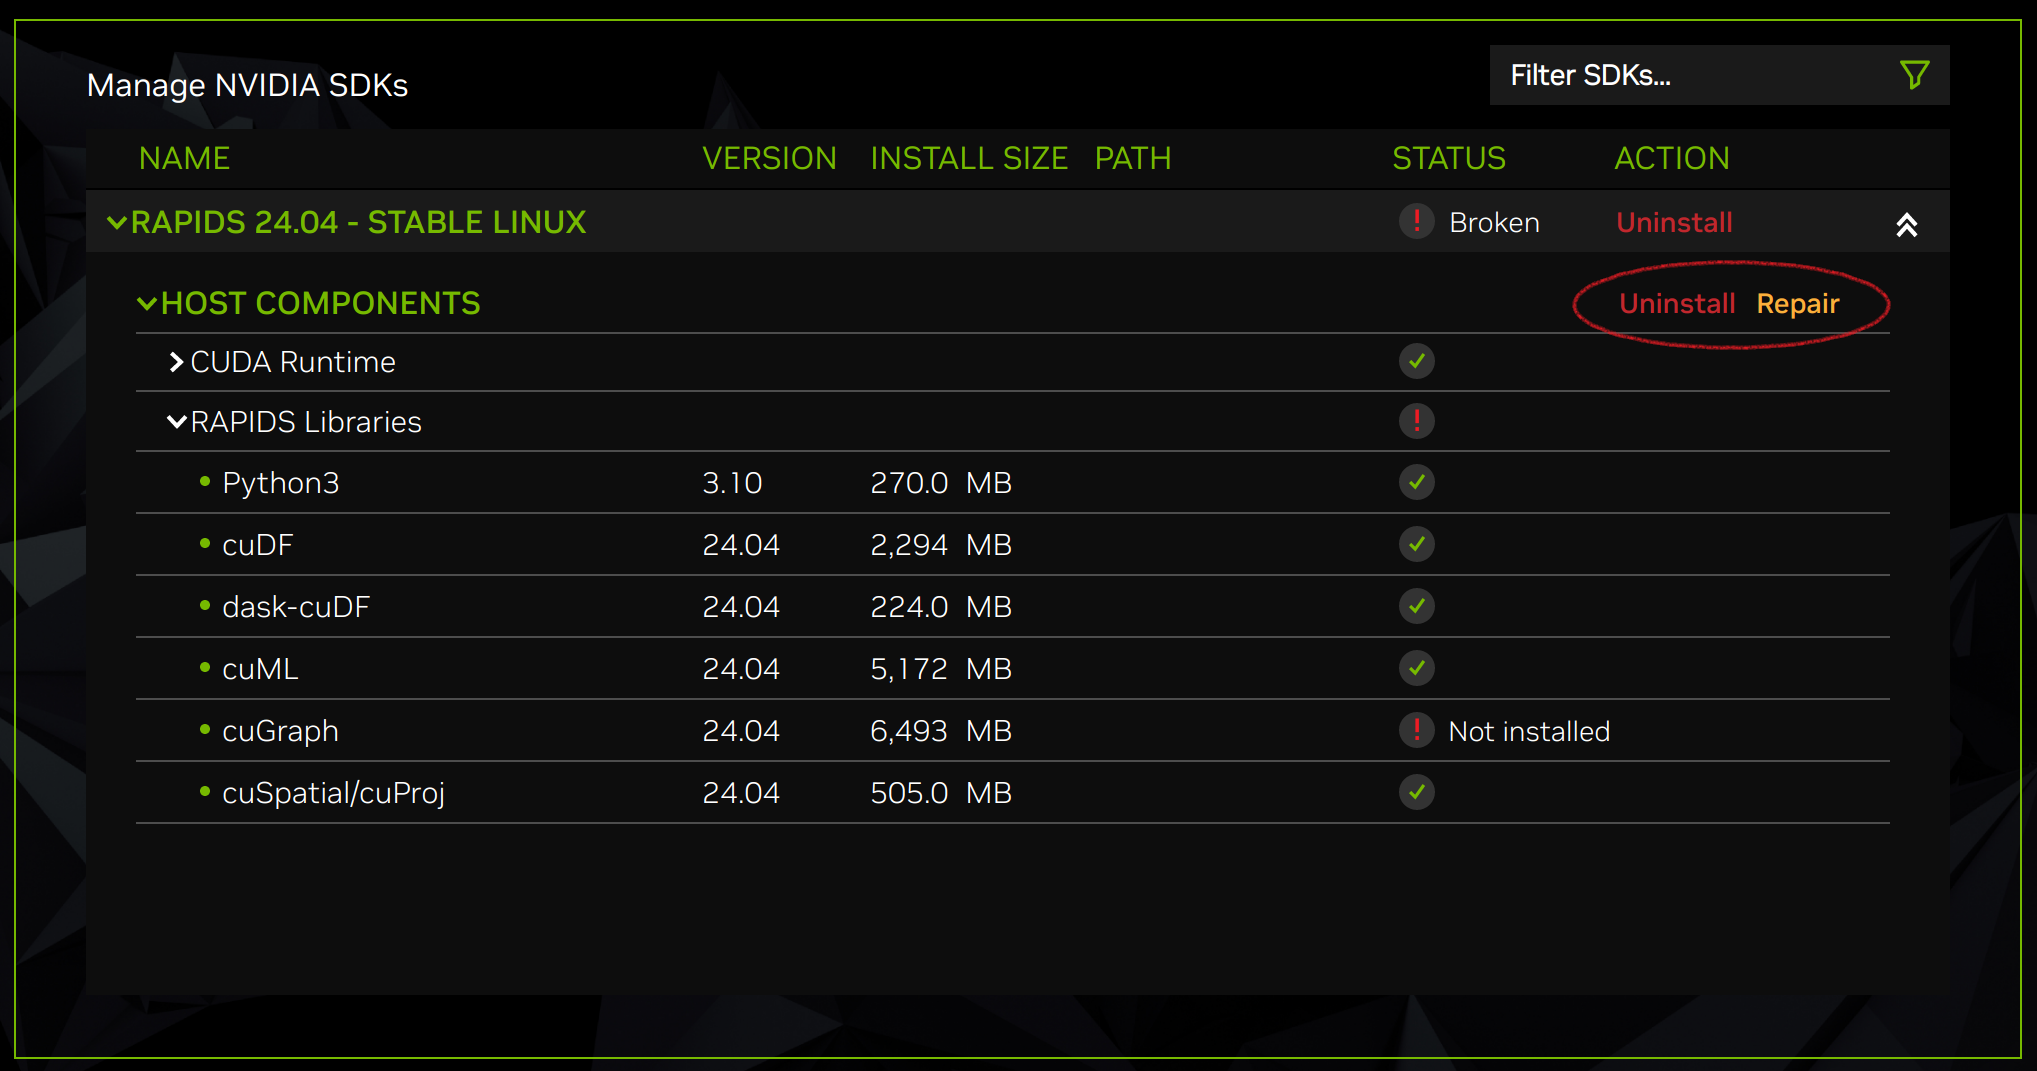
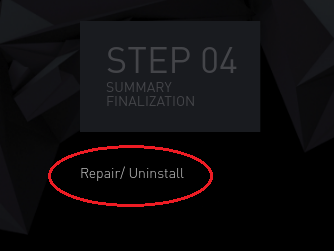
Repair and Uninstall#
To repair or uninstall an SDK on your system, launch SDK Manager again.
On Step 01, under the installation step numbers, click the Repair/Uninstall hyperlink.
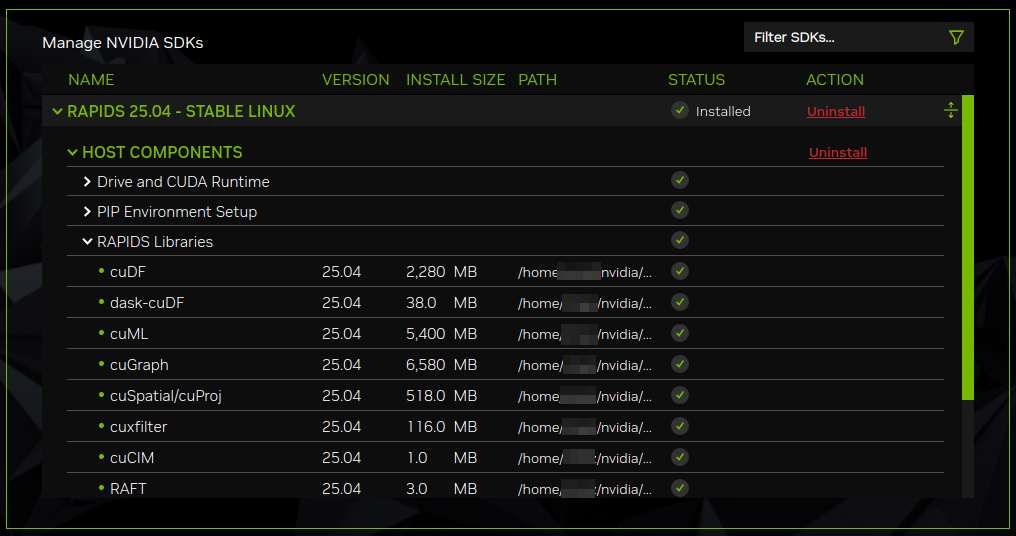
The Manage NVIDIA SDKs screen shows what has been installed on your system. You can select whether to repair a broken installation or uninstall an SDK.
Recommended Recovery Steps#
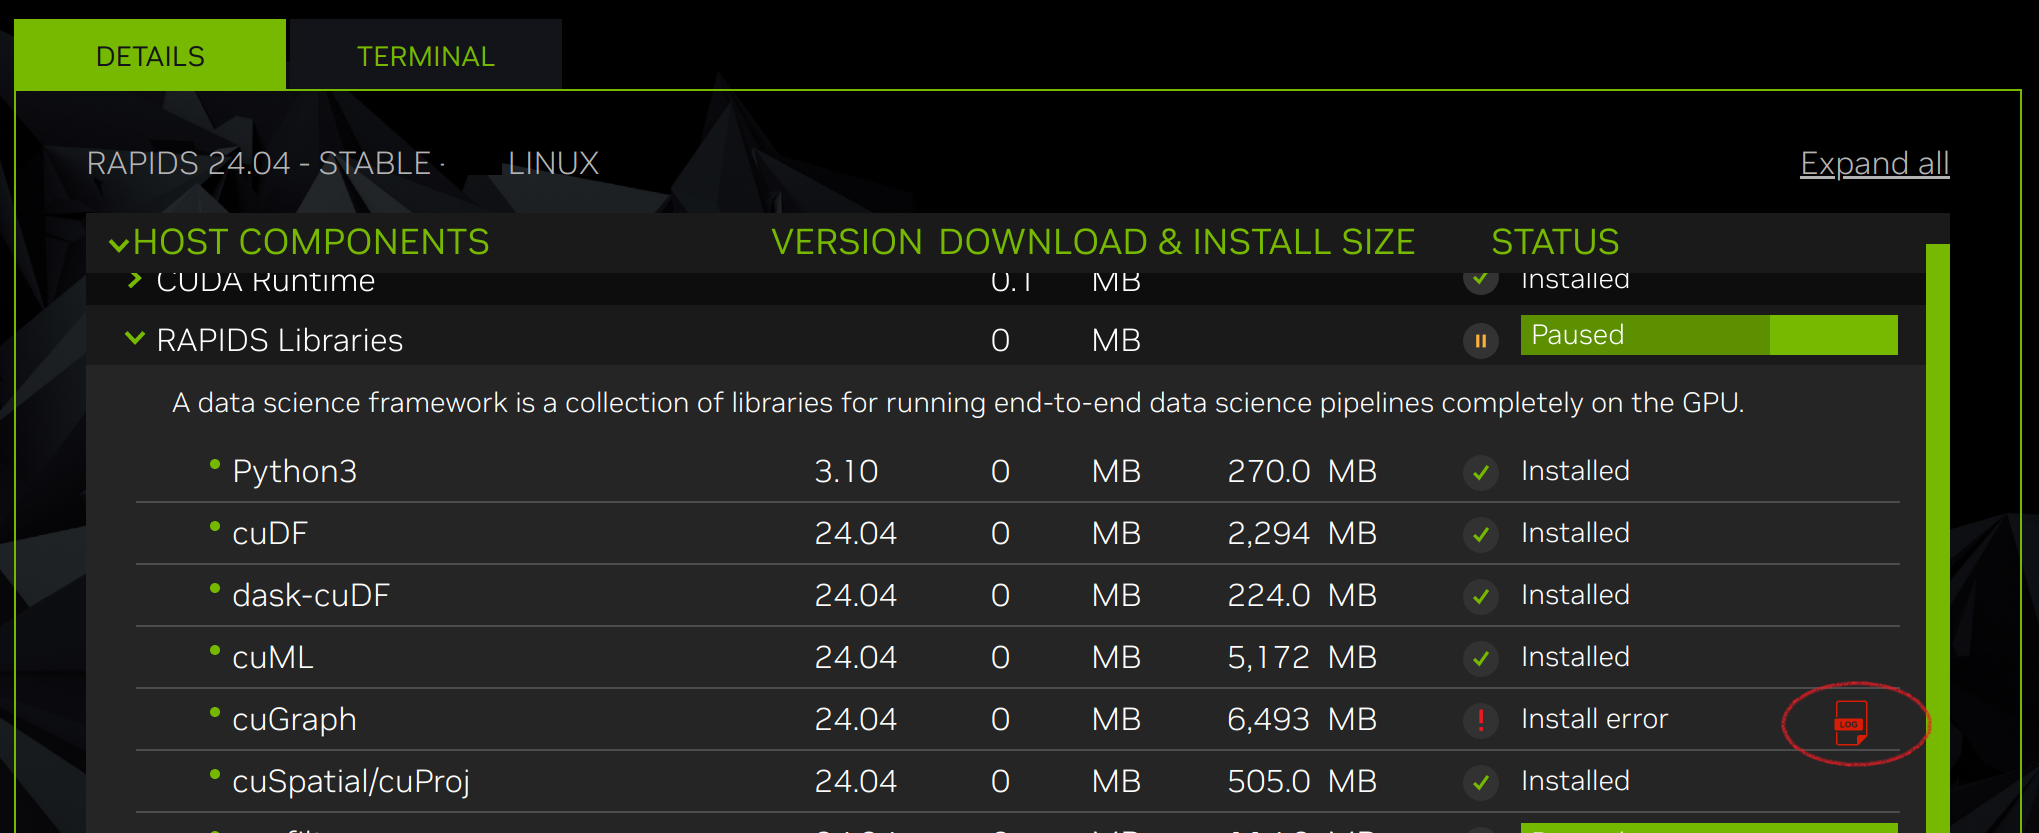
There are many causes of various installation errors. Below is a checklist of common installation issues, which may help you recover from a broken installation.
Review the summary table to identify which component failed.
Expand the group with the “Error” status.
When you find the failed component, click the details icon to the right of Install Error to be redirected to the Terminal tab, which will display the exact error.
If the error is related to an environmental issue, such as a broken apt repository or missing prerequisite, try to fix it manually, then click the Retry Failed Items button.

Retrying the installation is also available in two other ways:
Finally, try to uninstall and reinstall the relevant SDK.