RAPIDS Shuffle Manager#
The RAPIDS Shuffle Manager is an implementation of the ShuffleManager interface in Apache Spark that allows custom mechanisms to exchange shuffle data. We currently expose two modes of operation: Multi Threaded and UCX.
In Spark, shuffle managers are configured via the spark.shuffle.manager configuration variable. The following table shows the appropriate configuration to use for each Spark version supported in our plugin:
Spark Shim |
spark.shuffle.manager value |
|---|---|
3.2.0 |
com.nvidia.spark.rapids.spark320.RapidsShuffleManager |
3.2.1 |
com.nvidia.spark.rapids.spark321.RapidsShuffleManager |
3.2.1 CDH |
com.nvidia.spark.rapids.spark321cdh.RapidsShuffleManager |
3.2.2 |
com.nvidia.spark.rapids.spark322.RapidsShuffleManager |
3.2.3 |
com.nvidia.spark.rapids.spark323.RapidsShuffleManager |
3.2.4 |
com.nvidia.spark.rapids.spark324.RapidsShuffleManager |
3.3.0 |
com.nvidia.spark.rapids.spark330.RapidsShuffleManager |
3.3.1 |
com.nvidia.spark.rapids.spark331.RapidsShuffleManager |
3.3.2 |
com.nvidia.spark.rapids.spark332.RapidsShuffleManager |
3.3.3 |
com.nvidia.spark.rapids.spark333.RapidsShuffleManager |
3.4.0 |
com.nvidia.spark.rapids.spark340.RapidsShuffleManager |
3.4.1 |
com.nvidia.spark.rapids.spark341.RapidsShuffleManager |
3.5.0 |
com.nvidia.spark.rapids.spark350.RapidsShuffleManager |
Databricks 10.4 |
com.nvidia.spark.rapids.spark321db.RapidsShuffleManager |
Databricks 11.3 |
com.nvidia.spark.rapids.spark330db.RapidsShuffleManager |
Databricks 12.2 |
com.nvidia.spark.rapids.spark332db.RapidsShuffleManager |
Multi-Threaded Mode#
Multi-threaded mode (default) is similar to the built-in Spark shuffle, but it attempts to use more CPU threads for compute-intensive tasks, such as compression and decompression.
The multi-threaded shuffle writer targets the “BypassMergeSortShuffle” shuffle algorithm in Spark, which is the default when spark.shuffle.partitions is 200 or less.
The shuffle reader is a single implementation irrespective of the number of partitions. To turn off multi-threaded reader entirely, set spark.rapids.shuffle.multiThreaded.reader.threads to zero.
Minimum configuration:
1--conf spark.shuffle.manager=com.nvidia.spark.rapids.[shim package].RapidsShuffleManager \
2--conf spark.driver.extraClassPath=${SPARK_RAPIDS_PLUGIN_JAR} \
3--conf spark.executor.extraClassPath=${SPARK_RAPIDS_PLUGIN_JAR}
By default, a thread pool of 20 threads is used for shuffle writes and reads. This configuration can be independently changed for writers and readers using: spark.rapids.shuffle.multiThreaded.[writer|reader].threads. An appropriate value for these pools is the number of cores in the system divided by the number of executors per machine.
On the reader side, when blocks are received from the network, they are queued onto these threads for decompression and decode. The amount of bytes we allow in flight per Spark task is controlled by: spark.rapids.shuffle.multiThreaded.maxBytesInFlight, and it is set to 128MB-per-task as a default. Note that this memory comes from the Netty off-heap pool, and this is sized at startup automatically by Netty, but this limit can be controlled by setting -Dio.netty.maxDirectMemory=[amount in Bytes] under spark.executor.extraJavaOptions.
UCX Mode#
Note
As of the spark-rapids 23.10 release, UCX packages support CUDA 11. UCX support for CUDA 12 in the RAPIDS Accelerator will be added in a future release.
UCX mode (spark.rapids.shuffle.mode=UCX) has two components: a spillable cache, and a transport that can utilize Remote Direct Memory Access (RDMA) and high-bandwidth transfers within a node that has multiple GPUs. This is possible because this mode utilizes Unified Communication X (UCX) as its transport.
Spillable cache: This store keeps GPU data close by where it was produced in device memory, but can spill in the following cases:
GPU out of memory: If an allocation in the GPU failed to acquire memory, spill will get triggered moving GPU buffers to host to allow for the original allocation to succeed.
Host spill store filled: If the host memory store has reached a maximum threshold (
spark.rapids.memory.host.spillStorageSize), host buffers will be spilled to disk until the host spill store shrinks back below said configurable threshold.
Tasks local to the producing executor will short-circuit read from the cache.
Transport: Handles block transfers between executors using various means like NVLink, PCIe, Infiniband (IB), RDMA over Converged Ethernet (RoCE) or TCP, and as configured in UCX, in these scenarios:
GPU-to-GPU: Shuffle blocks that were able to fit in GPU memory.
Host-to-GPU and Disk-to-GPU: Shuffle blocks that spilled to host (or disk) but will be manifested in the GPU in the downstream Spark task.
The RAPIDS Shuffle Manager uses the spark.shuffle.manager plugin interface in Spark and it relies on fast connections between executors, where shuffle data is kept in a cache backed by GPU, host, or disk. As such, it doesn’t implement functionality to interact with the External Shuffle Service (ESS). To enable the RAPIDS Shuffle Manager, users need to disable ESS using spark.shuffle.service.enabled=false. Note that Spark’s Dynamic Allocation feature requires ESS to be configured, and must also be disabled with spark.dynamicAllocation.enabled=false.
System Setup#
In order to enable the RAPIDS Shuffle Manager, UCX user-space libraries and its dependencies must be installed on the host and inside Docker containers (if not baremetal). A host has additional requirements, like the MLNX_OFED driver and nv_peer_mem kernel module.
The minimum UCX requirement for the RAPIDS Shuffle Manager is UCX 1.14.0.
Baremetal#
If you have Mellanox hardware, please ensure you have the MLNX_OFED driver, and the nv_peer_mem kernel module installed. UCX packages are compatible with MLNX_OFED 5.0+. Please install the latest driver available.
With
nv_peer_mem(GPUDirectRDMA), IB/RoCE-based transfers can perform zero-copy transfers directly from GPU memory. Note that GPUDirectRDMA is known to show performance and bugs in machines that don’t connect their GPUs and NICs to PCIe switches (i.e. directly to the root-complex).Other considerations:
Please refer to Mellanox documentation on how to configure RoCE networks (lossless/lossy, QoS, and more)
We recommend that the
--without-ucxoption is passed when installing MLNX_OFED (mlnxofedinstall). This is because the UCX included in MLNX_OFED does not have CUDA support, and is likely older than what is available in the UCX repo (see Step 2 below).
If you encounter issues or poor performance, GPUDirectRDMA can be controlled via the UCX environment variable
UCX_IB_GPU_DIRECT_RDMA=no, but please file a GitHub issue so we can investigate further.Fetch and install the UCX package for your OS from: UCX 1.14.0.
RDMA packages have extra requirements that should be satisfied by MLNX_OFED.
Rocky UCX RPM#
The UCX packages for Rocky are divided into different RPMs.
For example, UCX 1.14.0 available at openucx/ucx contains:
1ucx-devel-1.14.0-1.el8.x86_64.rpm
2ucx-debuginfo-1.14.0-1.el8.x86_64.rpm
3ucx-1.14.0-1.el8.x86_64.rpm
4ucx-cuda-1.14.0-1.el8.x86_64.rpm
5ucx-rdmacm-1.14.0-1.el8.x86_64.rpm
6ucx-cma-1.14.0-1.el8.x86_64.rpm
7ucx-ib-1.14.0-1.el8.x86_64.rpm
For a setup without RoCE or Infiniband networking, the only packages required are:
1ucx-1.14.0-1.el8.x86_64.rpm
2ucx-cuda-1.14.0-1.el8.x86_64.rpm
If accelerated networking is available, the package list is:
1ucx-1.14.0-1.el8.x86_64.rpm
2ucx-cuda-1.14.0-1.el8.x86_64.rpm
3ucx-rdmacm-1.14.0-1.el8.x86_64.rpm
4ucx-ib-1.14.0-1.el8.x86_64.rpm
Note
The Rocky RPM requires CUDA installed via RPMs to satisfy its dependencies. The CUDA runtime can be downloaded from https://developer.nvidia.com/cuda-downloads
The Archive of Previous CUDA releases link to download prior versions of the runtime.
For example, in order to download the CUDA RPM for Rocky 8 running on x86: Linux > x86_64 > Rocky > 8 > rpm (local) or rpm (network).
Docker Containers#
Running with UCX in containers imposes certain requirements. In a multi-GPU system, all GPUs that want to take advantage of PCIe peer-to-peer or NVLink need to be visible within the container. For example, if two containers are trying to communicate and each have an isolated GPU, the link between these GPUs will not be optimal, forcing UCX to stage buffers to the host or use TCP. Additionally, if you want to use RoCE/Infiniband, the /dev/infiniband device should be exposed in the container. Also, to avoid potential failed: Cannot allocate memory, please consider raising the memlock ulimit in the container via --ulimit memlock=[maximum]. Note that setting --ulimit memlock=-1 disables the limit.
If UCX will be used to communicate between containers, the IPC (--ipc) and PID namespaces (--pid) should also be shared.
As of the writing of this document we have successfully tested --privileged containers, which essentially turns off all isolation. We are also assuming --network=host is specified, allowing the container to share the host’s network. We will revise this document to include any new configurations as we are able to test different scenarios.
Note
A system administrator should have performed Step 1 in Baremetal in the host system if you have RDMA capable hardware.
The following are examples of Docker containers with UCX 1.14.0 and CUDA 11.8 support.
OS Type |
RDMA |
Dockerfile |
|---|---|---|
Ubuntu |
Yes |
|
Ubuntu |
No |
|
Rocky |
Yes |
|
Rocky |
No |
Validating UCX Environment#
After installing UCX you can utilize ucx_info and ucx_perftest to validate the installation.
In this section, we are using a docker container built using the sample dockerfile above.
Start the docker container with
--privilegedmode, which makes Mellanox devices available for our test (this is only required if you are using RDMA),pid=hostandipc=hostare requirements for container communication within the same machine:1nvidia-docker run \ 2--privileged \ 3--pid=host \ 4--ipc=host \ 5--network=host \ 6-it \ 7ucx_container:latest \
If you are testing between different machines, please run the above command in each node.
Test to check whether UCX can link against CUDA:
1root@test-machine:/# ucx_info -d|grep cuda
2# Memory domain: cuda_cpy
3#     Component: cuda_cpy
4#      Transport: cuda_copy
5#         Device: cuda
6# Memory domain: cuda_ipc
7#     Component: cuda_ipc
8#      Transport: cuda_ipc
9#         Device: cuda
Mellanox device seen by UCX, and what transports are enabled (i.e.
rc)1root@test-machine:/# ucx_info -d|grep mlx5_3:1 -B1 2# Transport: rc_verbs 3# Device: mlx5_3:1 4-- 5# Transport: rc_mlx5 6# Device: mlx5_3:1 7-- 8# Transport: dc_mlx5 9# Device: mlx5_3:1 10-- 11# Transport: ud_verbs 12# Device: mlx5_3:1 13-- 14# Transport: ud_mlx5 15# Device: mlx5_3:1
You should be able to execute
ucx_perftest, and get a good idea that things are working as you expect.Example 1: GPU <-> GPU in the same host. Without NVLink you should expect PCIe speeds. In this case this is PCIe3, and somewhere along the lines of ~10GB/sec is expected. It should also match the performance seen in
p2pBandwidthLatencyTest, which is included with the cuda toolkit.On server container:
root@test-server:/# CUDA_VISIBLE_DEVICES=0 ucx_perftest -t tag_bw -s 10000000 -n 1000 -m cuda
On client container:
1root@test-client:/# CUDA_VISIBLE_DEVICES=1 ucx_perftest -t tag_bw -s 10000000 -n 1000 -m cuda localhost
2+--------------+--------------+-----------------------------+---------------------+-----------------------+
3|              |              |      overhead (usec)        |   bandwidth (MB/s)  |  message rate (msg/s) |
4+--------------+--------------+---------+---------+---------+----------+----------+-----------+-----------+
5|    Stage     | # iterations | typical | average | overall |  average |  overall |  average  |  overall  |
6+--------------+--------------+---------+---------+---------+----------+----------+-----------+-----------+
7Final:                  1000     0.000   986.122   986.122     9670.96    9670.96        1014        1014
Example 2: GPU <-> GPU across the network, using GPUDirectRDMA. You will notice that in this example we picked GPU 3. In our test machine, GPU 3 is closest (same root complex) to the NIC we are using for RoCE, and yields better performance than GPU 0, for example, which is sitting on a different socket.
On server container:
root@test-server: CUDA_VISIBLE_DEVICES=3 ucx_perftest -t tag_bw -s 10000000 -n 1000 -m cuda
On client container:
1root@test-client:/# CUDA_VISIBLE_DEVICES=3 ucx_perftest -t tag_bw -s 10000000 -n 1000 -m cuda test-server
2+--------------+--------------+-----------------------------+---------------------+-----------------------+
3|              |              |      overhead (usec)        |   bandwidth (MB/s)  |  message rate (msg/s) |
4+--------------+--------------+---------+---------+---------+----------+----------+-----------+-----------+
5|    Stage     | # iterations | typical | average | overall |  average |  overall |  average  |  overall  |
6+--------------+--------------+---------+---------+---------+----------+----------+-----------+-----------+
7[thread 0]               498     0.000  2016.444  2016.444     4729.49    4729.49         496         496
8[thread 0]               978     0.000  2088.412  2051.766     4566.50    4648.07         479         487
9Final:                  1000     0.000  3739.639  2088.899     2550.18    4565.44         267         479
Example 3: GPU <-> GPU across the network, without GPUDirectRDMA. You will notice that the bandwidth achieved is higher than with GPUDirectRDMA on. This is expected, and a known issue in machines where GPUs and NICs are connected directly to the root complex.
On server container:
root@test-server:/# UCX_IB_GPU_DIRECT_RDMA=no CUDA_VISIBLE_DEVICES=3 ucx_perftest -t tag_bw -s 10000000 -n 1000 -m cuda
On client container:
1root@test-client:/# UCX_IB_GPU_DIRECT_RDMA=no CUDA_VISIBLE_DEVICES=3 ucx_perftest -t tag_bw -s 10000000 -n 1000 -m cuda test-server
2+--------------+--------------+-----------------------------+---------------------+-----------------------+
3|              |              |      overhead (usec)        |   bandwidth (MB/s)  |  message rate (msg/s) |
4+--------------+--------------+---------+---------+---------+----------+----------+-----------+-----------+
5|    Stage     | # iterations | typical | average | overall |  average |  overall |  average  |  overall  |
6+--------------+--------------+---------+---------+---------+----------+----------+-----------+-----------+
7[thread 0]               670     0.000  1497.859  1497.859     6366.91    6366.91         668         668
8Final:                  1000     0.000  1718.843  1570.784     5548.35    6071.33         582         637
Spark App Configuration#
Choose the version of the shuffle manager that matches your Spark version. Please refer to the table at the top of this document for
spark.shuffle.managervalues.Settings for UCX 1.14.0+:
Minimum configuration:
1...
2--conf spark.shuffle.manager=com.nvidia.spark.rapids.[shim package].RapidsShuffleManager \
3--conf spark.rapids.shuffle.mode=UCX \
4--conf spark.shuffle.service.enabled=false \
5--conf spark.dynamicAllocation.enabled=false \
6--conf spark.executor.extraClassPath=${SPARK_RAPIDS_PLUGIN_JAR} \
7--conf spark.executorEnv.UCX_ERROR_SIGNALS= \
8--conf spark.executorEnv.UCX_MEMTYPE_CACHE=n
Recommended configuration:
 1--conf spark.shuffle.manager=com.nvidia.spark.rapids.[shim package].RapidsShuffleManager \
 2--conf spark.rapids.shuffle.mode=UCX \
 3--conf spark.shuffle.service.enabled=false \
 4--conf spark.dynamicAllocation.enabled=false \
 5--conf spark.executor.extraClassPath=${SPARK_RAPIDS_PLUGIN_JAR} \
 6--conf spark.executorEnv.UCX_ERROR_SIGNALS= \
 7--conf spark.executorEnv.UCX_MEMTYPE_CACHE=n \
 8--conf spark.executorEnv.UCX_IB_RX_QUEUE_LEN=1024 \
 9--conf spark.executorEnv.UCX_TLS=cuda_copy,cuda_ipc,rc,tcp \
10--conf spark.executorEnv.UCX_RNDV_SCHEME=put_zcopy \
11--conf spark.executorEnv.UCX_MAX_RNDV_RAILS=1
Please replace [shim package] with the appropriate value. For example, the full class name for Apache Spark 3.1.3 is: com.nvidia.spark.rapids.spark313.RapidsShuffleManager.
Please note LD_LIBRARY_PATH should optionally be set if the UCX library is installed in a non-standard location.
With the RAPIDS Shuffle Manager configured, the setting spark.rapids.shuffle.enabled (default on) can be used to enable or disable the usage of RAPIDS Shuffle Manager during your application.
Databricks#
Please make sure you follow the Getting Started guide for Databricks. The following are extra steps required to enable UCX.
Create and enable an additional “init script” that installs UCX:
1#!/bin/bash
2sudo apt install -y wget libnuma1 &&
3wget https://github.com/openucx/ucx/releases/download/v1.14.0/ucx-1.14.0-ubuntu20.04-mofed5-cuda11.tar.bz2 &&
4tar -xvf ucx-1.14.0-ubuntu20.04-mofed5-cuda11.tar.bz2 &&
5sudo dpkg -i ucx-1.14.0.deb ucx-cuda-1.14.0.deb &&
6rm ucx-1.14.0-ubuntu20.04-mofed5-cuda11.tar.bz2 ucx-1.14.0.deb ucx-cuda-1.14.0.deb
7
8Save the script in Databricks workspace and add it to the "Init Scripts" list:
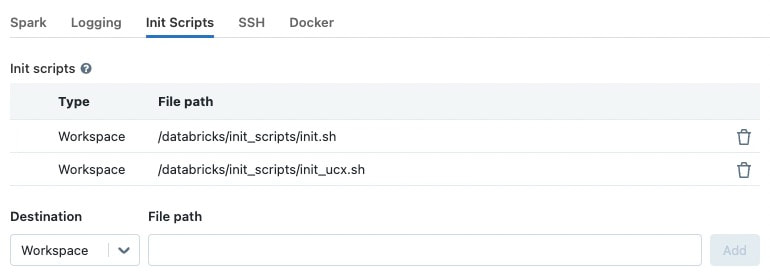
Add the UCX minimum configuration for your Cluster.
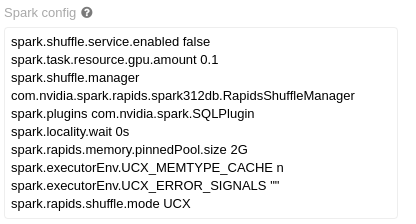
Databricks 10.4:
1spark.shuffle.manager com.nvidia.spark.rapids.spark321db.RapidsShuffleManager
2spark.rapids.shuffle.mode UCX
3spark.shuffle.service.enabled false
4spark.executorEnv.UCX_MEMTYPE_CACHE n
5spark.executorEnv.UCX_ERROR_SIGNALS ""
Example of configuration panel with the new settings:
Please note that at this time, we have tested with Autoscaling off. It is not clear how an autoscaled cluster will behave with the RAPIDS Shuffle Manager.
UCX Environment Variables#
UCX_TLS:cuda_copy, andcuda_ipc: enables handling of CUDA memory in UCX, both for copy-based transport and peer-to-peer communication between GPUs (NVLink/PCIe).rc: enables Infiniband and RoCE based transport in UCX.tcp: allows for TCP communication in cases where UCX deems necessary.
UCX_ERROR_SIGNALS=: Disables UCX signal catching, as it can cause issues with the JVM.UCX_MAX_RNDV_RAILS=1: Set this to1to disable multi-rail transfers in UCX, where UCX splits data to utilize various channels (e.g. two NICs). A value greater than1can cause a performance drop for high-bandwidth transports between GPUs.UCX_MEMTYPE_CACHE=n: Disables a cache in UCX that can cause UCX to fail when running with CUDA buffers.UCX_RNDV_SCHEME=put_zcopy: By default,UCX_RNDV_SCHEME=autowill pick different schemes for the RNDV protocol (get_zcopyorput_zcopy) depending on message size, and on other parameters given the hardware, transports, and settings. We have found thatUCX_RNDV_SCHEME=put_zcopyis more reliable than automatic detection, or get_zcopy in our testing, especially in UCX 1.9.0. The main difference between get and put is the direction of transfer. A send operation underget_zcopywill really beRDMA READfrom the receiver, whereas the same send will beRDMA_WRITEfrom the sender ifput_zcopyis utilized.UCX_IB_RX_QUEUE_LEN=1024: Length of receive queue for the Infiniband/RoCE transports. The length change is recommended as it has shown better performance when there is memory pressure and message sizes are relatively large (> few hundred Bytes)
Fine Tuning#
Here are some settings that could be utilized to fine tune the RAPIDS Shuffle Manager.
Bounce Buffers#
The following configs control the number of bounce buffers, and the size. Please note that for device buffers, two pools are created (for sending and receiving). Take this into account when sizing your pools.
The GPU buffers should be smaller than the PCI BAR Size for your GPU. Please verify the defaults work in your case.
spark.rapids.shuffle.ucx.bounceBuffers.device.countspark.rapids.shuffle.ucx.bounceBuffers.host.countspark.rapids.shuffle.ucx.bounceBuffers.size
Spillable Store#
This setting controls the amount of host memory (RAM) that can be utilized to spill GPU blocks when the GPU is out of memory, before going to disk. Please verify the defaults.
spark.rapids.memory.host.spillStorageSize
Shuffle Garbage Collection#
Shuffle buffers cached in the spillable store, whether they are in the GPU, host, or disk, will not be removed even after all actions for your query complete. This is a design decision in Spark, where shuffle temporary stores are cleaned when there is a garbage collection on the driver, and the references to the RDDs supporting your query are not reachable.
One of the issues with this is with large JVM footprints in the driver. The driver may not run a GC at all between different parts of your application, causing output for shuffle to accumulate (output that will not be reused), and eventually causing OOM or even filled disk. This is true for Spark even without the RAPIDS Shuffle Manager, but in our case it’s likely GPU memory that is being occupied, and performance degrades given the churn due to spill to host memory or disk. As of this stage, there isn’t a good solution for this, other than to trigger a GC cycle on the driver.
Spark has a configuration spark.cleaner.periodicGC.interval (defaults to 30 minutes), that can be used to periodically cause garbage collection. If you are experiencing OOM situations, or performance degradation with several Spark actions, consider tuning this setting in your jobs.
Known Issues#
UCX configures TCP keep-alive for TCP transports. We have seen issues with keep-alive in multi-NIC environments after long periods of inactivity (when the inactivity is greater than the system’s
tcp_keepalive_time). If you see errors such as:ERROR UCX: UcpListener detected an error for executorId 2: UCXError(-25,Connection reset by remote peer)
Consider turning off keep-alive for UCX using:
spark.executorEnv.UCX_TCP_KEEPINTVL=inf.Note
This would only mitigate the issue but not resolve it.