


PyNvVideoCodec Performance#
PyNvVideoCodec offers video encode and decode performance close to Video Codec SDK. This chapter outlines the performance capabilities enabled by unique APIs and features of PyNvVideoCodec.
Note
The benchmarks presented in this chapter use the BtBN FFmpeg build for comparison purposes.
Benchmark Overview#
The benchmark scripts provided with PyNvVideoCodec measure performance across different use cases. Each benchmark automatically generates test videos using FFmpeg on the first run, and subsequent runs will reuse these videos for consistent testing.
Important Considerations Before Running Benchmarks:
Initial run time: The first execution of any benchmark script takes significantly longer because it generates sample videos using FFmpeg. Subsequent runs are much faster as they reuse the generated videos.
Disk space: The generated test videos are stored locally. Ensure sufficient disk space is available.
GPU requirements: A CUDA-capable NVIDIA GPU with NVDEC hardware decoder support is required.
Understanding the NVDEC Parameter#
Benchmark scripts require an --nvdecs parameter, which specifies the number of hardware NVDEC (NVIDIA Video Decoder) instances available on your GPU. This parameter is critical for achieving optimal performance.
How to determine your NVDEC count:
Find your GPU model in the list
Look for the “NVDEC” column to see the number of decoder instances
Common NVDEC counts by GPU:
NVIDIA L40G: 3 NVDECs
NVIDIA A100: 5 NVDECs
NVIDIA RTX 4090: 2 NVDECs
NVIDIA RTX 3090: 1 NVDEC
NVIDIA T4: 2 NVDECs
Setting the correct NVDEC count allows the benchmark to spawn the appropriate number of threads to fully saturate the available hardware decoders, maximizing throughput.
Benchmark Dependencies#
Before running the benchmark scripts, ensure you have all required Python packages installed. requirements.txt file is provided in the benchmark scripts directory.
Install the dependencies using:
pip install -r requirements.txt
Additional requirements:
FFmpeg: Must be installed and accessible in your system PATH. The benchmarks use FFmpeg (with NVENC support) to generate test videos. We recommend using the BtBN FFmpeg builds which include NVIDIA hardware acceleration support.
CUDA Toolkit: A compatible CUDA toolkit must be installed for PyCUDA.
Expected Execution Time#
The following table provides approximate execution times for each benchmark script. These times were measured on an NVIDIA L40G GPU with 3 threads (matching the 3 NVDECs available).
Benchmark Script |
Execution Time |
Notes |
|---|---|---|
|
~1 minute |
Tests 1080p videos with different GOP sizes |
|
~42 minutes |
Tests multiple resolutions (360p to 4K) with 500 iterations each |
|
~6 minutes |
Generates and processes video segments |
Actual execution times will vary depending on your GPU model, CPU, storage speed, and the number of threads used.
Available Benchmarks#
Frame Retrieval - Performance of different frame retrieval patterns
Decoder Reuse - Performance benefits of reusing decoder instances
Segmented Transcoding - Performance of segment based transcoding
Frame Retrieval#
Performance benchmarks for different frame retrieval patterns using PyNvVideoCodec decoder.
Objective#
This benchmark measures the sampling performance of PyNvVideoCodec when retrieving frames using different access patterns. It evaluates how efficiently frames can be extracted from a video depending on whether you need sequential, uniformly distributed, or randomly selected frames.
What this benchmark measures:
Frame retrieval throughput (Frames Per Second) for three sampling patterns
Impact of GOP (Group of Pictures) size on seek performance
Efficiency of direct frame sampling versus sequential decoding
Multi-threaded scaling performance across available NVDECs
Sampling Patterns Tested:
Sequential Decoding: Retrieves frames in order from the start of the video (e.g., first 100 frames). This is the fastest pattern as it requires minimal seeking.
Uniform Sampling: Retrieves frames at regular intervals across the entire video duration. For example, sampling 30 frames from a 30-second video fetches one frame every second.
Random Sampling: Retrieves frames at randomly selected positions throughout the video. This pattern represents the most challenging access pattern due to unpredictable seek locations. The script uses
torch.randperm()to generate unique random frame indices, ensuring no duplicate frames are sampled.
Key Performance Indicators (KPI):
FPS (Frames Per Second): The number of frames retrieved per second. Higher is better.
Efficiency: Ratio comparing direct sampling performance to sequential decode-then-sample approach. Values greater than 1.0x indicate direct sampling is faster than decoding all frames and then selecting the needed ones.
How the Benchmark Works#
The benchmark follows these steps:
Video Generation (first run only): Creates test videos using FFmpeg with the mandelbrot pattern at 1080p resolution. Multiple videos with different GOP sizes (default: 30 and 250) are generated to test the impact of GOP on seek performance.
Thread Setup: Creates multiple decoder threads (1 thread for single-threaded test, N threads to match NVDEC count).
Sequential Decode Test: Each thread decodes the first N frames (default: 100) sequentially and measures FPS.
Uniform Sampling Test: Each thread samples M frames (default: 30) at regular intervals and measures FPS. The efficiency is calculated by comparing against the time needed to sequentially decode up to the last sampled frame.
Random Sampling Test: Each thread samples M frames at random positions and measures FPS, also calculating efficiency.
Results Aggregation: FPS and efficiency metrics are calculated and displayed for all configurations.
Running the Benchmark#
Basic Usage:
python frame_sampling_benchmark.py --nvdecs 3
Replace 3 with the number of NVDEC instances on your GPU. See the NVDEC Parameter section to determine your GPU’s NVDEC count.
Command Line Options:
Option |
Default |
Description |
|---|---|---|
|
(required) |
Number of NVDEC instances on your GPU. Determines the number of parallel decoder threads. |
|
1920x1080 |
Video resolution for generated test videos |
|
30 250 |
GOP sizes to test (space-separated list) |
|
30 |
Video duration in seconds |
|
30 |
Video frames per second |
|
100 |
Number of frames to decode for sequential test |
|
30 |
Number of frames to sample for uniform/random tests |
|
False |
Show detailed per-thread performance information |
Example Commands:
# Run benchmark with default settings on a GPU with 3 NVDECs
python frame_sampling_benchmark.py --nvdecs 3

# Run with 720p resolution and specific GOP sizes
python frame_sampling_benchmark.py --nvdecs 3 --resolution 1280x720 --gop 30 60 120

# Run with verbose output showing per-thread details
python frame_sampling_benchmark.py --nvdecs 3 --verbose

# Run with custom sampling parameters
python frame_sampling_benchmark.py --nvdecs 2 --num-seq-frames 200 --num-samp-frames 50
Output Files:
benchmark_results.json- Detailed results including system info and per-test metricsbenchmark_videos/- Generated test videos (reused in subsequent runs)
Expected Execution Time: Approximately 1 minute on an L40G GPU with 3 threads.
Benchmark Environment#
Environment:
GPU: 1 x L40G (3 NVDECs)
CPU: AMD EPYC 7313P 16-Core Processor, 2 threads per core
OS: Ubuntu 22.04
Methodology#
Script to execute benchmark:
frame_sampling_benchmark.pyDataset generated using FFmpeg with the following default parameters:
Resolution: 1920x1080
GOP: 30 & 250
Duration: 30 seconds
Frame Rate: 30
Multithreaded implementation to fully utilize NVDECs (multiple Python threads)
Each Python thread independently decodes the same video & reports the FPS
Benchmark Results#
The following results were obtained on the representative platform described in the Benchmark Environment section above. You can run the benchmark script in your own environment to obtain results specific to your hardware configuration.
Sequential Decode (First 100 Frames)
Decodes frames in sequential order from the start of the video. This approach retrieves a specified number of consecutive frames (e.g., first 100 frames).
Video Config |
Num Threads |
FPS |
|---|---|---|
1920x1080 250gop 30s |
1 |
886 |
1920x1080 250gop 30s |
3 |
2615.4 |
1920x1080 30gop 30s |
1 |
881.1 |
1920x1080 30gop 30s |
3 |
2609.4 |
Random Sampling (30 Frames)
Randomly selects frames from across the entire video duration. This method is useful for obtaining a representative sample of frames throughout the video.
Video Config |
Num Threads |
FPS |
Efficiency |
|---|---|---|---|
1920x1080 250gop 30s |
1 |
37.3 |
1.02x |
1920x1080 250gop 30s |
3 |
110.8 |
1.03x |
1920x1080 30gop 30s |
1 |
78.4 |
2.14x |
1920x1080 30gop 30s |
3 |
218 |
1.98x |
Uniform Sampling (30 Frames)
Evenly distributes frame sampling across the entire video duration. For example, when sampling 30 frames from a 30-second video, it fetches one frame every second.
Video Config |
Num Threads |
FPS |
Efficiency |
|---|---|---|---|
1920x1080 250gop 30s |
1 |
39.6 |
1.05x |
1920x1080 250gop 30s |
3 |
117.6 |
1.05x |
1920x1080 30gop 30s |
1 |
54.2 |
1.44x |
1920x1080 30gop 30s |
3 |
158.4 |
1.42x |
Note on Efficiency: Efficiency represents the performance comparison between two approaches:
Direct sampling: Decoding specific frames directly using seek operations
Sequential decode + sampling: Decoding all frames sequentially up to the last required frame, then extracting the needed frames
The efficiency value shows how much faster direct sampling is compared to sequential decoding with sampling. Higher efficiency values indicate better performance of the direct sampling approach.
Important: Efficiency should only be compared within the same thread configuration. Do not compare efficiency values across different thread counts. For example, while 1-thread random sampling shows 2.14x efficiency and 3-thread shows 1.98x efficiency, this does not mean single-threaded is better. The 3-thread configuration achieves 218 FPS compared to 78.4 FPS for single-thread-a 2.8x improvement in absolute throughput. The efficiency metric only indicates how much faster direct sampling is versus sequential decoding within that same thread configuration.
Key Observations#
GOP size has significant impact on frame retrieval performance:
For random sampling, smaller GOP size (30) increases performance by 110% as compared to bigger GOP size (250)
For uniform sampling, smaller GOP size (30) increases performance by 37% as compared to bigger GOP size (250)
Sequential decoding performance is largely unaffected by GOP size
Multi-threading provides significant absolute performance gains:
Sequential decoding: 881 FPS (1 thread) → 2609 FPS (3 threads) = 2.96x speedup
Random sampling (30 GOP): 78.4 FPS (1 thread) → 218 FPS (3 threads) = 2.78x speedup
Uniform sampling (30 GOP): 54.2 FPS (1 thread) → 158.4 FPS (3 threads) = 2.92x speedup
Efficiency comparison (within same thread configuration):
Smaller GOP (30) provides higher efficiency for both sampling methods because less data needs to be decoded to reach each target frame
Random sampling with 30 GOP: 2.14x efficiency (1 thread), 1.98x efficiency (3 threads)
Uniform sampling with 30 GOP: 1.44x efficiency (1 thread), 1.42x efficiency (3 threads)
Larger GOP (250) shows minimal efficiency advantage (1.02x-1.05x) because more frames must be decoded to reach seek points
Decoder Reuse#
Performance benefits of reusing decoder instances when processing multiple videos.
Objective#
This benchmark measures and compares the performance of NVIDIA’s video decoder in two operational modes:
Simple Decoder: Creates a new decoder instance for each video file
Cached Decoder: Reuses the same decoder instance across multiple video files through reconfiguration
What this benchmark measures:
Decoding throughput (Frames Per Second) for both decoder modes
Total time taken to decode a batch of video clips
Performance comparison across different video resolutions (360p, 480p, 720p, 1080p, 4K)
Impact of decoder initialization overhead on overall performance
Key Performance Indicator (KPI): The primary metric is FPS (Frames Per Second). Higher FPS indicates better decoder efficiency. The speedup ratio (Cached FPS / Simple FPS) shows the benefit of decoder caching.
How the Benchmark Works#
The benchmark follows these steps:
Video Generation (first run only): Creates test videos using FFmpeg with the mandelbrot test pattern at various resolutions (360p, 480p, 720p, 1080p, 4K). Each video is 2 seconds long at 30 fps.
Workload Creation: Each generated video is queued 500 times to create sufficient workload to saturate the GPU’s NVDEC hardware.
Thread Distribution: Videos are distributed across multiple decoder threads (1 thread for single-threaded test, N threads to match NVDEC count).
Simple Decoder Test: Each thread creates a new decoder instance for every video clip and measures total decoding time.
Cached Decoder Test: Each thread creates a single decoder instance with caching enabled and reconfigures it for each subsequent video, measuring total decoding time.
Results Comparison: FPS is calculated for both modes and compared across all resolutions.
Running the Benchmark#
Basic Usage:
python cached_decoder_benchmark.py --nvdecs 3
Replace 3 with the number of NVDEC instances on your GPU. See the NVDEC Parameter section to determine your GPU’s NVDEC count.
Command Line Options:
Option |
Default |
Description |
|---|---|---|
|
(required) |
Number of NVDEC instances on your GPU. This determines the number of parallel decoder threads. |
|
h264 |
Video codec to use: |
|
30 |
Frame rate for generated test videos |
|
60 |
GOP (Group of Pictures) size for generated videos |
|
False |
Skip benchmark and only generate plots from existing JSON results. The JSON files from the existing runs are stored in the same directory as the benchmark script. |
Example Commands:
# Run benchmark with H.264 codec on a GPU with 3 NVDECs
python cached_decoder_benchmark.py --nvdecs 3

# Run benchmark with HEVC codec on a GPU with 2 NVDECs
python cached_decoder_benchmark.py --nvdecs 2 --codec hevc

# Run benchmark with custom video settings
python cached_decoder_benchmark.py --nvdecs 4 --codec av1 --fps 60 --gop 120

# Only generate plots from existing results
python cached_decoder_benchmark.py --nvdecs 3 --plot-only
Output Files:
cached_decoder_performance_{codec}_{threads}_threads.json- Detailed results in JSON formatcached_decoder_performance_{codec}_{threads}_threads.png- Performance comparison bar graphstest_videos_{codec}/- Generated test videos (reused in subsequent runs)
Expected Execution Time: Approximately 42 minutes on an L40G GPU with 3 threads. This benchmark takes longer because it tests multiple resolutions (360p to 4K) with 500 iterations each to ensure statistically significant results.
Benchmark Environment#
Environment:
GPU: 1 x L40G (3 NVDECs)
CPU: AMD EPYC 7313P 16-Core Processor, 2 threads per core
OS: Ubuntu 22.04
Methodology#
Script to execute benchmark:
cached_decoder_benchmark.pyDataset generated using FFmpeg with the following parameters:
Resolutions: 360p, 480p, 720p, 1080p, 4k
Frame Rate: 30 fps
GOP Size: 60
Duration: 2 seconds (short) and 30 seconds (long)
Pattern: mandelbrot
5 videos created using FFmpeg (1 video per resolution)
Each video was reused 500 times to create enough decoding workload to fully saturate all available NVDEC hardware instances.
Videos are distributed across multiple decoder threads
Example configuration: In a 20-clip/4-thread setup, each thread processes 5 videos
Decoder Types:
Simple decoder:
Creates a new decoder instance for each video clip
For example, if a thread has to decode 5 videos, a total of 5 decoder instances will be created
Cached decoder:
Creates a single decoder instance per thread
Reuses the same decoder for subsequent clips through reconfiguration
Implementation follows the principles outlined in Decoder Caching
For example, for 5 videos per thread, only one decoder instance is created and reused
Benchmark Results#
The following results were obtained on the representative platform described in the Benchmark Environment section above. You can run the benchmark script in your own environment to obtain results specific to your hardware configuration.
Short Duration Videos (2 seconds)
Performance comparison when decoding many short video clips, where decoder initialization overhead is most significant.
Resolution |
Decoder Type |
Time Taken (s) |
FPS |
|---|---|---|---|
360p |
Simple |
17.05 |
1760 |
360p |
Cached |
2.37 |
12679 |
480p |
Simple |
17.27 |
1737 |
480p |
Cached |
3.28 |
9151 |
720p |
Simple |
18.55 |
1617 |
720p |
Cached |
5.78 |
5190 |
1080p |
Simple |
20.53 |
1461 |
1080p |
Cached |
11.53 |
2602 |
4k |
Simple |
53.28 |
563 |
4k |
Cached |
42.78 |
701 |
Long Duration Videos (30 seconds)
Performance comparison when decoding longer video clips, where actual decoding time dominates over initialization overhead.
Resolution |
Decoder Type |
Time Taken (s) |
FPS |
|---|---|---|---|
360p |
Simple |
39.28 |
11456 |
360p |
Cached |
30.78 |
14621 |
480p |
Simple |
54.28 |
8291 |
480p |
Cached |
44.78 |
10049 |
720p |
Simple |
94.03 |
4786 |
720p |
Cached |
84.28 |
5339 |
1080p |
Simple |
188.28 |
2390 |
1080p |
Cached |
177.78 |
2531 |
4k |
Simple |
709.78 |
634 |
4k |
Cached |
695.53 |
647 |
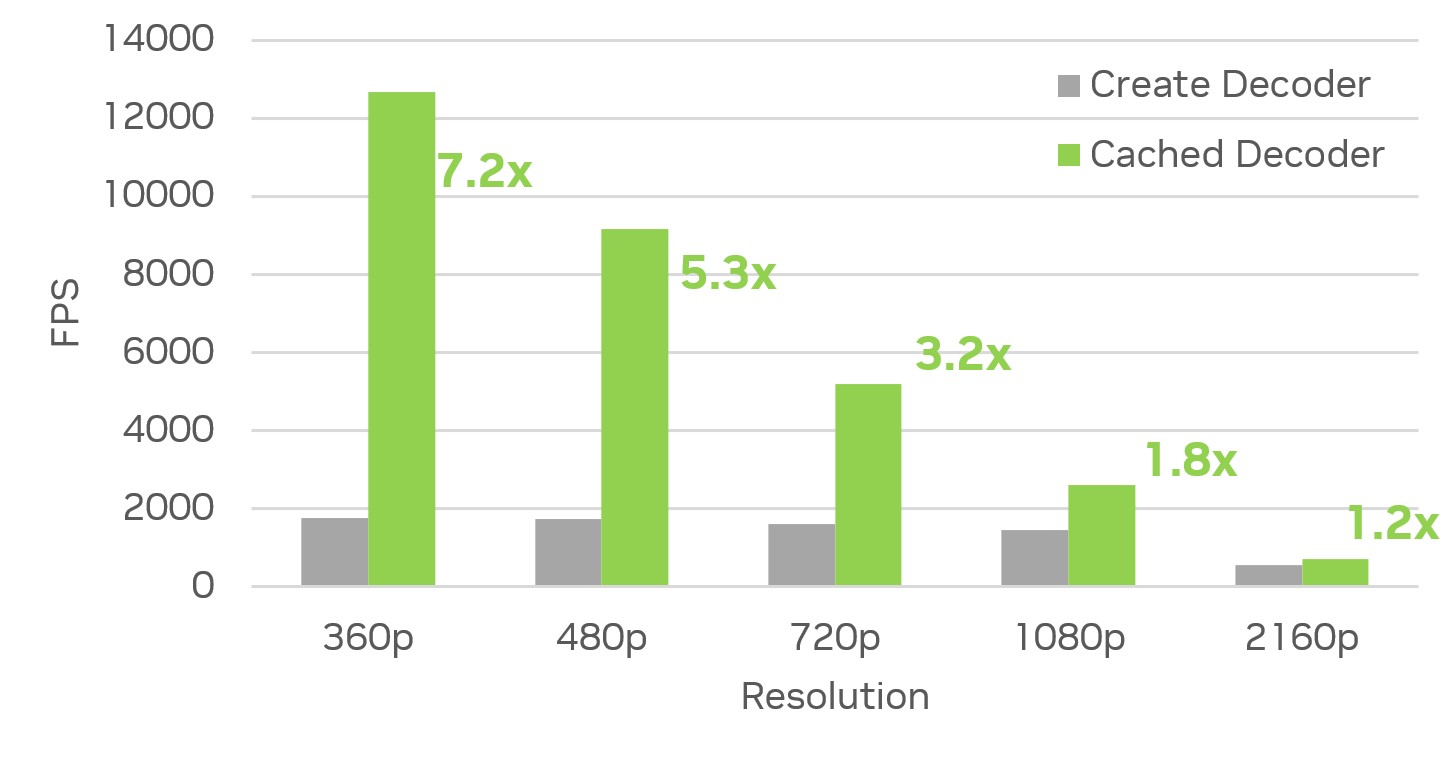
Figure 2 Performance Comparison: Simple vs. Cached Decoders Bar chart comparing performance of simple decoder creation vs. cached decoder approach across resolutions for short duration videos#
Key Observations:
Cached decoders consistently outperform simple decoders across all resolutions and video durations
For short videos (2 sec), performance improvement is dramatic at lower resolutions:
360p: 7.2x faster (12679 vs 1760 FPS)
480p: 5.3x faster (9151 vs 1737 FPS)
720p: 3.2x faster (5190 vs 1617 FPS)
1080p: 1.8x faster (2602 vs 1461 FPS)
4K: 1.2x faster (701 vs 563 FPS)
For long videos (30 sec), the improvement is more modest as decoding time dominates:
360p: 1.3x faster
480p: 1.2x faster
720p-4K: 1.02x-1.1x faster
The performance benefit comes from eliminating decoder initialization overhead, which is most significant when processing many short video clips
Segmented Transcoding#
Performance comparison of PyNvVideoCodec’s segmented transcoding approach against traditional FFmpeg-based methods.
Objective#
This benchmark compares the performance of different approaches for transcoding video segments. It measures how efficiently PyNvVideoCodec’s Transcoder class handles segmented video transcoding compared to traditional FFmpeg-based methods.
What this benchmark measures:
Transcoding throughput (Frames Per Second) for each method
Total processing time for a batch of video segments
Performance difference between PyNvVideoCodec and FFmpeg approaches
Impact of different FFmpeg configurations (with/without filter_complex, audio handling)
Transcoding Methods Compared:
Mode 0 - PyNvVideoCodec Transcoding: Uses PyNvVideoCodec’s Transcoder class with
segmented_transcode()method. Maintains persistent GPU context and avoids repeated encoder/decoder initialization.Mode 1 - FFmpeg Without Map: Uses separate FFmpeg commands for each segment with
-ss/-tofor time ranges. Simple approach but spawns multiple processes.Mode 2 - FFmpeg With Map (No Audio): Uses FFmpeg’s filter_complex to process multiple segments in one command. Video only processing.
Mode 3 - FFmpeg With Map (With Audio): Same as Mode 2 but includes audio stream processing.
Key Performance Indicator (KPI): The primary metric is FPS (Frames Per Second) representing transcoding throughput. Higher FPS indicates faster processing. The speedup ratio (PyNvVideoCodec FPS / FFmpeg FPS) shows the performance advantage of using PyNvVideoCodec.
How the Benchmark Works#
The benchmark follows these steps:
Video Generation (first run only): Creates a test video using FFmpeg with the mandelbrot pattern and audio. The video includes both H.264 video and AAC audio tracks. A short base clip is generated and then looped to reach the target duration.
Segment Creation: Generates random non-overlapping segments within the video. Each segment has a configurable minimum duration (default: 5 seconds).
PyNvVideoCodec Transcoding Test: Uses PyNvVideoCodec’s Transcoder class to transcode each segment. The decoder and encoder contexts are maintained across segments, avoiding repeated initialization.
FFmpeg Transcoding Tests: Runs the same segments through different FFmpeg configurations (Modes 1-3) for comparison.
Results Comparison: Calculates FPS for each method and generates a comparison report.
Logging: Saves detailed execution logs in JSON format for reproducibility and replay.
Running the Benchmark#
Basic Usage:
python segmented_transcode_benchmark.py
This runs the benchmark with default settings (1920x1080, 5 seconds, 10 segments, all 4 transcoding modes).
Command Line Options:
Option |
Default |
Description |
|---|---|---|
|
1920 |
Video width in pixels |
|
1080 |
Video height in pixels |
|
5400 |
Video duration in seconds |
|
30 |
Frames per second |
|
10 |
Number of random segments to transcode |
|
5 |
Segment duration in seconds |
|
0 1 2 3 |
Transcoding modes to benchmark (space-separated list) |
|
h264 |
Input codec: |
|
h264 |
Output codec: |
|
P1 |
Encoder preset (P1-P7) |
|
1 |
Number of concurrent threads |
|
250 |
GOP size for encoding |
|
0 |
GPU device ID |
|
(none) |
Use existing video file instead of generating |
|
(auto) |
Path to save execution log |
|
(none) |
Replay transcoding from a previous log file |
Example Commands:
# Run full benchmark with default settings (all 4 modes)
python segmented_transcode_benchmark.py

# Compare only PyNvVideoCodec vs basic FFmpeg
python segmented_transcode_benchmark.py -u 0 1

# Test only PyNvVideoCodec transcoding
python segmented_transcode_benchmark.py -u 0

# Custom video parameters with 10 segments
python segmented_transcode_benchmark.py -W 1920 -H 1080 -d 30 -s 10

# Use HEVC codec with 2 B-frames
python segmented_transcode_benchmark.py -ic hevc -c hevc -bf 2

# Use an existing video file
python segmented_transcode_benchmark.py -i /path/to/video.mp4

# Replay a previous benchmark run
python segmented_transcode_benchmark.py --replay logs/run_20240615_123045.json
Output Files:
logs/run_{timestamp}.json- Detailed execution logpynvc_out/- Transcoded segments from PyNvVideoCodecffmpeg_out/- Transcoded segments from FFmpeg Mode 1ffmpeg_fc_out/- Transcoded segments from FFmpeg Modes 2 and 3source_videos/- Generated source videos (reused in subsequent runs)
Expected Execution Time: Approximately 6 minutes on an L40G GPU with 3 threads.
Benchmark Environment#
Environment:
GPU: 1 x L40G (3 NVDECs)
CPU: AMD EPYC 7313P 16-Core Processor, 2 threads per core
OS: Ubuntu 22.04
Methodology#
Script to execute benchmark:
segmented_transcode_benchmark.pyDataset details:
Resolution: 1920x1080
Codec: H.264
Duration: 5400 seconds
Number of segments: 10
GOP Size: 250
Segment duration: 5 seconds
Transcoding parameters:
Output FPS: 30
Output B Frames: 0
Output Preset: P1
Benchmarks examine performance of different transcoding methods
Transcoding Methods:
PyNvVideoCodec transcoding: Uses PyNvVideoCodec with persistent context for segmented transcoding
FFmpeg without map: Uses HW accelerated FFmpeg with simple re-encoding, no mapping or container preservation
Benchmark Results#
The following results were obtained on the representative platform described in the Benchmark Environment section above. You can run the benchmark script in your own environment to obtain results specific to your hardware configuration.
Method |
Time (s) |
Throughput (FPS) |
|---|---|---|
PyNvVideoCodec transcoding |
2.31 |
1072.34 |
FFmpeg without map |
6.36 |
389.17 |
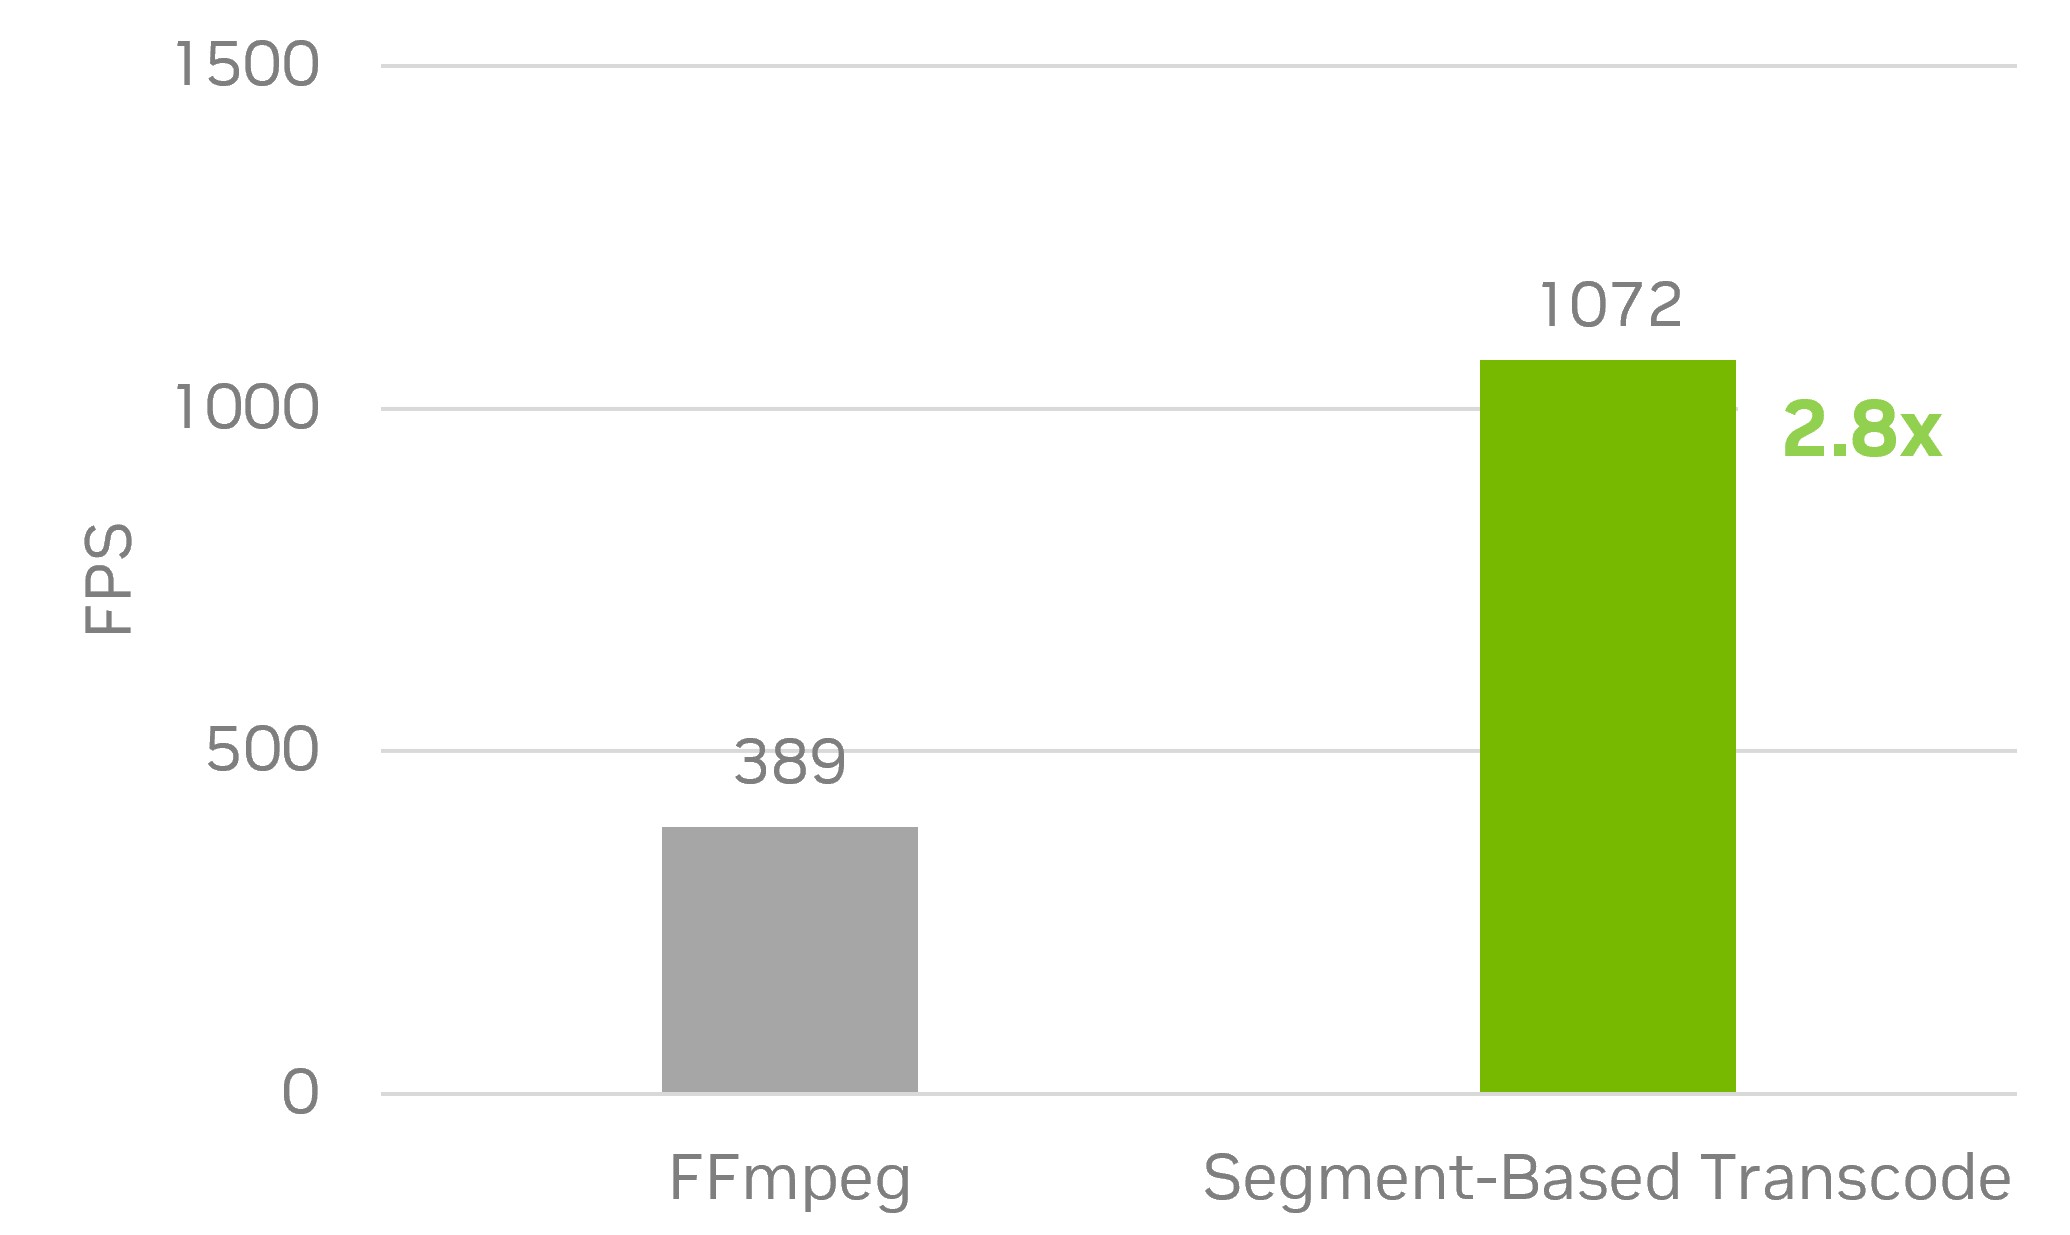
Figure 3 Performance Comparison: FFmpeg vs. PyNvVideoCodec Segment-Based Transcoding Bar chart comparing transcoding performance between standard FFmpeg approach and PyNvVideoCodec’s segment-based transcoding for H.264 1080p content, showing a 2.8x performance improvement#
Key Observations#
PyNvVideoCodec transcoding significantly outperforms FFmpeg’s standard transcoding method
For 1080p content, PyNvVideoCodec transcoding (1072 FPS) is approximately 2.8x faster than FFmpeg without map (389 FPS)
The performance advantage comes from persistent context management, avoiding repeated decoder and encoder initialization
This performance gain is particularly valuable for workflows that process multiple video segments, such as AI training datasets