Docker & Unreal Animation Pipeline Workflow#
In this setup, you will run the microservices in docker containers, render an avatar using Unreal Renderer and view it in a browser.
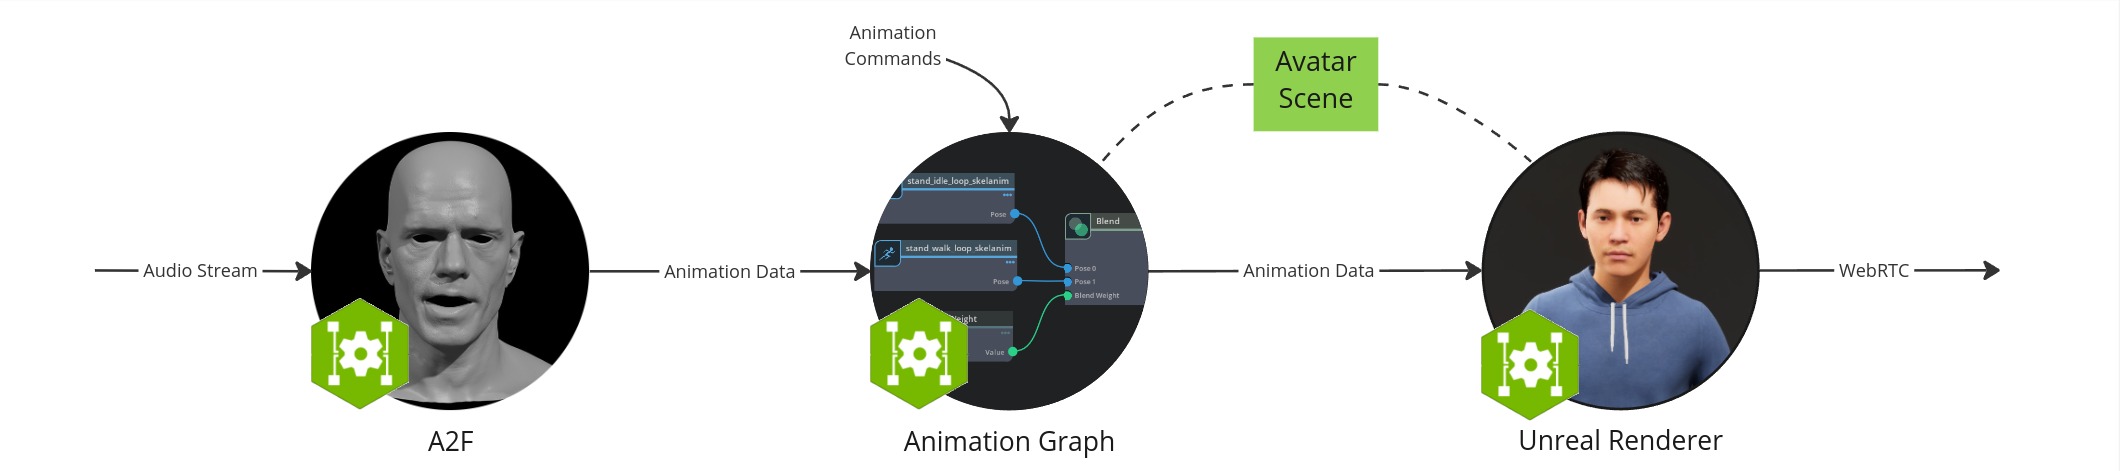
The workflow configuration consists of the following components:
Audio2Face-3D microservice: converts speech audio into facial animation including lip syncing.
Animation Graph microservice: manages and blendes animation states.
Unreal Renderer microservice: renderer that visualizes the animation data using Unreal Engine (UE).
Unreal Engine Pixel Streaming client: allows to viewing the animation from a browser.
Coturn TURN server: enables WebRTC communication between the browser and the Unreal Renderer microservice.
Avatar scene: A collection of 3D scene and avatar model data that is saved in a local folder.
Prerequisites#
Before you start, make sure to have installed and checked all prerequisites in the Development Setup.
Additionally, this section assumes that the following prerequisites are met:
You have installed Docker.
You have access to NVAIE, which is required to download the Animation Graph and Unreal Renderer microservices.
You also need to link a Github account to EPIC games. To do so:
Create a Github account if you do not have one already
Create an Epic Games account if you do not have one already
Authenticate with the GitHub Container Registry and note your access token
Finally, this workflow relies on the Unreal Renderer Microservice which is currently only available as Early Access. If you do not have access to this resource yet, reach out to your NVIDIA Account Manager.
Hardware Requirements#
Each component has its own hardware requirements. The requirements of the workflow are the sum of its components.
Audio2Face-3D microservice
Animation Graph microservice
Unreal Renderer microservice
The actual hardware requirements depend on the specific use case and the complexity of the avatar scene. Also the numbers vary on the actuall hardware used. The following table gives some guidance.
Component |
Minimum CPU |
Recommended CPU |
Minimum RAM |
Recommended RAM |
Recommended GPU |
Minimum GPU RAM |
Recommended GPU RAM |
Recommended Storage |
|---|---|---|---|---|---|---|---|---|
Audio2Face-3D |
4 cores |
8 cores |
4 GB |
8 GB |
Any NVIDIA GPU with compute capability |
10 GB |
12 GB |
10 GB |
Animation Graph |
< 1 core |
1 core |
1 GB |
4 GB |
< 1 NVIDIA RTX-compatible GPU |
1 GB |
1 GB |
5 GB |
Unreal Renderer |
1 cores |
2 cores |
8 GB |
32 GB |
1 NVIDIA GPU with compute and encoding capability |
6 GB |
8 GB |
10 GB |
Signalling Server |
1 cores |
2 cores |
1 GB |
2 GB |
0 |
0 GB |
0 GB |
0 GB |
TURN Server |
1 cores |
2 cores |
1 GB |
2 GB |
0 |
0 GB |
0 GB |
0 GB |
Total |
8 cores |
15 cores |
15 GB |
48 GB |
1-2 NVIDIA RTX-compatible GPU |
17 GB |
21 GB |
25 GB |
Create Directory#
This guide requires downloading some files. We recommend creating an empty directory to store them. The commands in this document assume you are running them from this directory.
mkdir ~/docker-unreal
cd ~/docker-unreal
Create Avatar Scene#
To create a customized MetaHuman avatar, follow the Avatar Customization guide to create and build a UE project.
Once you have the new UE project built, upload it to its own unreal-scene directory in your ~/docker-unreal:
mv <your_unreal_project>/linux ~/docker-unreal/unreal-scene
Create an empty text file called ngc_resource_path.txt in the ~/docker-unreal/unreal-scene folder:
touch ~/docker-unreal/unreal-scene/ngc_resource_path.txt
We will use this project when running the renderer in the Run Unreal Renderer Microservice section.
Pull Docker Containers#
docker pull nvcr.io/nvidia/ace/ia-animation-graph-microservice:1.1.0
docker pull nvcr.io/nvidia/ace/ia-unreal-renderer-microservice:0.1.3
docker pull nvcr.io/nim/nvidia/audio2face-3d:1.2
Start TURN Server#
A TURN server is required to allow the Unreal Renderer microservice to stream data to the browser through WebRTC.
To start a TURN server, download the TURN and Signalling server docker-compose file to your ~/docker-unreal directory. Then, open a new terminal and run the following:
cd ~/docker-unreal
UNREAL_ENGINE_RELEASE_SHORT=5.3 PUBLIC_IP=<CHANGE_WITH_YOUR_IP_ADDRESS> docker compose --file turn-and-signalling-server-docker-compose.yaml up --force-recreate
Starting the TURN server should take no more than a few seconds. The TURN server is ready when the output prints TCP listener opened on : <SOME_IP>:<SOME_PORT> or Http listening on *: 30080.
Note
If you are using a firewall, you may need to open ports:
sudo ufw allow 31720:31820/udp
sudo ufw allow 30080/tcp
sudo ufw allow 30080/udp
sudo ufw allow 8888/tcp
sudo ufw allow 8888/udp
sudo ufw allow 3478/tcp
sudo ufw allow 3478/udp
If you get a Permission Denied error while running these images, check the “Permission Denied For EpicGames Docker Images” chapter of the troubleshooting section.
At this point, you should be able to see the pixel streaming UI at http://localhost:30080, with a message “click to start”. Clicking this button will not work at this stage. Follow the next steps to stream the avatar.
The Pixel Streaming initial screen.#
Download Avatar Scene from NGC#
Download scene from NGC and save it to a default-avatar-scene_v1.1.5 directory in your main work directory.
Alternatively, you can download the scene using the ngc command.
ngc registry resource download-version "nvidia/ace/default-avatar-scene:1.1.5"
Run Animation Graph Microservice#
Run the following command to start the Animation Graph Microservice. This service manages and animates the avatar’s position.
docker run -it --rm --gpus all --network=host --name anim-graph-ms -v $(pwd)/default-avatar-scene_v1.1.5:/home/interactive-avatar/asset nvcr.io/nvidia/ace/ia-animation-graph-microservice:1.1.0
The service is up and running from the moment you see the log line app ready.
Note
If you encounter warnings about glfw failing to initialize, see the troubleshooting section.
Run Unreal Renderer Microservice#
docker run --env IAUEMS_ANIM_SOURCE_HOST=<CHANGE_WITH_YOUR_IP_ADDRESS> --env IAUEMS_ANIM_SOURCE_PORT=51000 --env IAUEMS_RESOURCE_DOWNLOAD_DESTINATION="/home/unreal-renderer" \
  -v $(pwd)/unreal-scene:/home/unreal-renderer/unrealEngineProject \
  --rm --gpus all --network=host --name renderer-ms --runtime=nvidia  nvcr.io/nvidia/ace/ia-unreal-renderer-microservice:0.1.3
Note
You should now see a slightly moving avatar rendering at http://localhost:30080 like below. If the UI is stuck in “WebRTC Connection Negotiated”:
Ensure the
PUBLIC_IPyou are using is accessible from both your Linux workstation and the computer running the browser. This might not be the case if you are in a private network (VPN). If this is the case, restart the renderer and the TURN server using a private IP address.Check the “Glfw Warnings” chapter of the troubleshooting section.
Run Audio2Face-3D Microservice#
Run the following command to run Audio2Face-3D:
# Create config file to disable bidirectional grpc
cat > deployment_config.yaml <<EOT
endpoints:
  use_bidirectional: false
EOT

# Run the docker container and mount the deployment config
docker run --rm --network=host -it --gpus all --entrypoint /bin/bash -w /opt/nvidia/a2f_pipeline -v ./deployment_config.yaml:/opt/configs/deployment_config.yaml nvcr.io/nim/nvidia/audio2face-3d:1.2
Generating TRT models:
# Generate the TRT models
./service/generate_trt_models.py
You should see the following line, when the model generation finishes successfully:
Model generation done.
Note
Note that generating models must be done every time the service is started unless they are cached explicitly. See Audio2Face-3D NIM Container Deployment and Configuration Guide for more information.
Launch service:
# Start A2F
/usr/local/bin/a2f_pipeline.run --deployment-config /opt/configs/deployment_config.yaml
The following log line appears when the service is ready:
[<date> <time>] [ global ] [info] Running...
Note
More details on Audio2Face-3D deployment can be found in Audio2Face-3D NIM Container Deployment and Configuration Guide.
Create stream ID#
Back in the main terminal, run the following commands to generate a new stream ID and create it in the Animation Graph and Unreal Renderer Microservices:
stream_id=$(uuidgen)
curl -X POST -s http://localhost:8020/streams/$stream_id
curl -s -X POST http://localhost:8021/streams/$stream_id -d ""
Test Audio2Face-3D#
Let’s now take a sample audio file to feed into Audio2Face-3D to drive the facial speaking animation.
Normally, you would send audio to Audio2Face-3D through its gRPC API. For convenience, a python script allows you to do this through the command line. Clone the ACE repo and follow the steps to setup the script.
The script comes with a sample audio file that is compatible with Audio2Face-3D. From the microservices/audio_2_face_microservice/1.2/scripts/audio2face_in_animation_pipeline_validation_app directory of the ACE repo, run the following command to send the sample audio file to Audio2Face-3D:
python3 validate.py -u 127.0.0.1:50000 -i $stream_id ../../example_audio/Mark_joy.wav
You can safely ignore any WavFileWarning warnings when running the script.
Note
The audio formats in the Audio2Face-3D microservice, Animation Graph microservice, and Omniverse Renderer microservice need to be configured in the same way.
At this stage, you should see the avatar’s lips move, and hear it speak the sentence from the audio file.
You can interrupt the request while the avatar is speaking with the HTTP API interruption endpoint:
curl -X DELETE -s http://localhost:8020/streams/$stream_id/requests/<request-id>
where <request-id> is the one sent by Audio2Face (currently hardcoded randomly in the validate.py script).
Clean up: Remove Streams#
You can clean up the streams using the following commands:
curl -X DELETE -s http://localhost:8020/streams/$stream_id
curl -X DELETE -s http://localhost:8021/streams/$stream_id