NVIDIA AI Enterprise Quick Start Guide
Minimal instructions for installing and configuring NVIDIA AI Enterprise.
About this Guide
NVIDIA AI Enterprise Quick Start Guide provides minimal instructions for a bare-metal, single-node deployment of NVIDIA AI Enterprise on a third-party NVIDIA-certified system and for using a Cloud License Service (CLS) instance to serve licenses.
If you need complete instructions for installing and configuring NVIDIA AI Enterprise, are using NVIDIA AI Enterprise in an NVIDIA vGPU deployment, or are using multiple nodes, refer to NVIDIA AI Enterprise User Guide.
If you are using Delegated License Service (DLS) instances to serve licenses, refer to NVIDIA License System User Guide.
1. Activating the Accounts for Getting NVIDIA AI Enterprise
- NVIDIA NGC™ , which provides access to all enterprise software, services, and management tools included in NVIDIA AI Enterprise
- NVIDIA Licensing Portal, which provides access to your entitlements and options for managing your NVIDIA AI Enterprise license servers
- NVIDIA Enterprise Support Portal, which provides access to NVIDIA AI Enterprise support services
These web properties can be reached from the NVIDIA Application Hub.
1.1. Before You Begin
Before following the procedures in this guide, ensure that the following prerequisites are met:
- You have a third-party NVIDIA-certified server platform that supports NVIDIA AI Enterprise.
- One or more NVIDIA GPUs that support NVIDIA AI Enterprise is installed in your server platform.
- You have a valid NVIDIA software subscription.
- If you are using a GPU that is supplied with NVIDIA AI Enterprise software, such as the NVIDIA H100 PCIe GPU, your NVIDIA AI Enterprise license for H100 has been activated.
For information about supported hardware and software, and any known issues for this release of NVIDIA AI Enterprise, refer to NVIDIA AI Enterprise Release Notes.
1.2. Your Order Confirmation Message
After your order for NVIDIA AI Enterprise is processed, you will receive an order confirmation message to which your NVIDIA Entitlement Certificate is attached. Your NVIDIA Entitlement Certificate contains your product activation keys and provides instructions for using the certificate.
If you are a data center administrator, follow the instructions in the NVIDIA Entitlement Certificate to use the certificate. Otherwise, forward your order confirmation message, including the attached NVIDIA Entitlement Certificate, to a data center administrator in your organization.
1.3. NVIDIA Enterprise Account Requirements
To get NVIDIA AI Enterprise, you must have a suitable NVIDIA Enterprise Account for getting NVIDIA AI Enterprise and technical support from NVIDIA.
- If you have previously purchased NVIDIA AI Enterprise, you
already have a suitable NVIDIA Enterprise Account.
To use this account to get NVIDIA AI Enterprise, download the software assets that you require from the NVIDIA AI Enterprise Infra Release 4.2 collection on NVIDIA NGC. For details, refer to Accessing the NVIDIA AI Enterprise Collection.
- If you have obtained an evaluation license but have not previously
purchased NVIDIA AI Enterprise, you do not have a suitable NVIDIA Enterprise Account.
To create a suitable NVIDIA Enterprise Account, follow the Register link in the instructions for using the certificate to create an account for your purchased licenses. You can choose to create a separate account for your purchased licenses or link your existing account for an evaluation license to the account for your purchased licenses.
- To create a separate account for your purchased licenses, follow the instructions in Creating your NVIDIA Enterprise Account, specifying a different e-mail address than the address with which you created your existing account.
- To link your existing account for an evaluation license to the account for your purchased licenses, follow the instructions in Linking an Evaluation Account to an NVIDIA Enterprise Account for Purchased Licenses, specifying the e-mail address with which you created your existing account.
- If you have not previously purchased NVIDIA AI Enterprise, you do
not have a suitable NVIDIA Enterprise Account.
To create a suitable NVIDIA Enterprise Account, follow the Register link in the instructions for using the certificate to create your account. For details, refer to Creating your NVIDIA Enterprise Account.
1.3.1. Creating your NVIDIA Enterprise Account
For details of these web properties, refer to Activating the Accounts for Getting NVIDIA AI Enterprise.
If you already have an account, skip this task and go to Installing Your NVIDIA AI Enterprise License Server and License Files.
- To create a separate account for your purchased licenses, perform this task, specifying a different e-mail address than the address with which you created your existing account.
- To link your existing account for an evaluation license to the account for your purchased licenses, follow the instructions in Linking an Evaluation Account to an NVIDIA Enterprise Account for Purchased Licenses, specifying the e-mail address with which you created your existing account.
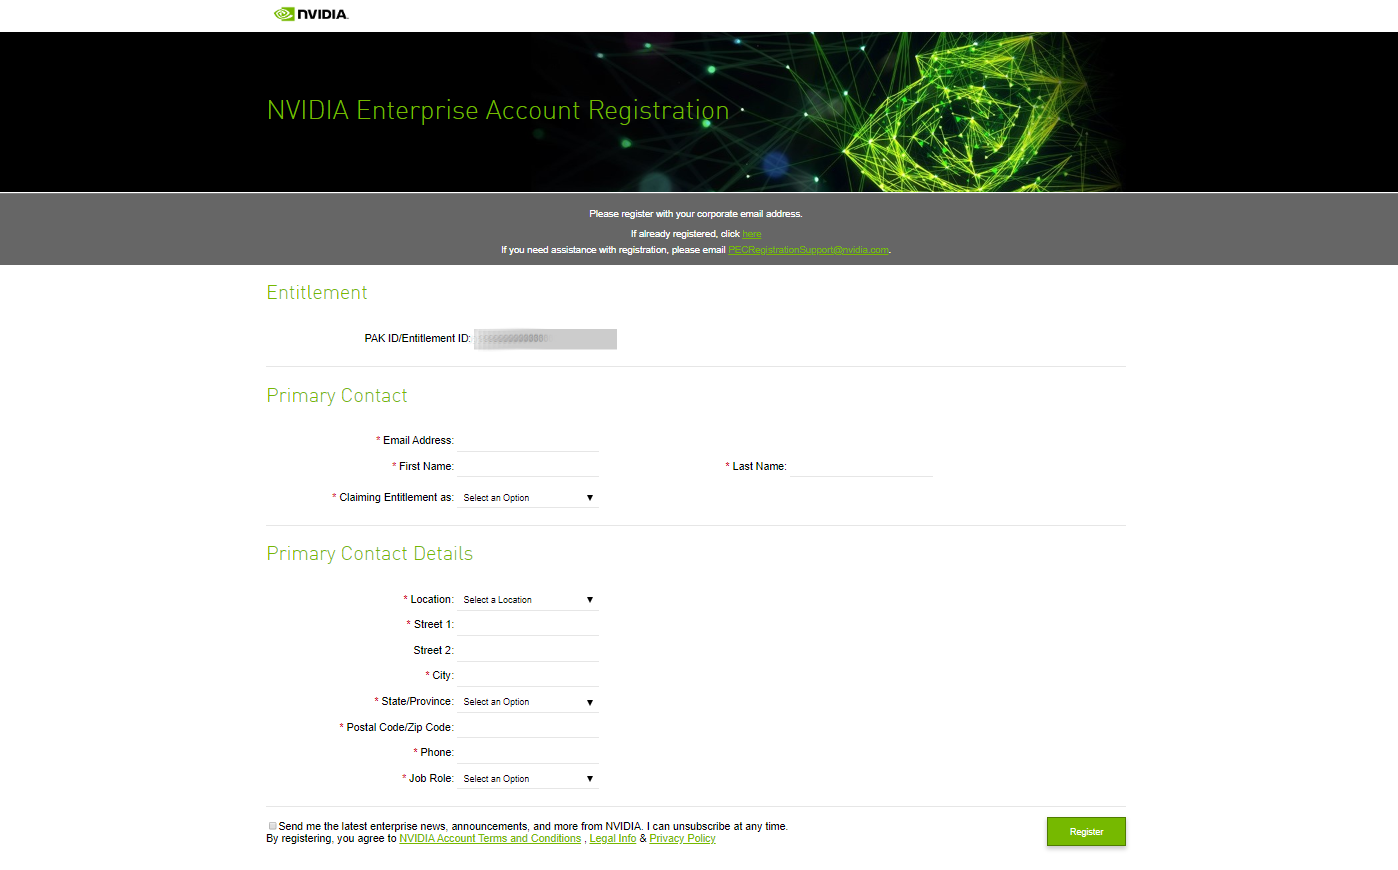
- In the instructions for using your NVIDIA Entitlement Certificate, follow the Register link.
- Fill out the form on the NVIDIA Enterprise Account Registration page and click REGISTER. A message confirming that an account has been created appears. An e-mail instructing you to log in to your account on the NVIDIA Application Hub is sent to the e-mail address you provided.
- Open the e-mail instructing you to log in to your account and click Log In.
- On the NVIDIA Application Hub Login page that opens, in the text-entry field, type the e-mail address you provided and click Sign In.
- On the Create Your Account page that opens, provide and confirm a password for the account and click Create Account. A message prompting you to verify your e-mail address appears. An e-mail instructing you to verify your e-mail address is sent to the e-mail address you provided.
- Open the e-mail instructing you to verify your e-mail address and click Verify Email Address. A message confirming that your email address is confirmed appears.
1.3.2. Linking an Evaluation Account to an NVIDIA Enterprise Account for Purchased Licenses
If you want to create a separate account for your purchased licenses, follow the instructions in Creating your NVIDIA Enterprise Account, specifying a different e-mail address than the address with which you created your existing account.
- In the instructions for using the NVIDIA Entitlement Certificate for your purchased licenses, follow the Register link.
- Fill out the form on the NVIDIA Enterprise Account
Registration page, specifying the e-mail address with which you
created your existing account, and click Register.
- When a message stating that your e-mail address is already linked to an
evaluation account is displayed, click LINK TO NEW
ACCOUNT.

2. Installing Your NVIDIA AI Enterprise License Server and License Files
The NVIDIA License System is used to serve a pool of floating licenses to licensed NVIDIA software products. The NVIDIA License System is configured with licenses obtained from the NVIDIA Licensing Portal.
2.1. Introduction to NVIDIA Software Licensing
To activate licensed functionalities, a licensed client must obtain a software license when it is booted.
A client with a network connection obtains a license by leasing it from a NVIDIA License System service instance. The service instance serves the license to the client over the network from a pool of floating licenses obtained from the NVIDIA Licensing Portal. The license is returned to the service instance when the licensed client no longer requires the license.
2.2. Performing an Express CLS Installation
If no default CLS instance exists, NVIDIA License System creates a default instance for you. After you perform an express installation, no further action is required to complete the initial configuration of the CLS instance. The instance is ready to serve licenses to clients.
- In the NVIDIA Licensing Portal, navigate to the organization or virtual
group for which you want to perform an express CLS installation.
- If you are not already logged in, log in to the NVIDIA Application Hub and click NVIDIA LICENSING PORTAL to go to the NVIDIA Licensing Portal.
- Optional: If your assigned roles give you access to multiple virtual groups, click View settings at the top right of the page and in the My Info window that opens, select the virtual group from the Virtual Group drop-down list, and close the My Info window.
- In the left navigation pane of the NVIDIA Licensing Portal dashboard,
expand LICENSE SERVER and click CREATE
SERVER.
The Create License Server wizard opens.
- On the Step 1 - Identification page of the wizard,
provide the details of your license server.
- In the Name field, enter your choice of name for the license server.
- In the Description field, enter a text description of the license server. This description is required and will be displayed on the details page for the license server that you are creating.
- Click NEXT STEP.
- On the Step 2 - Features page of the wizard, add the
licenses for the products that you want to allot to this license server.
For each product, add the licenses as follows:
- In the list of products, select the product for which you want to add licenses.
- In the text-entry field in the ADDED column, enter the number of licenses for the product that you want to add.
- Click NEXT STEP.
- On the Step 3 – Environment page, select Cloud (CLS), select the Express installation option that is added to the page, and click NEXT STEP.
- On the Step 4-Configuration page, select the leasing mode that you require. If the license server is to be used for networked licensing, you can simplify the management of licensed products on the server by selecting the Standard Networked Licensing mode.
- Click CREATE SERVER.
2.3. Generating a Client Configuration Token for a CLS Instance
- Log in to the NVIDIA Application Hub and click NVIDIA LICENSING PORTAL to go to the NVIDIA Licensing Portal.
- If your assigned roles give you access to multiple virtual groups, select the virtual group for which you are managing licenses from the list of virtual groups at the top right of the NVIDIA Licensing Portal dashboard.
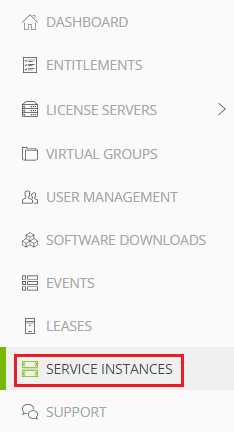
- In the left navigation pane, click SERVICE
INSTANCES.
- On the Service Instances page that opens, from the Actions menu for the CLS instance for which you want to generate a client configuration token, choose Generate client configuration token.
- In the Generate Client Configuration Token pop-up window
that opens, select the references that you want to include in the client
configuration token.
- From the list of scope references, select the scope references that you
want to include.
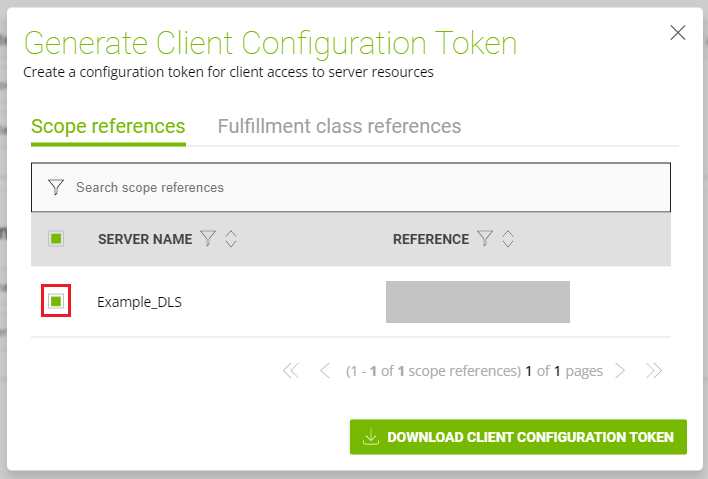
You must select at least one scope reference.
Each scope reference specifies the license server that will fulfil a license request.
- Optional: Click the Fulfillment class references tab, and
from the list of fulfillment class references, select the fulfillment
class references that you want to include.
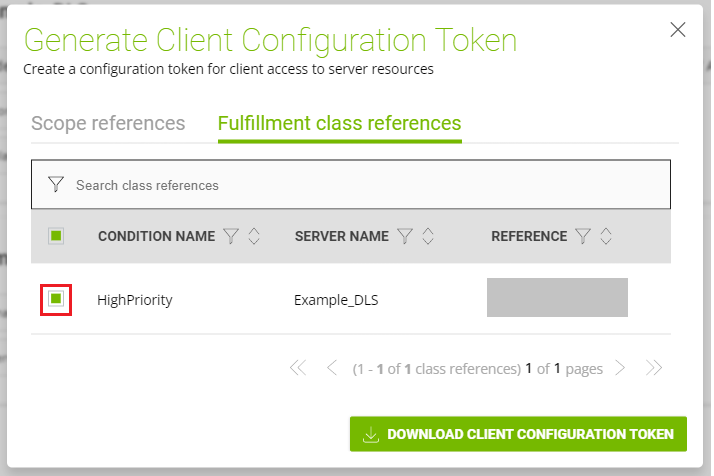
Including fulfillment class references is optional. - Optional: In the Expiration section, select an expiration date for the client configuration token. If you do not select a date, the default token expiration time is 12 years.
- Click DOWNLOAD CLIENT CONFIGURATION TOKEN.
- From the list of scope references, select the scope references that you
want to include.
3. Installing and Licensing NVIDIA AI Enterprise Software Components
3.1. The Enterprise Catalog
The NVIDIA AI Enterprise Software Suite is distributed through the Enterprise Catalog. After you access the Enterprise Catalog, you will see the NVIDIA AI Enterprise Software Suite collection. Detailed documentation makes it easy to utilize the software, and if additional support is required, users can submit the ticket directly from the portal.
3.1.1. Accessing the NVIDIA AI Enterprise Collection
- Go to the NVIDIA AI Enterprise collection on NVIDIA NGC and, if prompted, log in.
- Under Enterprise Collections, scroll down to and click the NVIDIA AI Enterprise Infra Release 4.2 collection.
- On the NVIDIA AI Enterprise Infra Release 4.2 page that opens, click the Entities tab to review the software assets in the NVIDIA AI Enterprise Infra Release 4.2 collection.
- Click the software asset that you are interested in to learn more about or download the asset.
3.1.2. Resources
- GPU Operator
- Network Operator
- NVIDIA Base Command Manager Essentials
- vGPU Guest Driver, Ubuntu 22.04
- Go to the Enterprise Catalog.
- Click the NVIDIA AI Enterprise Infra Release 4.2 collection.
- Click the Entities tab and select the resource you are interested in.
- Download the resource directly from the UI or use the displayed wget or CLI commands.
3.2. Installing the NVIDIA AI Enterprise Graphics Driver on Ubuntu from a Debian Package
The NVIDIA AI Enterprise graphics driver for Ubuntu is distributed as a Debian package file.
- Copy the NVIDIA AI Enterprise Linux driver package, for example nvidia-linux-grid-535_535.154.05_amd64.deb, to the guest VM where you are installing the driver.
- Log in to the guest VM as a user with sudo privileges.
- Open a command shell and change to the directory that contains the NVIDIA AI Enterprise Linux driver package.
- From the command shell, run the command to install the package.
$ sudo apt-get install ./nvidia-linux-grid-535_535.154.05_amd64.deb - Verify that the NVIDIA driver is operational.
- Reboot the system and log in.
- After the system has rebooted, confirm that you can see your NVIDIA vGPU device in the output from the
nvidia-smi command.
$ nvidia-smi
3.3. Configuring a Licensed Client
A client with a network connection obtains a license by leasing it from a NVIDIA License System service instance. The service instance serves the license to the client over the network from a pool of floating licenses obtained from the NVIDIA Licensing Portal. The license is returned to the service instance when the licensed client no longer requires the license.
The graphics driver creates a default location in which to store the client configuration token on the client.
The process for configuring a licensed client is the same for CLS and DLS instances but depends on the OS that is running on the client.
3.3.1. Configuring a Licensed Client on Linux with Default Settings
Perform this task from the client.
- As root, open the file /etc/nvidia/gridd.conf in a
plain-text editor, such as vi.
$ sudo vi /etc/nvidia/gridd.conf
Note: You can create the /etc/nvidia/gridd.conf file by copying the supplied template file /etc/nvidia/gridd.conf.template. - Add the FeatureType configuration parameter to the file
/etc/nvidia/gridd.conf on a new line as
FeatureType="value".
value depends on the type of the GPU assigned to the licensed client that you are configuring.
GPU Type Value NVIDIA vGPU 1. NVIDIA AI Enterprise automatically selects the correct type of license based on the vGPU type. Physical GPU The feature type of a GPU in pass-through mode or a bare-metal deployment: - 0: NVIDIA Virtual Applications
- 2: NVIDIA RTX Virtual Workstation
- 4: NVIDIA Virtual Compute Server
This example shows how to configure a licensed Linux client for NVIDIA Virtual Compute Server.
# /etc/nvidia/gridd.conf.template - Configuration file for NVIDIA Grid Daemon
…
# Description: Set Feature to be enabled
# Data type: integer
# Possible values:
# 0 => for unlicensed state
# 1 => for NVIDIA vGPU
# 2 => for NVIDIA RTX Virtual Workstation
# 4 => for NVIDIA Virtual Compute Server
FeatureType=4
...
- Copy the client configuration token to the /etc/nvidia/ClientConfigToken directory.
- Ensure that the file access modes of the client configuration token allow the
owner to read, write, and execute the token, and the group and others only to
read the token.
- Determine the current file access modes of the client configuration
token.
# ls -l client-configuration-token-directory
- If necessary, change the mode of the client configuration token to
744.
# chmod 744 client-configuration-token-directory/client_configuration_token_*.tok
- client-configuration-token-directory
- The directory to which you copied the client configuration token in the previous step.
- Determine the current file access modes of the client configuration
token.
- Save your changes to the /etc/nvidia/gridd.conf file and close the file.
- Restart the nvidia-gridd service.
The NVIDIA service on the client should now automatically obtain a license from the CLS or DLS instance.
3.3.2. Verifying the NVIDIA AI Enterprise License Status of a Licensed Client
After configuring a client with an NVIDIA AI Enterprise license, verify the license status by displaying the licensed product name and status.
To verify the license status of a licensed client, run nvidia-smi with the –q or --query optionfrom the licensed client, not the hypervisor host. If the product is licensed, the expiration date is shown in the license status.
nvidia-smi -q
==============NVSMI LOG==============

Timestamp                                 : Wed Nov 23 10:52:59 2022
Driver Version                            : 525.60.06
CUDA Version                              : 12.0

Attached GPUs                             : 2
GPU 00000000:02:03.0
    Product Name                          :
    Product Brand                         : NVIDIA Virtual Compute Server
    Product Architecture                  : Ampere
    Display Mode                          : Enabled
    Display Active                        : Disabled
    Persistence Mode                      : Enabled
    MIG Mode
        Current                           : Disabled
        Pending                           : Disabled
    Accounting Mode                       : Disabled
    Accounting Mode Buffer Size           : 4000
    Driver Model
        Current                           : N/A
        Pending                           : N/A
    Serial Number                         : N/A
    GPU UUID                              : GPU-ba5b1e9b-1dd3-11b2-be4f-98ef552f4216
    Minor Number                          : 0
    VBIOS Version                         : 00.00.00.00.00
    MultiGPU Board                        : No
    Board ID                              : 0x203
    Board Part Number                     : N/A
    GPU Part Number                       : 25B6-890-A1
    Module ID                             : N/A
    Inforom Version
        Image Version                     : N/A
        OEM Object                        : N/A
        ECC Object                        : N/A
        Power Management Object           : N/A
    GPU Operation Mode
        Current                           : N/A
        Pending                           : N/A
    GSP Firmware Version                  : N/A
    GPU Virtualization Mode
        Virtualization Mode               : VGPU
        Host VGPU Mode                    : N/A
    vGPU Software Licensed Product
        Product Name                      : NVIDIA Virtual Compute Server
        License Status                    : Licensed (Expiry: 2022-11-23 10:41:16 GMT)
    …
    …
3.4. Installing NVIDIA Container Toolkit
Ensure that the following software is installed in the guest VM:
- Docker 20.10 for your Linux distribution. For instructions, refer to Install Docker Engine on Ubuntu in the Docker product manuals.
- The NVIDIA AI Enterprise graphics driver. For instructions, refer to Installing the NVIDIA AI Enterprise Graphics Driver on Ubuntu from a Debian Package.
- Set up the GPG key and configure apt to use NVIDIA Container Toolkit packages in the file
/etc/apt/sources.list.d/nvidia-docker.list.
$ distribution=$(. /etc/os-release;echo $ID$VERSION_ID)
$ curl -s -L https://nvidia.github.io/nvidia-docker/gpgkey | sudo apt-key add -
$ curl -s -L https://nvidia.github.io/nvidia-docker/$distribution/nvidia-docker.list | sudo tee /etc/apt/sources.list.d/nvidia-docker.list
- Download information from all configured sources about the latest versions of the
packages and install the nvidia-container-toolkit package.
$ sudo apt-get update && sudo apt-get install -y nvidia-container-toolkit
- Restart the Docker service.
$ sudo systemctl restart docker
3.5. Verifying the Installation of NVIDIA Container Toolkit
- Run the nvidia-smi command contained in the latest official
NVIDIA CUDA Toolkit image that is compatible with the release
of the NVIDIA CUDA Toolkit driver that is running on your
machine.Note: Do not use a release of the NVIDIA CUDA Toolkit image later than the release of the NVIDIA CUDA Toolkit driver that is running on your machine. For a list of all NVIDIA CUDA Toolkit images, refer to nvidia/cuda on Docker Hub.
$ docker run --gpus all nvidia/cuda:12.2.0-base-ubuntu22.04 nvidia-smi - Start a GPU-enabled container on any two available GPUs.
$ docker run --gpus 2 nvidia/cuda:12.2.0-base-ubuntu22.04 nvidia-smi - Start a GPU-enabled container on two specific GPUs identified by their index
numbers.
$ docker run --gpus '"device=1,2"' nvidia/cuda:12.2.0-base-ubuntu22.04 nvidia-smi - Start a GPU-enabled container on two specific GPUs with one GPU identified by
its UUID and the other GPU identified by its index number.
$ docker run --gpus '"device=UUID-ABCDEF,1"' nvidia/cuda:12.2.0-base-ubuntu22.04 nvidia-smi - Specify a GPU capability for the container.
$ docker run --gpus all,capabilities=utility nvidia/cuda:12.2.0-base-ubuntu22.04 nvidia-smi
3.6. Installing Software Distributed as Container Images
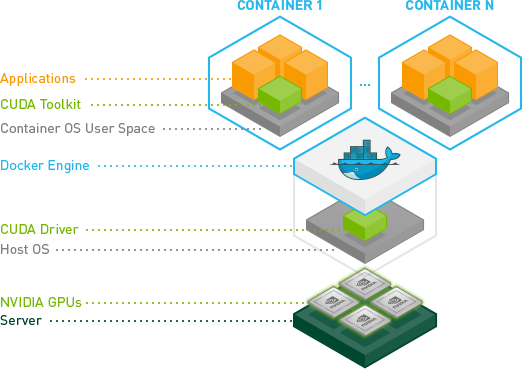
The NGC container images accessed through the NVIDIA Enterprise Catalog include the AI and data science applications and frameworks. Each container image for an AI and data science application or framework contains the entire user-space software stack that is required to run the application or framework, namely, the CUDA libraries, cuDNN, any required Magnum IO components, TensorRT, and the framework.
Ensure that you have completed the following tasks in NGC Private Registry User Guide:
- Applications:
- NVIDIA Clara Parabricks
- NVIDIA DeepStream
- NVIDIA Riva
- MONAI - Medical Open Network for Artificial Intelligence
- RAPIDS
- RAPIDS Accelerator for Apache Spark
- TAO
- Deep learning framework components:
- NVIDIA TensorRT
- NVIDIA Triton Inference Server
- PyTorch
- TensorFlow 2
3.7. Running ResNet-50 with TensorRT
- Launch the NVIDIA TensorRT container image on all GPUs in interactive mode,
specifying that the container will be deleted when it is stopped.
$ sudo docker run --gpus all -it --rm nvcr.io/nvaie/tensorrt:21.07-py3
- From within the container runtime, change to the directory that contains test
data for the ResNet-50 convolutional neural network.
# cd /workspace/tensorrt/data/resnet50
- Run the ResNet-50 convolutional neural network with FP32, FP16, and INT8
precision and confirm that each test is completed with the result
PASSED.
- To run ResNet-50 with the default FP32 precision, run this
command:
# trtexec --duration=90 --workspace=1024 --percentile=99 --avgRuns=100 \
--deploy=ResNet50_N2.prototxt --batch=1 --output=prob
- To run ResNet-50 with FP16 precision, add the --fp16
option:
# trtexec --duration=90 --workspace=1024 --percentile=99 --avgRuns=100 \
--deploy=ResNet50_N2.prototxt --batch=1 --output=prob --fp16
- To run ResNet-50 with INT8 precision, add the --int8
option:
# trtexec --duration=90 --workspace=1024 --percentile=99 --avgRuns=100 \
--deploy=ResNet50_N2.prototxt --batch=1 --output=prob --int8
- To run ResNet-50 with the default FP32 precision, run this
command:
- Press Ctrl+P, Ctrl+Q to exit the container runtime and return to the Linux command shell.
3.8. Running ResNet-50 with TensorFlow
- Launch the TensorFlow 1 container image on all GPUs in interactive mode,
specifying that the container will be deleted when it is stopped.
$ sudo docker run --gpus all -it --rm \
nvcr.io/nvaie/tensorflow:21.07-tf1-py3
- From within the container runtime, change to the directory that contains test
data for cnn example.
# cd /workspace/nvidia-examples/cnn
- Run the ResNet-50 training test with FP16 precision.
# python resnet.py --layers 50 -b 64 -i 200 -u batch --precision fp16
- Confirm that all operations on the application are performed correctly and that a set of results is reported when the test is completed.
- Press Ctrl+P, Ctrl+Q to exit the container runtime and return to the Linux command shell.
A. Obtaining NVIDIA Base Command Manager Essentials
NVIDIA Base Command™ Manager Essentials streamlines cluster provisioning, workload management, and infrastructure monitoring in the data center. In bare-metal deployments, NVIDIA Base Command Manager Essentials simplifies the installation of operating systems supported by NVIDIA Base Command Manager Essentials.
- Request your NVIDIA Base Command Manager Essentials product keys by sending email with your entitlement certificate to sw-bright-sales-ops@NVIDIA.onmicrosoft.com. After your entitlement certificate has been reviewed, you will receive a product key from which you can generate a license key for the number of licenses that you purchased.
- Go to the NGC Enterprise Catalog.
- Click the NVIDIA AI Enterprise Infra Release 4.2 collection.
- Click the Entities tab and under Resources, select the NVIDIA Base Command Manager Essentials ISO for your operating system, and download it.
B. Additional Information
Additional information about the software components of NVIDIA AI Enterprise is available in the documentation for these entities.
Infrastructure and Workload Management Components
Tools for AI Development and Use Cases
- NVIDIA Clara Parabricks
- NVIDIA DeepStream
- NVIDIA DGL
- NVIDIA Maxine
- NVIDIA Modulus
- MONAI (Medical Open Network for Artificial Intelligence) Enterprise
- NVIDIA NeMo™
- PyTorch
- NVIDIA RAPIDS
- NVIDIA RAPIDS Accelerator for Apache Spark
- NVIDIA Riva
- TAO Toolkit
- NVIDIA TensorRT
- TensorFlow
- NVIDIA Triton Inference Server
- NVIDIA Triton Management Service
Notices
Notice
This document is provided for information purposes only and shall not be regarded as a warranty of a certain functionality, condition, or quality of a product. NVIDIA Corporation (“NVIDIA”) makes no representations or warranties, expressed or implied, as to the accuracy or completeness of the information contained in this document and assumes no responsibility for any errors contained herein. NVIDIA shall have no liability for the consequences or use of such information or for any infringement of patents or other rights of third parties that may result from its use. This document is not a commitment to develop, release, or deliver any Material (defined below), code, or functionality.
NVIDIA reserves the right to make corrections, modifications, enhancements, improvements, and any other changes to this document, at any time without notice.
Customer should obtain the latest relevant information before placing orders and should verify that such information is current and complete.
NVIDIA products are sold subject to the NVIDIA standard terms and conditions of sale supplied at the time of order acknowledgement, unless otherwise agreed in an individual sales agreement signed by authorized representatives of NVIDIA and customer (“Terms of Sale”). NVIDIA hereby expressly objects to applying any customer general terms and conditions with regards to the purchase of the NVIDIA product referenced in this document. No contractual obligations are formed either directly or indirectly by this document.
NVIDIA products are not designed, authorized, or warranted to be suitable for use in medical, military, aircraft, space, or life support equipment, nor in applications where failure or malfunction of the NVIDIA product can reasonably be expected to result in personal injury, death, or property or environmental damage. NVIDIA accepts no liability for inclusion and/or use of NVIDIA products in such equipment or applications and therefore such inclusion and/or use is at customer’s own risk.
NVIDIA makes no representation or warranty that products based on this document will be suitable for any specified use. Testing of all parameters of each product is not necessarily performed by NVIDIA. It is customer’s sole responsibility to evaluate and determine the applicability of any information contained in this document, ensure the product is suitable and fit for the application planned by customer, and perform the necessary testing for the application in order to avoid a default of the application or the product. Weaknesses in customer’s product designs may affect the quality and reliability of the NVIDIA product and may result in additional or different conditions and/or requirements beyond those contained in this document. NVIDIA accepts no liability related to any default, damage, costs, or problem which may be based on or attributable to: (i) the use of the NVIDIA product in any manner that is contrary to this document or (ii) customer product designs.
No license, either expressed or implied, is granted under any NVIDIA patent right, copyright, or other NVIDIA intellectual property right under this document. Information published by NVIDIA regarding third-party products or services does not constitute a license from NVIDIA to use such products or services or a warranty or endorsement thereof. Use of such information may require a license from a third party under the patents or other intellectual property rights of the third party, or a license from NVIDIA under the patents or other intellectual property rights of NVIDIA.
Reproduction of information in this document is permissible only if approved in advance by NVIDIA in writing, reproduced without alteration and in full compliance with all applicable export laws and regulations, and accompanied by all associated conditions, limitations, and notices.
THIS DOCUMENT AND ALL NVIDIA DESIGN SPECIFICATIONS, REFERENCE BOARDS, FILES, DRAWINGS, DIAGNOSTICS, LISTS, AND OTHER DOCUMENTS (TOGETHER AND SEPARATELY, “MATERIALS”) ARE BEING PROVIDED “AS IS.” NVIDIA MAKES NO WARRANTIES, EXPRESSED, IMPLIED, STATUTORY, OR OTHERWISE WITH RESPECT TO THE MATERIALS, AND EXPRESSLY DISCLAIMS ALL IMPLIED WARRANTIES OF NONINFRINGEMENT, MERCHANTABILITY, AND FITNESS FOR A PARTICULAR PURPOSE. TO THE EXTENT NOT PROHIBITED BY LAW, IN NO EVENT WILL NVIDIA BE LIABLE FOR ANY DAMAGES, INCLUDING WITHOUT LIMITATION ANY DIRECT, INDIRECT, SPECIAL, INCIDENTAL, PUNITIVE, OR CONSEQUENTIAL DAMAGES, HOWEVER CAUSED AND REGARDLESS OF THE THEORY OF LIABILITY, ARISING OUT OF ANY USE OF THIS DOCUMENT, EVEN IF NVIDIA HAS BEEN ADVISED OF THE POSSIBILITY OF SUCH DAMAGES. Notwithstanding any damages that customer might incur for any reason whatsoever, NVIDIA’s aggregate and cumulative liability towards customer for the products described herein shall be limited in accordance with the Terms of Sale for the product.
VESA DisplayPort
DisplayPort and DisplayPort Compliance Logo, DisplayPort Compliance Logo for Dual-mode Sources, and DisplayPort Compliance Logo for Active Cables are trademarks owned by the Video Electronics Standards Association in the United States and other countries.
HDMI
HDMI, the HDMI logo, and High-Definition Multimedia Interface are trademarks or registered trademarks of HDMI Licensing LLC.
Trademarks
NVIDIA, the NVIDIA logo, NVIDIA Maxwell, NVIDIA Pascal, NVIDIA Turing, NVIDIA Volta, Quadro, and Tesla are trademarks or registered trademarks of NVIDIA Corporation in the U.S. and other countries. Other company and product names may be trademarks of the respective companies with which they are associated.