Step 2: Set Up Required Infrastructure#
Spear Phishing
NVIDIA AI Workflows are designed to be deployed on a cloud-native Kubernetes-based platform, which can be deployed on-premise or using a cloud service provider (CSP).
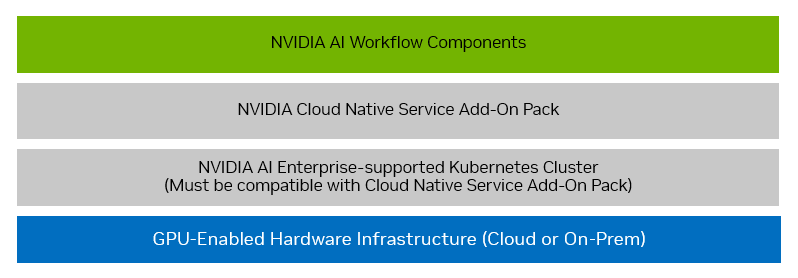
The infrastructure stack that will be set up for the workflow should follow the diagram below:

Follow the instructions in the sections below to set up the required infrastructure (denoted by the blue and grey boxes) that will be used in Step 3: Install Workflow Components (denoted by the green box).
GPU-Enabled Hardware Infrastructure#
NVIDIA AI Workflows at minimum require a single GPU-enabled node for running the provided example workload. Production deployments should be performed in an HA environment.
The following hardware specification for the GPU-enabled node is recommended for this workflow:
2x T4/A10/A30/A40/A100 (or newer) GPUs with more than or equal to 16 GB memory
32 vCPU Cores
128 GB RAM
1 TB HDD
Make a note of these hardware specifications, as you will use them in the following sections to provision the nodes used in the Kubernetes cluster.
Note
The Kubernetes cluster and Cloud Native Service Add-On Pack may have additional infrastructure requirements for networking, storage, services, etc. More detailed information can be found in the NVIDIA Cloud Native Service Add-On Pack Deployment Guide.
Kubernetes Cluster#
The workflow requires a Kubernetes cluster that is supported by NVIDIA AI Enterprise to be provisioned.
The Cloud Native Service Add-On Pack only supports a subset of NVIDIA AI Enterprise-supported Kubernetes distributions at this time. Specific supported distributions and the steps to provision a cluster can be found in the NVIDIA Cloud Native Service Add-On Pack Deployment Guide.
An example reference to provision a minimal cluster based on the NVIDIA AI Enterprise VMI, with NVIDIA Cloud Native Stack, can be found in the guide here.
Note
If your instance has a single GPU you will have to enable GPU-sharing. To do so, run the following commands on your instance:
 1cat << EOF >> time-slicing-config.yaml
 2apiVersion: v1
 3kind: ConfigMap
 4metadata:
 5  name: time-slicing-config
 6  namespace: nvidia-gpu-operator
 7data:
 8  any: |-
 9    version: v1
10    flags:
11      migStrategy: none
12    sharing:
13      timeSlicing:
14        renameByDefault: false
15        failRequestsGreaterThanOne: false
16        resources:
17          - name: nvidia.com/gpu
18            replicas: 4
19EOF
20
21kubectl create -f time-slicing-config.yaml
22
23kubectl patch clusterpolicy/cluster-policy -n nvidia-gpu-operator --type merge -p '{"spec": {"devicePlugin": {"config": {"name": "time-slicing-config"}}}}'
24
25kubectl patch clusterpolicy/cluster-policy -n nvidia-gpu-operator --type merge -p '{"spec": {"devicePlugin": {"config": {"name": "time-slicing-config", "default": "any"}}}}'
NVIDIA Cloud Native Service Add-On Pack#
Once the Kubernetes cluster has been provisioned, proceed to the next step in the NVIDIA Cloud Native Service Add-On Pack Deployment Guide to deploy the add-on pack on the cluster.
An example reference following the one from the previous section can be found here.
Workflow Components#
All of the workflow components are integrated and deployed on top of the the previously described infrastructure stack as a starting point. The workflow can then be customized and integrated with one’s own specific environment if required.
After the add-on pack has been installed, proceed to Step 3: Install Workflow Components to continue setting up the workflow.