Base Command Platform
Running NeMo Framework on Base Command Platform
Introduction
Training Large Language Models (LLMs) requires vast amounts of compute power, data, and a code base. LLM training jobs can take hours to months to run and need a robust platform to support users through the end-to-end training process.
The NVIDIA NeMo Framework provides a toolkit for developing, training and customizing LLMs and other Generative AI Workloads. NVIDIA Base Command Platform (BCP) brings a robust user interface for deploying and managing NeMo Framework on complex hardware.
This document covers how to use the NeMo Framework on BCP:
How to launch NeMo Framework in a Jupyter Notebook
How to launch long running training jobs
How to manage data and results of training jobs
Best practices for using BCP to run, manage and tune LLMs using the NeMo Framework
For more details on the NeMo Framework, visit Generative AI.
Base Command Platform Key Concepts
This section covers the key concepts and terms used in the Base Command Platform. For more information about the Base Command Platform, refer to the Base Comand Platform User Guide.
Jobs
A job is a unit of computation on BCP.
Examples of jobs include:
A container with JupyterLab exposed as an endpoint
A container to download and preprocess a dataset used for training
A specified container image, and a set of Python scripts which, when run, train an LLM on multiple replicas (compute nodes)
Workspaces
Workspaces are shareable read-write persistent storage mountable in jobs for concurrent use. Mounting workspaces in read-write mode (the default) in a job works well for use as a checkpoint folder. Workspaces can also be mounted to a job in read-only mode, making them ideal for configuration/code/input use cases in the comfort of knowing that the job will not corrupt/modify any of this data. Data persists after a job completes and is identical for each replica. Note that there are no file-locking mechanisms within workspaces, so the same file in a shared workspace could be written to by two jobs simultaneously, resulting in corruption.
Datasets
Datasets are the data inputs to a job, mounted as read-only to the location specified in the job. They can contain data or code. Like Workspaces, Datasets persist after a job completes and are identical for each replica.
Results
Results is a read-write mount specified by the job and captured by the system. All data written to results is available once the job completes, along with contents of stdout and stderr. Results persist after a job completes, and are unique for each replica - they are not shared amongst nodes in a multinode job.
Prerequisites
To run NeMo workloads on BCP, you will need the following:
Access to BCP on DGX Cloud
Permission to create workspaces within BCP
The latest version of the NGC CLI installed and configured on your local machine, which must be coming from an “allowed” IP. This guide was tested with NGC version 3.33.0
If you wish to follow along with the examples in this document you will also need the following:
Access to an ACE in DGX Cloud with at least 4 DGX A100 or DGX H100 nodes
At least 1.5TB of storage quota
Using NeMo on Base Command Platform
There are two main ways to run NeMo Framework jobs on BCP. The first is to launch a JupyterLab environment and interact with NeMo Framework from a Jupyter notebook. The second is to launch a batch job that runs scripts for non-interactive work.
The JupyterLab method is usually used when learning the environment and preparing your code and launch scripts. Once you have your launch scripts prepared, the preferred method of running a sustained training job is to launch a batch job - this means others in your BCP organization or team can re-use your launch command with repeatable results.
Running NeMo Framework in a Batch Job on BCP
You can run most LLM training jobs as batch jobs on BCP. These jobs can run for multiple days and require large amounts of resources.
In this section, we step through the process of training an LLM on Base Command Platform using the NeMo Framework. Throughout, we will work in the context of a specific example. We will be using the 8B parameter GPT model. However, we will indicate where you can personalize the workflow to use your own model and data.
Training an LLM has three main stages:
Setup
Data preparation
Model pre-training
The following sections will walk through each step.
Setup
First, identify the org ID for the ACE you want to train your LLM on. This will be unique to each cluster.
You can find your org ID by running ngc org list on your local machine where NGC CLI is installed. This command lists all the orgs that you currently have access to. The output may look similar to the following:
+--------+---------------------------------+----------------+------------+
| Id     | Name                            | Description    | Type       |
+--------+---------------------------------+----------------+------------+
| 123456 | nv-dgx-cloud-org (abcdefghijkl) |                | ENTERPRISE |
+--------+---------------------------------+----------------+------------+
In the example above, the org would be abcdefghijkl. Note your org ID will be referenced throughout the document as <ORG ID>.
To shorten NGC commands, run ngc config set on your local machine, where you will launch commands and specify your NGC key, ACE, and org ID. By setting the default values, you won’t need to specify the --org, --team, and --ace flags in each command. The remainder of the doc assumes the config has been set locally with ngc config set.
Creating a Workspace
A workspace is needed to store dynamic code and intermediate data. NeMo Framework requires the launcher repository to be copied to a workspace and mounted during jobs. The workspace will contain the launching code, model configurations, datasets, and checkpoints.
To create a workspace, run the following command from a terminal on your local computer:
ngc workspace create --name nemo-framework
where:
nemo-framework is the name of the workspace. (You are welcome to replace the workspace name here, but
nemo-frameworkwill be used for the workspace name for the remainder of the document.)
To verify the workspace has been created successfully, run ngc workspace list | grep nemo-framework (replacing the workspace name as needed) which should contain the newly created workspace.
Mounting the Workspace Locally (Optional)
To view and update your config files and any training checkpoints, you can mount the workspace on your local machine.
To mount the workspace, run the following command:
ngc workspace mount \
   --mode RW \
   nemo-framework \
   <LOCAL-MOUNT-DIRECTORY>
where:
<LOCAL-MOUNT-DIRECTORY> is the path to mount the workspace locally on your computer
After mounting the workspace, cd into the directory and view the contents. At this point, it should be empty since no files have been written to it yet.
If you choose not to mount your workspace locally, job monitoring can be done once the NeMo job has started by either using NGC CLI’s exec functionality to interact with your config files and checkpoints or simply by viewing the job’s Log tab if you just want to observe basic job progress.
Data Preparation
To train an LLM using NeMo Framework on BCP we need to make sure that the training data is accessible through BCP and has been preprocessed to be optimally ingested by the NeMo Framework.
Uploading Datasets
The following are recommendations for getting your data into Base Command Platform:
Use a workspace to house the data if you want to co-locate the resulting model with the dataset
If the model location does not need to be co-located with the dataset, and if the dataset is completely static, consider using a dataset instead
If you can use a dataset, use the NGC CLI’s dataset import functionality to migrate data if possible
For this guide, the dataset will be downloaded via batch jobs and data is not uploaded directly via a workspace or dataset.
Config Files
If you need to make changes, copy a config file from the default config files into a workspace (you can either use a directory on a workspace being used for another purpose if necessary or create an entirely separate workspace for config files.)
Make the desired changes to the copied config file in the workspace.
When launching a NeMo FW job, ensure the workspace holding the config file modifications is mounted to the job, and set the NeMo FW config file path to target the newly modified config file.
Preprocessing the Dataset
The NeMo Framework supports processing custom text-based datasets for pre-training new models. The data preprocessor requires datasets to be cleansed, excluding any sensitive or improperly formatted data that is unsuitable for use during pre-training. Each file in the dataset needs to be in .json or, ideally, .jsonl format. Datasets can be downloaded from external sources or uploaded directly to the workspace.
The following example walks through downloading, extracting, concatenating, and preprocessing the SlimPajama dataset. While the remainder of the document will be based on the SlimPajama dataset, this general process can be followed for most custom datasets and will provide guidance on how to adapt as needed.
First, several scripts must be written to the workspace to download, extract, and concatenate files. On a local machine where NGC CLI is installed, create a new directory named “slim-pajama-scripts” and save the following files in the new directory. The files will be explained in the next sections.
NOTE: For the download.py file, the CHUNKS = 10 variable at the top of the script can be reduced to CHUNKS = 1 to only pull the first 6,000 files of the dataset for faster data prep. This is useful for quick workload validations that don’t rely on a complete dataset. The remainder of the document will assume all ten chunks are pulled from but the steps will still work if using less.
download.py
import os
import requests
import time

CHUNKS = 10
SHARDS = 6000

wrank = int(os.environ.get('RANK', 0))
wsize = int(os.environ.get('WORLD_SIZE', 0))

def download(url, filename, retry=False):
    if os.path.exists(filename):
        return

    response = requests.get(url)

    # In case of getting rate-limited, wait 3 seconds and retry the
    # download once.
    if response.status_code == 429 and not retry:
        time.sleep(3)
        download(url, filename, retry=True)

    if response.status_code != 200:
        return

    with open(filename, 'wb') as fn:
        fn.write(response.content)

def split_shards(wsize):
    shards = []
    shards_to_download = list(range(SHARDS))

    for shard in range(wsize):
        idx_start = (shard * SHARDS) // wsize
        idx_end = ((shard + 1) * SHARDS) // wsize
        shards.append(shards_to_download[idx_start:idx_end])
    return shards

for chunk in range(1, CHUNKS + 1):
    shards_to_download = split_shards(wsize)

    for shard in shards_to_download[wrank]:
        filename = f'example_train_chunk{chunk}_shard{shard}.jsonl.zst'
        url = f'https://huggingface.co/datasets/cerebras/SlimPajama-627B/resolve/main/train/chunk{chunk}/example_train_{shard}.jsonl.zst'
        download(url, filename)
extract.py
import os
import requests
import subprocess
from glob import glob

wrank = int(os.environ.get('RANK', 0))
wsize = int(os.environ.get('WORLD_SIZE', 0))

def split_shards(wsize, dataset):
    shards = []

    for shard in range(wsize):
        idx_start = (shard * len(dataset)) // wsize
        idx_end = ((shard + 1) * len(dataset)) // wsize
        shards.append(dataset[idx_start:idx_end])
    return shards

dataset = glob('example_train*')
shards_to_extract = split_shards(wsize, dataset)

for shard in shards_to_extract[wrank]:
    subprocess.run([f"unzstd --rm {shard}"], shell=True)
concat.sh
#!/bin/bash
shards_per_file=800
num_files=`ls example_train_chunk*.jsonl | wc -l`
files=(example_train_chunk*.jsonl)

# Find the ceiling of the result
shards=$(((num_files+shards_per_file-1)/shards_per_file ))

echo "Creating ${shards} combined chunks comprising ${shards_per_file} files each"

for ((i=0; i<$shards; i++)); do
  file_start=$((i*shards_per_file))

  if [[ $(((i+1)*shards_per_file)) -ge ${#files[@]} ]]; then
    file_stop=$((${#files[@]}-1))
  else
    file_stop=$(((i+1)*shards_per_file))
  fi

  echo "  Building chunk $i with files $file_start to $file_stop"
  cat ${files[@]:$file_start:$shards_per_file} > train_chunk_${i}.jsonl
done
Once the files are saved, upload them to the workspace with the following command:
ngc workspace upload \
    --source slim-pajama-scripts \
    --destination /scripts nemo-framework
This will upload the three scripts to the /scripts directory inside the workspace.
The SlimPajama dataset is hosted on HuggingFace as a collection of nearly 60,000 individual jsonl.zst files, each being about 16MB in size. The download.py script that was saved to the workspace earlier downloads all of the files in parallel and saves them to the workspace. While the files could be loaded with the HuggingFace Python library, it would take several orders of magnitude longer to fully download and is recommended to download each shard directly per the script.
To launch the download process, run the following batch job:
ngc base-command job run \
    --name slim-pajama-download \
    --priority NORMAL \
    --order 50 \
    --preempt RUNONCE \
    --min-timeslice 10h \
    --total-runtime 10h \
    --instance dgxa100.80g.8.norm \
    --workspace nemo-framework:/mount_workspace:RW \
    --image nvcr.io/nvaie/nemo-framework-training:23.11 \
    --result /results \
    --array-type "PYTORCH" \
    --replicas 2 \
    --commandline "mkdir -p /mount_workspace/data && \
    bcprun --nnodes 2 \
        --npernode=48 \
        --no_redirect \
        --cmd 'cd /mount_workspace/data && python3 ../scripts/download.py'"
This can finish in as little as 15 minutes on two nodes depending on network traffic. Once completed, there should be 59,165 dataset shards in the workspace, which can be verified by running the following job:
ngc base-command job run \
    --name slim-pajama-download-verification \
    --priority NORMAL \
    --order 50 \
    --preempt RUNONCE \
    --min-timeslice 1h \
    --instance dgxa100.80g.1.norm \
    --workspace nemo-framework:/mount_workspace:RW \
    --image nvcr.io/nvaie/nemo-framework-training:23.11 \
    --result /results \
    --commandline "echo 'Number of files:' \`ls /mount_workspace/data/*zst | wc -l\`"
This will launch a short job against the workspace using the smallest GPU instance type and display the number of files that were downloaded to the workspace. The result can be viewed by logging into the BCP web UI and navigating to the log page for the slim-pajama-download-verification job. If it worked, the output should say Number of files: 59166.
Each shard in the dataset is compressed with the .zst format, which is not uncommon for text-based datasets. All shards need to be decompressed to start preprocessing. The extract.py script that was uploaded to the workspace extracts all shards inside the workspace in parallel. Note that the zstd package is required to extract the files not in the NeMo Framework training container. The command below installs this package using apt.
To launch the extraction process, run the following batch job:
ngc base-command job run \
    --name slim-pajama-extract \
    --priority NORMAL \
    --order 50 \
    --preempt RUNONCE \
    --min-timeslice 10h \
    --total-runtime 10h \
    --instance dgxa100.80g.8.norm \
    --workspace nemo-framework:/mount_workspace:RW \
    --image nvcr.io/nvaie/nemo-framework-training:23.11 \
    --result /results \
    --array-type "PYTORCH" \
    --replicas 2 \
    --commandline "bcprun --nnodes 2 \
        --npernode=1 \
        --no_redirect \
        --cmd 'apt update && apt install -y zstd' && \
    bcprun --nnodes 2 \
        --npernode=48 \
        --no_redirect \
        --cmd 'cd /mount_workspace/data && python3 ../scripts/extract.py'"
This can take up to one hour on two nodes to finish. Once complete, there should be 59,165 extracted dataset shards with extension .jsonl and no compressed files in the workspace which can be verified with the following job:
ngc base-command job run \
    --name slim-pajama-extract-verification \
    --priority NORMAL \
    --order 50 \
    --preempt RUNONCE \
    --min-timeslice 1h \
    --instance dgxa100.80g.1.norm \
    --workspace nemo-framework:/mount_workspace:RW \
    --image nvcr.io/nvaie/nemo-framework-training:23.11 \
    --result /results \
    --commandline "echo 'Number of files:' \`ls /mount_workspace/data/*jsonl | wc -l\`"
This will launch a short job against the workspace using the smallest GPU instance type and display the number of files that were downloaded to the workspace. The result can be viewed by logging into the BCP web UI and navigating to the log page for the slim-pajama-extract-verification job. If it worked, it should say Number of files: 59166 in the output.
For optimal pre-training throughput, it is recommended to minimize the total number of files in the dataset to reduce disk and CPU I/O operations. Since SlimPajama contains nearly 60,000 files, all being approximately 43MB, the files should be combined into fewer, larger ones. There isn’t a hard rule for how large the files should be, but it is recommended to keep the combined files smaller than 45GB as larger files could throw Out of Memory errors.
The uploaded concat.sh script takes 800 individual files at a time and concatenates them to a single file of approximately 34GB each for a total of 74 combined files. Given that the shards are in .jsonl format, each line in all files is a valid JSON structure and can be safely concatenated without worrying about structure. If the files were in just .json format, they should be inspected for their structure to see if concatenating will alter the format.
To concatenate all files into larger chunks, launch the following batch job:
ngc base-command job run \
    --name "slim-pajama-concat" \
    --priority NORMAL \
    --order 50 \
    --preempt RUNONCE \
    --min-timeslice 10h \
    --total-runtime 10h \
    --instance dgxa100.80g.8.norm \
    --workspace nemo-framework:/mount_workspace:RW \
    --image nvcr.io/nvaie/nemo-framework-training:23.11 \
    --result /results \
    --commandline "cd /mount_workspace/data && \
        bash ../scripts/concat.sh && \
        rm example_train_chunk*.jsonl"
This can take four or more hours to finish. Once complete, there should be 74 larger chunks (0-73), each being 34GB with the exception of the last file which is only 29GB. This can be verified with the following job:
ngc base-command job run \
    --name slim-pajama-concat-verification \
    --priority NORMAL \
    --order 50 \
    --preempt RUNONCE \
    --min-timeslice 1h \
    --instance dgxa100.80g.1.norm \
    --workspace nemo-framework:/mount_workspace:RW \
    --image nvcr.io/nvaie/nemo-framework-training:23.11 \
    --result /results \
    --commandline "echo 'Number of files:' \`ls /mount_workspace/data/*jsonl | wc -l\`"
This will launch a short job against the workspace using the smallest GPU instance type and display the number of files that were downloaded to the workspace. The result can be viewed by logging into the BCP web UI and navigating to the log page for the slim-pajama-concat-verification job. If it worked, it should say Number of files: 74 in the output.
The dataset is ready for preprocessing once the individual shards are combined into the larger files. Preprocessing involves tokenizing the dataset and converting each file into a large binary and small index file for optimal I/O operations. NeMo Framework includes scripts to convert .jsonl files to the intended format. Various tokenizers can be used or a custom SentencePiece tokenizer can be trained during preprocessing. In this example, the BPE tokenizer used for GPT models is used.
To preprocess the concatenated shards, launch the following batch job:
ngc base-command job run \
    --name "preprocess-slim-pajama" \
    --priority NORMAL \
    --order 50 \
    --preempt RUNONCE \
    --min-timeslice 10h \
    --total-runtime 10h \
    --instance dgxa100.80g.8.norm \
    --replicas 2 \
    --array-type "PYTORCH" \
    --result /results \
    --image "nvcr.io/nvaie/nemo-framework-training:23.11" \
    --workspace nemo-framework:/mount_workspace:RW \
    --commandline "cd /opt/NeMo-Megatron-Launcher/launcher_scripts && \
    bcprun \
        --nnodes=1 \
        --npernode=1 \
        --no_redirect \
        --cmd 'mkdir -p /mount_workspace/data/bpe && \
            cd /mount_workspace/data/bpe && \
            wget https://huggingface.co/gpt2/resolve/main/vocab.json && \
            wget https://huggingface.co/gpt2/resolve/main/merges.txt' && \
    python3 main.py \
        launcher_scripts_path=/opt/NeMo-Megatron-Launcher/launcher_scripts \
        data_dir=/mount_workspace/data \
        base_results_dir=/mount_workspace/results \
        cluster_type=bcp \
        stages=[data_preparation] \
        data_preparation=generic/custom_dataset \
        data_preparation.run.node_array_size=\${NGC_ARRAY_SIZE} \
        data_preparation.run.cpus_per_node=512 \
        data_preparation.train_tokenizer=False \
        data_preparation.custom_dataset_dir=/mount_workspace/data \
        data_preparation.raw_dataset_files=/mount_workspace/data \
        data_preparation.tokenizer_library=megatron \
        data_preparation.tokenizer_model=null \
        data_preparation.tokenizer_type=GPT2BPETokenizer \
        data_preparation.vocab_file=/mount_workspace/data/bpe/vocab.json \
        data_preparation.merges_file=/mount_workspace/data/bpe/merges.txt && \
    rm -rf /mount_workspace/data/train_chunk*jsonl && \
    mv /mount_workspace/data/preprocessed/* /mount_workspace/data/"
On two nodes, this can take six or more hours to finish. Once complete, there will be 74 individual .bin files, each around 16GB, and 74 .idx files, each around 165MB, in the data/custom_dataset/preprocessed directory inside the workspace. This can be verified with the following job:
ngc base-command job run \
    --name slim-pajama-preprocess-verification \
    --priority NORMAL \
    --order 50 \
    --preempt RUNONCE \
    --min-timeslice 1h \
    --instance dgxa100.80g.1.norm \
    --workspace nemo-framework:/mount_workspace:RW \
    --image nvcr.io/nvaie/nemo-framework-training:23.11 \
    --result /results \
    --commandline "echo 'Number of binary files:' \`ls /mount_workspace/data/*bin | wc -l\` && \
    echo 'Number of index files:' \`ls /mount_workspace/data/*idx | wc -l\` && \
    echo 'File sizes:' \`du -sh /mount_workspace/data/*\`"
This will launch a short job against the workspace using the smallest GPU instance type and display the number of files that were downloaded to the workspace. The result can be viewed by logging into the BCP web UI and navigating to the log page for the slim-pajama-preprocess-verification job. If it worked, it should say:
Number of binary files: 74
Number of index files: 74
File sizes: 16G /mount_workspace/data/train_chunk_0.jsonl_text_document.bin
153M /mount_workspace/data/train_chunk_0.jsonl_text_document.idx
16G /mount_workspace/data/train_chunk_1.jsonl_text_document.bin
153M /mount_workspace/data/train_chunk_1.jsonl_text_document.idx
...
Model Training
Once the data has been prepared, it is time to train a model. NeMo Framework contains many predefined configuration files for various models, including the 8 billion parameter GPT model. This section will demonstrate how to initiate training in an 8B model on a variable number of nodes.
ngc base-command job run \
      --name "gpt-training-8b-bf16" \
      --instance dgxa100.80g.8.norm \
      --image "nvcr.io/nvaie/nemo-framework-training:23.11" \
      --result /results \
      --workspace nemo-framework:/mount_workspace:RW \
      --total-runtime 5D \
      --replicas 8 \
      --array-type PYTORCH \
      --commandline "\
      set -x && \
      python3 /opt/NeMo-Megatron-Launcher/launcher_scripts/main.py \
      cluster_type=bcp \
      stages=[training] \
      training=gpt3/7b_improved \
      launcher_scripts_path=/opt/NeMo-Megatron-Launcher/launcher_scripts \
      data_dir=/mount_workspace/data \
      base_results_dir=/mount_workspace/results \
      training.run.name=\"gpt_8b\" \
      training.run.time_limit=\"5-00:00:00\" \
      training.trainer.max_time=\"4:23:30:00\" \
      training.trainer.num_nodes=\${NGC_ARRAY_SIZE} \
      training.model.tokenizer.vocab_file=/mount_workspace/data/bpe/vocab.json \
      training.model.tokenizer.merge_file=/mount_workspace/data/bpe/merges.txt \
      training.model.data.data_prefix=[0.0135,'/mount_workspace/data/train_chunk_0.jsonl_text_document',0.0135,'/mount_workspace/data/train_chunk_1.jsonl_text_document',0.0135,'/mount_workspace/data/train_chunk_2.jsonl_text_document',0.0135,'/mount_workspace/data/train_chunk_3.jsonl_text_document',0.0135,'/mount_workspace/data/train_chunk_4.jsonl_text_document',0.0135,'/mount_workspace/data/train_chunk_5.jsonl_text_document',0.0135,'/mount_workspace/data/train_chunk_6.jsonl_text_document',0.0135,'/mount_workspace/data/train_chunk_7.jsonl_text_document',0.0135,'/mount_workspace/data/train_chunk_8.jsonl_text_document',0.0135,'/mount_workspace/data/train_chunk_9.jsonl_text_document',0.0135,'/mount_workspace/data/train_chunk_10.jsonl_text_document',0.0135,'/mount_workspace/data/train_chunk_11.jsonl_text_document',0.0135,'/mount_workspace/data/train_chunk_12.jsonl_text_document',0.0135,'/mount_workspace/data/train_chunk_13.jsonl_text_document',0.0135,'/mount_workspace/data/train_chunk_14.jsonl_text_document',0.0135,'/mount_workspace/data/train_chunk_15.jsonl_text_document',0.0135,'/mount_workspace/data/train_chunk_16.jsonl_text_document',0.0135,'/mount_workspace/data/train_chunk_17.jsonl_text_document',0.0135,'/mount_workspace/data/train_chunk_18.jsonl_text_document',0.0135,'/mount_workspace/data/train_chunk_19.jsonl_text_document',0.0135,'/mount_workspace/data/train_chunk_20.jsonl_text_document',0.0135,'/mount_workspace/data/train_chunk_21.jsonl_text_document',0.0135,'/mount_workspace/data/train_chunk_22.jsonl_text_document',0.0135,'/mount_workspace/data/train_chunk_23.jsonl_text_document',0.0135,'/mount_workspace/data/train_chunk_24.jsonl_text_document',0.0135,'/mount_workspace/data/train_chunk_25.jsonl_text_document',0.0135,'/mount_workspace/data/train_chunk_26.jsonl_text_document',0.0135,'/mount_workspace/data/train_chunk_27.jsonl_text_document',0.0135,'/mount_workspace/data/train_chunk_28.jsonl_text_document',0.0135,'/mount_workspace/data/train_chunk_29.jsonl_text_document',0.0135,'/mount_workspace/data/train_chunk_30.jsonl_text_document',0.0135,'/mount_workspace/data/train_chunk_31.jsonl_text_document',0.0135,'/mount_workspace/data/train_chunk_32.jsonl_text_document',0.0135,'/mount_workspace/data/train_chunk_33.jsonl_text_document',0.0135,'/mount_workspace/data/train_chunk_34.jsonl_text_document',0.0135,'/mount_workspace/data/train_chunk_35.jsonl_text_document',0.0135,'/mount_workspace/data/train_chunk_36.jsonl_text_document',0.0135,'/mount_workspace/data/train_chunk_37.jsonl_text_document',0.0135,'/mount_workspace/data/train_chunk_38.jsonl_text_document',0.0135,'/mount_workspace/data/train_chunk_39.jsonl_text_document',0.0135,'/mount_workspace/data/train_chunk_40.jsonl_text_document',0.0135,'/mount_workspace/data/train_chunk_41.jsonl_text_document',0.0135,'/mount_workspace/data/train_chunk_42.jsonl_text_document',0.0135,'/mount_workspace/data/train_chunk_43.jsonl_text_document',0.0135,'/mount_workspace/data/train_chunk_44.jsonl_text_document',0.0135,'/mount_workspace/data/train_chunk_45.jsonl_text_document',0.0135,'/mount_workspace/data/train_chunk_46.jsonl_text_document',0.0135,'/mount_workspace/data/train_chunk_47.jsonl_text_document',0.0135,'/mount_workspace/data/train_chunk_48.jsonl_text_document',0.0135,'/mount_workspace/data/train_chunk_49.jsonl_text_document',0.0135,'/mount_workspace/data/train_chunk_50.jsonl_text_document',0.0135,'/mount_workspace/data/train_chunk_51.jsonl_text_document',0.0135,'/mount_workspace/data/train_chunk_52.jsonl_text_document',0.0135,'/mount_workspace/data/train_chunk_53.jsonl_text_document',0.0135,'/mount_workspace/data/train_chunk_54.jsonl_text_document',0.0135,'/mount_workspace/data/train_chunk_55.jsonl_text_document',0.0135,'/mount_workspace/data/train_chunk_56.jsonl_text_document',0.0135,'/mount_workspace/data/train_chunk_57.jsonl_text_document',0.0135,'/mount_workspace/data/train_chunk_58.jsonl_text_document',0.0135,'/mount_workspace/data/train_chunk_59.jsonl_text_document',0.0135,'/mount_workspace/data/train_chunk_60.jsonl_text_document',0.0135,'/mount_workspace/data/train_chunk_61.jsonl_text_document',0.0135,'/mount_workspace/data/train_chunk_62.jsonl_text_document',0.0135,'/mount_workspace/data/train_chunk_63.jsonl_text_document',0.0135,'/mount_workspace/data/train_chunk_64.jsonl_text_document',0.0135,'/mount_workspace/data/train_chunk_65.jsonl_text_document',0.0135,'/mount_workspace/data/train_chunk_66.jsonl_text_document',0.0135,'/mount_workspace/data/train_chunk_67.jsonl_text_document',0.0135,'/mount_workspace/data/train_chunk_68.jsonl_text_document',0.0135,'/mount_workspace/data/train_chunk_69.jsonl_text_document',0.0135,'/mount_workspace/data/train_chunk_70.jsonl_text_document',0.0135,'/mount_workspace/data/train_chunk_71.jsonl_text_document',0.0135,'/mount_workspace/data/train_chunk_72.jsonl_text_document',0.0135,'/mount_workspace/data/train_chunk_73.jsonl_text_document'] \
      > >(tee -a /results/train_log.log) \
      2> >(tee -a /results/train_stderr.log >&2) && \
      rsync -P -rvh /mount_workspace/results /results"
where:
Total Runtime specifies a time limit, after which the job will be terminated by BCP. This job as specified will be terminated automatically after 5 days. If a different time limit is desired (ie. if a job should only run for 24 hours), specify it here.
Replicas should be updated depending on the desired number of nodes to test on. Note that while the number can be tweaked, it needs to be cleanly divisible by the global batch size (GBS), micro batch size (MBS), tensor parallelism (TP), and pipeline parallelism (PP), where
GBS % (MBS * num GPUs) / (PP * TP). For the 8B model, the default GBS is 512, MBS is 1, TP is 4, and PP is 1. Therefore, a replica value of 8 is valid as512 % (1 * (8 * 8)) / (1 * 4) == 0.training.run.time_limit: is a time after which NeMo Framework will automatically close itself. This is different from the Total Runtime above as this is not implemented by BCP and should theoretically involve a clean exit whereas the BCP kill will kill regardless of state. This can be set lower than the Total Runtime above if a clean exit is preferred.training.trainer.max_time: is a time after which NeMo Framework will finish the current forward pass if necessary and begin saving a checkpoint. It is recommended to have this 30-60 minutes before the overall time limit to provide extra wiggle room to save a checkpoint reflecting the final state of the model. Once the checkpoint is saved, the training process will exit cleanly.training.model.data.data_prefix: points to the custom dataset that was preprocessed.training=gpt3/7b_improved: is the model to train. The7b_improvedmodel in particular is equivalent to the 8B model. To train a different model, specify the config to use. The options can be found in the/opt/NeMo-Megatron-Launcher/launcher_scripts/conf/directory.
NOTE: The 8B model will take several days to train to convergence on smaller clusters. If a quick validation is desired, the gpt3/126m config can be used which can train to full convergence in less than two days on 4 DGX A100s.
As mentioned, the training process exercises many of the hardware components involved in the cluster. Once the job begins, you can view the telemetry in the BCP Web UI. The following screenshot is an example of the first 24 hours of a GPT 8B training session running on 8 nodes.
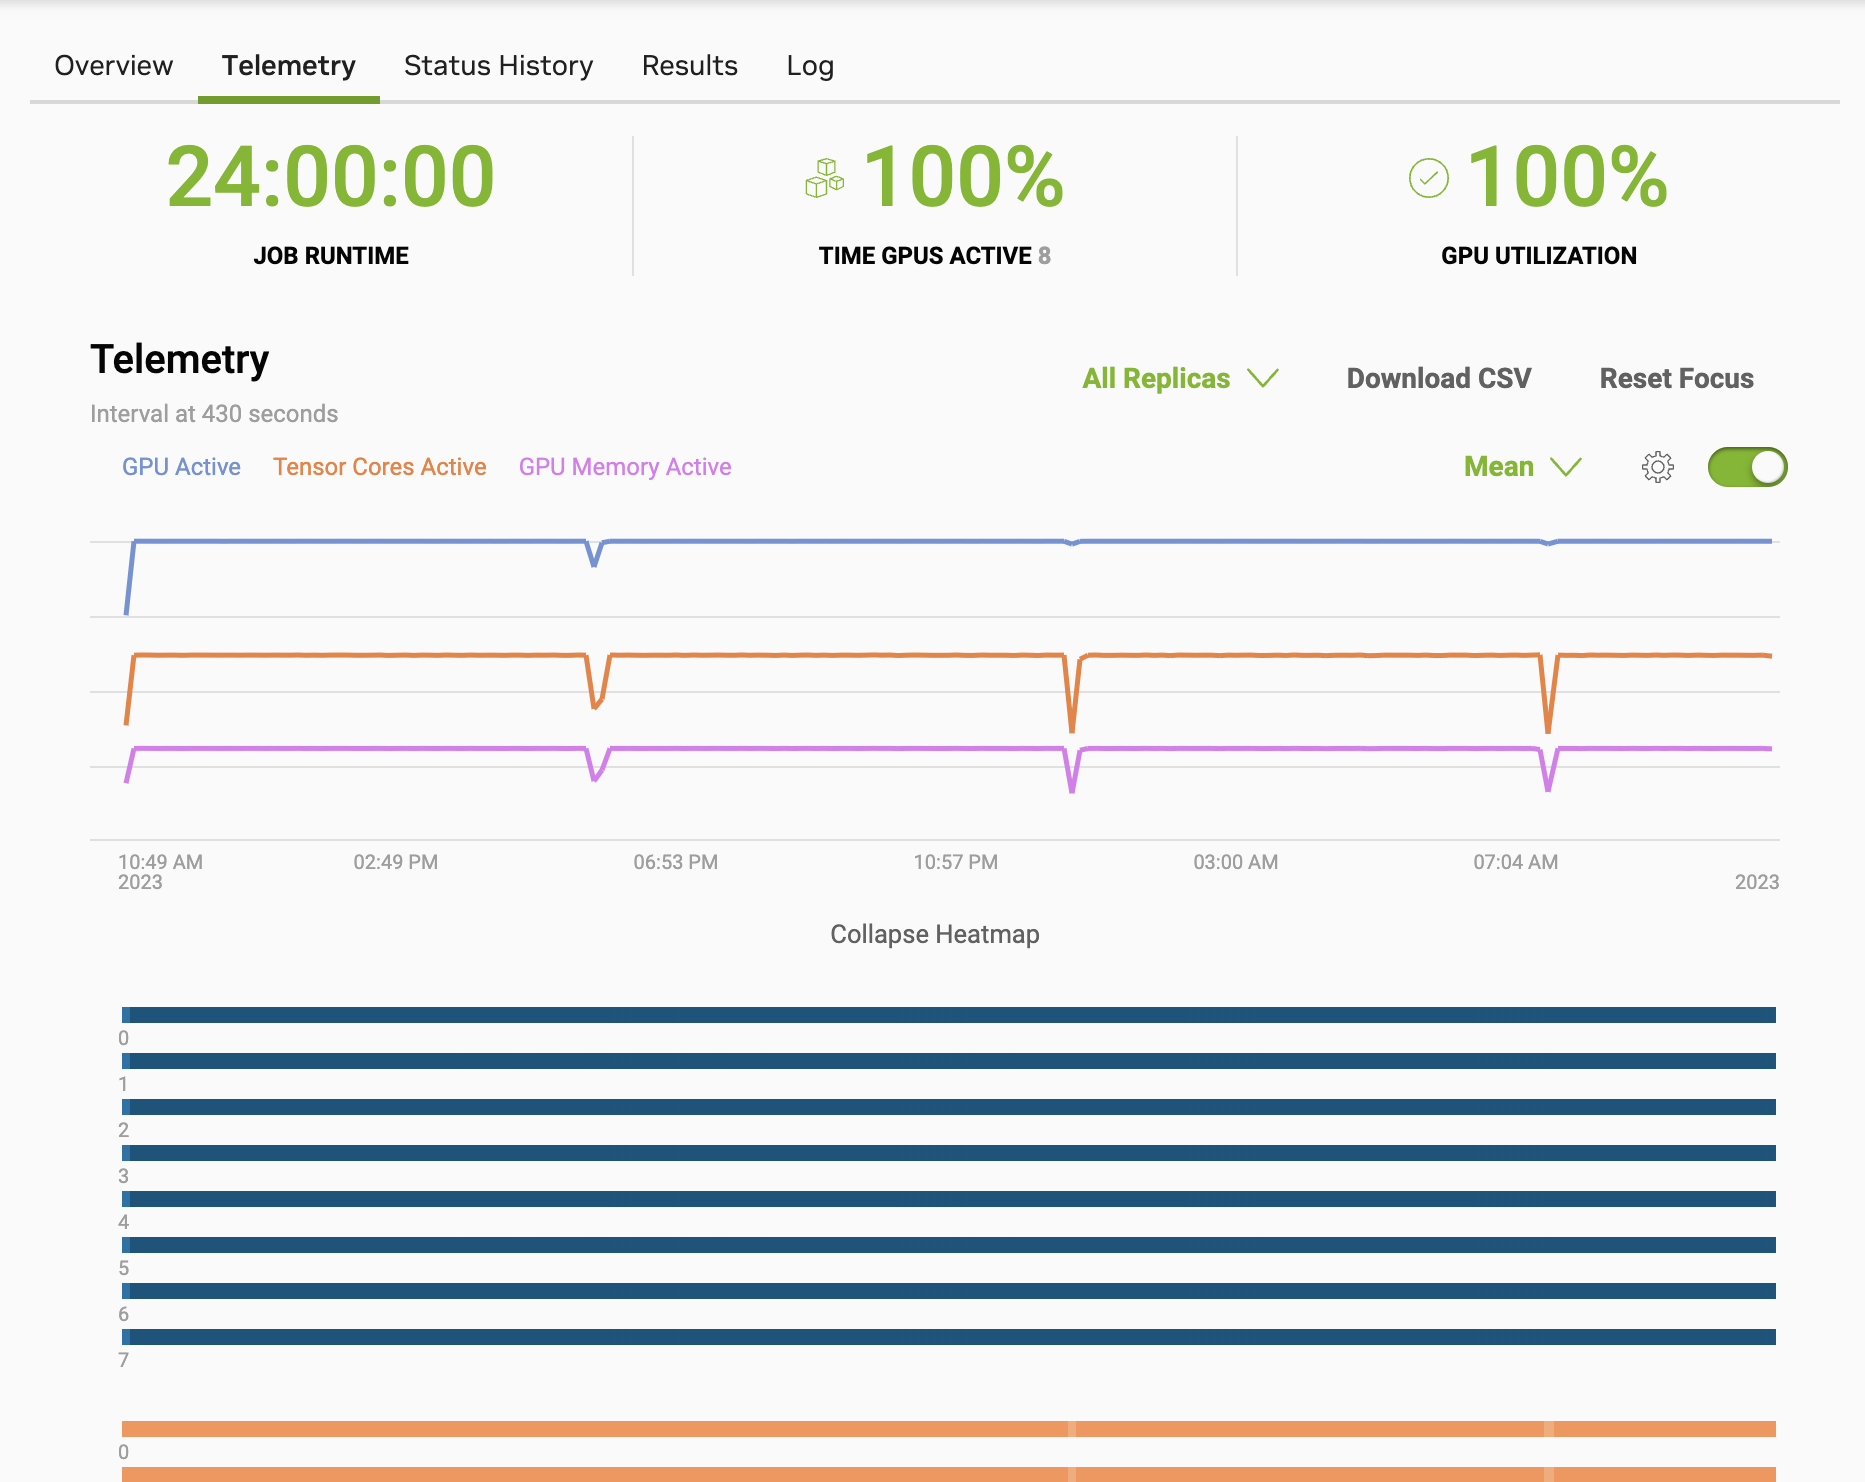
Training progress can be viewed in the Log section of the job page. This will display the percentage completion as well as the estimated time remaining to train the model. Note that the job may terminate prior to the model finishing training depending on the time limits specified. This is still valuable as the models should have a deterministic loss curve and can be compared for accuracy and if the job was run for long enough, can be used to certify the hardware is still healthy.
By default, after 2000 global steps, a checkpoint will be saved based on the current model state. For the 8B models using the latest training containers, each distributed checkpoint will be saved as a distributed directory of approximately 90GB in size.The checkpoints can be viewed in the workspace if mounted locally:
du -sh results/gpt_8b/results/checkpoints/*
90G       results/gpt_8b/results/checkpoints/megatron_gpt--val_loss=1.76-step=50000-consumed_samples=25600000.0
90G       results/gpt_8b/results/checkpoints/megatron_gpt--val_loss=1.76-step=50000-consumed_samples=25600000.0-last
90G       results/gpt_8b/results/checkpoints/megatron_gpt--val_loss=1.76-step=48000-consumed_samples=24576000.0
90G       results/gpt_8b/results/checkpoints/megatron_gpt--val_loss=1.76-step=46000-consumed_samples=23552000.0
90G       results/gpt_8b/results/checkpoints/megatron_gpt--val_loss=1.77-step=44000-consumed_samples=22528000.0
90G       results/gpt_8b/results/checkpoints/megatron_gpt--val_loss=1.77-step=42000-consumed_samples=21504000.0
90G       results/gpt_8b/results/checkpoints/megatron_gpt--val_loss=1.78-step=40000-consumed_samples=20480000.0
The above command indicates six checkpoints were saved with an additional copy of the latest checkpoint, including -last.ckpt in the name. In this case, the validation loss improved with every checkpoint, indicating the model was progressing as expected. By default, up to ten checkpoints with the lower val_loss score will be saved, with lower scores replacing higher ones once that limit is reached.
After every validation pass, the latest checkpoint will always be overwritten based on the current model regardless of the val_loss score. As such, in some scenarios, the -last.ckpt file might not have the lowest val_loss score if it did not decrease.
Running NeMo Framework in JupyterLab
You can use BCP to launch a job that deploys JupyterLab within the NeMo Framework training container. This is ideal for testing and developing models and workflows using the NeMo Framework.
To do so from the Base Command Platform UI:
From the Base Command Dashboard, select Jobs then Create Job. You will be taken to the Job Creation page.
Select your Accelerated Computing Environment, and specific compute instance. A single-node 8-GPU instance is recommended for starting out.
Select any datasets or workspaces to mount to your job.
From the
Container Selectionsection:Select
nvaie/nemo-framework-trainingfrom the ‘Select a Container’ dropdown menuSelect the latest tag from the ‘Select a Tag’ dropdown menu
Add
jupyter lab --ip=0.0.0.0 --allow-root --no-browser --NotebookApp.token='' --notebook-dir=/ --NotebookApp.allow_origin='*'in the Run Command boxSelect a HTTPS protocol port, and expose it on port
8888(Be sure to click Add to add the port).
Click the Launch Job button in the top right of the page to launch your JupyterLab NeMo job.
This will launch JupyterLab inside the training container on the specified compute instance, which will be exposed on port 8888, where the endpoint will be publicly accessible. Once the job is running, from the Job page, you can launch JupyterLab by clicking on the URL shown under the URL / Hostname in the Web UI job details “Overview” tab.
Within JupyterLab, launch a Python notebook and run import nemo in a cell to use NeMo within the notebook or use one of the existing notebooks in the /opt/NeMo directory inside the container.
Notices
Notice
This document is provided for information purposes only and shall not be regarded as a warranty of a certain functionality, condition, or quality of a product. NVIDIA Corporation (“NVIDIA”) makes no representations or warranties, expressed or implied, as to the accuracy or completeness of the information contained in this document and assumes no responsibility for any errors contained herein. NVIDIA shall have no liability for the consequences or use of such information or for any infringement of patents or other rights of third parties that may result from its use. This document is not a commitment to develop, release, or deliver any Material (defined below), code, or functionality.
NVIDIA reserves the right to make corrections, modifications, enhancements, improvements, and any other changes to this document, at any time without notice.
Customer should obtain the latest relevant information before placing orders and should verify that such information is current and complete.
NVIDIA products are sold subject to the NVIDIA standard terms and conditions of sale supplied at the time of order acknowledgement, unless otherwise agreed in an individual sales agreement signed by authorized representatives of NVIDIA and customer (“Terms of Sale”). NVIDIA hereby expressly objects to applying any customer general terms and conditions with regards to the purchase of the NVIDIA product referenced in this document. No contractual obligations are formed either directly or indirectly by this document.
NVIDIA products are not designed, authorized, or warranted to be suitable for use in medical, military, aircraft, space, or life support equipment, nor in applications where failure or malfunction of the NVIDIA product can reasonably be expected to result in personal injury, death, or property or environmental damage. NVIDIA accepts no liability for inclusion and/or use of NVIDIA products in such equipment or applications and therefore such inclusion and/or use is at customer’s own risk.
NVIDIA makes no representation or warranty that products based on this document will be suitable for any specified use. Testing of all parameters of each product is not necessarily performed by NVIDIA. It is customer’s sole responsibility to evaluate and determine the applicability of any information contained in this document, ensure the product is suitable and fit for the application planned by customer, and perform the necessary testing for the application in order to avoid a default of the application or the product. Weaknesses in customer’s product designs may affect the quality and reliability of the NVIDIA product and may result in additional or different conditions and/or requirements beyond those contained in this document. NVIDIA accepts no liability related to any default, damage, costs, or problem which may be based on or attributable to: (i) the use of the NVIDIA product in any manner that is contrary to this document or (ii) customer product designs.
No license, either expressed or implied, is granted under any NVIDIA patent right, copyright, or other NVIDIA intellectual property right under this document. Information published by NVIDIA regarding third-party products or services does not constitute a license from NVIDIA to use such products or services or a warranty or endorsement thereof. Use of such information may require a license from a third party under the patents or other intellectual property rights of the third party, or a license from NVIDIA under the patents or other intellectual property rights of NVIDIA.
Reproduction of information in this document is permissible only if approved in advance by NVIDIA in writing, reproduced without alteration and in full compliance with all applicable export laws and regulations, and accompanied by all associated conditions, limitations, and notices.
THIS DOCUMENT AND ALL NVIDIA DESIGN SPECIFICATIONS, REFERENCE BOARDS, FILES, DRAWINGS, DIAGNOSTICS, LISTS, AND OTHER DOCUMENTS (TOGETHER AND SEPARATELY, “MATERIALS”) ARE BEING PROVIDED “AS IS.” NVIDIA MAKES NO WARRANTIES, EXPRESSED, IMPLIED, STATUTORY, OR OTHERWISE WITH RESPECT TO THE MATERIALS, AND EXPRESSLY DISCLAIMS ALL IMPLIED WARRANTIES OF NONINFRINGEMENT, MERCHANTABILITY, AND FITNESS FOR A PARTICULAR PURPOSE. TO THE EXTENT NOT PROHIBITED BY LAW, IN NO EVENT WILL NVIDIA BE LIABLE FOR ANY DAMAGES, INCLUDING WITHOUT LIMITATION ANY DIRECT, INDIRECT, SPECIAL, INCIDENTAL, PUNITIVE, OR CONSEQUENTIAL DAMAGES, HOWEVER CAUSED AND REGARDLESS OF THE THEORY OF LIABILITY, ARISING OUT OF ANY USE OF THIS DOCUMENT, EVEN IF NVIDIA HAS BEEN ADVISED OF THE POSSIBILITY OF SUCH DAMAGES. Notwithstanding any damages that customer might incur for any reason whatsoever, NVIDIA’s aggregate and cumulative liability towards customer for the products described herein shall be limited in accordance with the Terms of Sale for the product.
Trademarks
NVIDIA, the NVIDIA logo, and Base Command are trademarks and/or registered trademarks of NVIDIA Corporation in the United States and other countries. Other company and product names may be trademarks of the respective companies with which they are associated.
Copyright
© 2023-2026 NVIDIA Corporation and Affiliates. All rights reserved.