Your First CloudXR Client for visionOS#
System Requirements#
Xcode 16.4 or later
visionOS Simulator 2.4
Make Your Project#
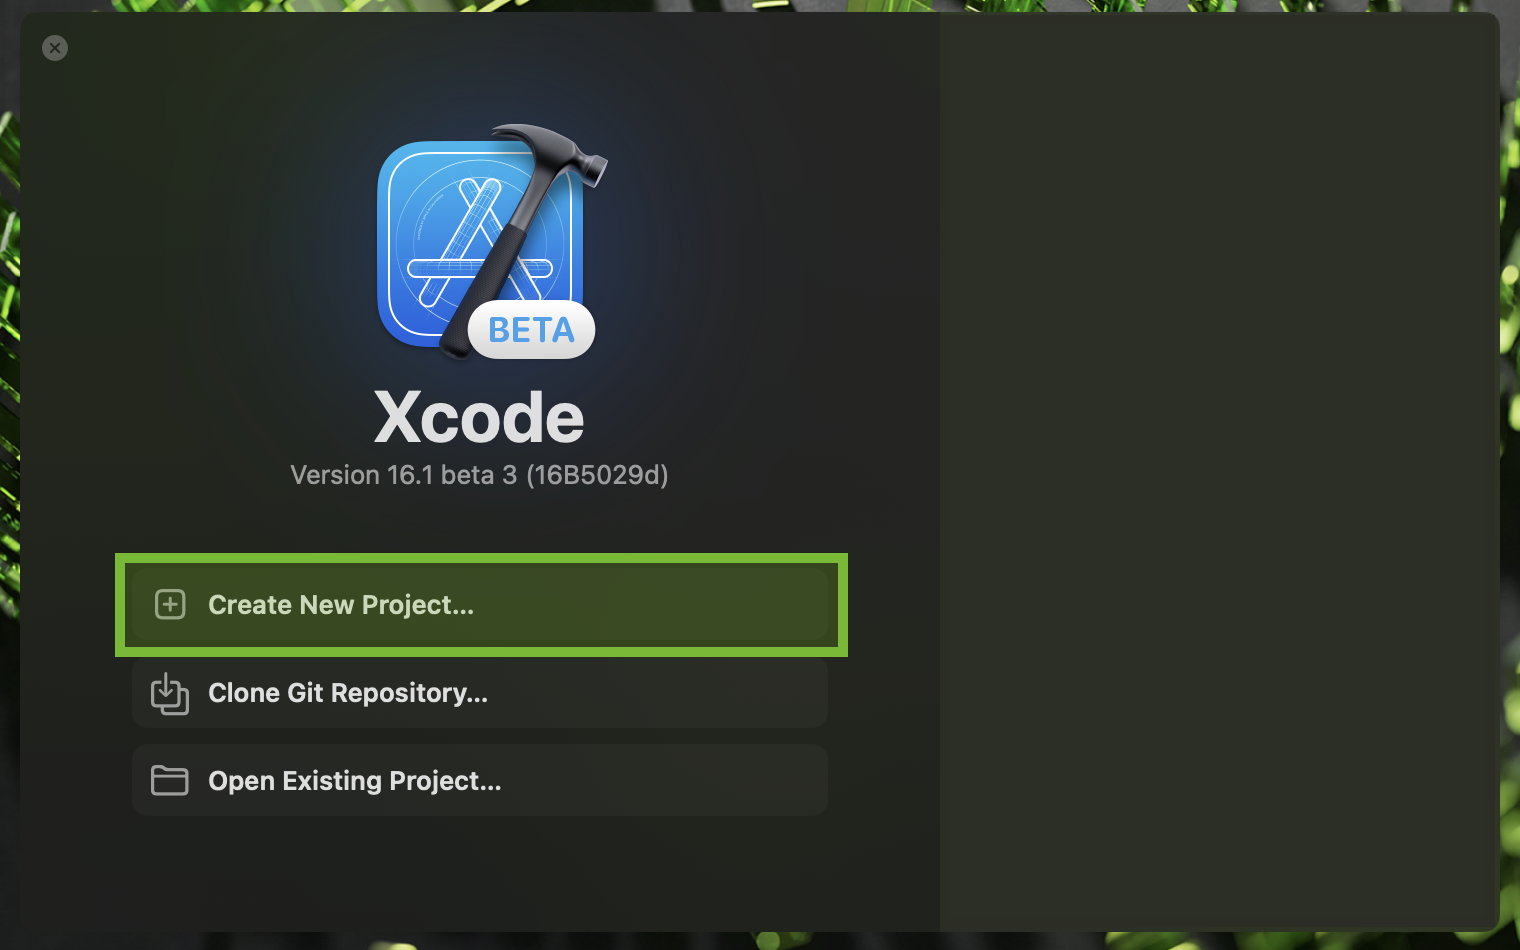
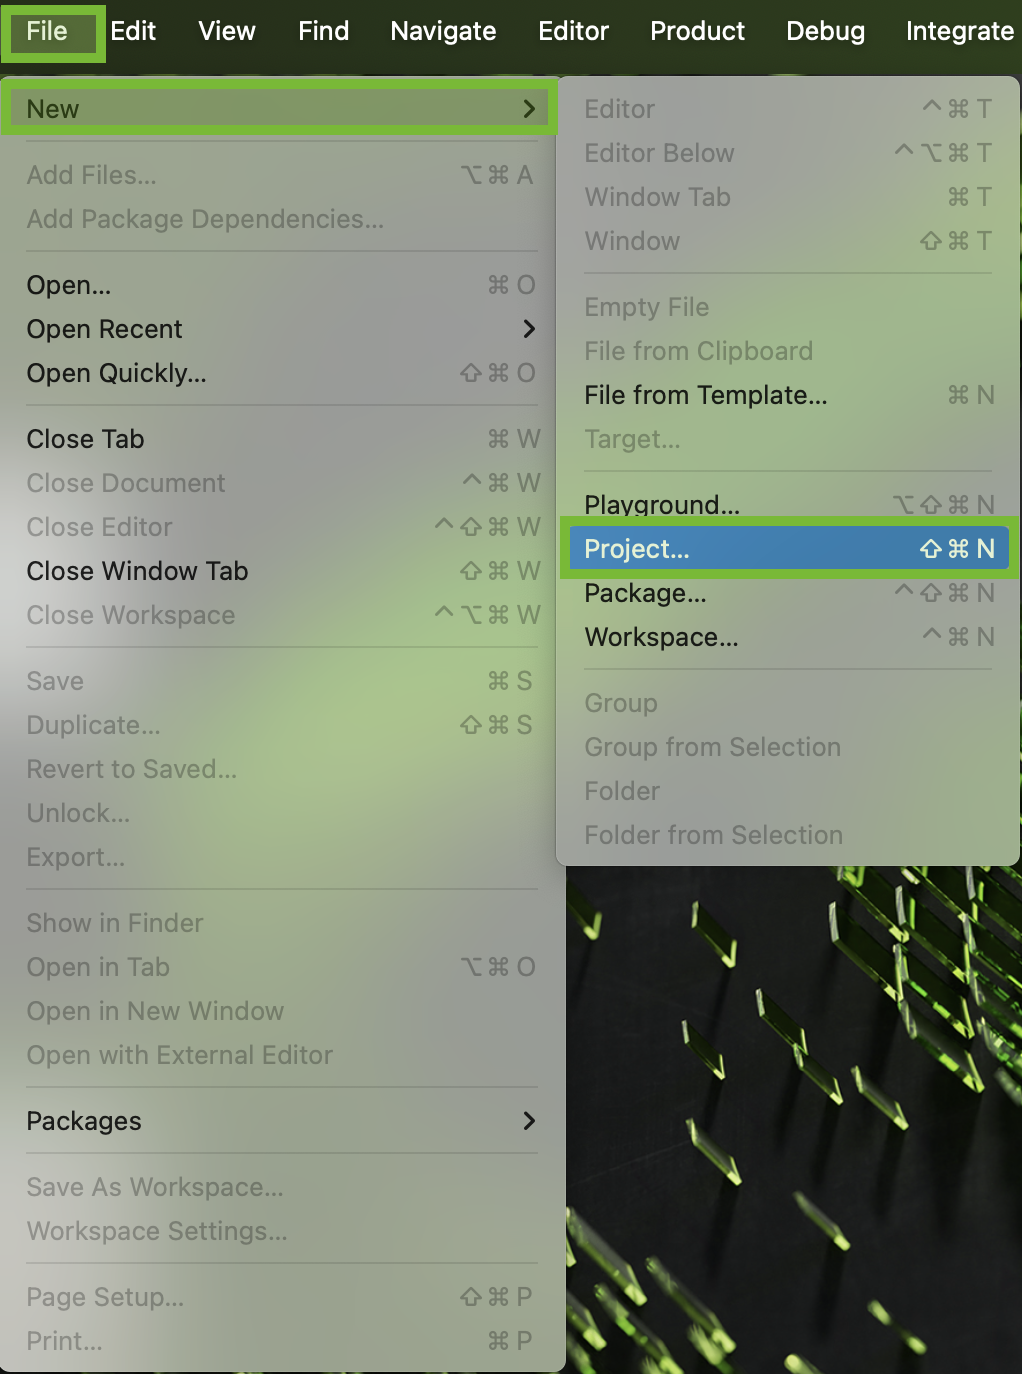
Open Xcode and select New Project. If Xcode is already open, go to File > New > Project.

Xcode welcome screen#

New project dialog#
Now you must choose a template. From the menu bar, select visionOS, then select App, then click Next.
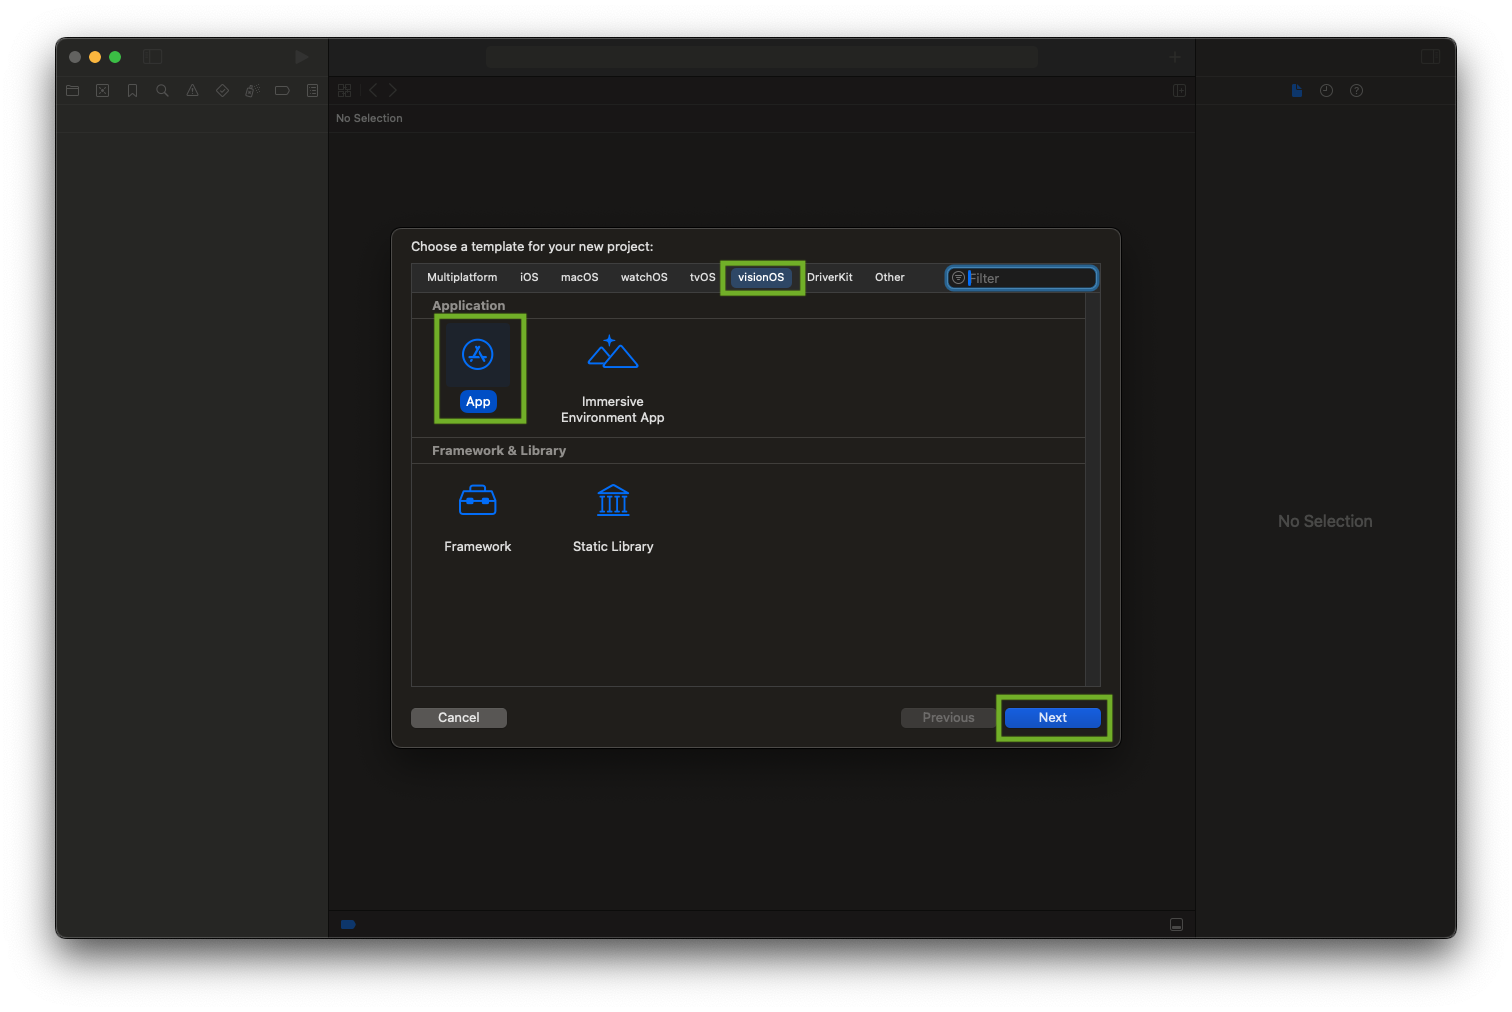
Selecting the visionOS App template#
Set up and configure the following options:
Product Name: My First AVP CloudXR Client
Team: Select your team from the dropdown
Organization Identifier: Provide an identifier corresponding to your organization and team
Initial scene: Window
For now, assume that you want your users to start in a “login window.”
Immersive space renderer: None
You will set this up later with NVIDIA CloudXR™.

Project configuration options#
Click Next. Xcode prompts you to choose where to save your project. Once you have selected a destination, click Create. Xcode opens a window similar to the one below.
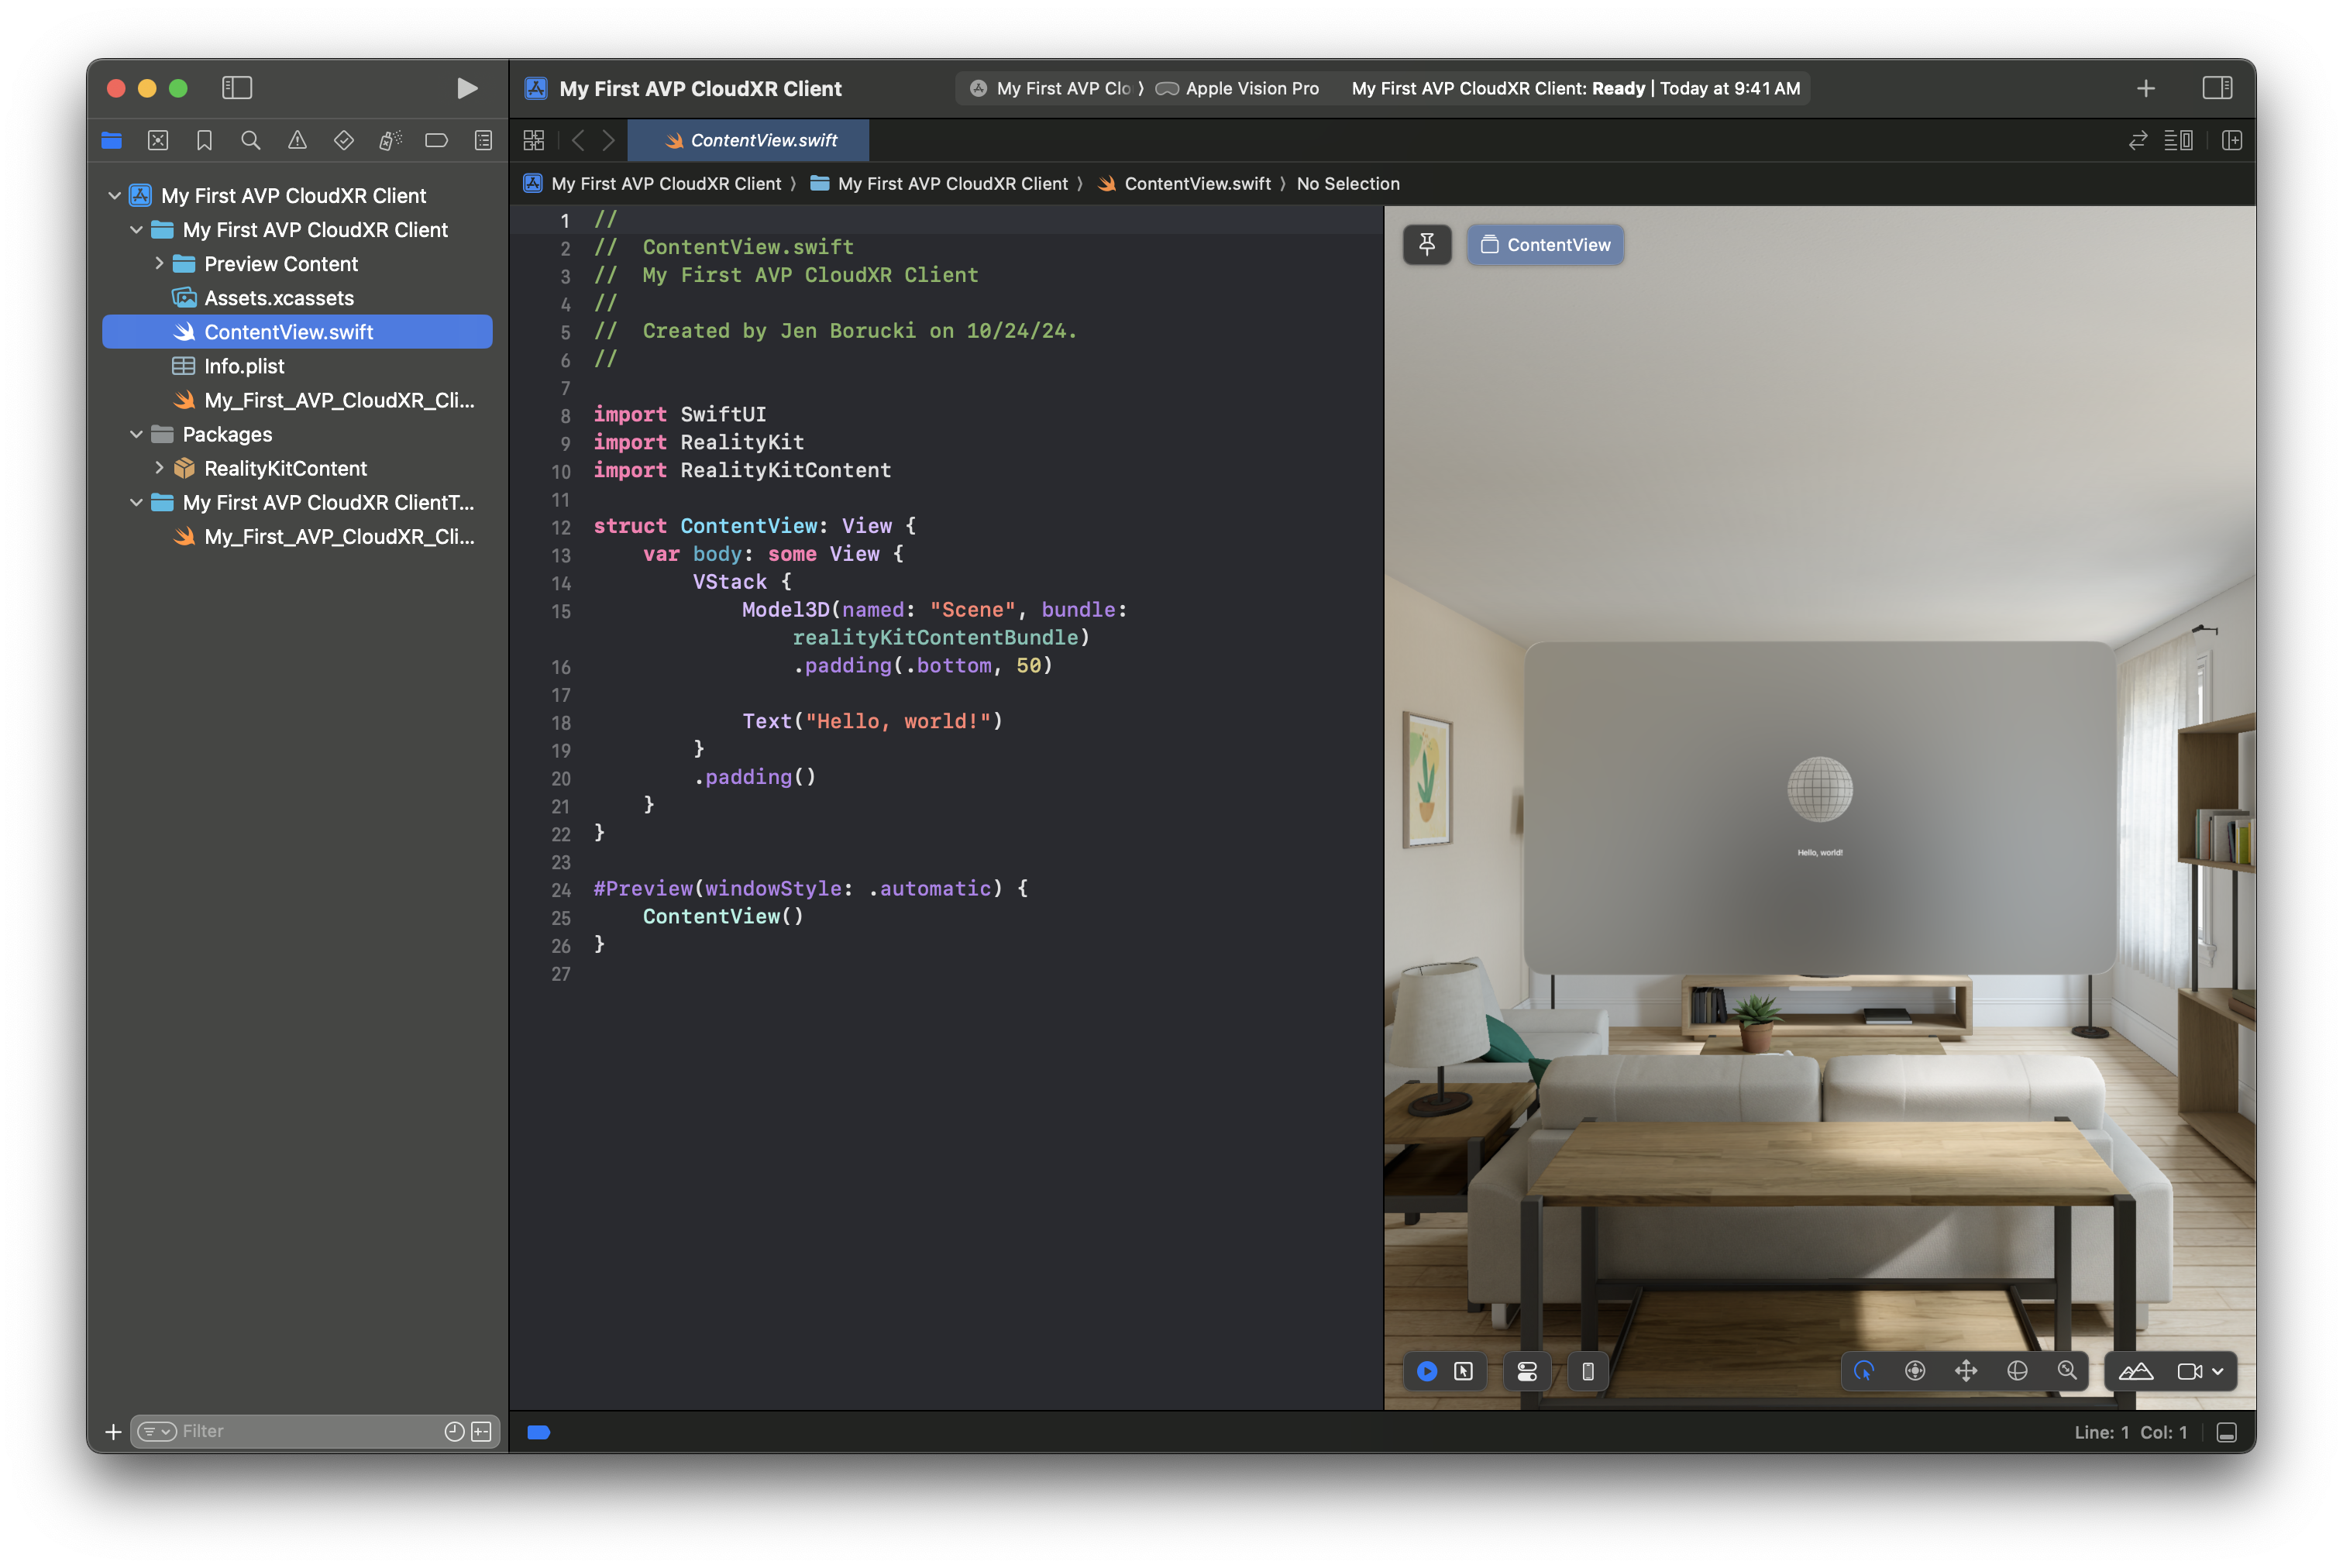
Created project workspace#
Note
Do not worry if the Preview Window is not working. That will not affect how the project runs in the simulator or on the device.
Make sure you know how to run apps on both the visionOS simulator and a Vision Pro device, as appropriate. If you are unsure, refer to Running your app in Simulator or on a device.
Build your project and make sure everything works. To build, click the “Play” icon (“▶”) at the top left of the window.
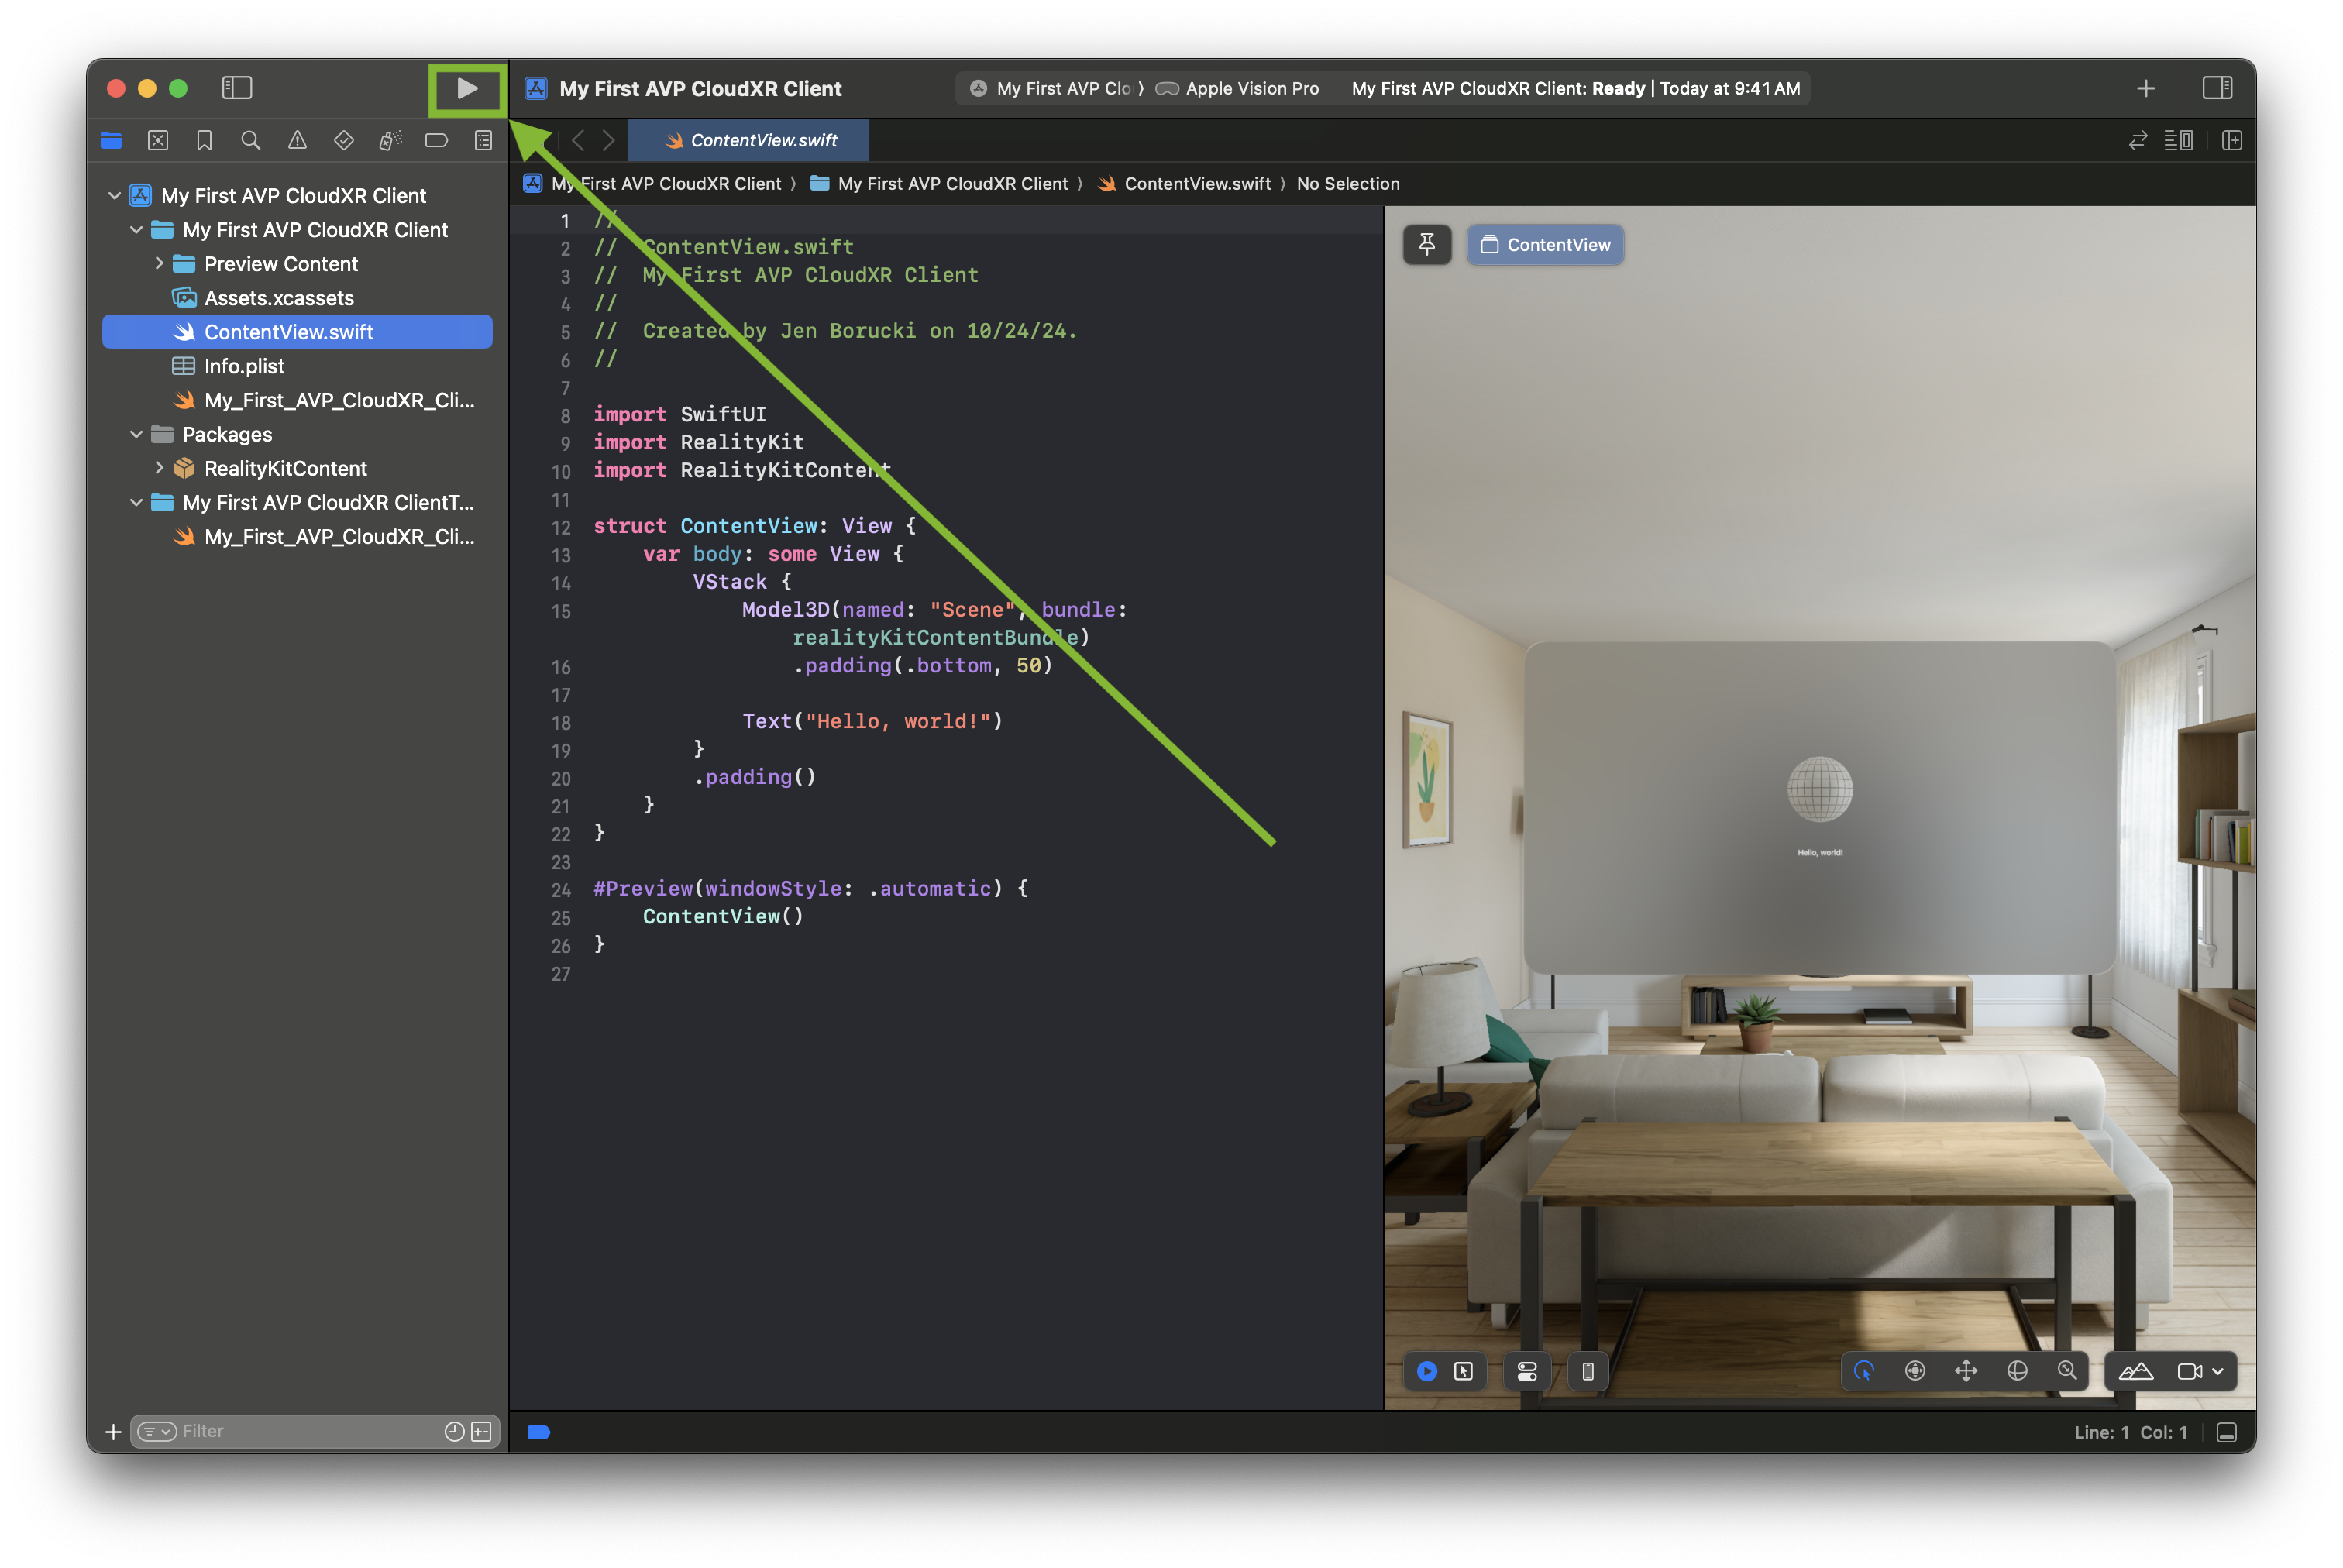
Build button location#
After you build, you should see the following on the simulator or device.
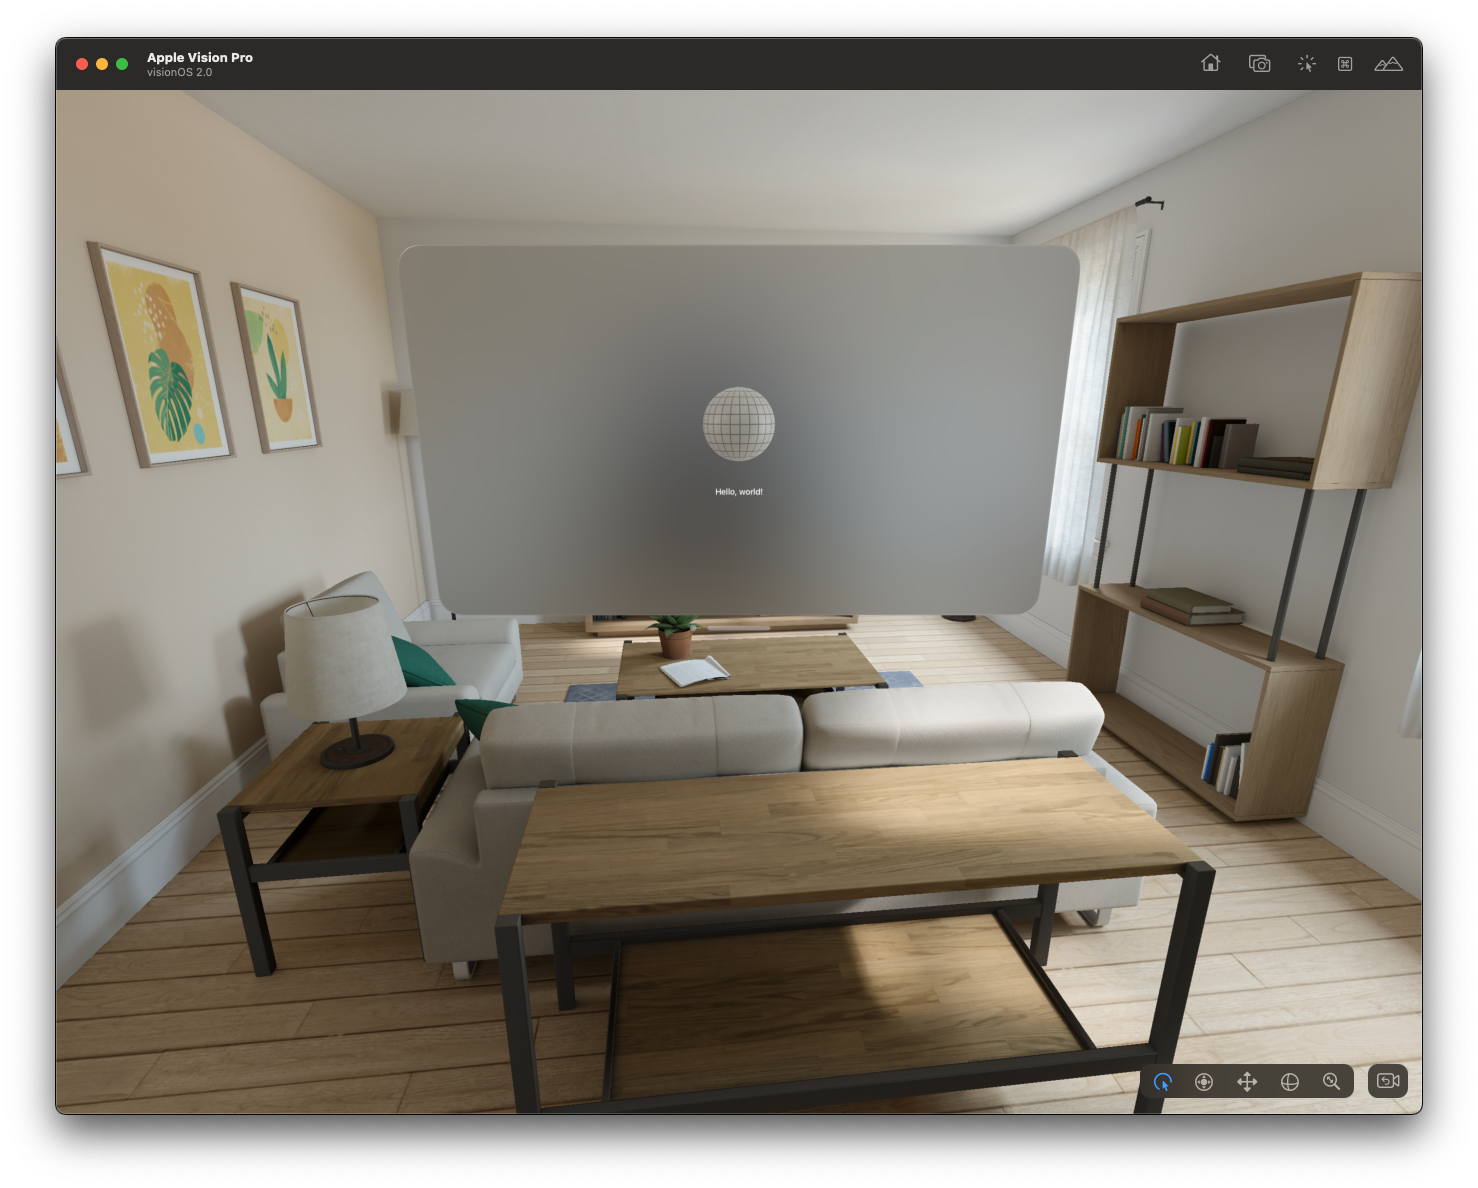
First run in the simulator#
For more information on how to navigate using the simulator, refer to Interacting with your app in the visionOS simulator.
Import the CloudXR Swift Package#
Next you must add the CloudXR Framework Swift package. If your application is still running, close it. In the Project Navigator, right click an empty area, then select Add Package Dependencies.
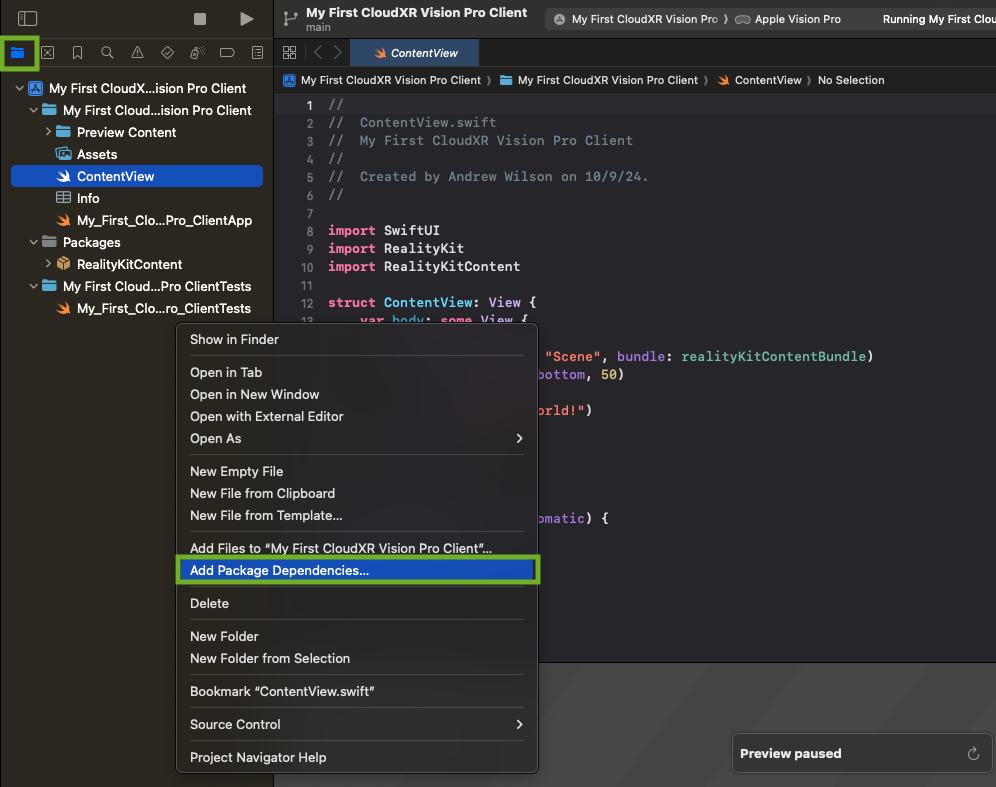
Add Package Dependencies menu#
The Project Navigator opens a new window. Enter the URL
https://github.com/NVIDIA/cloudxr-framework, then select Add Package.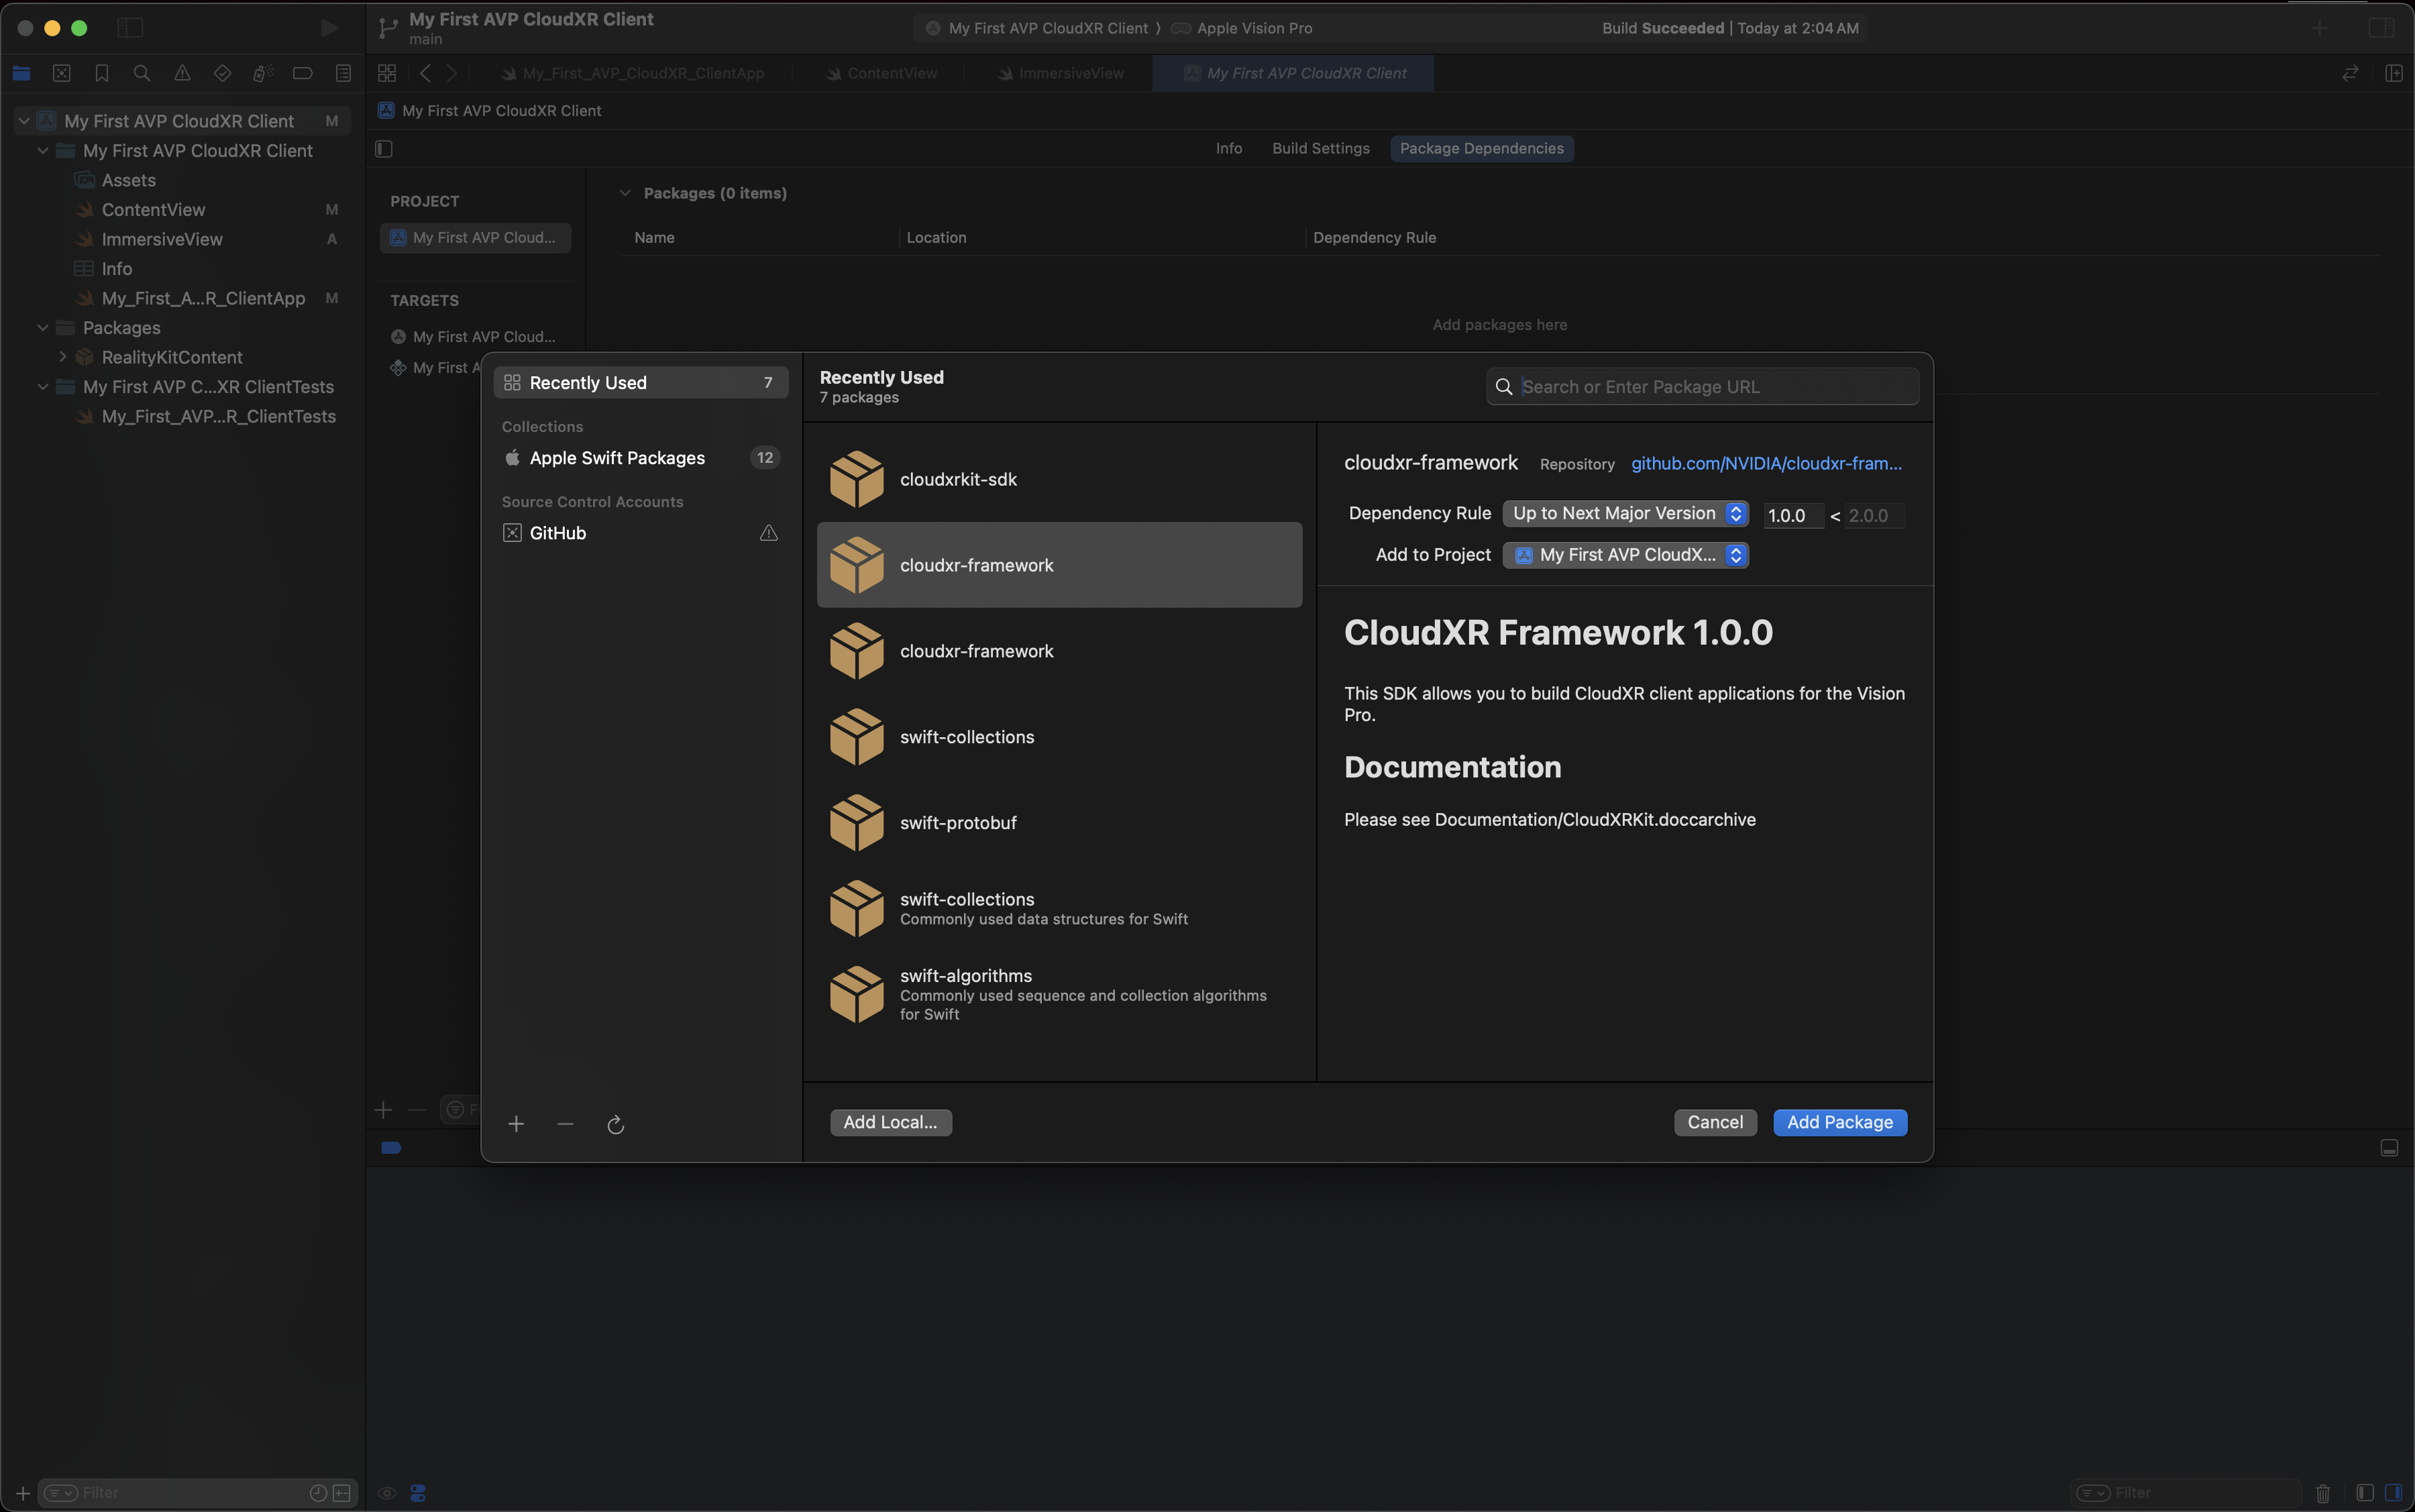
Add package from GitHub#
The Project Navigator opens another window asking about the target for the package. In the dropdown menu, select your application, “My First AVP CloudXR Client.”
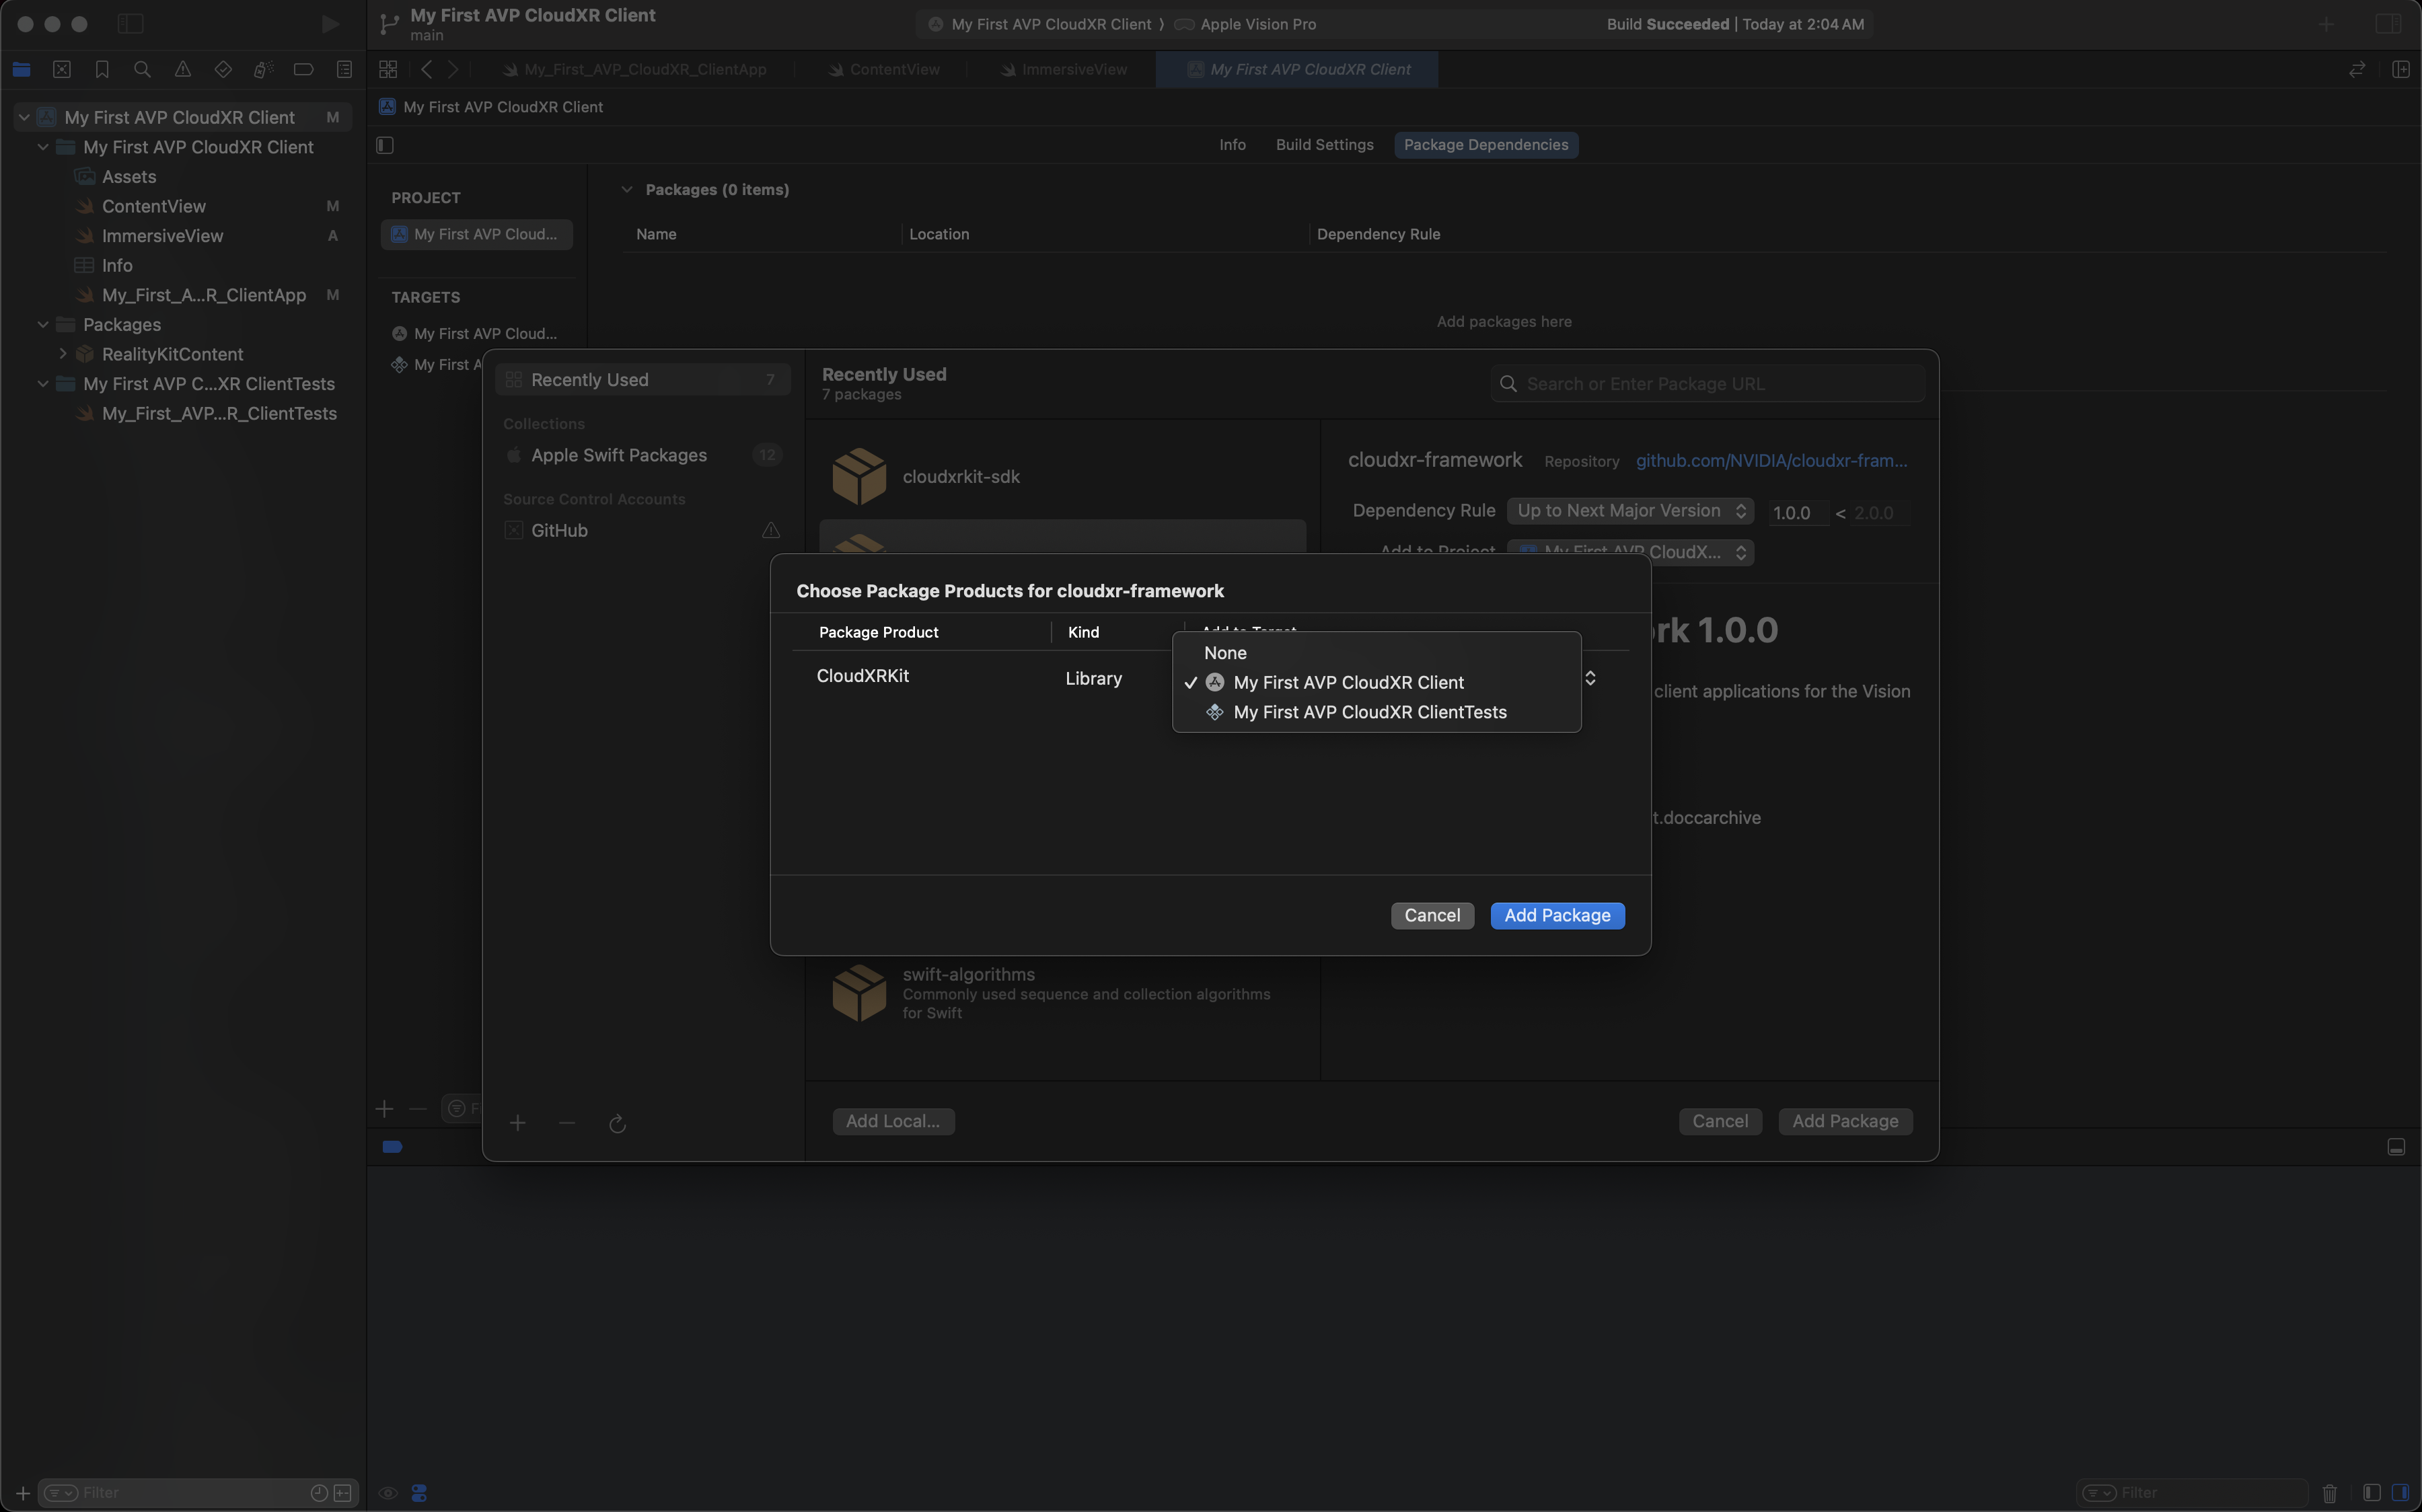
Select package target#
Click Add Package.
From the Project Navigator, go to your main application source file,
My_First_AVP_CloudXR_ClientApp.swift, and add the following import afterimport SwiftUI:import CloudXRKit
Now your file
My_First_AVP_CloudXR_ClientApp.swiftshould look like this:import SwiftUI import CloudXRKit @main struct My_First_AVP_CloudXR_ClientApp: App { var body: some Scene { WindowGroup { ContentView() } } }
Now build your application and run it on the simulator. Assuming there are no build or runtime errors, you’ve now got CloudXR inside your Vision Pro app! You just haven’t done anything with it yet.
Enter Your IP Address#
Next you must build the UI to enter your IP address.
Open
ContentView.swift. Add the sameimportstatement at the top underimport RealityKitContent.import CloudXRKit
Add some variables to your
Viewto keep track of the CloudXR configuration. Make them@AppStorage()variables, which will persist them between runs, and add a variable to store a useful configuration variable.Add the following line inside
ContentViewand beforebody:// Configurable session settings. @AppStorage("ipAddress") static var ipAddress: String = "" @AppStorage("resolutionPreset") private var resolutionPreset: ResolutionPreset = .standardPreset
Here is a reference on placement:
struct ContentView: View { // The new section // Configurable session settings. @AppStorage("ipAddress") static var ipAddress: String = "" @AppStorage("resolutionPreset") private var resolutionPreset: ResolutionPreset = .standardPreset // end of the new section var body: some View { ...
Next, add an IP address entry box within the
ContentViewbody. Add the following code within theVStack, beforeModel3D:Form { HStack { Text("IP Address") Spacer() TextField("0.0.0.0", text: ContentView.$ipAddress) .autocorrectionDisabled(true) .keyboardType(.numbersAndPunctuation) .textInputAutocapitalization(.never) .searchDictationBehavior(.inline(activation: .onLook)) .onSubmit { // strip whitespace ContentView.ipAddress = ContentView.ipAddress.trimmingCharacters( in: .whitespacesAndNewlines ) } } }
Here is a reference on placement:
var body: some View { VStack { // The new section Form { HStack { ... } } // end of the new section Model3D(named: "Scene", bundle: realityKitContentBundle) .padding(.bottom, 50) Text("Hello, world!") } .padding() }
Now build and run, and you should see your IP address box!
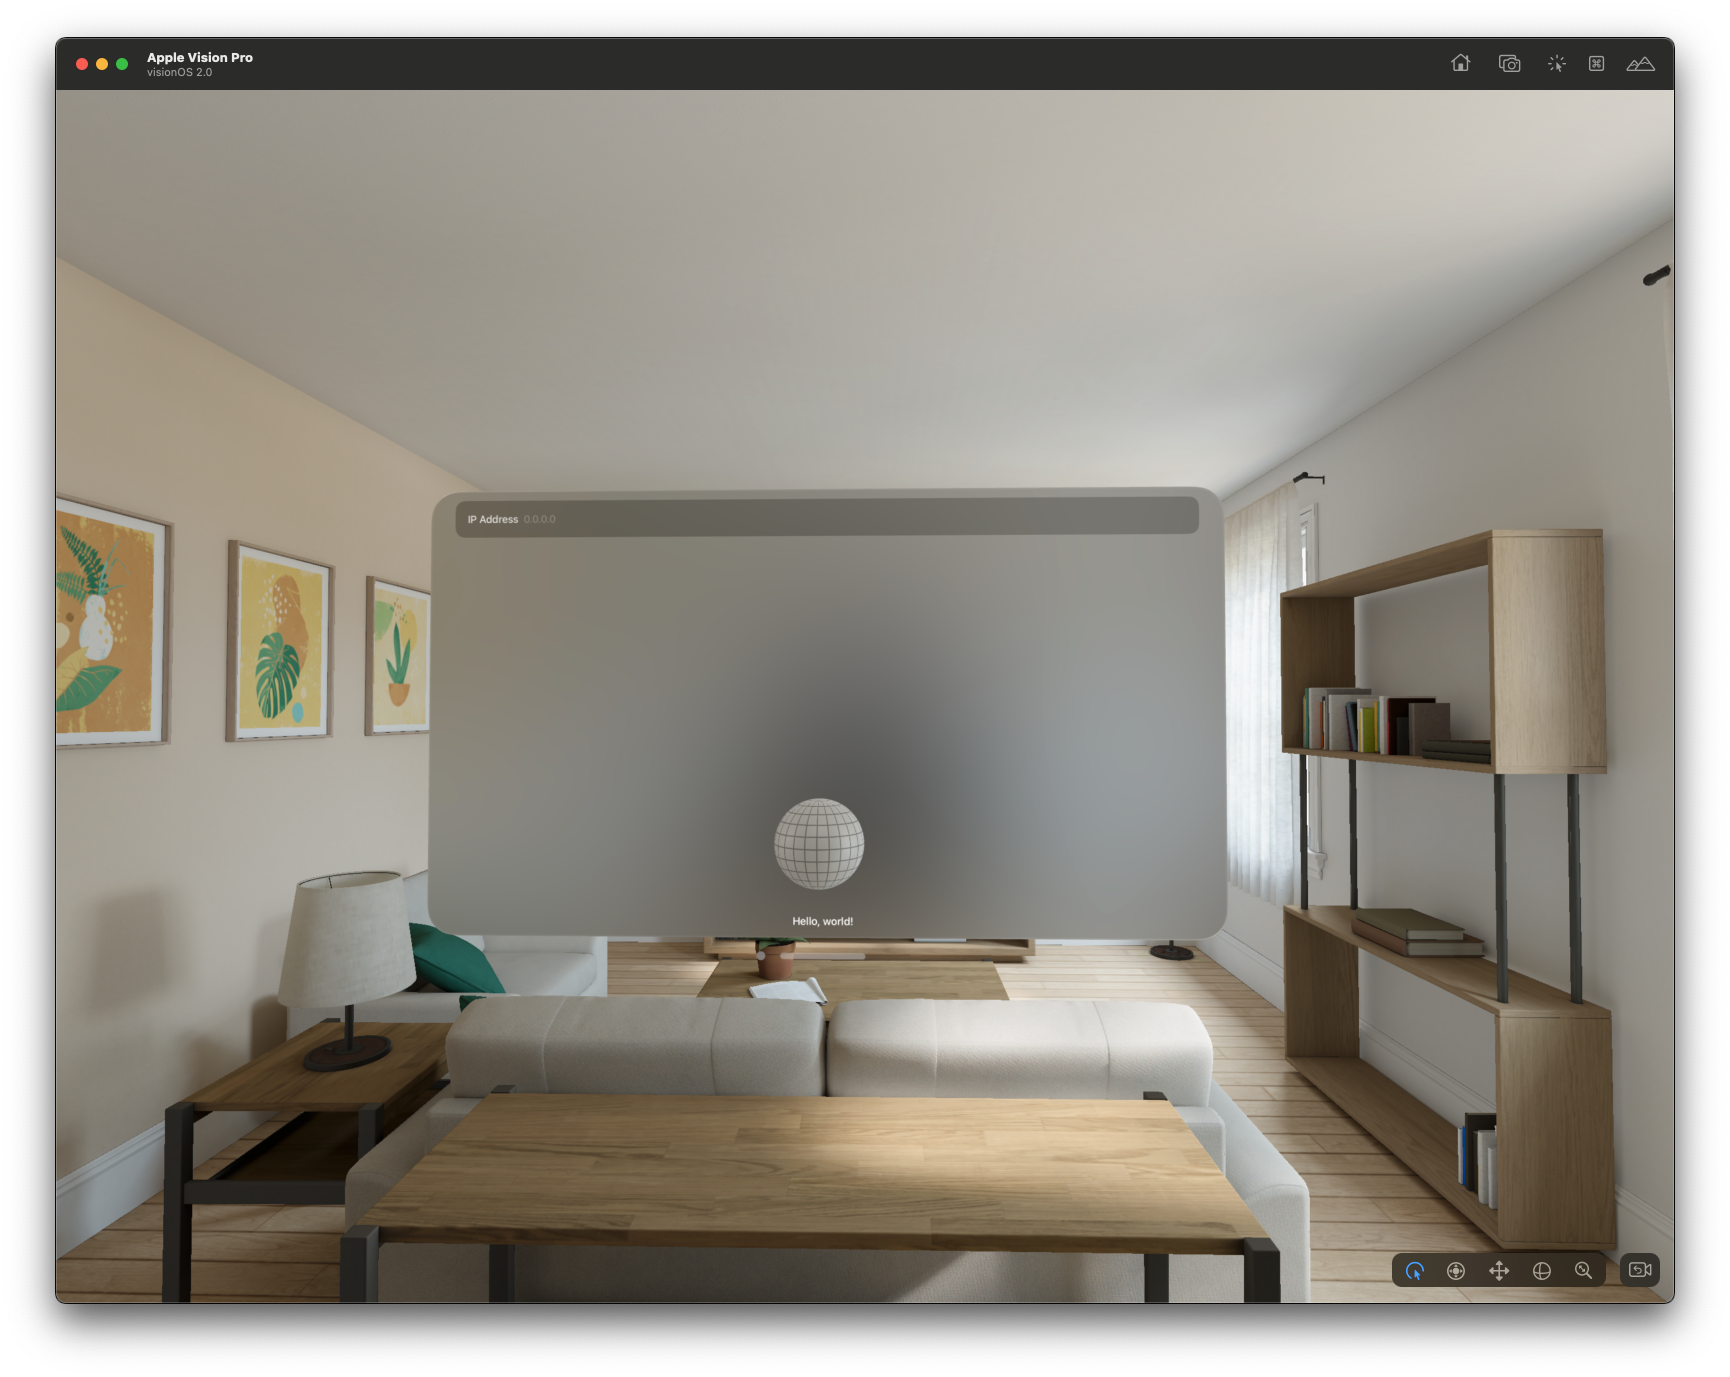
New IP address box#
Select the text box to open a numeric keypad.
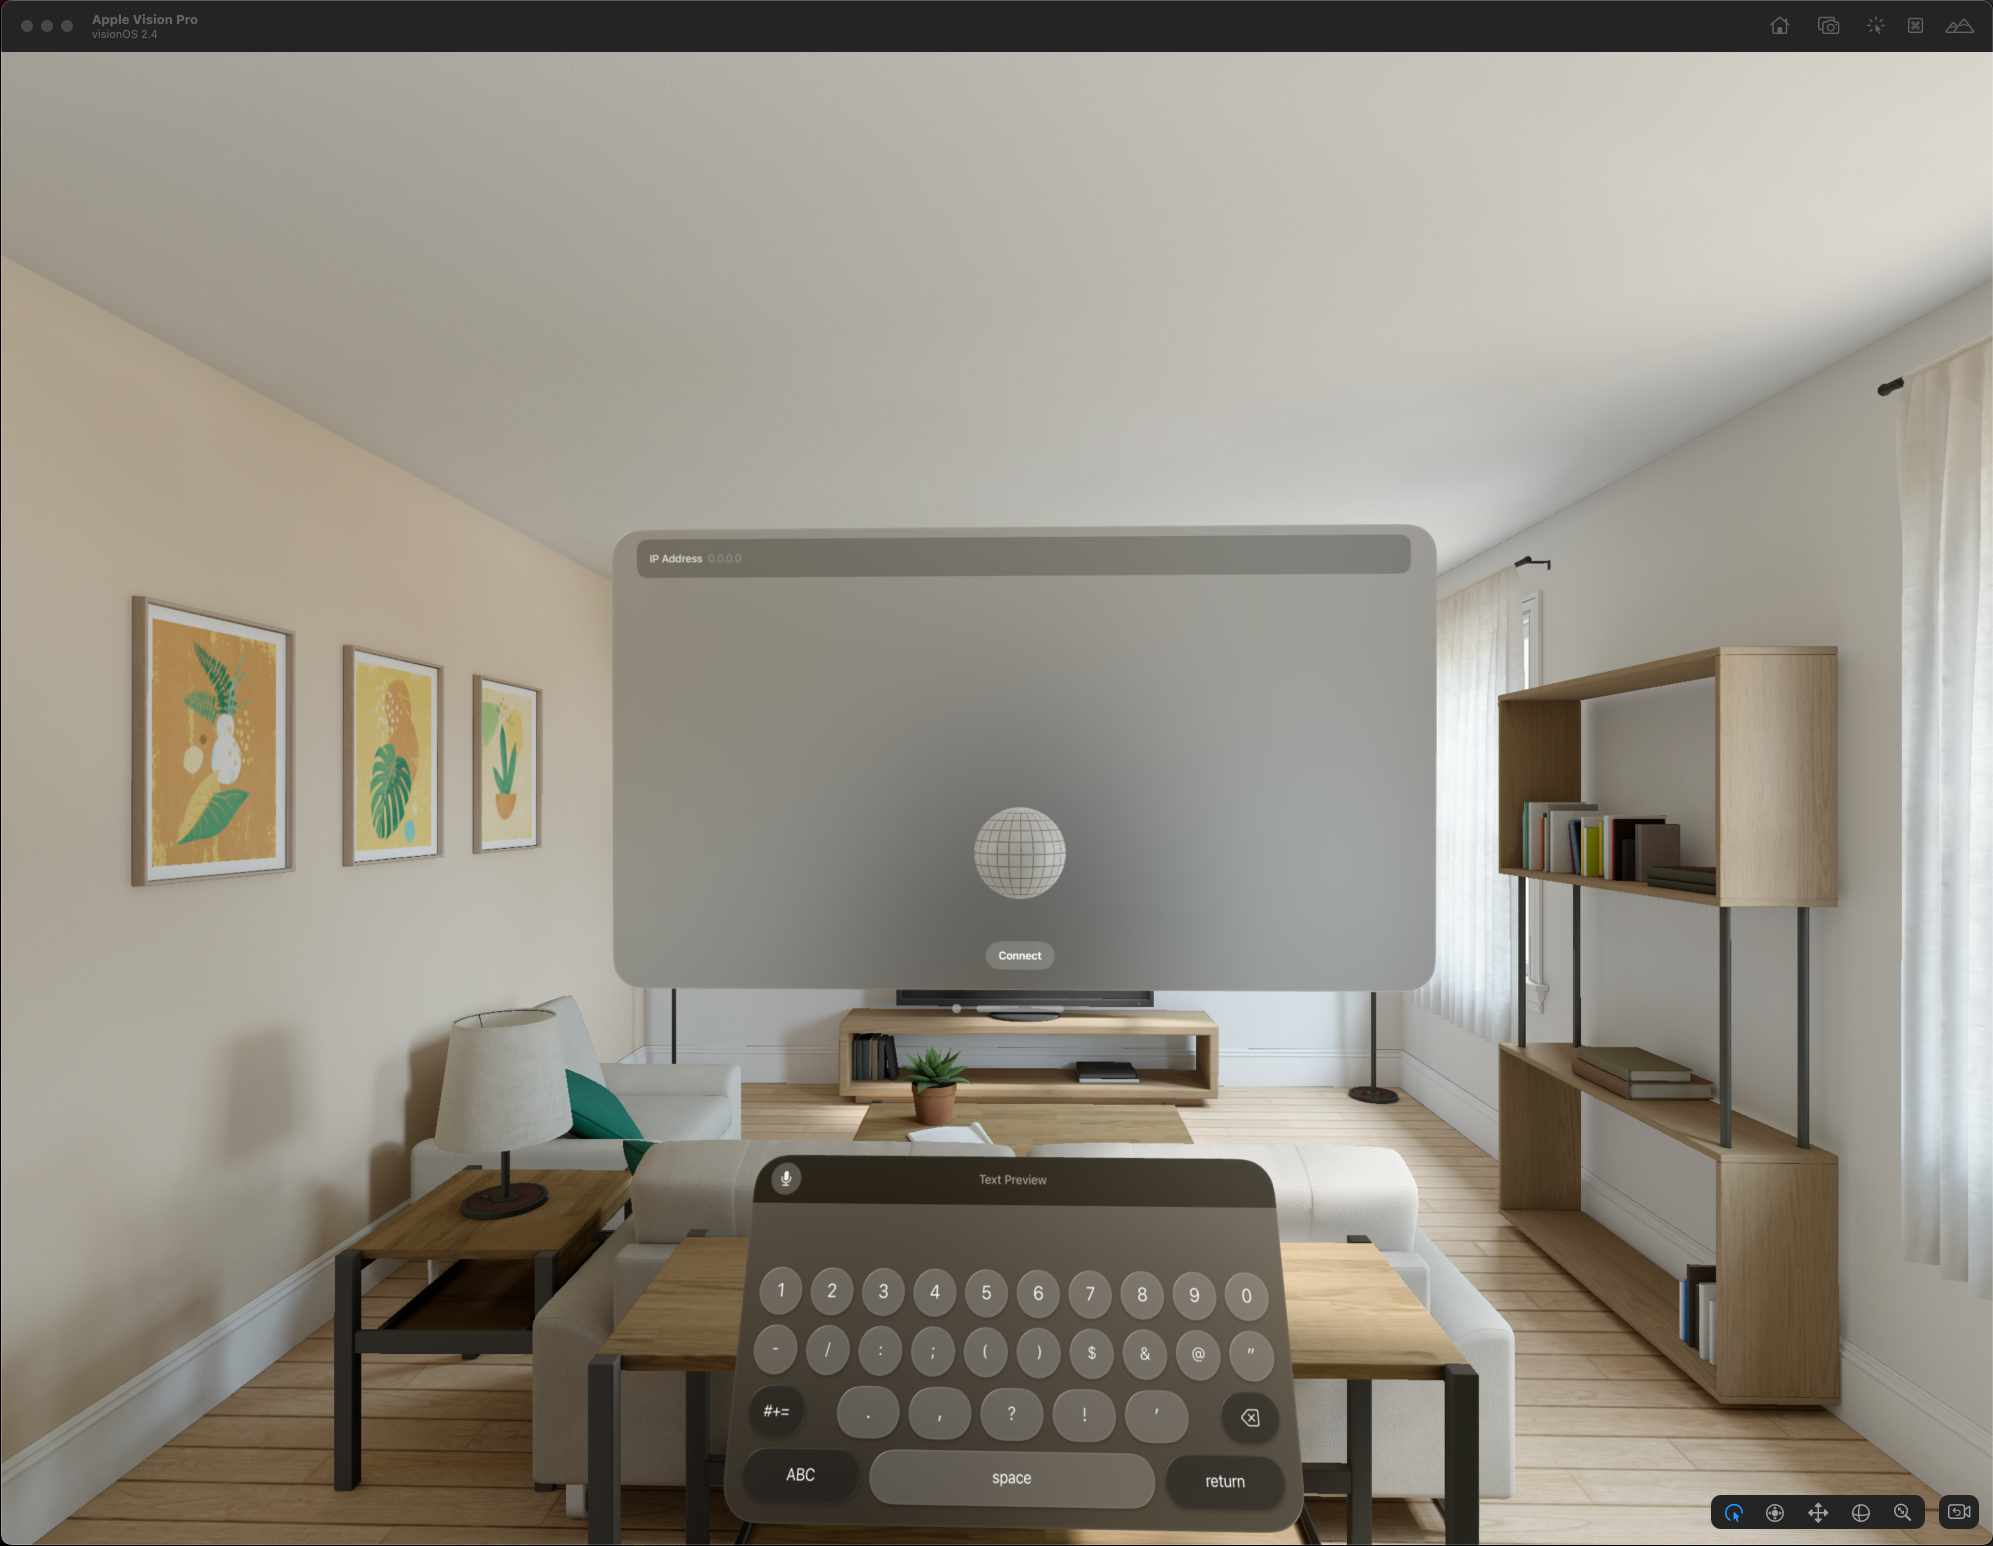
IP address box with numeric keypad#
Now your file ContentView.swift should look like this:
import SwiftUI
import RealityKit
import RealityKitContent
import CloudXRKit
struct ContentView: View {
// Configurable session settings.
@AppStorage("ipAddress") static var ipAddress: String = ""
@AppStorage("resolutionPreset") private var resolutionPreset: ResolutionPreset = .standardPreset
var body: some View {
VStack {
Form {
    HStack {
        Text("IP Address")
        Spacer()
        TextField("0.0.0.0", text: ContentView.$ipAddress)
            .autocorrectionDisabled(true)
            .keyboardType(.numbersAndPunctuation)
            .textInputAutocapitalization(.never)
            .searchDictationBehavior(.inline(activation: .onLook))
            .onSubmit {
                // strip whitespace
                ContentView.ipAddress = ContentView.ipAddress.trimmingCharacters(
                    in: .whitespacesAndNewlines
                )
            }
    }
}
Model3D(named: "Scene", bundle: realityKitContentBundle)
.padding(.bottom, 50)
Text("Hello, world!")
}
.padding()
}
}
Add a Connect Button#
From Xcode, click the “Stop” button to terminate your application.
Now you need to add a Connect button that takes the IP address and connects to a server.
Start by adding the button itself. Replace Text("Hello, world!") with the following code:
Button("Connect") {
    Task { @MainActor in
    }
}.padding()
Build and run, and the Connect button should appear at the bottom of your app window.
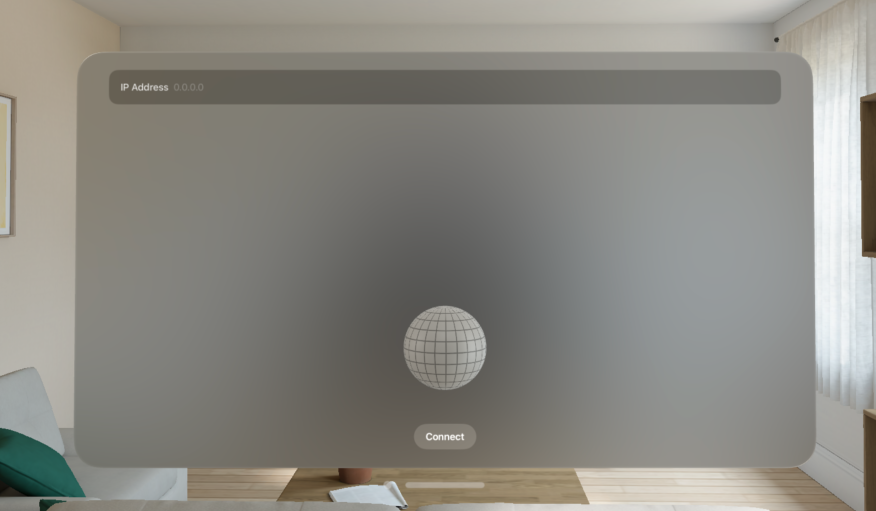
Connect button added#
Now your file ContentView.swift should look like this:
import SwiftUI
import RealityKit
import RealityKitContent

import CloudXRKit

struct ContentView: View {

    // Configurable session settings.
    @AppStorage("ipAddress") static var ipAddress: String = ""
    @AppStorage("resolutionPreset") private var resolutionPreset: ResolutionPreset = .standardPreset

    var body: some View {
        VStack {
            Form {
                HStack {
                    Text("IP Address")
                    Spacer()
                    TextField("0.0.0.0", text: ContentView.$ipAddress)
                        .autocorrectionDisabled(true)
                        .textInputAutocapitalization(.never)
                        .keyboardType(.numbersAndPunctuation)
                        .searchDictationBehavior(.inline(activation: .onLook))
                        .onSubmit {
                            // strip whitespace
                            ContentView.ipAddress = ContentView.ipAddress.trimmingCharacters(
                                in: .whitespacesAndNewlines
                            )
                        }
                }
            }
            Model3D(named: "Scene", bundle: realityKitContentBundle)
                .padding(.bottom, 50)

            // The new section

            Button("Connect") {
                Task { @MainActor in
                }
            }.padding()

            // end of the new section
        }
        .padding()
    }
}
Note that the Connect button has a Task, although so far it does nothing. To make the button work, you need to:
Set the CloudXRKit
ResolutionPresetto the correct value for the simulatorAdd a single, global
CloudXRSessionobjectConfigure the session with a local IP address
Call the session’s
.connect()method and wait on itOpen an immersive space for the session to render into
Set Up the CloudXR Session#
The CloudXRSession object you add must be a global singleton for the app, accessible to all UI elements.
Open your main app file, e.g.,
My_First_AVP_CloudXR_ClientApp.swift. You’re going to add theCloudXRSessionobject to your application, declaring it to be a@Statevariable insideMy_First_AVP_CloudXR_ClientApp, beforebody:@State private var cxrSession = CloudXRSession( config: CloudXRKit.Config() )
Here is a reference on placement:
@main struct My_First_AVP_CloudXR_ClientApp: App { // The new section @State private var cxrSession = CloudXRSession( config: CloudXRKit.Config() ) // end of the new section var body: some Scene { ... } }
The variable you added is not yet visible to your
ContentView. You need to pass it via.environment.Add the following code after the closing curly bracket (“}”) from
WindowGroup..environment(cxrSession)
Here is a reference on placement:
@main struct My_First_AVP_CloudXR_ClientApp: App { ... var body: some Scene { WindowGroup { ContentView() }.environment(cxrSession) // The new section } }
Now check if you can build and run.
Your file My_First_AVP_CloudXR_ClientApp.swift should look like this:
import SwiftUI
import CloudXRKit
@main
struct My_First_AVP_CloudXR_ClientApp: App {
@State private var cxrSession = CloudXRSession(
    config: CloudXRKit.Config()
)
var body: some Scene {
WindowGroup {
ContentView()
}.environment(cxrSession)
}
}
Register Systems#
CloudXR uses the ECS tools (entity-component-system). You need to register CloudXRKit’s Systems in your app’s init method
Add the following code in My_First_AVP_CloudXR_ClientApp.swift. It goes after cxrSession but before body:
init() {
    CloudXRKit.registerSystems()
}
Here is a reference on placement:
struct My_First_AVP_CloudXR_ClientApp: App {

    @State private var cxrSession = ...

    // The new section

    init() {
        CloudXRKit.registerSystems()
    }

    // end of the new section

    var body: some Scene {
        ...
    }
}
Now check if you can build and run.
Your file My_First_AVP_CloudXR_ClientApp.swift should look like this:
import SwiftUI

import CloudXRKit

@main
struct My_First_AVP_CloudXR_ClientApp: App {

    @State private var cxrSession = CloudXRSession(
        config: CloudXRKit.Config()
    )

    init() {
        CloudXRKit.registerSystems()
    }

    var body: some Scene {
        WindowGroup {
            ContentView()
        }.environment(cxrSession)
    }
}
Connecting to a Server#
Back in ContentView.swift, you need to make sure you can use that CloudXRSession object from the environment.
Add the following line of code before
ipAddress:@Environment(CloudXRSession.self) var cxrSession
Here is a reference on placement:
struct ContentView: View {

    // The new section

    @Environment(CloudXRSession.self) var cxrSession

    // end of the new sections

    // Configurable session settings.
    @AppStorage("ipAddress") static var ipAddress: String = ""
    @AppStorage("resolutionPreset") private var resolutionPreset: ResolutionPreset = .standardPreset

    var body: some View {
        ...
    }
}
Next, flesh out the
Taskon theButton. Add the following code insideTask:var config = CloudXRKit.Config() // Configure our IP address config.connectionType = .local(ip: ContentView.ipAddress) // Set the resolution preset config.resolutionPreset = .standardPreset cxrSession.configure(config: config) // Connect! try await cxrSession.connect()
Here is a reference on placement:
...

struct ContentView: View {

    ...

    var body: some View {
        VStack {

            ...

            Button("Connect") {
                Task { @MainActor in

                    // The new section

                    var config = CloudXRKit.Config()
                    // Configure our IP address
                    config.connectionType = .local(ip: ContentView.ipAddress)
                    // Set the resolution preset
                    config.resolutionPreset = .standardPreset
                    cxrSession.configure(config: config)
                    // Connect!
                    try await cxrSession.connect()

                    // end of the new section
                }
            }.padding()
        }
        .padding()
    }
}
Now check if you can build and run. Enter a random invalid IP address, and tap Connect.
This won’t work yet, because no valid CloudXR Runtime is running, but you should see some activity in the Xcode console log, and eventually a log line containing:
setState: Connecting -> Disconnected
This means that CloudXR’s streaming library was unable to connect, but it tried!
Now your file ContentView.swift should look like this:
import SwiftUI
import RealityKit
import RealityKitContent

import CloudXRKit

struct ContentView: View {

    @Environment(CloudXRSession.self) var cxrSession

    // Configurable session settings.
    @AppStorage("ipAddress") static var ipAddress: String = ""
    @AppStorage("resolutionPreset") private var resolutionPreset: ResolutionPreset = .standardPreset

    var body: some View {
        VStack {

            Form {
                HStack {
                    Text("IP Address")
                    Spacer()
                    TextField("0.0.0.0", text: ContentView.$ipAddress)
                        .autocorrectionDisabled(true)
                        .keyboardType(.numbersAndPunctuation)
                        .textInputAutocapitalization(.never)
                        .searchDictationBehavior(.inline(activation: .onLook))
                        .onSubmit {
                            // strip whitespace
                            ContentView.ipAddress = ContentView.ipAddress.trimmingCharacters(
                                in: .whitespacesAndNewlines
                            )
                        }
                }
            }

            Model3D(named: "Scene", bundle: realityKitContentBundle)
                .padding(.bottom, 50)

            Button("Connect") {
                Task { @MainActor in
                    var config = CloudXRKit.Config()
                    // Configure our IP address
                    config.connectionType = .local(ip: ContentView.ipAddress)
                    // Set the resolution preset to low-resolution for testing; normally use .standardPreset
                    config.resolutionPreset = .standardPreset
                    cxrSession.configure(config: config)
                    // Connect!
                    try await cxrSession.connect()
                }
            }.padding()
        }
        .padding()
    }
}
Streaming Content from a Server#
For CloudXR to stream, the current space must be a RealityKit ImmersiveSpace that is properly “hooked up.”
Create a new empty file (File > New > Empty File) named
ImmersiveView.swift: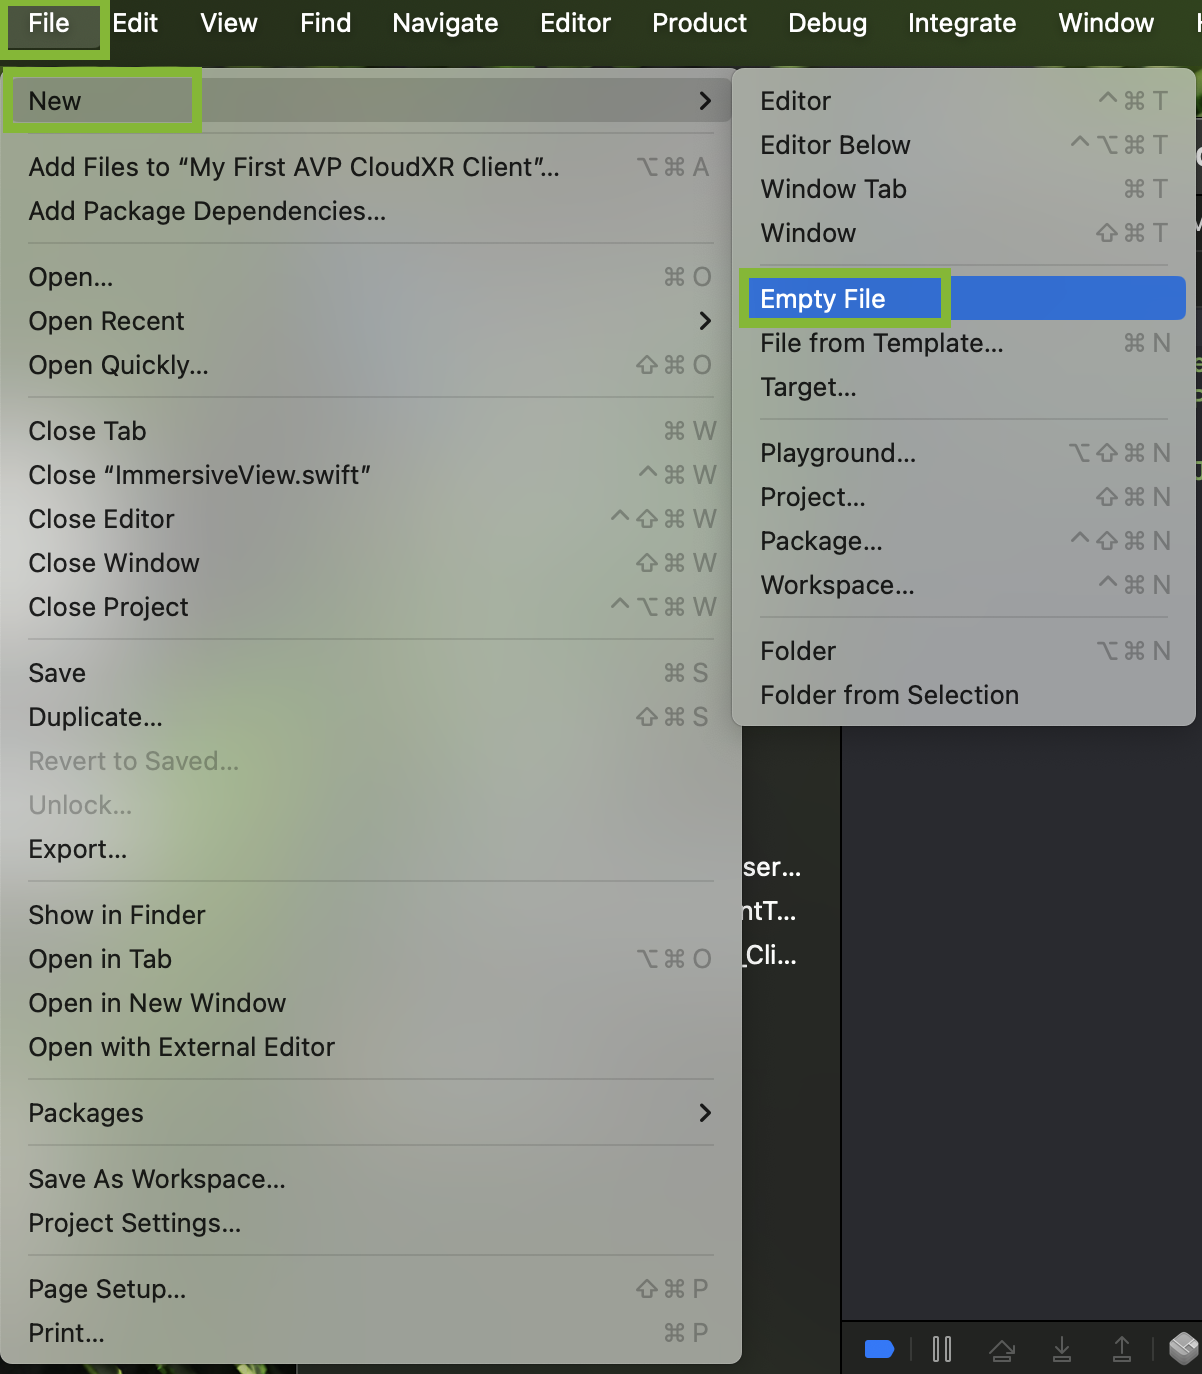
Create empty file#
Start by adding imports and the basic structure of View. Add the following code to the empty file:
import SwiftUI
import RealityKit

import CloudXRKit

let streamingSpaceTitle = "CxrStreamingImmersiveSpace"

struct ImmersiveView: View {
    var body: some View {
        RealityView { content in
        }
    }
}
This view will need to be able to see the CloudXR Session object, just like
ContentView.Add the following code inside
ImmersiveViewand beforebody:@Environment(CloudXRSession.self) var cxrSession
Here is a reference on placement:
...

struct ImmersiveView: View {

    // The new section

    @Environment(CloudXRSession.self) var cxrSession

    // end of the new Section

    var body: some View {
        ...
    }
}
CloudXR also needs know about the scene and the session, so you need an
Entityto glue it all together. Add the following code aftercxrSession:@State private var sessionEntity = Entity()
Here is a reference on placement:
...

struct ImmersiveView: View {

    @Environment(CloudXRSession.self) var cxrSession

    // The new section

    @State private var sessionEntity = Entity()

    // end of the new section

    var body: some View {
        ...
    }
}
Next you need to create a
CloudXRSessionComponentin the scene (at this point, active) that knows about the connectedCloudXRSession. Add the following code insideRealityView:sessionEntity.name = "Session" // Just a quick check; this View shouldn't be opened unless we're connected. if cxrSession.state != .connected { print("Oops, we shouldn't be trying to render CloudXR without being connected!") } sessionEntity.components[CloudXRSessionComponent.self] = .init(session: cxrSession) sessionEntity.transform = .init() content.add(sessionEntity)
This new View is not (yet) being opened. To do that, you must go back to the main app file (
My_First_AVP_CloudXR_ClientApp.swiftor similar) and add it to the end of our Scene.Go to
My_First_AVP_CloudXR_ClientApp.swiftand add the following code insidebody, afterWindowGroup:ImmersiveSpace(id: streamingSpaceTitle) { ImmersiveView() } .environment(cxrSession)
Here is a reference on placement:
... @main struct My_First_AVP_CloudXR_ClientApp: App { ... var body: some Scene { ... WindowGroup { ... } .environment(cxrSession) // The new section ImmersiveSpace(id: streamingSpaceTitle) { ImmersiveView() } .environment(cxrSession) // end of the new section } }
Back in
ContentView.swift, you need to open thisImmersiveSpaceonce CloudXR is connected, which requires you to bring inopenImmersiveSpacefrom the environment.Go to
ContentView.swiftand add the following code aftercxrSessionbut beforeipAddress:@Environment(\.openImmersiveSpace) var openImmersiveSpace
Here is a reference on placement:
... struct ContentView: View { @Environment(CloudXRSession.self) var cxrSession // The new section @Environment(\.openImmersiveSpace) var openImmersiveSpace // end of the new section // Configurable session settings. @AppStorage("ipAddress") static var ipAddress: String = "" @AppStorage("resolutionPreset") private var resolutionPreset: ResolutionPreset = .standardPreset var body: some View { ... } }
Add the following code after
try await cxrSession.connect()insideTask:await openImmersiveSpace(id: streamingSpaceTitle)
Here is a reference on placement:
... struct ContentView: View { ... var body: some View { VStack { ... Button("Connect") { Task { @MainActor in ... try await cxrSession.connect() // The new section await openImmersiveSpace(id: streamingSpaceTitle) // end of the new section } }.padding() } .padding() } }
Now check if you can build, run, connect, and stream. Make sure your test server is running.
You should see streaming content that appears to be in the “room”:
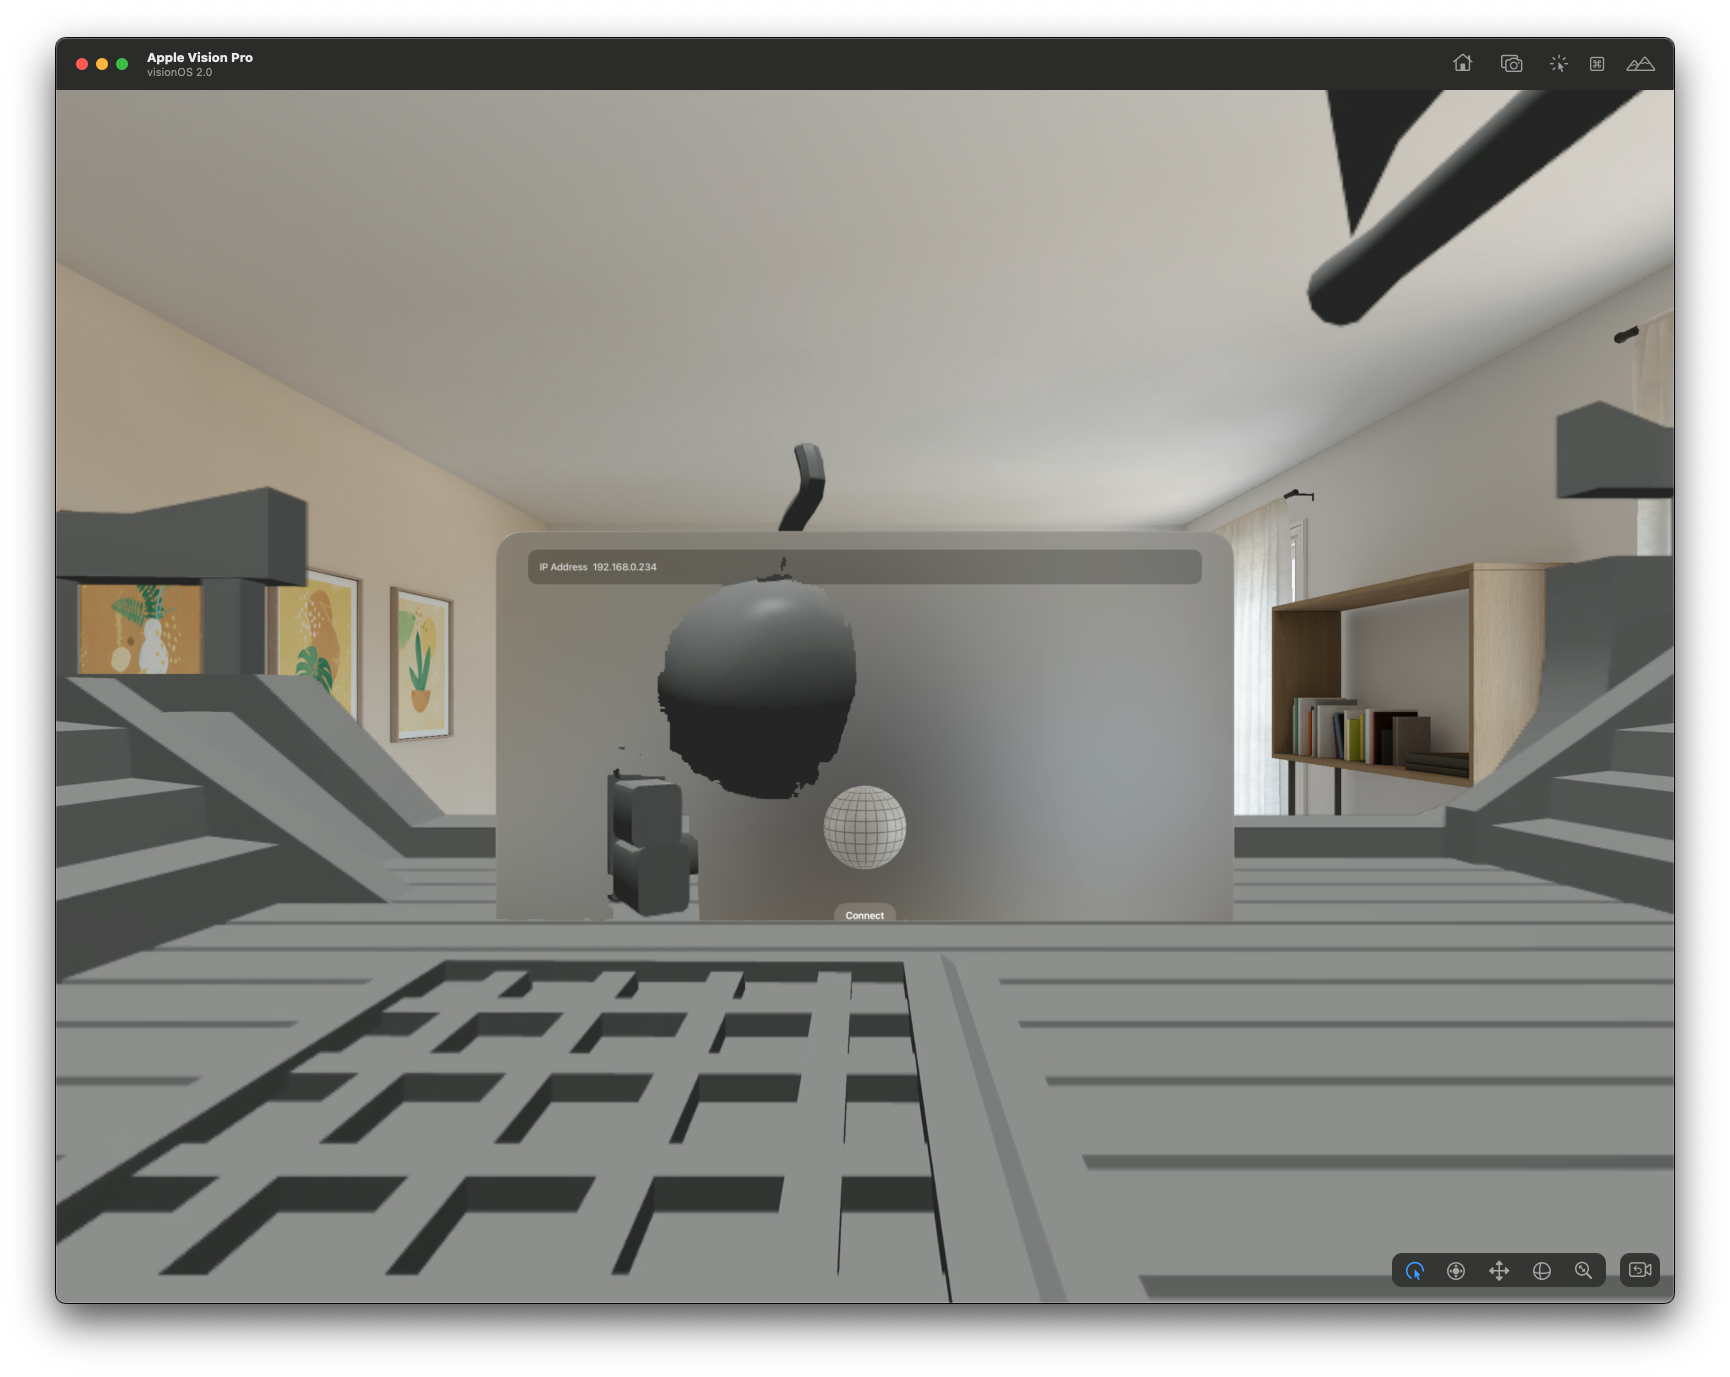
Streaming content visible#
Complete Source Files#
My_First_AVP_CloudXR_ClientApp.swift#
import SwiftUI
import CloudXRKit
@main
struct My_First_AVP_CloudXR_ClientApp: App {
@State private var cxrSession = CloudXRSession(
config: CloudXRKit.Config()
)
init() {
CloudXRKit.registerSystems()
}
var body: some Scene {
WindowGroup {
ContentView()
}
.environment(cxrSession)
ImmersiveSpace(id: streamingSpaceTitle) {
ImmersiveView()
}
.environment(cxrSession)
}
}
ContentView.swift#
import SwiftUI
import RealityKit
import RealityKitContent
import CloudXRKit
struct ContentView: View {
@Environment(CloudXRSession.self) var cxrSession
@Environment(\.openImmersiveSpace) var openImmersiveSpace
// Configurable session settings.
@AppStorage("ipAddress") static var ipAddress: String = ""
@AppStorage("resolutionPreset") private var resolutionPreset: ResolutionPreset = .standardPreset
var body: some View {
VStack {
Form {
HStack {
Text("IP Address")
Spacer()
TextField("0.0.0.0", text: ContentView.$ipAddress)
.autocorrectionDisabled(true)
.keyboardType(.numbersAndPunctuation)
.textInputAutocapitalization(.never)
.searchDictationBehavior(.inline(activation: .onLook))
.onSubmit {
// strip whitespace
ContentView.ipAddress = ContentView.ipAddress.trimmingCharacters(
in: .whitespacesAndNewlines
)
}
}
}
Model3D(named: "Scene", bundle: realityKitContentBundle)
.padding(.bottom, 50)
Button("Connect") {
Task { @MainActor in
var config = CloudXRKit.Config()
// Configure our IP address
config.connectionType = .local(ip: ContentView.ipAddress)
// Set the resolution preset to low-resolution for testing; normally use .standardPreset
config.resolutionPreset = .standardPreset
cxrSession.configure(config: config)
// Connect!
try await cxrSession.connect()
await openImmersiveSpace(id: streamingSpaceTitle)
}
}.padding()
}
.padding()
}
}
#Preview(windowStyle: .automatic) {
ContentView()
}
ImmersiveView.swift#
import SwiftUI
import RealityKit
import CloudXRKit
let streamingSpaceTitle = "CxrStreamingImmersiveSpace"
struct ImmersiveView: View {
@Environment(CloudXRSession.self) var cxrSession
@State private var sessionEntity = Entity()
var body: some View {
RealityView { content in
sessionEntity.name = "Session"

// Just a quick check; this View shouldn't be opened unless we're connected.
if cxrSession.state != .connected {
    print("Oops, we shouldn't be trying to render CloudXR without being connected!")
}

sessionEntity.components[CloudXRSessionComponent.self] = .init(session: cxrSession)
sessionEntity.transform = .init()
content.add(sessionEntity)
}
}
}