NVIDIA CloudXR Server Driver for SteamVR
Before you begin, ensure your system meets the CloudXR Server System Requirements.
Remote Desktop Software
If you need to remotely control your server, we recommend that you use VNC. Other compatible remote desktop solutions that we have tested include NICE DCV and Teradici.
Warning
Microsoft Remote Desktop (RDP) is known to be incompatible with CloudXR, and it causes side effects such as a green video stream, and sometimes, network connection issues.
Note
NICE DCV should be configured to not close the session when the DCV connection drops.
Setting up the CloudXR Server
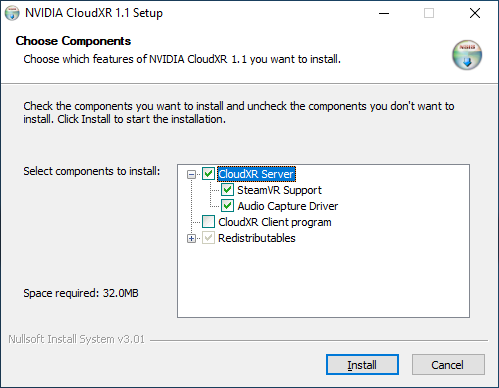
Use the Installer\CloudXR-Setup.exe file to set up the NVIDIA CloudXR server. When prompted to select the components to install, ensure that you select only the server portion with redistributables.
Install SteamVR.
Run SteamVR once.
To install the NVIDIA CloudXR software, run the
CloudXR-Setup.exefile.When prompted to select components, select the components for the server-side installation.
Select the server components.
Deselect the client component.
Select the Redistributables checkbox, which is required only for the first-time install.
Select the Audio Capture Driver checkbox, which installs the driver for the virtual audio input/output devices required to enable sending and receiving audio between server and client.
Choosing the CloudXR Server
Note
The installer completes the following tasks:
Automatically opens Windows Firewall ports required to establish a CloudXR session.
Checks for the HEVC codec capability.
If this capability is not detected, the installation will fail.
Launch SteamVR.
As long as no headset is connected locally to the server, this step launches the CloudXR server driver. See Command-Line Options for information on setting up custom launch options for the CloudXR server.
Until the client is started and is connected, the Steam interfaces displays the Headset Not Detected message. However, the first time the CloudXR server driver is run, the Steam interface will display the Plug in your VR Device message.
The headset icon at the bottom of the SteamVR mini window changes to indicate that CloudXR has been installed and is active. The icon displays the letters CXR on the headset as shown in The CloudXR icon. The icon turns green when the headset is active and is greyed out when the headset is inactive. You will not see the icons in the SteamVR mini window until a client attempts to connect to the server.
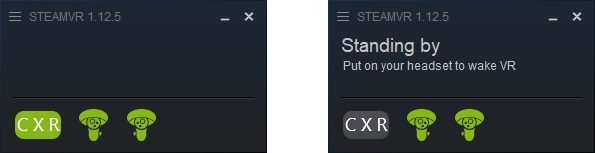
The CloudXR icon
CloudXR Server Installer Command-Line Arguments
The Installer accepts some basic flags to aid with automated deployment.
Option |
Action |
|---|---|
/S |
Silent install with the default options: a server driver only, with all sub-components. |
/FORCE=1 |
Install even if SteamVR is not found. The CloudXR server driver needs to be manually registered with SteamVR. |
Running OpenVR Applications on the Server
In general, you need to launch the application that will be streamed after a client has connected to the server. Otherwise, SteamVR and the application will report that there is no connected headset. When a client connects to the server, the first thing it sends is its specifications, such as resolution and refresh rate, so that the CloudXR SteamVR driver can emulate a headset. That information is then passed to OpenVR applications when launched. Note that SteamVR has no concept of ‘changing HMDs’, and so if you want to use a different device with the same server (like move between HMD brands, or move from HMD to a tablet), you need to restart SteamVR each time you switch the first-connected device.
Similarly, the virtual audio devices that the application will use to read and write audio data are only created after the client connects. To minimize the possibility of the OpenVR application selecting the wrong audio device, we recommend that you disable the physical audio input and output devices on the server. This step is optional because the CloudXR server will attempt to set the virtual devices as the default ones, but some applications might not handle this gracefully.
SteamVR server applications can be started in the following ways:
By pressing a button on the controller to invoke the SteamVR menu on the server.
Pressing the right controller’s menu button on most standalone HMDs typically brings up the local system menu on the client device, intercepted by the operating system and not provided to applications. In sample applications that are provided with this SDK or certain third party samples, the left controller’s menu button is mapped to invoke the server driver system menu.
By manually launching the application on the server directly.
By using some custom
launchprocedure, that is not provided by the NVIDIA CloudXR SDK. For example, you might have a ‘watchdog’ application which waits for a client to connect and then starts the desired executable.