1. Introduction
CUDA® is a parallel computing platform and programming model invented by NVIDIA. It enables dramatic increases in computing performance by harnessing the power of the graphics processing unit (GPU).
- Provide a small set of extensions to standard programming languages, like C, that enable a straightforward implementation of parallel algorithms. With CUDA C/C++, programmers can focus on the task of parallelization of the algorithms rather than spending time on their implementation.
- Support heterogeneous computation where applications use both the CPU and GPU. Serial portions of applications are run on the CPU, and parallel portions are offloaded to the GPU. As such, CUDA can be incrementally applied to existing applications. The CPU and GPU are treated as separate devices that have their own memory spaces. This configuration also allows simultaneous computation on the CPU and GPU without contention for memory resources.
This guide will show you how to install and check the correct operation of the CUDA development tools.
1.1. System Requirements
- a CUDA-capable GPU
- Mac OS X 10.13
- the Clang compiler and toolchain installed using Xcode
- the NVIDIA CUDA Toolkit (available from the CUDA Download page)
| Toolchain | Mac OSX Version (native x86_64)* | |
|---|---|---|
| Xcode | Apple LLVM | 10.13.5 |
| 9.2 | 9.0.0 | YES |
(*) As specific minor versions of Mac OSX are released, the corresponding CUDA drivers can be downloaded from here.
Before installing the CUDA Toolkit, you should read the Release Notes, as they provide important details on installation and software functionality.
1.2. About This Document
This document is intended for readers familiar with the Mac OS X environment and the compilation of C programs from the command line. You do not need previous experience with CUDA or experience with parallel computation.
2. Prerequisites
2.1. CUDA-capable GPU
To verify that your system is CUDA-capable, under the Apple menu select About This Mac, click the More Info … button, and then select Graphics/Displays under the Hardware list. There you will find the vendor name and model of your graphics card. If it is an NVIDIA card that is listed on the CUDA-supported GPUs page, your GPU is CUDA-capable.
The Release Notes for the CUDA Toolkit also contain a list of supported products.
2.2. Mac OS X Version
The CUDA Development Tools require an Intel-based Mac running Mac OSX v. 10.13. To check which version you have, go to the Apple menu on the desktop and select About This Mac.
Xcode Version
A supported version of Xcode must be installed on your system. The list of supported Xcode versions can be found in the System Requirements section. The latest version of Xcode can be installed from the Mac App Store.
Older versions of Xcode can be downloaded from the Apple Developer Download Page. Once downloaded, the Xcode.app folder should be copied to a version-specific folder within /Applications. For example, Xcode 6.2 could be copied to /Applications/Xcode_6.2.app.
sudo xcode-select -s /Applications/<Xcode_install_dir>/Contents/Developer
Command-Line Tools
The CUDA Toolkit requires that the native command-line tools are already installed on the system. Xcode must be installed before these command-line tools can be installed.
$ xcode-select --install
Note: It is recommended to re-run the above command if Xcode is upgraded, or an older version of Xcode is selected.
$ /usr/bin/cc --version
3. Installation
Basic instructions can be found in the Quick Start Guide. Read on for more detailed instructions.
3.1. Download
Once you have verified that you have a supported NVIDIA GPU, a supported version the MAC OS, and clang, you need to download the NVIDIA CUDA Toolkit.
- Network Installer: A minimal installer which later downloads packages required for installation. Only the packages selected during the selection phase of the installer are downloaded. This installer is useful for users who want to minimize download time.
- Full Installer: An installer which contains all the components of the CUDA Toolkit and does not require any further download. This installer is useful for systems which lack network access.
The download can be verified by comparing the posted MD5 checksum with that of the downloaded file. If either of the checksums differ, the downloaded file is corrupt and needs to be downloaded again.
$ openssl md5 <file>
3.2. Install
Use the following procedure to successfully install the CUDA driver and the CUDA toolkit. The CUDA driver and the CUDA toolkit must be installed for CUDA to function. If you have not installed a stand-alone driver, install the driver provided with the CUDA Toolkit.
- CUDA Driver: This will install /Library/Frameworks/CUDA.framework and the UNIX-compatibility stub /usr/local/cuda/lib/libcuda.dylib that refers to it.
- CUDA Toolkit: The CUDA Toolkit supplements the CUDA Driver with compilers and additional libraries and header files that are installed into /Developer/NVIDIA/CUDA-9.2 by default. Symlinks are created in /usr/local/cuda/ pointing to their respective files in /Developer/NVIDIA/CUDA-9.2/. Previous installations of the toolkit will be moved to /Developer/NVIDIA/CUDA-#.# to better support side-by-side installations.
- CUDA Samples (read-only): A read-only copy of the CUDA Samples is installed in /Developer/NVIDIA/CUDA-9.2/samples. Previous installations of the samples will be moved to /Developer/NVIDIA/CUDA-#.#/samples to better support side-by-side installations.
- --accept-eula: Signals that the user accepts the terms and conditions of the CUDA-9.2 EULA.
- --silent: No user-input will be required during the installation. Requires --accept-eula to be used.
- --no-window: No windows will be created during the installation. Useful for installing in environments without a display, such as via ssh. Implies --silent. Requires --accept-eula to be used.
- --install-package=<package>: Specifies a package to install. Can be used multiple times. Options are "cuda-toolkit", "cuda-samples", and "cuda-driver".
- --log-file=<path>: Specify a file to log the installation to. Default is /var/log/cuda_installer.log.
export PATH=/Developer/NVIDIA/CUDA-9.2/bin${PATH:+:${PATH}}
export DYLD_LIBRARY_PATH=/Developer/NVIDIA/CUDA-9.2/lib\
                         ${DYLD_LIBRARY_PATH:+:${DYLD_LIBRARY_PATH}}
In order to modify, compile, and run the samples, the samples must also be installed with write permissions. A convenience installation script is provided: cuda-install-samples-9.2.sh. This script is installed with the cuda-samples-9-2 package.
$ /Developer/NVIDIA/CUDA-9.2/bin/nsight_ee_plugins_manage.sh install <eclipse-dir>
Refer to Nsight Eclipse Plugins Installation Guide for more details.
- Uncheck
- Drag the Computer sleep bar to Never in
3.3. Uninstall
The CUDA Driver, Toolkit and Samples can be uninstalled by executing the uninstall script provided with each package:
| Package | Location |
|---|---|
| CUDA Driver | /usr/local/bin/uninstall_cuda_drv.pl |
| CUDA Toolkit | /Developer/NVIDIA/CUDA-9.2/bin/uninstall_cuda_9.2.pl |
| CUDA Samples | /Developer/NVIDIA/CUDA-9.2/bin/uninstall_cuda_9.2.pl |
All packages which share an uninstall script will be uninstalled unless the --manifest=<uninstall_manifest> flag is used. Uninstall manifest files are located in the same directory as the uninstall script, and have filenames matching .<package_name>_uninstall_manifest_do_not_delete.txt.
$ cd /Developer/NVIDIA/CUDA-9.2/bin
$ sudo perl uninstall_cuda_9.2.pl \
    --manifest=.cuda_toolkit_uninstall_manifest_do_not_delete.txt
4. Verification
Before continuing, it is important to verify that the CUDA toolkit can find and communicate correctly with the CUDA-capable hardware. To do this, you need to compile and run some of the included sample programs.
4.1. Driver
kextstat | grep -i cuda
4.2. Compiler
The installation of the compiler is first checked by running nvcc -V in a terminal window. The nvcc command runs the compiler driver that compiles CUDA programs. It calls the host compiler for C code and the NVIDIA PTX compiler for the CUDA code.
make -C 0_Simple/vectorAdd
make -C 0_Simple/vectorAddDrv
make -C 1_Utilities/deviceQuery
make -C 1_Utilities/bandwidthTest
The builds should produce no error message. The resulting binaries will appear under <dir>/bin/x86_64/darwin/release. To go further and build all the CUDA samples, simply type make from the samples root directory.
4.3. Runtime
After compilation, go to bin/x86_64/darwin/release and run deviceQuery. If the CUDA software is installed and configured correctly, the output for deviceQuery should look similar to that shown in Figure 1.
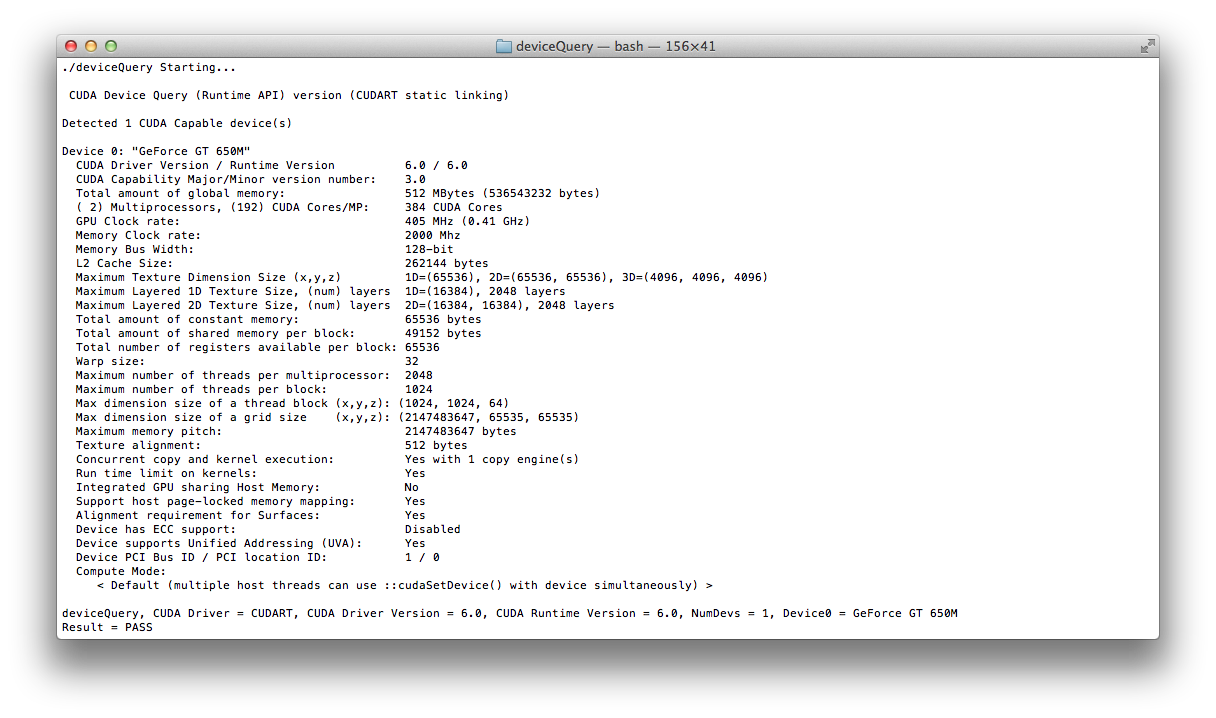
Note that the parameters for your CUDA device will vary. The key lines are the first and second ones that confirm a device was found and what model it is. Also, the next-to-last line, as indicated, should show that the test passed.
Running the bandwidthTest sample ensures that the system and the CUDA-capable device are able to communicate correctly. Its output is shown in Figure 2
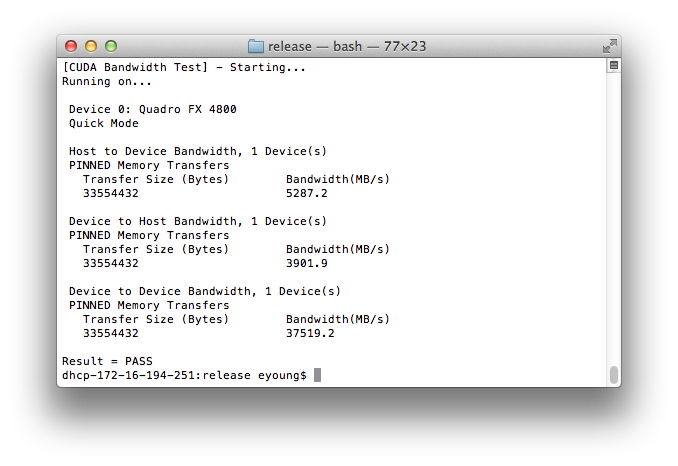
Note that the measurements for your CUDA-capable device description will vary from system to system. The important point is that you obtain measurements, and that the second-to-last line (in Figure 2) confirms that all necessary tests passed.
Should the tests not pass, make sure you have a CUDA-capable NVIDIA GPU on your system and make sure it is properly installed.
If you run into difficulties with the link step (such as libraries not being found), consult the Release Notes found in the doc folder in the CUDA Samples directory.
To see a graphical representation of what CUDA can do, run the particles executable.
5. Additional Considerations
Now that you have CUDA-capable hardware and the NVIDIA CUDA Toolkit installed, you can examine and enjoy the numerous included programs. To begin using CUDA to accelerate the performance of your own applications, consult the CUDA C Programming Guide.
A number of helpful development tools are included in the CUDA Toolkit to assist you as you develop your CUDA programs, such as NVIDIA® Nsight™ Eclipse Edition, NVIDIA Visual Profiler, cuda-gdb, and cuda-memcheck.
For technical support on programming questions, consult and participate in the Developer Forums.
Notices
Notice
ALL NVIDIA DESIGN SPECIFICATIONS, REFERENCE BOARDS, FILES, DRAWINGS, DIAGNOSTICS, LISTS, AND OTHER DOCUMENTS (TOGETHER AND SEPARATELY, "MATERIALS") ARE BEING PROVIDED "AS IS." NVIDIA MAKES NO WARRANTIES, EXPRESSED, IMPLIED, STATUTORY, OR OTHERWISE WITH RESPECT TO THE MATERIALS, AND EXPRESSLY DISCLAIMS ALL IMPLIED WARRANTIES OF NONINFRINGEMENT, MERCHANTABILITY, AND FITNESS FOR A PARTICULAR PURPOSE.
Information furnished is believed to be accurate and reliable. However, NVIDIA Corporation assumes no responsibility for the consequences of use of such information or for any infringement of patents or other rights of third parties that may result from its use. No license is granted by implication of otherwise under any patent rights of NVIDIA Corporation. Specifications mentioned in this publication are subject to change without notice. This publication supersedes and replaces all other information previously supplied. NVIDIA Corporation products are not authorized as critical components in life support devices or systems without express written approval of NVIDIA Corporation.