BCM Headnodes Installation#
Download the Base Command Manager ISO#
Download the BCM ISO image from the BCM website.
Be sure to select the following options for the download:
Version: Base Command Manager 10
Architecture: x86_64/amd64
Linux Base Distribution: Ubuntu 22.04
Hardware Vendor: NVIDIA DGX
Additional Features: Include MOFED Packages & Include NVIDIA DGX OS
software images for DGX H100 & DGX A100
Validate the downloaded file by verifying the MD5 checksum
$md5sum bcm-10.0-ubuntu2204-dgx-os-6.3.iso

66ecc05da5b0ed89cf365a168af86ec9 bcm-10.0-ubuntu2204-dgx-os-6.3.iso
Burn the BCM ISO to a DVD or to a bootable USB device. The ISO can also be mounted as virtual media and installed using appliance BMC Virtual Console.
Primary Headnode preparation#
Before starting the installation process it’s important to ensure the Headnode’s storage media are all in a freshly wiped state, and perform a BIOS configuration default. This resets all boot devices/order priorities.
The following is an example of Dell appliances.
Dell appliances with iDRAC9#
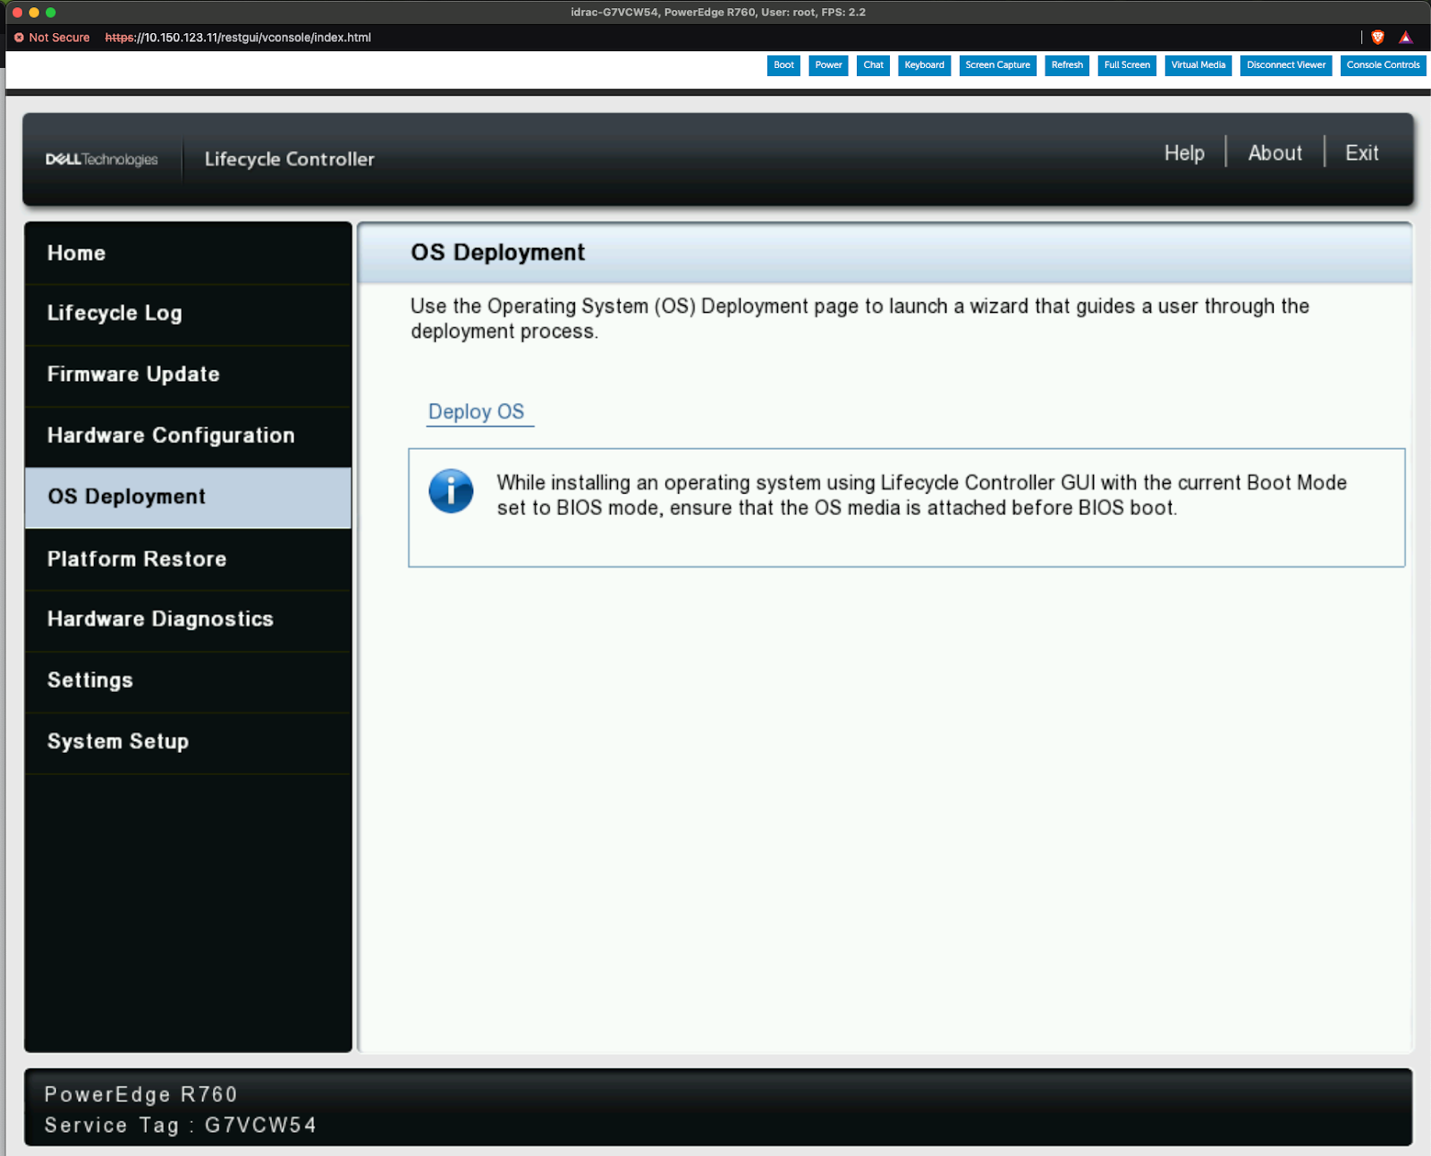
Access the appliance’s iDRAC9 web portal, click the boot button and select Lifecycle Controller. Power cycle the appliance and boot into the Lifecycle Controller. Select “OS Deployment” on the left side of the screen and then click “Deploy OS”.
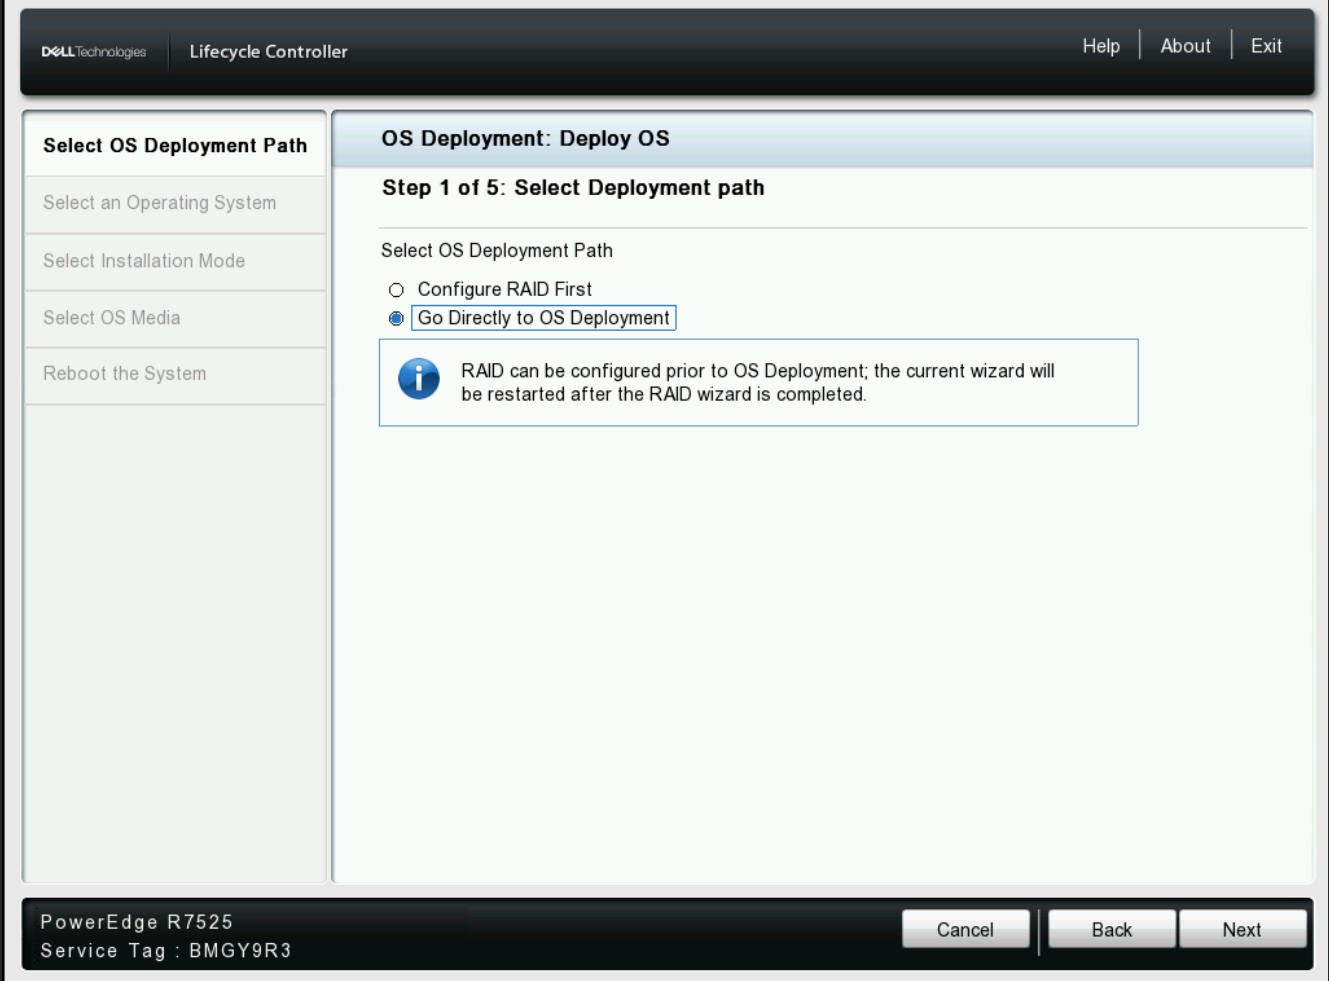
Select “Go Directly to OS Deployment” then click “Next”.
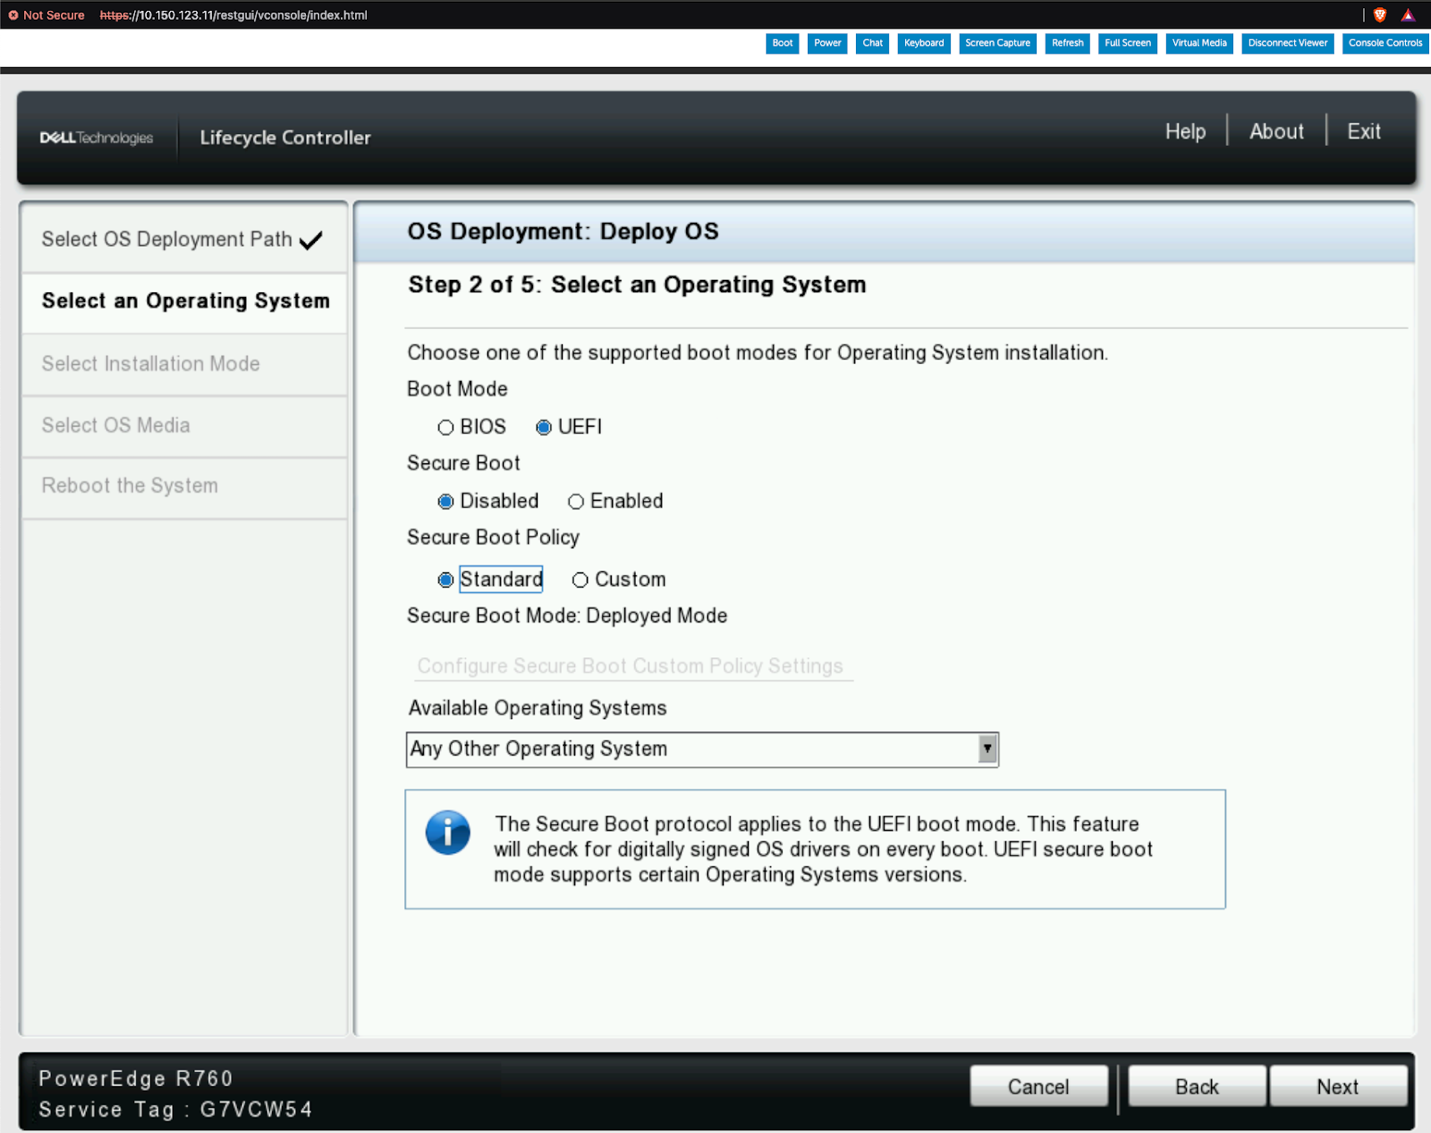
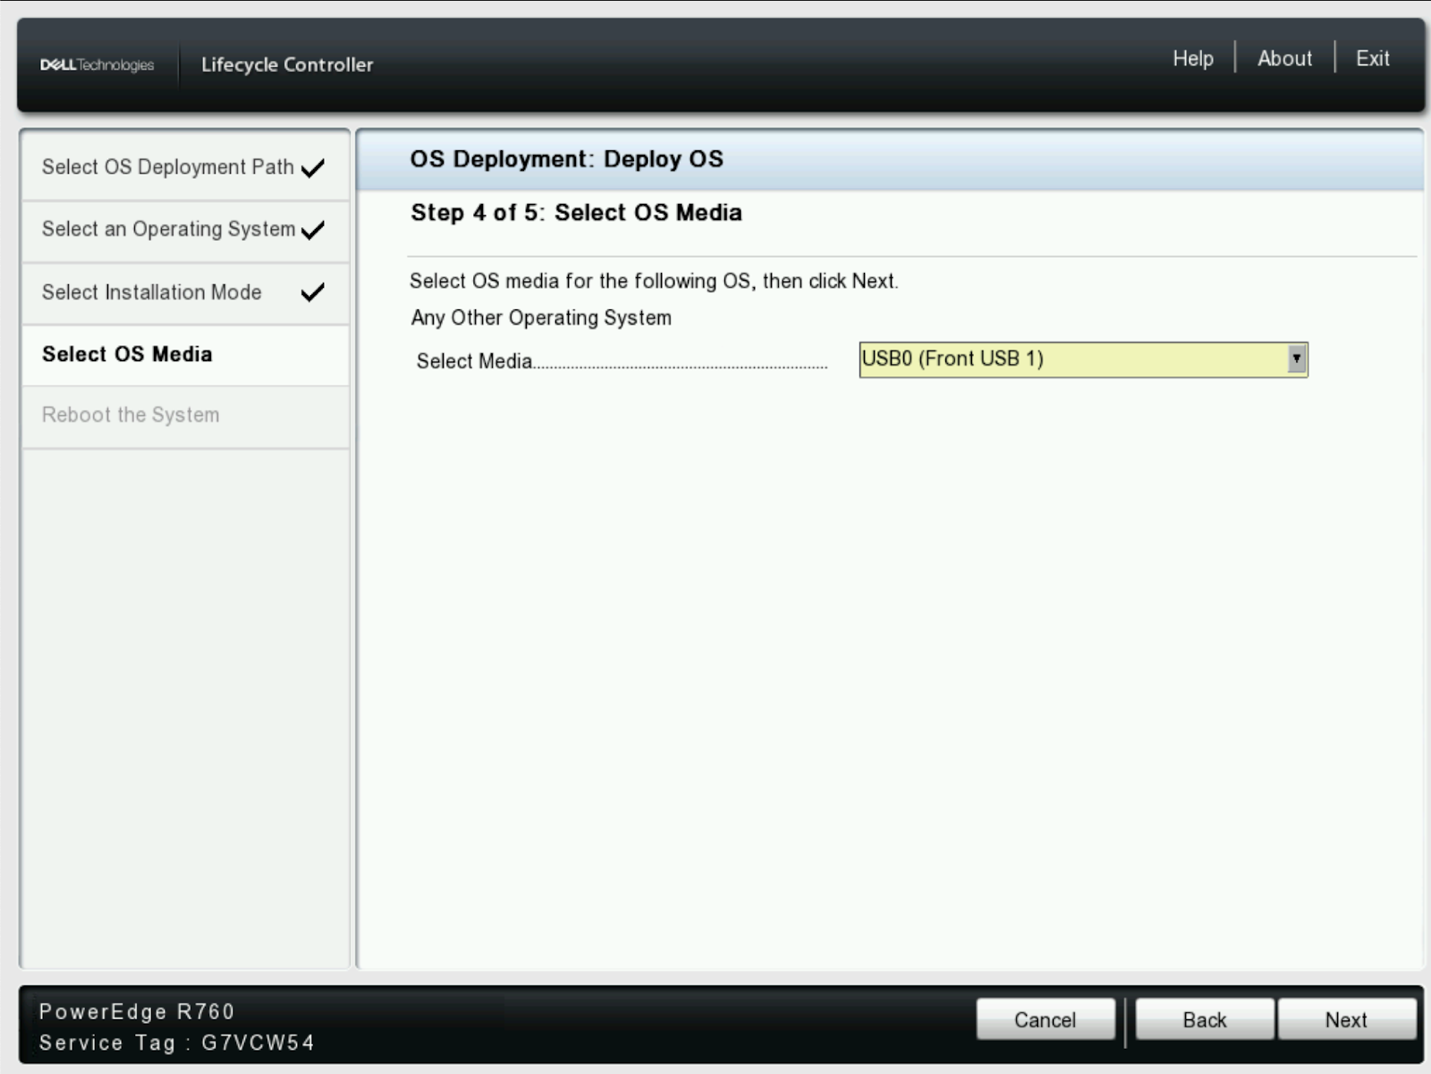
Ensure that Boot Mode is set to UEFI, Secure Boot is Disabled, Secure Boot Policy is set to Standard, and lastly that “Any Other Operating System” is set for the Available Operating System. Click “Next” to proceed.
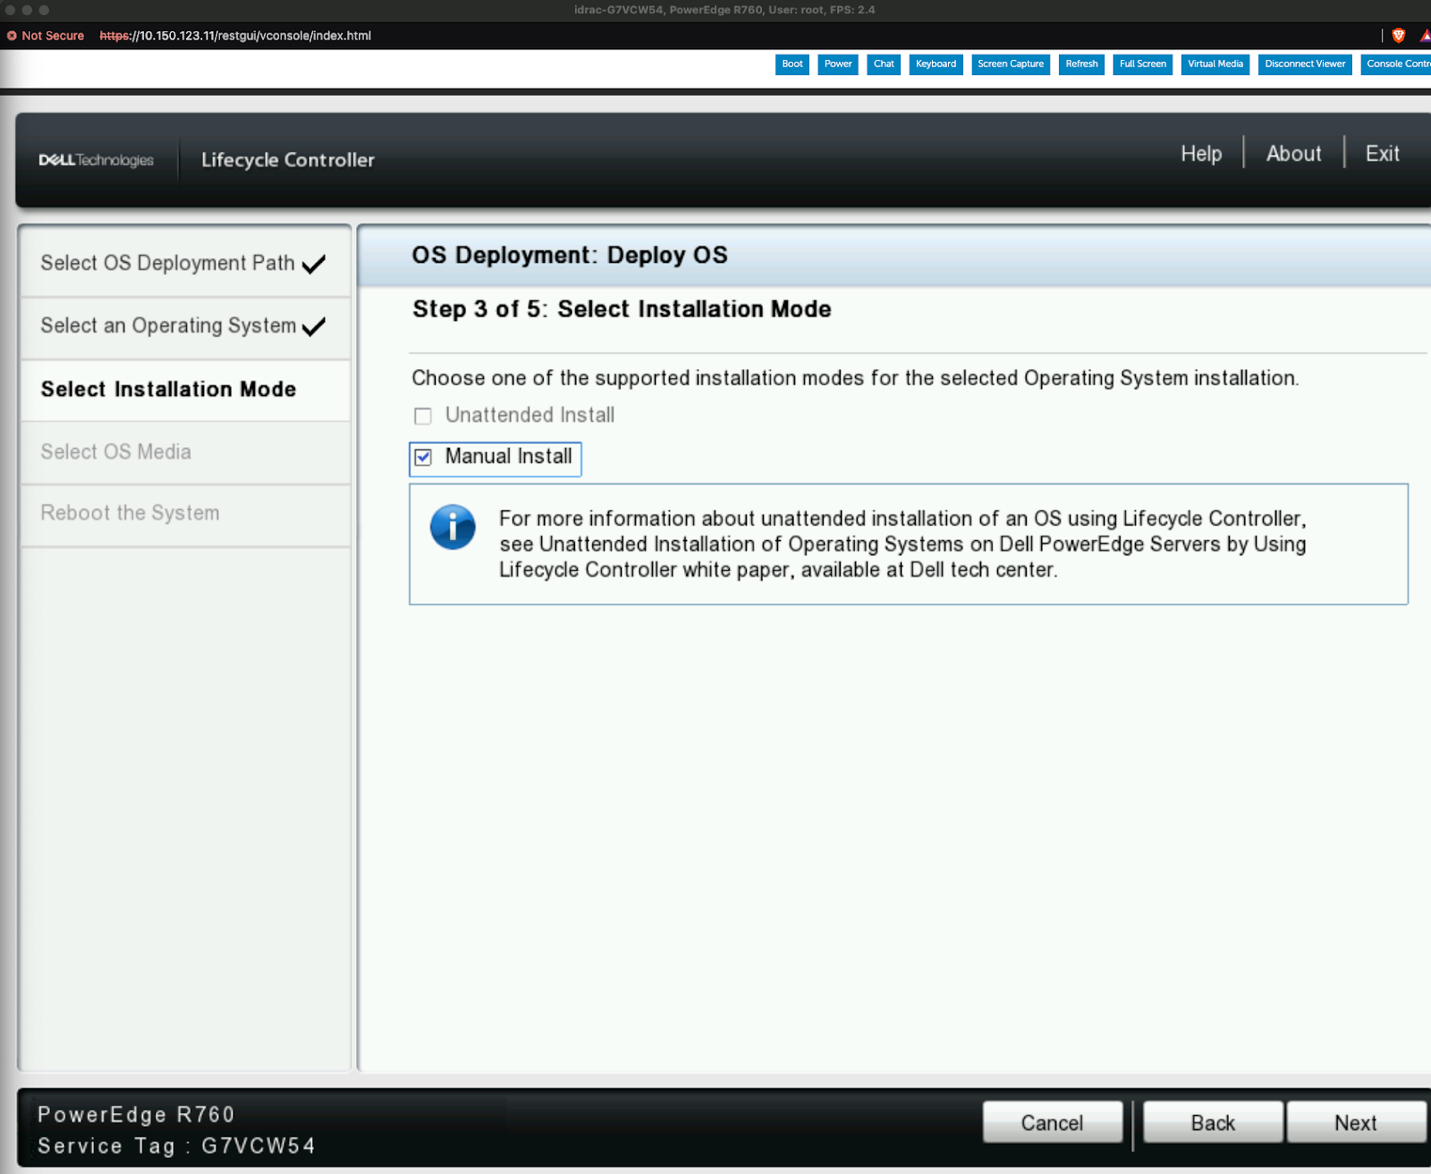
Next select the option for “Manual Install” and click “Next”.
Proceed to choose the appropriate Media/Virtual Media containing the BCM10 Installation ISO and then select “Next”.
Confirm the selected options, if any adjustments need to be made click the “Back” button to return to the appropriate screen to make a correction. If all options have been confirmed as correct select “Finish”.
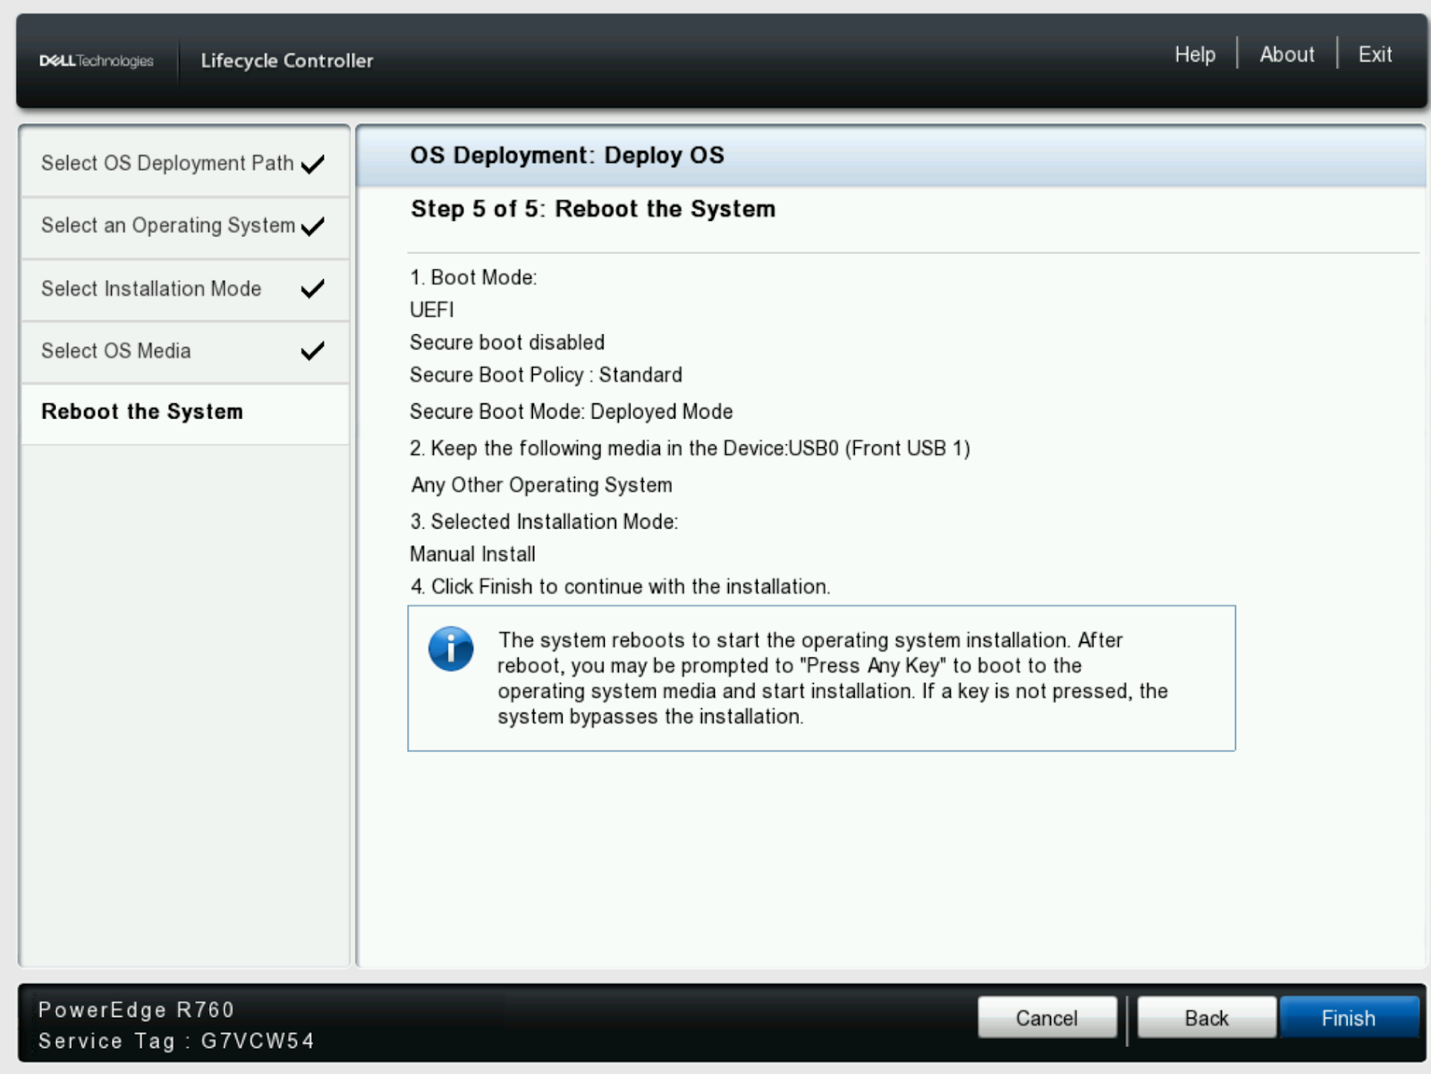
The Dell appliance will proceed to boot as normal.
Other Vendor Appliances#
Attach the BCM10 installation media to the designated Headnode1 appliance.
Power on Headnode1 and proceed to boot from the BCM installation media.The specific procedure may vary by vendor, follow the respective vendor’s user manual for details.
Booting the Base Command Manager Graphical Installer#
After booting from the BCM ISO, at the grub menu, highlight Start Base Command Manager Graphical Installer using the arrow keys then press enter/return to select the option.
This step has an automated countdown timer, to interrupt the timer simply use the up or down arrow key.
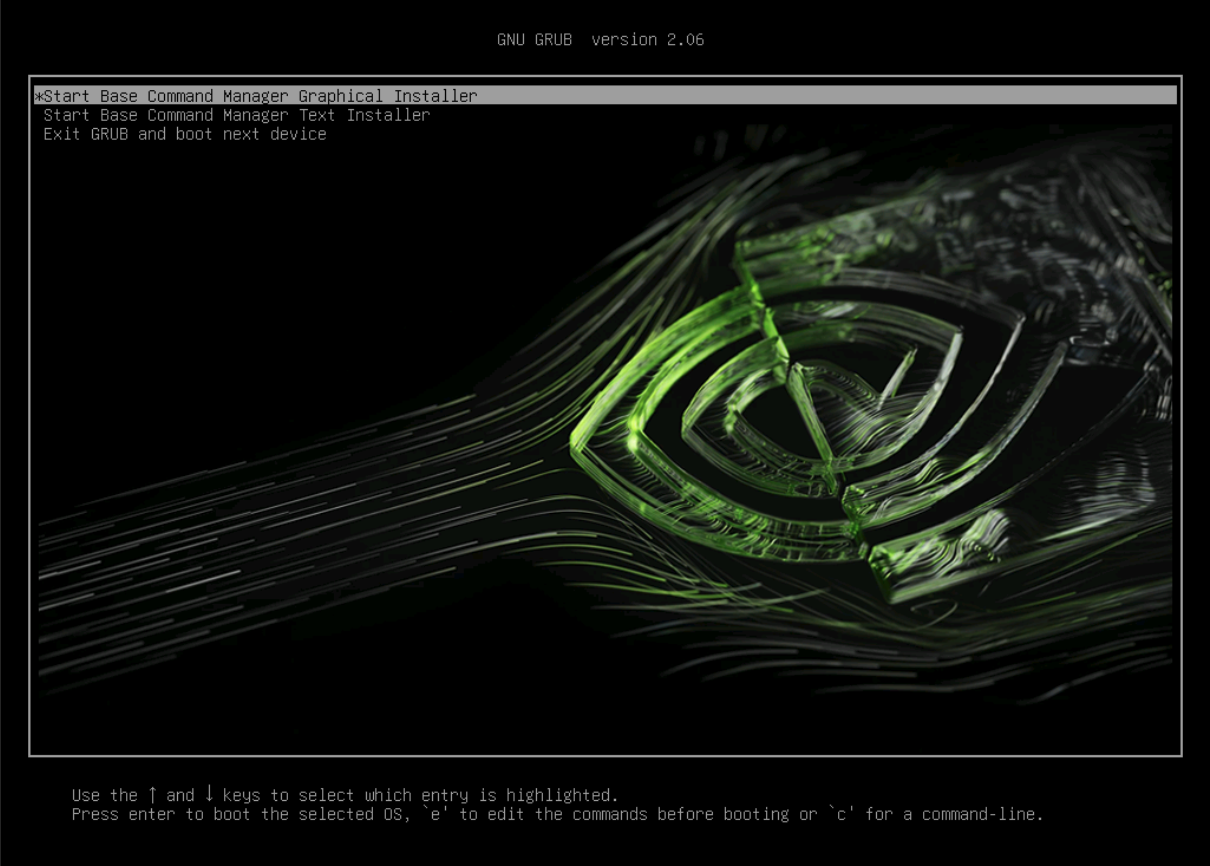
If you see the following after selecting “Start Base Command Manager Graphical Installer” this is expected and patience is needed while the installer loads up.

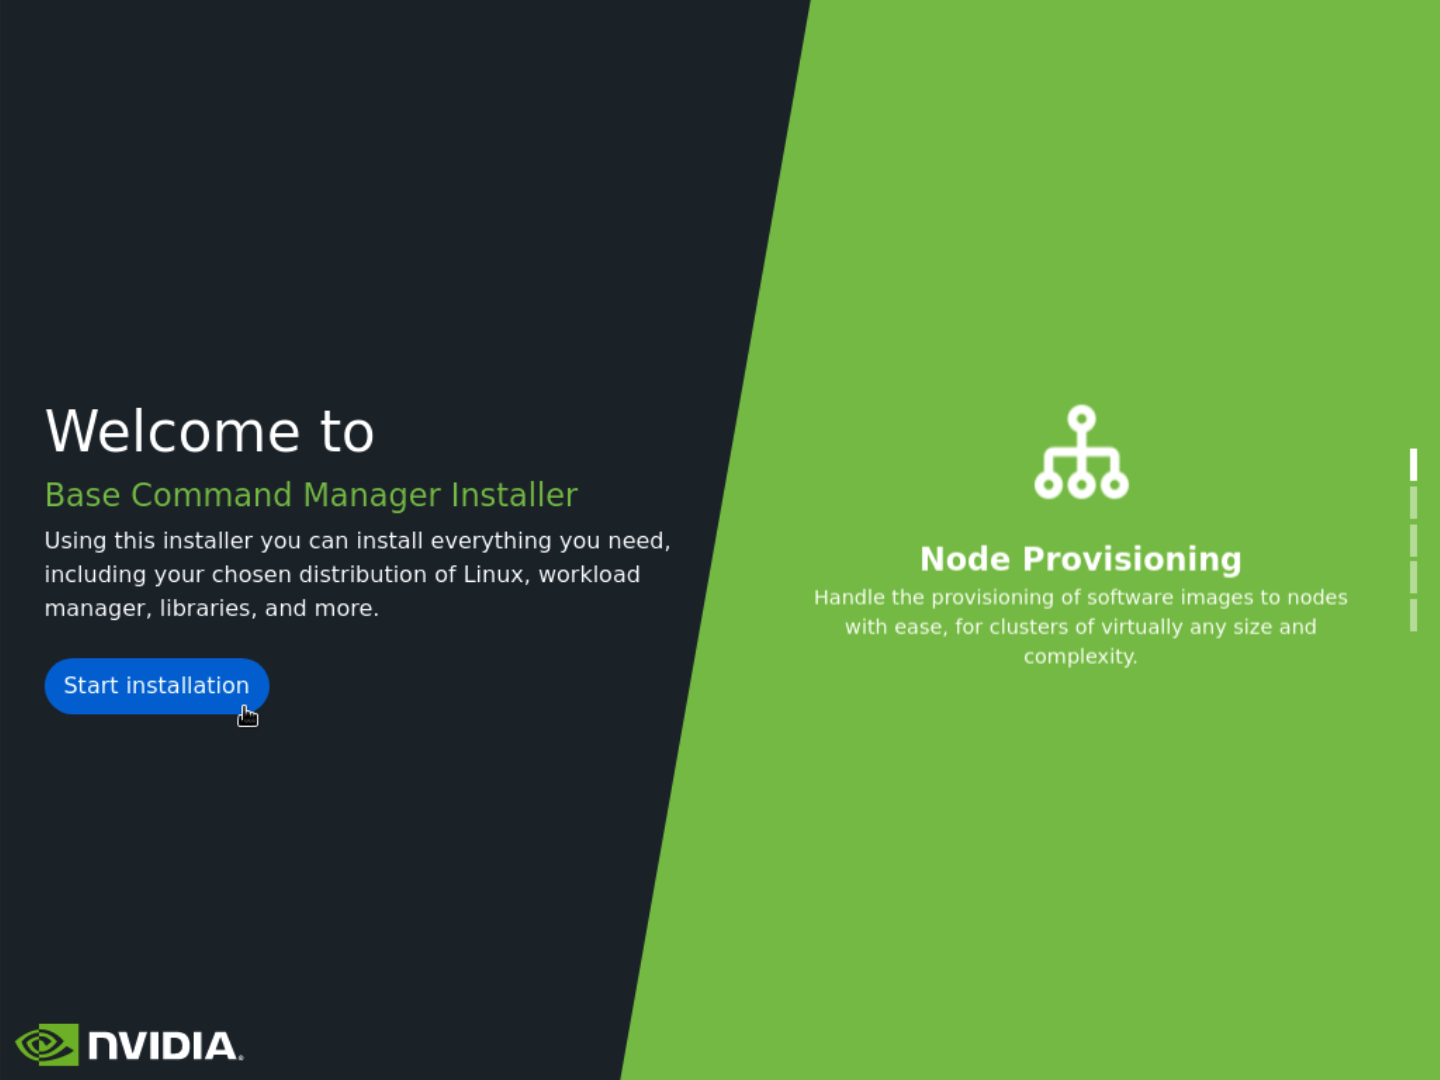
From here we can proceed to use the mouse to click Start installation on the Installer splash screen.
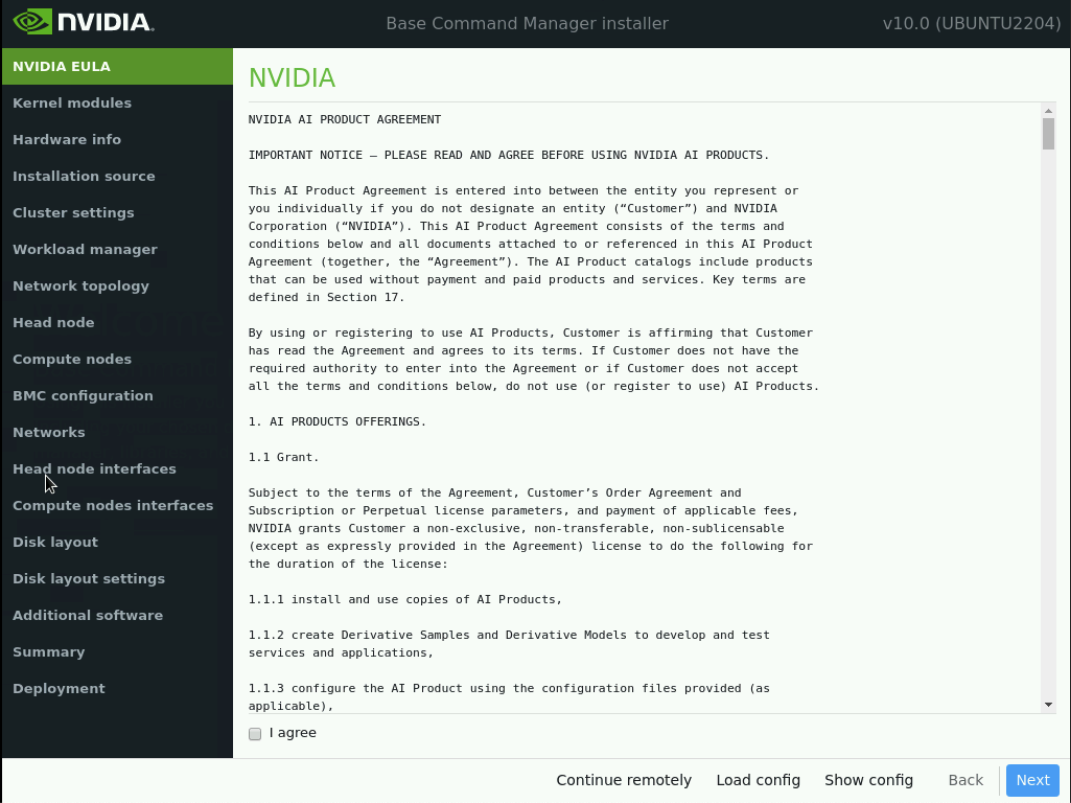
Accept the terms of the NVIDIA EULA by checking I agree and then select Next.
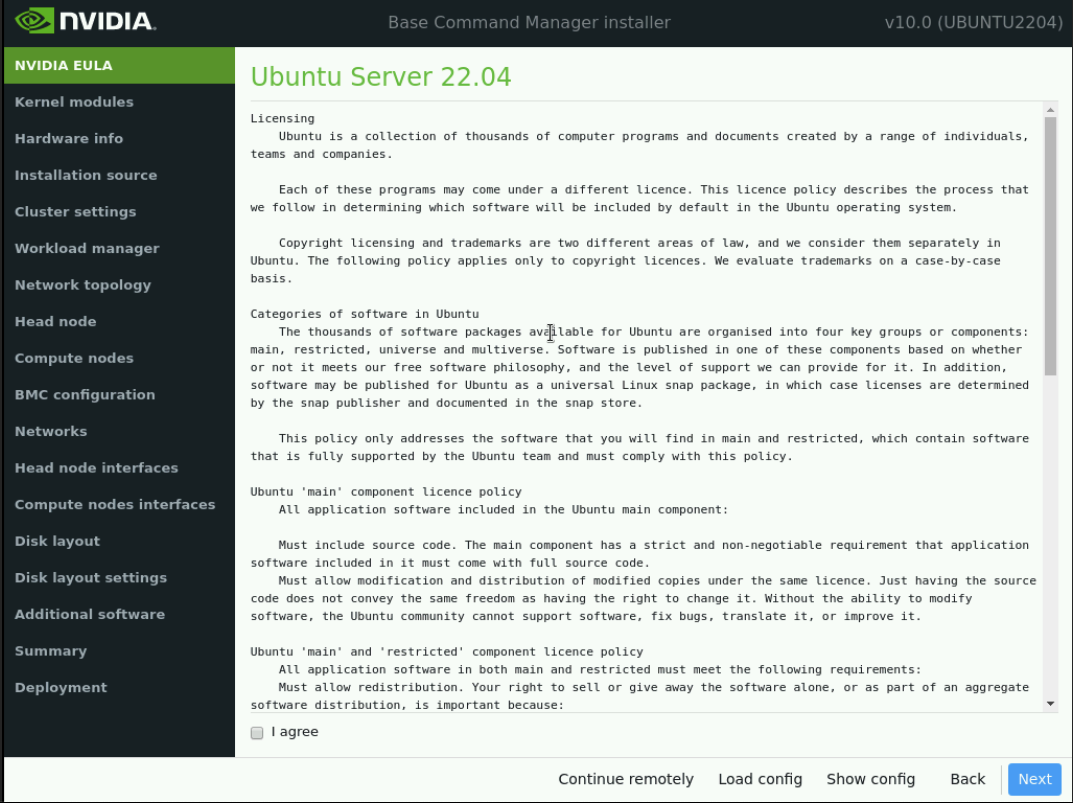
Accept the terms of the Ubuntu Server EULA by checking I agree and then select Next.
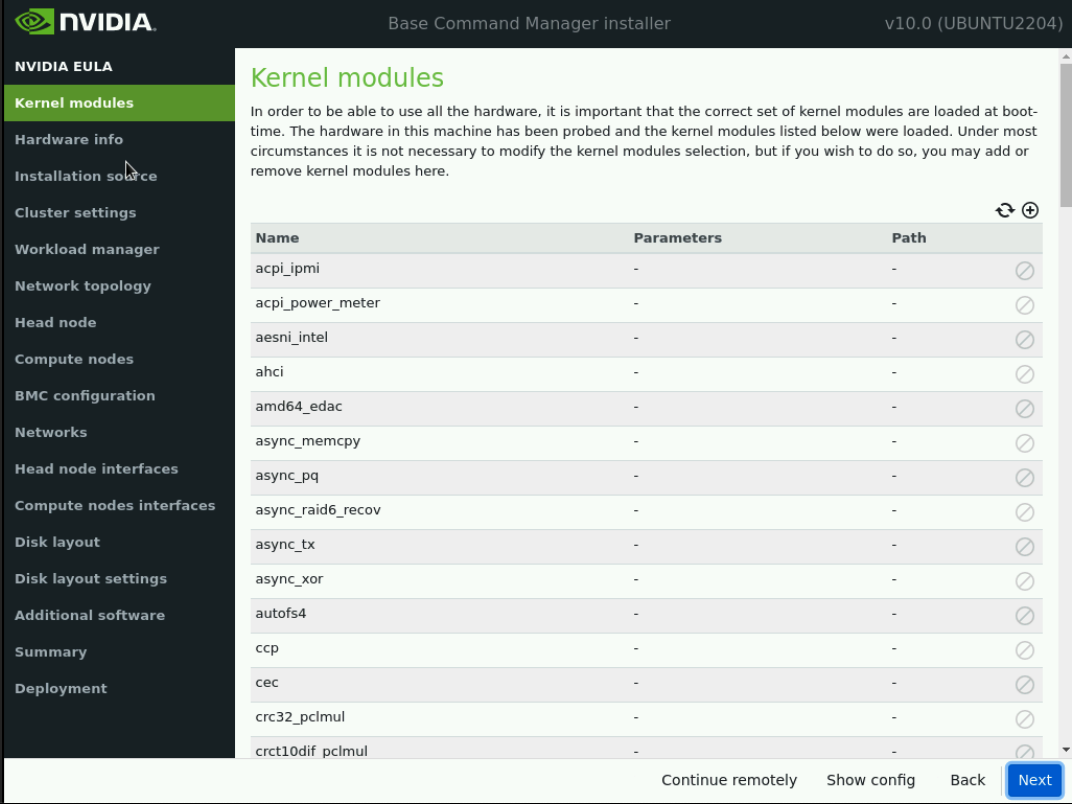
Unless instructed otherwise, select Next without modifying the Kernel modules to be loaded at boot time.
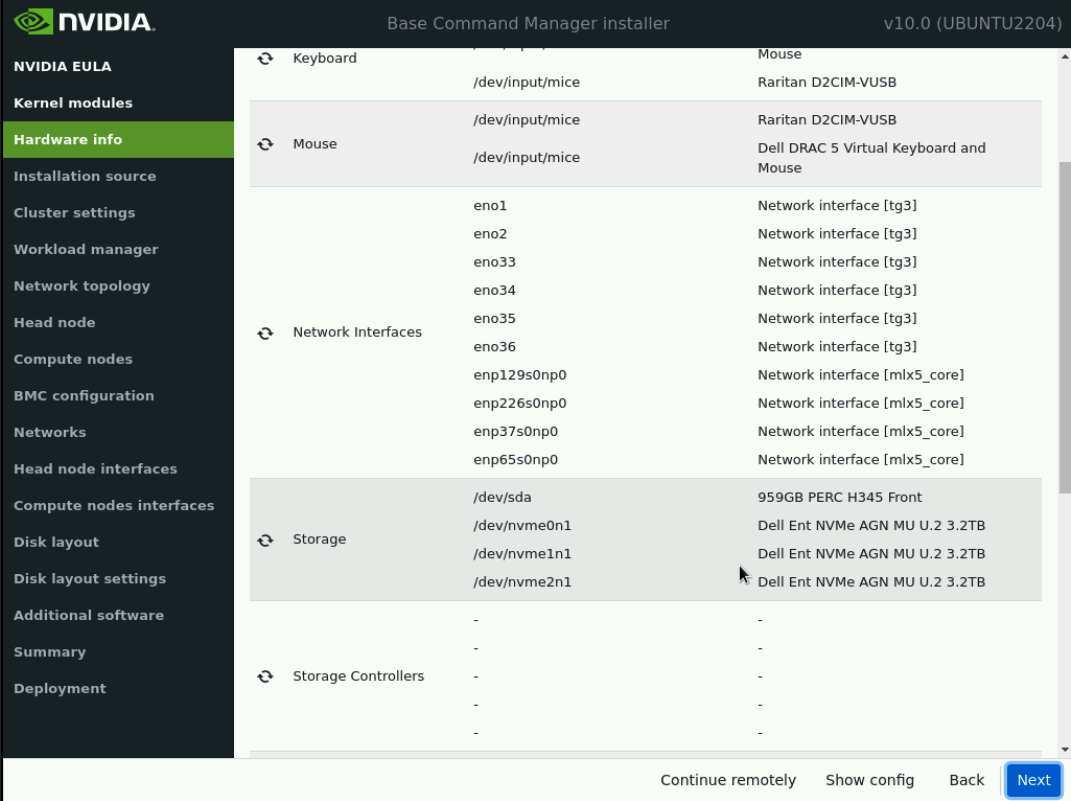
Verify the Primary Headnode Hardware info is correct and then select Next.
The key components that need to be validated are as follows:
Network interfaces - Verify that a minimum of 2 Ethernet mode interfaces are detected, this is typically indicated via the device naming convention.
Devices starting with e = ethernet, i = InfiniBand
Storage devices - It is advisable to install the operating system on a redundant storage device, such as a hardware or software RAID array.
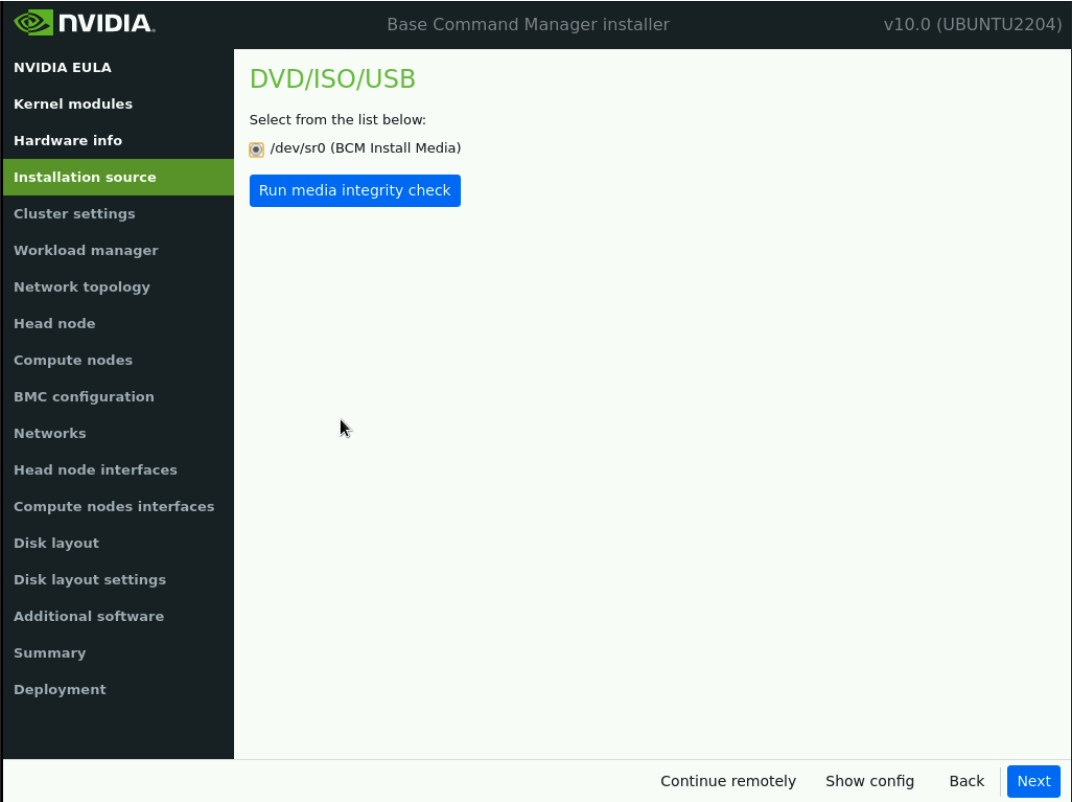
On the Installation source screen, choose the appropriate source for the installation media and then select Next.
On the General cluster settings screen, enter the required information according to the Site Survey and then select Next.

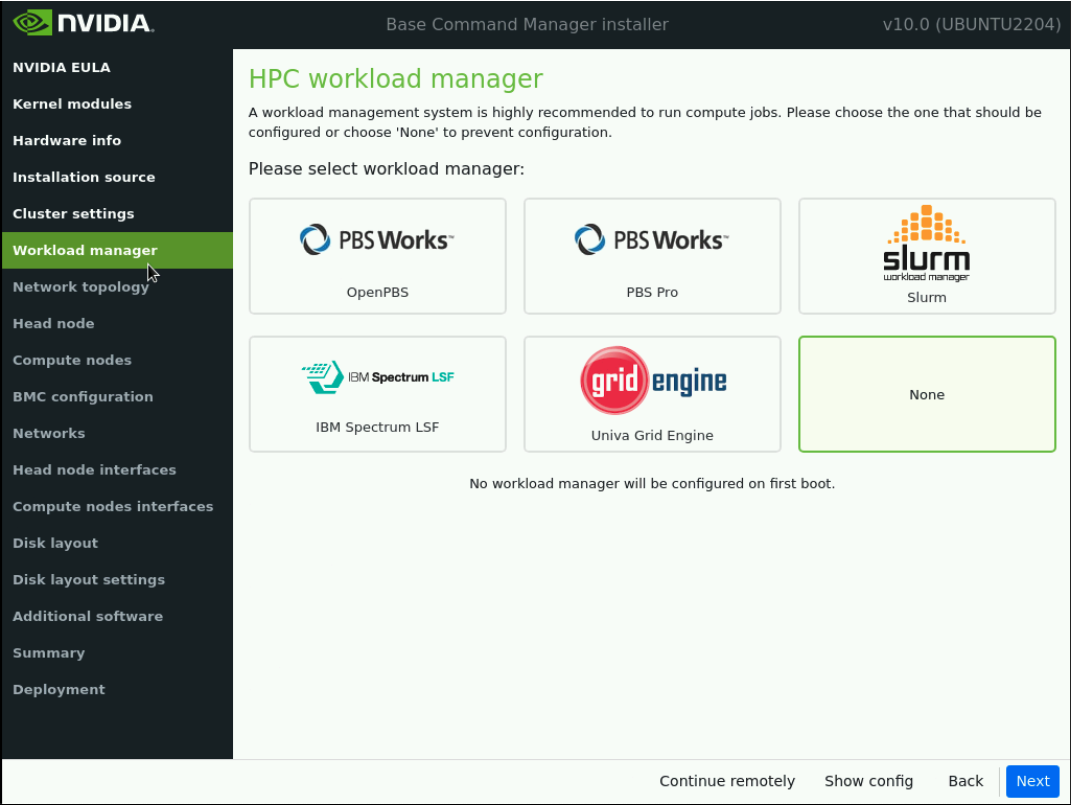
On the Workload manager screen, choose None and then select Next.
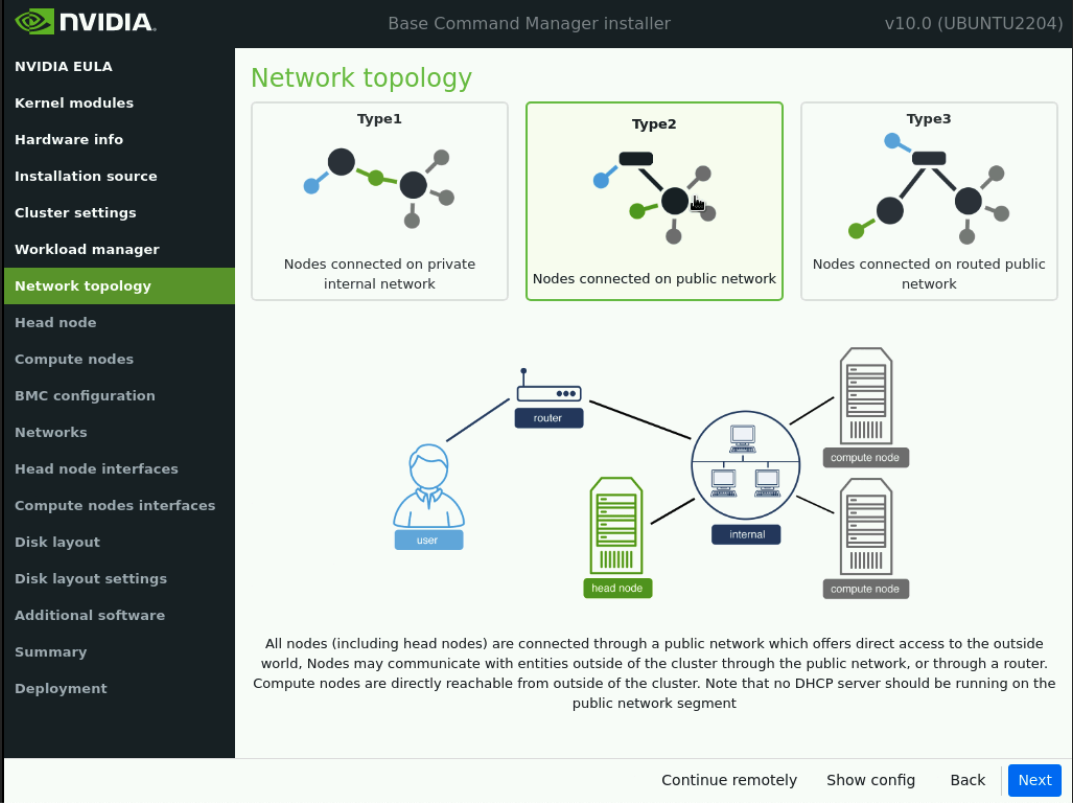
On the Network topology screen, choose the network type for the data center environment and then select Next.
Note
In this deployment example we are using a type 2 network. More information on the different types of networks can be found in the BCM Installation Manual
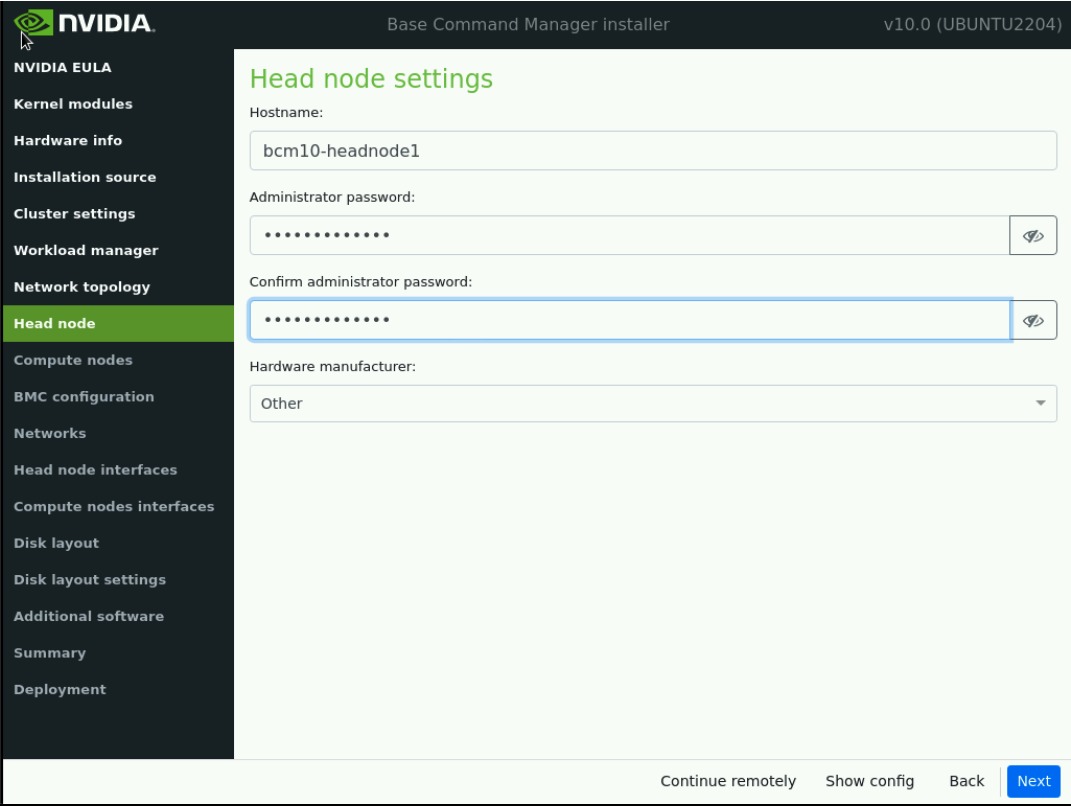
Update head node settings
On the Head node screen enter the Hostname and Administrator password as defined on the Site Survey.
Choose Other for Hardware manufacturer, and then select Next.
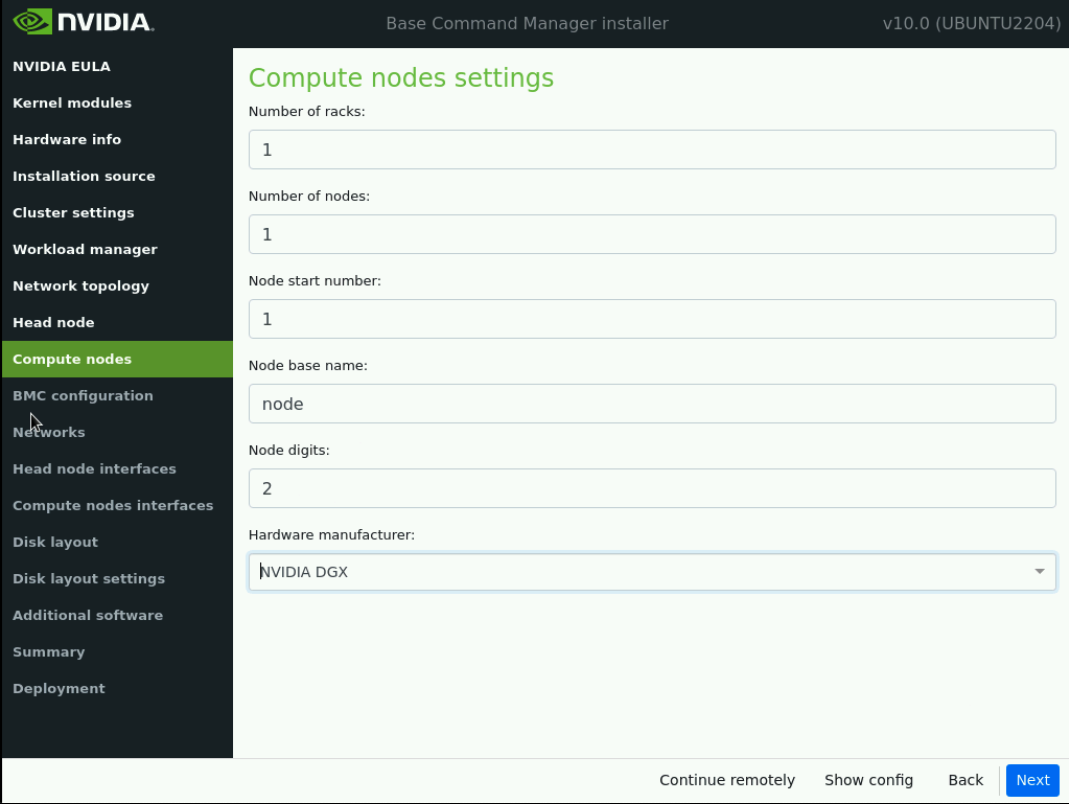
Update compute node settings
On the Compute nodes screen, update node digits from 3 to 2 and select Next.
This will populate what will be referred to as a “template” node with the name of node01, which will be modified to create the appropriate DGX and workload management node identities.
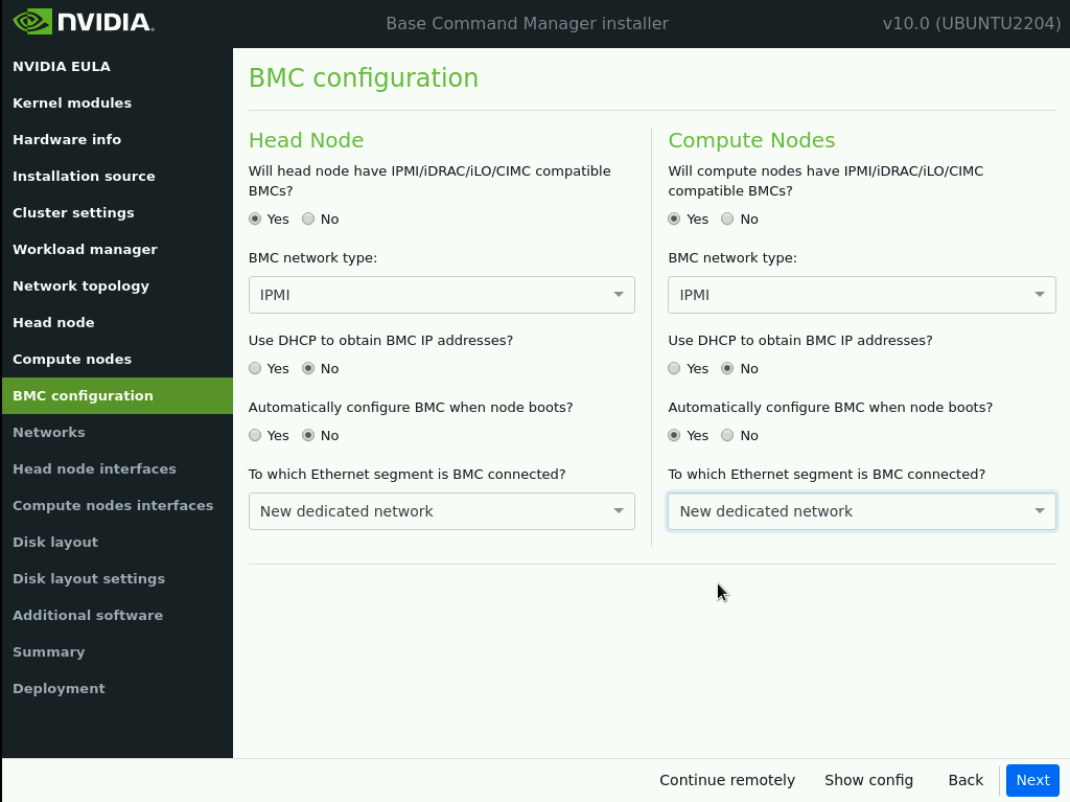
On the BMC Configuration screen, choose Yes for both Head Node and Compute Nodes and populate the following values for both the Head & Compute nodes
BMC network type select IPMI from the dropdown menu.
Choose No for “Use DHCP to obtain BMC IP addresses?”
For the Head node, select No for “Automatically configure BMC when node boots?”. Select Yes for Compute nodes.
Lastly select “New dedicated network” from the dropdown list for “To which Ethernet segment is BMC connected?”.
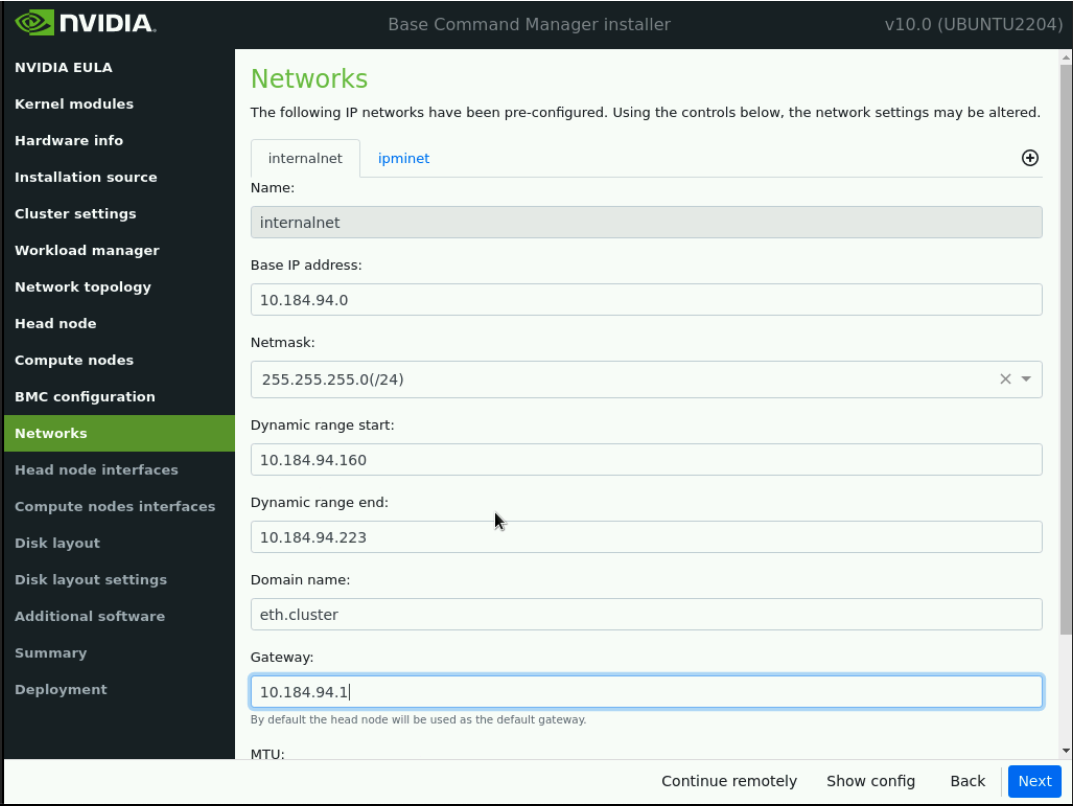
Since a Type 2 network was specified and “New dedicated network” was selected in the prior step for IPMI, there will be a total of 2 networks defined: managementnet (internalnet) & oobmanagementnet (ipminet). Proceed to populate both network definitions with the defined values in the Site Survey.

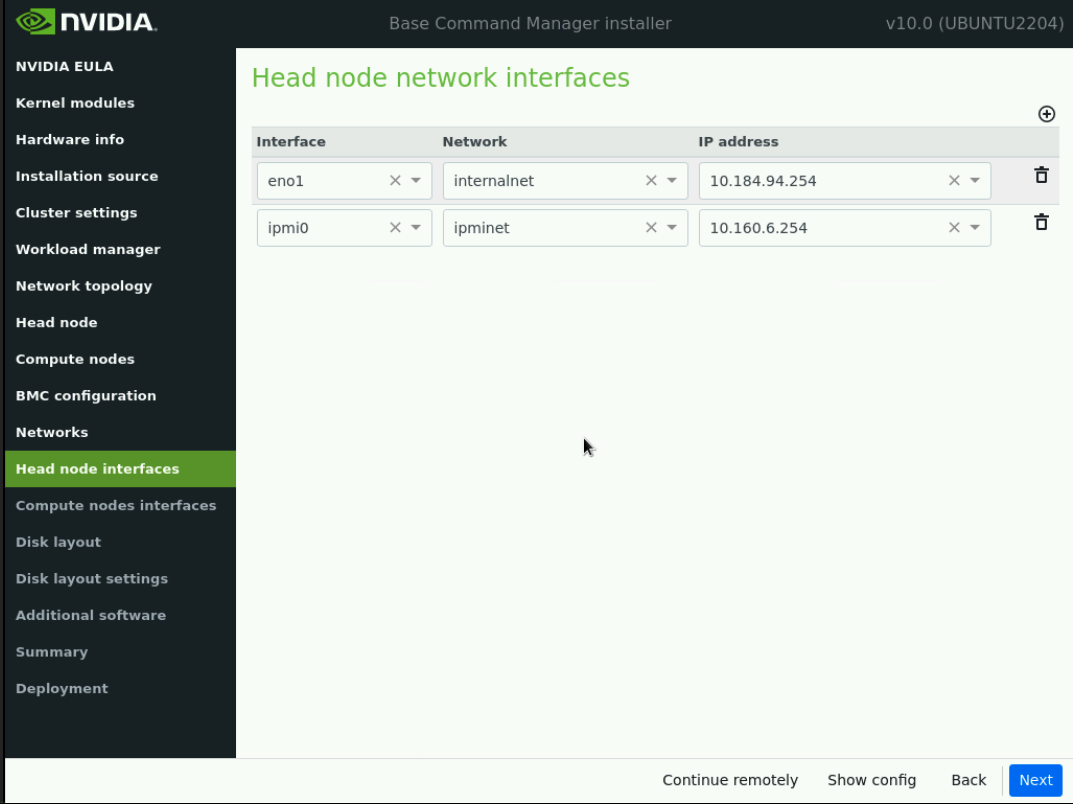
On the Head node interfaces screen, ensure that the correct interface is configured (refer to site survey) with the head node’s target managementnet (internalnet) IP.
We will also need to remove the IPMI alias interface that was defined by default, in our example this interface is ens18:ipmi.
In other scenarios you will be looking for an interface name that ends with “:ipmi”.
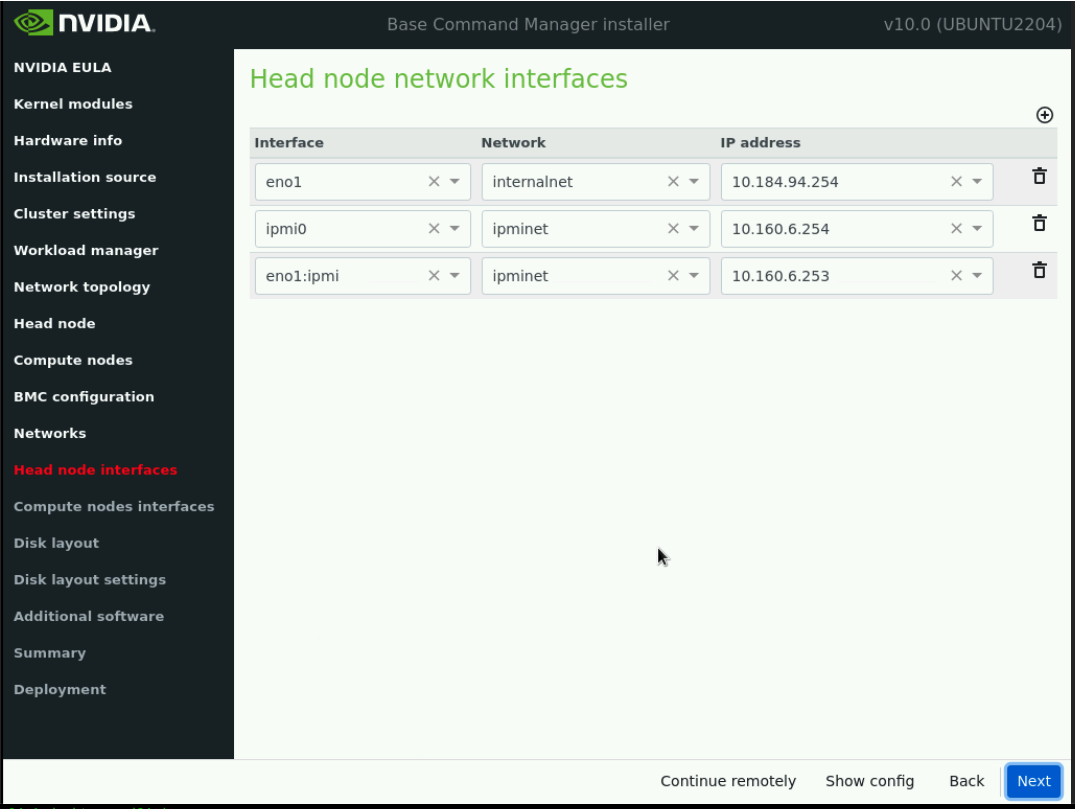
After deleting the alias interface ens18:ipmi.
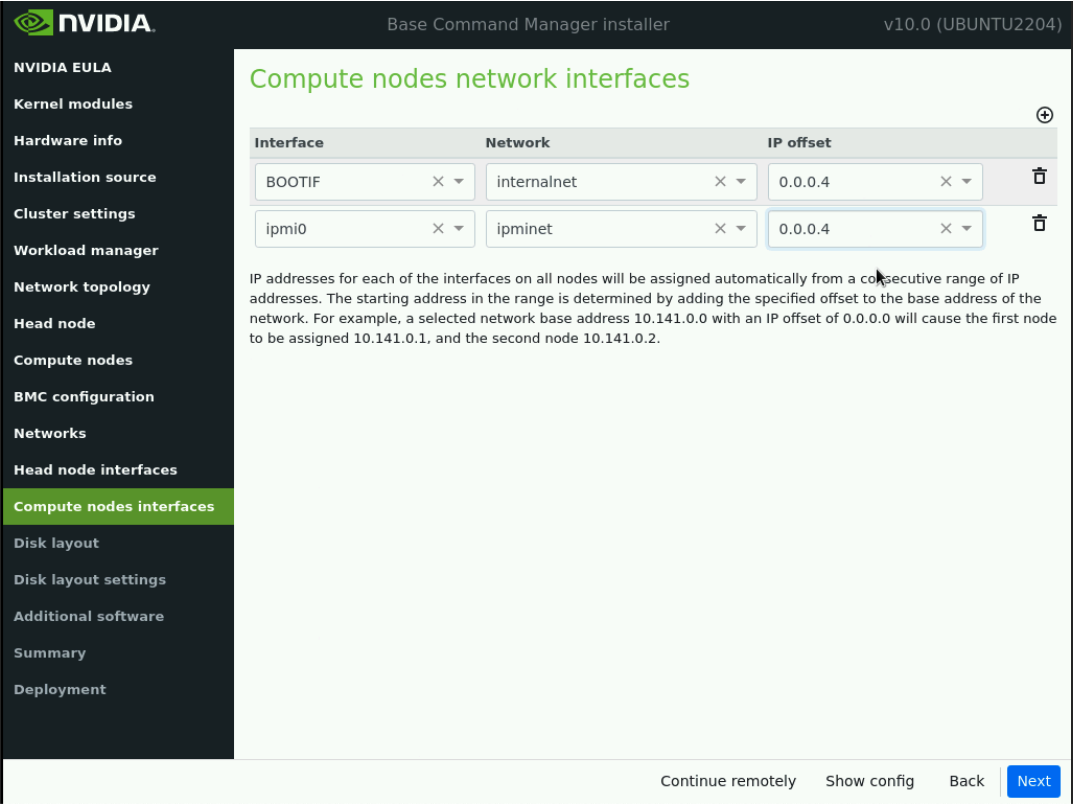
On the Compute node interfaces screen, update the IP offset for both listed items, and then select Next. Here we are setting the IP offset for any nodes that get provisioned into the cluster later in the deployment process. The offset effectively blocks off the first n number of IP’s from the specified network.
In our example we have it set to 0.0.0.4 for managementnet (internalnet) (10.141.225.0/16) which means the first IP available out of our managementnet (internalnet) ip range will be 10.141.225.4 instead of the expected 10.141.225.1 address. The offset allows the reserved IP addresses to be used for gateways, VRRP etc within the network subnet.
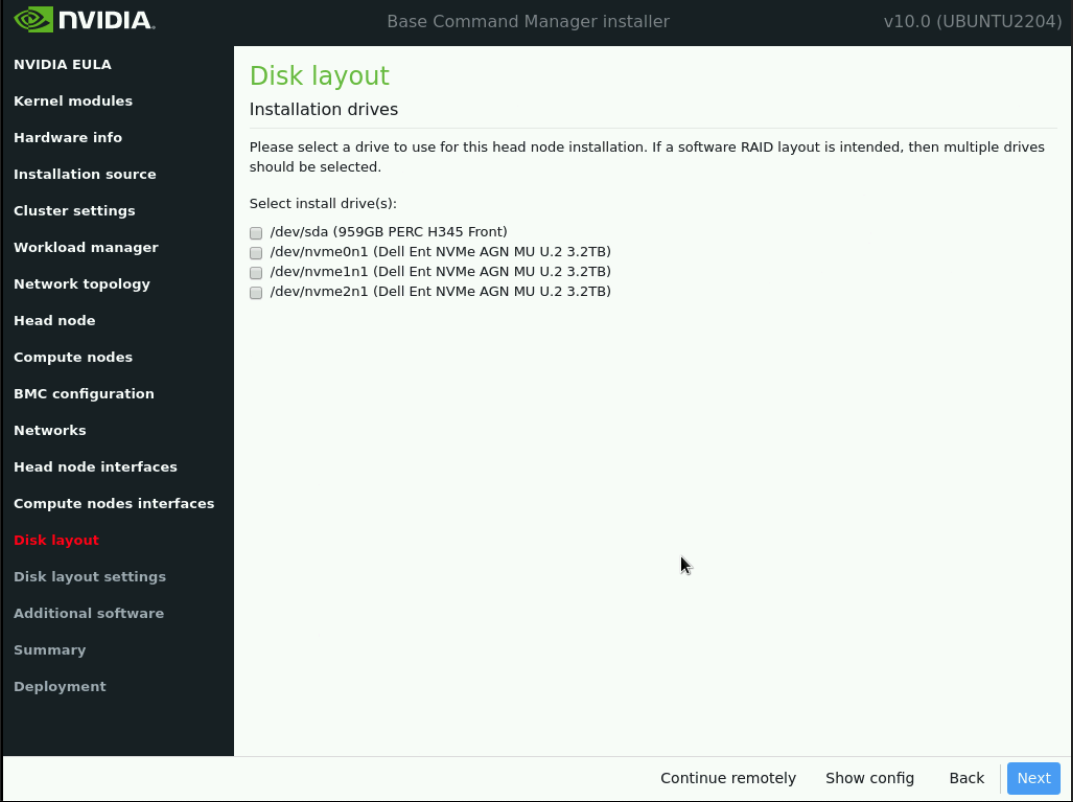
On the Disk layout screen, select the target install location (in this case /dev/sda) and then select Next.
When selecting the target installation location be sure to use a storage device with a minimum of RAID1 redundancy.
On the Disk layout settings screen, if hardware RAID storage was selected in the prior step accept defaults and then select Next.
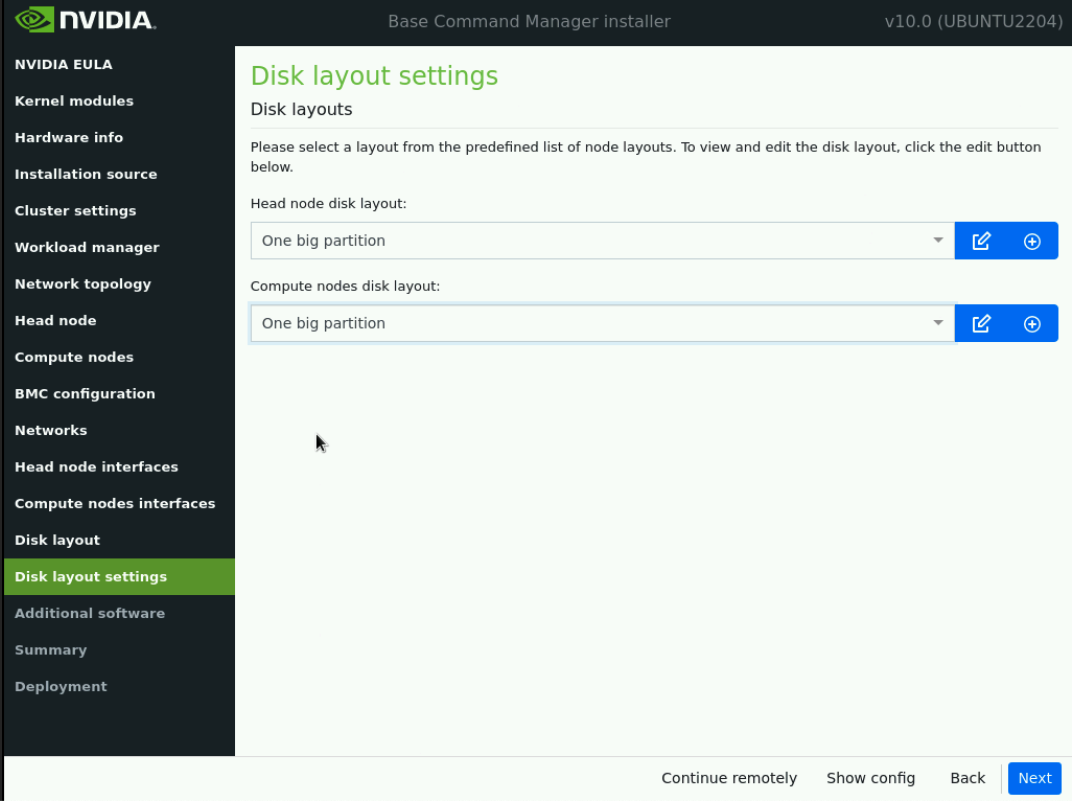
If software RAID is the storage option, ensure that “One big partition RAID1” or “One big partition RAID5” is selected for Head node disk layout.
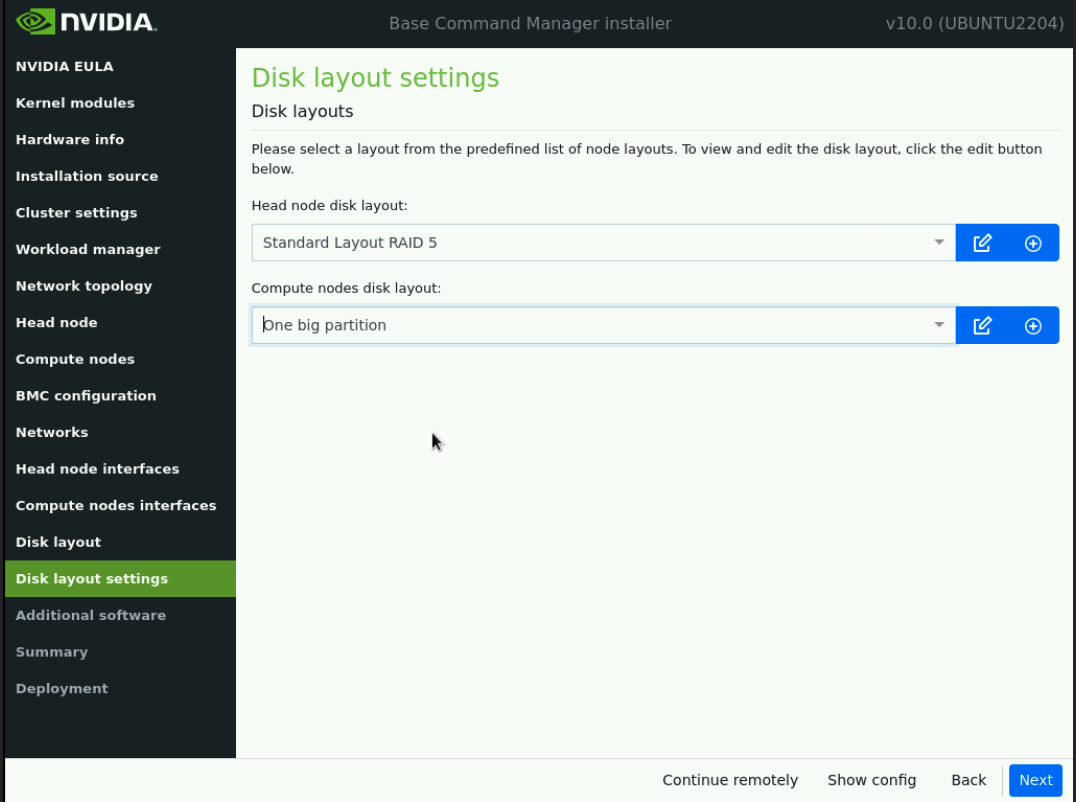
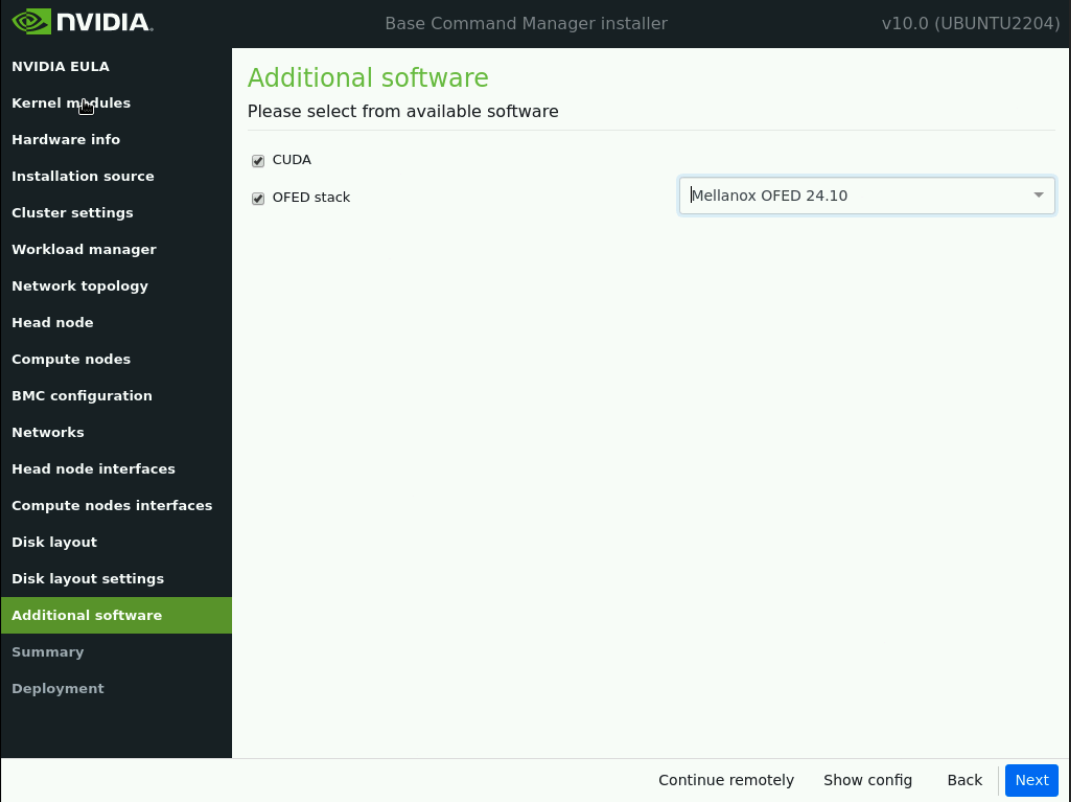
In the Additional software screen, select the newest version of OFED that is compatible with the DGX and select Next.
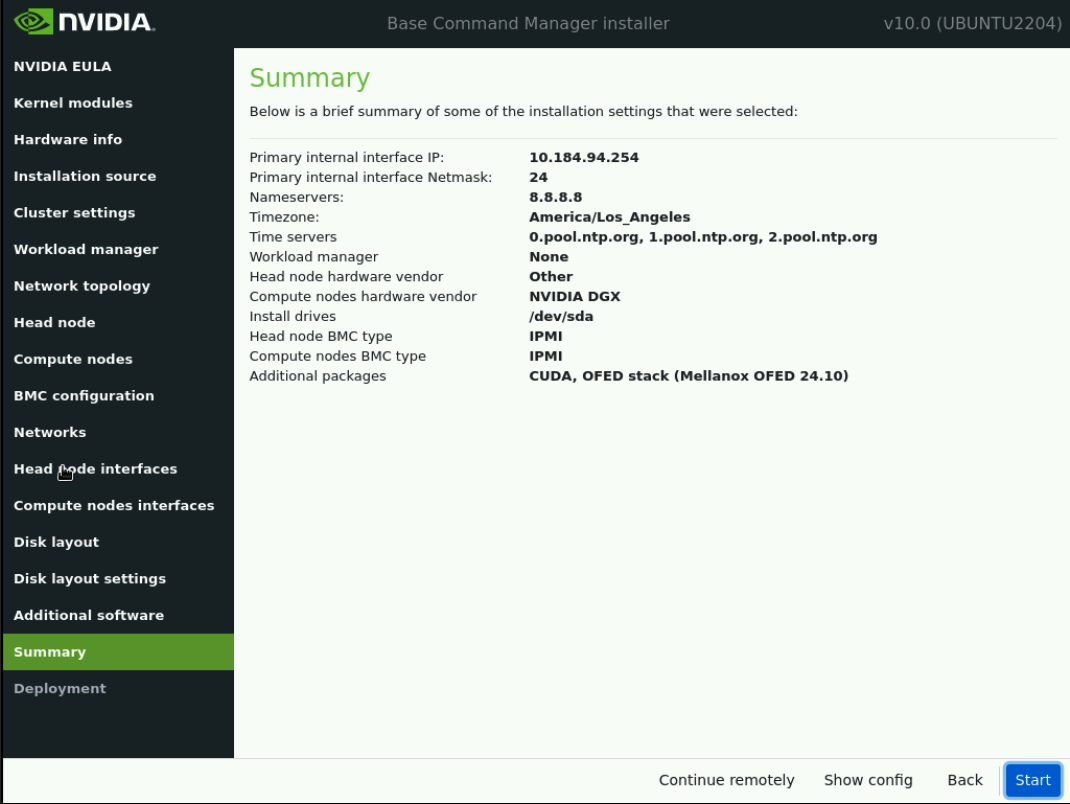
Confirm the information on the Summary screen and then select Next.
The Summary screen provides an opportunity to confirm the Head node/basic cluster configuration before installation begins.
If values do not match site survey, use the back button to navigate to the appropriate screen to correct any errors.
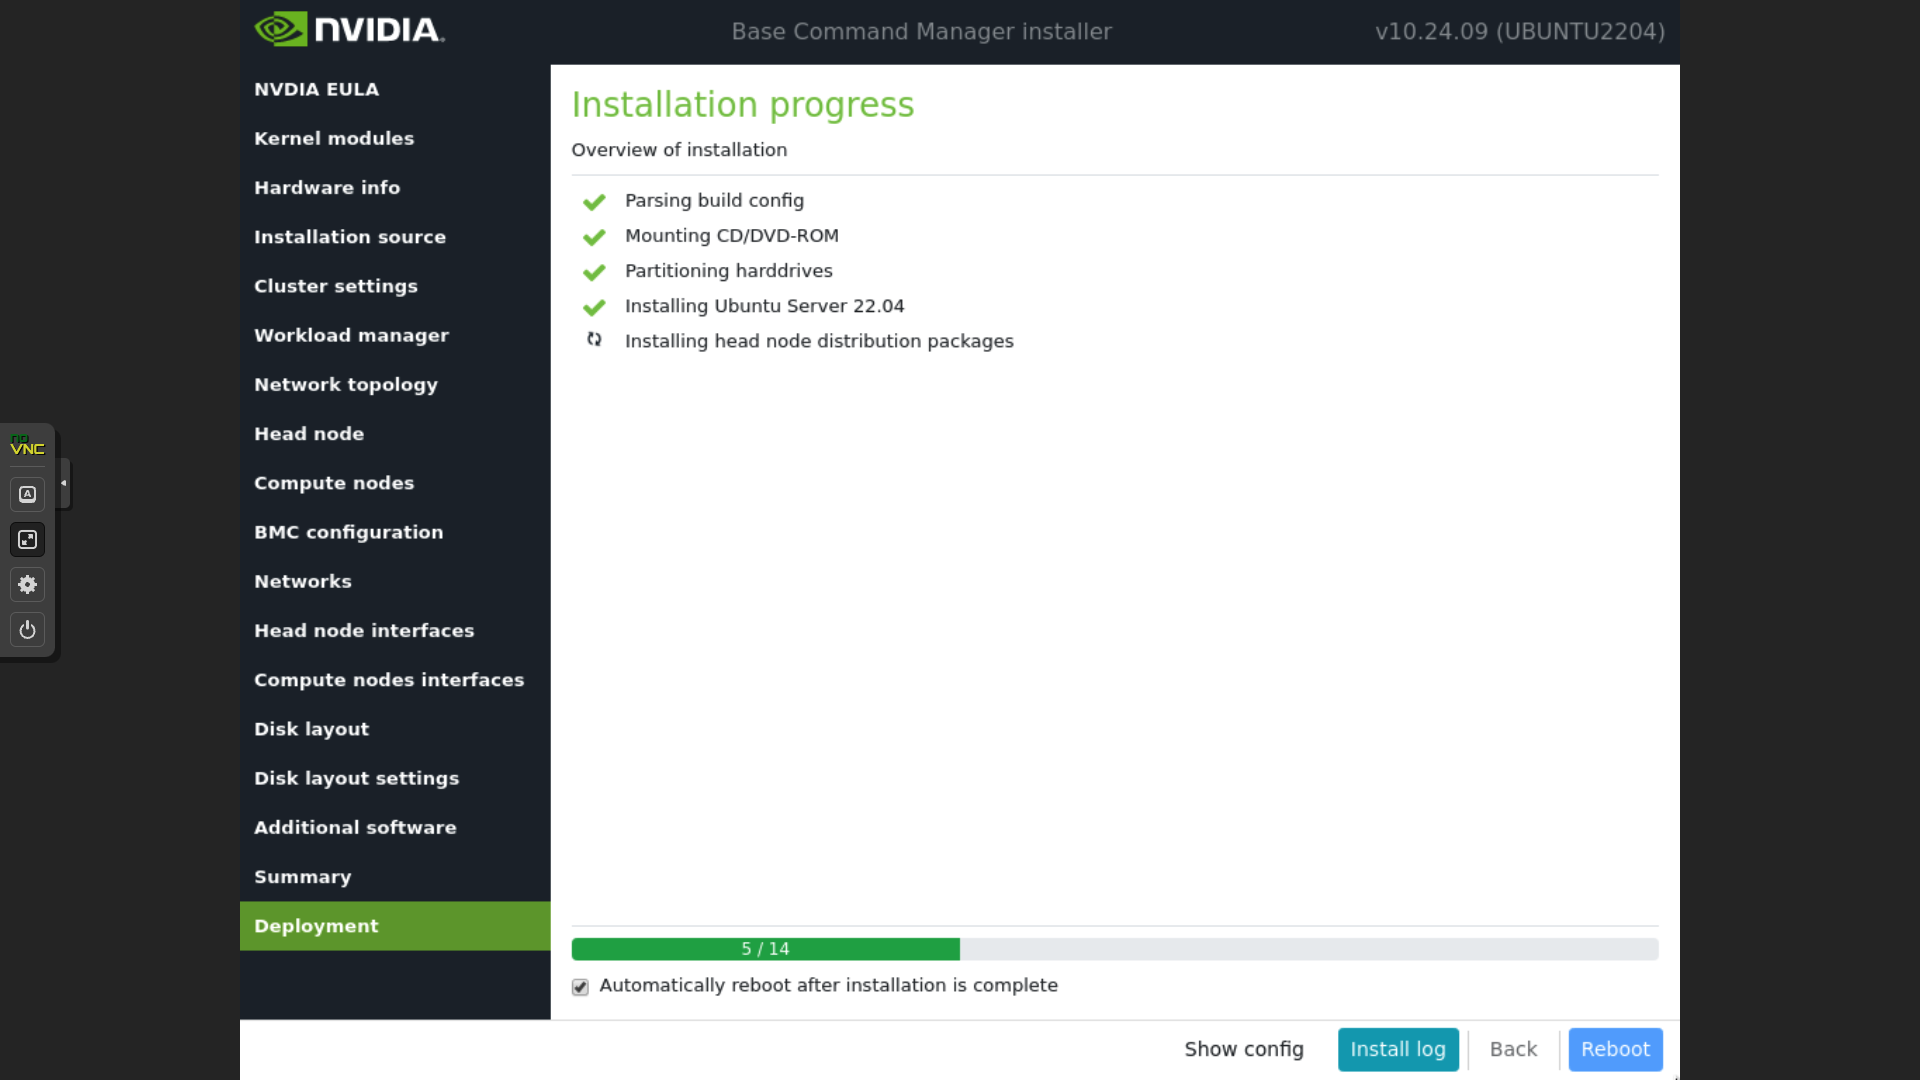
Monitor the progress of the installation, once the deployment is complete, select Reboot.
Note
You can tick the “Automatically reboot after installation is complete” box to have the headnode automatically reboot after the installation completes.
Login to the Headnode#
Once the headnode has finished rebooting, ssh to it using the root credentials.
Update BCM#
Use apt update followed by apt upgrade to get the latest version of
tools/utilities. Reboot the system if prompted.
Activate the BCM Cluster License#
License the cluster by running the request-license command and providing the product key and other pieces of information as per the site survey.
#request-license
Product Key (XXXXXX-XXXXXX-XXXXXX-XXXXXX-XXXXXX):
Country Name (2 letter code): US
State or Province Name (full name): California
Locality Name (e.g. city): Santa Clara
Organization Name (e.g. company): NVIDIA
Organizational Unit Name (e.g. department): Demo
Cluster Name: Demo Cluster
Private key data saved to /cm/local/apps/cmd/etc/cluster.key.new

Warning: Permanently added 'bcm10-headnode' (ED25519) to the list of known hosts.
MAC Address of primary head node (bcm10-headnode) for ens3f1np1 [08:C0:EB:F5:72:0F]:
If setting up a second headnode for HA, enter the mac address for it's primary in-band interface.
Will this cluster use a high-availability setup with 2 head nodes? [y/N] y
MAC Address of secondary head node for eth0 [XX:XX:XX:XX:XX:XX]: 5c:6f:69:24:dd:54

Certificate request data saved to /cm/local/apps/cmd/etc/cluster.csr.new
Submit certificate request to http://licensing.brightcomputing.com/licensing/index.cgi ? [Y/n] Y

Contacting http://licensing.brightcomputing.com/licensing/index.cgi...

License granted.
License data was saved to /cm/local/apps/cmd/etc/cluster.pem.new
Install license? [Y/n] Y
========= Certificate Information ========
Version:                     10
Edition:                     Advanced
OEM:                         NVIDIA
Common name:                 Demo Cluster
Organization:                NVIDIA
Organizational unit:         Demo
Locality:                    Santa Clara
State:                       California
Country:                     US
Serial:                      2369865
Starting date:               04/Oct/2023
Expiration date:             01/Sep/2024
MAC address / Cloud ID:      08:C0:EB:F5:72:0F|5C:6F:69:24:DD:54
Licensed tokens:             8192
Pay-per-use nodes:           Yes
Accounting & Reporting:      Yes
Allow edge sites:            Yes
License type:                Free
==========================================

Is the license information correct ? [Y/n] Y
Backup directory of old license: /var/spool/cmd/backup/certificates/2024-05-31_08.25.05
Installed new license
Revoke all existing cmd certificates

Waiting for CMDaemon to stop: OK

Installing admin certificates

Waiting for CMDaemon to start: OK
mysql: [Warning] Using a password on the command line interface can be insecure.
Copy cluster certificate to 3 images / node-installers
Copy cluster certificate to /cmimages/default-image//cm/local/apps/cmd/etc/cluster.pem
Copy cluster certificate to /cm/node-installer//cm/local/apps/cmd/etc/cluster.pem
Copy cluster certificate to /cmimages/dgx-os-6.3-h100-image//cm/local/apps/cmd/etc/cluster.pem
Copy cluster certificate to /cmimages/dgx-os-6.3-a100-image//cm/local/apps/cmd/etc/cluster.pem
mysql: [Warning] Using a password on the command line interface can be insecure.

Regenerating certificates for users

New license was installed. In order to allow compute nodes to obtain a new
node certificate, all compute nodes must be rebooted.

Please issue the following command to reboot all compute nodes:
     pdsh -g computenode reboot
Enable Bonding on the Headnode#
Note
We recommended that you perform this from a remote/physical KVM, not via SSH. Before attempting the following steps on the headnode, verify the headnode’s out of band management or BMC interface/remote/physical KVM is reachable and in service.
In the event a mistake is made here, remote access will temporarily be lost to the host OS, and the out of band management or BMC interface or remote console/crash cart would be the only way to rectify the problem.
In this step, we’ll clear the managementnet (internalnet) interface IP which was assigned to the primary interface during the installation and assign it to the newly created bond interface with the network interfaces. Refer to site survey for the network interface names/MAC addresses.
Login to headnode and run Cluster Manager Shell ( cmsh).
root@HEAD-01:~# cmsh
[bcm10-headnode]% device
[bcm10-headnode->device]% use bcm10-headnode1
[bcm10-headnode->device[bcm10-headnode]]% interfaces
[bcm10-headnode1->device[bcm10-headnode1]->interfaces]% list
Type         Network device name  IP               Network          Start if
------------------------------------------------------------------------
bmc          ipmi0                <Change IP>     ipminet          always
physical     ens3f1np1 [prov]    <Change IP>    internalnet
[bcm10-headnode->device[bcm10-headnode]->interfaces]% clear ens3f1np1 ip
[bcm10-headnode->device*[bcm10-headnode*]->interfaces*]% clear ens3f1np1 network
[bcm10-headnode->device*[bcm10-headnode*]->interfaces*]% add physical ens2np0
[bcm10-headnode->device*[bcm10-headnode*]->interfaces*[ens2np0*]]% set mac 88:00:00:00:18:d8
[bcm10-headnode->device*[bcm10-headnode*]->interfaces*[ens2np0*]]% add bond bond0
[bcm10-headnode->device*[bcm10-headnode*]->interfaces*[bond0*]]% append interfaces ens3f1np1 ens2np0
[bcm10-headnode->device*[bcm10-headnode*]->interfaces*[bond0*]]% set mode 1
[bcm10-headnode->device*[bcm10-headnode*]->interfaces*[bond0*]]% set network managementnet
[bcm10-headnode->device*[bcm10-headnode*]->interfaces*[bond0*]]% set ip 10.133.4.24
[bcm10-headnode->device*[bcm10-headnode*]->interfaces*[bond0*]]% ..
[bcm10-headnode->device*[bcm10-headnode*]->interfaces*]% ..
[bcm10-headnode->device*[bcm10-headnode*]]% set provisioninginterface bond0
[bcm10-headnode->device*[bcm10-headnode*]]% commit
Verify the IP connectivity to the BCM headnode using ping/ssh before proceeding.