softwareimage and Category Creation#
Before configuring AWS using cmcluster-extension, create the software images and non-director node categories that are necessary for the target public cloud environment.
sshto the head node as root or a user capable of gaining root permissions.Specify the external network address or hostname of the head node to gain access.
ssh <head-node>Enter the
cmshconfiguration shell.cmsh
Note
This document uses
#to indicate commands executed as the root user on a head node and%to indicate commands executed within cmsh. The prompt change is in the preceding block. If it is unclear where a command is being executed, check the prompt that precedes it.Enter the
softwareimagemenu and create three additional software images as clones of thedefault-image—onefor each of the node types to be provisioned in the public cloud.1softwareimage 2clone default-image cloud-director-image 3clone default-image k8s-cloud-master-image 4clone default-image k8s-cloud-gpu-worker-image 5.. 6commit
Enter the
categorymenu and create categories fork8s-cloud-masterandk8scloud-gpu-worker.The
cm-cluster-extensiontool automatically creates a category for theclouddirector(softwareimageis configured at a later step).1category 2clone default k8s-cloud-master 3set softwareimage k8s-cloud-master-image 4commit 5clone default k8s-cloud-gpu-worker 6set softwareimage k8s-cloud-gpu-worker-image 7commit
Augment the
disksetupof the new categories as well.This guide was executed with a disk layout that maximized the root partition size to avoid scenarios where containers quickly fill a smaller partition. Save the following text to /tmp/big-cloud-disk.xml.
 1<diskSetup>
 2  <device>
 3    <blockdev>/dev/sda</blockdev>
 4    <blockdev>/dev/I</blockdev>
 5    <blockdev>/dev/vda</blockdev>
 6    <blockdev>/dev/xvda</blockdev>
 7    <blockdev>/dev/cciss/c0d0</blockdev>
 8    <blockdev>/dev/nvme0n1</blockdev>
 9    <blockdev mode=”cloud”>/dev/sdb</blockdev>
10    <blockdev mode=”cloud”>/dev/hdb</blockdev>
11    <blockdev mode=”cloud”>/dev/vdb</blockdev>
12    <blockdev mode=”cloud”>/dev/xvdb</blockdev>
13    <blockdev mode=”cloud”>/dev/xvdf</blockdev>
14    <blockdev mode=”cloud”>/dev/nvme1n1</blockdev>
15    <partition id=”a0” partitiontype=”esp”>
16      <size>100M</size>
17      <type>linux</type>
18      <filesystem>fat</filesystem>
19      <mountpoint>/boot/efi</mountpoint>
20      <mountOptions>defaults,noatime,nodiratime</mountOptions>
21    </partition>
22    <partition id=”a1”>
23      <size>max</size>
24      <type>linux</type>
25      <filesystem>xfs</filesystem>
26      <mountpoint>/</mountpoint>
27      <mountOptions>defaults,noatime,nodiratime</mountOptions>
28    </partition>
29    <partition id=”a2”>
30      <size>12G</size>
31      <type>linux swap</type>
32    </partition>
33  </device>
34</diskSetup>
Assign the new disk layout file to the cloud categories in Step 4.
1cmsh
2category
3use k8s-cloud-master
4set disksetup /tmp/big-cloud-disk.xml
5commit
6use k8s-cloud-gpu-worker
7set disksetup /tmp/big-cloud-disk.xml
8commit
Exit the cmsh configuration shell and update all three images.
1cm-chroot-sw-img /cm/images/k8s-cloud-master-image/
2apt update && apt -y upgrade
3exit
4cm-chroot-sw-img /cm/images/k8s-cloud-gpu-worker-image/
5apt update && apt -y upgrade
6exit
7cm-chroot-sw-img /cm/images/cloud-director-image/
8apt update && apt -y upgrade
9exit
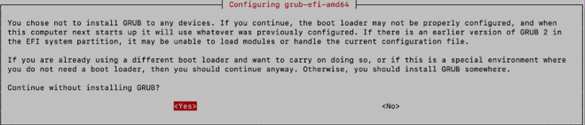
When a terminal menu is displayed to confirm that GRUB does not need to be installed, select Yes to continue.