2. Cluster Administration Guide#
2.1. NVIDIA DGX Cloud Overview#
NVIDIA DGX Cloud is an AI platform for enterprise developers, optimized for the demands of generative AI.

DGX Cloud delivers an integrated, full-stack solution co-engineered with leading cloud partners, integrating their best of breed architectures with the newest NVIDIA AI technologies across accelerated computing, networking fabric, and software, and providing direct access to NVIDIA AI experts.
DGX Cloud includes NVIDIA AI Enterprise, offering accelerated data science libraries, optimized frameworks and pre-trained models enabling developers to quickly and easily deliver production-ready AI.
2.2. Overview of Your Cluster#
The DGX Cloud cluster includes the following components provisioned and configured for use:
Head (management) node(s)
Login nodes
CPU worker nodes
GPU worker nodes
Shared NFS storage
Shared high-performance Lustre storage

The exact configuration and capacity of each of the components available is customized for specific requirements as specified during the onboarding process.
The Slurm workload management tool is provided as the primary interface of the cluster for users familiar with HPC schedulers who want direct access to underlying systems.
The Slurm implementation is deployed and configured by NVIDIA Base Command Manager, and leverages Pyxis and Enroot as the container plugin and runtime.
The cluster configuration via Base Command Manager (BCM) and the Slurm configuration can be further modified and customized by the customer for specific use cases.
For more information on BCM, refer to the BCM documentation.
For more information on Slurm, refer to the Slurm Quick Start Guide.
2.3. Overview of Cluster Administration#
This section provides an overview of what you as the customer owners and admins have the ability to do on your DGX Cloud cluster. This information is provided for guidance and is a high-level overview.
For more information about the personas mentioned, see the DGX Cloud Onboarding Quick Start Guide.
For details on a shared responsibility model between NVIDIA and the customer, see the Shared Responsibility Model section below.
2.3.1. Cluster Owner Tasks#
For a cluster owner, common tasks include:
Onboarding cluster admins and users to the cluster via
cmsh.Enrolling and inviting admins and users to your NGC Org.
Activating their subscription and registering for NVIDIA Enterprise Support.
Working with NVIDIA and your cluster admins to troubleshoot and file any issues associated with their DGX Cloud cluster.
2.3.2. Cluster Admin Tasks#
For a cluster admin, common tasks include:
Onboarding cluster users via Base View.
Creating/managing teams/accounts.
Managing the cluster’s high-performance filesystem.
Configuring Slurm queues and user quotas.
Deeper inspection and manipulation of the Slurm job queue state.
Debugging cluster behavior concerns.
2.4. Security of DGX Cloud#
2.4.2. Additional Security Considerations#
As the operator of a DGX Cloud cluster, you must consider your own security requirements once you take possession of the cluster. This cluster is yours to operate according to your organization’s requirements. However, during the provisioning and onboarding process for the cluster, you may want to take in to account a few different security considerations:
Before onboarding, your organization will be asked to specify Classless Inter-Domain Routing (CIDR) ranges to define the IP addresses that can access the DGX Cloud cluster. To minimize risk, these ranges should be as small as possible, and could even be restricted to a single IP address via a jumphost to maximize security.
For some organizations, the
rootaccount may not be allowed to be used for SSH access. In this scenario, consider following the Enable an Alternative Cluster Owner Account (Cluster Owner Only) documentation to implement a non-root privileged account on the head node. By default, only therootaccount can be used to access the head node, but enabling an alternative non-root privileged account and storing the root SSH certificate in a secure manner as a backup is a good practice to consider.
2.5. DGX Cloud Cluster Onboarding#
A quick start guide providing step-by-step instructions for the cluster owner, cluster admins, and cluster users to get started on their DGX Cloud cluster is available.
For more information, refer to the DGX Cloud Onboarding Quick Start Guide.
2.6. Accessing Your DGX Cloud Cluster as Admins#
As an admin, you have several connection options for accessing your DGX Cloud environment. The cluster only exposes port 22 access, so all port access beyond port 22 is accomplished via SSH port forwarding.
Head Node: The cluster owner can access the head node to manage Base Command Manager (BCM) as the root user. This is done via the public internet using Classless Inter-Domain Routing (CIDR) ranges and a public SSH key provided by the user to NVIDIA during the initial cluster creation.
Login Nodes: Two login nodes are accessible via public internet using CIDR ranges provided by the user to NVIDIA, using public SSH keys registered with a DGX Cloud deployment.
Base View: A web interface accessible via the public internet using CIDR ranges provided by the user to NVIDIA. Base View is accessed through the login nodes.
Note
NVIDIA provides the cluster owner with the IP addresses for the head nodes and login nodes. Please work with the cluster owner to retrieve the correct addresses to access the cluster using the steps below.
Important
The root account used by the cluster owner on the head node should not be used to run jobs in the Slurm cluster. Only cluster admins and users should run jobs on the Slurm cluster, via the login nodes.
If needed, the cluster owner should create their own admin and/or user accounts to access the login nodes for work that does not require root access.
2.6.1. Accessing the Head Node as Root (Cluster Owner Only)#
As the cluster owner, you can access the head node using the SSH key pair you provided to your Technical Account Manager (TAM). To do this, use the following command:
ssh -i /path/to/ssh_cert root@ip-addr-of-head-node
Note
If you encounter any issues while trying SSH, refer to SSH Key Permissions for assistance.
2.6.2. Accessing the Head Node as Non-Root (Cluster Owner Only)#
Optionally, a non-root privileged account can be created to access the head node. Follow Enable an Alternative Cluster Owner Account (Cluster Owner Only) to configure a non-root privileged account. To use that account instead (named dgxc-admin in this example), use the following command:
ssh -i /path/to/ssh_cert_for_dgxc_admin dgxc-admin@ip-addr-of-head-node
Once logged in to the head node, this user account can then use sudo to elevate to the root user by running the following command:
dgxc-admin@dgxc-bcm-prod-002-cluster1:~$ sudo su -

Node Status: running in active master mode

-------------------------------------------------------------------------------
Cluster Manager license expiration date: 03/Jul/2024, time remaining: 8w 2d
root@dgxc-bcm-prod-002-cluster1:~#
Now you can leverage cmsh to make configuration and user account changes as root.
root@dgxc-bcm-prod-002-cluster1:~# cmsh
[dgxc-bcm-prod-002-cluster1]% quit
root@dgxc-bcm-prod-002-cluster1:~#
2.6.3. Accessing Login Nodes as Root (Cluster Owner Only)#
To access login nodes as
root, first log in to the head node asroot, following the steps in the previous sections.Once you’ve logged in to the head node as root, you can then ssh to the login nodes from the head node using the following command (from inside of the head node session):
ssh slogin001Note
slogin002is also available.
2.6.4. Accessing Login Nodes as Cluster Admins#
Non-root users are not permitted to SSH to the head node - they will only be able to SSH to the cluster’s Slurm login nodes.
To SSH to a Slurm login node, ensure that you have a user account created along with a matching public SSH key pair on your system tied to that user.
2.6.4.1. Logging In with an SSH Key#
Cluster admins will have SSH access to the login nodes. They can also access the Base View from the login nodes.
Obtain the Login node addresses from your cluster owner.
Login with the user account(s) created by the cluster owner:
ssh -i /path/to/ssh_cert <cluster-admin>@ip-addr-of-login-node
Note
If you encounter any issues while trying SSH, refer to SSH Key Permissions for assistance.
2.6.5. Accessing Base View#
Base View is a browser-based GUI that provides a dashboard view of the cluster. This web application is hosted on the head node and provides a uniform view of the cluster’s status, health, and performance.
Base View is designed for use by cluster admins and is compatible with the latest versions of all major desktop web browsers. It is currently not supported on mobile devices.
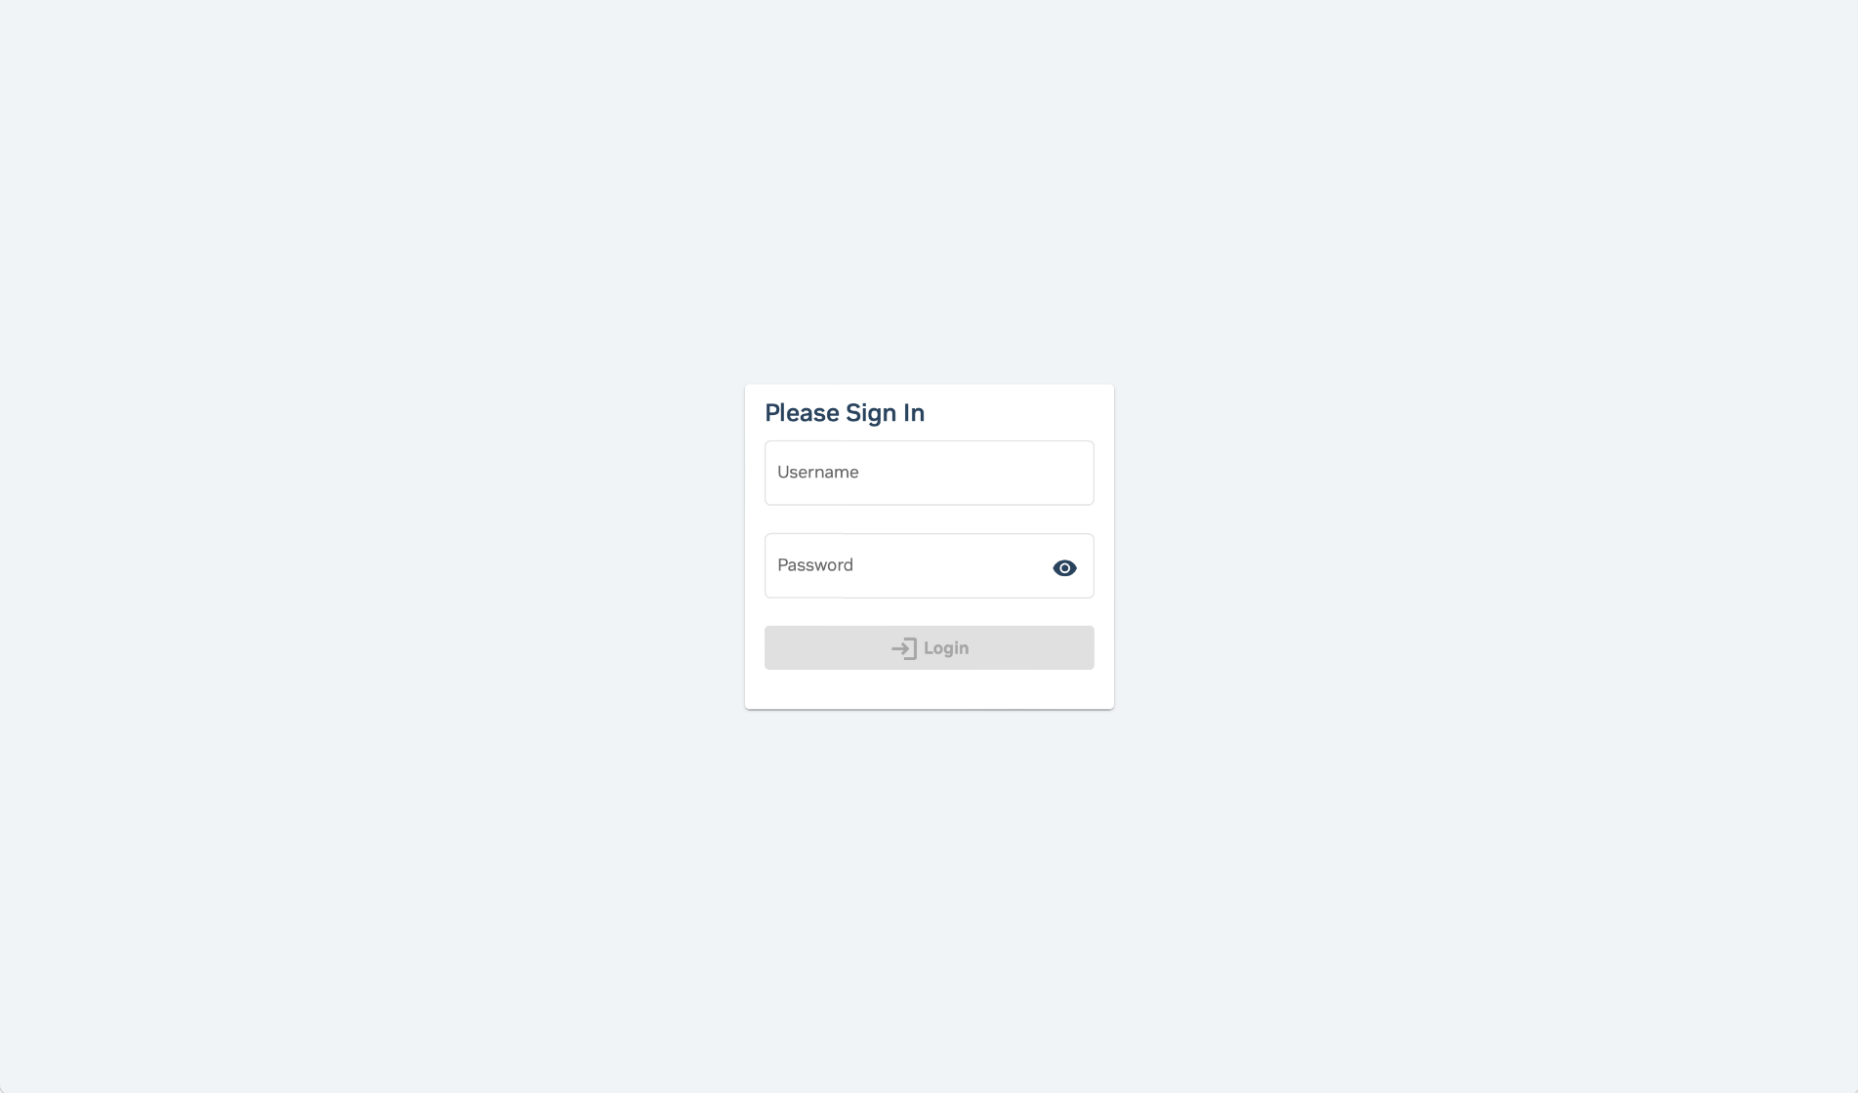
2.6.5.1. Logging In#
To log in to Base View, you will need a password, which your cluster owner should have provided when onboarding your user. If you do not remember your password, you must work with your cluster owner to reset it.
Assuming that your user can already SSH to a login node, create an SSH tunnel back to your local desktop host at port
8081using the following command:ssh -i /path/to/ssh_cert <cluster-admin>@ip-addr-of-login-node -L8081:master:8081
The hostname or IP address of the head node should have been provided as part of the cluster prerequisite information. Once the correct URL has been entered in your browser, a login screen will appear.
Navigate to
https://localhost:8081/base-view/from your web browser.In the browser, add your admin username and password to sign into Base View.
Note
The first time a browser is used to log in to the cluster portal, a warning about the site certificate being untrusted appears in a default cluster configuration. This can safely be accepted.
Once logged in, you will see an overview of the cluster, including graphs for occupation rate, memory used, CPU cycles used, node statuses, GPU usage, and other cluster details.
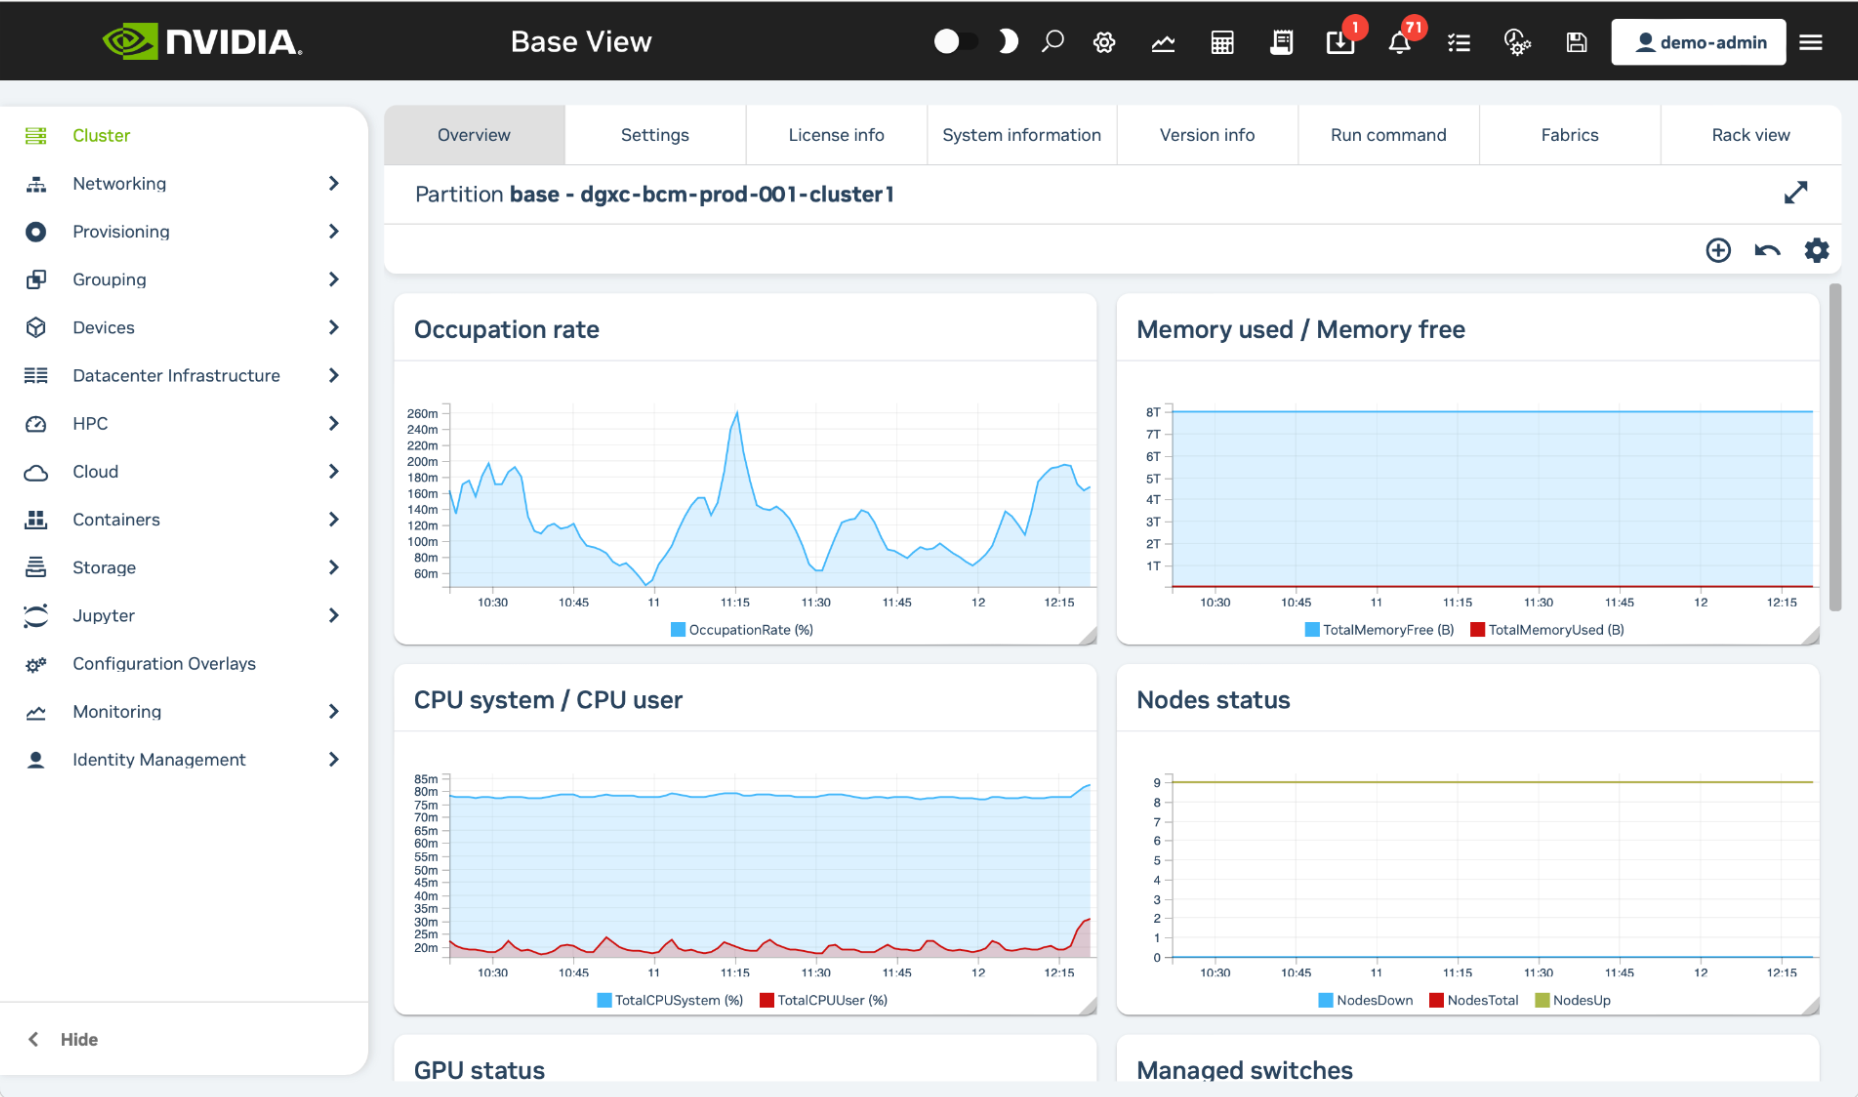
Base View provides additional information for cluster admins through various tabs, as shown in the following table.
Tab |
Information |
|---|---|
Settings |
Controls various cluster settings such as cluster name and node name. |
License Information |
Shows various license information for the cluster. |
System Information |
Shows the main hardware specifications of the node (CPU, memory, BIOS), along with the OS version that it runs. |
Version Information |
Shows version information for important cluster software components, such as the CMDaemon database version, and the cluster manager version and builds. |
Run Command |
Allows a specified command to be run on a selected node of the cluster. |
2.6.6. Accessing NGC#
As a part of the DGX Cloud subscription, your organization has received access to NVIDIA NGC, with Private Registry and NVIDIA AI Enterprise subscriptions enabled.
For more information on setting up your NGC org, please see the NGC User Guide.
Note
The cluster owner is the org owner on NGC. The cluster owner can then also invite and set up admins to access and manage users within the NGC org.
2.7. Administering Your DGX Cloud Cluster#
2.7.1. Managing Users and Admins#
2.7.1.1. Adding Cluster Admins Via cmsh (Cluster Owner Only)#
As a cluster owner, you can add admins to help manage the Slurm cluster using the following steps.
Compile a list of cluster admins: Make a list of people who will require admin access to the cluster.
Create SSH key pairs: Ask each cluster admin to create an SSH key pair for themselves using the following command:
ssh-keygen -t ed25519 -b 4096 -f ~/.ssh/<cluster-admin>-ed25519-dgxc -C "cluster_admin_email@example.com"
Obtain public keys: Once each admin has an SSH key pair, have each send you the contents of their public key (
<cluster-admin>-ed25519-dgxc.pub) file generated in their~/.ssh/directory. You will use this information in the following steps to create the cluster admin user.Create a cluster admin user: From the head node as
root, run the following commands to create a cluster admin.Enter
cmshwith this command:cmsh
Run the following commands within
cmsh:1user 2add <cluster-admin> 3set password 4set profile tenantadmin 5commit 6 7group 8use tenantadmin 9append members <cluster-admin> 10commit 11quit
Switch to the user’s account:
sudo su - <cluster-admin>
Add their SSH public key (obtained during Step 3 above) to the
authorized_keysfile using a text editor of your choice. For example:nano $HOME/.ssh/authorized_keys
(Optional) If the cluster admin will be running Slurm jobs, you can configure their user account to automatically load the Slurm module upon login. This avoids the user having to run the
module load slurmcommand every time on login. Run the following command to do so:module initadd slurm
Exit the user’s account:
exitRun the following commands to add the user as a Slurm admin:
1module load slurm
2sacctmgr add User User=<cluster-admin> Account=root AdminLevel=Administrator
Commit the changes when prompted.
(Optional) Create a shared scratch space on LustreFS for the admin user: If the cluster admin will be running Slurm jobs, you can configure their user to have a scratch space on the Lustre shared file system, or they can configure this themselves if needed. Follow the steps in Creating and Configuring Lustre Shared Storage for Cluster Admins and Users to do so.
Send the information to the admin: The admin is now set up to access the cluster and start working. Send the following information to the admin:
Login node addresses
Their username and password information
Which SSH public key you configured for their user
(Optional) Their LustreFS scratch directory information
Each cluster admin should now be able to log on to the login nodes using the following command:
ssh -i /path/to/cluster_admin_ssh_cert <cluster-admin>@ip-addr-of-login-node
Add additional users: Repeat the steps in Adding Cluster Admins Via cmsh (Cluster Owner Only) and Creating and Configuring Lustre Shared Storage for Cluster Admins and Users for each cluster admin user you want to create. Then the cluster admins can follow the steps in the next section to create cluster users.
2.7.1.2. Adding Cluster Users Via cmsh (Cluster Owner Only)#
As a cluster owner, you’ll need to gather some information to onboard users to the cluster.
Compile a list of cluster users: Start by compiling a list of users who need access to the cluster.
Create SSH key pairs: Each user will need to create an SSH key pair for themselves with the following command:
ssh-keygen -t ed25519 -b 4096 -f ~/.ssh/<cluster-user>-ed25519-dgxc -C "your_email@example.com"
Obtain public keys: Once each user has created an SSH key pair, have them send you the contents of their public key (
<cluster-user>-ed25519-dgxc.pub) file located in their~/.ssh/directory. You will use this in the following steps to create the cluster user.Create a cluster user: From the head node as
root, run the following commands to create a cluster user.Enter
cmshwith this command:cmsh
Within
cmsh, run the following commands to create a cluster user:1user 2add <cluster-user> 3set password 4set profile portal 5commit 6quit
Switch to the user’s account using the following command:
sudo su - <cluster-user>
Add the user’s SSH public key (obtained earlier) into the
authorized_keysfile in their~/.ssh/directory, using the text editor of your choice. For example:nano $HOME/.ssh/authorized_keys
Configure their user account to automatically load the Slurm module upon login. This will prevent the user from having to run the
module load slurmcommand every time on login. Run the following command:module initadd slurm
Exit the user’s account by running the following command:
exit
Create a shared scratch space on LustreFS for the user: Next, create a LustreFS directory for the user.
Follow the steps in Creating and Configuring Lustre Shared Storage for Cluster Admins and Users to create and configure shared storage for the user.
Send the information to the user: The user is now set up to access the cluster and start working. Send the following information to the user:
Login node addresses
Their username and password information
Which SSH public key you configured for their user
Their LustreFS scratch directory information
Each user should now be able to log on to the login nodes using the following command:
ssh -i /path/to/cluster_user_ssh_cert <cluster-user>@ip-addr-of-login-node
Add additional users: Repeat the steps in Adding Cluster Users Via cmsh (Cluster Owner Only) and Creating and Configuring Lustre Shared Storage for Cluster Admins and Users for each cluster user you want to create.
(Optional) Create a list of cluster teams or Slurm accounts: Refer to Managing the Slurm Cluster for more information.
2.7.1.3. (Optional) Elevating a User to a Cluster Admin (Cluster Owner Only)#
Important
The following steps should only be performed if the user needs cluster admin capabilities.
From the head node as
root, entercmshwith this command:cmsh
Run the following commands within
cmsh:1user 2use <target-cluster-admin> 3set profile tenantadmin 4commit 5 6group 7use tenantadmin 8append members <target-cluster-admin> 9commit 10quit
Run the following commands to add the cluster admin as a Slurm admin:
1module load slurm
2sacctmgr add User User=<target-cluster-admin> Account=root AdminLevel=Administrator
Commit the changes when prompted.
2.7.1.4. Enable an Alternative Cluster Owner Account (Cluster Owner Only)#
To enable an alternative non-root cluster owner account with sudo privileges, follow the steps below.
This new user (which we will call dgxc-admin in this section) can then log in to the head node instead of the root user, and will have sudo permissions and the ability to elevate to root.
First, follow the onboarding procedures defined in Adding Cluster Admins Via cmsh (Cluster Owner Only) to create the new user.
Once the user has been created, in the head node’s
/etc/ssh/sshd_configfile, append the new user to theAllowUsersline, and save the file. An example of what that line should look like is provided below.AllowUsers root dgxc-admin
Add the user to the
sudogroup on the head node.usermod -a -G sudo dgxc-admin
Restart the
sshservice.service ssh restart
Verify that the update was successful by performing a test
sshto the head node.ssh dgxc-admin@ip-addr-of-login-nodeEnsure that
cmshcan be used with the account.1dgxc-admin@dgxc-bcm-prod-002-cluster1:~$ sudo su - 2[sudo] password for dgxc-admin: 3 4Node Status: running in active master mode 5 6------------------------------------------------------------------------------- 7Cluster Manager license expiration date: 03/Jul/2024, time remaining: 8w 2d 8root@dgxc-bcm-prod-002-cluster1:~# cmsh 9[dgxc-bcm-prod-002-cluster1]%
Further changes can be made to the /etc/ssh/ssh_config file to restrict SSH entirely for the root user. Align to your organization’s requirements for further changes.
2.7.1.5. Adding Users Via Base View#
2.7.1.5.1. Prerequisites#
Before creating users in Base View, you’ll need to gather some information to onboard users to the cluster.
Compile a list of cluster users: Start by compiling a list of users who need access to the cluster.
Create SSH key pairs: Each user will need to create an SSH key pair for themselves with the following command:
ssh-keygen -t ed25519 -b 4096 -f ~/.ssh/<cluster-user>-ed25519-dgxc -C "your_email@example.com"
Obtain public keys: Once each user has created an SSH key pair, have them send you the contents of their public key (
<cluster-user>-ed25519-dgxc.pub) file located in their~/.ssh/directory. You will use this in the following steps to create the cluster user.
2.7.1.5.2. Creating Users in Base View#
To do so, first log in to Base View with your cluster admin user account, following the instructions in Accessing Base View.
Once logged into Base View, click on the Identity Management section in the nav bar and choose the Users option.

Click on the + ADD button at the bottom of the page, then select the User option that appears.
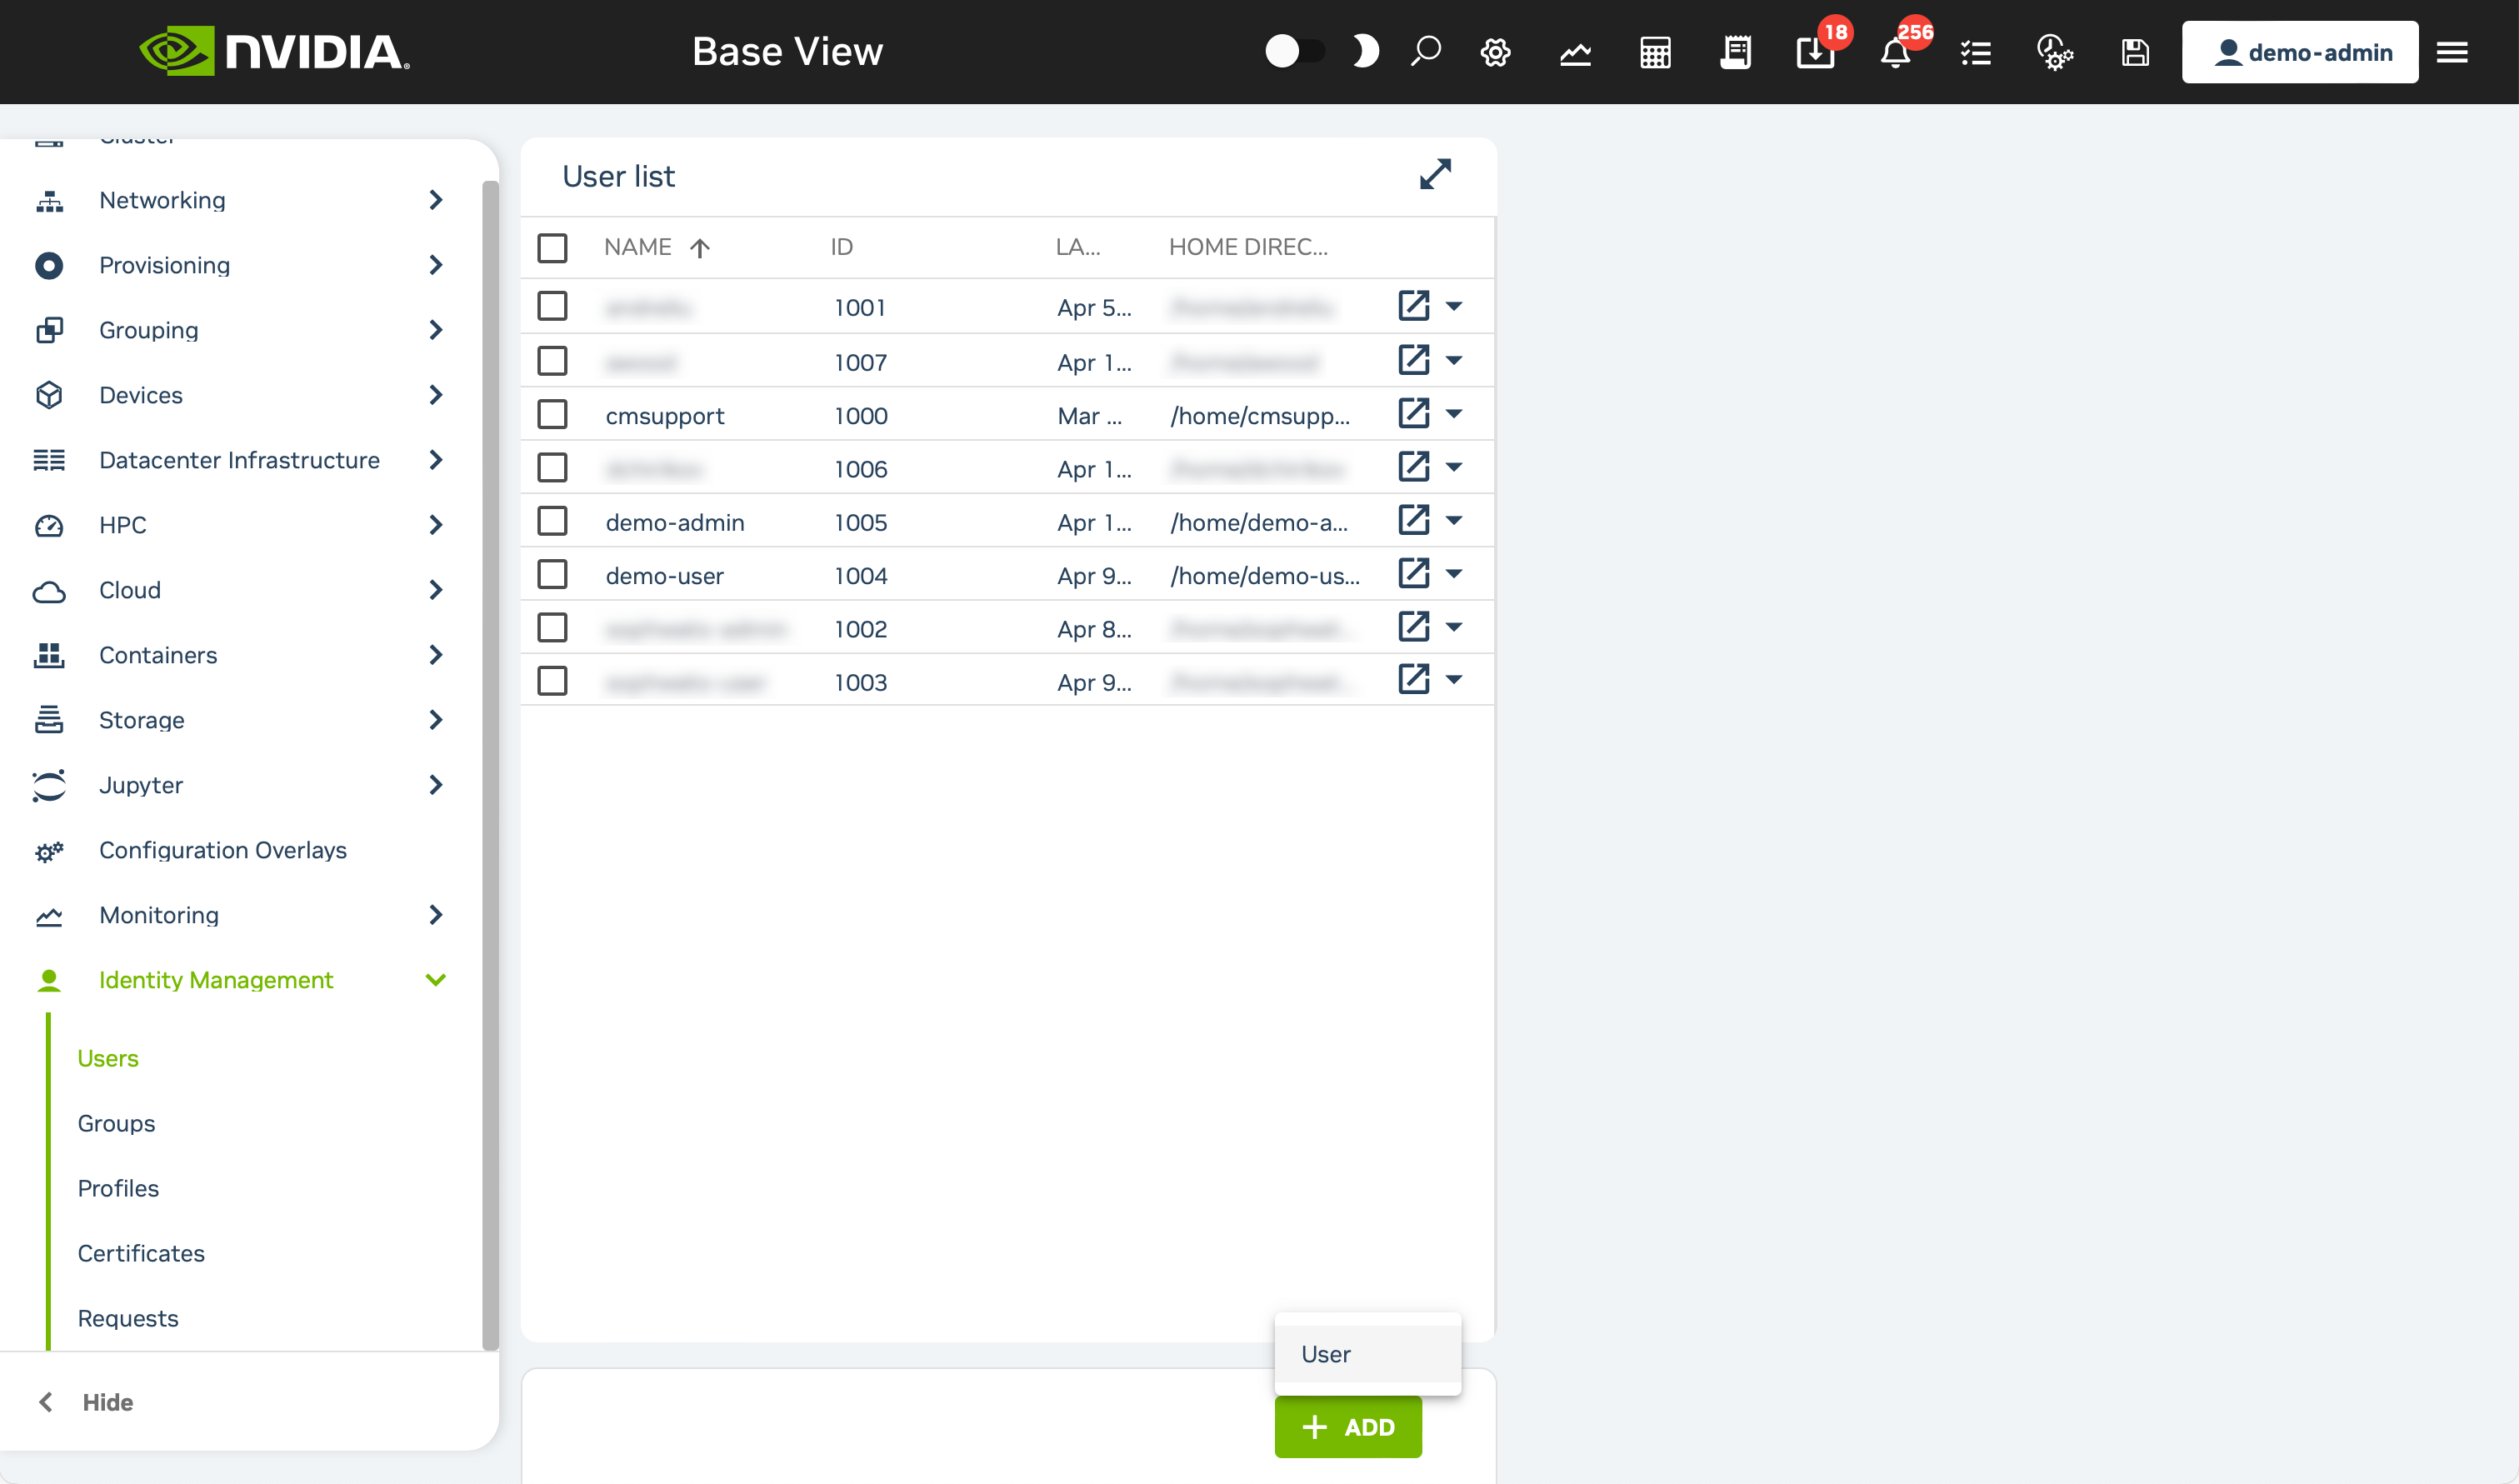
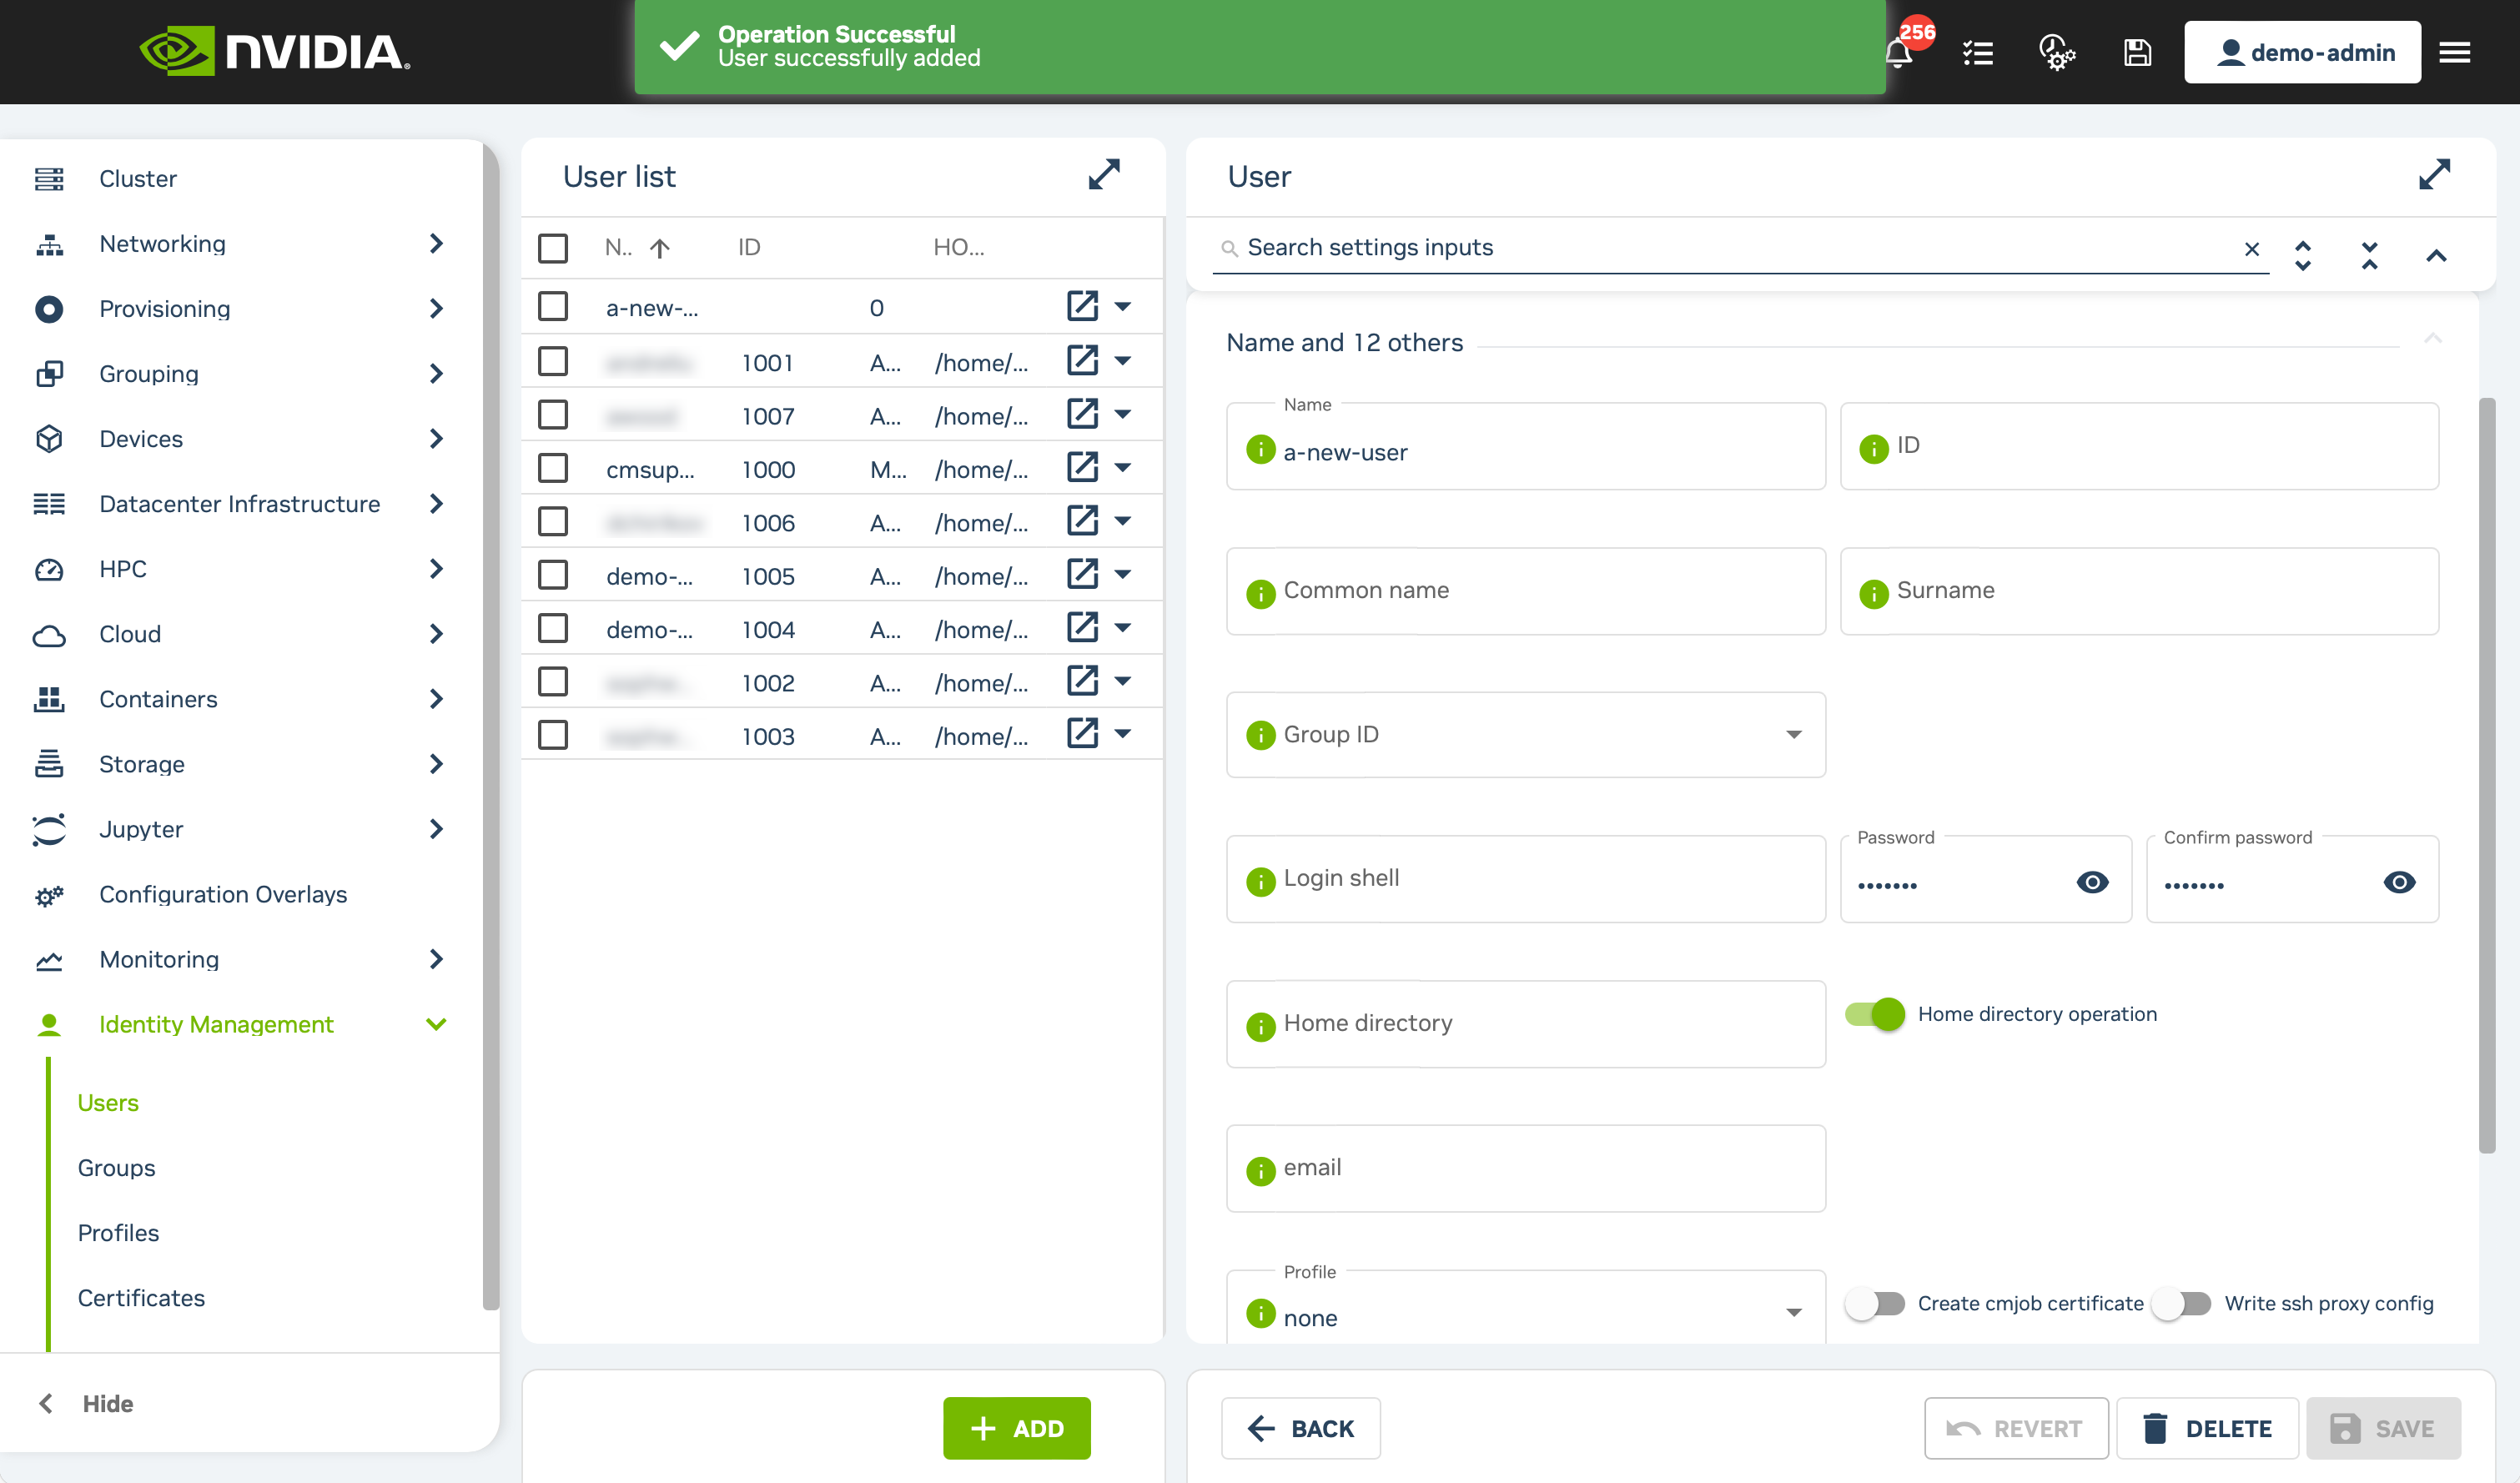
Fill the Name field along with both the Password and Confirm password fields for the user you want to create. Do not alter any other values.

Click the Save button at the bottom right of the form. A successful user creation will be indicated with a green Operation Successful banner at the top of the page.
2.7.1.5.3. Configuring SSH Access for Users After Account Creation with Base View#
Once the user account is created, you’ll need to add their SSH key for access. From a new terminal, SSH to a login node:
ssh -i /path/to/ssh_cert <cluster-admin>@ip-addr-of-login-node
Switch to the user’s account:
sudo su - <cluster-admin-or-user>
Add their SSH public key (obtained during the Prerequisites section above) to the
authorized_keysfile using a text editor of your choice. For example:nano $HOME/.ssh/authorized_keys
Configure their user account to automatically load the slurm module upon login. This will avoid the user having to run the
module load slurmcommand every time on login. Run the following command to do so:module initadd slurm
Exit the user’s account:
exitProceed to the Creating and Configuring Lustre Shared Storage for Cluster Admins and Users section to create a scratch directory for the user if necessary.
To complete cluster admin onboarding, have the cluster owner proceed to the (Optional) Elevating a User to a Cluster Admin (Cluster Owner Only) section.
The user is now set up to access the cluster and start working. Send the following information to the user:
Login node addresses
Their username and password information
Which SSH public key you configured for their user
Their LustreFS scratch directory information
Each user should now be able to log on to the login nodes using the following command:
ssh -i /path/to/cluster_user_ssh_cert <cluster-admin-or-user>@ip-addr-of-login-node
2.7.1.7. Updating Password#
Password-based logins are disabled via SSH, but a password is required to access Base View.
A default account password should have been created for each onboarded user or admin.
To change your password after initial login, use the passwd command.
passwd
If you do not remember your password, please work with the cluster owner to reset your user account’s password.
2.7.1.7.1. Resetting User Passwords as Root (Cluster Owner Only)#
To reset another user’s password, log in to the head node as root. Once logged in, run the following command to reset the user password:
passwd <cluster-user>
Or to reset the password via cmsh, run the following commands as root:
cmsh
user
use <cluster-user>
set password
commit
2.7.2. Managing Home Directories#
A user’s home directory is their default file path upon logging into a DGX Cloud Slurm cluster. This is of the form /home/demo-user.
In a DGX Cloud Slurm cluster, user home directories reside on a network filesystem (NFS). This allows for all nodes in the cluster to access the same data concurrently when a user is running a job.
This design choice makes the following behaviors possible:
Writing a script once and running it on multiple nodes simultaneously
Cloning code from a repository once and making it available on the entire cluster
Using a shared directory to log job output from multiple producers
Allowing users to run their code on whatever systems are available - data availability is not dependent on any one system.
User data is isolated via filesystem permissions (user-a can only read and write data to /home/user-a, not /home/user-b). However, users can impact each other if the home filesystem is overtaxed.
Some best practices and limitations to keep in mind:
Home directory storage is a great fit for small amounts of data, particularly code, scripts, and configuration files.
Home directory storage can also be an acceptable fit for log files, but alternative storage should be considered for log files that will grow to be large ot are frequently written to.
Home directory storage has a quota configured for each user’s home directory - the default per-user quota is 10 GB if you have not specified a different quota in collaboration with your NVIDIA TAM. Administrators can monitor home directory capacity if desired and occasionally encourage users to remove unneeded data or migrate that data elsewhere.
A parallel filesystem is provided for datasets and more intensive storage IO use cases. The following section discusses key information.
2.7.2.1. Checking Utilization#
To check the utilization of all home directories relative to total available capacity, use the df -h command from either the head node or a login node. An example of usage and output follows.
 1df -h
 2
 3Filesystem                Size  Used Avail Use% Mounted on
 4tmpfs                      13G  1.6M   13G   1% /run
 5/dev/sdb3                 500G   56G  445G  12% /
 6tmpfs                      63G   28K   63G   1% /dev/shm
 7tmpfs                     5.0M     0  5.0M   0% /run/lock
 8/dev/sda1                 251G   32K  239G   1% /mnt/resource
 910.14.1.4:/bcm-home       1.0T  308M  1.0T   1% /home
1010.14.1.4:/bcm-cm-shared  1.0T  2.5G 1022G   1% /cm/shared
In the example above, the /home path (identified by the text in the Mounted on column) indicates 308 Megabytes of 1 Terabyte of available capacity is used.
To get a breakdown of capacity used by each user in their home directory, the du -sh command can be used. An example usage and output follows.
1du -sh /home/*
2
392K /home/charlie
440K /home/cmsupport
5196K        /home/demo-admin
6288M        /home/demo-user
752K /home/alice
848K /home/bob
In scenarios where the aggregate home directory utilization across all users approaches its maximum capacity, 80-90% capacity utilization is a common range to begin proactively removing or migrating data. Leveraging the du command is a quick way to identify heavy NFS storage users.
2.7.3. Managing Lustre Storage#
The parallel filesystem made available as part of DGX Cloud clusters is Lustre. In DGX Cloud clusters, the Lustre filesystem will be mounted at /lustre/fs0. This can be seen by using the df command and looking for the the lustre/fs0 path in the Mounted on column.
 1df -h
 2
 3Filesystem                Size  Used Avail Use% Mounted on
 4tmpfs                      63G  1.3M   63G   1% /run
 5/dev/sda1                 199G   14G  186G   7% /
 6tmpfs                      63G     0   63G   0% /dev/shm
 7tmpfs                     5.0M     0  5.0M   0% /run/lock
 8tmpfs                     4.0M     0  4.0M   0% /sys/fs/cgroup
 9/dev/sdb3                 4.4G  4.0G  404M  91% /cm/node-installer-ebs
1010.14.1.4:/bcm-cm-shared  1.0T  2.5G 1022G   1% /cm/shared
1110.14.1.4:/bcm-home       1.0T  308M  1.0T   1% /home
1210.14.2.9@tcp:/lustrefs    79T   87G   75T   1% /lustre/fs0
13tmpfs                      13G  4.0K   13G   1% /run/user/0
2.7.3.1. Checking Utilization#
To check the utilization of all Lustre relative to total available capacity, use the df -h command from the login node. An example usage and output follows.
 1df -h
 2
 3Filesystem                Size  Used Avail Use% Mounted on
 4tmpfs                      63G  1.3M   63G   1% /run
 5/dev/sda1                 199G   14G  186G   7% /
 6tmpfs                      63G     0   63G   0% /dev/shm
 7tmpfs                     5.0M     0  5.0M   0% /run/lock
 8tmpfs                     4.0M     0  4.0M   0% /sys/fs/cgroup
 9/dev/sdb3                 4.4G  4.0G  404M  91% /cm/node-installer-ebs
1010.14.1.4:/bcm-cm-shared  1.0T  2.5G 1022G   1% /cm/shared
1110.14.1.4:/bcm-home       1.0T  308M  1.0T   1% /home
1210.14.2.9@tcp:/lustrefs    79T   87G   75T   1% /lustre/fs0
13tmpfs                      13G  4.0K   13G   1% /run/user/0
In the example above, the /lustre/fs0 path (identified by the text in the Mounted on column, as noted above) indicates 87 Gigabytes of 79 Terabytes of available capacity is used.
To get a breakdown of capacity used by directory, the du -sh command can be used. Example usage and output follows.
1du -sh /lustre/fs0/*
24.0K        /lustre/fs0/admin-dir
387G /lustre/fs0/scratch
The scratch directory can be further investigated by targeting that path, given that the admin-dir in the above case uses minimal capacity.
1du -sh /lustre/fs0/scratch/*
2
34.0K        /lustre/fs0/scratch/charlie
487G /lustre/fs0/scratch/demo-user
54.0K        /lustre/fs0/scratch/alice
64.0K        /lustre/fs0/scratch/bob
In scenarios where Lustre capacity utilization approaches its maximum capacity, 80-90% capacity utilization is a common range to begin proactively removing or migrating data. Leveraging the du command is a quick way to identify heavy Lustre storage users.
2.7.3.2. Viewing Quota#
To view the quota for a directory for a specific user (in this example, demo-user), the following lfs quota command can be used.
lfs quota -u demo-user -v /lustre/fs0/scratch/demo-user
2.7.3.3. Setting Quota#
As an administrator, to set a user’s quota on their scratch directory, use the lctl setquota command. The following example is used for a user named demo-user on their dedicated scratch directory.
lfs setquota -u demo-user -b 100G -B 100G -i 10000 -I11000 /lustre/fs0/scratch/demo-user
The lfs quota command and resulting output when the quota for a directory is checked by either the admin or the user is as follows.
 1lfs quota -u demo-user -v /lustre/fs0/scratch/demo-user
 2
 3Disk quotas for usr demo-user (uid 1004):
 4    Filesystem  kbytes   quota   limit   grace   files   quota   limit   grace
 5/lustre/fs0/scratch/demo-user/
 6                    4  104857600 104857600       -       1   10000   11000       -
 7lustrefs-MDT0000_UUID
 8                    4*      -       4       -       1*      -       1       -
 9lustrefs-OST0000_UUID
10                    0       -       0       -       -       -       -       -
11lustrefs-OST0001_UUID
12                    0       -       0       -       -       -       -       -
13lustrefs-OST0002_UUID
14                    0       -       0       -       -       -       -       -
15lustrefs-OST0003_UUID
16                    0       -       0       -       -       -       -       -
17lustrefs-OST0004_UUID
18                    0       -       0       -       -       -       -       -
For more details, refer to Quota Administration.
2.7.4. Managing the Slurm Cluster#
2.7.4.2. Viewing Node Information#
To view all nodes in the cluster and their current state, ssh to the Slurm login node for your cluster and run the sinfo command:
1sinfo
2
3PARTITION  AVAIL  TIMELIMIT  NODES  STATE  NODELIST
4defq*      up     infinite   64     idle   gpu[001-064]
There are 64 nodes available in this example, all in an idle state. If a node is busy, its state will change from idle to alloc when the node is in use:
1sinfo
2
3PARTITION  AVAIL  TIMELIMIT  NODES  STATE  NODELIST
4defq*      up     infinite   1      alloc  gpu001
5defq*      up     infinite   63     idle   gpu[002-064]
Additional states include drain indicating a node is currently down, mix indicating a node is partially in use, and maint when a node is down for maintenance.
To get additional information about a specific node, use scontrol as follows.
 1scontrol show node gpu007
 2
 3NodeName=gpu007 Arch=x86_64 CoresPerSocket=48
 4CPUAlloc=0 CPUEfctv=96 CPUTot=96 CPULoad=0.24
 5AvailableFeatures=location=southcentralus
 6ActiveFeatures=location=southcentralus
 7Gres=gpu:a100:8(S:0-1)
 8NodeAddr=gpu007 NodeHostName=gpu007 Version=23.02.7
 9OS=Linux 5.15.0-1056-azure #64-Ubuntu SMP Tue Feb 6 19:23:34 UTC 2024
10RealMemory=1814258 AllocMem=0 FreeMem=1792041 Sockets=2 Boards=1
11State=IDLE ThreadsPerCore=1 TmpDisk=0 Weight=1 Owner=N/A MCS_label=N/A
12Partitions=defq
13BootTime=2024-04-10T14:58:04 SlurmdStartTime=2024-04-15T14:37:44
14LastBusyTime=2024-04-15T14:37:45 ResumeAfterTime=None
15CfgTRES=cpu=96,mem=1814258M,billing=96,gres/gpu=8
16AllocTRES=
17CapWatts=n/a
18CurrentWatts=0 AveWatts=0
19ExtSensorsJoules=n/s ExtSensorsWatts=0 ExtSensorsTemp=n/s
2.7.4.3. Draining Nodes#
If a node needs to be taken down for maintenance or is otherwise unhealthy, it can be put it in the drain state. This lets Slurm know that the node should not be selected for jobs until it returns to the idle state. If a node is currently running jobs, it can be set to the mixed drain state, where the node will continue to run the job to completion. Once finished, the node will automatically set to drain, so another job can’t be run on it.
To drain a node, run the following command, replacing the node names with the nodes to drain and providing a reason for draining the node, such as maintenance:
scontrol update NodeName=<Enter name of node(s) to put in DRAIN state> State=Drain Reason="Specify reason for draining node here"
To confirm the node has been drained, run sinfo:
1sinfo
2
3PARTITION AVAIL TIMELIMIT NODES STATE NODELIST
4default   up    4:00:00   1     drain node001
2.7.4.3.1. Restarting Failed Nodes#
If a node is suspected to be unhealthy, it can be disabled for use by jobs using the previous steps.
If, in coordination with NVEX support, it is determined that the node is unhealthy and must be reprovisioned, the root administrator can initiate that process via cmsh as shown.
cmsh -c "device; terminate -n <name(s) of node(s) placed in DRAIN state>"
When the cmsh device submenu indicates the Status field of the node(s) as [DOWN], terminated, the following can be run to re-provision those nodes.
cmsh -c "device; power on -n <name(s) of node(s) placed in DRAIN state>"
Note
There can be a delay between sending the termination state to DGX Cloud and the underlying cloud provider updating the quota accurately. If you receive a message after submitting the power-on operation indicating that the quota is being exceeded, or if the power-on operation for a node progresses to [DOWN], terminated, wait ten minutes and attempt to power on any affected nodes again. If this persists, please reach out to your TAM for support.
Provisioning a replacement node can take ten or more minutes to complete. During that period, the node state will update to [PENDING], terminated. The terminated value will remain as part of the status until the node provisioning is complete.
When the cmsh device submenu indicates the Status field of the node(s) as [UP], an administrator can use scontrol again to remove the node(s) from the drain state.
scontrol update NodeName=<Enter name of node(s) to remove from DRAIN state> State=Idle
If there are continued issues with the node, reach out to NVEX support for next steps.
2.7.5. Managing Users on NGC#
Note
The cluster owner is the org owner on NGC. The cluster owner can then also invite and set up admins to access and manage users within the NGC org.
To invite users to the NGC org, follow the steps in the NGC User Guide here.
2.8. Troubleshooting#
2.8.1. SSH Key Permissions#
2.8.1.1. Unprotected Private Key File#
You may see this error when trying to ssh to the head node when using WSL on Windows.
1 @@@@@@@@@@@@@@@@@@@@@@@@@@@@@@@@@@@@@@@@@@@@@@@@@@@@@@@@@@@
2 @         WARNING: UNPROTECTED PRIVATE KEY FILE!          @
3 @@@@@@@@@@@@@@@@@@@@@@@@@@@@@@@@@@@@@@@@@@@@@@@@@@@@@@@@@@@
4 Permissions 0777 for '<path-to-ssh-key>' are too open.
5 It is required that your private key files are NOT accessible by others.
6 This private key will be ignored.
7 Load key "<path-to-ssh-key>": bad permissions
8 <cluster-user>@slogin001: Permission denied (publickey,gssapi-with-mic).
To fix this, you need to update your WSL conf to allow you to own and change the file permissions for the SSH private key.
Create an
/etc/wsl.conffile (assudo) with the following contents:1 [automount] 2 options="metadata"
Exit WSL.
Terminate the instance (
wsl --terminate <distroname>) or shut it down (wsl --shutdown).Restart WSL.
Then, from WSL, run the following command to change the permissions of the private key:
user@local:$HOME/.ssh$ chmod 600 <ssh-key-file>
Then, check the permissions:
user@local:$HOME/.ssh$ ls -l <ssh-key-file>
It should look like:
-rw------- 1 user local 2610 Apr 2 19:19 <ssh-key-file>
2.8.2. Base View Permissions#
In general, cluster users should use the User Portal instead of Base View for a UI to utilize the cluster. If a cluster user with insufficient permissions tries to log in to Base View, they will see an error similar to the following.

Base View is primarily intended for cluster admins.
2.8.3. Issues With Jobs#
In a DGX Cloud Slurm cluster, job-related errors typically fall into two categories:
Issues that a user caused or are in the user’s control.
Issues stemming from factors beyond the user’s control, such as system health problems.
To distinguish between these requires familiarity with Slurm, GPU infrastructure, and the particular software in use.
2.8.3.1. Basic Questions#
To determine if the environment is functioning as expected, a basic inspection of the job queue and hardware state is performed as a sanity check. Consider the following:
Are jobs completing across the cluster at all, or are issues limited to jobs interacting with specific nodes in the cluster?
Are problems isolated to specific applications or datasets?
Do basic tools like
nvidia-smiandibdev2netdevreport the expected resources?At the administrator level, do lower-level tools like
dmesgindicate any errors related to the symptoms?
If any significant discrepancies from expected behavior are identified during this debugging process, there are several ways to proceed.
2.8.3.2. Container Download Timeout Issues#
If a user observes Pyxis errors when launching a job of the following form:
1slurmstepd: error: pyxis:     [INFO] Querying registry for permission grant
2slurmstepd: error: pyxis:     [INFO] Authenticating with user: $oauthtoken
3slurmstepd: error: pyxis:     [INFO] Using credentials from file: /home/demo-user/.config/enroot/.credentials
4slurmstepd: error: pyxis:     [INFO] Authentication succeeded
5slurmstepd: error: pyxis:     [INFO] Fetching image manifest list
6slurmstepd: error: pyxis:     [INFO] Fetching image manifest
7slurmstepd: error: pyxis:     [INFO] Downloading 70 missing layers...
8slurmstepd: error: pyxis:     curl: (92) HTTP/2 stream 0 was not closed cleanly: PROTOCOL_ERROR (err 1)
This indicates that the NGC container download is timing out. This can happen for various reasons, but is more common when larger scale jobs are run as compared to one or two node jobs.
Re-running the job is often successful and is the best initial course of action. if a re-run does not succeed, it is worth having the user consider downloading the container to Lustre as a squash file and using the cached file as their target container, as shown in Downloading Containers Onto the Cluster .
2.8.3.3. Job and Application Issues#
If a job is causing problems, whether due to the user or the application itself, administrators can often resolve the issue by using scontrol to manage that job.
To use scontrol to view a specific job, first run squeue to identify the JOBID value:
1squeue -u demo-user
2
3            JOBID PARTITION     NAME     USER ST       TIME  NODES NODELIST(REASON)
4            235      defq bad-job  demo-use  R      49:40      4 gpu[002-005]
We can then take the JOBID value of 235 and use it as an argument to scontrol.
 1scontrol show job 235
 2
 3JobId=235 JobName=bad-job
 4UserId=demo-user(1004) GroupId=demo-user(1005) MCS_label=N/A
 5Priority=4294901758 Nice=0 Account=(null) QOS=normal
 6JobState=RUNNING Reason=None Dependency=(null)
 7Requeue=1 Restarts=0 BatchFlag=1 Reboot=0 ExitCode=0:0
 8RunTime=00:52:44 TimeLimit=02:00:00 TimeMin=N/A
 9SubmitTime=2024-04-15T14:54:08 EligibleTime=2024-04-15T14:54:08
10AccrueTime=2024-04-15T14:54:08
11StartTime=2024-04-15T14:54:09 EndTime=2024-04-15T16:54:09 Deadline=N/A
12SuspendTime=None SecsPreSuspend=0 LastSchedEval=2024-04-15T14:54:09 Scheduler=Main
13Partition=defq AllocNode:Sid=slogin001:709779
14ReqNodeList=(null) ExcNodeList=(null)
15NodeList=gpu[002-005]
16BatchHost=gpu002
17NumNodes=4 NumCPUs=384 NumTasks=32 CPUs/Task=1 ReqB:S:C:T=0:0:*:*
18ReqTRES=cpu=32,mem=515232M,node=4,billing=32,gres/gpu=32
19AllocTRES=cpu=384,node=4,billing=384,gres/gpu=32
20Socks/Node=* NtasksPerN:B:S:C=8:0:*:* CoreSpec=*
21MinCPUsNode=8 MinMemoryNode=0 MinTmpDiskNode=0
22Features=(null) DelayBoot=00:00:00
23OverSubscribe=NO Contiguous=0 Licenses=(null) Network=(null)
24Command=/lustre/fs0/scratch/demo-user/nemo-megatron-launcher/launcher_scripts/results/gpt3_5b/nemo-megatron-gpt3_5b_submission.sh
25WorkDir=/lustre/fs0/scratch/demo-user/nemo-megatron-launcher/launcher_scripts
26StdErr=/lustre/fs0/scratch/demo-user/nemo-megatron-launcher/launcher_scripts/results/gpt3_5b/log-nemo-megatron-gpt3_5b_235.err
27StdIn=/dev/null
28StdOut=/lustre/fs0/scratch/demo-user/nemo-megatron-launcher/launcher_scripts/results/gpt3_5b/log-nemo-megatron-gpt3_5b_235.out
29Power=
30TresPerNode=gres:gpu:8
This output provides information on where to find the log files and how a job was initiated. If a job requires a time limit, use the following scontrol command to set it.
scontrol update job id=235 timelimit=01:00:00
Or if the job needs to be canceled, use the scancel command.
scancel job id=235
2.8.3.4. Stability or Health Issues#
Repeated attempts to run a job that are met with errors can be frustrating - for example, NCCL could emit errors like the following:
gpu001:7127:17776 [2] socket.c:540 NCCL WARN Net : Connection closed by remote peer dgxc-bcm-prod-002-cluster1.cm.cluster<59366>
A recommended first step is to add a debug flag to the code. For NCCL-related problems, adding the following environment variable to a new run of the job experiencing the error will provide additional information. It’s advisable not to keep it enabled constantly, as it will generate extensive logging output.
export NCCL_DEBUG=INFO
An appropriate next step, assuming the information provided continues to indicate a problem with the node, is to completely remove the potentially unhealthy node (gpu001, in this case) from use while it is being triaged. As noted in previous sections, using scontrol to drain the node accomplishes this goal.
scontrol update NodeName=gpu001 State=Drain Reason="NCCL errors"
If similar or identical jobs now pass without issues, then there is likely a problem with the node that you have placed into a drain state. Contact your NVIDIA TAM to get customer support involved in triaging the system and providing a replacement.
2.8.3.5. Performance Issues#
Diagnosing performance issues often involves combining the debugging methods discussed in the stability and application-specific sections above. In addition to these methods, verifying the software state of both the system and the application is essential.
For example, have there been any recent updates to the codebase or container? Has the operating system software on the cluster been updated?
The interaction between hardware, systems, and software can evolve, leading to unforeseen consequences. Experimenting with job configurations that have worked previously is a good first step in assessing performance issues.
If you are confident that there is a new problem that is not an application bug, please contact your NVIDIA TAM to open a support ticket.
2.9. Requesting Modifications To Your DGX Cloud Cluster#
While most administrative tasks are available to you, some tasks require assistance from NVIDIA.
These include actions such as expanding and adding additional nodes to the cluster, increasing shared storage capacity on NFS or Lustre, and changing quota for user home directories.
For assistance with these steps, please work with your TAM to ensure necessary modifications are made to your quota.
2.10. Resolving Security Bulletins#
All security bulletins and associated resolutions for DGX Cloud Slurm clusters are detailed below. If you have any additional questions, please reach out to your TAM for assistance.
2.10.1. NVIDIA Container Toolkit - September 2024#
Visit the NVIDIA Support Knowledgebase for more detail regarding this security bulletin.
To update the NVIDIA Container Toolkit on a DGX Cloud Slurm cluster that uses the default software image and category configuration it was delivered with, run the following commands.
1cm-chroot-sw-img /cm/images/amlfs-image
2apt update
3apt install --only-upgrade cm-nvidia-container-toolkit
4exit
5cmsh -c 'device imageupdate -w -c slurm-cpu,slurm-gpu,slurm-login --wait'
If you have augmented the cluster to use different software images or category configurations, please read the more general BCM Knowledgebase to understand how to update a different configuration.