Network Operator Installation using Base Command Manager#
This section assumes that Base Command Manager (BCM) was installed and the DGX and Kubernetes control nodes are provisioned in the SuperPOD / BasePOD cluster. We recommend installing Network Operator as part of the Kubernetes setup using the built-in installation wizard (cm-kubernetes0setup) in BCM.
It’s important to ensure the driver stack works for the DGX nodes, especially the OS kernel, DOCA OFED and GPU driver. Please refer to the latest DGX Release Notes and the DGX OS guide for the proper combination of component versions.
NOTE: The procedures used in this document are tested on DGX H100 cluster with the following combination of component versions:
DGX OS: 7.3.1
DGX Kernel: 6.8.0-87-generic
GPU driver: nvidia-driver-580-server (580.126.09)
DOCA OFED: 3.1.0-091548
Network Operator: 25.10
GPU Operator: 25.10
MPI Operator: 0.6.0
NOTE: the nvidia_peermem kernel module needs to be loaded for inter-node GPU-to-GPU RDMA communications. It enables GPUDirect RDMA between NVIDIA GPUs and ConnectX NICs. nvidia_peermem comes with the nvidia-driver-580-server or the nvidia-driver-580-server-open package, it does not come with the nvidia-driver-580-open package, however.
Install Network Operator as part of the Kubernetes setup wizard#
Once BCM has installed the nodes in the cluster, the Kubernetes installation can begin. Kubernetes installation is performed by running the cm-kubernetes-setup wizard on the BCM head node. This is well documented in the NVIDIA Mission Control documentation.
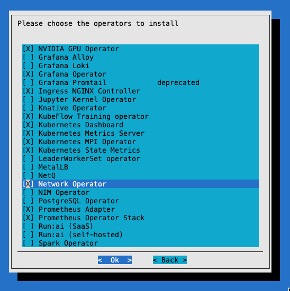
Several components are installed that may vary depending on your environment. We recommend installing the network operator as part of the process. This simplifies the Kubernetes installation and is less error prone. In the context of Mission Control, the network operator is deployed as part of the user space Kubernetes cluster.
Install Network Operator separately from the Kubernetes setup wizard#
If you didn’t select the Network Operator during the installation of Kubernetes or need to update Network Operator to a newer version, then you can use Helm to install Network Operator. If you selected Network Operator in the cm-kubernetes-setup wizard and you are content with that version, then you can skip to the next section.
To install, first add the NVIDIA NGC Helm repository:
~# helm repo add nvidia https://helm.ngc.nvidia.com/nvidia
Next, make a file called values.yaml that contains the following. The values.yaml file is the main configuration file that tells the NVIDIA Network Operator Helm chart how to deploy and configure the operator and its related components in your specific cluster environment.
RDMARD:
  enabled: true
deployNodeFeatureRules: true
maintenanceOperator:
  enabled: false
nvIpam:
  deploy: true
sriovNetworkOperator:
  enabled: true
sriov-network-operator:
  sriovOperatorConfig:
    configDaemonNodeSelector:
      node-role.kubernetes.io/worker: ""
    featureGates:
      parallelNicConfig: true
    mellanoxFirmwareReset: false
With this file created, we can deploy the helm chart:
~# helm install network-operator nvidia/network-operator -n network-operator --create-namespace --version v25.10.0 -f values.yaml
If you are performing an upgrade, first download the updated helm chart, then apply the helm chart update. You can follow the upgrade guide in the documentation of the latest NVIDIA Network Operator release.
NIC Cluster Policy#
Once the network operator is installed, additional components are required. The first item to create is the NIC Cluster Policy. This resource is used to declare which networking components should be managed and deployed by the NVIDIA Network Operator. Only the fields specified in the resource are acted upon, so here we define only the Secondary Network and the IP Address Management features. We create a file called nic-cluster-policy.yaml with the contents of:
apiVersion: mellanox.com/v1alpha1
kind: NicClusterPolicy
metadata:
  name: nic-cluster-policy
spec:
  # Exclude master/control-plane nodes to avoid conflicts with network-operator components
  nodeAffinity:
    requiredDuringSchedulingIgnoredDuringExecution:
      nodeSelectorTerms:
        - matchExpressions:
            - key: node-role.kubernetes.io/master
              operator: DoesNotExist
            - key: node-role.kubernetes.io/control-plane
              operator: DoesNotExist
  secondaryNetwork:
    cniPlugins:
      image: plugins
      repository: nvcr.io/nvidia/mellanox
      version: network-operator-v25.10.0
      imagePullSecrets: []
    multus:
      image: multus-cni
      repository: nvcr.io/nvidia/mellanox
      version: network-operator-v25.10.0
      imagePullSecrets: []
      containerResources:
        - name: "kube-multus"
          limits: {memory: "100Mi"}
          requests: {memory: "100Mi"}
  nvIpam:
    image: nvidia-k8s-ipam
    repository: nvcr.io/nvidia/mellanox
    version: network-operator-v25.10.0
    imagePullSecrets: []
    enableWebhook: false
In this example, only the secondary network interfaces (using Multus) and network IP address management (nvIpam) are enabled and managed by the operator. Other features, such as automatic OFED driver installation or RDMA plugins, are not configured and will not be deployed. For DGX we recommend that the OFED drivers were installed previously using the BCM command cm-doca-ofed-install.sh
By enabling secondary network attachment, high-performance workloads can be configured with multiple network interfaces, giving Kubernetes pods direct access to InfiniBand HCAs (Host Channel Adapter) for line-rate networking. This design is particularly useful in bare metal clusters for HPC and AI/ML use cases with GPU-based workloads, where each GPU can be mapped to its own dedicated high-speed network interface for optimal performance.
For more information on Multus see the github repository.
For more information on other features that can be installed with the NIC Cluster Policy see the full example policy in the NVIDIA documentation.
This cluster policy should be applied with:
~# Kubectl apply –f nic-cluster-policy.yaml
If you attempt to apply this without Network Operator being installed, you may run into issues. Ensure that it is installed from the previous step.
IP Pools#
For each GPU rail on the compute node (e.g. DGX B200/B300) we need an IP pool. The IP Pools provide centralized, declarative control over subnet allocation, pernode address blocks, and gateway settings, enabling consistent, conflictfree IP assignment to pods that consume SRIOV and other highperformance network interfaces. Since each DGX B200/B300 compute node has 8 GPU rails, you would define 8 IP pools. Each compute node (AKA compute tray) in a DGX GB200/GB300 rack has 4 GPU rails, so you would define 4 IP pools. An IP Pool is defined as follows:
apiVersion: nv-ipam.nvidia.com/v1alpha1
kind: IPPool
metadata:
  name: sriovibnet-pool-a-su-1
  namespace: network-operator
spec:
  subnet: 100.131.0.0/16
  perNodeBlockSize: 32
  gateway: 100.131.0.1
  nodeSelector:
    nodeSelectorTerms:
      - matchExpressions:
          - key: node-role.kubernetes.io/worker
            operator: Exists
Name - You can name the IP Pool anything you want that makes sense to you. We recommend it is named something that will designate the rail it will be assigned to. In our case we have the name sriovibnet-pool-a-su-1 showing this will be designated to all the rails in pool A.
Subnet - Each IP pool will require enough IPs in a subnet to satisfy all the potential IPs required. If you have 32 nodes in a cluster and want to give each node 32 IP addresses (as specified in the next paragraph) then you would need 1024 IP addresses. Our example uses /16 network which translates to roughly 2^16 IP addresses ~= 65,536.
perNodeBlockSize – The number of IP addresses assigned to a node. Here it is set to 32. Even if our nodes only use 8 VFs per port, allocating a larger block (32) ensures the node has a contiguous range of IPs and reduces the frequency of the node needing to request more addresses from the controller as Pods are churned.
For 8 IP pools, create a yaml file and repeat the above IP pool example 8 times in the yaml file, each with its own unique metadata name, subnet, and gateway. See a full definition in the appendix.
Once you are satisfied with your definition you can apply the IP pool definitions to your cluster:
~ kubectl apply -f combined-ippools.yaml
ippool.nv-ipam.nvidia.com/sriovibnet-pool-a-su-1 created
ippool.nv-ipam.nvidia.com/sriovibnet-pool-b-su-1 created
ippool.nv-ipam.nvidia.com/sriovibnet-pool-c-su-1 created
ippool.nv-ipam.nvidia.com/sriovibnet-pool-d-su-1 created
ippool.nv-ipam.nvidia.com/sriovibnet-pool-e-su-1 created
ippool.nv-ipam.nvidia.com/sriovibnet-pool-f-su-1 created
ippool.nv-ipam.nvidia.com/sriovibnet-pool-g-su-1 created
ippool.nv-ipam.nvidia.com/sriovibnet-pool-h-su-1 created
SR-IOV Network Node Policy#
To achieve a high-performance Multi-Rail configuration, each GPU rail on the compute node must have its own dedicated SR-IOV Network Node Policy. This ensures that Kubernetes can distinguish between the physical NICs and assign specific “rails” to specific GPU-accelerated tasks.
The policy for Rail A is defined as follows:
apiVersion: sriovnetwork.openshift.io/v1
kind: SriovNetworkNodePolicy
metadata:
  name: sriovibnet-rdma-node-policy-a-su-1
  namespace: network-operator
spec:
  deviceType: netdevice
  nicSelector:
    vendor: "15b3"
    pfNames: [ "ibp24s0" ]
  numVfs: 8
  linkType: IB
  priority: 90
  isRdma: true
  resourceName: sriovib_resource_a
  nodeSelector:
    node-role.kubernetes.io/worker: ""
    feature.node.kubernetes.io/pci-15b3.present: "true"
Key Components of the Policy:
resourceName (sriovib_resource_a): This is the most critical field for Multi-Rail setups. By giving each rail a unique resource name (e.g., _a, _b, _c), you prevent Kubernetes from “mixing up” the rails. When a pod needs to use Rail A, it will explicitly request this specific resource.
pfNames (ibp24s0): This identifies the specific physical port (Physical Function) on the node. You must ensure that ibp24s0 matches the actual OS-level interface name for the first NVIDIA NIC on your nodes. These names can be seen for DGX nodes in the Port Mapping table.
numVfs (8): This “slices” the physical NIC into 8 Virtual Functions. This allows up to 8 different pods to share this physical rail while maintaining isolated, near-bare-metal performance.
isRdma: true: This enables the RDMA stack, which is required for high-speed, low-latency communication like GPUDirect RDMA, allowing GPUs to talk directly to the NIC.
linkType: Set this to IB for InfiniBand fabrics or eth for Ethernet/RoCE fabrics.
SR-IOV Network#
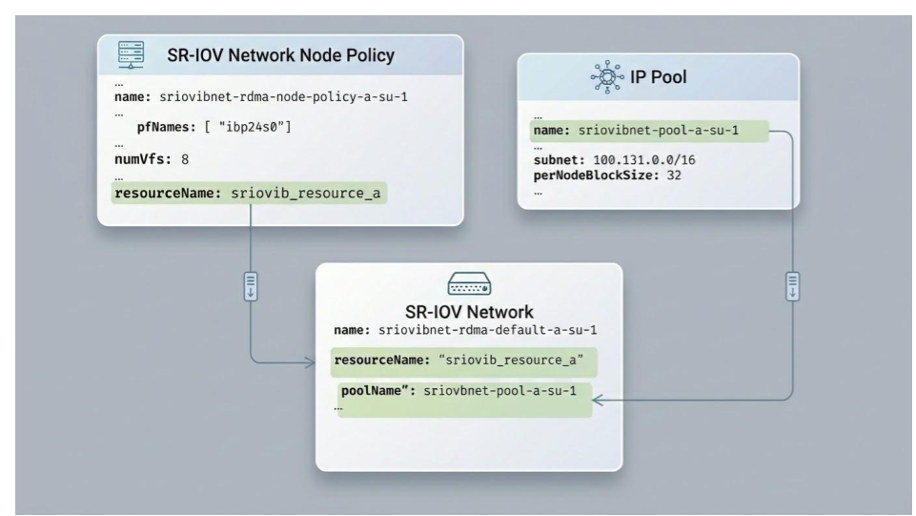
The SR-IOV network resource provides the mapping between the IP pool to the Node Policy from the previous section. Each device (resourceName) is connected to the ipam object which includes the IP Pool name.
apiVersion: sriovnetwork.openshift.io/v1
kind: SriovIBNetwork
metadata:
  name: "sriovibnet-rdma-default-a-su-1"
  namespace: network-operator
spec:
  linkState: enable
  networkNamespace: "default"
  resourceName: "sriovib_resource_a"
  ipam: |
    "type": "nv-ipam",
    "datastore": "kubernetes",
    "kubernetes": {
    "kubeconfig": "/etc/cni/net.d/nv-ipam.d/nv-ipam.kubeconfig"
    "log_file": "/var/log/SriovIBNetwork_nv-ipam.log",
    "log_level": "debug",
    "poolName": "sriovibnet-pool-a-su-1",
    "poolType": "IPPool"
Applying the previous two resources in the same file called combined-sriovibnet.yaml yields the following:
~# kubectl apply -f combined-sriovibnet-h100.yaml
sriovnetworknodepolicy.sriovnetwork.openshift.io/sriovibnet-rdma-node-policy-a-su-1 created
sriovnetworknodepolicy.sriovnetwork.openshift.io/sriovibnet-rdma-node-policy-b-su-1 created
sriovnetworknodepolicy.sriovnetwork.openshift.io/sriovibnet-rdma-node-policy-c-su-1 created
sriovnetworknodepolicy.sriovnetwork.openshift.io/sriovibnet-rdma-node-policy-d-su-1 created
sriovnetworknodepolicy.sriovnetwork.openshift.io/sriovibnet-rdma-node-policy-e-su-1 created
sriovnetworknodepolicy.sriovnetwork.openshift.io/sriovibnet-rdma-node-policy-f-su-1 created
sriovnetworknodepolicy.sriovnetwork.openshift.io/sriovibnet-rdma-node-policy-g-su-1 created
sriovnetworknodepolicy.sriovnetwork.openshift.io/sriovibnet-rdma-node-policy-h-su-1 created
sriovibnetwork.sriovnetwork.openshift.io/sriovibnet-rdma-default-a-su-1 created
sriovibnetwork.sriovnetwork.openshift.io/sriovibnet-rdma-default-b-su-1 created
sriovibnetwork.sriovnetwork.openshift.io/sriovibnet-rdma-default-c-su-1 created
sriovibnetwork.sriovnetwork.openshift.io/sriovibnet-rdma-default-d-su-1 created
sriovibnetwork.sriovnetwork.openshift.io/sriovibnet-rdma-default-e-su-1 created
sriovibnetwork.sriovnetwork.openshift.io/sriovibnet-rdma-default-f-su-1 created
sriovibnetwork.sriovnetwork.openshift.io/sriovibnet-rdma-default-g-su-1 created
sriovibnetwork.sriovnetwork.openshift.io/sriovibnet-rdma-default-h-su-1 created
SR/IOV Node Pool Configuration#
Applying the previous configuration (the Node Policy) will trigger the SR-IOV Network Operator to begin reconfiguring the hardware. By default, the operator will “drain” and reboot nodes one at a time to ensure the number of VFs (Virtual Functions) on the physical NIC matches the desired state. While this safe, rolling update is good practice for production clusters, it can take a long time. For smaller clusters or initial deployments where a maintenance window is available, you can create a SriovNetworkPoolConfig. This tells the controller that 100% of the nodes can be updated and rebooted simultaneously, significantly speeding up the cluster-wide configuration:
apiVersion: sriovnetwork.openshift.io/v1
kind: SriovNetworkPoolConfig
metadata:
  name: node-pool-unavailable-config
  namespace: network-operator
spec:
  maxUnavailable: "100%"   # warning this may bring down the entire cluster!
  nodeSelector:
    matchExpressions:
      - key: node-role.kubernetes.io/worker
        operator: Exists
Note: The reboot only occurs if the node policy requires a change that cannot be applied “live” such as changing the total number of VFs supported by the firmware or switching between InfiniBand and Ethernet modes.