Installing the DGX Software
This section requires that you have already installed CentOS 8 or derived operating system on the DGX system. You can skip this section of you already installed the DGX software stack during a kickstart install.
Configuring a System Proxy
- Edit the file /etc/dnf/dnf.conf and make sure the following lines are
present in the [main] section, using the parameters that apply to your
network:
proxy=http://<Proxy-Server-IP-Address>:<Proxy-Port>
proxy_username=<Proxy-User-Name>
proxy_password=<Proxy-Password>
Enabling the DGX Software Repository
Installing Required Components
- Upgrade to the latest software.Important: Before performing the upgrade, consult the release notes for additional instructions depending on the specific EL8 release.
sudo dnf update -y --nobest
- Install DGX tools and configuration files.
- For DGX-1, install DGX-1 Configurations.
sudo dnf group install -y 'DGX-1 Configurations'
- For the DGX-2, install DGX-2 Configurations.
sudo dnf group install -y 'DGX-2 Configurations'
- For the DGX A100, install DGX A100 Configurations.
sudo dnf group install -y 'DGX A100 Configurations'
- For the DGX Station, install DGX Station Configurations.
sudo dnf group install -y 'DGX Station Configurations'
- For the DGX Station A100, install DGX Station A100
Configurations.
sudo dnf group install -y 'DGX Station A100 Configurations'
The configuration changes take effect only after rebooting the system, which will be performed after installing the CUDA driver.
- For DGX-1, install DGX-1 Configurations.
- Configure the /raid partition.
All DGX systems support RAID 0 or RAID 5 arrays.
The following commands create a RAID array, mount it to /raid and create an appropriate entry in /etc/fstab.- To create a RAID 0
array:
sudo /usr/bin/configure_raid_array.py -c -f
- To create a RAID 5 array:
sudo /usr/bin/configure_raid_array.py -c -f -5
Note: The RAID array must be configured before installing nvidia-conf-cachefilesd, which places the proper SELinux label on the /raid directory. If you ever need to recreate the RAID array — which will wipe out any labeling on /raid — after nvidia-conf-cachefilesd has already been installed, be sure to restore the label manually before restarting cachefilesd.Optional: If you wish to use your RAID array for caching, install nvidia-conf-cachefilesd. This will update the cachefilesd configuration to use the /raid partition.sudo restorecon /raid sudo systemctl restart cachefilesd
sudo dnf install -y nvidia-conf-cachefilesd
- To create a RAID 0
array:
- Install the NVIDIA CUDA driver.
- For non-NVSwitch systems such as DGX-1, DGX Station, and DGX Station A100, install
either the R450 or R470 driver using the default and src profiles:
Installing the R450 drivers
sudo dnf module install -y nvidia-driver:450/{default.src}
sudo dnf install -y nv-persistence-mode libnvidia-nscq-450
Installing the R470 driverssudo dnf module install -y nvidia-driver:470/{default,src} sudo dnf install -y nv-persistence-mode libnvidia-nscq-470 - For NVSwitch systems such as DGX-2 and DGX A100, install either the R450 or R470
driver using the fabric manager (fm) and src profiles:
Installing the R450 drivers
sudo dnf module install -y nvidia-driver:450/{fm,src}
sudo dnf install -y nv-persistence-mode nvidia-fm-enable
Installing the R470 drivers
sudo dnf module install -y nvidia-driver:470/{fm,src}
sudo dnf install -y nv-persistence-mode nvidia-fm-enable
- For non-NVSwitch systems such as DGX-1, DGX Station, and DGX Station A100, install
either the R450 or R470 driver using the default and src profiles:
- (DGX Station A100 Only) Install additional packages required for DGX Station
A100.
These packages must be installed after installation of the nvidia-driver module.
sudo dnf install -y nvidia-conf-xconfig nv-docker-gpus
- Reboot the system to load the drivers and to update system configurations.
- Issue the reboot.
sudo reboot
- After the system has rebooted, verify that the drivers have been loaded and are
handling the NVIDIA devices.
nvidia-smi
The output should show all available GPUs.
Example:+-----------------------------------------------------------------------------+ | NVIDIA-SMI 450.80.02 Driver Version: 450.80.02 CUDA Version: 11.0 | |-------------------------------+----------------------+----------------------+ | GPU Name Persistence-M| Bus-Id Disp.A | Volatile Uncorr. ECC | | Fan Temp Perf Pwr:Usage/Cap| Memory-Usage | GPU-Util Compute M. | | | | MIG M. | |===============================+======================+======================| | 0 Tesla V100-SXM2... On | 00000000:06:00.0 Off | 0 | | N/A 35C P0 42W / 300W | 0MiB / 16160MiB | 0% Default | | | | N/A | +-------------------------------+----------------------+----------------------+ | 1 Tesla V100-SXM2... On | 00000000:07:00.0 Off | 0 | | N/A 35C P0 44W / 300W | 0MiB / 16160MiB | 0% Default | | | | N/A | +-------------------------------+----------------------+----------------------+ ... +-------------------------------+----------------------+----------------------+ | 7 Tesla V100-SXM2... On | 00000000:8A:00.0 Off | 0 | | N/A 35C P0 43W / 300W | 0MiB / 16160MiB | 0% Default | | | | N/A | +-------------------------------+----------------------+----------------------+ +-----------------------------------------------------------------------------+ | Processes: | | GPU GI CI PID Type Process name GPU Memory | | ID ID Usage | |=============================================================================| | No running processes found | +-----------------------------------------------------------------------------+
- Issue the reboot.
- Install the NVIDIA container device plugin.
- Install docker-ce.
As this may conflict with existing packages on the system, specify the
--allowerasing option:
sudo dnf install -y docker-ce --allowerasing
- Install the NVIDIA Container Runtime group
sudo dnf group install -y 'NVIDIA Container Runtime'
- Restart the docker daemon.
sudo systemctl restart docker
- Run the following command to verify the installation.
sudo docker run --gpus=all --rm nvcr.io/nvidia/cuda:11.0-base nvidia-smi
See the section Running Containers for more information about this command.
The output should show all available GPUs
+-----------------------------------------------------------------------------+
| NVIDIA-SMI 470.57.02    Driver Version: 470.57.02    CUDA Version: 11.4     |
|-------------------------------+----------------------+----------------------+
| GPU  Name        Persistence-M| Bus-Id        Disp.A | Volatile Uncorr. ECC |
| Fan  Temp  Perf  Pwr:Usage/Cap|         Memory-Usage | GPU-Util  Compute M. |
|                               |                      |               MIG M. |
|===============================+======================+======================|
|   0  Tesla V100-SXM2...  On   | 00000000:06:00.0 Off |                    0 |
| N/A   35C    P0    42W / 300W |      0MiB / 16160MiB |      0%      Default |
|                               |                      |                  N/A |
+-------------------------------+----------------------+----------------------+
|   1  Tesla V100-SXM2...  On   | 00000000:07:00.0 Off |                    0 |
| N/A   35C    P0    44W / 300W |      0MiB / 16160MiB |      0%      Default |
|                               |                      |                  N/A |
+-------------------------------+----------------------+----------------------+
...
+-------------------------------+----------------------+----------------------+
|   7  Tesla V100-SXM2...  On   | 00000000:8A:00.0 Off |                    0 |
| N/A   35C    P0    43W / 300W |      0MiB / 16160MiB |      0%      Default |
|                               |                      |                  N/A |
+-------------------------------+----------------------+----------------------+

+-----------------------------------------------------------------------------+
| Processes:                                                                  |
|  GPU   GI   CI        PID   Type   Process name                  GPU Memory |
|        ID   ID                                                   Usage      |
|=============================================================================|
|  No running processes found                                                 |
+-----------------------------------
- Install docker-ce.
As this may conflict with existing packages on the system, specify the
--allowerasing option:
Installing Optional Components
- To install the CUDA Toolkit 11.2, issue the
following.
$ sudo dnf install -y cuda-toolkit-11-2 cuda-compat-11-2 nvidia-cuda-compat-setup
- To administer self-encrypting drives, install the nv-disk-encrypt
package, issue the following.
$ sudo dnf install -y nv-disk-encrypt
$ sudo reboot
Refer to the “Managing Self-Encrypting Drives” section in the DGX A100 User Guide for usage information. - To install the NVIDIA Collectives Communication Library (NCCL) Runtime, refer to the NCCL:Getting Started documentation.
- To install the CUDA Deep Neural Networks (cuDNN) Library Runtime, refer to the NVIDIA cuDNN page.
- To install NVIDIA TensorRT, refer to the NVIDIA TensorRT page.
- To install NVIDIA GPUDirect Storage (GDS), issue the following to install the GDS
packages.
$ sudo dnf install nvidia-gds
Be sure to enable GDS within the MLNX_OFED driver if you install the driver. Refer to Using the NVIDIA Mellanox InfiniBand Drivers.
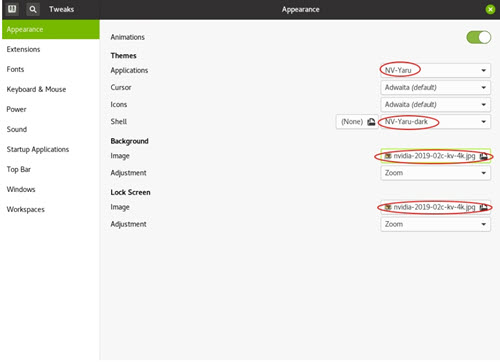
Installing the Optional NVIDIA Desktop Theme
The DGX Software Repository also provides optional theme packages and desktop wallpapers to give the user-interface an NVIDIA look-and-feel. These packages would have been installed as part of the DGX Station Configurations group, but users can also manually install this:
- To apply the theme and background images, first open gnome-tweaks.
- Under Applications, select one of the NV-Yaru themes. This comes in default, light, and dark variations.
- Under Shell, select the NV-Yaru-dark theme.
If this field is grayed out, you may need to reboot the system or restart GDM in order to enable the user-themes extension.
To restart GDM, issue the following.sudo systemctl restart gdm
- Select one of the NVIDIA wallpapers for the background image and lock screen.