A. Installing Software on Air-Gapped NVIDIA DGX Systems
When installing Red Hat Enterprise Linux on DGX systems, many of the packages that the DGX system requires are downloaded over the internet from both Red Hat and NVIDIA servers. This is not suitable for tightly secured systems which must be "Air-Gapped"; isolated from the internet or outside networks.
For air-gapped systems, Red Hat provides tools (createrepo and reposync) to make local mirrors of the internet available repositories. These repository mirrors can then be copied into the air-gapped environment and activated on the DGX system for installation.
This document assumes that you have created a mirror of the Red Hat repositories. For the NVIDIA repositories, it provides steps for mirroring NVIDIA repositories on a "low-side" system that has public internet access, and then copying and activating the repositories to an air-gapped DGX system. It also includes a process for installing Docker containers.
A.1. Registering Your System
See the Red Hat customer portal knowledge base article How to register and subscribe a system offline to the Red Hat Customer Portal.
A.2. Creating the Mirrors on the Low-Side Red Hat System
- low-side-user
- represents the username on the low-side system.
- my-mirror
- represents the folder where the mirrored files are create or stored.
- Set up a directory for creating the mirror.
mkdir /home/<low-side-user>/<my-mirror>
- Mirror the nvidia-dgx-7 repo.
- cd
/home/<low-side-user>/<my-mirror>
- sudo reposync --newest-only --gpgcheck -l --repoid nvidia-dgx-7
--download_path=/home/<low-side-user>/<my-mirror>
--downloadcomps --download-metadata
- cd nvidia-dgx-7/
- sudo createrepo -v
/home/<low-side-user>/<my-mirror>/nvidia-dgx-7
-g comps.xml
- cp /etc/yum.repos.d/nvidia-dgx-7.repo
/home/<low-side-user>/<my-mirror>/nvidia-dgx-7/
- cp /etc/pki/rpm-gpg/RPM-GPG-KEY-dgx-cosmos-support
/home/<low-side-user>/<my-mirror>/nvidia-dgx-7/
- cd
/home/<low-side-user>/<my-mirror>
- Mirror the nvidia-dgx-7-updates repo
- cd
/home/<low-side-user>/<my-mirror>
- sudo reposync --newest-only --gpgcheck -l --repoid
nvidia-dgx-7-updates
--download_path=path/to/mirrored/files
--downloadcomps --download-metadata
- sudo createrepo -v
/home/<low-side-user>/<my-mirror>/nvidia-dgx-7-updates
- cd
/home/<low-side-user>/<my-mirror>
- Mirror the rhel-7-server-extras-rpms repo.
- cd
/home/<low-side-user>/<my-mirror>
- sudo reposync --newest-only --gpgcheck -l --repoid
rhel-7-server-extras-rpms
--download_path=/home/<low-side-user>/<my-mirror>
--downloadcomps --download-metadata
- cd rhel-7-server-extras-rpms/
- sudo createrepo -v
/home/<low-side-user>/<my-mirror>/rhel-7-server-extras-rpms
-g comps.xml
- sudo cp /etc/yum.repos.d/redhat_repo
/home/<low-side-user>/<my-mirror>/rhel-7-server-extras-rpms/
- sudo cp /etc/pki/rpm-gpg/RPM-GPG-KEY-redhat-release
/home/<low-side-user>/<my-mirror>/rhel-7-server-extras-rpms
- cd
/home/<low-side-user>/<my-mirror>
- Mirror the rhel-7-server-optional-rpms repo
- cd
/home/<low-side-user>/<my-mirror>
- sudo reposync --newest-only --gpgcheck -l --repoid
rhel-7-server-optional-rpms
--download_path=/home/<low-side-user>/<my-mirror>
--downloadcomps --download-metadata
- cd rhel-7-server-optional-rpms/
- sudo createrepo -v
/home/<low-side-user>/<my-mirror>/rhel-7-server-optional-rpms
-g comps.xml
- cd
/home/<low-side-user>/<my-mirror>
- Mirror the rhel-7-server-rpms repo
- cd
/home/<low-side-user>/<my-mirror>
- sudo reposync --newest-only --gpgcheck -l --repoid
rhel-7-server-rpms
--download_path=/home/<low-side-user>/<my-mirror>
--downloadcomps --download-metadata
- cd rhel-7-server-rpms/
- sudo createrepo -v
/home/<low-side-user>/<my-mirror>/rhel-7-server-rpms
-g comps.xml
- cd
/home/<low-side-user>/<my-mirror>
- Mirror the rhel-server-rhscl-7-rpms repo.
- cd
/home/<low-side-user>/<my-mirror>
- sudo reposync --newest-only --gpgcheck -l --repoid
rhel-server-rhscl-7-rpms
--download_path=/home/<low-side-user>/<my-mirror>
--downloadcomps --download-metadata
- cd rhel-server-rhscl-7-rpms/
- sudo createrepo -v
/home/<low-side-user>/<my-mirror>/rhel-server-rhscl-7-rpms
-g comps.xml
- cd
/home/<low-side-user>/<my-mirror>
- Create an archive of the mirrored repos.
tar cf <mirror-archive-name>.tar <username>
A.3. Installing Red Hat Enterprise Linux on the Air-Gapped DGX-2/DGX A100
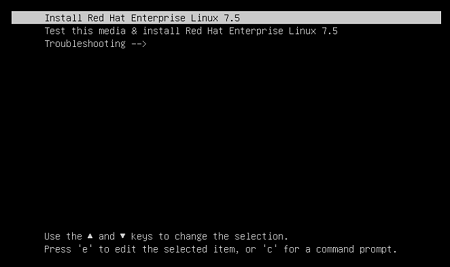
- After booting the ISO image through either the BMC or from the USB drive, select Install Red Hat Enterprise Linux and then press Enter to start the installation.
- Refer to the Red Hat Enterprise Linux Quick Installation Guide
for guidance on using the installer.
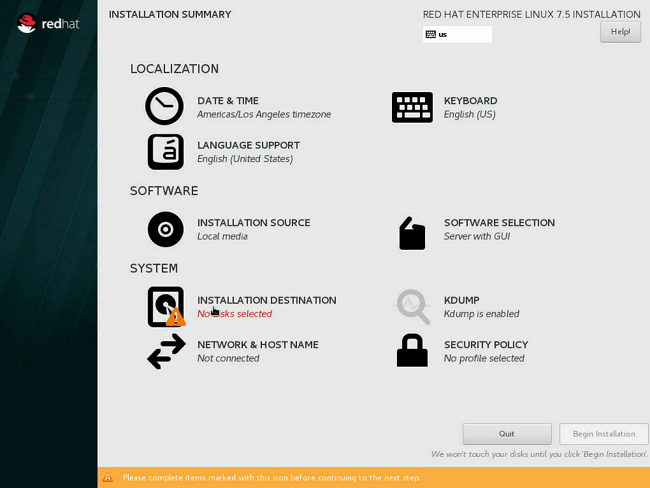
Configure the language, region, date, time, keyboard, and other configuration options you may need from the Installation Summary screen.
- Set up the system drives.
- Remove all partitions.
At the Installation Destination screen, select both M.2 (894.25 GB on DGX-2 or 1788 GB on DGX A100) disks, the "Automatically configure partitioning" radio button and the I would like to make additional space available check box, then click Done.
- At the Reclaim Disk Space screen, click Reclaim Space.
- Remove all partitions.
- Create EFI partitions.
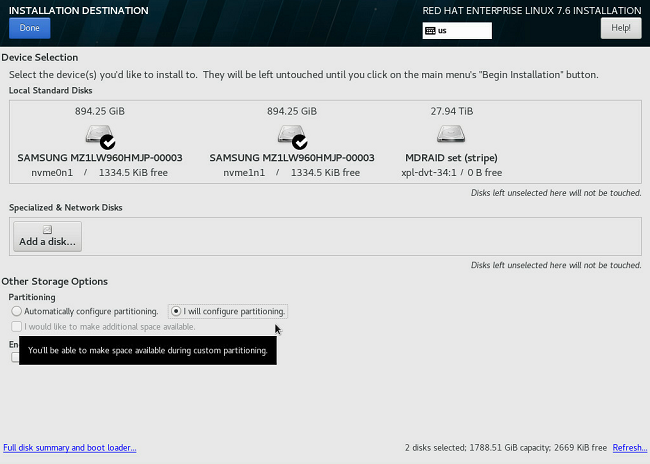
- From the Installation Summary screen, click INSTALLATION DESTINATION to create new partitions.
- At the Installation Destination screen, select both M.2 (894.25 GB on DGX-2 or
1788 GB on DGX A100) disks and the "I will configure
partitioning" radio button, then click Done.
The Manual Partitioning window appears.
- Create a new partition.
At the Manual Partitioning screen, use the Standard Partition and then click "+" .
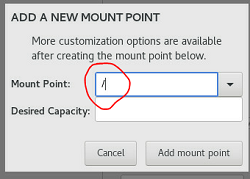
- Add the mount point for the first EFI partition.
Set the Mount Point to /boot/efi and the Desired Capacity to 512 MB, then click Add mount point.
- Verify that the installer selects drive nvme0n1p1 (DGX-2) or nvme3n1p1 (DGX A100).
If the correct drive is not designated, then click Modify and then select the correct drive from the Configure Mount Point dialog box and click Select.
- Click "+" to create the alternate EFI boot partition.
- Add the mount point for the alternate EFI partition.
Set the Mount Point to /boot/efi2 and the Desired Capacity to 512 MB, then click Add mount point
- Create the RAID 1 partition.
- Verify the following assignments:
- DGX-2: /boot/efi is assigned drive nvme0n1p1 and /boot/efi2 is assigned drive nvme1n1p1
- DGX A100: /boot/efi is assigned drive nvme3n1p1 and /boot/efi2 is assigned drive nvme2n1p1
Occasionally, the partition names will change. If that happens, select the desired drive and click Modify->Update settings to correct.
- Click Done to exit and commit the new partition scheme, then click Accept Changes.
- Continue following the steps starting with -
- DGX-2: Step 5 of Installing on the DGX-2.
- DGX A100: Step 5 of Installing on the DGX A100
Installing DGX Software on the Air-Gapped DGX-2/DGX A100
- dgx-user
- represents the DGX user
- my-mirror
- represents the folder where the mirrored files are create or stored
- After the system has rebooted, log in and verify the partitioning scheme & correct
EFI mount;
NVSM requires the RAID-1 volume to be named md0, and the EFI boot partition to be correctly ordered.
- Verify that the partition scheme matches the output shown for the following
commands:
$ ls -ldh /dev/md*

drwxr-xr-x. 2 root root 80 Aug 9 17:26 /dev/md
brw-rw----. 1 root disk 9, 0 Aug 9 17:26 /dev/md0
brw-rw----. 1 root disk 9, 127 Aug 9 17:26 /dev/md127
$ sudo mdadm --detail /dev/md0 | grep nvme

0 259 3 0 active sync /dev/nvme0n1p2
1 259 5 1 active sync /dev/nvme1n1p2
$ sudo lsblk -f | grep efi

├─nvme0n1p1 vfat /boot/efi
├─nvme1n1p1 vfat /boot/efi2
If the RAID-1 volume is not named md0, see the Appendix: Renaming RAID Volumes for instructions on how to rename the RAID volume. - Edit /etc/fstab and remove the line to mount /boot/efi2.
- Verify that the partition scheme matches the output shown for the following
commands:
- Copy over and enable the repo mirror on the DGX-2 system.
- Switch to the directory to place the mirrored repo.
cd /home/<dgx-user>
- Secure-copy the mirrored archive from the low-side system.
scp <dgx-user>@<low-side-ip-address>:home/<dgx-user>/<mirror-archive-name>.tar .
- Extract the mirrored archive.
sudo tar xf <mirror-archive-name>.tar
- Copy the rhel-7-server-extras and nvidia-dgx-7
repos to the yum.repos.d.
sudo cp ./<my-mirror>/rhel-7-server-extras-rpms/redhat.repo /etc/yum.repos.d/redhat-mirror.repo
sudo cp ./<my-mirror>/nvidia-dgx-7/nvidia-dgx-7.repo /etc/yum.repos.d/
- Edit /etc/yum.repos.d/nvidia-dgx-7.repo.
Change the nvidia-dgx-7 repo
From:baseurl=https://international.download.nvidia.com/dgx/repos/rhel7/
To:baseurl=file:///home/<dgx-user>/<my-mirror>/nvidia-dgx-7
Change nvidia-dgx-7-updates repo
From:baseurl=https://international.download.nvidia.com/dgx/repos/rhel7-updates/
To:baseurl=file:///home/<dgx-user>/<my-mirror>/nvidia-dgx-7-updates
Change enabled=0 to enabled=1 - For each of the following repos ($reponame):
- rhel-7-server-extras-rpms
- rhel-7-server-optional-rpms
- rhel-7-server-rpms
- rhel-server-rhscl-7-rpms
Edit /etc/yum.repos.d/redhat-mirror.repo, find the $reponame section (listed in brackets), and change the text in that section:
From:baseurl=https://cdn.redhat.com/content/dist/rhel/server/7/...
To:baseurl=file:///home/<dgs-user>/<my-mirror>/$reponame
Set enabled = 1. - Copy the GPG key file to your system.
sudo cp <my-mirror>/nvidia-dgx-7/RPM-GPG-KEY-dgx-cosmos-support /etc/pki/rpm-gpg
- List the repositories and verify that all 11 repositories are enabled.
sudo yum repolist
The output should look like the following:Loaded plugins: product-id, search-disabled-repos, subscription-manager This system is not registered with an entitlement server. You can use subscription-manager to register. Repo rhel-7-server-extras-rpms forced skip_if_unavailable=True due to: /etc/pki/entitlement/9124846071548788754.pem Repo rhel-7-server-extras-rpms forced skip_if_unavailable=True due to: /etc/pki/entitlement/9124846071548788754-key.pem Repo rhel-7-server-rpms forced skip_if_unavailable=True due to: /etc/pki/entitlement/9124846071548788754.pem Repo rhel-7-server-rpms forced skip_if_unavailable=True due to: /etc/pki/entitlement/9124846071548788754-key.pem Repo rhel-7-server-optional-rpms forced skip_if_unavailable=True due to: /etc/pki/entitlement/9124846071548788754.pem Repo rhel-7-server-optional-rpms forced skip_if_unavailable=True due to: /etc/pki/entitlement/9124846071548788754-key.pem Repo rhel-server-rhscl-7-rpms forced skip_if_unavailable=True due to: /etc/pki/entitlement/3657713380925279193.pem Repo rhel-server-rhscl-7-rpms forced skip_if_unavailable=True due to: /etc/pki/entitlement/3657713380925279193-key.pem nvidia-dgx-7 | 3.6 kB 00:00 nvidia-dgx-7-updates | 2.9 kB 00:00 rhel-7-server-extras-rpms | 3.6 kB 00:00 rhel-7-server-optional-rpms | 3.6 kB 00:00 rhel-7-server-rpms | 3.6 kB 00:00 rhel-server-rhscl-7-rpms | 3.6 kB 00:00 (1/11): nvidia-dgx-7/group_gz | 644 B 00:00 (2/11): rhel-7-server-optional-rpms/group_gz | 6.4 kB 00:00 (3/11): nvidia-dgx-7/primary_db | 70 kB 00:00 (4/11): rhel-7-server-optional-rpms/primary_db | 2.1 MB 00:00 (5/11): rhel-7-server-rpms/group_gz | 150 kB 00:00 (6/11): nvidia-dgx-7-updates/primary_db | 56 kB 00:00 (7/11): rhel-7-server-rpms/primary_db | 4.4 MB 00:00 (8/11): rhel-7-server-extras-rpms/group_gz | 133 B 00:00 (9/11): rhel-7-server-extras-rpms/primary_db | 85 kB 00:00 (10/11): rhel-server-rhscl-7-rpms/group_gz | 133 B 00:00 (11/11): rhel-server-rhscl-7-rpms/primary_db | 3.0 MB 00:00 repo id repo name status nvidia-dgx-7 NVIDIA DGX EL7 146 nvidia-dgx-7-updates NVIDIA DGX EL7 Updates 101 rhel-7-server-extras-rpms Red Hat Enterprise Linux 7 Server - Extras (R 151 rhel-7-server-optional-rpms Red Hat Enterprise Linux 7 Server - Optional 5,190 rhel-7-server-rpms Red Hat Enterprise Linux 7 Server (RPMs) 5,457 rhel-server-rhscl-7-rpms Red Hat Software Collections RPMs for Red Hat 7,123 repolist: 18,168
- Switch to the directory to place the mirrored repo.
- Continue following the installation steps beginning with Installing Required Components.
A.5. Renaming RAID Volumes
A.6. Installing Docker Containers
- Enter the docker pull command, specifying the image registry, image repository, and
tag.
docker pull nvcr.io/nvidia/repository:tag
- Verify the image is on your system using docker images.
docker images
- Save the Docker image as an archive.
docker save nvcr.io/nvidia/repository:tag > framework.tar
- Transfer the image to the air-gapped system using removable media such as a USB flash drive.
- Load the NVIDIA Docker image.
docker load -i framework.tar
- Verify the image is on your system.
docker images