Using the Baseboard Management Controller (BMC)#
The NVIDIA DGX™ H100/H200 system comes with a baseboard management controller (BMC) for monitoring and controlling various hardware devices on the system. It monitors system sensors and other parameters.
Connecting to the BMC#
Here are the steps to connect to the BMC on a DGX H100/H200 system.
Before you begin, ensure that you connected the BMC network interface controller port on the DGX system to your LAN.
Open a browser within your LAN and enter the IP address of the BMC in the location.
The BMC is supported on the following browsers:
Internet Explorer 11 and later
Firefox 29.0 (64-bit) and later
Google Chrome 7.0.3396.87 (64-bit) and later
Log in.
The BMC dashboard opens.

Overview of BMC Controls#
The left-side navigation menu bar on the BMC main page contains the primary controls.
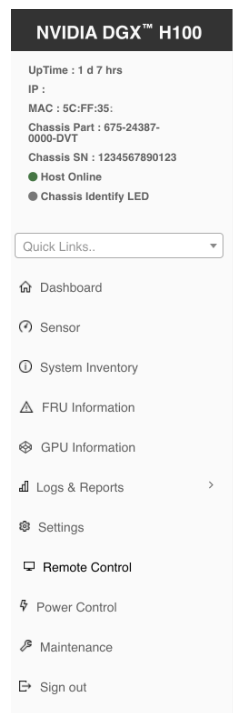
Control |
Description |
|---|---|
Quick Links |
Provides quick access to several tasks. |
Dashboard |
Displays the overall information about the status of the device. |
Sensor |
Provides status and readings for system sensors, such as SSD, PSUs, voltages, CPU temperatures, DIMM temperatures, and fan speeds. |
System Inventory |
Displays inventory information of system modules. |
FRU Information |
System, Processor, Memory Controller, BaseBoard, Power, Thermal, PCIE Device, PCIE Function, and Storage. |
GPU Information |
Provides basic information on all the GPUs in the systems, including GUID, VBIOS version, InfoROM version, and number of retired pages for each GPU. |
Logs and Reports |
View, and if applicable, download and erase, the IPMI event log, and System, Audit, Video, and POST Code logs. |
Settings |
Configure the following settings: Captured BSOD, External User Services, KVM Mouse Setting, Log Settings, Media Redirection Settings, Network Settings, PAM Order Settings, Platform Event Filter, Services, SMTP Settings, SSL Settings, System Firewall, User Management, and Video Recording |
Remote Control |
Opens the KVM Launch page to remotely access the DGX H100/H200 console. |
Power Control |
Perform the following power actions: Power On, Power Off, Power Cycle, Hard Reset, and ACP/Shutdown |
Chassis ID LED Control |
“Virtual LED” is a button to toggle the UID LED on/off:
|
Maintenance |
Perform the following maintenance tasks: Backup Configuration, Firmware Image Location, Firmware Update, Preserve Configuration, Restore Configuration, Restore Factory Defaults, and System Administrator |
Sign out |
Sign out of the BMC web UI. |
Open Ports#
Ensure that the ports listed in the following table are open and available on your firewall to the DGX H100/H200 System.
Port |
Protocol |
Function |
|---|---|---|
443 |
HTTPS |
Web User Interface |
80 |
HTTPS |
Redfish service root |
443 |
Redfish |
Redfish https with auth |
623 |
RMCP+ |
IPMI |
7582 |
KVM |
Secure (SSL) KVM redirection |
1900 |
UPNP |
UPNP discovery |
50000 |
UPNP |
UPNP discovery |
427 |
SLPD |
Service Locater |
123 |
NTP |
Network Time Protocol |
161 |
SNMP |
SNMP incoming UDP requests |
199 |
SNMP |
SNMP incoming SMUX PDUs |
546 |
DHCPv6 |
DHCPv6 messages |
5124 |
CD Media redirection |
CD media redirection secure (SSL) connections |
Configuring a Static IP Address for the BMC#
This section explains how to set a static IP address for the BMC. You will need to do this if your network does not support DHCP.
Use one of the methods described in the following sections:
Configuring a BMC Static Address by Using ipmitool#
This section describes how to set a static IP address for the BMC from the Ubuntu command line.
Note
If you cannot access the DGX H100/H200 system remotely, connect a display (1440x900 or lower resolution) and keyboard directly to the DGX H100/H200 system.
To view the current settings, enter the following command.
$ sudo ipmitool lan print 1
Set the IP address source to static.
$ sudo ipmitool lan set 1 ipsrc static
Set the appropriate address information.
To set the IP address (
Station IP addressin the BIOS settings), enter the following and replace the italicized text with your information.$ sudo ipmitool lan set 1 ipaddr <my-ip-address>
To set the subnet mask, enter the following and replace the italicized text with your information.
$ sudo ipmitool lan set 1 netmask <my-netmask-address>
To set the default gateway IP (
Router IP addressin the BIOS settings), enter the following and replace the italicized text with your information.$ sudo ipmitool lan set 1 defgw ipaddr <my-default-gateway-ip-address>
Configuring a BMC Static IP Address by Using the System BIOS#
This section describes how to set a static IP address for the BMC when you cannot access the DGX H100/H200 System remotely, and this process involves setting the BMC IP address during system boot.
Connect a keyboard and display (1440 x 900 maximum resolution) to the DGX H100/H200 System and turn on the DGX H100/H200 System.
When you see the SBIOS version screen, press Del or F2 to enter the BIOS Setup Utility screen.
On the BIOS Setup Utility screen, navigate to the Server Mgmt tab on the top menu. Scroll to BMC network configuration and press Enter.
Scroll to Configuration Address Source and press Enter. On the Configuration Address Source dialog, select Static and then press Enter.
Set the addresses for the Station IP address, Subnet mask, and Router IP address as needed by performing the following steps for each:
Scroll to the specific item and press Enter.
Enter the appropriate information at the dialog, and then press Enter.
When you finish making all your changes, press F10 to save and exit.
Changing the BMC Login Credentials#
User Name and Password Requirements#
Refer to the following requirements for the user name:
a string of 1 to 16 alphanumeric characters
must start with an alphabetical character
case-sensitive
special characters
-(hyphen),_(underscore), and@(at sign) are allowed
Refer to the following requirements for the password:
a string up to 20 characters
case-sensitive
special characters that must be preceded by a
\(backslash) character:!"&'();<>`|}~\special characters that do not require any special consideration:
#$%*+,-./:=?@[]^_{
Procedure#
To change your credentials or add or remove users, perform the following steps:
Select Settings from the left-side navigation menu.
Select the User Management card.
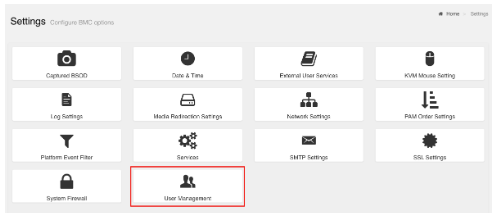
Click the help icon (?) for information about configuring users and creating a password.
Log out and then log in with the new credentials.
Using the Remote Console#
To use the remote console, perform the following steps:
Click Remote Control from the left-side navigation menu.
Click Launch KVM to start the remote KVM and access the DGX system console.
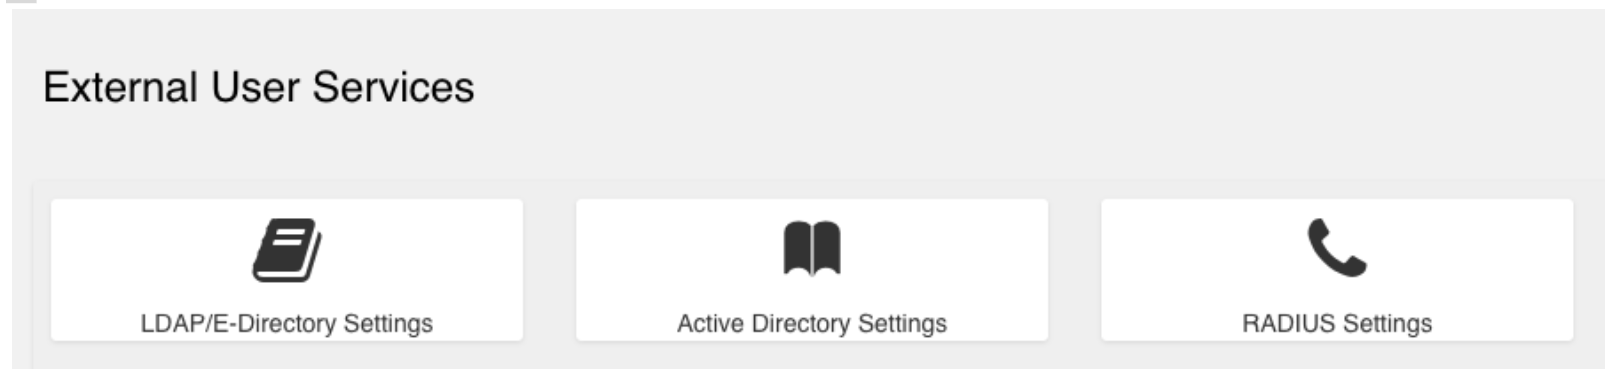
Setting Up Active Directory, LDAP, or E-Directory#
To set up Active Directory, LDAP, or E-Directory, perform the following steps:
From the side navigation menu, click Settings > External User Services.

Click Active Directory Settings or LDAP/E-Directory Settings and follow the instructions.
Configuring Platform Event Filters#
From the side navigation menu, click Settings and then click Platform Event Filters.
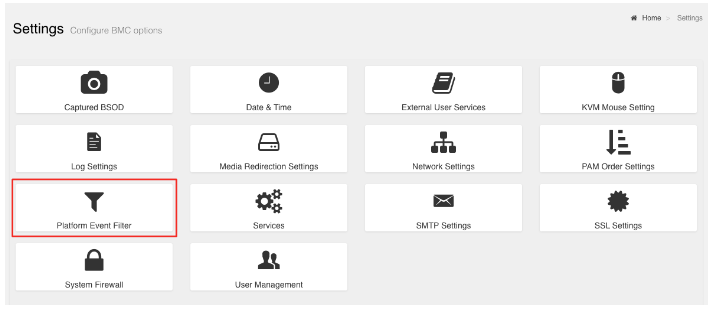
The Event Filters page shows all configured event filters and available slots. You can modify or add new event filter entry on this page.
To view available configured and unconfigured slots, click All in the upper-left corner of the page.
To view available configured slots, click Configured in the upper-left corner of the page.
To view available unconfigured slots, click UnConfigured in the upper-left corner of the page.
To delete an event filter from the list, click the x icon.
Uploading or Generating SSL Certificates#
You can set up a new certificate by generating a (self-signed) SSL or by uploading an SSL (for example, to use a Trusted CA-signed certificate).
From the side navigation menu, click Settings > SSL Settings.
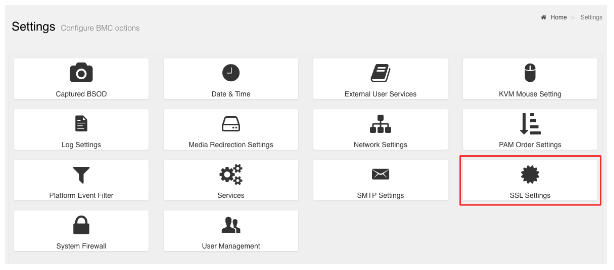
Refer to the following sections for more information.
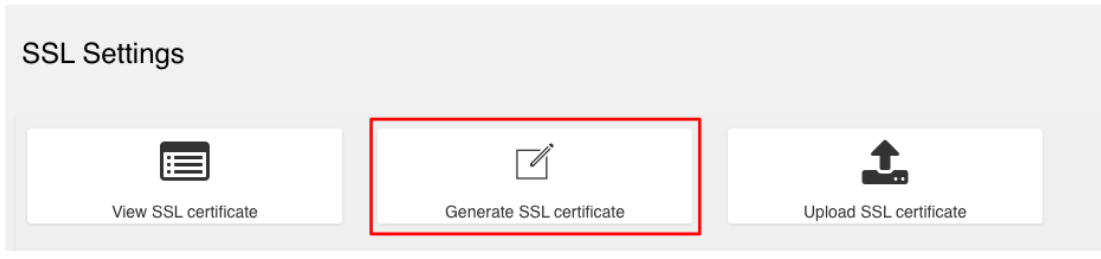
Viewing the SSL Certificate#
To view the SSL certificate, on the SSL Setting page, click View SSL Certificate.
The View SSL Certificate page displays the following basic information about the uploaded SSL certificate:
Certificate Version, Serial Number, Algorithm, and Public Key
Issuer information
Valid Date range
Issued to information
Generating the SSL Certificate#
Here is some information about generating an SSL certificate.
From the SSL Setting page, click Generate SSL Certificate.
Enter the information as described in the following table.
Table 9. SSL Certificate# Items
Description and Requirements
Common Name (CN)
The common name for which the certificate is to be generated.
Maximum length of 64 alphanumeric characters.
Special characters ‘#’ and ‘$’ are not allowed.
Organization (O)
The name of the organization for which the certificate is generated.
Maximum length of 64 alphanumeric characters.
Special characters ‘#’ and ‘$’ are not allowed.
Organization Unit (OU)
Overall organization section unit name for which the certificate is generated.
Maximum length of 64 alphanumeric characters.
Special characters ‘#’ and ‘$’ are not allowed.
City or Locality (L)
City or Locality of the organization (mandatory)
Maximum length of 64 alphanumeric characters.
Special characters ‘#’ and ‘$’ are not allowed.
State or Province (ST)
State or Province of the organization (mandatory)
Maximum length of 64 alphanumeric characters.
Special characters ‘#’ and ‘$’ are not allowed.
Country (C)
Country code of the organization.
Only two characters are allowed.
Special characters are not allowed.
Email Address
Email address of the organization (mandatory)
Valid for
Enter a range from 1 to 3650 (days)
Key Length
Enter
4096.To generate the new certificate, click Save.
Uploading the SSL Certificate#
In BMC, you can upload your SSL certificate.
Make sure the certificate and key meet the following requirements:
SSL certificates and keys must both use the
.pemfile extension.Private keys must not be encrypted.
SSL certificates and keys must each be less than
3584bits in size.SSL certificates must be current (not expired).
On the SSL Setting page, click Upload SSL Certificate.

Click the New Certificate folder icon, browse to locate the appropriate file, and select it.
Click the New Private Key folder icon, browse and locate the appropriate file, and select it.
Click Save.
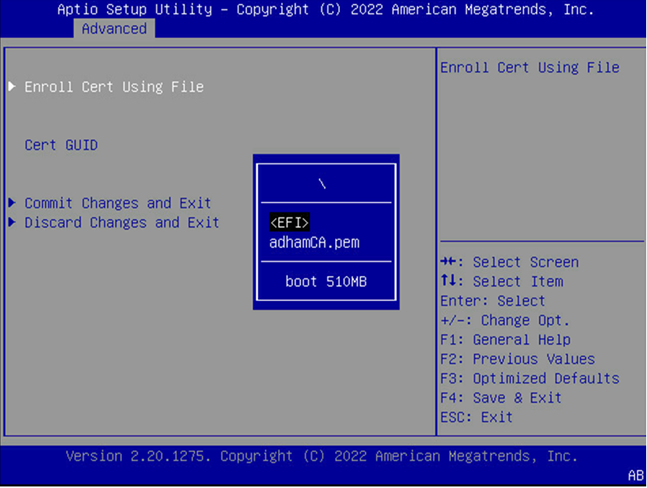
Updating the SBIOS Certificate#
The CA Certificate for the trusted CA that was used to sign the SSL certificate must be uploaded to allow the SBIOS to authenticate the certificate.
Obtain the CA certificate from the signing authority that was used to sign the SSL certificate.
Copy the CA certificate onto a USB thumb drive or to
/boot/efion the operating system.Access a console from a locally connected keyboard and mouse or through the BMC remote console.
Reboot the server.
To enter BIOS setup menu, when prompted, press DEL.
Note
you may need to be logged in with admin privileges.
In the BIOS setup menu on the Advanced tab, select Tls Auth Config.

Select Server CA Configuration.

Select Enroll Cert.
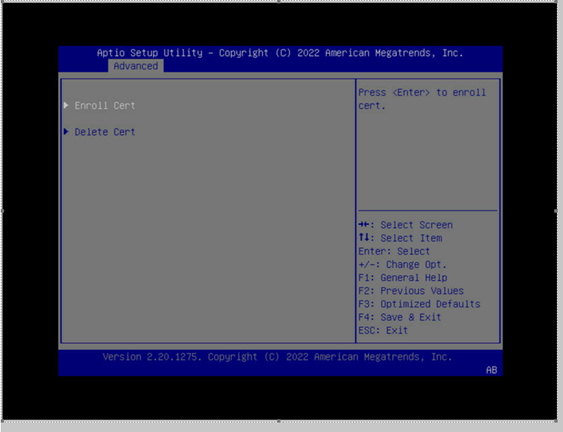
Select Enroll Cert Using File.
Select the device where you stored the certificate.
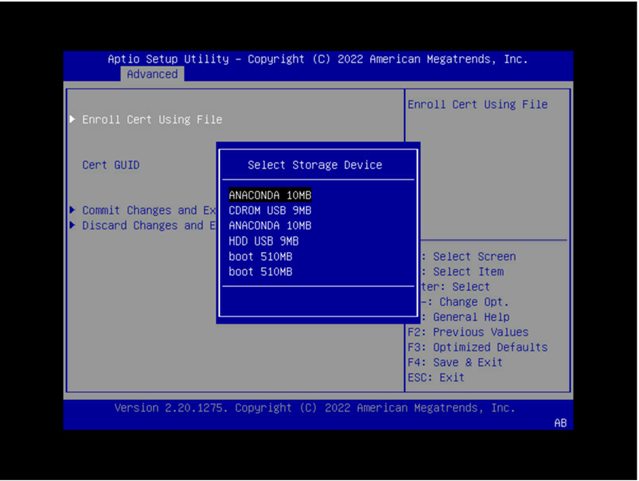
Navigate the file structure and select the certificate.