Redfish APIs Support#
The DGX System firmware supports Redfish APIs. Redfish is DMTF’s standard set of APIs for managing and monitoring a platform. By default, Redfish support is enabled in the DGX H100/H200 BMC and the SBIOS. By using the Redfish interface, administrator-privileged users can browse physical resources at the chassis and system level through the REST API interface. Redfish provides information that is categorized under a specific resource endpoint and Redfish clients can use the end points by using following HTTP methods:
GETPOSTPATCHPUTDELETE
Not all endpoints support all these operations. Refer to the Redfish JSON Schema for more information about the operations. The Redfish server follows the DSP0266 1.7.0 Specification and Redfish Schema 2019.1 documentation. Redfish URIs are accessed by using basic authentication and implementation, so that IPMI users with required privilege can access the Redfish URIs.
Supported Redfish Features#
Here is some information about the Redfish features that are supported in DGX H100/H200.
The following features are supported:
Manage user accounts, privileges, and roles
Manager sessions
BMC configuration
SBIOS configuration
SBIOS boot order management
Changing the UEFI Secure Boot Platform Key
Get PCIe device and functions inventory
Get storage Inventory
Get system component information and health (PSU, FAN, CPU, DIMM, and so on)
Get sensor information (Thermal/Power/Cooling)
BMC configuration change, backup, and restore, and BMC reset
System/Chassis power operations
Get health event log/advanced system event log
Logging Service, which provides critical/informational severity events
Event Services (SSE)
Querying GPU power limit
Power capping
Refer to the following documentation for more information:
Redfish Schema 2019.1 announcement from DMTF
Connectivity Between the Host and BMC#
You can configure internal network connectivity between the host and the BMC rather than using external network connectivity and routing traffic outside the host.
To configure internal network connectivity, you must configure an interface on the 169.254.0.0/255.255.0.0 network.
The interface can then send and receive Redfish API traffic between the host and the BMC.
The BMC is preconfigured to use the 169.254.0.17 IP address.
Run an ifconfig command like the following example to configure connectivity:
sudo ifconfig enx9638a3b292ec 169.254.0.18 netmask 255.255.0.0
Replace the network interface name and IP address in the preceding example according to your needs.
After you configure the network interface, you can use commands such as curl and nvfwupd
with the 169.254.0.17 IP address to connect to the BMC and use the Redfish API.
The following example command shows the firmware versions:
nvfwupd -t ip=169.254.0.17 username=<bmc-user> password=<password> show_version
Redfish Examples#
BMC Manager#
Accounts
You should set the password after the first boot. The following
curlcommand changes the password for the admin user.curl -k -u <bmc-user>:<password> --request PATCH 'https://<bmc-ip-address>/redfish/v1/AccountService/Accounts/2' --header 'If-Match: *' --header 'Content-Type: application/json' --data-raw '{ "Password" : "<password>" }'
The
passwordfield is mandatory and must meet the following requirements:At least 13 characters long but no more than 20 characters.
At least 1 lowercase letter (
a-z).At least 1 uppercase letter (
A-Z).At least 1 digit (
0-9).At least 1 special character (
!"#$%&'()*+,-./:;<=>?@[\]^_`{|}~).White space is not allowed.
Reset BMC
The following
curlcommand forces a reset of the DGX H100/H200 BMC.curl -k -u <bmc-user>:<password> --request POST --location 'https://<bmc-ip-address>/redfish/v1/Managers/BMC/Actions/Manager.Reset' --header 'Content-Type: application/json' --data '{"ResetType": "ForceRestart"}'
Reset BMC to factory defaults
The following
curlcommand resets the BMC to factory defaults.curl -k -u <bmc-user>:<password> --request POST --location 'https://<bmc-ip-address>/redfish/v1/Managers/BMC/Actions/Manager.ResetToDefaults' --header 'Content-Type: application/json' --data '{"ResetType":"ResetAll"}'
Firmware Update#
Firmware inventory
curl -k -u <bmc-user>:<password> --request GET 'https://<bmc-ip-address>/redfish/v1/UpdateService/FirmwareInventory'
Example Output
{
    "@odata.context": "/redfish/v1/$metadata#SoftwareInventoryCollection.SoftwareInventoryCollection",
    "@odata.etag": "\"1683226281\"",
    "@odata.id": "/redfish/v1/UpdateService/FirmwareInventory",
    "@odata.type": "#SoftwareInventoryCollection.SoftwareInventoryCollection",
    "Description": "Collection of Firmware Inventory resources available to the UpdateService",
    "Members": [
        {
            "@odata.id": "/redfish/v1/UpdateService/FirmwareInventory/CPLDMB_0"
        },
        {
            "@odata.id": "/redfish/v1/UpdateService/FirmwareInventory/CPLDMID_0"
        },
        // ...
    ],
    "Members@odata.count": 66,
    "Name": "Firmware Inventory Collection",
    "Oem": {
        "Ami": {
            "FirmwareInventory": [
                {
                    "DataSourceUri": "/redfish/v1/UpdateService/FirmwareInventory/CPLDMB_0",
                    "Name": "CPLDMB_0",
                    "Version": "0.2.1.6"
                },
                {
                    "DataSourceUri": "/redfish/v1/UpdateService/FirmwareInventory/CPLDMID_0",
                    "Name": "CPLDMID_0",
                    "Version": "0.2.0.7"
                },
                // ...
            ]
        }
    }
}
Update GPU tray components
To update the GPU tray components in your DGX H100/H200 system, you need to specify
HGX_0as the target regardless of the GPU tray component that you want to update.echo "{\"Targets\":[\"/redfish/v1/UpdateService/FirmwareInventory/HGX_0\"]}" > parameters.json curl -k -u <bmc-user>:<password> -H 'Expect:' --location --request POST https://<bmc-ip-address>/redfish/v1/UpdateService/upload -F 'UpdateParameters=@parameters.json;type=application/json' -F UpdateFile=@<fw_bundle>
Make sure to specify the
nvfw_HGX_DGXH100-H200x8_xxxxxx.x.x.fwpkgfirmware file.Update motherboard tray components
To update the motherboard tray components, you need to specify the component name as a target in a JSON file. The following example updates the host BMC:
echo "{\"Targets\":[\"/redfish/v1/UpdateService/FirmwareInventory/HostBMC_0\"]}" > parameters.json
curl -k -u <bmc-user>:<password> -H 'Expect:' --location --request POST https://<bmc-ip-address>/redfish/v1/UpdateService/upload -F 'UpdateParameters=@parameters.json;type=application/json' -F UpdateFile=@<fw_bundle>
The following targets are available:
HostBMC_0— This is the DGX H100/H200 BMC.HostBIOS_0— This is the DGX H100/H200 BIOS.EROT_BMC_0— This is the external root of trust for the host BMC.EROT_BIOS_0— This is the external root of trust for the host BIOS.CPLDMID_0— This is the midplane CPLD.CPLDMB_0— This is the CPU tray CPLD.PSU_0toPSU_5— These are the PSUs.PCIeSwitch_0andPCIeSwitch_1— These are the Gen5 PCIe switches on the CPU tray.PCIeRetimer_0andPCIeRetimer_1— These are the PCIe retimers on the CPU tray.
To update a target, change the path
/redfish/v1/UpdateService/FirmwareInventory/HostBMC_0in the preceding example. For example, for CPU tray CPLD, specify/redfish/v1/UpdateService/FirmwareInventory/CPLDMB_0.Make sure to specify the
nvfw_DGX_xxxxxx.x.x.fwpkgfirmware file.Forced Update
The DGX H100/H200 system component firmware is only updated if the incoming firmware version is newer than the existing version. To override this behavior and flash the component anyway, specify the
ForceUpdatefield and set it totrue.curl -k -u <bmc-user>:<password> --request PATCH 'https://<bmc-ip-address>/redfish/v1/UpdateService' --header 'If-Match: *' --header 'Content-Type: application/json' --data-raw '{"HttpPushUriOptions" : {"ForceUpdate": true}}'
On success, the command returns a
204HTTP status code. If you attempt to set the flag to the currently set value, the command returns a400HTTP status code.To get the value of the
ForceUpdateparameter:curl -k -u <bmc-user>:<password> --request GET 'https://<bmc-ip-address>/redfish/v1/UpdateService'
Firmware Update Activation
To activate the firmware update, refer to Firmware Update Activation in the NVIDIA DGX H100/H200 Firmware Update Guide for more information.
Background Copy
After the firmware image is successfully booted, use the background copy API to synchronize firmware images between partitions.
curl -k -u <bmc-user>:<password> --request POST --location 'https://<bmc-ip-address>/redfish/v1/UpdateService/Actions/Oem/NvidiaUpdateService.CommitImage' \
     --header 'Content-Type: application/json' \
     --data '{
              "Targets": ["/redfish/v1/UpdateService/FirmwareInventory/HostBIOS_0"]
             }'
BIOS Settings#
Supported BIOS attributes
Get a list of all the attributes that your BIOS supports:
curl -k -u <bmc-user>:<password> --location --request GET 'https://<bmc-ip-address>/redfish/v1/Registries'
One of the Registries in the list is your BIOS attribute registry. The format is
BiosAttributeRegistry<version><version>. For example, for BIOS 0.1.6, the registry isBiosAttributeRegistry106.1.0.6.Get the URI of the BIOS registry:
curl -k -u <bmc-user>:<password> --location --request GET 'https://<bmc-ip-address>/redfish/v1/Registries/BiosAttributeRegistry016.0.1.6/'
The response includes the location of the JSON file that describes all the BIOS attributes. Under
Location, theUriis specified. For example,Uri":"/redfish/v1/Registries/BiosAttributeRegistry106.1.0.6.Get the JSON file with the registry of all your BIOS attributes:
curl -k -u <bmc-user>:<password> --location --request GET 'https://<bmc-ip-address>/redfish/v1/Registries/BiosAttributeRegistry106.en-US.1.0.6.json' --output BiosAttributeRegistry106.en-US.1.0.6.json
Each attribute name has a default value, display name, help text, a read-only indicator, and an indicator of whether a reset is required to take effect.
To get the current BIOS settings:
curl -k -u <bmc-user>:<password> --location --request GET 'https://<bmc-ip-address>/redfish/v1/Systems/DGX/Bios'
Match the attribute name with the value in the registry for a description.
Example response:
"Description": "Current BIOS Settings",
"Id": "Bios",
"Name": "Current BIOS Settings"
...
To change an attribute in the future BIOS settings, PATCH the SD URI and specify the attribute name with the new value. You can change more than one attribute at a time.
For example, the following PATCH request specifies how the system responds when the SEL log is full:
curl -k -u <bmc-user>:<password> --location --request PATCH 'https://<bmc-ip-address>/redfish/v1/Systems/DGX/Bios/SD' -H 'Content-Type: application/json' -H 'If-Match:*' --data-raw '{"Attributes" : {"IPMI002":"IPMI002DoNothing", "IPMI201":"IPMI201Donotloganymore"}}'
Example response:
"Description": "Future BIOS Settings",
"Id": "SD",
"Name": "Future BIOS Settings"
...
Note
All attribute changes to the BIOS require a power cycle to take effect. When changing the attributes is followed by a BIOS update, an additional power cycle is needed to apply the changes.
Modifying the Boot Order on DGX H100/H200 Using Redfish#
To modify the boot order on DGX H100/H200 using Redfish APIs, follow the steps described in this procedure.
Read the current boot order.
From any system in the same network as the BMC, run the following
curlcommand to get the current boot order:$ curl -k -u <BMC username>:<BMC password> https://<BMC_IP_address>/redfish/v1/Systems/DGX/SD -H "content-type:application/json" -X GET -s | jq .Boot.BootOrder
[
  "Boot0000",
  "Boot000F",
  "Boot0004",
  "Boot0005",
  "Boot0006",
  "Boot0007",
  "Boot0008",
  "Boot0009",
  "Boot000A",
  "Boot0010"
 ]
Identify the available boot devices.
To show more information about the boot devices in step 1, such as
Boot0000,Boot000F, andBoot0004, run the following command:$ curl -k -u <BMC username>:<BMC password> https://<BMC_IP_address>/redfish/v1/Systems/DGX/BootOptions/00{0,1}{0,4,5,6,7,8,9,A,F} -H "content-type:application/json" -X GET -s | jq |grep -e "UefiDevicePath\|Name"
"@odata.etag": "\"1696896625\"",
"DisplayName": "DGX OS",
"Name": "Boot0000",
"UefiDevicePath": "HD(1,GPT,159C2E52-2329-40AC-9103-6C28DC1528B8,0x800,0x100000)/\\EFI\\UBUNTU\\SHIMX64.EFI"
"@odata.etag": "\"1696896625\"",
"DisplayName": "UEFI: PXE IPv4 Intel(R) Ethernet Controller X550",
"Name": "Boot0004",
"UefiDevicePath": "PciRoot(0x0)/Pci(0x10,0x0)/Pci(0x0,0x0)/MAC(5CFF35FBDA09,0x1)/IPv4(0.0.0.0,0x0,DHCP,0.0.0.0,0.0.0.0,0.0.0.0)"
"@odata.etag": "\"1696896625\"",
"DisplayName": "UEFI: PXE IPv4 Nvidia Network Adapter - B8:3F:D2:E7:B1:6C",
"Name": "Boot0005",
"UefiDevicePath": "PciRoot(0x20)/Pci(0x1,0x0)/Pci(0x0,0x0)/Pci(0x0,0x0)/Pci(0x0,0x0)/Pci(0x0,0x0)/Pci(0x0,0x0)/MAC(B83FD2E7B16C,0x1)/IPv4(0.0.0.0,0x0,DHCP,0.0.0.0,0.0.0.0,0.0.0.0)"
"@odata.etag": "\"1696896625\"",
"DisplayName": "UEFI: PXE IPv4 Nvidia Network Adapter - B8:3F:D2:E7:B1:6D",
"Name": "Boot0006",
"UefiDevicePath": "PciRoot(0x20)/Pci(0x1,0x0)/Pci(0x0,0x0)/Pci(0x0,0x0)/Pci(0x0,0x0)/Pci(0x0,0x0)/Pci(0x0,0x1)/MAC(B83FD2E7B16D,0x1)/IPv4(0.0.0.0,0x0,DHCP,0.0.0.0,0.0.0.0,0.0.0.0)"
"@odata.etag": "\"1696896625\"",
"DisplayName": "UEFI: PXE IPv4 Nvidia Network Adapter - B8:3F:D2:E7:B0:9C",
"Name": "Boot0007",
"UefiDevicePath": "PciRoot(0x120)/Pci(0x1,0x0)/Pci(0x0,0x0)/Pci(0x0,0x0)/Pci(0x0,0x0)/Pci(0x0,0x0)/Pci(0x0,0x0)/MAC(B83FD2E7B09C,0x1)/IPv4(0.0.0.0,0x0,DHCP,0.0.0.0,0.0.0.0,0.0.0.0)"
"@odata.etag": "\"1696896625\"",
"DisplayName": "UEFI: PXE IPv4 Nvidia Network Adapter - B8:3F:D2:E7:B0:9D",
"Name": "Boot0008",
"UefiDevicePath": "PciRoot(0x120)/Pci(0x1,0x0)/Pci(0x0,0x0)/Pci(0x0,0x0)/Pci(0x0,0x0)/Pci(0x0,0x0)/Pci(0x0,0x1)/MAC(B83FD2E7B09D,0x1)/IPv4(0.0.0.0,0x0,DHCP,0.0.0.0,0.0.0.0,0.0.0.0)"
"@odata.etag": "\"1696896625\"",
"DisplayName": "UEFI: PXE IPv4 Intel(R) Ethernet Network Adapter E810-C-Q2",
"Name": "Boot0009",
"UefiDevicePath": "PciRoot(0x160)/Pci(0x5,0x0)/Pci(0x0,0x0)/MAC(6CFE543D8F48,0x1)/IPv4(0.0.0.0,0x0,DHCP,0.0.0.0,0.0.0.0,0.0.0.0)"
"@odata.etag": "\"1696896625\"",
"DisplayName": "UEFI: PXE IPv4 Intel(R) Ethernet Network Adapter E810-C-Q2",
"Name": "Boot000A",
"UefiDevicePath": "PciRoot(0x160)/Pci(0x5,0x0)/Pci(0x0,0x1)/MAC(6CFE543D8F49,0x1)/IPv4(0.0.0.0,0x0,DHCP,0.0.0.0,0.0.0.0,0.0.0.0)"
"@odata.etag": "\"1696896625\"",
"DisplayName": "ubuntu",
"Name": "Boot000F",
"UefiDevicePath": "HD(1,GPT,1E0EFF2A-2BF3-4DC6-8757-4075B1E5343D,0x800,0x100000)/\\EFI\\UBUNTU\\SHIMX64.EFI"
"@odata.etag": "\"1696896625\"",
"DisplayName": "UEFI: PXE IPv4 American Megatrends Inc.",
"Name": "Boot0010",
"UefiDevicePath": "PciRoot(0x0)/Pci(0x14,0x0)/USB(0xA,0x0)/USB(0x2,0x1)/MAC(4E2A712C2451,0x0)/IPv4(0.0.0.0,0x0,DHCP,0.0.0.0,0.0.0.0,0.0.0.0)"
Where
The
DisplayNamestring is the name of the drive or network adapter.The
Namestring is the boot device name.The
MAC(<address>,0x1)value for theUefiDevicePathstring is the corresponding MAC address.The
@odata.etagstring is theetagnumber.
Identify the following information from the JSON output for the next step:
The name of the device to be the boot device.
The
etagnumber to compose the header.
Update the boot order.
The following command uses the
PATCHmethod to modify theBootOrdersettings, specifying theetagnumber and boot device names from step 2. The command generates a new order list forBootOrder, which affects the next boot of the system.$ curl -k -u <BMC username>:<BMC password> https://<BMC_IP_address>/redfish/v1/Systems/DGX/SD -H "content-type:application/json" -H 'if-None-Match: "@odata.etag": "1697483651"' --data '{"Boot":{"BootOrder": ["Boot0004", "Boot0000", "Boot0005", "Boot0006", "Boot0007", "Boot0008", "Boot0009", "Boot000A", "Boot000F", "Boot0010"]}}' -X PATCH
Confirm the boot order.
Repeat the command in step 1 to ensure the
BootOrdersettings are as expected. Note that theBoot0004boot device is now at the top and the system will boot from the on-board RJ-45 network interface.$ curl -k -u <BMC username>:<BMC password> https://<BMC_IP_address>/redfish/v1/Systems/DGX/SD -H "content-type:application/json" -X GET -s | jq .Boot.BootOrder
[
  "Boot0004",
  "Boot0000",
  "Boot0005",
  "Boot0006",
  "Boot0007",
  "Boot0008",
  "Boot0009",
  "Boot000A",
  "Boot000F",
  "Boot0010"
]
Upon reboot, the system should attempt to boot from the network using the correct network interface:
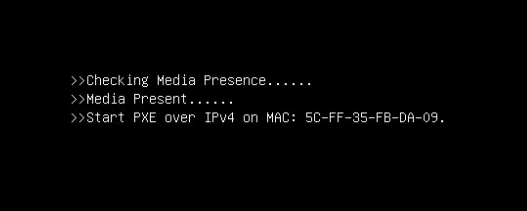
This boot order change will remain until the next boot order update, which can be done by resetting the SBIOS or running this procedure again.
Changing the UEFI Secure Boot Platform Key#
You can change the UEFI Secure Boot Platform Key (PK) in the following two ways:
Enroll a new key that is signed by the current PK.
Enroll any new key when the system is in Secure Boot Setup Mode, as described in this procedure.
This mode is entered when no Secure Boot PK is enrolled. Before enrolling any arbitrary key as the new PK, delete the current PK first. After enrolling the new PK, the Secure Boot state will automatically be updated from Setup Mode to User Mode.
Set the
SecureBootEnableaction tofalseusing thePATCHmethod.curl -ks -u <bmc-user>:<password> -H "Content-Type: application/json" -X PATCH https://<bmc-ip-address>/redfish/v1/Systems/DGX/SecureBoot --header 'If-Match: "1721382290"' -d '{"SecureBootEnable":false}' | jq
Remove the current PK using the
DELETEmethod.curl -ks -u <bmc-user>:<password> -H "Content-Type: application/json" -X DELETE https://<bmc-ip-address>/redfish/v1/Systems/DGX/SecureBoot/SecureBootDatabases/PK/Certificates/1 | jq
Add the new PK using the
POSTmethod.curl -ks -u <bmc-user>:<password> -H "Content-Type: application/json" -X POST https://<bmc-ip-address>/redfish/v1/Systems/DGX/SecureBoot/SecureBootDatabases/PK/Certificates -d '{ "CertificateString": "-----BEGIN CERTIFICATE-----\n ... \n-----END CERTIFICATE-----", "CertificateType": "PEM", "UefiSignatureOwner": "<GUID-of-the-UEFI-signature-owner>" }'
Where
The
CertificateStringstring is the certificate starting with-----BEGIN CERTIFICATE.The
CertificateTypestring is the format of the certificate, a Privacy Enhanced Mail (PEM)-encoded single certificate.The
UefiSignatureOwnerstring (UUID) is the UEFI signature owner for this signature.
Reboot the system for the change to take effect.
curl -ks -u <bmc-user>:<password> -H "Content-Type: application/json" -X POST https://<bmc-ip-address>/redfish/v1/Systems/DGX/Actions/ComputerSystem.Reset -d '{ "ResetType": "ForceRestart"}' | jq
Wait for the OS to boot.
After the system starts, check the PK credentials whether the new certificate is listed.
curl -ks -u <bmc-user>:<password> https://<bmc-ip-address>/redfish/v1/Systems/DGX/SecureBoot/SecureBootDatabases/PK/Certificates/2 | jq
Telemetry#
GPU tray sensors
curl -k -u <bmc-user>:<password> --location --request GET 'https://<bmc-ip-address>/redfish/v1/TelemetryService/MetricReportDefinitions/HGX_PlatformEnvironmentMetrics_0'
DGX platform sensors
curl -k -u <bmc-user>:<password> --location --request GET 'https://<bmc-ip-address>/redfish/v1/Chassis/DGX/Sensors'
The endpoint returns
75members at a time. To page through the results, use the URI in theMembers@odata.nextLinkfield. For example,/redfish/v1/Chassis/DGX/Sensors?$skip=75.
Chassis#
Chassis Restart (IPMI chassis power cycle)
curl -k -u <bmc-user>:<password> --request POST --location 'https://<bmc-ip-address>/redfish/v1/Systems/DGX/Actions/ComputerSystem.Reset' --header 'Content-Type: application/json' --data '{"ResetType": "ForceRestart"}'
Chassis Start (IPMI chassis power on)
curl -k -u <bmc-user>:<password> --request POST --location 'https://<bmc-ip-address>/redfish/v1/Systems/DGX/Actions/ComputerSystem.Reset' --header 'Content-Type: application/json' --data '{"ResetType": "On"}'
Chassis Graceful Restart (IPMI chassis soft off, IPMI chassis power on)
curl -k -u <bmc-user>:<password> --request POST --location 'https://<bmc-ip-address>/redfish/v1/Systems/DGX/Actions/ComputerSystem.Reset' --header 'Content-Type: application/json' --data '{"ResetType": "GracefulRestart"}'
Chassis Off (IPMI chassis power off)
curl -k -u <bmc-user>:<password> --request POST --location 'https://<bmc-ip-address>/redfish/v1/Systems/DGX/Actions/ComputerSystem.Reset' --header 'Content-Type: application/json' --data '{"ResetType": "ForceOff"}'
Chassis Off Gracefully (IPMI chassis soft off)
curl -k -u <bmc-user>:<password> --request POST --location 'https://<bmc-ip-address>/redfish/v1/Systems/DGX/Actions/ComputerSystem.Reset' --header 'Content-Type: application/json' --data '{"ResetType": "GracefulShutdown"}'
Chassis Power Cycle (IPMI chassis power off, IPMI chassis power on)
curl -k -u <bmc-user>:<password> --request POST --location 'https://<bmc-ip-address>/redfish/v1/Systems/DGX/Actions/ComputerSystem.Reset' --header 'Content-Type: application/json' --data '{"ResetType": "PowerCycle"}'
Note
The ForceRestart, GracefulRestart, and GracefulShutdown reset actions on HMC are not
supported for security reasons.
SEL Logs#
To view all the SEL entries using redfish:
curl -k -u <bmc-user>:<password> --location --request GET 'https://<bmc-ip-address>/redfish/v1/Managers/BMC/LogServices/SEL/Entries'
The endpoint returns 75 members at a time.
To page through the results, use the URI in the Members@odata.nextLink field.
For example, /redfish/v1/Managers/BMC/LogServices/SEL/Entries?$skip=75.
Virtual Image#
Enable remote virtual media and verify it is active.
curl -s -k -u <bmc-user>:<password> -H content-type:application/json -X POST https://<bmc-ip-address>/redfish/v1/Managers/BMC/Actions/Oem/AMIVirtualMedia.EnableRMedia -d '{"RMediaState":"Enable"}' -H 'If-None-Match: not_match' |jq
Example response:
{
  "error": {
    "@Message.ExtendedInfo": [
      {
        "@odata.type": "#Message.v1_0_8.Message",
        "Message": "EnableRMedia action has been initiated successfully.Please allow upto 4-5 secs and verify the value of RMediaStatus OEM property in /redfish/v1/Managers/BMC instance",
        "MessageArgs": [
          "EnableRMedia",
          "RMediaStatus OEM",
          "/redfish/v1/Managers/BMC"
        ],
        "MessageId": "Ami.1.0.DelayInActionCompletion",
        "Resolution": "Check the property value update after 4-5 seconds",
        "Severity": "OK"
      }
    ],
    "code": "Ami.1.0.DelayInActionCompletion",
    "message": "EnableRMedia action has been initiated successfully.Please allow upto 4-5 secs and verify the value of RMediaStatus OEM property in /redfish/v1/Managers/BMC instance"
  }
}
curl -k -u <bmc-user>:<password> -H "Content-Type: application/json" https://<bmc-ip-address>/redfish/v1/Managers/BMC/VirtualMedia | jq
Example response:
  % Total    % Received % Xferd  Average Speed   Time    Time     Time  Current
                           Dload  Upload   Total   Spent    Left  Speed
100   616  100   616    0     0    925      0 --:--:-- --:--:-- --:--:--   926
{
  "@odata.context": "/redfish/v1/$metadata#VirtualMediaCollection.VirtualMediaCollection",
  "@odata.etag": "\"1749834214\",
  "@odata.id: "/redfish/v1/Managers/BMC/VirtualMedia",
  "@odata.type": "#VirtualMediaCollection.VirtualMediaCollection",
  "Description": "Collection of Virtual Media redirected to host via this Manager",
  "Members": [
    {
      "@odata.id": "/redfish/v1/Managers/BMC/VirtualMedia/CD1"
    },
    {
      "@odata.id": "/redfish/v1/Managers/BMC/VirtualMedia/CD2"
    },
    {
      "@odata.id": "/redfish/v1/Managers/BMC/VirtualMedia/CD3"
    },
    {
      "@odata.id": "/redfish/v1/Managers/BMC/VirtualMedia/CD4"
    }
  ],
  Members@odata.count: 4,
  "Name": "Virtual Media Collection"
}
To mount the ISO file over NFS, send the Redfish POST request.
curl -k -u <bmc-user>:<password> -H "Content-Type: application/json" –request POST https://<bmc-ip-address>/redfish/v1/Managers/BMC/VirtualMedia/CD1/Actions/VirtualMedia.InsertMedia -d '{"Image": "//<server-ip-address>/<ISO-image-path>/<ISO-image-filename>", "TransferProtocolType": "NFS"}' | jq
Example response:
  % Total    % Received % Xferd  Average Speed   Time    Time     Time  Current
                           Dload  Upload   Total   Spent    Left  Speed
100   344  100   231  100   113    236    115 --:--:-- --:--:-- --:--:--   352
{
  "@odata.context": "/redfish/v1/$metadata#Task.Task",
  "@odata.id": "/redfish/v1/TaskService/Tasks/1",
  "@odata.type": "#Task.v1_4_2.Task",
  "Description": "Task for InsertMedia Action",
  "Id": "1",
  "Name": "InsertMedia Action",
  "TaskState": "New"
}
Verify the task is complete and then check that the image is mounted.
curl -k -u <bmc-user>:<password> -H "Content-Type: application/json" https://<bmc-ip-address>/redfish/v1/Managers/BMC/VirtualMedia/CD1 | jq
Example response:
  % Total    % Received % Xferd  Average Speed   Time    Time     Time  Current
                           Dload  Upload   Total   Spent    Left  Speed
100  1115  100  1115    0     0   1413      0 --:--:-- --:--:-- --:--:--  1414
{
  "@odata.context": "/redfish/v1/$metadata#VirtualMedia.VirtualMedia",
  "@odata.etag": "\"1749843453\",
  "@odata.id: "/redfish/v1/Managers/BMC/VirtualMedia/CD1",
  "@odata.type": "#VirtualMedia.v1_3_2.VirtualMedia",
  "Actions": {
    "#VirtualMedia.EjectMedia": {
      "@Redfish.ActionInfo": "/redfish/v1/Managers/BMC/VirtualMedia/CD1/EjectMediaActionInfo",
      "target": "/redfish/v1/Managers/BMC/VirtualMedia/CD1/Actions/VirtualMedia.EjectMedia"
    },
    "#VirtualMedia.InsertMedia": {
      "@Redfish.ActionInfo": "/redfish/v1/Managers/BMC/VirtualMedia/CD1/InsertMediaActionInfo",
      "target": "/redfish/v1/Managers/BMC/VirtualMedia/CD1/Actions/VirtualMedia.InsertMedia"
    }
  },
  "ConnectedVia": "URI",
  "Description": "Virtual Media Instance redirected to host via this Manager",
  "Id": "CD1",
  "Image": "//server-ip-address:0/home/nvidia/images/DGXOS-7.0.0-2024-08-13-07-50-56.iso",
  "ImageName": "DGXOS-7.0.0-2024-08-13-07-50-56.iso",
  "Inserted": true,
  "MediaTypes": [
    "CD"
  ],
  "Name": "CD1",
  "Oem": {
    "Ami": {
      "@odata.type": "#AMIVirtualMedia.v1_0_0.AMIVirtualMedia",
      "RedirectionStatus": "Redirection Started"
    }
  },
  "TransferMethod": "Stream",
  "TransferProtocolType": "NFS",
  "UserName": "",
  "WriteProtected": true
}
From Redfish, you can configure the SBIOS boot order and set
''UEFI: AMI Virtual CDROM0 1.00''to the boot device, following the steps in Modifying the Boot Order on DGX H100/H200 Using Redfish.
Backing Up and Restoring BMC Configurations#
In addition to using the Web UI to back up and restore the BMC configuration, you can use Redfish API with the following approach:
Install a security AES key in the BMC.
Back up the BMC configuration.
Restore the BMC configuration using a backup file.
The BMC automatically reboots when you perform a configuration restore.
Backing Up the BMC Configuration#
Generate an AES key and save it to a
.binfile.openssl rand -out aes_key.bin 32
Upload the AES key.
curl -s -k -u <username>:<password> --location --request POST 'https://<bmcip>/redfish/v1/Managers/BMC/Actions/Oem/NvidiaManager.UploadAESKey' --form 'AESKey=@aes_key.bin' | jq
A successful command returns a
204HTTP status code.Back up the BMC configuration by creating a backup file, for example,
bmc-config.bak.curl -s -k -u <username>:<password> POST 'https://<bmcip>/redfish/v1/Managers/BMC/Actions/Oem/NvidiaManager.BackupConfig' -H 'Content-Type: application/json' --data-raw '{ "BackupFeatures" : ["NTP","Network and Services","Syslog","Authentication","SNMP","IPMI","KVM"] }' > bmc-config.bak
Restoring the BMC configuration#
Note
You must perform a factory reset to restore the default settings before restoring the BMC configuration.
Upload the AES key generated previously.
curl -s -k -u <username>:<password> --location --request POST 'https://<bmcip>/redfish/v1/Managers/BMC/Actions/Oem/NvidiaManager.UploadAESKey' --form 'AESKey=@aes_key.bin' | jq
A successful command returns a
204HTTP status code.Restore the BMC configuration using the backup file, for example,
bmc-config.bak.curl -s -k -u <username>:<password> --location --request POST 'https://<bmcip>/redfish/v1/Managers/BMC/Actions/Oem/NvidiaManager.RestoreConfig' --form 'conf_file=@"bmc-config.bak"' | jq
Collecting BMC Debug Data#
Create a request for BMC to start collecting debug data:
curl -k -u <bmc-user>:<password> --request POST --location 'https://<bmc-ip-address>/redfish/v1/Managers/BMC/LogServices/DiagnosticLog/Actions/LogService.CollectDiagnosticData' -H 'Content-Type: application/json' --data-raw '{"DiagnosticDataType" : "OEM", "OEMDiagnosticDataType": "ALL"}' | jq
Note
For BMC versions earlier than 24.09.17, specify
--data-raw '{"DiagnosticDataType" : "OEM"}'.Example response:
{
  "@odata.context": "/redfish/v1/$metadata#Task.Task",
  "@odata.id": "/redfish/v1/TaskService/Tasks/2",
  "@odata.type": "#Task.v1_4_2.Task",
  "Description": "Task for Manager CollectDiagnosticData",
  "Id": "2",
  "Name": "Manager CollectDiagnosticData",
  "TaskState": "New"
}
Change the task number to the appropriate task
Idreturned from step 1, and monitor the task for completion untilPercentCompletereaches100.curl -k -u <bmc-user>:<password> --request GET 'https://<bmc-ip-address>/redfish/v1/TaskService/Tasks/2' | jq
Example response:
    {
      "@odata.context": "/redfish/v1/$metadata#Task.Task",
      "@odata.etag": "\"1723565599\"",
      "@odata.id": "/redfish/v1/TaskService/Tasks/2",
      "@odata.type": "#Task.v1_4_2.Task",
      "Description": "Task for Manager CollectDiagnosticData",
      "EndTime": "2024-08-13T16:28:15+00:00",
      "Id": "2",
      "Messages": [
        {
          "@odata.type": "#Message.v1_0_8.Message",
          "Message": "Indicates that a DiagnosticDump of was created at /redfish/v1/Managers/BMC/LogServices/DiagnosticLog/Attachment/nvidiadiag-HT9buy.tar.gz",
          "MessageArgs": [
            "/redfish/v1/Managers/BMC/LogServices/DiagnosticLog/Attachment/nvidiadiag-HT9buy.tar.gz"
          ],
          "MessageId": "Ami.1.0.0.DiagnosticDumpCreated",
          "Resolution": "None",
          "Severity": "Warning"
        },
        {
          "@odata.type": "#Message.v1_0_8.Message",
          "Message": "Task /redfish/v1/Managers/BMC/LogServices/DiagnosticLog/Actions/LogService.CollectDiagnosticData has completed.",
          "MessageArgs": [
            "/redfish/v1/Managers/BMC/LogServices/DiagnosticLog/Actions/LogService.CollectDiagnosticData"
          ],
          "MessageId": "Task.1.0.Completed",
          "Resolution": "None",
          "Severity": "OK"
        }
      ],
      "Name": "Manager CollectDiagnosticData",
      "PercentComplete": 100,
      "StartTime": "2024-08-13T16:13:20+00:00",
      "TaskState": "Completed",
      "TaskStatus": "OK"
    }
After the
TaskStatefield indicatesCompleted, use the path provided byMessageArgsto download the attachment.In the following command, substitute
nvidiadiag-HT9buy.tar.gz(an example filename) with the actual attachment generated in step 2.curl -k -u <bmc-user>:<password> --request GET 'https://<bmc-ip-address>/redfish/v1/Managers/BMC/LogServices/DiagnosticLog/Attachment/nvidiadiag-HT9buy.tar.gz' --output nvidiadiag-HT9buy.tar.gz
Note
For BMC versions earlier than 24.09.17, use the following command:
curl -k -u <bmc-user>:<password> --request GET 'https://<bmc-ip-address>/redfish/v1/Managers/BMC/LogServices/DiagnosticLog/Entries/All/Attachment' --output debugBMC.tgz
Clear BIOS and Reset to Factory Defaults#
To clear the BIOS and reset the system to factory defaults:
curl -k -u <username>:<password> --request POST --location 'https://<bmcip>/redfish/v1/UpdateService/Actions/Oem/NvidiaUpdateService.ClearNVRAM' --header 'Content-Type: application/json' \
--data '{"Targets": ["/redfish/v1/UpdateService/FirmwareInventory/HostBIOS_0"]}'
Querying GPU Power Limit#
To query the current GPU power limit:
curl -k -u <username>:<password> https://<bmc>/redfish/v1/Systems/HGX_Baseboard_0/Processors/GPU_SXM_<id>/EnvironmentMetrics
Where
<bmc>is the BMC IP address.<id>is the GPU instance number of1to8.
As shown in the following example output, the
Readingfield indicates the current power usage, and theSetPointfield indicates the current GPU power limit.... "PowerLimitWatts": { "AllowableMax": 700, "AllowableMin": 200, "ControlMode": "Automatic", "DefaultSetPoint": 700, "Reading": 64.388, "SetPoint": 700 } ...
Power Capping#
Services#
To discover the available services:
curl -k -u <bmc-user>:<password> https://<bmcip>/redfish/v1/Managers/BMC/NodeManager
Example response:
{
    "@odata.context": "/redfish/v1/$metadata#NodeManager.NodeManager",
    "@odata.etag": "\"1709588153\"",
    "@odata.id": "/redfish/v1/Managers/BMC/NodeManager",
    "@odata.type": "#NodeManager.v1_0_0.NodeManager",
    "Actions": {
        "#NodeManager.ChangeState": {
            "@Redfish.ActionInfo": "/redfish/v1/Managers/BMC/NodeManager/ChangeStateActionInfo",
            "target": "/redfish/v1/Managers/BMC/NodeManager/Actions/NodeManager.ChangeState"
        }
    },
    "Description": "Node Manager for BMC",
    "Domains": {
        "@odata.id": "/redfish/v1/Managers/BMC/NodeManager/Domains"
    },
    "Id": "NodeManager",
    "Name": "Node Manager",
    "Policies": {
        "@odata.id": "/redfish/v1/Managers/BMC/NodeManager/Policies"
    },
    "Status": {
        "Health": "OK",
        "State": "Disabled"
    },
    "ThrottlingStatus": {
        "@odata.id": "/redfish/v1/Managers/BMC/NodeManager/ThrottlingStatus"
    },
    "Triggers": {
        "@odata.id": "/redfish/v1/Managers/BMC/NodeManager/Triggers"
    }
}
Domains#
There are several predefined domains. If no domains are set, the default domains are shown.
To get a list of domains:
curl -k -u <bmc-user>:<password> https://<bmcip>/redfish/v1/Managers/BMC/NodeManager/Domains
Example response:
{
    "@odata.context": "/redfish/v1/$Metadata#NvidiaNmDomainCollection.NvidiaNmDomainCollection",
    "@odata.id": "/redfish/v1/Managers/BMC/NvidiaNmDomainCollection",
    "@odata.type": "#NvidiaNmDomainCollection.NvidiaNmDomainCollection",
    "Members": [
        {
            "@odata.id": "/redfish/v1/Managers/BMC/NodeManager/Domains/0"
        },
        {
            "@odata.id": "/redfish/v1/Managers/BMC/NodeManager/Domains/1"
        },
        {
            "@odata.id": "/redfish/v1/Managers/BMC/NodeManager/Domains/4"
        },
        {
            "@odata.id": "/redfish/v1/Managers/BMC/NodeManager/Domains/2"
        },
        {
            "@odata.id": "/redfish/v1/Managers/BMC/NodeManager/Domains/3"
        },
        {
            "@odata.id": "/redfish/v1/Managers/BMC/NodeManager/Domains/5"
        }
    ],
    "Members@odata.count": 6,
    "Name": "NvidiaNmDomainCollection"
}
To view domain policies:
curl -k -u <bmc-user>:<password> https://<bmcip>/redfish/v1/Managers/BMC/NodeManager/Domains/<DomainID>
For example, to view policies in domain 0:
curl -k -u <bmc-user>:<password> https://<bmcip>/redfish/v1/Managers/BMC/NodeManager/Domains/0
Example response:
{
    "@odata.context": "/redfish/v1/$Metadata#NvidiaNmDomain.NvidiaNmDomain",
    "@odata.id": "/redfish/v1/Managers/BMC/NodeManager/Domains/0",
    "@odata.type": "#NvidiaNmDomain.v1_4_0.NvidiaNmDomain",
    "Capabilities": {
        "MaxCorrectionTimeInMs": 2000,
        "MaxStatisticsReportingPeriod": "2000",
        "Min": 5000,
        "MinCorrectionTimeInMs": 1000,
        "MinStatisticsReportingPeriod": "1000"
    },
    "Id": "0",
    "Name": "protection",
    "Policies": {
        "@odata.context": "/redfish/v1/$Metadata#NvidiaNmPolicyCollection.NvidiaNmPolicyCollection",
        "@odata.type": "#NvidiaNmPolicyCollection.NvidiaNmPolicyCollection",
        "Members": [
            {
                "@odata.id": "/redfish/v1/Managers/BMC/NodeManager/Domains/0/Policies/0"
            },
            {
                "@odata.id": "/redfish/v1/Managers/BMC/NodeManager/Domains/0/Policies/1"
            },
            {
                "@odata.id": "/redfish/v1/Managers/BMC/NodeManager/Domains/0/Policies/2"
            }
        ],
        "Name": "NvidiaNmPolicyCollection"
    },
    "Status": {
        "State": "Enabled"
    }
}
To view a policy within a domain:
Each domain has a set of policies that define how to manage each component. Power is divided up based on a percentage with a component not allowed to exceed a specific budget.
curl -k -u <bmc-user>:<password> https://<bmcip>/redfish/v1/Managers/BMC/NodeManager/Domains/0/Policies/<PolicyID>
For example, to view policy 0 in domain 0:
curl -k -u <bmc-user>:<password> https://<bmcip>/redfish/v1/Managers/BMC/NodeManager/Domains/0/Policies/0
Example response:
{
   "@odata.context": "/redfish/v1/$Metadata#NvidiaNmPolicy.NvidiaNmPolicy",
   "@odata.id": "/redfish/v1/Managers/BMC/NodeManager/Domains/0/Policies/0",
   "@odata.type": "#NvidiaNmPolicy.v1_2_0.NvidiaNmPolicy",
   "AssociatedDomainID": {
       "@odata.id": "/redfish/v1/Managers/BMC/NodeManager/Domains/0"
   },
   "ComponentId": "COMP_CPU",
   "Id": "0",
   "Limit": 800,
   "Name": "0",
   "PercentageOfDomainBudget": 15,
   "Status": {
       "State": "Disabled"
   }
}
In this example, policy 0 defines the percentage of budget for domain 0. The CPU budget for both sockets is 800 W, which is equally divided. The
PercentageOfDomainBudgetfield, which indicates how much of the overall budget will be allocated to the CPUs, shows 15 percent for this example.
Custom Policies#
To add a custom policy, use the following template and specify values for the highlighted fields. Custom domain ID starts from 10.
The engine will add the percentage values and the power values in the provided configuration fields. Error messages are issued for the following conditions:
Power exceeds the
Maxvalue or falls below theMinvalue of the domain power.The
PercentageOfDomainBudgetvalues add up to over 100 percent.
Template:
{
    "@odata.context": "/redfish/v1/$Metadata#NvidiaNmDomain.NvidiaNmDomain",
    "@odata.id": "/redfish/v1/Managers/BMC/NodeManager/Domains/0",
    "@odata.type": "#NvidiaNmDomain.v1_4_0.NvidiaNmDomain",
    "Capabilities": {
      "Max": 6000.0000,
      "Min": 4000.0000
    },
    "Id": "0",
    "Name": "custom4",
    "Status": {
      "State": "Enabled"
    },
    "Policies": {
      "@odata.context": "/redfish/v1/$Metadata#NvidiaNmPolicyCollection.NvidiaNmPolicyCollection",
      "@odata.type": "#NvidiaNmPolicyCollection.NvidiaNmPolicyCollection",
      "Members": [
        {
          "@odata.context": "/redfish/v1/$Metadata#NvidiaNmPolicy.NvidiaNmPolicy",
          "@odata.id": "/redfish/v1/Managers/BMC/NodeManager/Domains/0/Policies/0",
          "@odata.type": "#NvidiaNmPolicy.v1_2_0.NvidiaNmPolicy",
          "AssociatedDomainID": {
            "@odata.id": "/redfish/v1/Managers/BMC/NodeManager/Domains/0"
          },
          "ComponentId": "COMP_CPU",
          "Id": "0",
          "Limit": 500.0000,
          "PercentageOfDomainBudget": 15.0000,
          "Name": "0"
        },
        {
          "@odata.context": "/redfish/v1/$Metadata#NvidiaNmPolicy.NvidiaNmPolicy",
          "@odata.id": "/redfish/v1/Managers/BMC/NodeManager/Domains/0/Policies/1",
          "@odata.type": "#NvidiaNmPolicy.v1_2_0.NvidiaNmPolicy",
          "ComponentId": "COMP_MEMORY",
          "Id": "0",
          "Limit": 500.0000,
          "PercentageOfDomainBudget": 15.0000,
          "Name": "0"
        },
        {
          "@odata.context": "/redfish/v1/$Metadata#NvidiaNmPolicy.NvidiaNmPolicy",
          "@odata.id": "/redfish/v1/Managers/BMC/NodeManager/Domains/0/Policies/2",
          "@odata.type": "#NvidiaNmPolicy.v1_2_0.NvidiaNmPolicy",
          "AssociatedDomainID": {
            "@odata.id": "/redfish/v1/Managers/BMC/NodeManager/Domains/0"
          },
          "ComponentId": "COMP_GPU",
          "Id": "0",
          "Limit": 5000.0000,
          "PercentageOfDomainBudget": 70.0000,
          "Name": "0"
        }
      ],
      "Members@odata.count": 3,
      "Name": "NvidiaNmPolicyCollection"
    }
}
To create a new domain policy:
curl -k -u <bmc-user>:<password> -X POST https://<BMC>/redfish/v1/Managers/BMC/NodeManager/Domains --data @<pathtojsonfile>
Example response:
{
    "@odata.context": "/redfish/v1/$Metadata#NvidiaNmDomain.NvidiaNmDomain",
    "@odata.id": "/redfish/v1/Managers/BMC/NodeManager/Domains/21",
    "@odata.type": "#NvidiaNmDomain.v1_4_0.NvidiaNmDomain",
    "Capabilities": {
        "Max": 6000,
        "MaxCorrectionTimeInMs": 0,
        "MaxStatisticsReportingPeriod": "0",
        "Min": 4000,
        "MinCorrectionTimeInMs": 0,
        "MinStatisticsReportingPeriod": "0"
    },
    "Id": "21",
    "Name": "custom4",
    "Policies": {
        "@odata.context": "/redfish/v1/$Metadata#NvidiaNmPolicyCollection.NvidiaNmPolicyCollection",
        "@odata.type": "#NvidiaNmPolicyCollection.NvidiaNmPolicyCollection",
        "Members": [
            {
                "@odata.id": "/redfish/v1/Managers/BMC/NodeManager/Domains/21/Policies/0"
            },
            {
                "@odata.id": "/redfish/v1/Managers/BMC/NodeManager/Domains/21/Policies/1"
            },
            {
                "@odata.id": "/redfish/v1/Managers/BMC/NodeManager/Domains/21/Policies/2"
            }
        ],
        "Name": "NvidiaNmPolicyCollection"
    },
    "Status": {
        "State": "Enabled"
    }
}
To patch custom domain policies, provide only the configuration changes you want to make.
To delete custom domain policies:
curl -k -u <bmc-user>:<password> -X DELETE /redfish/v1/Managers/BMC/NodeManager/Domains/<DomainID>
PSU Policies#
Power supply unit (PSU) policies are read-only.
To view a list of PSU policies:
curl -k -u <bmc-user>:<password> https://<bmcip>/redfish/v1/Managers/BMC/NodeManager/PSUPolicies
Example response:
{
    "@odata.context": "/redfish/v1/$Metadata#NvidiaNmPSUPolicyCollection.NvidiaNmPSUPolicyCollection",
    "@odata.id": "/redfish/v1/Managers/BMC/NvidiaNmPSUPolicyCollection",
    "@odata.type": "#NvidiaNmPSUPolicyCollection.NvidiaNmPSUPolicyCollection",
    "Members": [
        {
            "@odata.id": "/redfish/v1/Managers/BMC/NodeManager/PSUPolicies/0"
        },
        {
            "@odata.id": "/redfish/v1/Managers/BMC/NodeManager/PSUPolicies/1"
        },
        {
            "@odata.id": "/redfish/v1/Managers/BMC/NodeManager/PSUPolicies/2"
        }
    ],
    "Members@odata.count": 3,
    "Name": "NvidiaNmPSUPolicyCollection"
}
To view a PSU policy:
curl -k -u <bmc-user>:<password> https://<bmcip>/Managers/BMC/NodeManager/PSUPolicies/<PSUPolicyID>
For example, to view PSU policy 0:
curl -k -u <bmc-user>:<password> https://<bmcip>/Managers/BMC/NodeManager/PSUPolicies/0
Example response:
{
    "@odata.context": "/redfish/v1/$Metadata#NvidiaNmPSUPolicy.NvidiaNmPSUPolicy",
    "@odata.id": "/redfish/v1/Managers/BMC/NodeManager/PSUPolicies/0",
    "@odata.type": "#NvidiaNmPSUPolicy.v1_2_0.NvidiaNmPSUPolicy",
    "Id": "0",
    "LimitMax": 6000,
    "MaxPSU": 2,
    "MinPSU": 2,
    "Name": "Limp",
    "Status": {
        "State": "Disabled"
    }
}
PSU policy 0 defines the number of PSUs and the power that will be allocated to the system with a maximum of two PSUs.
To view a metrics report:
A metrics report captures all critical values related to the power behavior of the system.
Example request:
curl -k -u <bmc-user>:<password> https://<bmcip>/redfish/v1/TelemetryService/MetricReports/NvidiaNMMetrics_0
Example output:
{
    "@odata.id": "/redfish/v1/TelemetryService/MetricReports/NvidiaNMMetrics_0",
    "@odata.type": "#MetricReport.v1_4_2.MetricReport",
    "Id": "NvidiaNMMetrics_0",
    "MetricReportDefinition": {
        "@odata.id": "/redfish/v1/TelemetryService/MetricReportDefinitions/NvidiaNMMetrics_0",
        "MetricProperties": []
    },
    "MetricValues": [
        {
            "MetricId": "dcPlatformPower_avg",
            "MetricValue": "2181.00",
            "Timestamp": "2024-07-15T18:49:43+00:00"
        },
        {
            "MetricId": "dcPlatformPowerDGX_avg",
            "MetricValue": "1444.00",
            "Timestamp": "2024-07-15T18:49:43+00:00"
        },
        {
            "MetricId": "dcPlatformPowerHGX_avg",
            "MetricValue": "736.00",
            "Timestamp": "2024-07-15T18:49:43+00:00"
        },
        {
            "MetricId": "dcPlatformEnergy",
            "MetricValue": "2181.00",
            "Timestamp": "2024-07-15T18:49:43+00:00"
        },

                ...

        {
            "MetricId": "gpuPowerCapabilitiesMax_7",
            "MetricValue": "700.00",
            "Timestamp": "2024-07-15T18:49:43+00:00"
        }
    ],
    "Name": "NvidiaNMMetrics_0"
}
Definitions of Metrics# MetricId
Definition
Example Metric Value
dcPlatformPower_avg
Total DC Power for the Platform
2181.00
dcPlatformPowerDGX_avg
Total DC Power for the non gpu base board components
1444.00
dcPlatformPowerHGX_avg
Total DC Power for the GPU Base Board
736.00
dcPlatformEnergy
Total Platform Energy (need to review)
2181.00
dcPlatformPowerLimit1
0.00
dcPlatformPowerLimit2
0.00
PSU_Redundancy_Policy
Current Policy Active PSU Policy
0
FixPwrDGXAvg
Power for fixed components on non gpu base board (e.g. FANs, NVMe, etc). Excludes CPU and Memory
1005.00
FixPwrHGXAvg
Power for fixed components on GPU Base Board. Excludes GPU
222.00
FixPwrAverage
Total Fixed Value for Platform
1228.00
AvblNoCPU
Number of CPU
2
AvblNoGPU
Number of GPU
8
PSU_WORKING_CNT
Total Number of PSU
6
DIMM_Count_Total
Total Number of DIMMS
32
GPU_PWR_BRAKE
State of Power Break
0
GPU_PWR_PRSNT
Indicates GPU Based Board is powered on
1
CPU_PWR_UNIT
Intel PWR Unit for CPU Power
3
CPU_TIM_UNIT
Intel Time Unit for CPU Energy
10
CPU_ENERGY_UNIT
Intel Energy Unit for CPU
14
cpuPackagePower_avg_0
Average Power for CPU0
193
cpuEnergy_0
Energy for CPU 0
196.00
coreEfficiency_0
Core Efficiency for CPU 0
61671.00
cpuPackagePowerCapabilitiesMin_0
Power Capabilities MIN CPU 0
209
cpuPackagePowerCapabilitiesMax_0
Power Capabilities MAX CPU 0
350
cpuPackagePowerLimit1_0
CPU Power Limit 1
400.00
cpuPackagePowerLimit2_0
CPU Power Limit 2
400.00
prochotRatioCapabilitiesMin_0
PROC Hot Ratio Min Capabilities CPU 0 (Min Frequency)
500
prochotRatioCapabilitiesMax_0
PROC Hot Ratio Max Capabilities CPU 0 (Max Frequency allowed when PROC Hot Asserted)
2000
turboRatioCapabilitiesMin_0
Turbo Ratio Min Capabilities CPU 0 (Min Frequency)
500
turboRatioCapabilitiesMax_0
Turbo Ratio Max Capabilities CPU 0 (Max Frequency)
3800
CPU_PWR_UNIT
Intel PWR Unit for CPU Power
3
CPU_TIM_UNIT
Intel Time Unit for CPU Energy
10
CPU_ENERGY_UNIT
Intel Energy Unit for CPU
14
cpuPackagePower_avg_1
Average Power for CPU1
182
cpuEnergy_1
Energy for CPU 1
185.00
coreEfficiency_1
Core Efficiency for CPU 1
62203.00
cpuPackagePowerCapabilitiesMin_1
Power Capabilities MIN CPU 1
209
cpuPackagePowerCapabilitiesMax_1
Power Capabilities MAX CPU 1
350
cpuPackagePowerLimit1_1
CPU Power Limit 1
400.00
cpuPackagePowerLimit2_1
CPU Power Limit 2
400.00
prochotRatioCapabilitiesMin_1
PROC Hot Ratio Min Capabilities CPU 1 (Min Frequency)
500
prochotRatioCapabilitiesMax_1
PROC Hot Ratio Max Capabilities CPU 1 (Max Frequency allowed when PROC Hot Asserted)
2000
turboRatioCapabilitiesMin_1
Turbo Ratio Min Capabilities CPU 1 (Min Frequency)
500
turboRatioCapabilitiesMax_1
Turbo Ratio Max Capabilities CPU 1 (Max Frequency)
3800
DIMM_Count_Socket_0
Number of DIMMS Socket 0
16.00
dramPackagePowerCapabilitiesMax_0
DRAM Power Capabilities MIN Socket 0
35.00
dramPackagePowerCapabilitiesMin_0
DRAM Power Capabilities MAX Socket 0
0.00
dramEnergy_0
DRAM Energy Socket 0
30.00
dramPowerLimit_0
DRAM Power Limit Socket 0
300.00
dramPower_avg_0
DRAM Average Power Socket 0
30.00
DIMM_Count_Socket_1
Number of DIMMS Socket 1
16.00
dramPackagePowerCapabilitiesMax_1
DRAM Power Capabilities MIN Socket 1
35.00
dramPackagePowerCapabilitiesMin_1
DRAM Power Capabilities MAX Socket 1
0.00
dramEnergy_1
DRAM Energy Socket 1
34.00
dramPowerLimit_1
DRAM Power Limit Socket 1
300.00
dramPower_avg_1
DRAM Average Power Socket 1
36.00
gpuPower_avg_0
GPU 0 Average Power
63.00
gpuPowerLimit_0
GPU 0 Power Limit
700.00
gpuPowerCapabilitiesMin_0
GPU 0 Min Power Limit
200.00
gpuPowerCapabilitiesMax_0
GPU 0 Max Power Limit
700.00
gpuPower_avg_1
GPU 1 Average Power
65.00
gpuPowerLimit_1
GPU 1 Power Limit
700.00
gpuPowerCapabilitiesMin_1
GPU 1 Min Power Limit
200.00
gpuPowerCapabilitiesMax_1
GPU 1 Max Power Limit
700.00
gpuPower_avg_2
GPU 2 Average Power
65.00
gpuPowerLimit_2
GPU 2 Power Limit
700.00
gpuPowerCapabilitiesMin_2
GPU 2 Min Power Limit
200.00
gpuPowerCapabilitiesMax_2
GPU 2 Max Power Limit
700.00
gpuPower_avg_3
GPU 3 Average Power
63.00
gpuPowerLimit_3
GPU 3 Power Limit
700.00
gpuPowerCapabilitiesMin_3
GPU 3 Min Power Limit
200.00
gpuPowerCapabilitiesMax_3
GPU 3 Max Power Limit
700.00
gpuPower_avg_4
GPU 4 Average Power
63.00
gpuPowerLimit_4
GPU 4 Power Limit
700.00
gpuPowerCapabilitiesMin_4
GPU 4 Min Power Limit
200.00
gpuPowerCapabilitiesMax_4
GPU 4 Max Power Limit
700.00
gpuPower_avg_5
GPU 5 Average Power
64.00
gpuPowerLimit_5
GPU 5 Power Limit
700.00
gpuPowerCapabilitiesMin_5
GPU 5 Min Power Limit
200.00
gpuPowerCapabilitiesMax_5
GPU 5 Max Power Limit
700.00
gpuPower_avg_6
GPU 6 Average Power
66.00
gpuPowerLimit_6
GPU 6 Power Limit
700.00
gpuPowerCapabilitiesMin_6
GPU 6 Min Power Limit
200.00
gpuPowerCapabilitiesMax_6
GPU 6 Max Power Limit
700.00
gpuPower_avg_7
GPU 7 Average Power
64.00
gpuPowerLimit_7
GPU 7 Power Limit
700.00
gpuPowerCapabilitiesMin_7
GPU 7 Min Power Limit
200.00
gpuPowerCapabilitiesMax_7
GPU 7 Max Power Limit
700.00