NVIDIA DOCA East-West Overlay Encryption Application
This guide describes IPsec-based strongSwan solution on top of NVIDIA® BlueField® DPU.
If your target application utilizes 100Gb/s or higher bandwidth, where a substantial part of the bandwidth is allocated for IPsec traffic, please refer to the NVIDIA BlueField-2 DPUs Product Release Notes to learn about a potential bandwidth limitation. To access the relevant product release notes, please contact your NVIDIA sales representative.
IPsec is used to set up encrypted connections between different devices. It helps keep data sent over public networks secure. IPsec is often used to set up VPNs, and it works by encrypting IP packets as well as authenticating the packets' originator.
IPsec contains the following main modules:
Key exchange – a key is a string of random bytes that can be used for encryption and decryption of messages. IPsec sets up keys with a key exchange between the connected devices, so that each device can decrypt the other device's messages.
Authentication – IPsec provides authentication for each packet which ensures that they come from a trusted source.
Encryption – IPsec encrypts the payloads within each packet and possibly, based on the transport mode, the packet's IP header.
Decryption – at the other end of the communication, packets are decrypted by the IPsec supported node.
IPsec supports two types of headers:
Authentication header (AH) – AH protocol ensures that packets are from a trusted source. AH does not provide any encryption.
Encapsulating security protocol (ESP) – ESP encrypts the payload for each packet as well as the IP header depending on the transport mode. ESP adds its own header and a trailer to each data packet.
IPsec support two types of transport mode:
IPsec tunnel mode – used between two network nodes, each acting as tunnel initiator/terminator on a public network. In this mode, the original IP header and payload are both encrypted. Since the IP header is encrypted, an IP tunnel is added for network forwarding. At each end of the tunnel, the routers decrypt the IP headers to route the packets to their destinations.
Transport mode – the payload of each packet is encrypted, but the original IP header is not. Intermediary network nodes are therefore able to view the destination of each packet and route the packet, unless a separate tunneling protocol is used.
strongSwan is an open-source IPsec-based VPN solution. For more information, refer to strongSwan documentation.
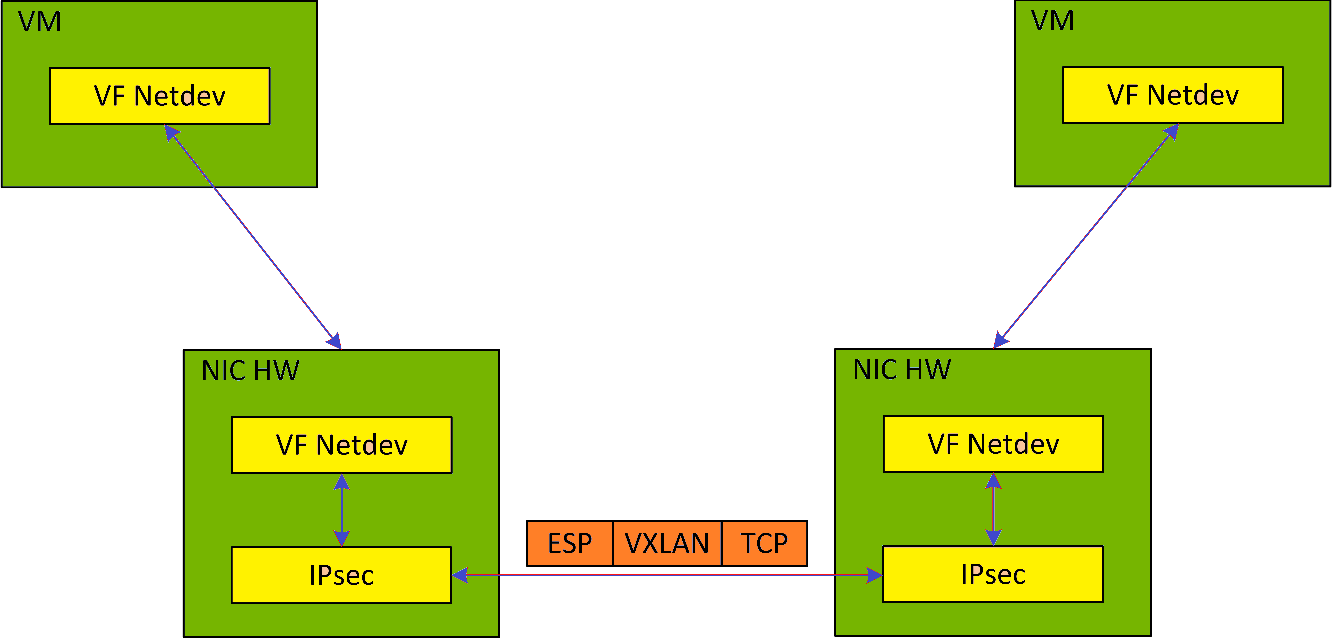
IPsec packet offload offloads both IPsec crypto (encrypt/decrypt) and IPsec encapsulation to the hardware.
The deployment model allows the IPsec offload to be transparent to the host with the benefits of securing legacy workloads (no dependency on host SW stack) and to zero CPU utilization on host.
IPsec packet offload configuration works with and is transparent to OVS offload. This means all packets from OVS offload are encrypted by IPsec rules.
The following figure illustrates the interaction between IPsec packet offload and OVS VXLAN offload.
IPsec packet offload is only supported on Ubuntu Bluefield kernel 5.15
OVS offload and IPsec IPv6 do not work together.
Configure strongSwan IPsec offload using
swanctl.confconfiguration file.Traffic is sent from the host through BlueField.
Using OVS, the packets are encapsulated on ingress using tunnel protocols (VXLAN for example) to match IPsec configuration by strongSwan.
Set by strongSwan configuration file, traffic will be encrypted using the hardware offload.
Egress flow is decryption first, decapsulation of the tunnel header and forward to the relevant physical function.
N/A
NVIDIA® BlueField®-2 platform or higher is required
BlueField Ubuntu BFB with kernel 5.15
strongSwan version 5.9.10 or greater
Compiling and Installing strongSwan
The following section provides instruction for compiling and installing NVIDIA's strongSwan fork (branch BF-5.9.10), but users can use the upstream strongSwan instructions (as long as the version is 5.9.10 or greater).
To compile and install strongswan from the source, perform these steps on BlueField (Arm cores):
Install dependencies:
sudo apt install dpkg-dev devscripts debhelper dh-autoreconf autoconf flex libtool gperf lzip yacc bison flex m4 libgmp-dev libsystemd-dev -y
Clone and compile strongSwan:
$ git clone https:
//github.com/Mellanox/strongswan.git$ cd strongswan $ git checkout BF-5.9.10$ dpkg-buildpackage -uc -us -bThis should create two
.debfiles in the parent folder,strongswan_5.9.10-2.bf_arm64.debandstrongswan-swanctl_5.9.10-2.bf_arm64.deb.NotestrongSwan BF-5.9.10 is based on the official strongSwan 5.9.10 branch with added packaging and support for DOCA IPsec plugin. Refer to the NVIDIA DOCA IPsec Security Gateway Application Guide for more information regarding the strongSwan DOCA plugin.
Uninstall all old strongSwan and charon packages to prevent conflicts:
$ sudo dpkg -P --force-depends <packages>
Example:
$ sudo dpkg -P --force-depends libstrongswan libstrongswan-standard-plugins strongswan strongswan-charon strongswan-libcharon strongswan-starter libcharon-extauth-plugins
InfoUsers can find all strongSwan and charon packages by running
dpkg -l | grep strongswananddpkg -l | grep charon.Install the two strongSwan .deb files (they should've been created in the parent folder).
$ sudo dpkg -i ../strongswan_5.
9.10-2.bf_arm64.deb ../strongswan-swanctl_5.9.10-2.bf_arm64.deb
The following section provides information on manually configuring IPsec packet offload in general and on using OVS IPsec with strongSwan specifically.
There is a script, east_west_overlay_encryption.sh which performs the steps in this section automatically.
If you are working directly with the ip xfrm tool, use /opt/mellanox/iproute2/sbin/ip to benefit from IPsec packet offload support.
There are two parts in the configuration flow
Enabling IPsec packet offload mode.
Configuring the IPsec OVS bridge using one of three modes of authentication.
An alternative for step two is configuring swanctl.conf files (configuration files for strongSwan) manually and using strongSwan directly instead of using IPsec OVS (which automatically generates swanctl.conf files) as explained in section "Configuring OVS IPsec Using strongSwan Manually".
Enabling IPsec Packet Offload
This section explicitly enables IPsec packet offload on the Arm cores before setting up offload-aware IPsec tunnels.
If an OVS VXLAN tunnel configuration already exists, stop openvswitch service prior to performing the steps below and restart the service afterwards.
Explicitly enable IPsec full offload on the Arm cores.
Set
IPSEC_FULL_OFFLOAD="yes"in/etc/mellanox/mlnx-bf.conf.NoteIf
IPSEC_FULL_OFFLOADdoes not appear in/etc/mellanox/mlnx-bf.confthen you are probably using an old version of the BlueField image. Check the way of enabling IPsec full offload in a previous DOCA versions in the NVIDIA DOCA Documentation Archives.Restart IB driver (rebooting also works). Run:
/etc/init.d/openibd restart
NoteIf
mlx-regexis running:Disable
mlx-regexprior to running restarting the IB driver:systemctl stop mlx-regex
Restart IB driver according to the command above.
Re-enable
mlx-regexafter the restart has finished:systemctl restart mlx-regex
To revert IPsec full offload mode, redo the procedure from step 1, only difference is to set IPSEC_FULL_OFFLOAD="no" in /etc/mellanox/mlnx-bf.conf.
Configuring OVS IPsec
Before proceeding with this section, make sure to follow the procedure in section "Enabling IPsec Packet Offload" for both DPUs.
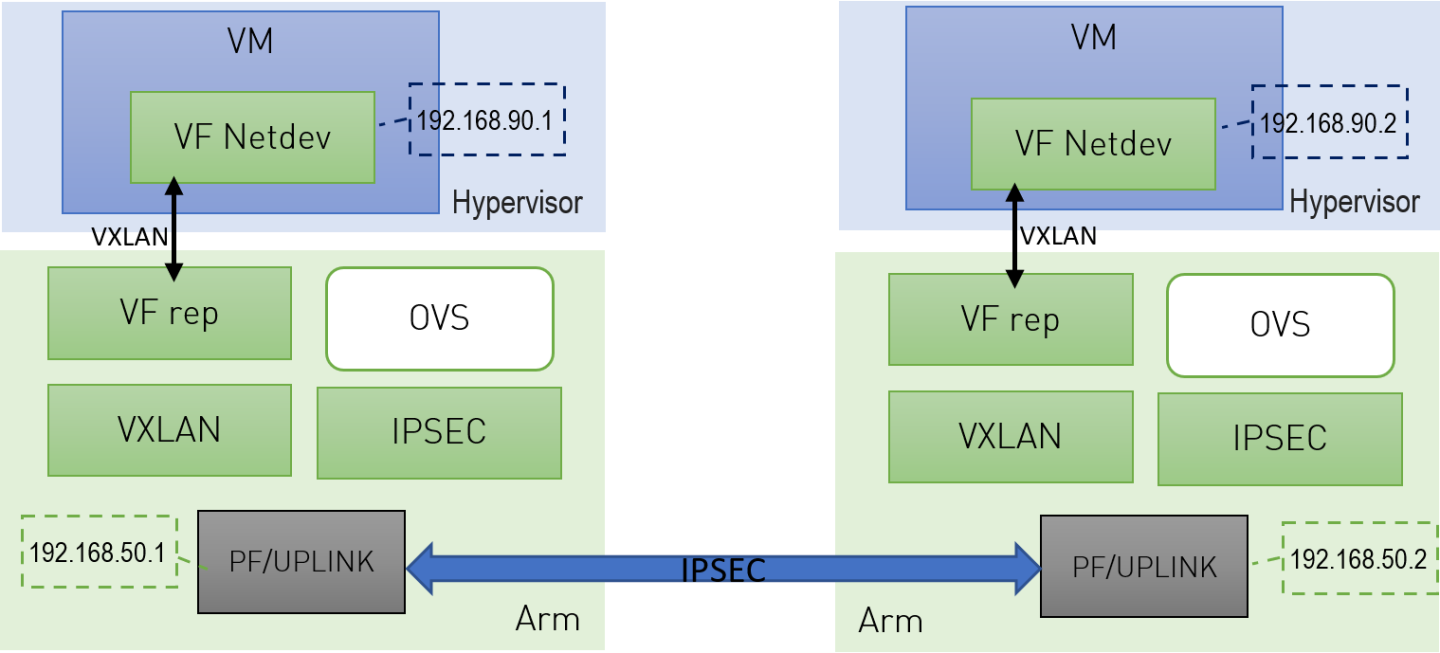
This section configures OVS IPsec VXLAN tunnel which automatically generates the swanctl.conf files and runs strongSwan (the IPsec daemon). The following figure illustrates an example with two BlueField DPUs, Left and Right, operating with a secured VXLAN channel.
Two BlueField DPUs are required to build an OVS IPsec tunnel between the two hosts, Right and Left.
The OVS IPsec tunnel configures an unaware IPsec connection between the two hosts' InfiniBand devices. For the sake of this example, the host's InfiniBand network device is HOST_PF, and the DPU's host representor is PF_REP and the DPU's physical function PF.
This example sets up the following variables on both Arms:
            # host_ip1=1.1.1.1
# host_ip2=1.1.1.2
# HOST_PF=ens7np0
# ip1=192.168.50.1
# ip2=192.168.50.2
# PF=p0
# PF_REP=pf0hpf
The name of the HOST_PF could be different in your machine. You may verify this by running:
            host# ibdev2netdev
mlx5_0 port 1 ==> ens7np0 (Down)
mlx5_1 port 1 ==> ens8np1 (Down)
This example uses the first
InfiniBand's (mlx5_0) network device which is ens7np0.
Configure IP addresses for the
HOST_PFs of both hosts (x86):On
host_1:# ifconfig $HOST_PF $host_ip1/24 up
On
host_2:# ifconfig $HOST_PF $host_ip2/24 up
NoteStep 1 is the only command that is performed on the host, the rest of the commands are performed on the Arm (DPU) side.
Configure IP addresses for the PFs of both Arms:
On
Arm_1:# ifconfig $PF $ip1/24 up
On
Arm_2:# ifconfig $PF $ip2/24 up
Start Open vSwitch. If your operating system is Ubuntu, run the following on both
Arm_1andArm_2:# service openvswitch-
switchstartIf your operating system is CentOS, run the following on both
Arm_1andArm_2:# service openvswitch restart
Start OVS IPsec service. Run on both
Arm_1andArm_2:# systemctl start openvswitch-ipsec.service
Set up OVS bridges in both DPUs. Run on both
Arm_1andArm_2:# ovs-vsctl add-br vxlan-br # ovs-vsctl add-port ovs-br $PF_REP # ovs-vsctl set Open_vSwitch . other_config:hw-offload=true
NoteConfiguring
other_config:hw-offload=truesets IPsec Packet offload. Setting it tofalsesets software IPsec.NoteThe MTU of the MTU of the tunnel interface (PF) should be at least 50 bytes larger than the MTU of the endpoints of the tunnels above (PF_REP) to account for the size of the VXLAN tunnel header. For example, if the MTU of PF_REP is 1500 then the MTU of PF should be at least 1550.
To configure the MTU of the PF:
# ifconfig $PF mtu $PF_MTU up
Set up IPsec tunnel on the OVS bridge. Three authentication methods are possible, choose your preferred authentication method and follow the steps relevant to it. Note that the last two authentication methods requires you to create certificates (self-signed certificates or certificate authority certificates).
After the IPsec tunnel is set up using one of the three methods of authentication, strongSwan configuration is done automatically and the swanctl.conf files will be generated and strongSwan will run automatically.
Authentication Methods
The following subsections detail the possible authentication methods for setting up the IPsec tunnel on the OVS bridge.
Pre-shared Key
This method configures OVS IPsec using a pre-shared key. You must select a pre-shared key, for example:
psk=swordfish
Set up the VXLAN tunnel:
On
Arm_1, run:# ovs-vsctl add-port vxlan-br tun -- \ set interface tun type=vxlan \ options:local_ip=$ip1 \ options:remote_ip=$ip2 \ options:key=100 \ options:dst_port=4789 \ options:psk=$psk
On
Arm_2, run:# ovs-vsctl add-port vxlan-br tun -- \ set interface tun type=vxlan \ options:local_ip=$ip2 \ options:remote_ip=$ip1 \ options:key=100 \ options:dst_port=4789\ options:psk=$psk
Self-signed Certificate
This method configures OVS IPsec using self-signed certificates. You must generate self-signed certificates and keys. This example demonstrates how to generate self-signed certificates using ovs-pki but you may generate them in any other way while skipping step 1.
Generate self-signed certificates using
ovs-pki:On
Arm_1, run:# ovs-pki req -u host_1 # ovs-pki self-sign host_1
After running this code you should have
host_1-cert.pemandhost_1-privkey.pem.On
Arm_2, run:# ovs-pki req -u host_2 # ovs-pki self-sign host_2
After running this code you should have
host_2-cert.pemandhost_2-privkey.pem.
Configure the certificates and private keys:
Copy the certificate of
Arm_1toArm_2, and the certificate ofArm_2toArm_1.On each machine, move both
host_1-privkey.pemandhost_2-cert.pemto/etc/swanctl/x509/if on Ubuntu, or/etc/strongswan/swanctl/x509/if on CentOS.On each machine, move the local private key (
host_1-privkey.pemonArm_1andhost_2-privkey.pemonArm_2) to/etc/swanctl/privateif on Ubuntu, or/etc/strongswan/swanctl/privateif on CentOS.
Set up OVS
other_configon both sides.On
Arm_1:# ovs-vsctl set Open_vSwitch . other_config:certificate=/etc/swanctl/x509/host_1-cert.pem \ other_config:private_key=/etc/swanctl/private/host_1-privkey.pem
On
Arm_2:# ovs-vsctl set Open_vSwitch . other_config:certificate=/etc/swanctl/x509/host_2-cert.pem \ other_config:private_key=/etc/swanctl/private/host_2-privkey.pem
Set up the VXLAN tunnel:
On
Arm_1:# ovs-vsctl add-port vxlan-br vxlanp0 -- set interface vxlanp0 type=vxlan options:local_ip=$ip1 \ options:remote_ip=$ip2 options:key=100 options:dst_port=4789 \ options:remote_cert=/etc/swanctl/x509/host_2-cert.pem # service openvswitch-switch restart
On
Arm_2:# ovs-vsctl add-port vxlan-br vxlanp0 -- set interface vxlanp0 type=vxlan options:local_ip=$ip2 \ options:remote_ip=$ip1 options:key=100 options:dst_port=4789 \ options:remote_cert=/etc/swanctl/x509/host_1-cert.pem # service openvswitch-switch restart
In steps 3 and 4, if you are in CentOS you must change the path of the certificates to /etc/strongswan/swanctl/x509/ and the path of the private keys to /etc/strongswan/swanctl/private.
CA-signed Certificate
This method configures OVS IPsec using certificate authority (CA)-signed certificates. You must generate CA-signed certificates and keys. The example demonstrates how to generate CA-signed certificates using ovs-pki but you may generate them in any other way while skipping step 1.
Generate CA-signed certificates using
ovs-pki. For this method, all the certificates and the requests must be in the same directory during the certificate generating and signing. This example refers to this directory ascertsworkspace.On
Arm_1, run:# ovs-pki init --force # cp /var/lib/openvswitch/pki/controllerca/cacert.pem <path_to>/certsworkspace # cd <path_to>/certsworkspace # ovs-pki req -u host_1 # ovs-pki sign host1
switchAfter running this code, you should have
host_1-cert.pem,host_1-privkey.pem, andcacert.pmin thecertsworkspacefolder.On
Arm_2, run:# ovs-pki init --force # cp /var/lib/openvswitch/pki/controllerca/cacert.pem <path_to>/certsworkspace # cd <path_to>/certsworkspace # ovs-pki req -u host_2 # ovs-pki sign host_2
switchAfter running this code, you should have
host_2-cert.pem,host_2-privkey.pem, andcacert.pmin thecertsworkspacefolder.
Configure the certificates and private keys:
Copy the certificate of
Arm_1toArm_2and the certificate ofArm_2toArm_1.On each machine, move both
host_1-privkey.pemandhost_2-cert.pemto/etc/swanctl/x509/if on Ubuntu, or/etc/strongswan/swanctl/x509/if on CentOS.On each machine, move the local private key (
host_1-privkey.pemif onArm_1andhost_2-privkey.pemif onArm_2) to/etc/swanctl/privateif on Ubuntu, or/etc/strongswan/swanctl/privateif on CentOS.On each machine, copy
cacert.pemto thex509cadirectory under/etc/swanctl/x509ca/if on Ubuntu, or/etc/strongswan/swanctl/x509ca/if on CentOS.
Set up OVS
other_configon both sides.On
Arm_1:# ovs-vsctl set Open_vSwitch . \ other_config:certificate=/etc/strongswan/swanctl/x509/host_1.pem \ other_config:private_key=/etc/strongswan/swanctl/private/host_1-privkey.pem \ other_config:ca_cert=/etc/strongswan/swanctl/x509ca/cacert.pem
On
Arm_2:# ovs-vsctl set Open_vSwitch . \ other_config:certificate=/etc/strongswan/swanctl/x509/host_2.pem \ other_config:private_key=/etc/strongswan/swanctl/private/host_2-privkey.pem \ other_config:ca_cert=/etc/strongswan/swanctl/x509ca/cacert.pem
Set up the tunnel:
On
Arm_1:# ovs-vsctl add-port vxlan-br vxlanp0 -- set interface vxlanp0 type=vxlan options:local_ip=$ip1 \ options:remote_ip=$ip2 options:key=100 options:dst_port=4789 \ options:remote_name=host_2 # service openvswitch-switch restart
On
Arm_2:# ovs-vsctl add-port vxlan-br vxlanp0 -- set interface vxlanp0 type=vxlan options:local_ip=$ip2 \ options:remote_ip=$ip1 options:key=100 options:dst_port=4789 \ options:remote_name=host_1 # service openvswitch-switch restart
In steps 3 and 4, if you are in CenOS you must change the path of the certificates to /etc/strongswan/swanctl/x509/, the path of the CA certificate to /etc/strongswan/swanctl/x509ca/, and the path of the private keys to /etc/strongswan/swanctl/private/.
Ensuring IPsec is Configured
Using /opt/mellanox/iproute2/sbin/ip xfrm state show, you should be able to see 4 IPsec states for the IPsec connection you configured with the keyword in mode packet meaning which means that you are in IPsec packet HW offload mode.
For example, after configuring IPsec using pre-shared key method, you would get something similar to the following on Arm_1:
            # /opt/mellanox/iproute2/sbin/ip xfrm state show

src 192.168.50.1 dst 192.168.50.2
	proto esp spi 0xcc8bf8ad reqid 1 mode transport
	replay-window 0 flag esn
	aead rfc4106(gcm(aes)) 0x9f45cc4577e70c4e077bcc0c1473a782143e7ad199f58566519639d03b593b8996383f11 128
	anti-replay esn context:
	 seq-hi 0x0, seq 0x0, oseq-hi 0x0, oseq 0x0
	 replay_window 1, bitmap-length 1
	 00000000
	crypto offload parameters: dev p0 dir out mode packet
	sel src 192.168.50.1/32 dst 192.168.50.2/32 proto udp sport 4789
src 192.168.50.2 dst 192.168.50.1
	proto esp spi 0xce8bf4b6 reqid 1 mode transport
	replay-window 0 flag esn
	aead rfc4106(gcm(aes)) 0xf2d0e335d9a64ef6e385a630a32b0e43bb52f581290cd34bbb8f7592d54f11657ed0258e 128
	anti-replay esn context:
	 seq-hi 0x0, seq 0x0, oseq-hi 0x0, oseq 0x0
	 replay_window 32, bitmap-length 1
	 00000000
	crypto offload parameters: dev p0 dir in mode packet
	sel src 192.168.50.2/32 dst 192.168.50.1/32 proto udp dport 4789
src 192.168.50.1 dst 192.168.50.2
	proto esp spi 0xcb600a84 reqid 2 mode transport
	replay-window 0 flag esn
	aead rfc4106(gcm(aes)) 0x7fb26035299bcc9b973abea5d581acfbcf87cbf0bd053b745c4d95c62311f934010973f6 128
	anti-replay esn context:
	 seq-hi 0x0, seq 0x0, oseq-hi 0x0, oseq 0x0
	 replay_window 1, bitmap-length 1
	 00000000
	crypto offload parameters: dev p0 dir out mode packet
	sel src 192.168.50.1/32 dst 192.168.50.2/32 proto udp dport 4789
src 192.168.50.2 dst 192.168.50.1
	proto esp spi 0xc137d5a0 reqid 2 mode transport
	replay-window 0 flag esn
	aead rfc4106(gcm(aes)) 0x28e3d12ad4e24aa9d9de9459de8ef8bb4379e8e12faac0054c5b629b6aa50fdeda8e4574 128
	anti-replay esn context:
	 seq-hi 0x0, seq 0x0, oseq-hi 0x0, oseq 0x0
	 replay_window 32, bitmap-length 1
	 00000000
	crypto offload parameters: dev p0 dir in mode packet
	sel src 192.168.50.2/32 dst 192.168.50.1/32 proto udp sport 4789
After insuring that the IPsec connection is configured, you can send encrypted traffic between host_1 and host_2 using the HOST_PFs IP addresses.
Configuring OVS IPsec Using strongSwan Manually
This section configures an OVS VXLAN tunnel which then uses swanctl.conf files and runs strongSwan (the IPsec daemon) manually.
Before proceeding with this section, make sure to follow the procedure in section "Enabling IPsec Packet Offload" for both DPUs.
Build a VXLAN tunnel over OVS and connect the PF representor to the same OVS bridge.
On
Arm_1:# ovs-vsctl add-br vxlan-br # ovs-vsctl add-port vxlan-br PF_REP # ovs-vsctl add-port vxlan-br vxlan11 -- set interface vxlan11 type=vxlan options:local_ip=$ip1 \ options:remote_ip=$ip2 options:key=100 options:dst_port=4789 \ # ovs-vsctl set Open_vSwitch . other_config:hw-offload=true
On
Arm_2:# ovs-vsctl add-br vxlan-br # ovs-vsctl add-port vxlan-br PF_REP # ovs-vsctl add-port vxlan-br vxlan11 -- set interface vxlan11 type=vxlan options:local_ip=$ip2 \ options:remote_ip=$ip1 options:key=100 options:dst_port=4789 \ # ovs-vsctl set Open_vSwitch . other_config:hw-offload=true
If your operating system is Ubuntu, run on both
Arm_1andArm_2:service openvswitch-
switchstartIf your operating system is CentOS, run:
service openvswitch restart
Enable TC offloading for the PF. Run on both
Arm_1andArm_2:# ethtool -K $PF hw-tc-offload on
Disable host PF as the port owner from Arm. Run on both
Arm_1andArm_2:# mlxprivhost -d /dev/mst/mt${pciconf} --disable_port_owner r
NoteTo get
${pciconf}, run the following on the DPU:# ls --color=never /dev/mst/ | grep --color=never
'^m.*f0$'| cut -c3-For example:
# mlxprivhost -d /dev/mst/mt41686_pciconf0 --disable_port_owner r
Configure the
swanctl.conffiles for each machine. See section swanctl.conf Files.NoteEach machine should have exactly one .
swanctl.conffile in/etc/swanctl/conf.d/.Load the
swanctl.conffiles and initialize strongSwan. Run:On the
Arm_2, run:systemctl restart strongswan.service swanctl --load-all
On the
Arm_1, run:systemctl restart strongswan.service swanctl --load-all swanctl -i --child bf
Now the IPsec connection should be established.
swanctl.conf Files
strongSwan configures IPSec packet HW offload using a new value added to its configuration file swanctl.conf. The file should be placed under sysconfdir which by default can be found at /etc/swanctl/swanctl.conf.
The terms Left (BFL) and Right (BFR), in reference to the illustration under "Application Architecture", are used to identify the two nodes (or machines) that communicate.
Either side (BFL or BFR) can fulfill either role (initiator or receiver).
In this example, 192.168.50.1 is used for the left PF uplink and 192.168.50.2 for the right PF uplink.
            connections {
   BFL-BFR {
      local_addrs  = 192.168.50.1
      remote_addrs = 192.168.50.2

      local {
        auth = psk
        id = host1
      }
      remote {
        auth = psk
        id = host2
      }
		children {
         bf-out {
            local_ts = 192.168.50.1/24 [udp]
            remote_ts = 192.168.50.2/24 [udp/4789]
            esp_proposals = aes128gcm128-x25519-esn
            mode = transport
            policies_fwd_out = yes
            hw_offload = packet
         }
         bf-in {
            local_ts = 192.168.50.1/24 [udp/4789]
            remote_ts = 192.168.50.2/24 [udp]
            esp_proposals = aes128gcm128-x25519-esn
            mode = transport
            policies_fwd_out = yes
            hw_offload = packet
         }
      }
      version = 2
      mobike = no
      reauth_time = 0
      proposals = aes128-sha256-x25519
   }
}

secrets {
   ike-BF {
      id-host1 = host1
      id-host2 = host2
      secret = 0sv+NkxY9LLZvwj4qCC2o/gGrWDF2d21jL
   }
}
The BFB installation will place two example swanctl.conf files for BFL and BFR (BFL.swanctl.conf and BFR.swanctl.conf respectively) in the strongSwan conf.d directory. Each node should have only one swanctl.conf file in its strongSwan conf.d directory.
Note that:
"
hw_offload = packet"is responsible for configuring IPsec packet offloadPacket offload support has been added to the existing
hw_offloadfield and preserves backward compatibility.For your reference:
Value
Description
no
Do not configure HW offload.
crypto
Configure crypto HW offload if supported by the kernel and hardware, fail if not supported.
yes
Same as crypto (considered legacy).
packet
Configure packet HW offload if supported by the kernel and hardware, fail if not supported.
auto
Configure packet HW offload if supported by the kernel and hardware, do not fail (perform fallback to crypto or no as necessary).
Whenever the value of
hw_offloadis changed, strongSwan configuration must be reloaded.Switching to crypto HW offload requires setting up
devlink/ipsec_modetononebeforehand.Switching to packet HW offload requires setting up
[udp/4789]is crucial for instructing strongSwan to IPSec only VXLAN communication.Packet HW offload can only be done on what is streamed over VXLAN.
Mind the following limitations:
Fields | Limitation |
reauth_time | Ignored if set |
rekey_time | Do not use. Ignored if set. |
rekey_bytes | Do not use. Not supported and will fail if it is set. |
rekey_packets | Use for rekeying |
Installation
Please refer to the NVIDIA DOCA Installation Guide for Linux for details on how to install BlueField-related software.
Application Execution
Notes:
IPsec daemons are started by
systemd strongswan.serviceUse
systemctl [start | stop | restart]to control IPsec daemons throughstrongswan.service. For example, to restart, run:systemctl restart strongswan.service
This command effectively does the same thing as
ipsec restart.NoteDo not use the
ipsecscript (located under/usr/sbin/ipsec) to restart/stop/start the IPsec connection.
This subsection explains how to configure and set an IPsec connection using the script. To configure the IPsec connection, you need two DPUs, referred to as the initiator and receiver machines. There are no differences between the two machines except that the initiator is the one that initiates the connection between the two (and should run the script after the receiver).
The script is located under /opt/mellanox/doca/applications/east_west_overlay_encryption/east_west_overlay_encryption.sh.
Script Parameters
Parameter | Description | Valid Values | Use when | Notes |
| The side of the connection (receiver or initiator). |
| Always | This parameter must be always passed on the command line and cannot be passed in the JSON parameter file. |
| The JSON parameters file full path. | JSON file path, written according to the template demonstrated in the following file: | To pass the parameters as a JSON file | When running the script with JSON file, you cannot pass on the command line other parameters than the |
| The IP address of the initiator machine's port interface for the IPsec connection. | A valid IP address, ranging from 1.1.1.1 to 255.255.255.255. | Always | In the JSON file, it is set by default to 192.168.50.1. |
| The IP address of the receiver machine's port interface for the IPsec connection. | A valid IP address, ranging from 1.1.1.1 to 255.255.255.255. | Always | In the JSON file, it is set by default to 192.168.50.2. |
| The number of the port interface (p0/p1) for the IPsec connection. | 0 or 1. | Always | In the JSON file, it is set by default to 0. |
|
the authentication method of IPsec. can be | Can be
| Always | In the JSON file, it is set by default to
|
| The pre-shared key. | A sequence of characters (string). | The
| In the JSON file it is set by default to |
| The initiator's certificate. | Any valid self-signed or CA signed certificate. Must provide full path of certificate. | The
| Both the initiator and receiver must configure the same
|
| The receiver's certificate. | Any valid self-signed or CA signed certificate. Must provide full path of certificate. | The
| Both the initiator and receiver must configure the same
|
| the initiator's private-key. | Any valid private key that is generated with the certificate. Must provide full path of private key. | The
| N/A |
| the receiver's private-key. | Any valid private key that is generated with the certificate. Must provide full path of private key. | The
| N/A |
| The initiator's CA certificate. | Any valid CA certificate. Must provide full path of certificate. | The
| N/A |
| The receiver's CA certificate. | Any valid CA certificate. Must provide full path of certificate. | The
| N/A |
| The common name (CN) of the initiator's certificate. | Must be the same as the CN described in the initiator's certificate. | The
| N/A |
| The CN of the receiver's certificate. | Must be the same as the CN described in the receiver's certificate. | The
| N/A |
There are two ways of passing the parameters, either using the JSON parameters file or by passing the parameters on the command line.
Using JSON Parameters File
In this method, you must configure the parameters file and the then run the script:
Configure the JSON parameters file located under
/opt/mellanox/doca/applications/east_west_overlay_encryption/east_west_overlay_encryption_params.jsonor create a JSON file according to the template ofeast_west_overlay_encryption_params.jsonfor the script according to the explanation under section "Script Parameters".Run the script on the receiver's DPU with the JSON file:
/opt/mellanox/doca/applications/east_west_overlay_encryption/east_west_overlay_encryption.sh --side=r --json=/opt/mellanox/doca/applications/east_west_overlay_encryption/east_west_overlay_encryption_params.json
Run the script on the initiator's DPU:
/opt/mellanox/doca/applications/east_west_overlay_encryption/east_west_overlay_encryption.sh --side=i --json=/opt/mellanox/doca/applications/east_west_overlay_encryption/east_west_overlay_encryption_params.json
You may now send encrypted data over the PF interface (192.168.50.[1|2]) configured for VXLAN.
Passing Parameters on Command Line
In this method, you do not need to configure the parameters file and can run the script with the appropriate parameters.
Passing Parameters for Pre-shared Key Authentication Method
Run the script on the receiver's DPU:
            /opt/mellanox/doca/applications/east_west_overlay_encryption/east_west_overlay_encryption.sh --side=r --initiator_ip_addr=INITIATOR_IP_ADDRESS --receiver_ip_addr=RECEIVER_IP_ADDRESS --port_num=PORT_NUM \
--auth_method=psk --preshared_key=PRESHARED_KEY
Run the script on the initiator's DPU:
            /opt/mellanox/doca/applications/east_west_overlay_encryption/east_west_overlay_encryption.sh --side=i --initiator_ip_addr=INITIATOR_IP_ADDRESS --receiver_ip_addr=RECEIVER_IP_ADDRESS --port_num=PORT_NUM \
--auth_method=psk --preshared_key=PRESHARED_KEY
Passing Parameters for Self-signed Certificates Authentication Method
Run the script on the receiver's DPU:
            /opt/mellanox/doca/applications/east_west_overlay_encryption/east_west_overlay_encryption.sh --side=r --initiator_ip_addr=INITIATOR_IP_ADDRESS --receiver_ip_addr=RECEIVER_IP_ADDRESS --port_num=PORT_NUM \
--auth_method=ssc --initiator_cert_path=INITIATOR_CERT_PATH --receiver_cert_path=RECEIVER_CERT_PATH --receiver_key_path=RECEIVER_KEY_PATH
Run the script on the initiator's DPU:
            /opt/mellanox/doca/applications/east_west_overlay_encryption/east_west_overlay_encryption.sh --side=i --initiator_ip_addr=INITIATOR_IP_ADDRESS --receiver_ip_addr=RECEIVER_IP_ADDRESS --port_num=PORT_NUM \
--auth_method=ssc --initiator_cert_path=INITIATOR_CERT_PATH --receiver_cert_path=RECEIVER_CERT_PATH --initiator_key_path=INITIATOR_KEY_PATH
Passing Parameters for CA Certificates Authentication Method
Run the script on the receiver's DPU:
            /opt/mellanox/doca/applications/east_west_overlay_encryption/east_west_overlay_encryption.sh --side=r --initiator_ip_addr=INITIATOR_IP_ADDRESS --receiver_ip_addr=RECEIVER_IP_ADDRESS --port_num=PORT_NUM \
--auth_method=ca --initiator_cert_path=INITIATOR_CERT_PATH --receiver_cert_path=RECEIVER_CERT_PATH --receiver_key_path=RECEIVER_KEY_PATH --receiver_cacert_path=RECEIVER_CACERT_PATH --initiator_cn=INITIATOR_CN
Run the script on the initiator's DPU:
            /opt/mellanox/doca/applications/east_west_overlay_encryption/east_west_overlay_encryption.sh --side=i --initiator_ip_addr=INITIATOR_IP_ADDRESS --receiver_ip_addr=RECEIVER_IP_ADDRESS --port_num=PORT_NUM \
--auth_method=ssc --initiator_cert_path=INITIATOR_CERT_PATH --receiver_cert_path=RECEIVER_CERT_PATH --initiator_key_path=INITIATOR_KEY_PATH --initiator_cacert_path=INITIATOR_CACERT_PATH --receiver_cn=RECEIVER_CN
For help and usage, run the script with --help/-h flag:
/opt/mellanox/doca/applications/east_west_overlay_encryption/east_west_overlay_encryption.sh -h
Troubleshooting
Please refer to the NVIDIA DOCA Troubleshooting for any issue you may encounter with the installation or execution of the DOCA applications.
Reverting IPsec Configuration
To destroy IPsec configuration, run the following on both machines:
/opt/mellanox/doca/applications/east_west_overlay_encryption/east_west_overlay_encryption.sh -d
Make sure to run this command only after at least two minutes have passed from running the application on either machines. Otherwise, this may lead to errors.
If you run this command without initializing the connection first (in Running strongSwan Example), you may receive errors. These errors have no functional impact and may be safely ignored.
/opt/mellanox/doca/applications/east_west_overlay_encryption/east_west_overlay_encryption.sh/opt/mellanox/doca/applications/east_west_overlay_encryption/east_west_overlay_encryption_params.json